> For the complete documentation index, see [llms.txt](https://documentation.swing2app.com/llms.txt). Markdown versions of documentation pages are available by appending `.md` to page URLs; this page is available as [Markdown](https://documentation.swing2app.com/store/playstore/update-playstore-1.md).
# Update the Play Store App
**How to update apps registered in the Play Store**
**How to update app version, store registration information, and app contents \_2021.08 Google Play Console updated version**
### **STEP.1 Update AAB file to a new version**
Google Play Console:
**If the app version has been updated, you can download the new version of the AAB file and upload it to Play Store-Production.**
It is simple because you only need to upload the AAB file.
We will show you how to update to a new version of the app from the Play Store.
> **Caution**
If the app is released as an APK file instead of as an AAB file, **you must upload it as an APK file → even when updating**.
When updating the Play Store, apps that have been released as an existing APK file can be uploaded as an APK file, not an AAB file.
It is the same for both general prototype apps and push/web-view apps. **If an app that has been registered and released as an APK file is updated, please upload the APK file.**
If you register as an AAB file and update it after release → Upload it as an AAB file.
In other words, you need to update the file with the same extension
> **Wait!**
App version update? In what cases do I need to update AAB files?
**\*Step 1 App basic information- Change the app name, idle screen image, and app icon image**
**\*Step 2 Design Theme – Prototype UI Change, Skin Color Change**
If you modify the contents of the above two steps, you must save and select \[App Creation Request] to create (update) the app with a new version.
When the production of the new version of the app is completed, the new version of the app must be uploaded and updated in Play Store Production. AAB file update required!!
\*The 3rd step page menu is automatically reflected in the app just after entering the contents and saving, so there is no need to re-create or update.
\*Important\* Due to the update of the Play Store app registration system, the existing app registration file, APK file, has been changed to → AAB file.
When updating, please register as AAB file.

**1. Select the app to update**
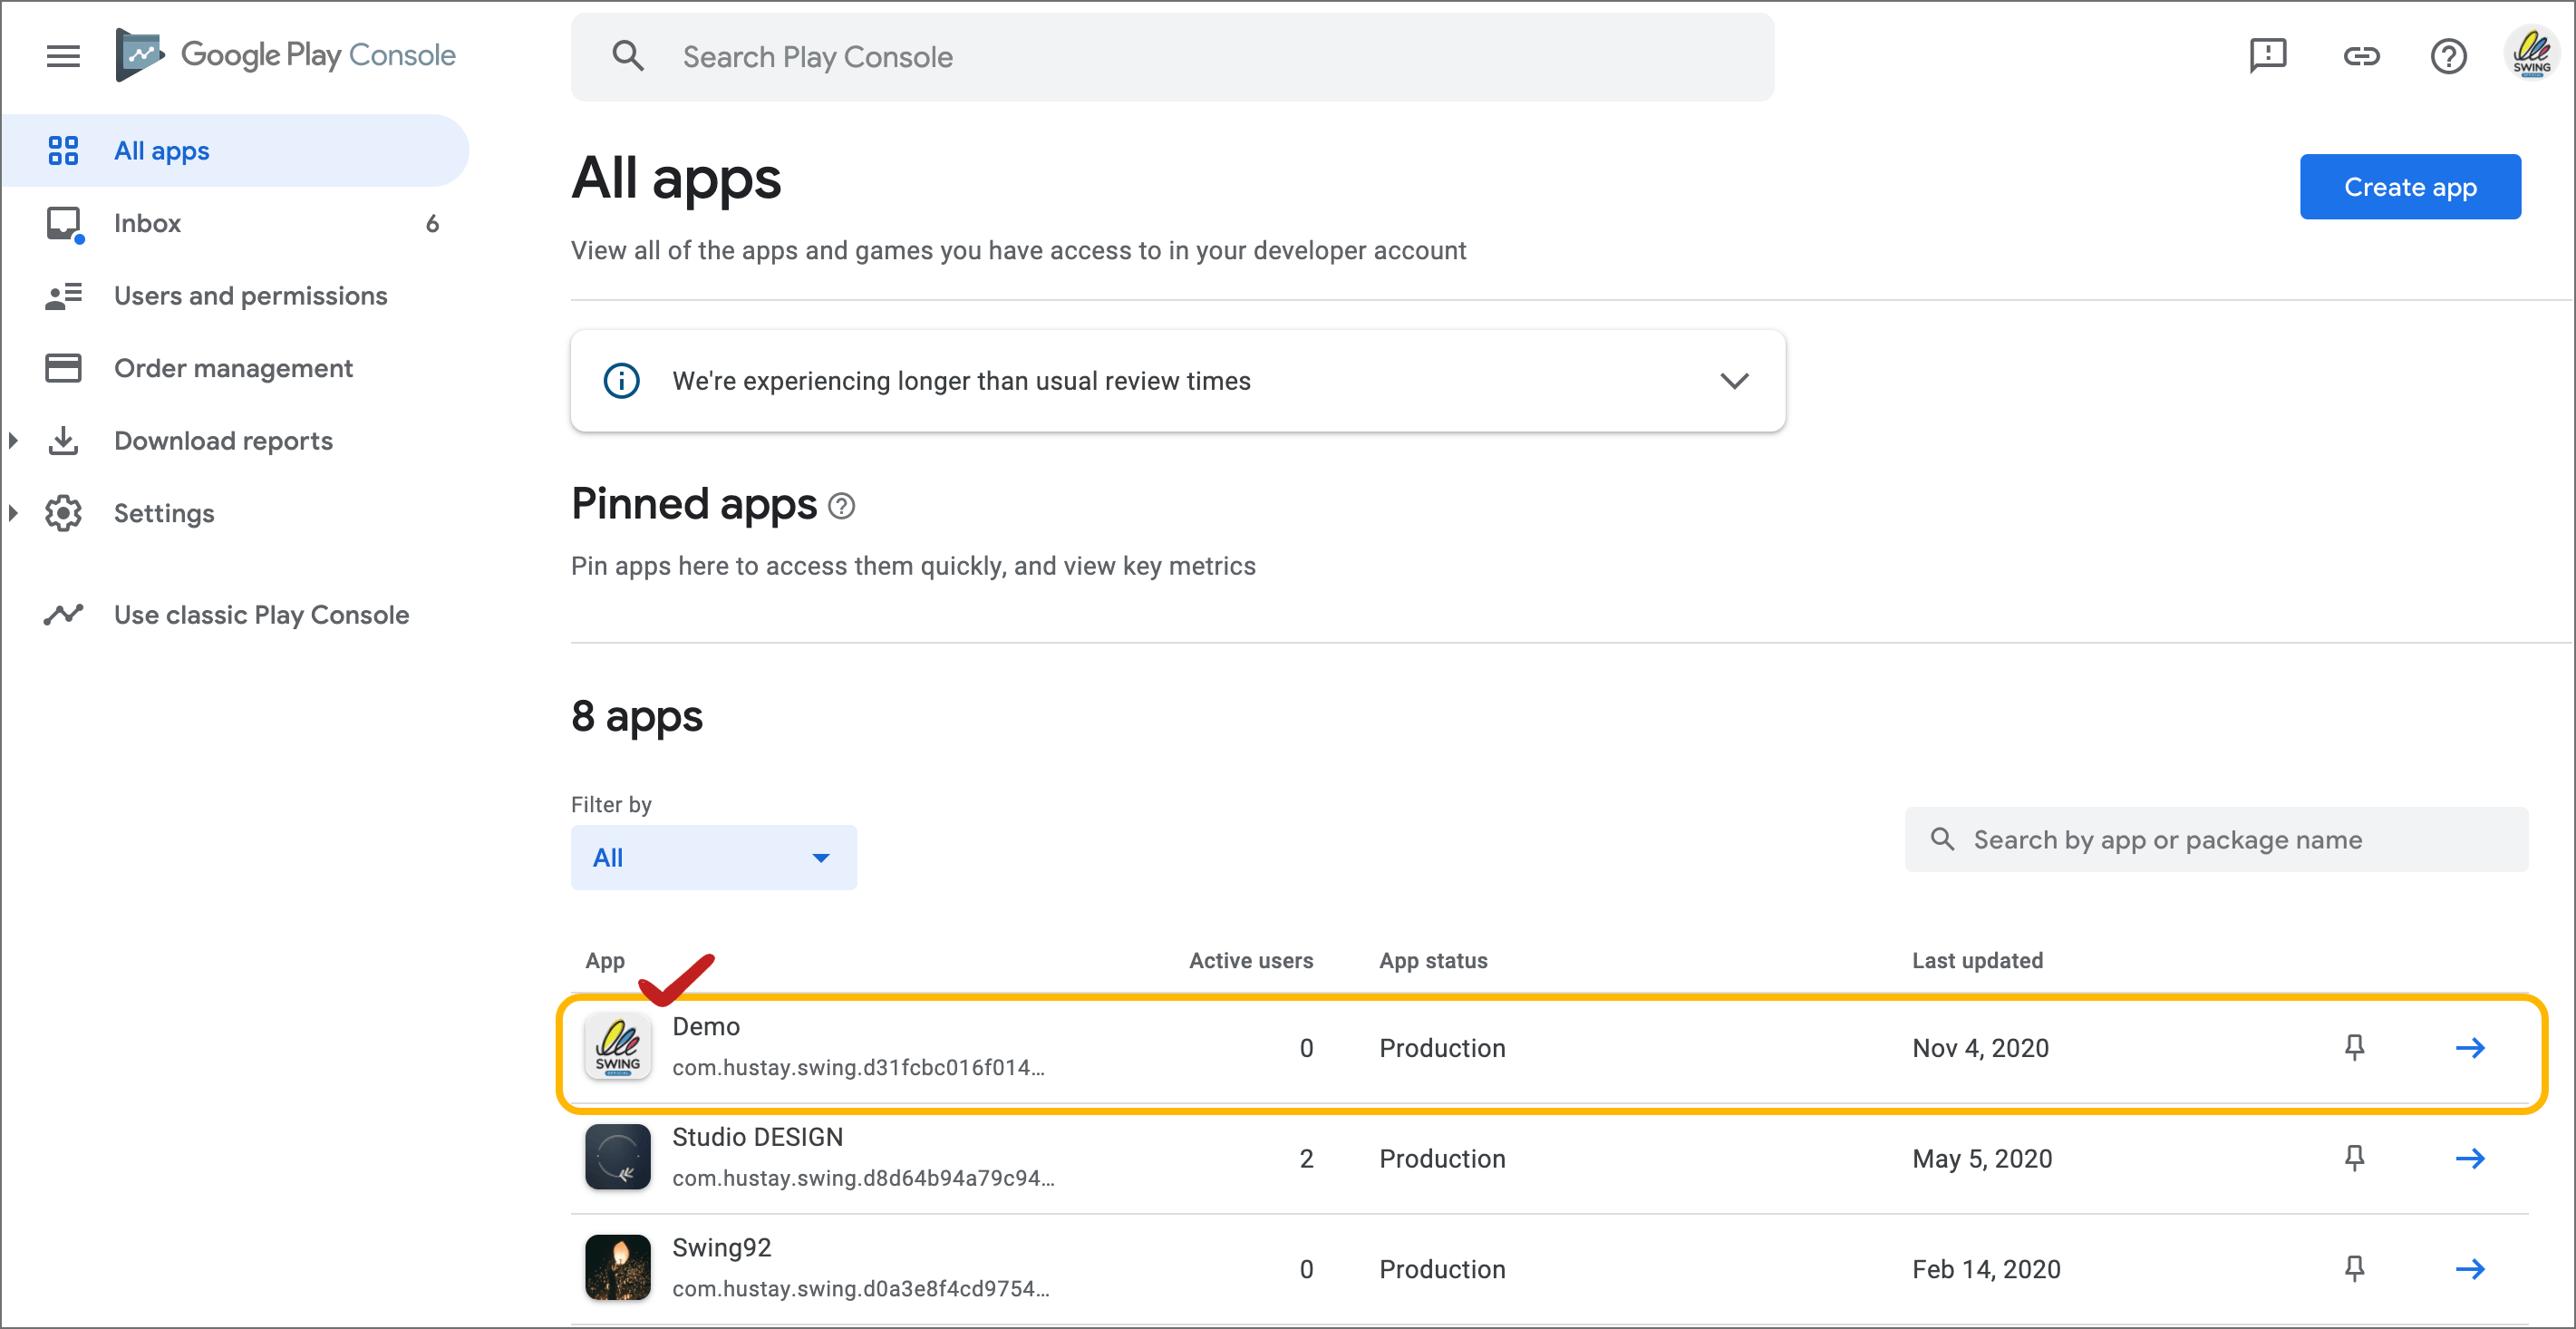
Please access the Google Play Store developer console site (), and select the app you want to update.
\* Please use the Google Play console through the Internet browser Chrome.
\ **2. Release Management → App Release**

**Console site left menu 1) Select \[Production] → 2) Select the \[Create new version] button.**
**3. Production release – AAB file Upload**
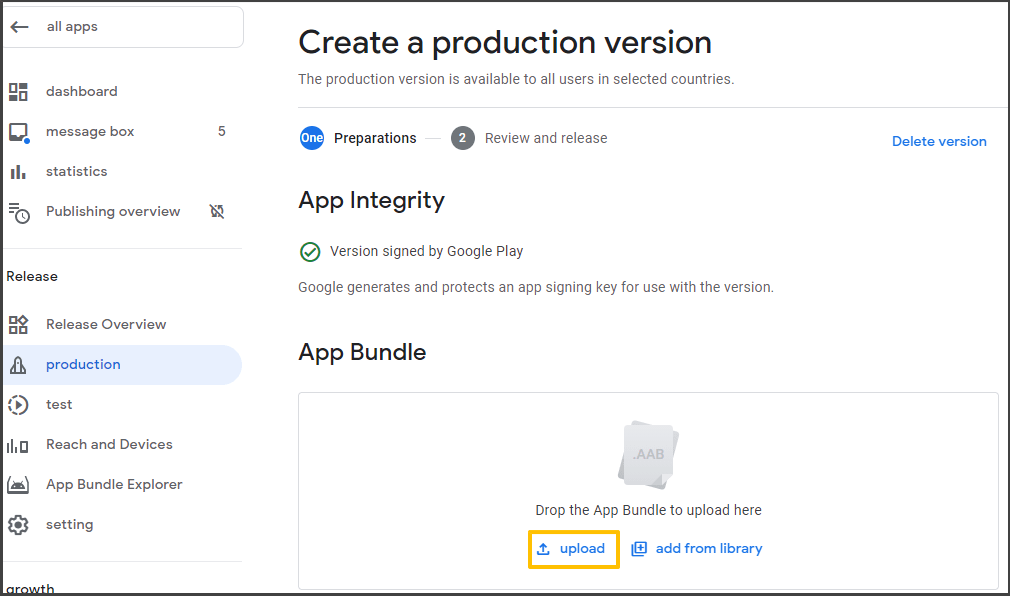
On the production version creation page, click the \[Upload] button to register a new version of the AAB file.

**\* Where can I download the AAB file??**
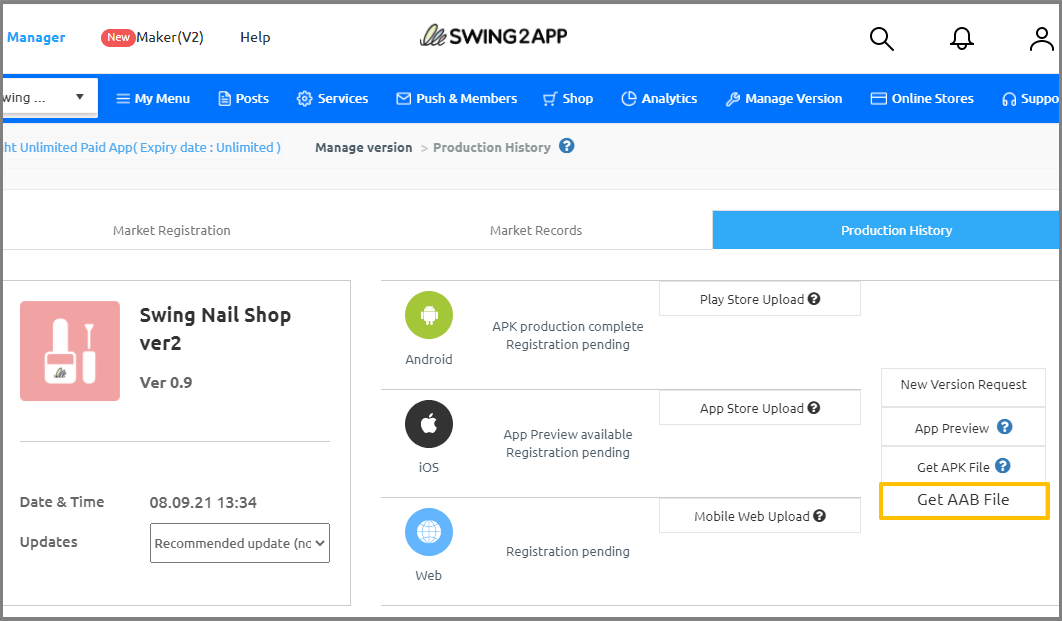
After app production is complete, go to the [app operation-version control-app production history](https://swing2app.com/view/app_work_history) page.
Here, if you click \[Get AAB File], the file is downloaded to your PC.
You can upload the downloaded AAB file as **Google Play → Production → AAB file.**
\*Please use the Internet browser Chrome.
\*Important Note: Due to the update of the Play Store app registration system, the existing app registration file, APK file, has been changed to → AAB file.
AAB files are created from apps created after August 9, 21 in Swing2App.
Therefore, for apps created before 21.08.09, go to App Creation V2 and select the Create App button to re-create the app with a new version.
You can receive AAB files from the newly created app.
If registration is not successful, please leave an inquiry on the Swing2App inquiry board.
**TIP. Registering by dragging a file**
Open the Google Play console screen and the Swing2App site 2 screens.
You can register the AAB file received from the Swing2App site as an app file on the Play Console screen by dragging (drag) it with your mouse.
You can work more conveniently than saving and loading a separate file, right?^^
**4. AAB file upload completed**

After uploading the AAB file, the Save and Review buttons at the bottom are activated.
**Select Saved → Select Version Review**

\*’New features of this version (Release Note)’ is a field for writing newly updated content. (not required)
If it is the same as the previously released content, please click the \[Copy from previous version] button. Previously written articles are registered as they are.
When the AAB file is saved, the \[Start release as a production track] button is created at the bottom again.
Select the \[Start Release with Production Track] button and you are done.
**★Wait!**

A warning message may appear before production release.
As this is a recommended message, you can ignore the message and move on. (No effect on release!)
**5. Reviewing updates**
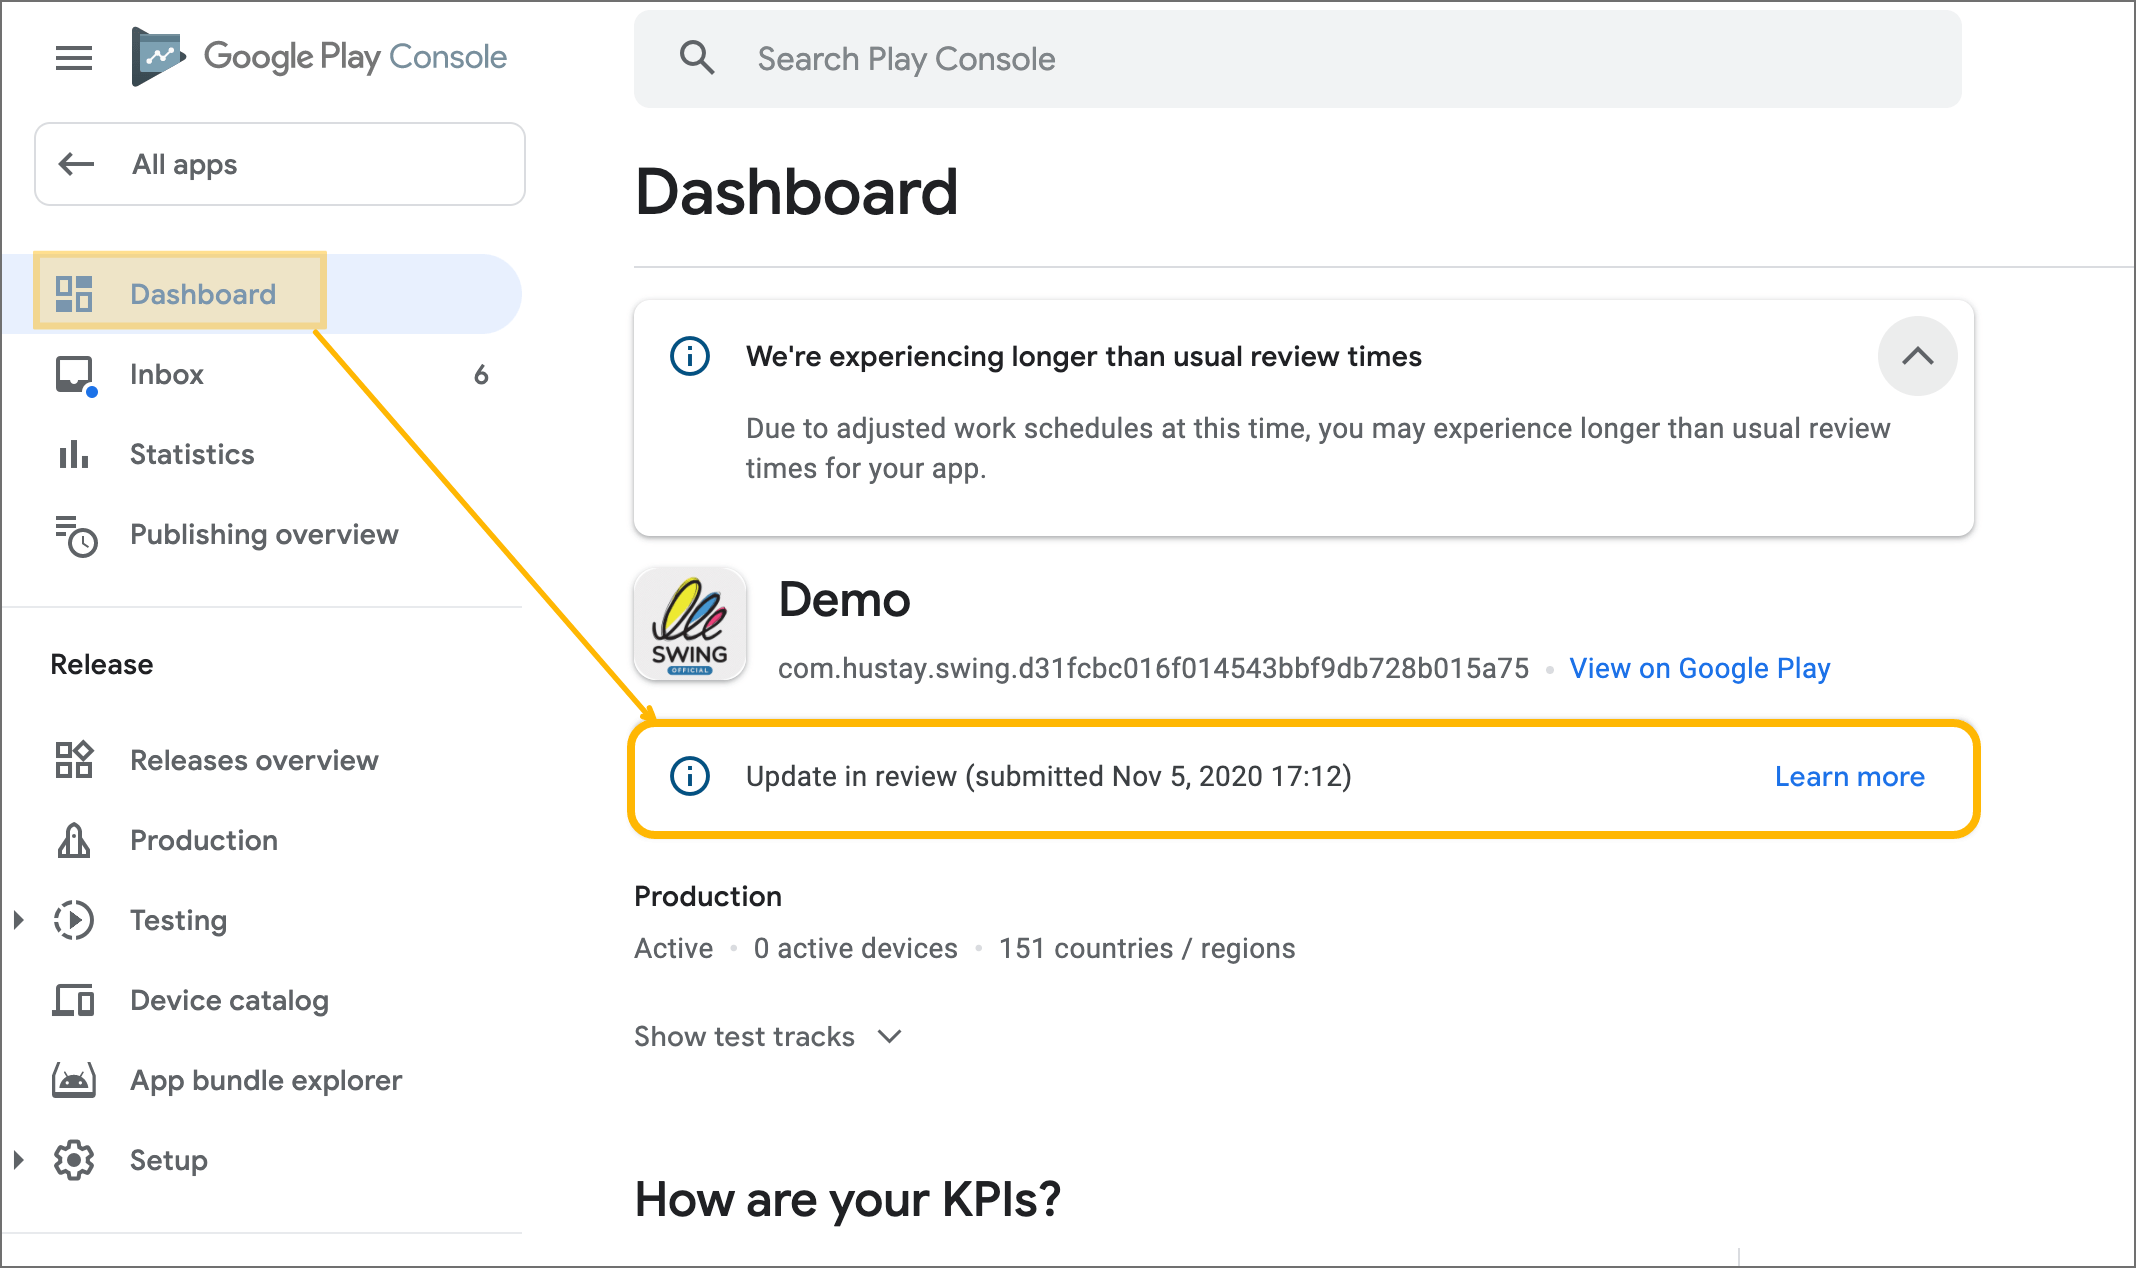
You can check the steps in reviewing updates.
This completes the AAB file (app) update process.
\*Updates have the same review time as the app release. (It is within 1 day, but it may take up to 7 days.)
– Once the review is complete, the updated version will be re-released.
– Since the review may be rejected in the update review, if it is rejected, you must check the contents and proceed with the review again.
\ **6. Update completed**
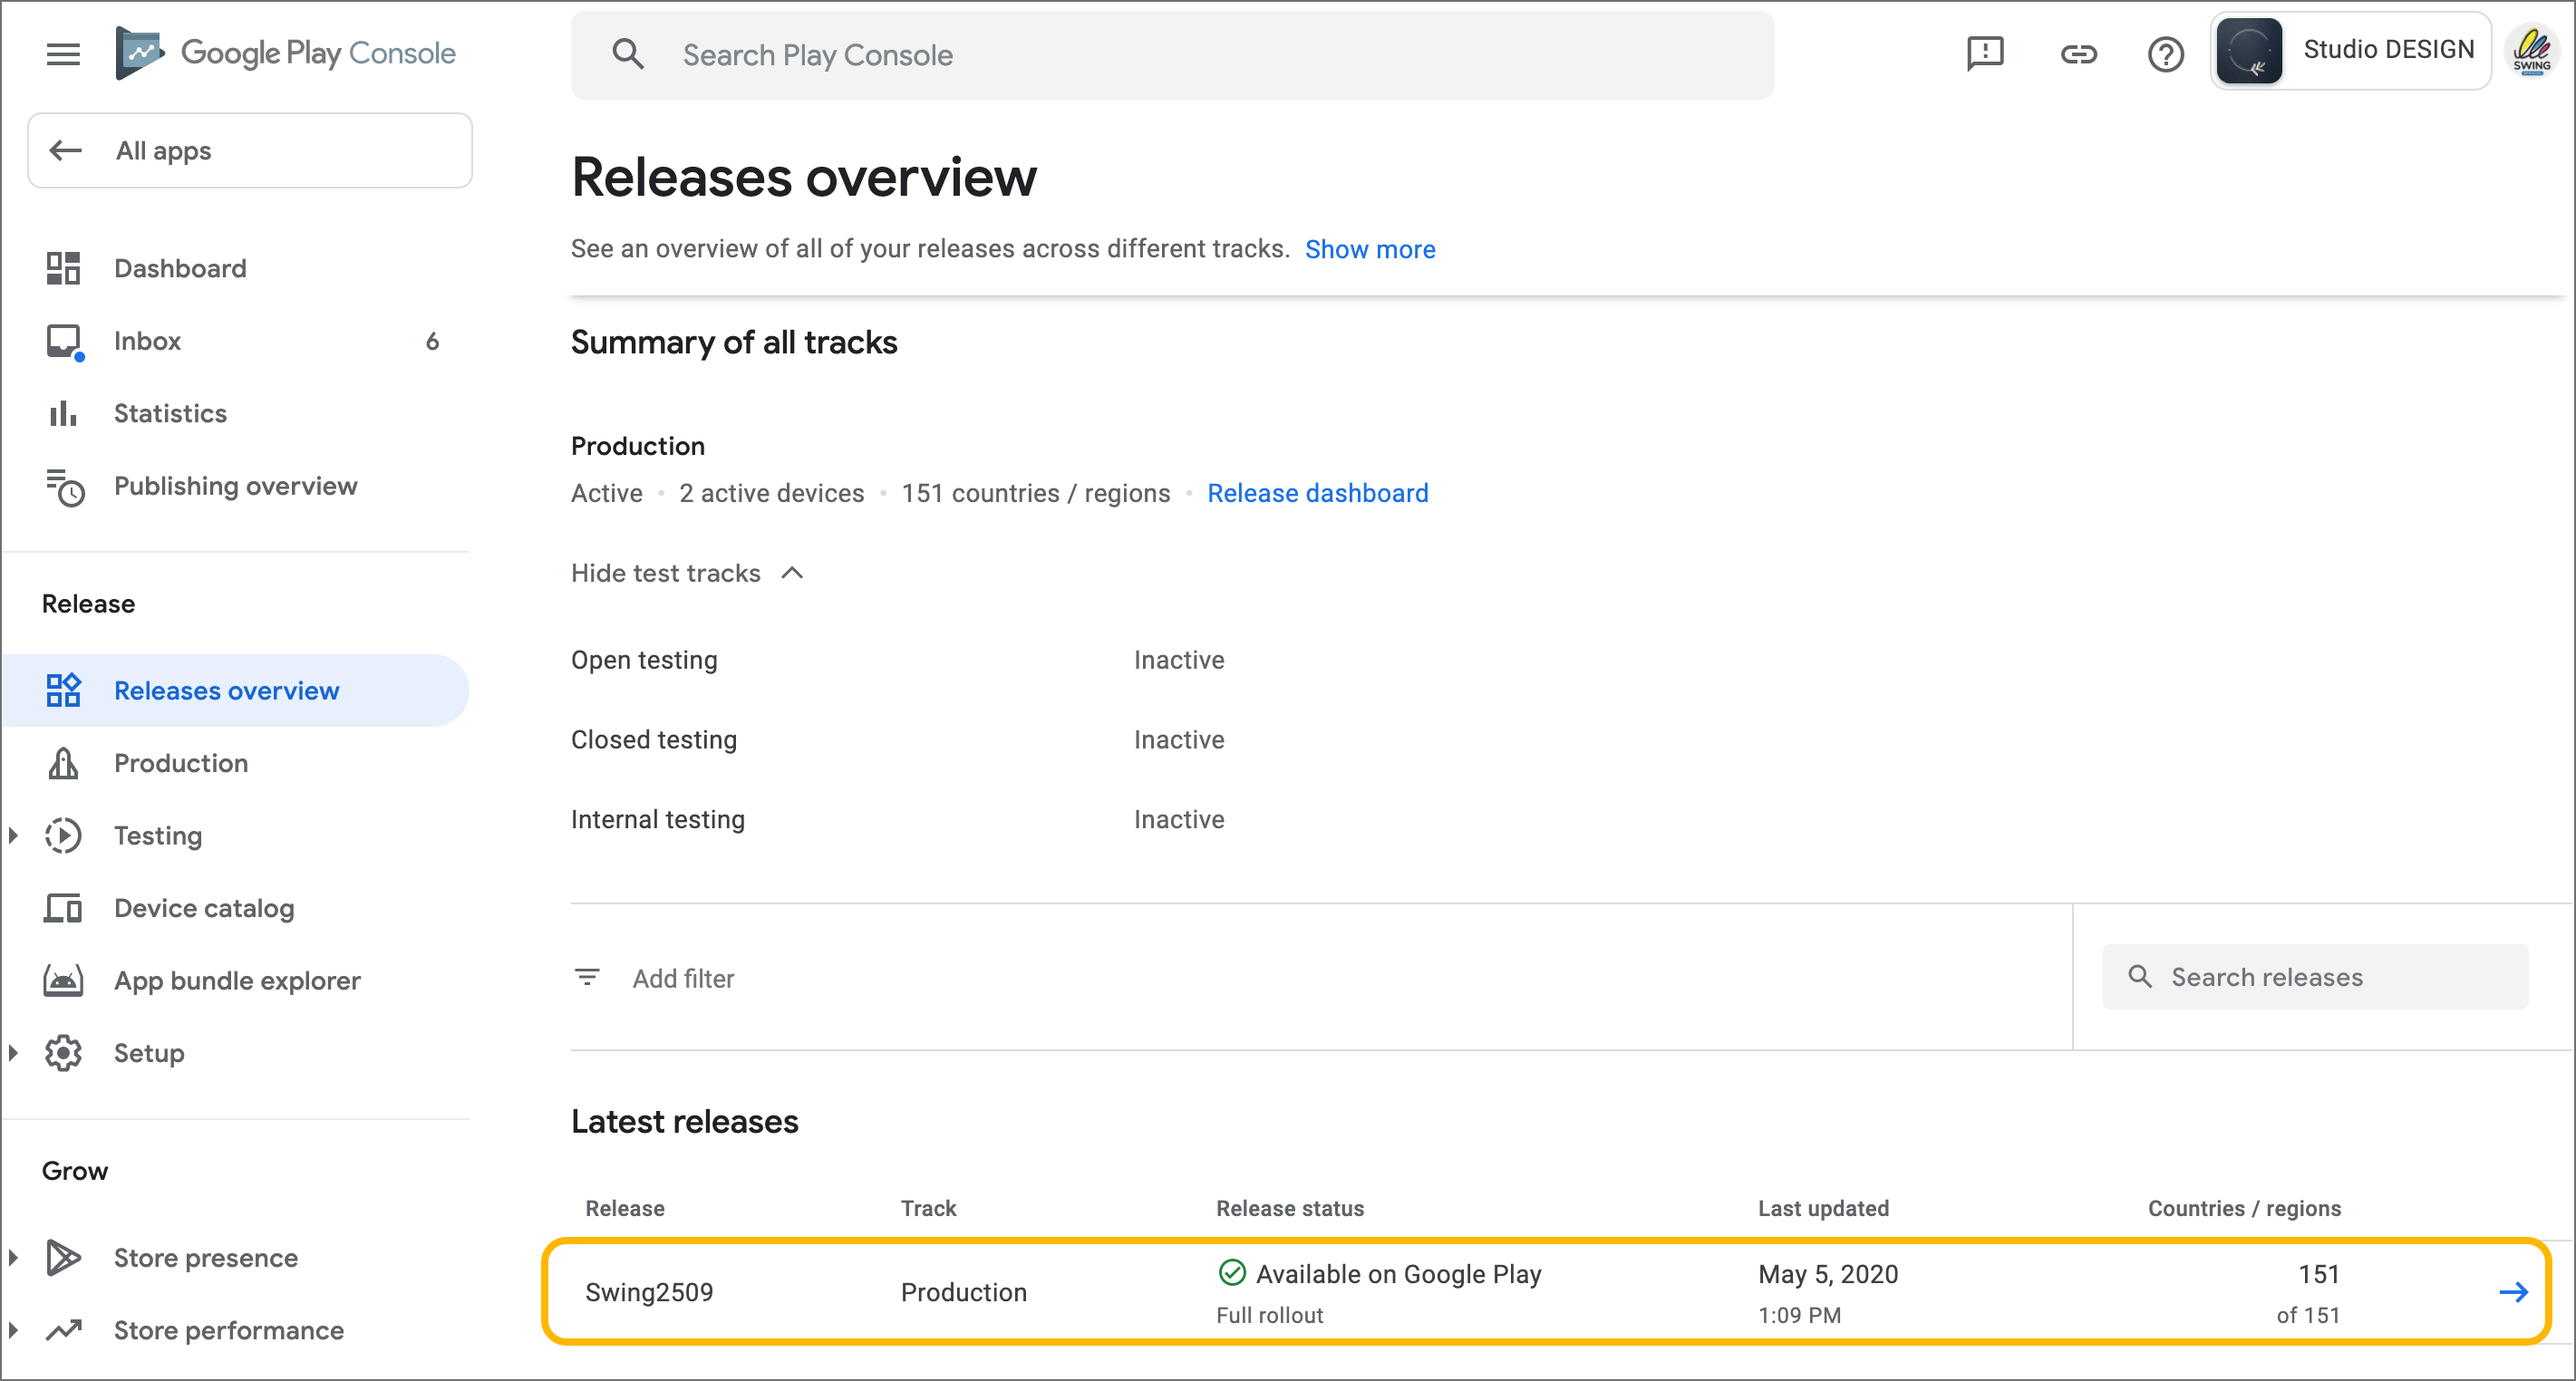
When the update is complete, you can check out the full production release on the release overview page.
If a message such as ‘update rejected’, ‘update rejected’, or ‘app deleted’ appears, the review is rejected.
You must check the rejection email received from Google and follow the measures taken.
### **STEP.2 Update by modifying store registration information**
Next, I’ll show you how to update your store listing by modifying it!!
What if you want to change **the app name, short description, detailed description, and screenshot image displayed on the Play Store?**
In the same way, if you modify and update the contents on the **\*Google Console–Store Registration Information page, it will be reflected in the store.**
#### **1. App information → Default store listing**
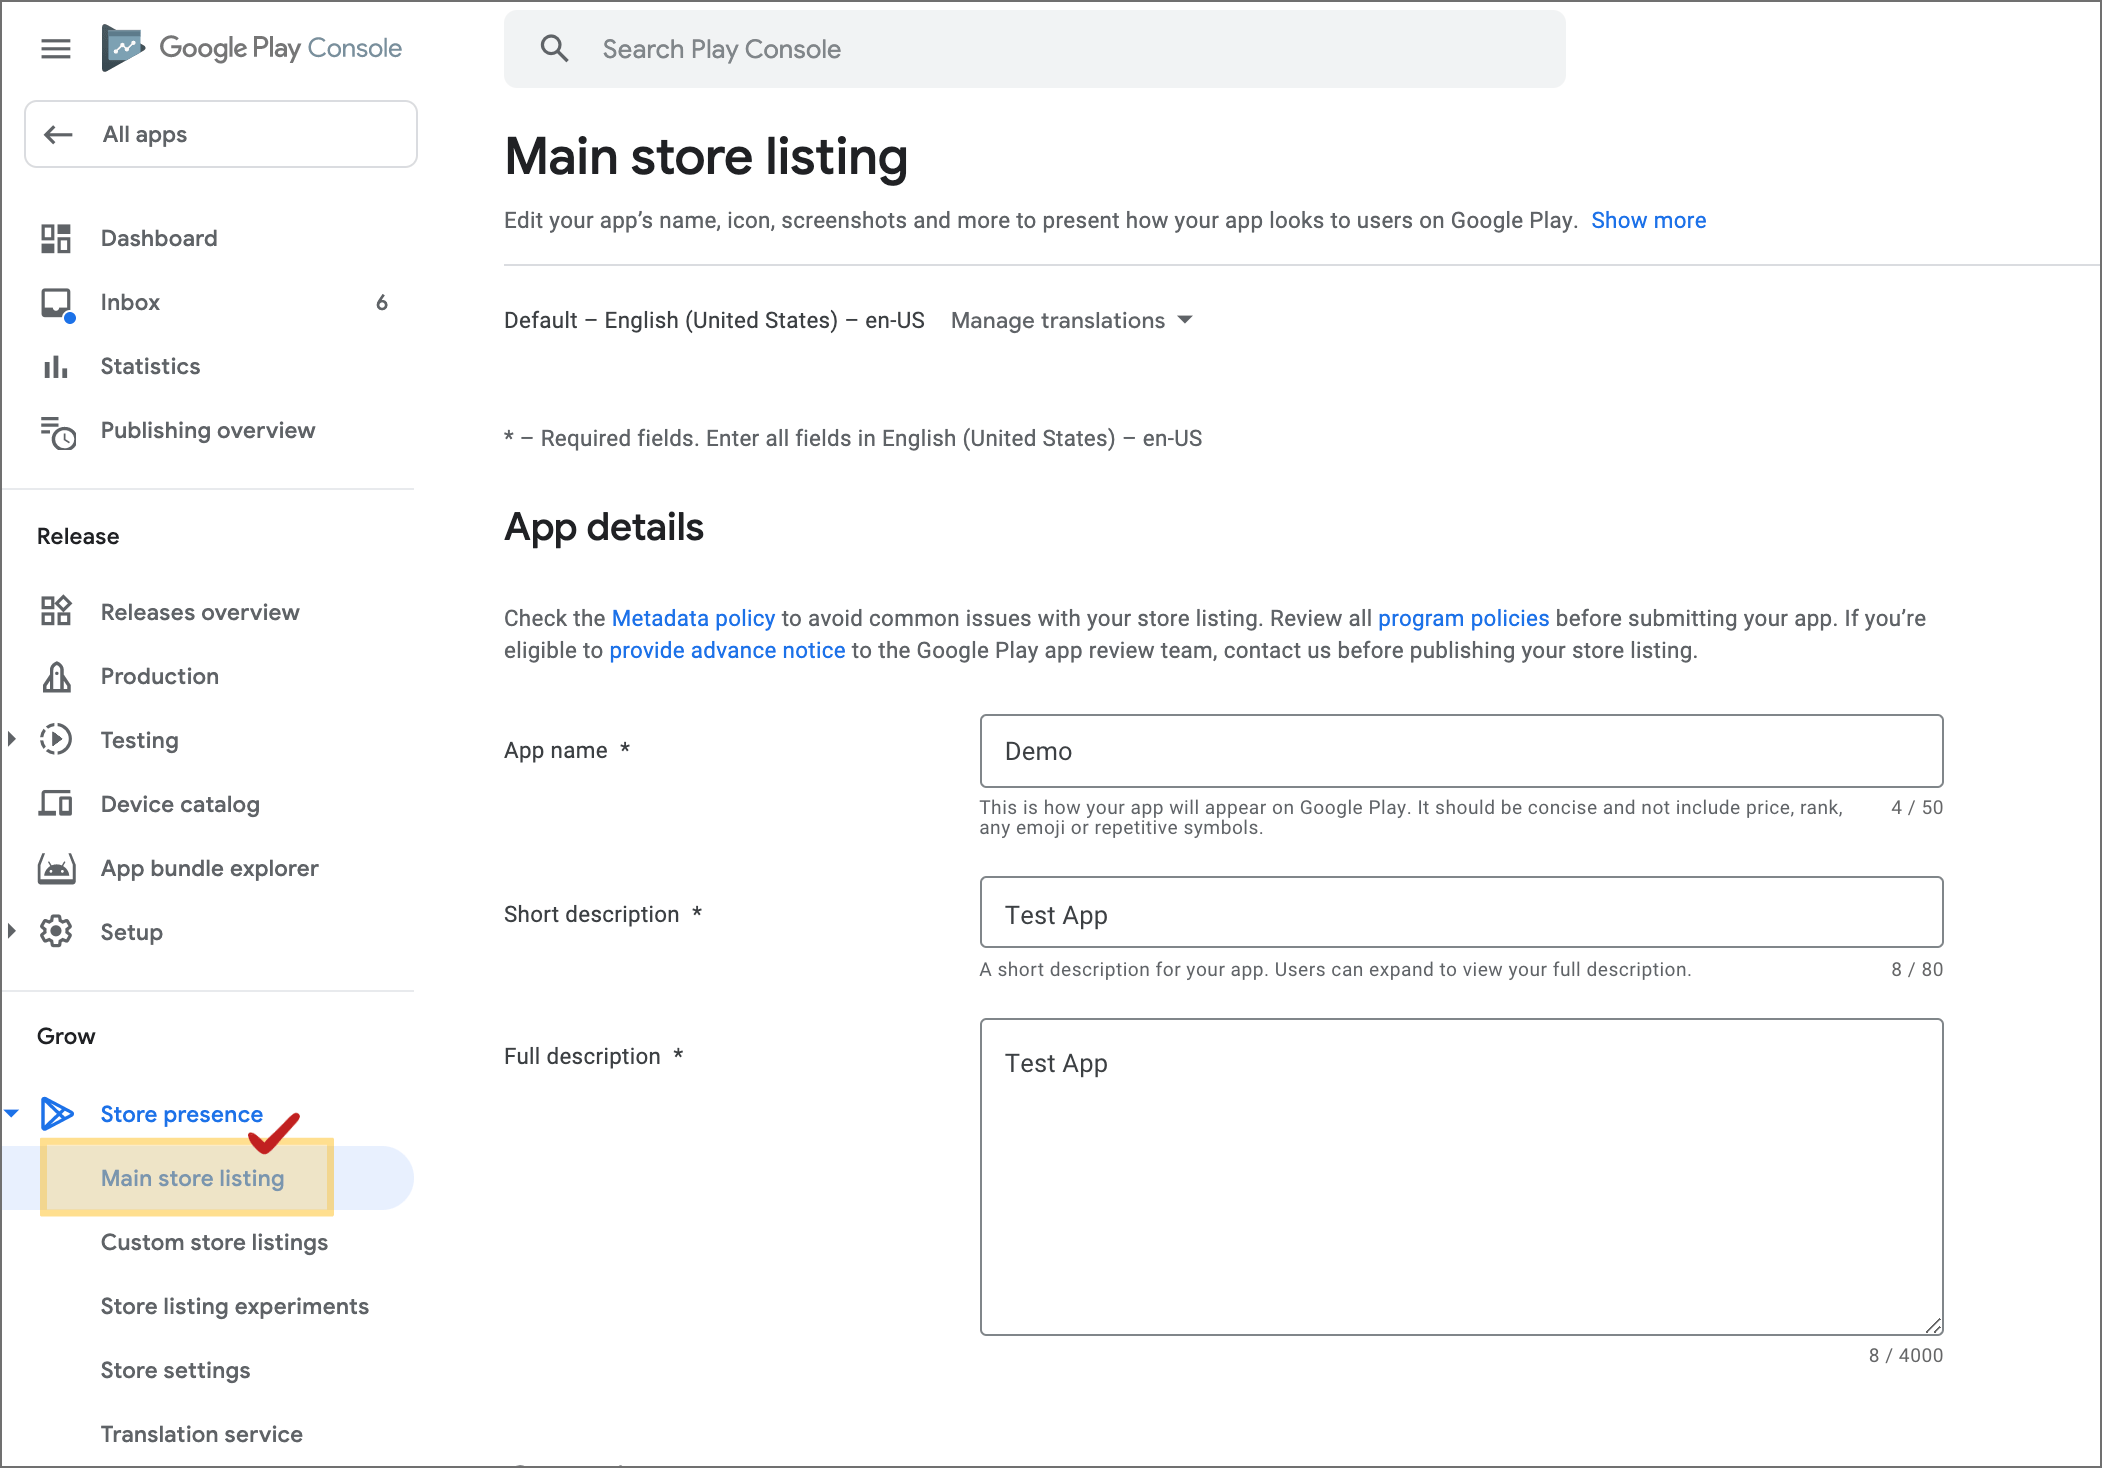
**Go to the \[Main Store Listing] page from the left menu \[Store Presence].**
Editing and updating content in the store is simpler!\
You can directly edit the content registered when you first launched the app in the store listing.
\=> In the store registration information, you can edit the launch app name, brief/detailed description, screenshot image, icon image, graphic image, email address, etc.
**2. Select the \[Save] button after modification**
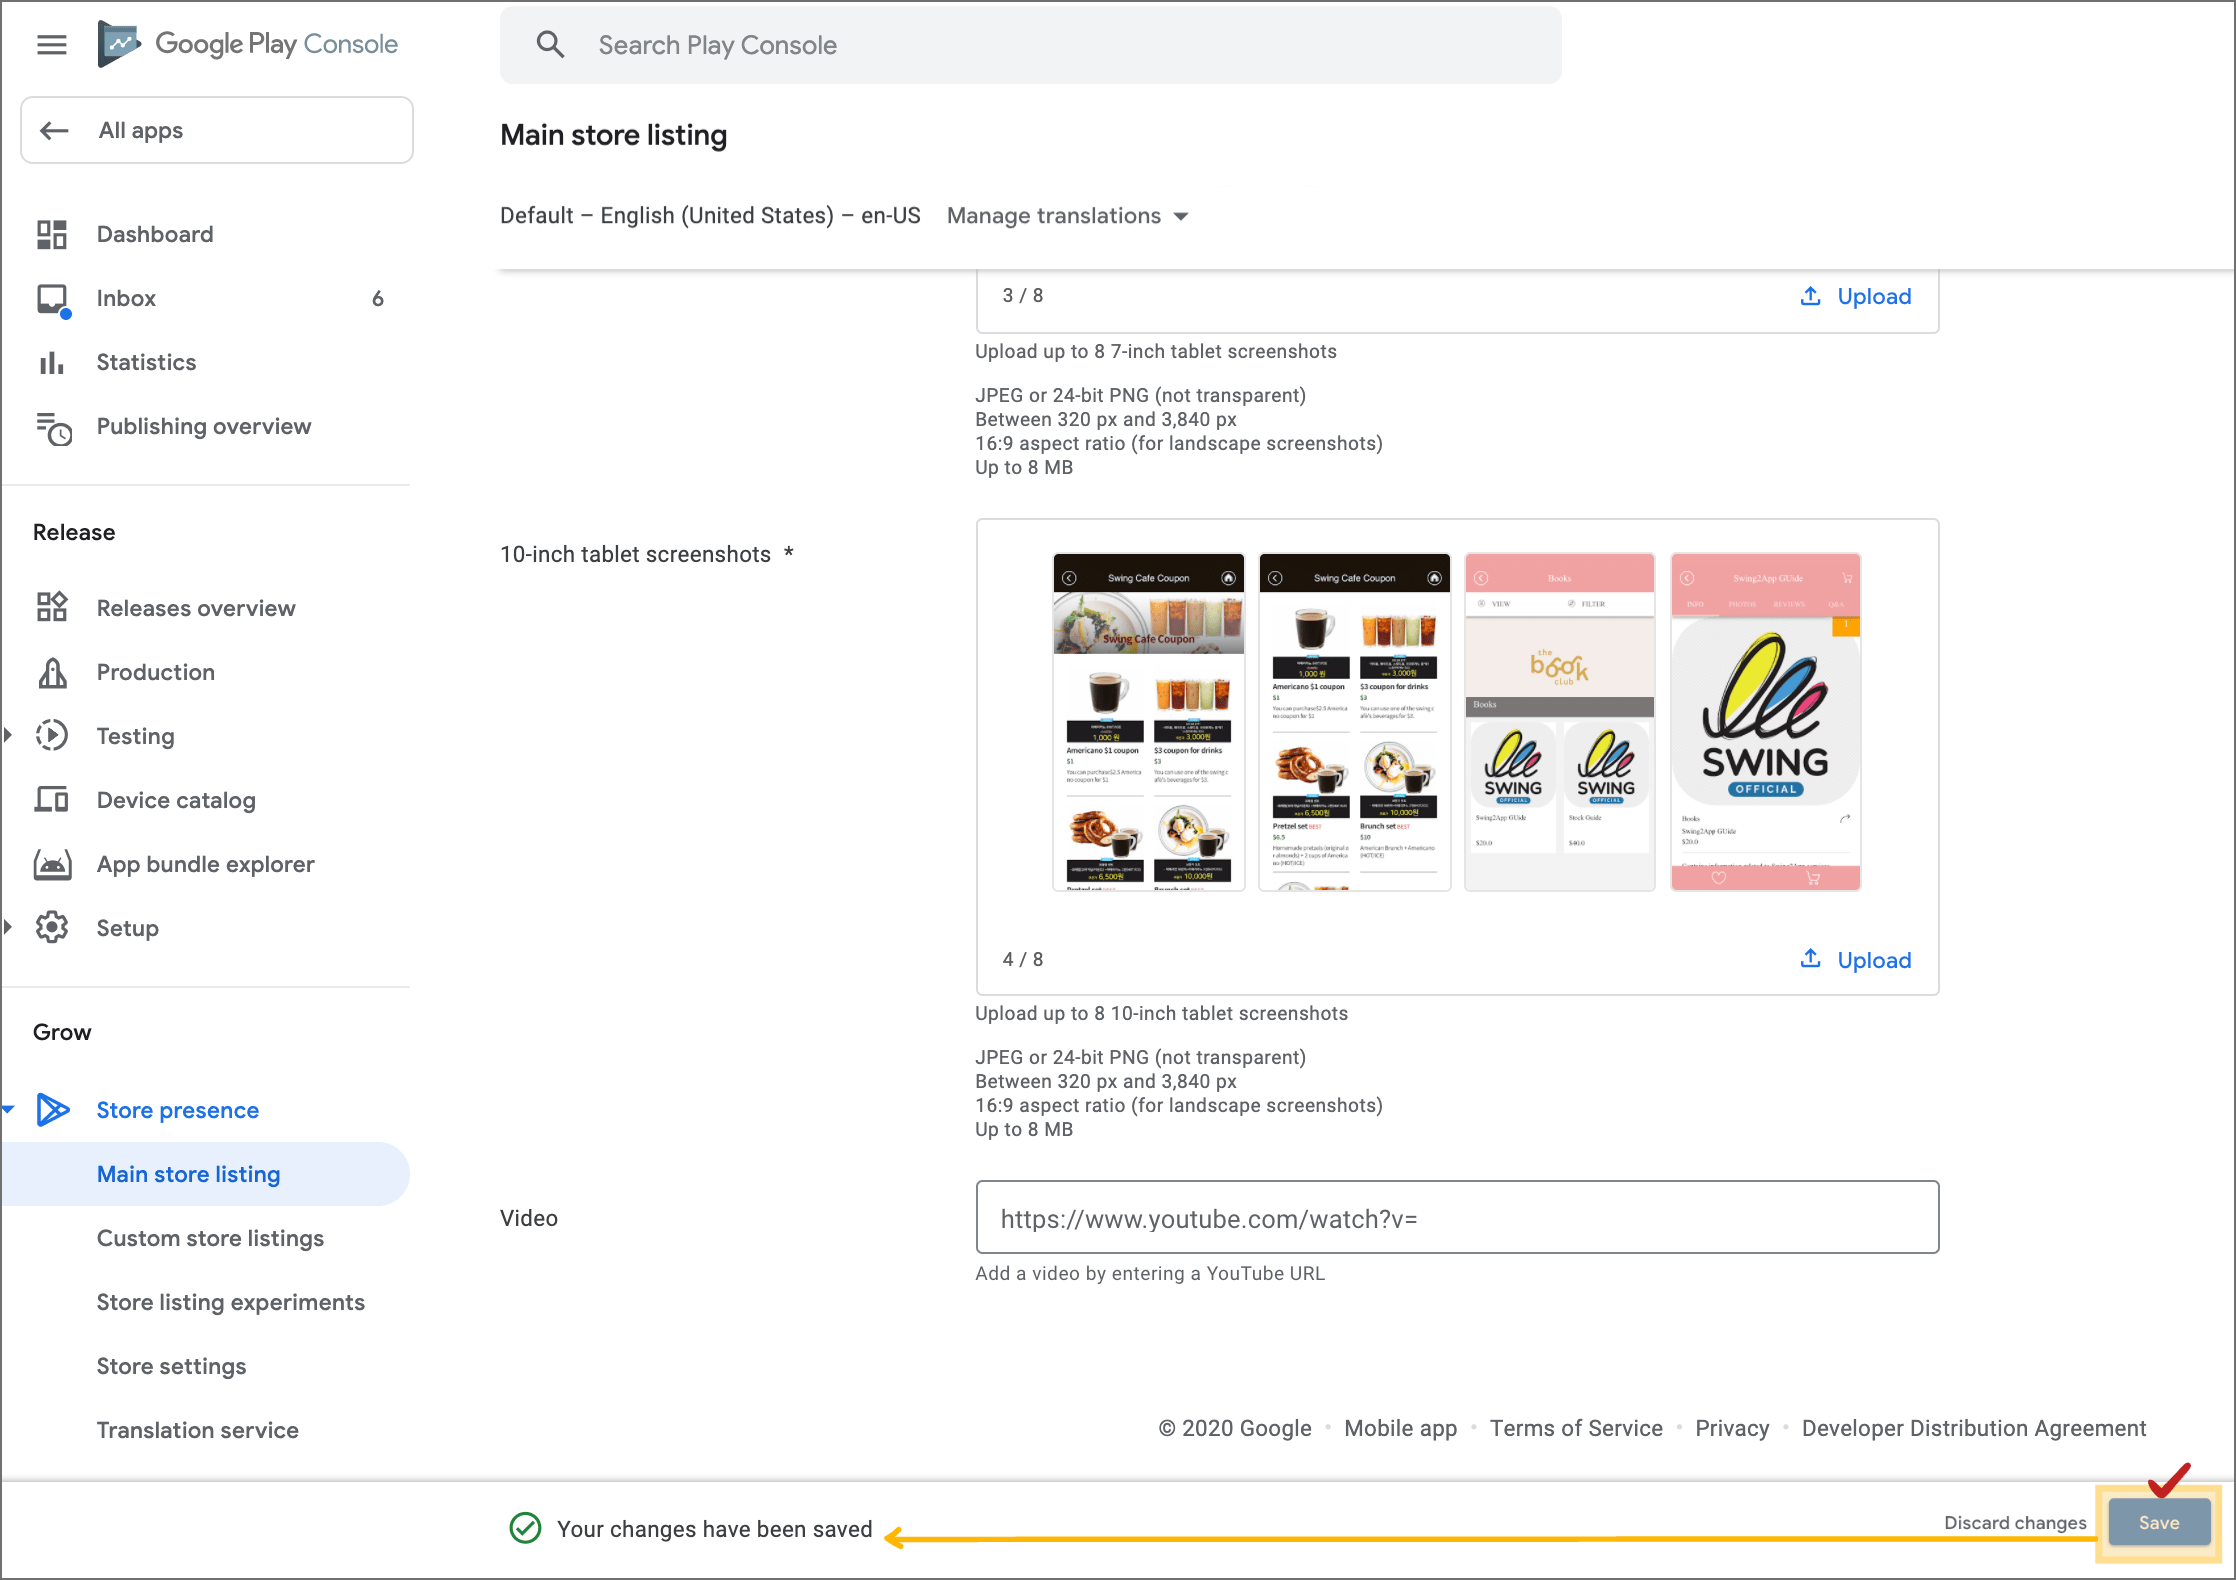
After editing, the **\[Save]** button, which was not visible at the bottom of the screen, turns blue and becomes active.
Click the button to proceed with the update.
**\*Revision of store registration information is also reflected after reviewing the update.**
Updates take an average of 1 day, but depending on the review, it may take up to 7 days, so the deviation is a little bit bigger.
When the review is complete, the store information will be changed to the updated version.
### **STEP.3 Fix and Update your store listing**
You can edit app categories and contacts in the store settings.
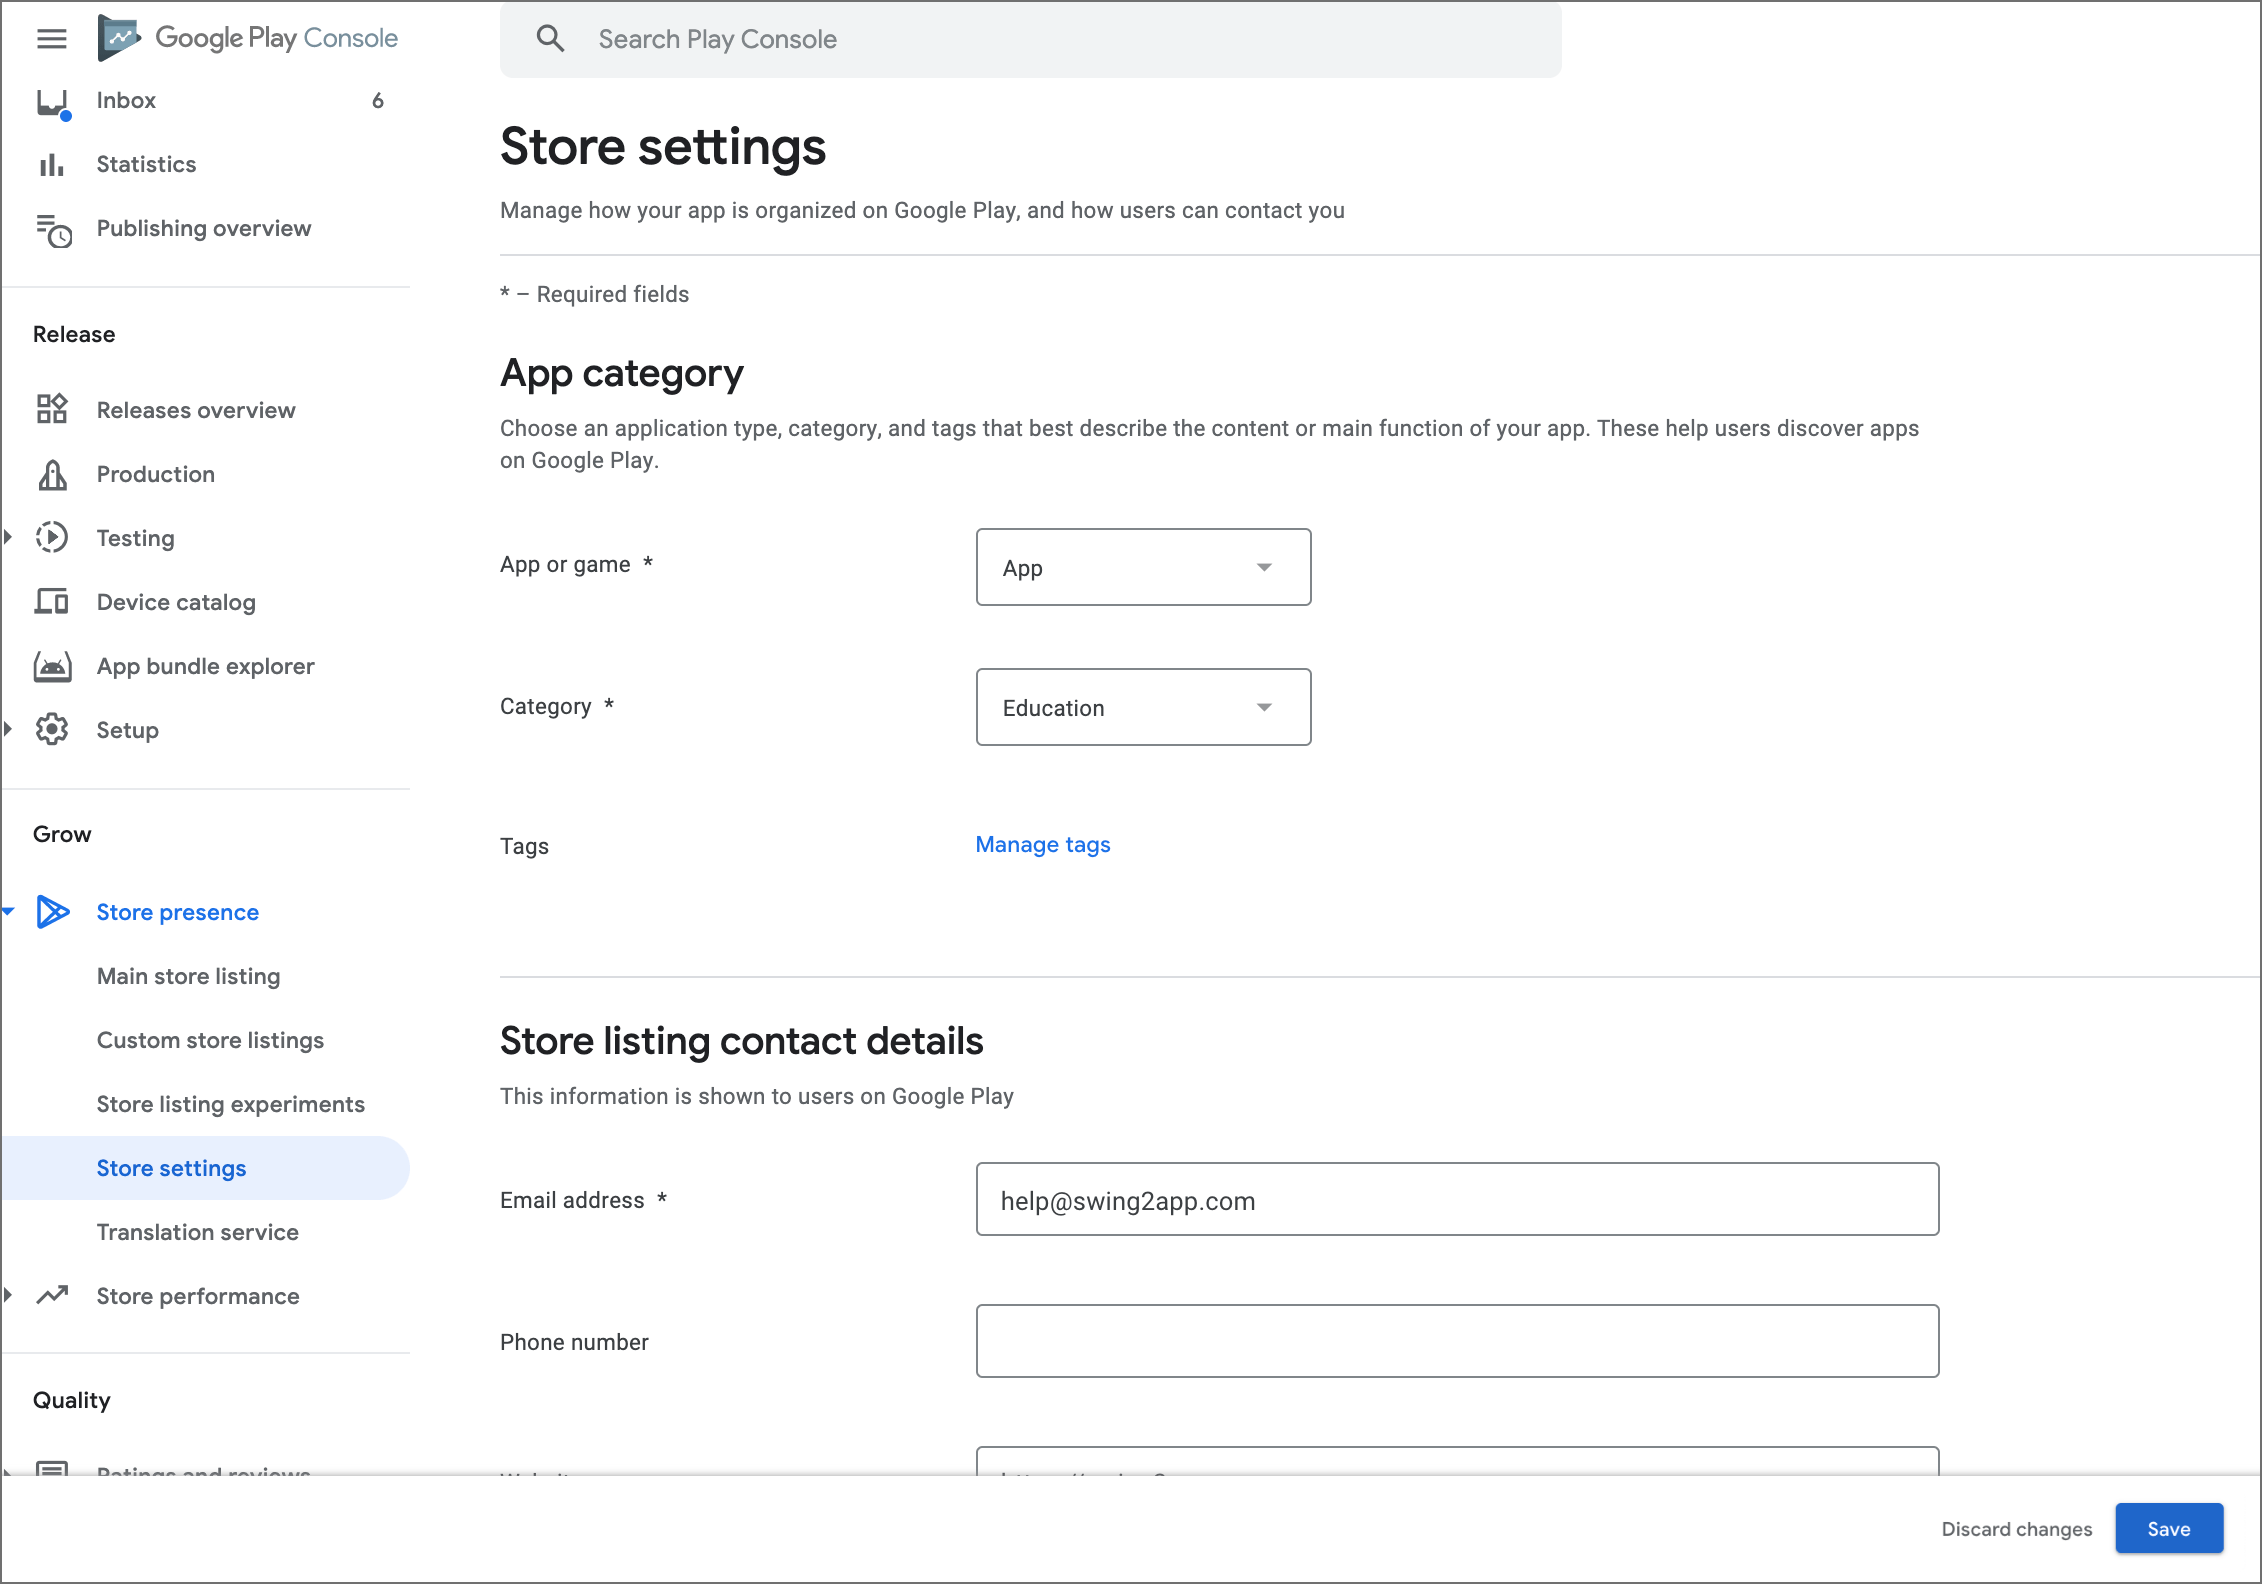
**Go to App Information → Store Settings, edit the contents, and click the \[Save] button.**
**\*Revision of store settings will also be reflected after reviewing the update.**
### **STEP.4 Modify app content**
Privacy policy link modification, advertisement availability, content (category modification), and target modification can be modified on the \[App Content] page.
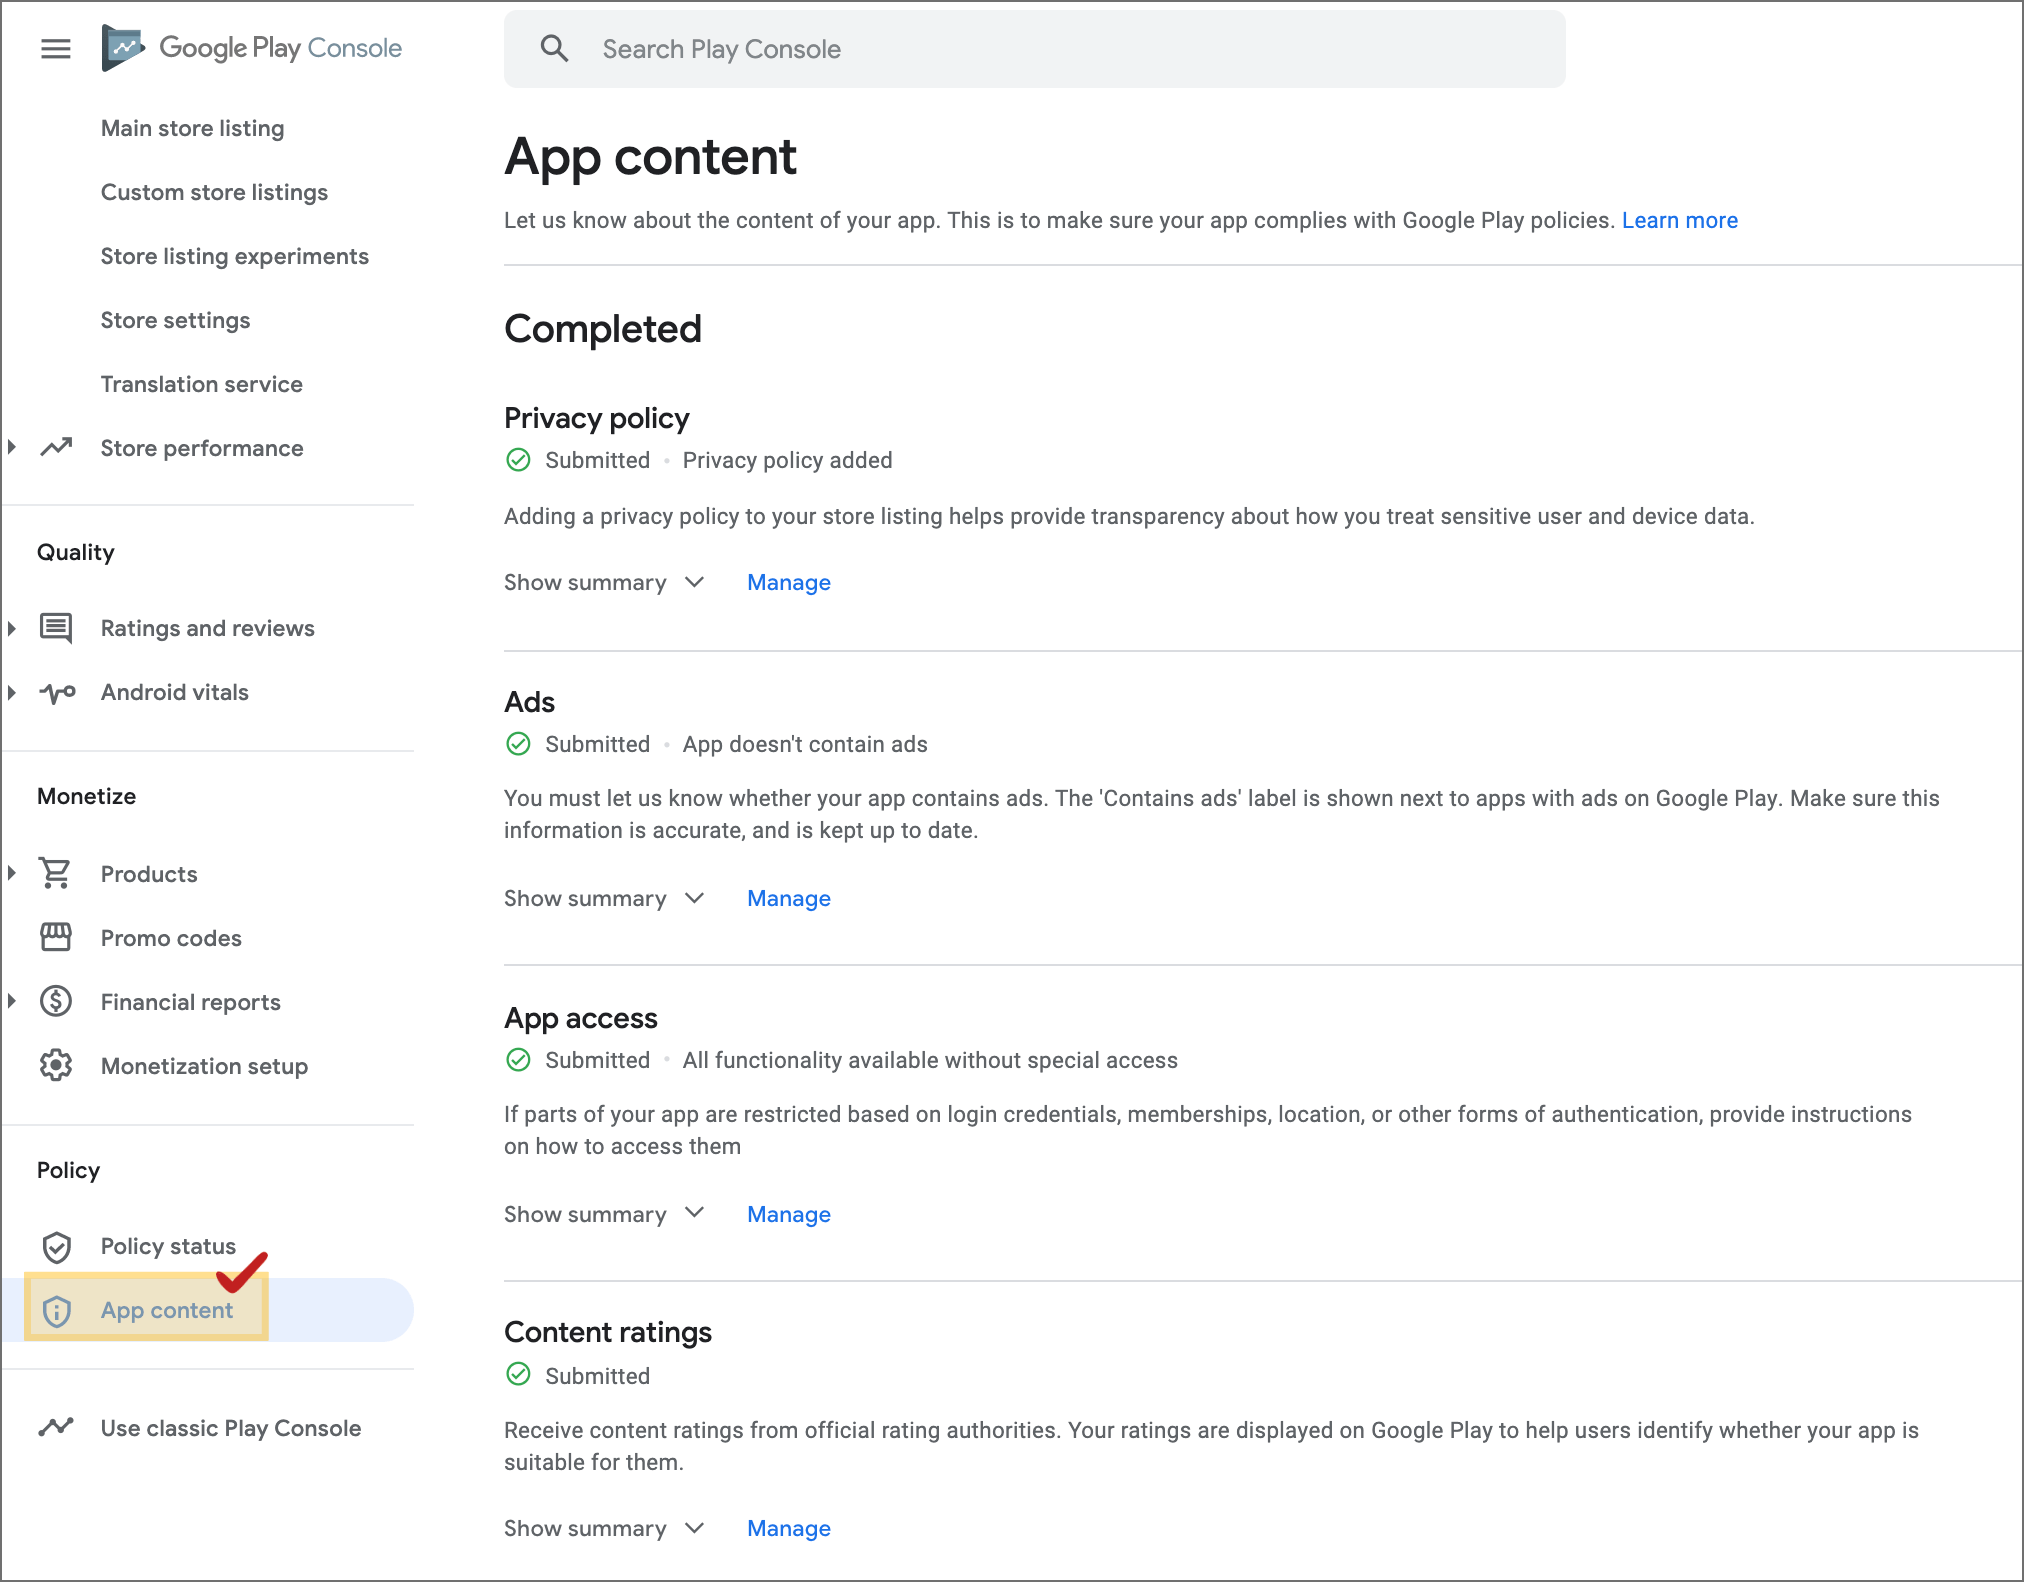
**If you go to the Policy → App Contents page, you can edit the contents of each section.**
For example, if the version has been updated to contain ads after launching the app, you must check Include ads.
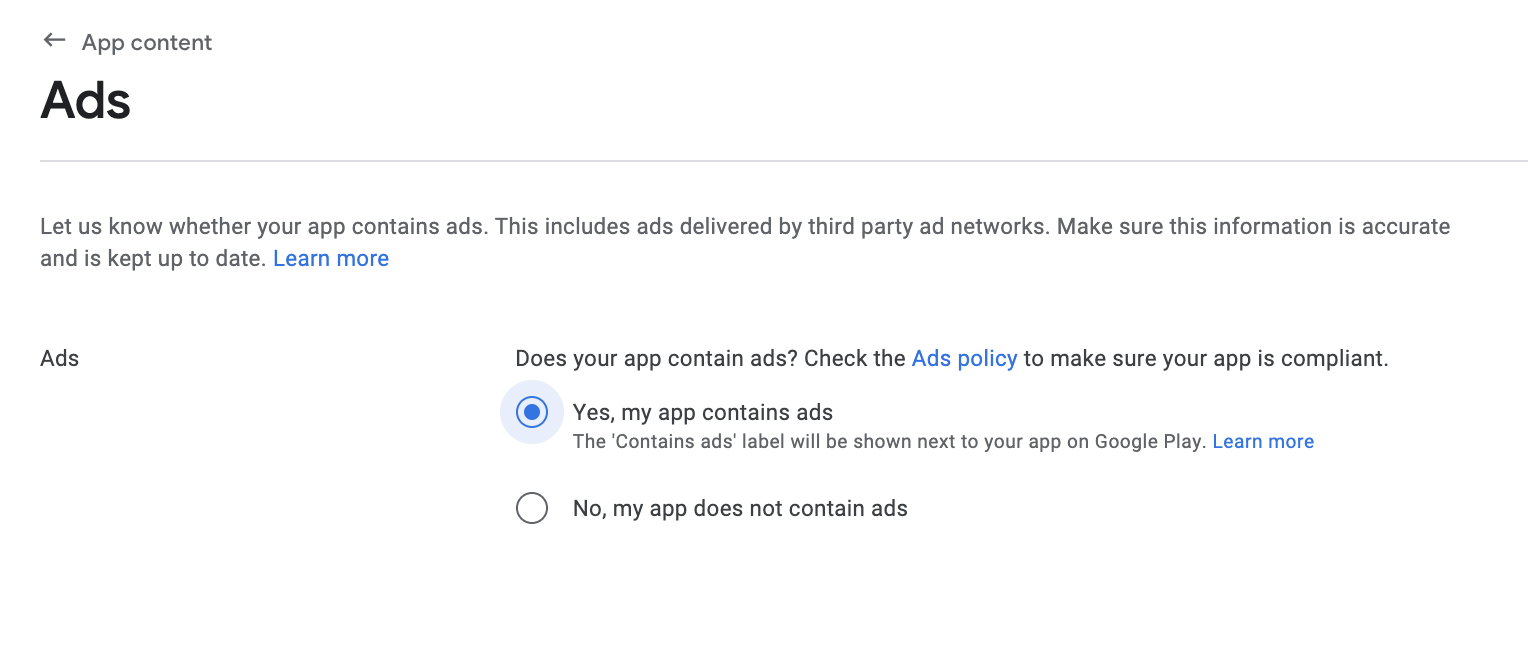
App information-If you select the app content menu → there is an advertisement section.
Click the Manage button and click **“Yes, it contains advertisements.”** After checking, click the Save button.
**\*App content modifications will also be reflected after reviewing the update**
#### **Play Store app update notice**
**1. Apps released on the Play Store can be freely updated. (There is no limit!)**
Therefore, if you want to update the app version or edit the store registration information, please proceed as described above.
**2. On Android phones, even if the app downloaded from the Play Store is updated, the update guide window may not appear when running the app.**
**3. Even if the app update on the Play Store is completed, the update time is different for each Android phone.**
Even if the Play Store says the update is complete, the actual distribution time to Android phones is different. (Reflection time within 24 to 48 hours)
Therefore, even if it is updated in the Google Play console, the app may not be updated yet.
Distribution times vary, so please be patient.
**4. Because automatic update is set, if there is an app update, it is automatically updated in the user’s cell phone data environment.**
It is automatically updated on the user’s device according to the Google Play update settings set for each Android phone.
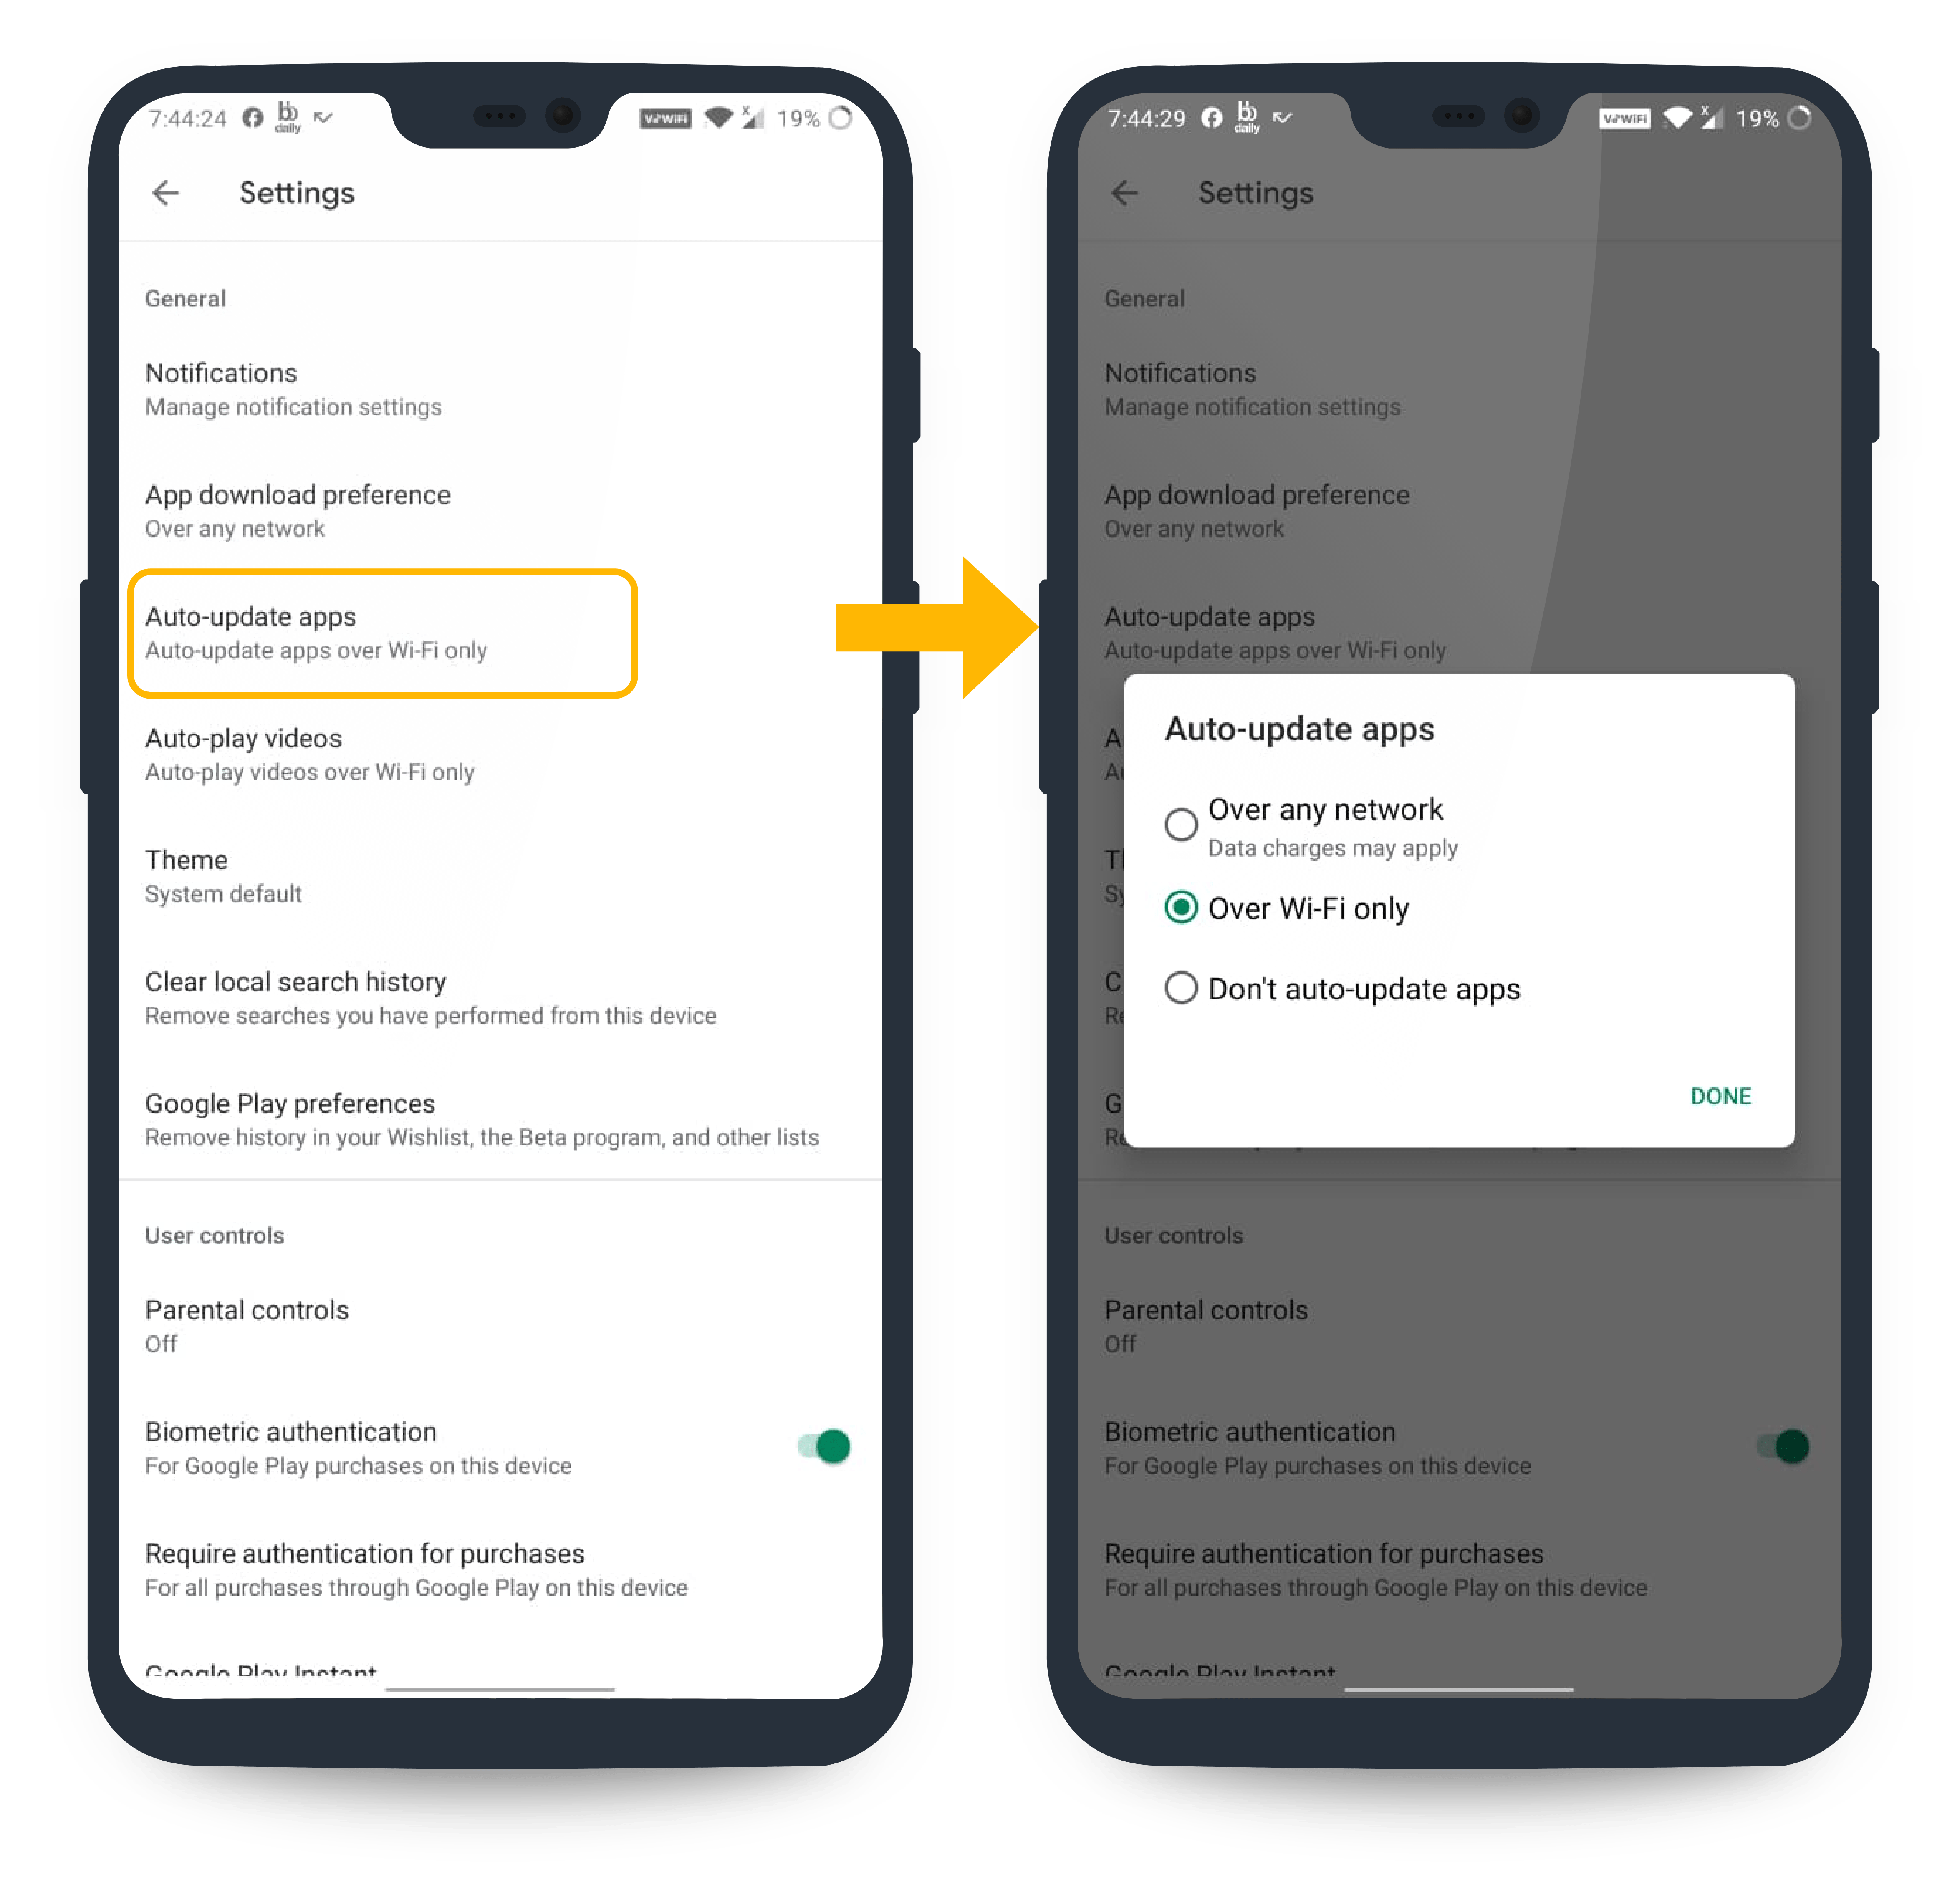
As shown in the image, Android phones are usually set to update automatically.
Therefore, even if it is updated, it is automatically updated according to the user’s Android phone environment without a separate guidance window or pop-up.
\*However, even if the user sets not to update, the app developer (developer) cannot take any action.
Even if it is updated, each user chooses whether to update or not, so the time to reflect the app update on the phone is also different.
If you have updated the app on the Play Store, be sure to keep that in mind!
**5. Updates also have a review time the same as app review. It takes from 1 to 7 days.**
Please wait until the update is completed after submitting the update review because the time required for the update review is large.
After judging is completed, the update will be reflected in the Play Store.
**6. The Play Store prohibits soft updates (automatic updates in the app). \*important\***
After updating the app as a hard update, you must register the app version in the Play Store in the same way.
If the updated version is different, the app may be deleted even after release.
\*For users who are using the Play Store app, please set the update type to ‘Hard Update’ when updating.
\*If the app has not been released on the App Store, you can create it after checking ‘Do not show updates’.
**7. Google filtering attention!!**
There are cases where an app that was initially released normally is suddenly deleted after an update due to a policy violation.
Therefore, please make sure that there are no violations of Google policy even when updating the app.!!