> For the complete documentation index, see [llms.txt](https://documentation.swing2app.com/llms.txt). Markdown versions of documentation pages are available by appending `.md` to page URLs; this page is available as [Markdown](https://documentation.swing2app.com/manual/appmanage/version/playstore-upload.md).
# How to apply for Google Play Store Upload
**How to Apply for Google Play Store Upload**
**Q. What if I want to post a Swing2App app on the Play Store?**
First, you need to make a paid conversion so that the app can be placed on the market.
You can purchase the Play Store upload ticket along with the payment of the swing2app paid ticket on the Manager page → Online Stores → Swing2App Voucher and Ticket Purchase page.
Then the app will go to the market… Think about it!
**Just because you made a payment does not mean your app will be released on the Play Store.**
**\[Apply for Play Store upload] can be registered in the market after the representative checks the app.**
**Q. Where and how do I apply for upload?**
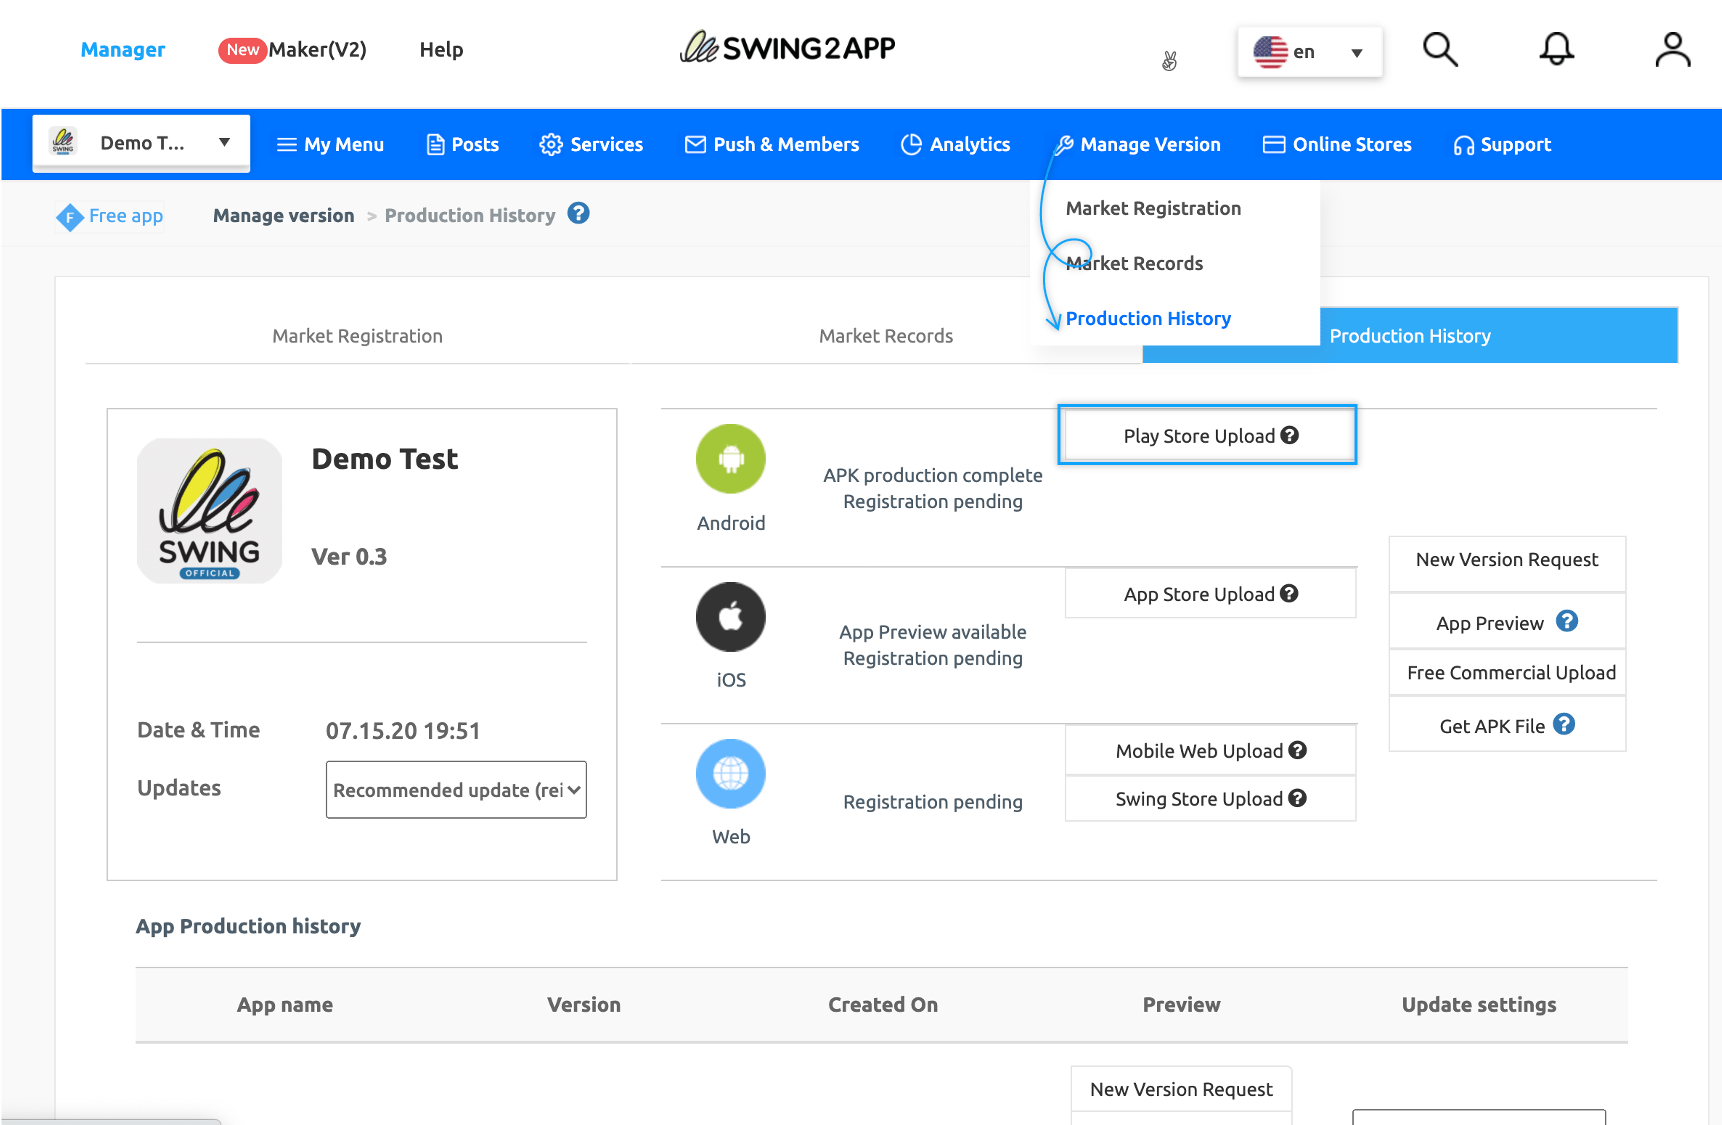
Application for upload goes to the swing2app Manager page → Manage Version → Production History.
You can find \[Play Store Upload Request] on this page.
Pressing the corresponding button brings up the application form window.
**Please fill out the form and the representative will upload the app to the Play Store.**
**Q. When I upload, will the app be released to the Play Store immediately?**
We will upload the app to the Play Store on behalf of Swing2App.
It will not be released immediately but will be first reviewed by Google Apps.
**Google app review takes 1 to 3 days. Therefore, uploading does not mean that your app will be released immediately.**
**If there are no issues after the review, we will launch to the store normally after the review period.**
However, the release time may be longer because it may be rejected.
**\*Before applying to upload Play Store, please make sure you have a Google Developer account**.
The Play Store requires a user’s Google Developer account to register.
If you do not have a developer account, please make a $25 payment through Developer Console site.
**★ Please refer to the manual on how to upload the App Store!!**
**☞** [**\[Go to App Store Upload Application Method\]**](/manual/appmanage/version/appstore-upload.md)
***
### **1. How to Apply for Play Store Upload**
Complete the purchase of the Swing2App paid app voucher and app store upload ticket.
**Move to Manager Page → Manage Version → Production History page and press the \[Play Store Upload Request] button.**
***
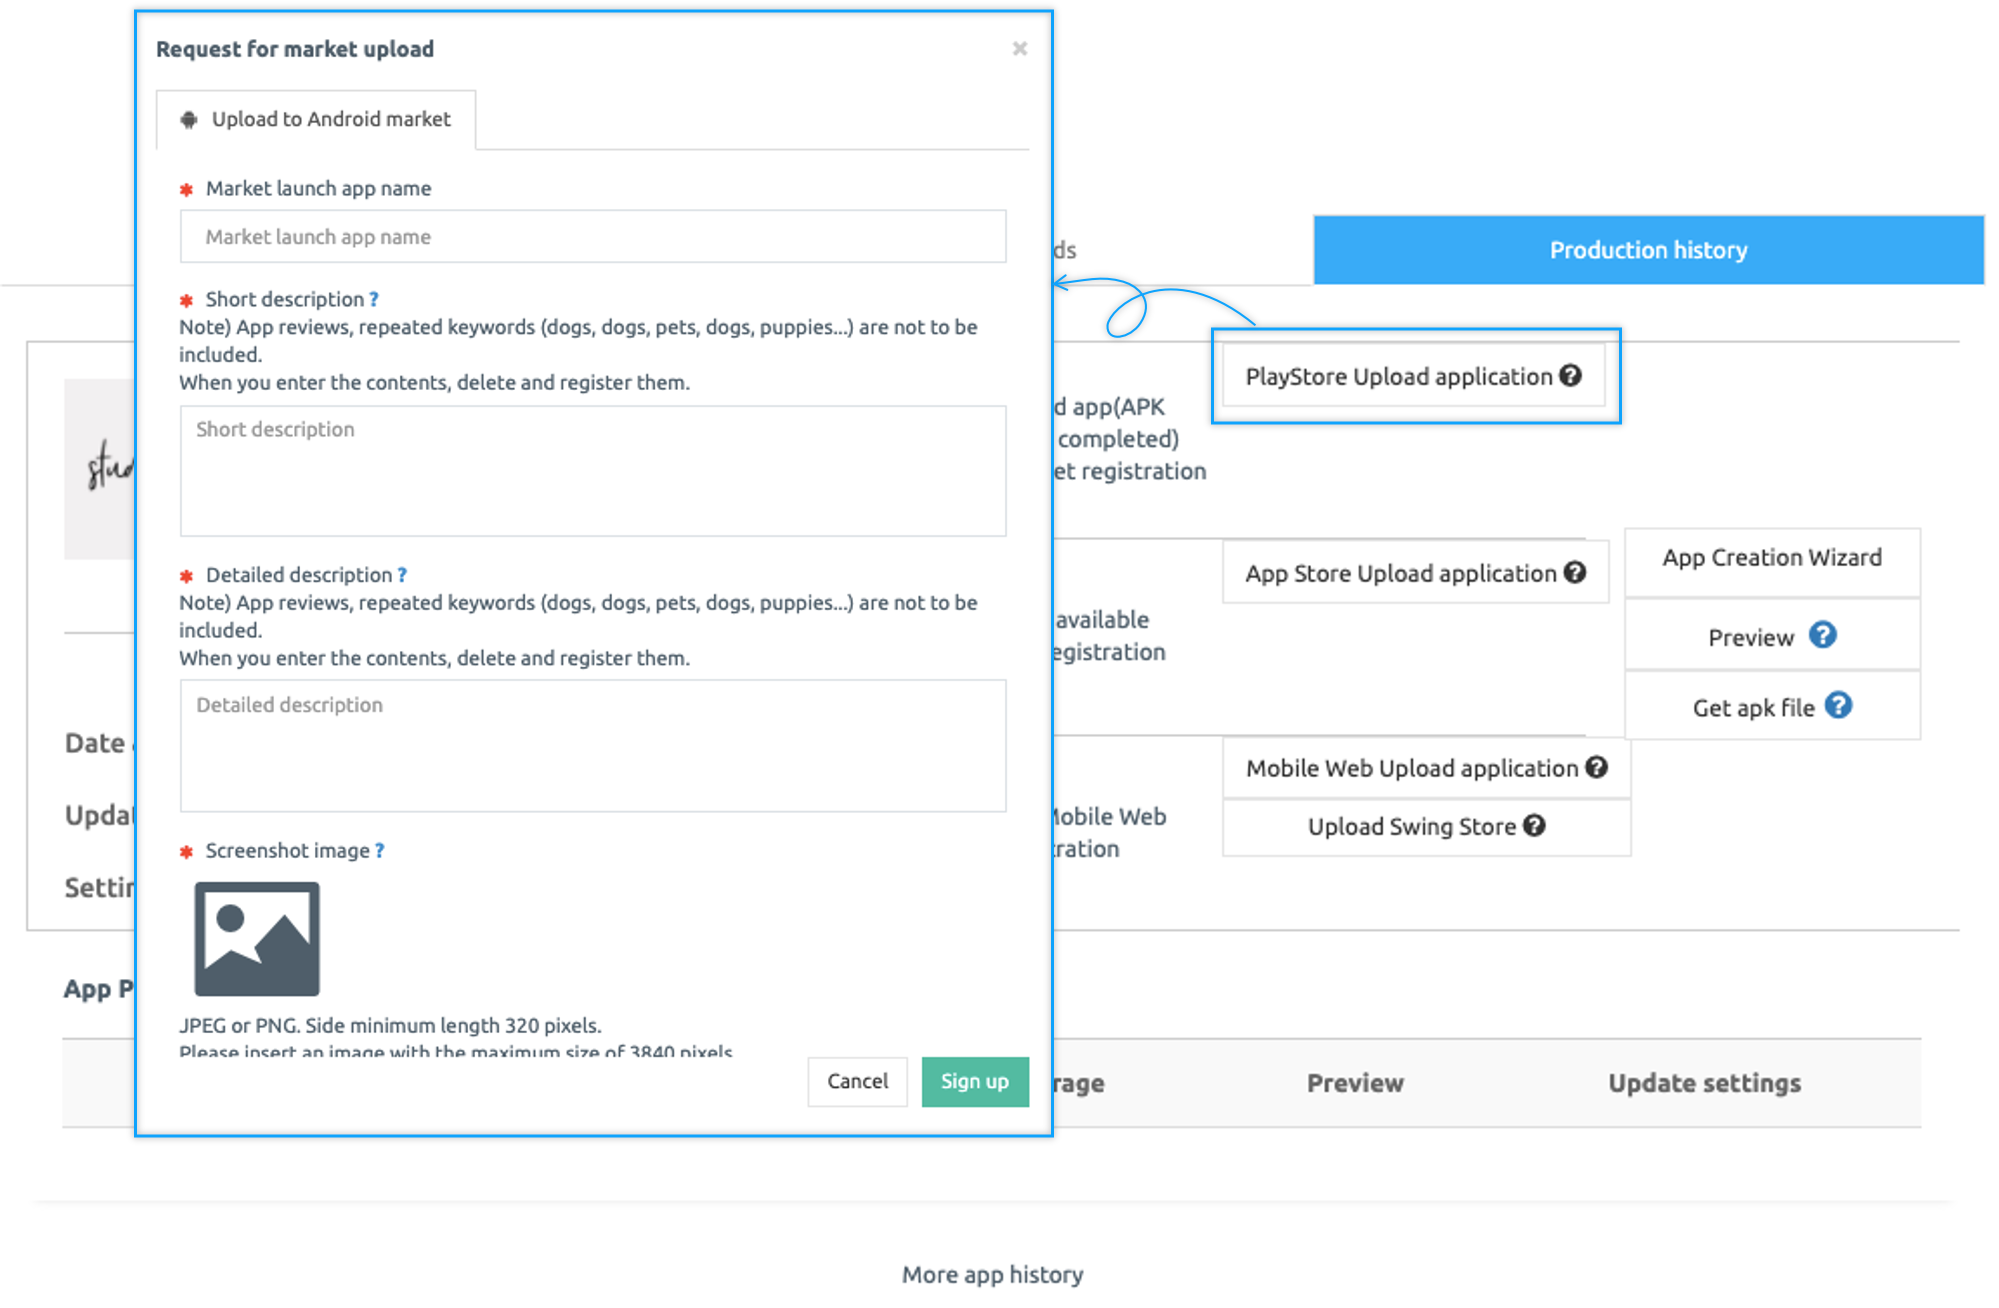
### **2. Play Store Upload Application**
If you press the upload application button, the upload application popup window will appear.
Please enter the items.
**\*** Items marked in **red** are required.
Select the **question ‘ ? ’ mark** icon to see the guidelines!
Please indicate how the item appears in the Play Store.
***
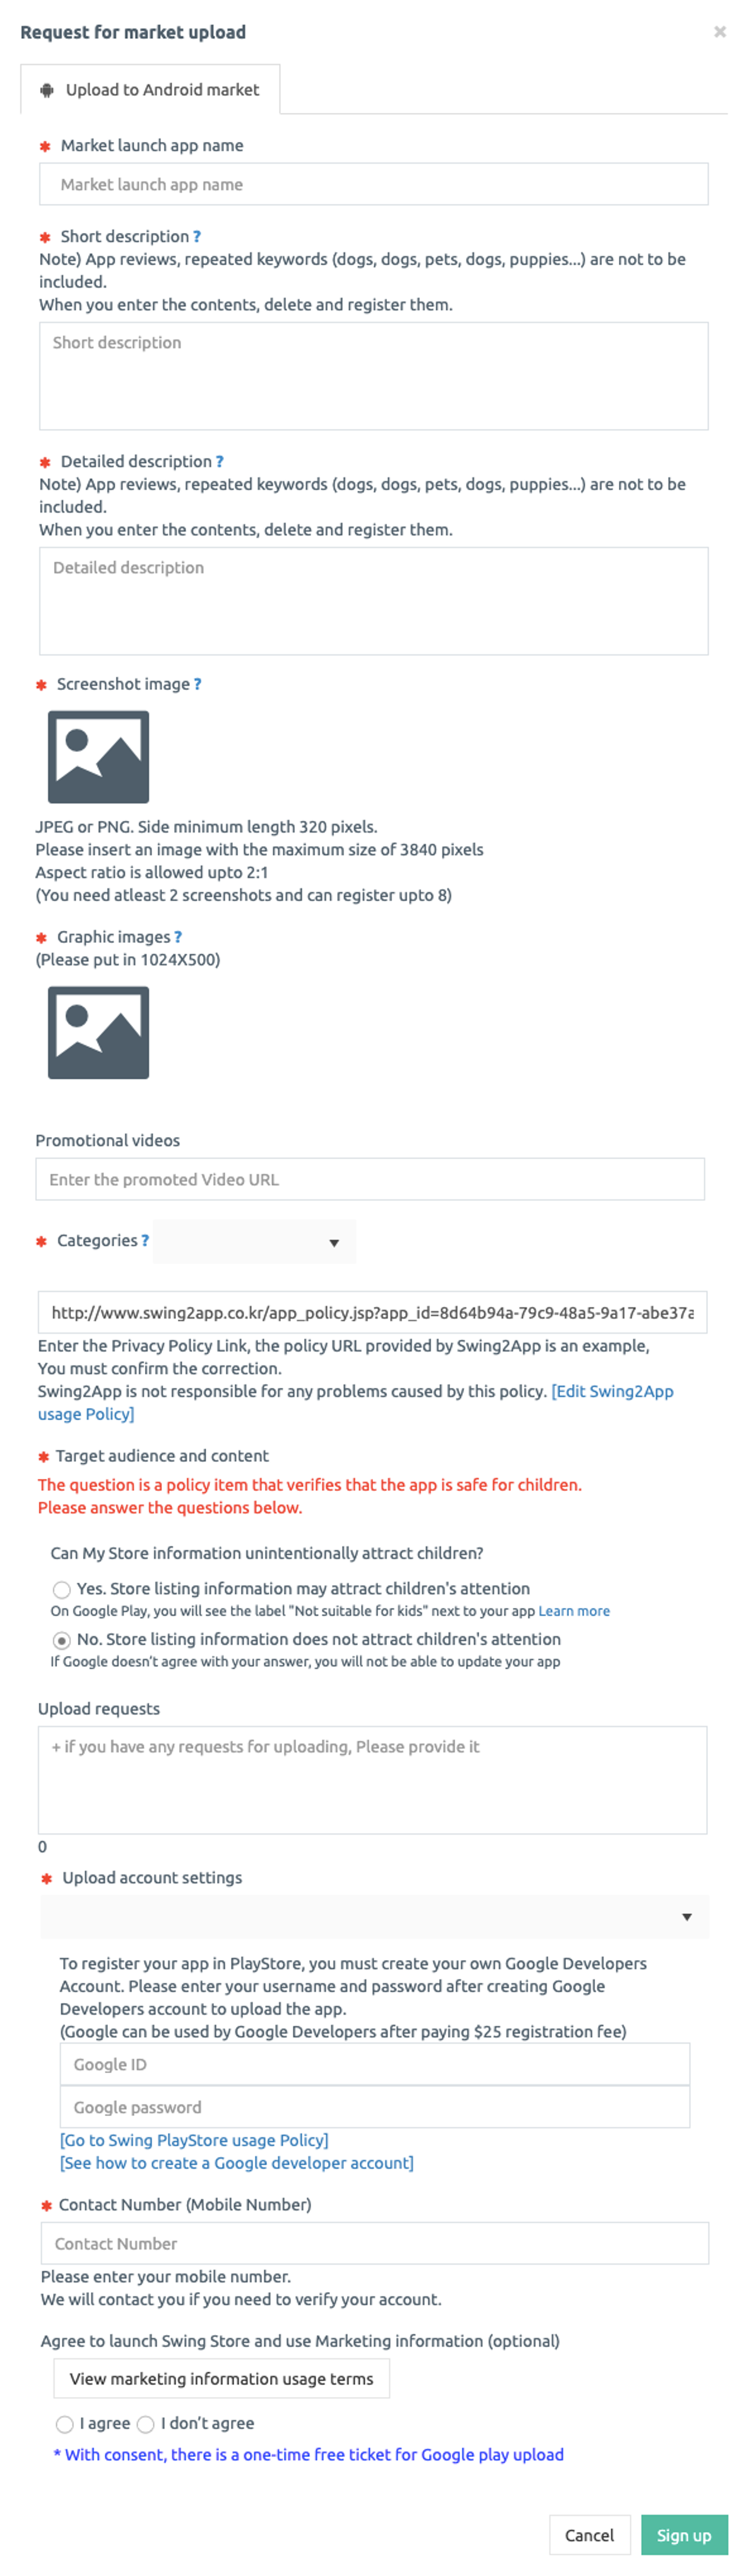
### **3. Guidelines for Filling Out the Play Store Upload Application**
**The guidelines will explain how to fill out an upload application.**
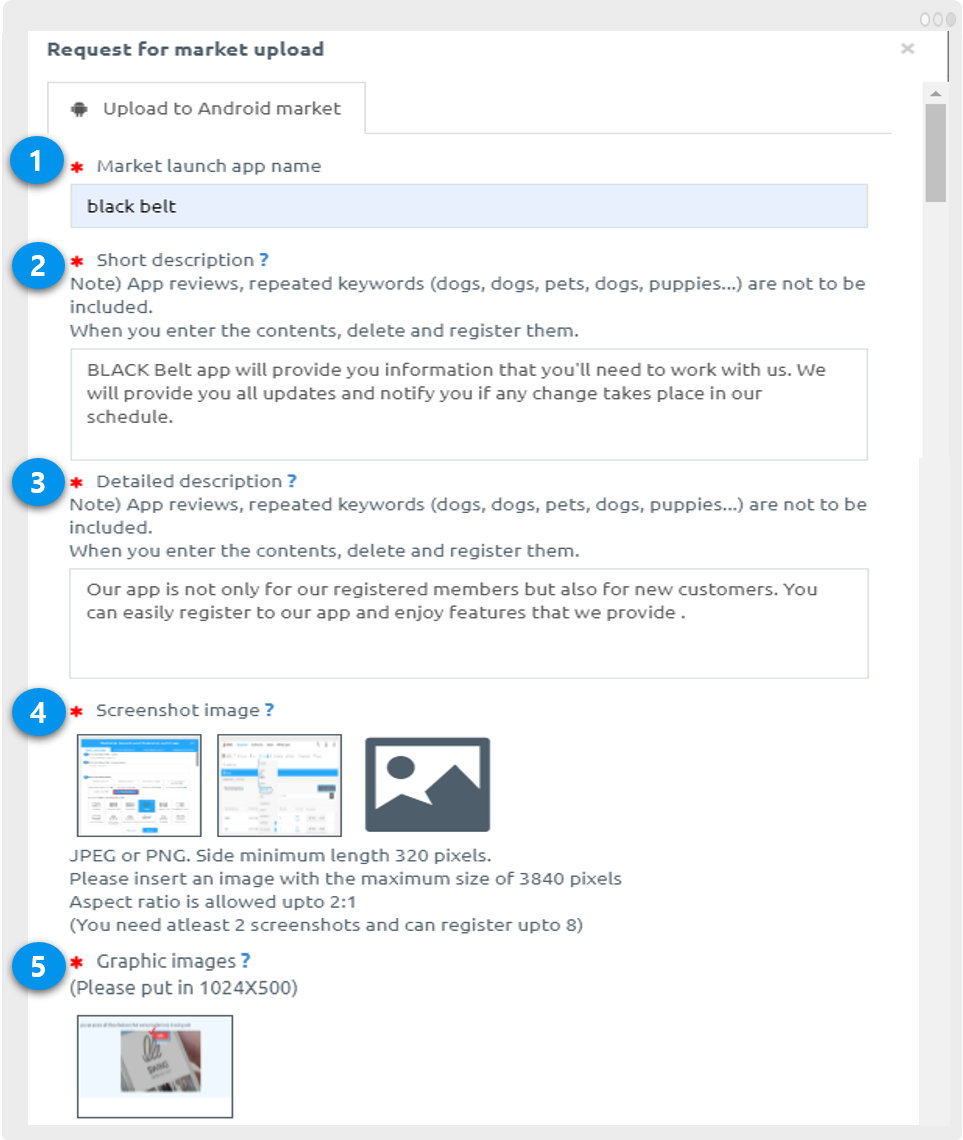
1. Market Launch App Name: Please enter the name of the app that will be released on the Play Store.\ \*\* If you write your app name and released the app name differently, it will be listed as the release name in the Play Store.
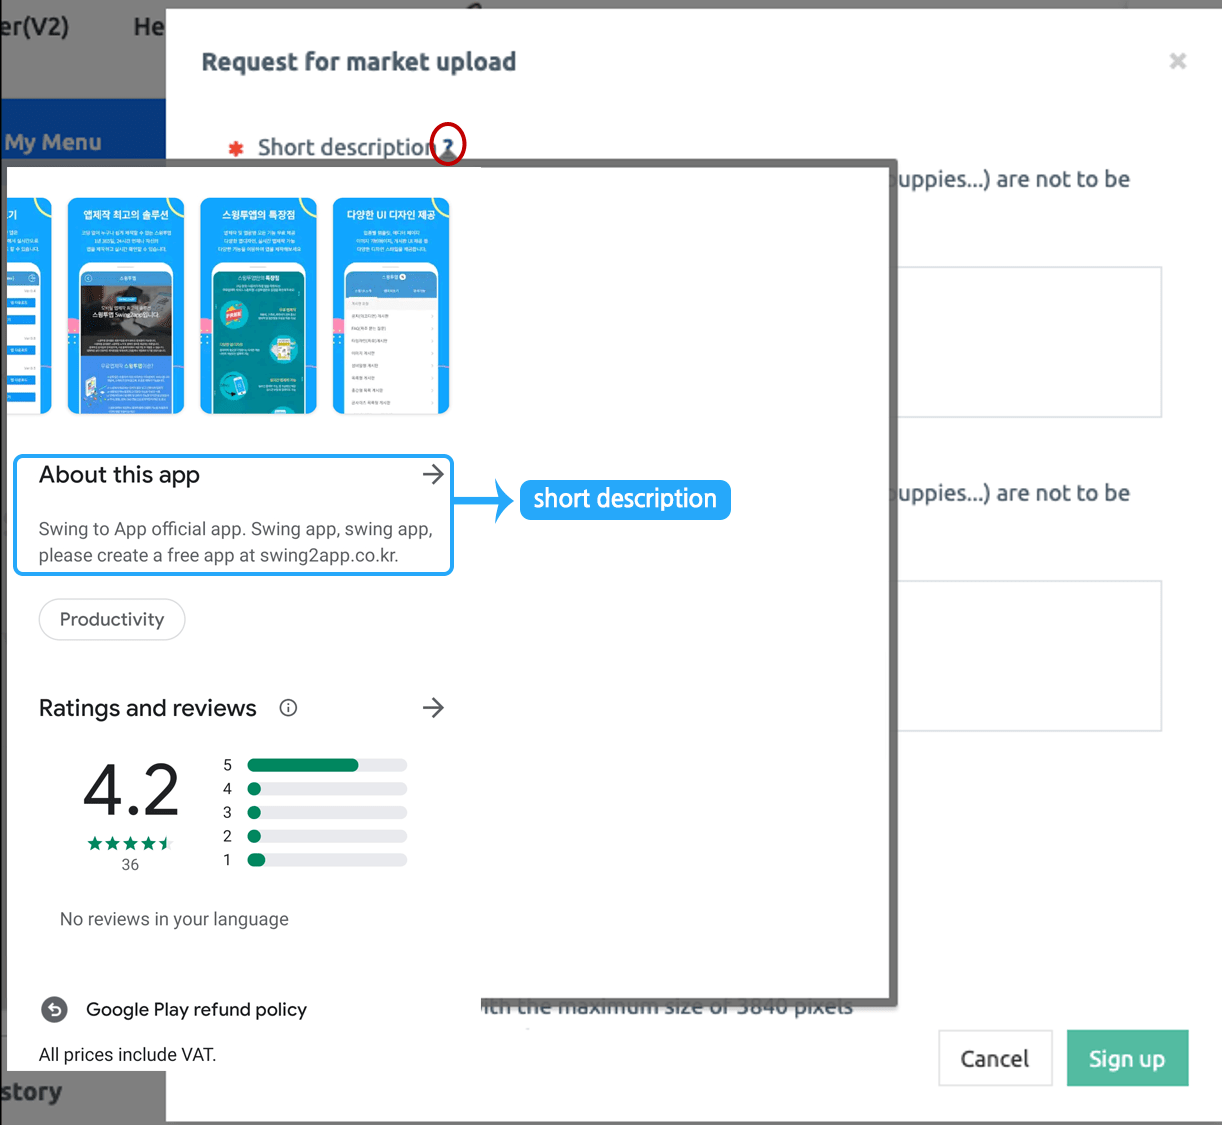
2. Brief description: Please enter a brief introduction to the app. (Less than 80 characters)\ Caution: Please do not put the app reviews, keywords repeatedly (dogs, dogs, pets, dogs, dogs …)\ Since it is a Google policy, please register after entering the relevant information.
3. Detailed description: Please provide a detailed description of the app. (4000 characters or less)\ Caution) Please do not put the app reviews, keywords repeatedly (dogs, dogs, pets, dogs, dogs …)\ Since it is a Google policy, delete it after entering and registering the contents.
4. Screenshot image: Register the screen capture image according to the size.
5. Graphic Image: The graphic image is not the image shown in the Play Store.\
If you share the store release link after launch, it will be displayed as a thumbnail image in the page information!
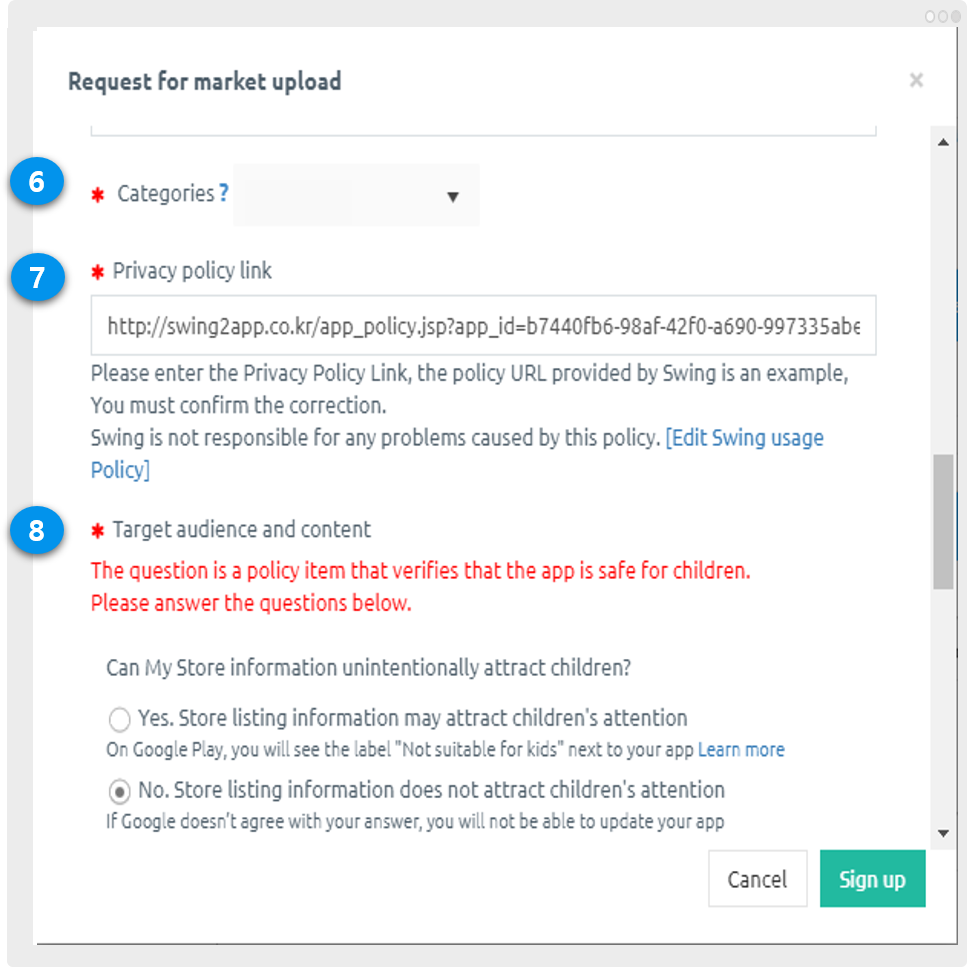
6\. **Category: Decide the category items to be classified in the Play Store. Please select the category that suits your personality**.
7\. **Privacy Policy Link: Enter the privacy policy URL (link).**\
The privacy policy URL is provided by default, but you need to edit the usage policy.\
To edit the usage policy, such as the Privacy Policy, you can press the **\[Revise swing2app policy]** button and save it**.**\
\*Please copy and paste the privacy policy URL provided by the homepage for the push or web view version of the app.
8\. **Target layers and Content**\
**This item is checked under Google’s policy to ensure that the app is safe for children.**\
Choose whether your app attracts children’s attention or not.\
Because the final decision is made by Google review, the review may be rejected if the answer you checked is incorrect.\\
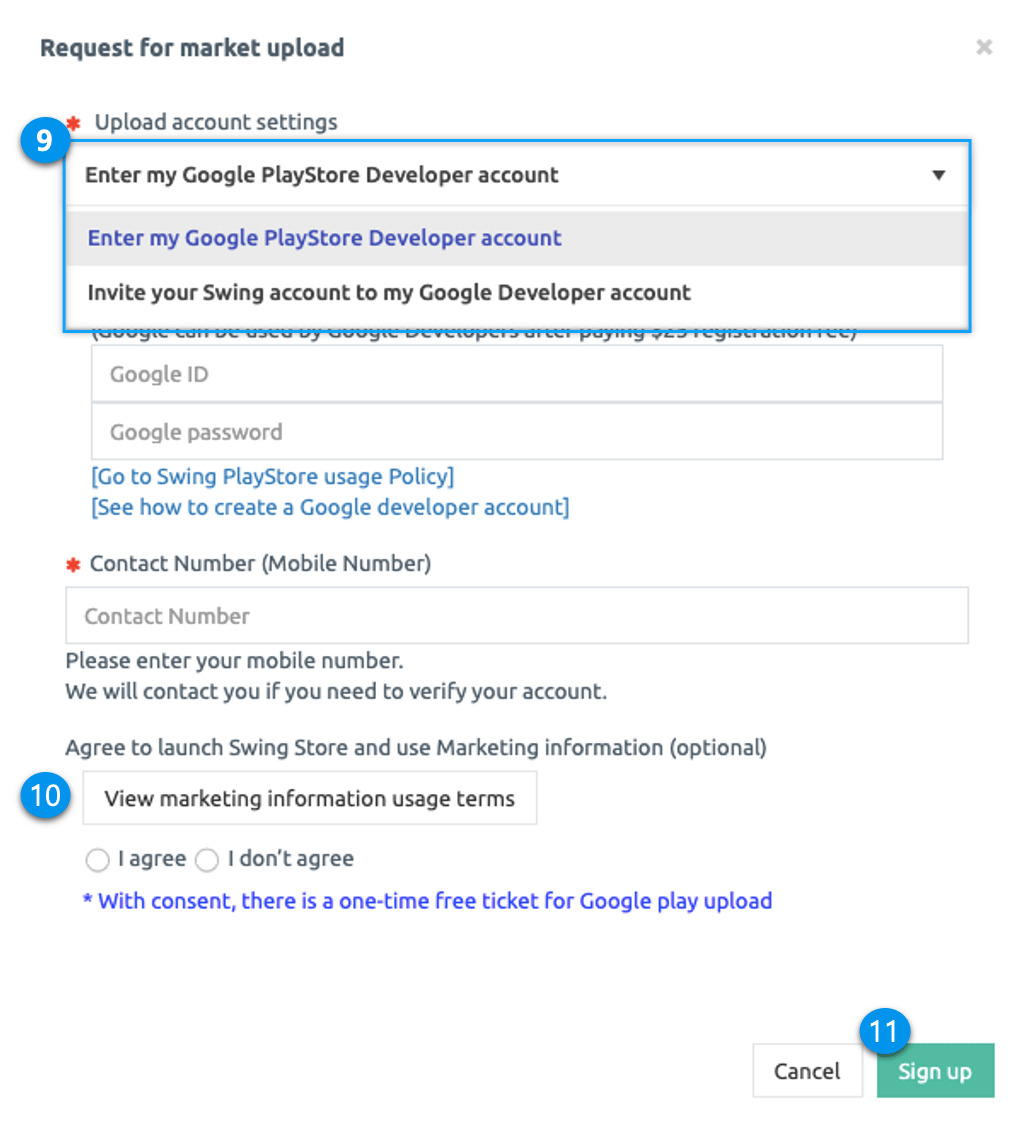
9\. **Upload Account Settings**
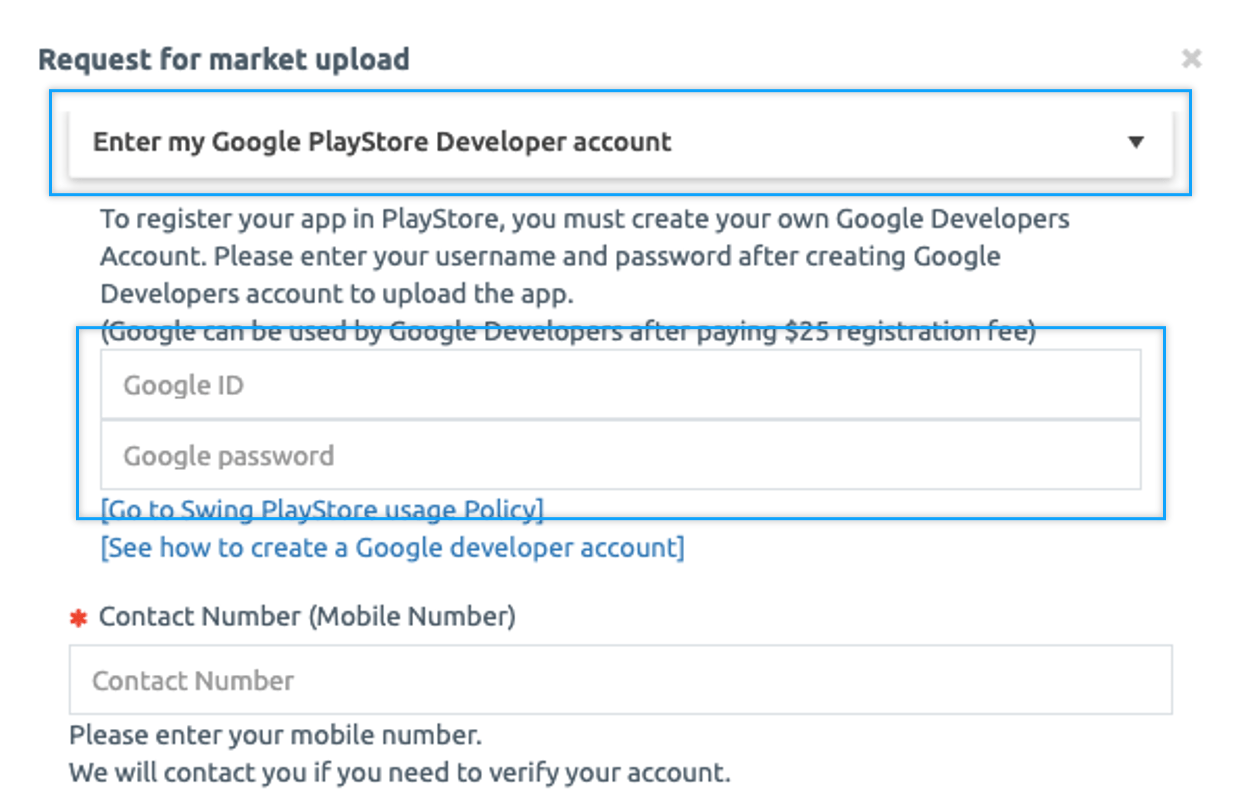
**You can select either “Enter my Google Developer Account”** or **“Invite a Swing2App Account to my Google Developer Account”**.
> \*Enter your Google Developer account: Please enter your Google Developer Account ID (email address) and password, and we will log in to the account uploaded by the swing2app upload team.
>
> \*Invite Swing2App account to my Google Developer account: You don’t have to tell us your account, just invite your Swing2App developer account to your account. (You can register without worrying about security)
\*To register a Play Store app, you must first register a developer on the Google Developer Console site **(**[**https://play.google.com/apps/publish/**](https://play.google.com/apps/publish/) ).
**You can use it after paying the $25 registration fee.**

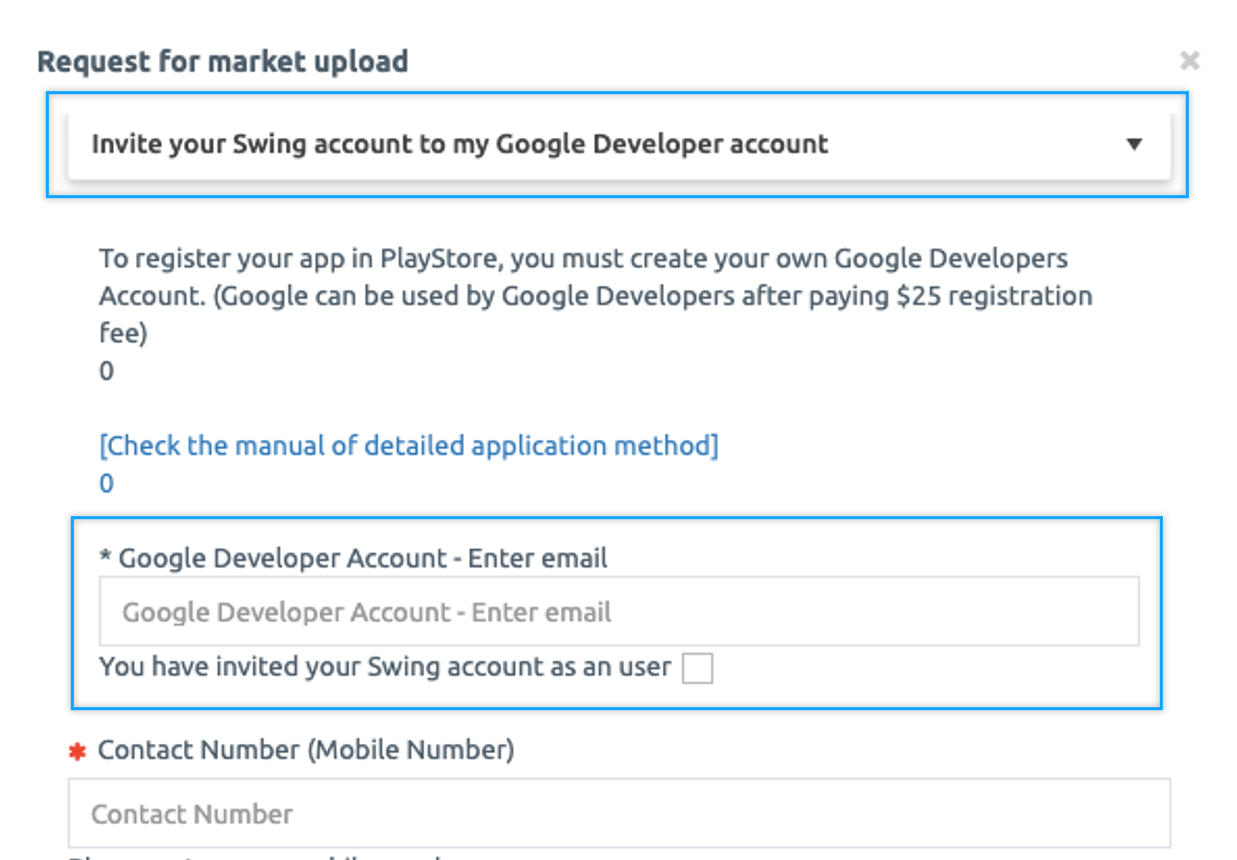
**▶ What is a Swing2App account invitation for my Google Developers account?**
You don’t have to give your Google Developer account – username and password with Swing2App.
If you invite Swing2App’s developer account () from the Google Developers Console, we can register your app with your account after accepting the invitation.
So if you apply for upload in this way,
-You do not need to expose your password.
-Even if your login is blocked because of your Google identity, it can be prevented!
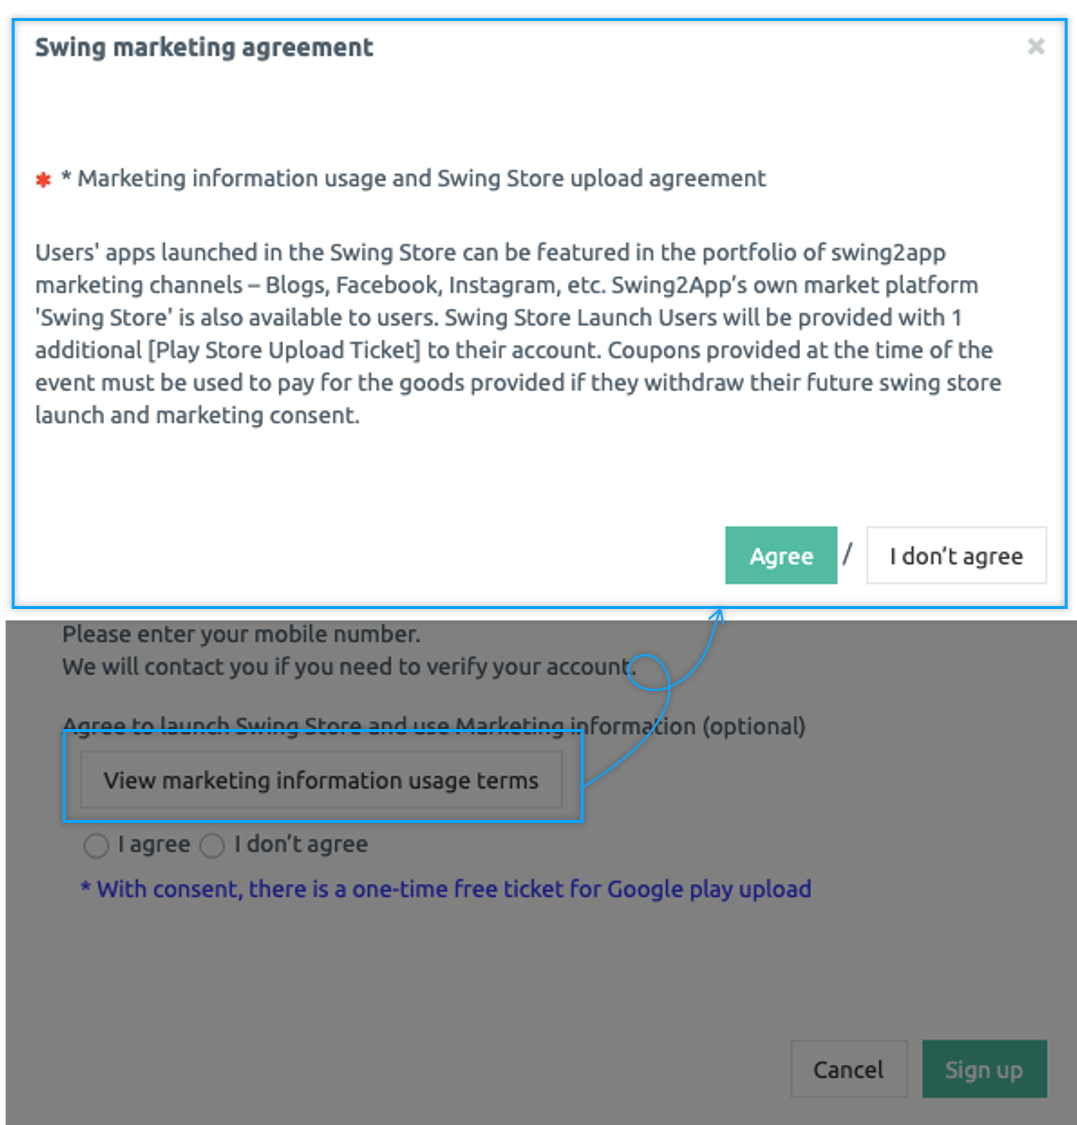
**10) Swing Store Release and Marketing Information Agreement (optional)**
\*\*▶ What are the terms of the \*\***use of marketing information?**
In the upload form, there is a View Marketing Terms and Conditions button.
Select the button and check the contents.
-If you agree, your app will be introduced to the marketing channel of Swing2App, and the swing store will be released.
As a thank you, you will receive a free Play Store upload ticket.
-If you do not want to be introduced to the marketing channel, please check the ‘I do not agree’.
\* You can use the Play Store Upload for free if you participate in the event, even if you do not purchase the Play Store Upload Ticket after purchasing the ticket only.
**★ Note**
If you agree to the use of marketing information, and later withdraw your marketing consent,
**“The coupons offered at the event will pay for the prizes offered at the event if you withdraw your swing store launch and marketing agreement in the future”.**
**As with our policy, if you withdraw your marketing, we will reclaim the products you were provided.**
Please check it out!
**If you have already used a free Play Store upload ticket, you will have to pay a $5 ticket.**
Please check the details before proceeding.
11\) When finished, press the **\[Request]** button.
***
### **4. Upload application completed**
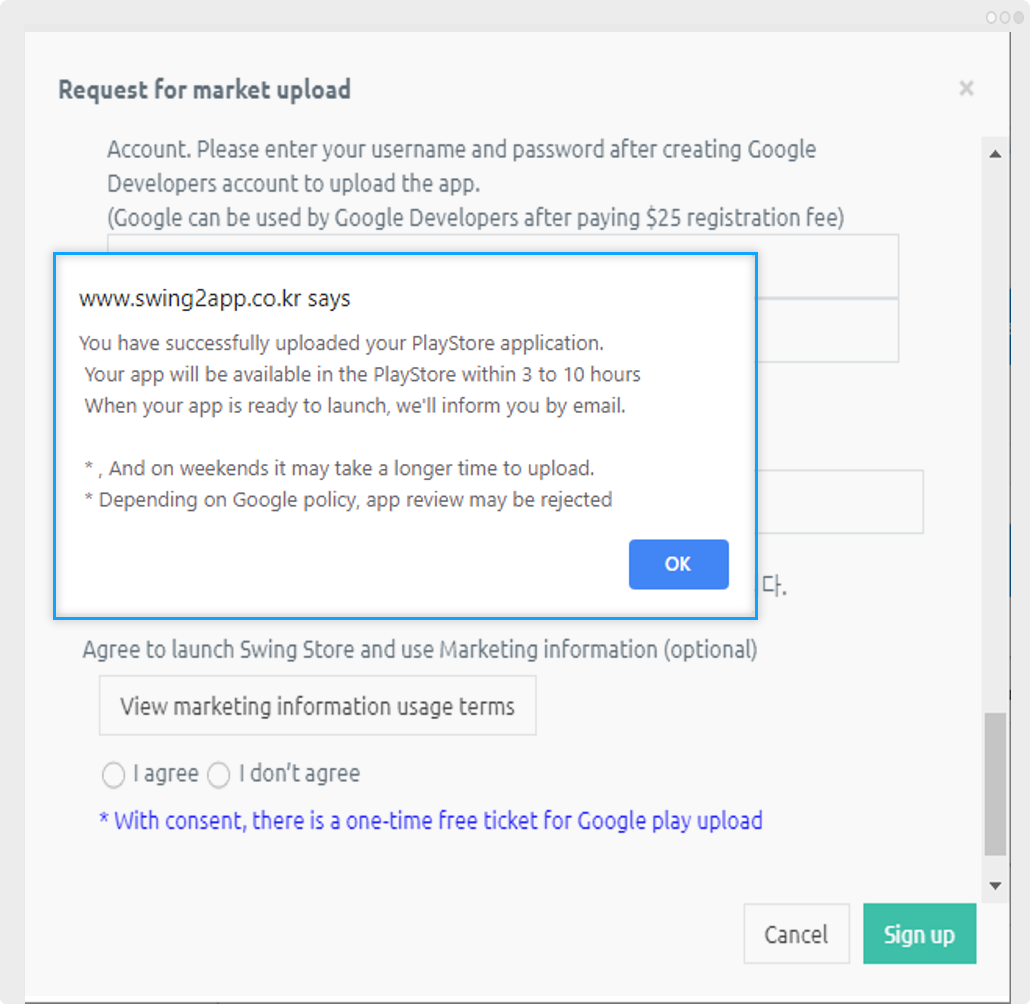
You’re all set to upload your Play Store.
When the upload request comes in, our Market Upload team will register the app with your Play Store account based on the application.
The Play Store has a review time, the app will not be launched immediately after uploading.
**There is a minimum screening period of 1 to 3 days, so please feel free to apply!**
\* If you apply for uploading within the working hours, we will proceed immediately within the same day, but if you apply for uploading outside of the working hours and on weekends, it will not be checked on the same day and will be processed in order during weekdays.
Please note that when applying for uploading.
***
**\[Guide]**
1. **A $5 upload ticket is a one-time fee.**\
If you update the released app and upload it again, or if you edit the app description or screenshot image in the store, you must re-apply the upload after purchasing the upload ticket.\
\*Updates also have reviewing time, and app updates usually take a few hours.
2. Google does not need to purchase an upload ticket, but users can directly access the Google Console site and edit it freely. (You can register directly because you have a Google Developer account)
3. The Play Store review period is from **1** **to 3 days**. If there are no issues with the review, they will be released after the review period.\
-If you apply for upload outside of business hours and on weekends, you will not be able to review on the same day.\
If you refuse to upload, we will send you an email with your rejection and action. \* Re-examination will be conducted at no additional cost.\
-If you receive an email, you must reply to the action to proceed with the review. If you do not reply within a week, the upload will be placed on hold. (If you have any pending registration, please contact us again and we will proceed with the review)
4. Please make sure to create your own Google Developer account before applying for Play Store upload. (Google developer registration fee is $25)
5. We do not pay your Google Developer account on behalf of Swing2App, and you can only use your account.
6. Unused tickets are 100% refundable, but **ticket refunds are not available for apps that have already been registered, even if they have already been used as an upload application or the review is rejected and not released normally.**