> For the complete documentation index, see [llms.txt](https://documentation.swing2app.com/llms.txt). Markdown versions of documentation pages are available by appending `.md` to page URLs; this page is available as [Markdown](https://documentation.swing2app.com/manual/appmanage/pay/push-lifetime.md).
# PushOnly Lifetime Paid App
 **What is a Push-only Unlimited Paid App?**
1. Push-only unlimited paid apps can be used **only with swing prototype-push style apps. \*Only push app available**
2. Push app is a web app style created by moving the website as it is, and can send push messages to users who have installed the app.
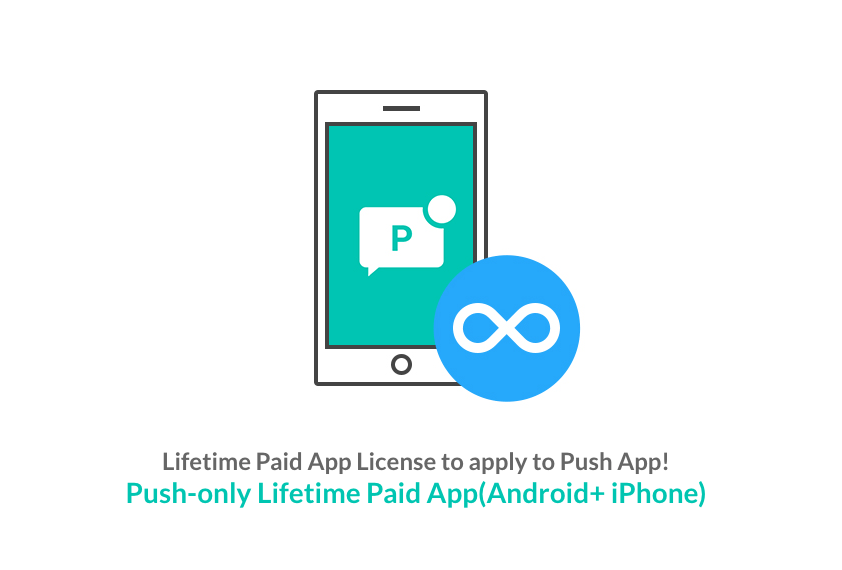
3. **It is an integrated application for Android + iPhone, and you can use the app with unlimited (limited period X) without paying monthly fees.**
4. **Push can be sent an unlimited number of times without any restrictions on the number of members or sending.**
5. Push-only unlimited paid app products cost $550(tax included).
6. Apps can be released on the Play Store and App Store.\
**If the cost of using the paid app that you have to pay monthly is a burden, you can use the app without any burden when you need to use the app for a long period of time.**
**Prototype: What is Push?**
Swing2App provides several styles of UI design-prototype.
‘Push’ only is a web app that is created by linking a website as it is with an app.
If you enter the website (homepage) URL without any other production function, it will be linked to the app and produced, and a push toolbar will be created at the bottom of the app.
Additionally, the push app can send push messages to users who have installed the app. \*Unlimited pushes are also sent.
* The first thing you should do is create a push version app, right? I’ll tell you how to make an app!
### **1. Creating a push version app**
**Step 1: App basic information**
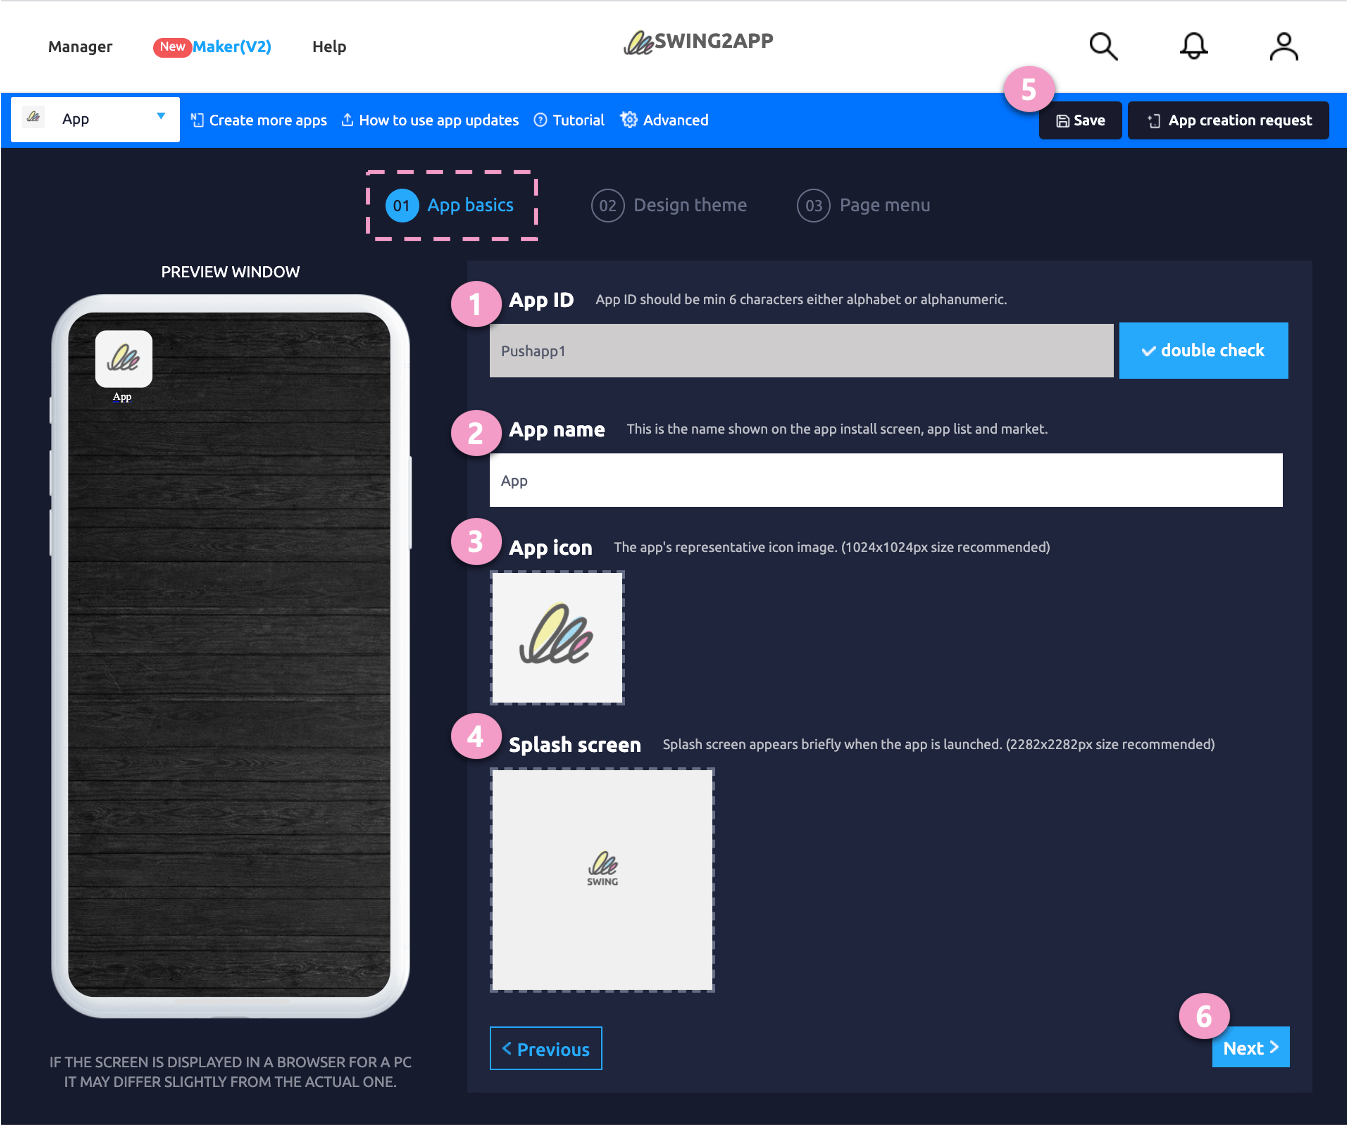
After logging in to the Swing homepage \[Maker(V2)] Step 1 Basic App Information
1. Enter App ID: This is a unique app identifier and cannot be changed after setting.
2. Enter the app name
3. App icon image
4. App standby screen image registration
5. Select \[Save] button
6. Select the \[Next] button.
**\*For the app icon image and standby screen image, first create an image according to the size indicated on the screen and then register.**
Please see the production guideline manual first for the icon and standby screen before making it!
**\*Except for the app ID, the app name, icon, and standby screen image can be modified and updated without restrictions.**
The modification of basic app information is reflected only when you update to a new version by pressing the \[App Creation Request] button.
**Step 2: Design theme**
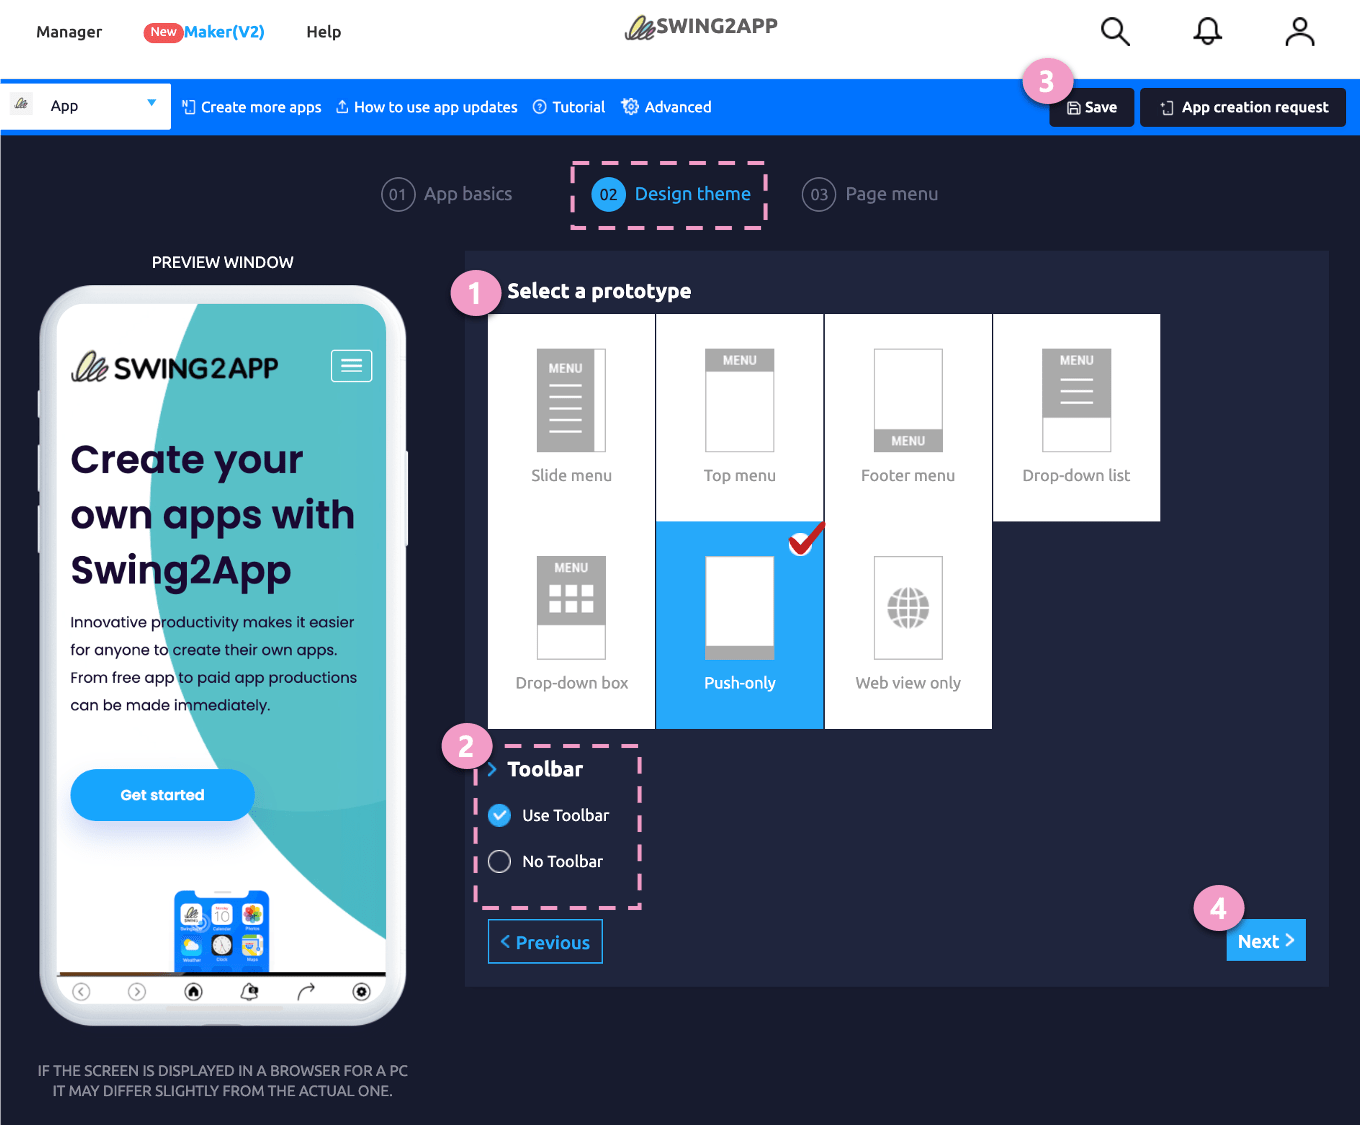
1. Prototype selection: Select’Push Only’
2\. Select whether to display the toolbar\
-Select whether to use toolbar or remove toolbar
3\. \[Save] button
4\. Select the \[Next] button.
**Step 3: Page menu**
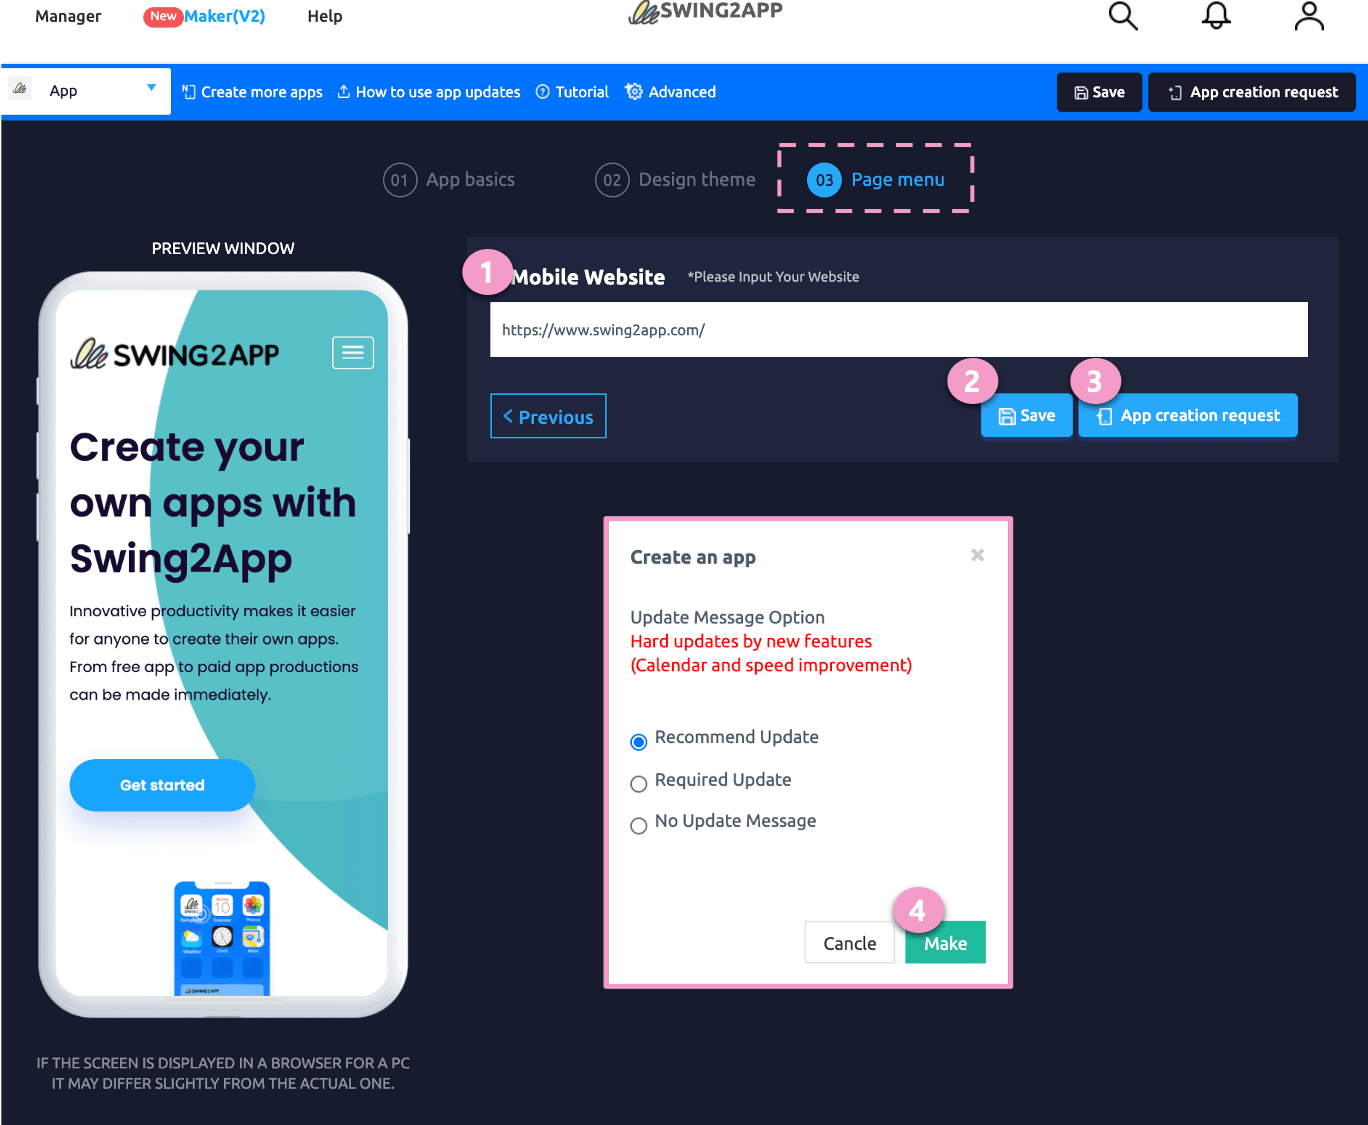
1. Enter site address: Enter the URL address of the link you want to apply to the app.\
\*When entering a link, be sure to enter the hyperlink http\://
2\. \[Save] button
3\. \[App production request] button
4\. Select the \[Create] button to complete.

Push app production is completed within 10 minutes.
You can check the completed app by using the Swing2App official app \[App Preview] or downloading the APK file sent by email from your Android phone.
**\*Apps created by push and web view can only be checked on Android phones. (iPhone cannot be checked\~)**
\*Please check the manual below for how to install the app and download it to your Android phone.
[https://support.swing2app.com/documentation/appoperation/appinstall/](/appguide/appoperation/appinstall.md)
Since creating an app is simple, you can easily follow it by looking at the manual.
Production and operation are available for free at no extra cost, so first create an app for free, make it, and test it!
### **2. How to purchase and use push-only unlimited paid apps**
If there is no problem after checking the created app, you can purchase unlimited Android + iPhone products for Swing Push.
You must purchase this product to release it on the Play Store and App Store!
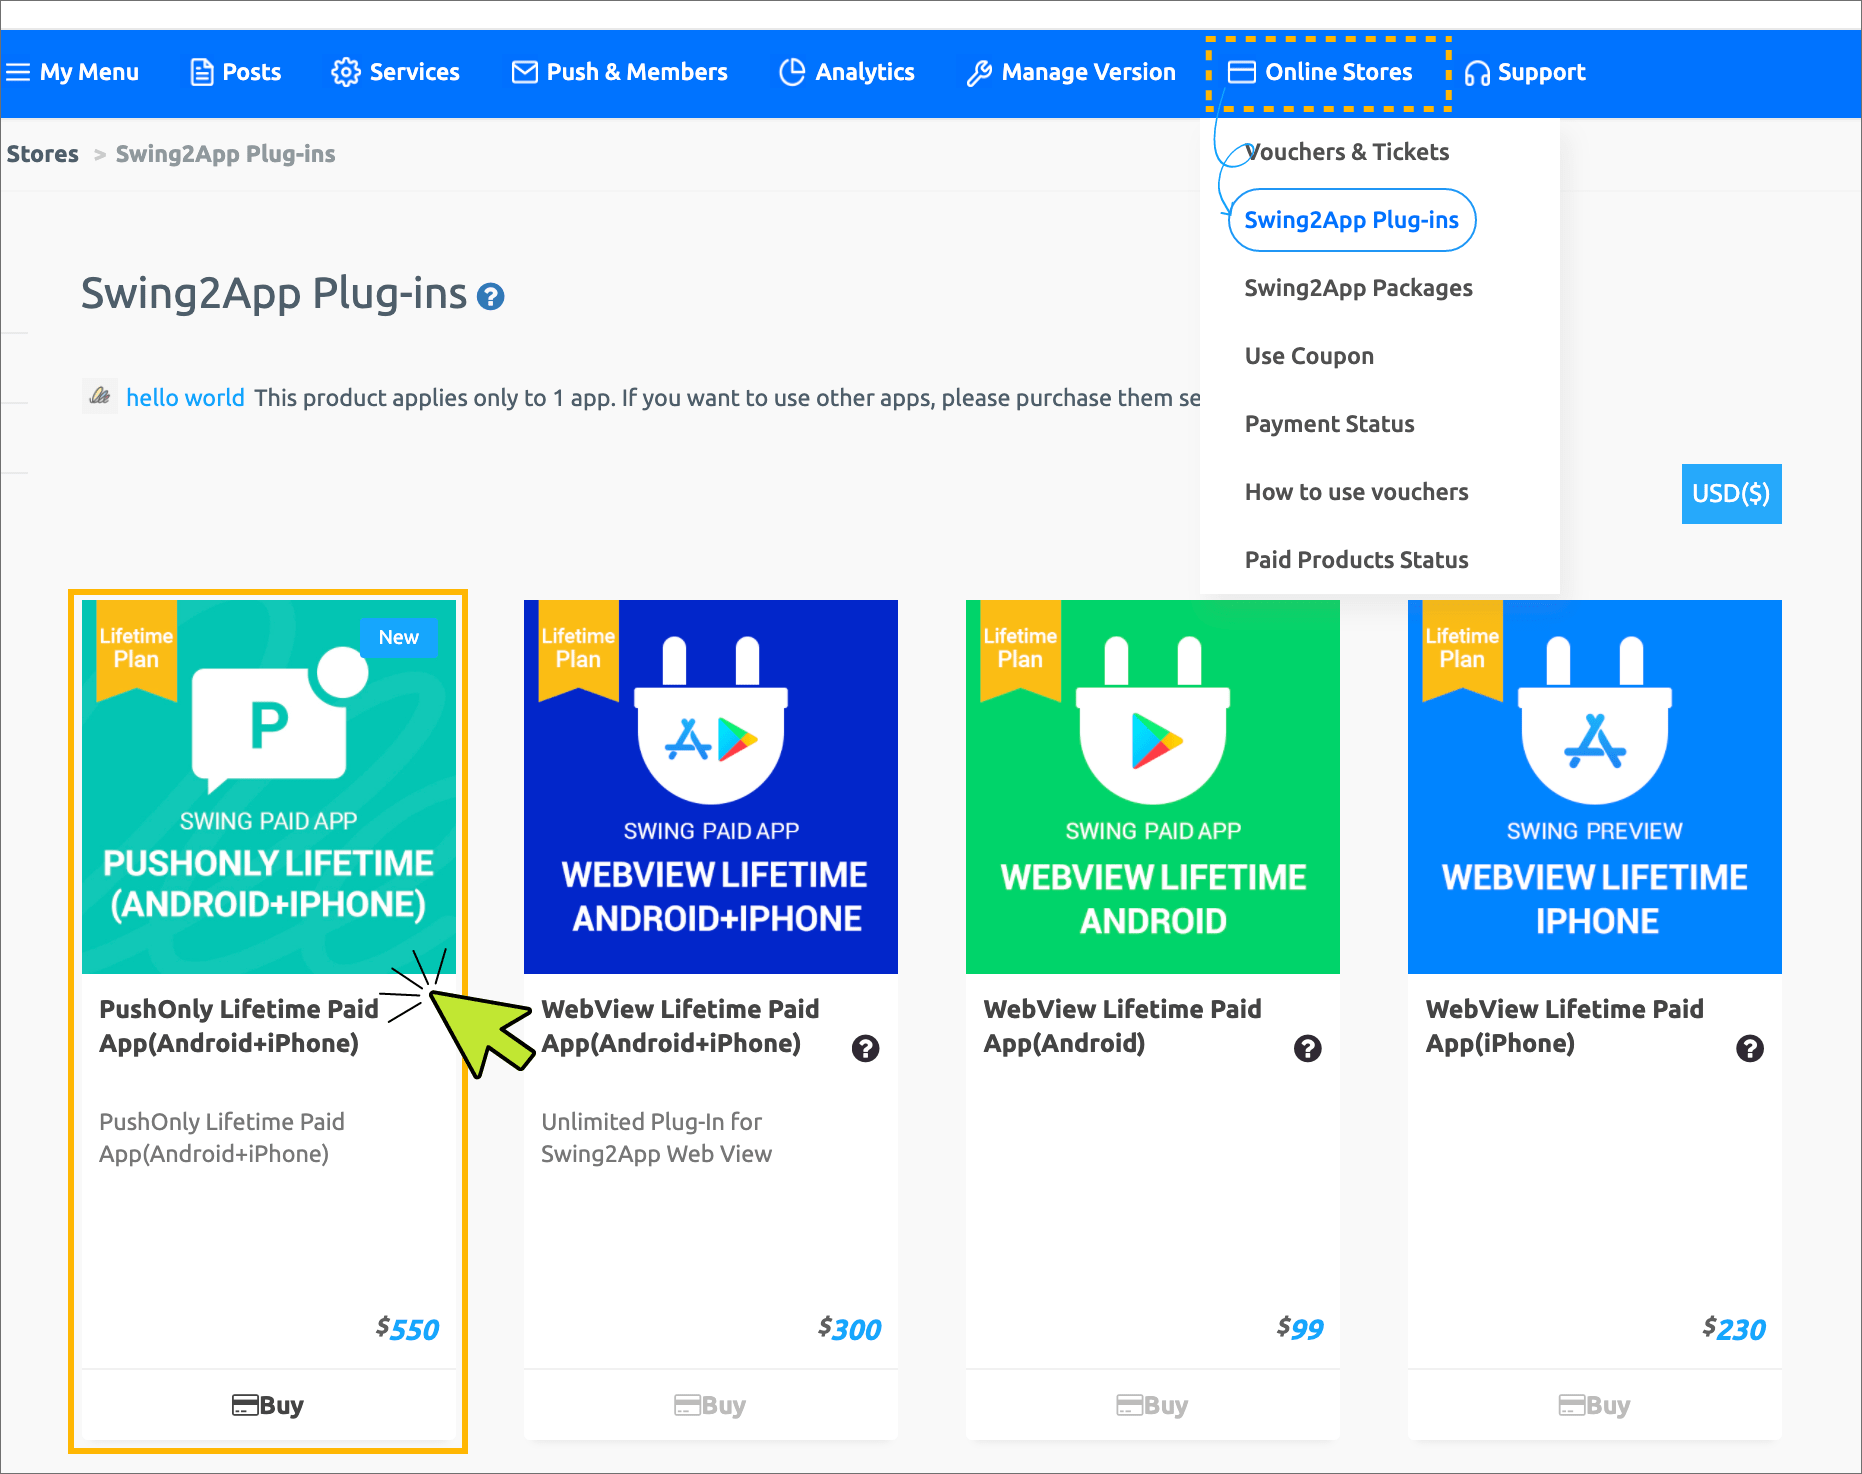
1\) After completing the app creation, go to the product purchase page for **\[Push-only Lifetime Paid App].**
On the Manager page → Online Store → Swing2App Plug-in purchase page → Select the Push-only Lifetime Paid App Android+iPhone product.
Click the \[Buy] button to go to the purchase detail page.

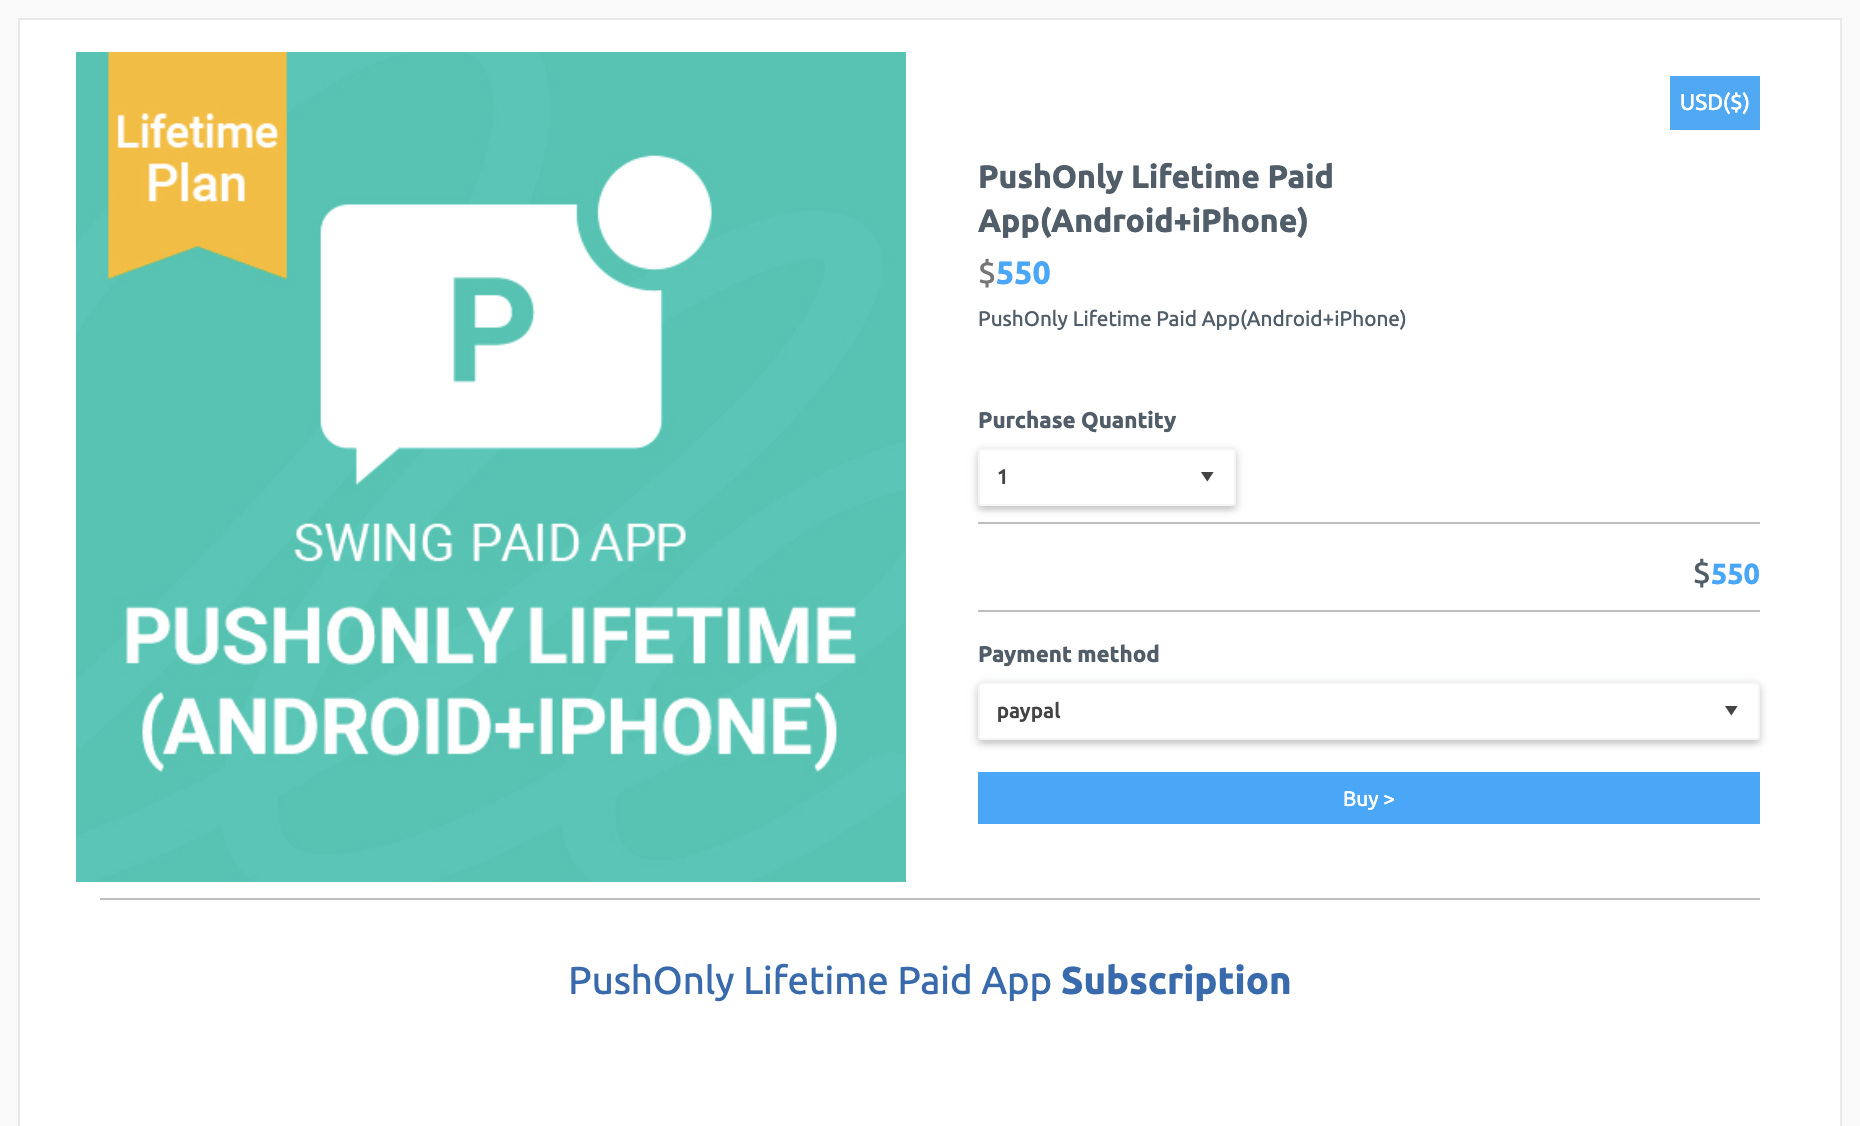
\*If you select to purchase the product, you can check the details related to the use.
2\) When the purchase is complete, the development team will re-create your app as a new version with the contents of the push-only unlimited paid app.
**Within 1 to 2 hours, the development team will process it separately and send you an email. (It doesn’t apply right away!)**
3\) After receiving the completion e-mail, you can register the new version of the app with unlimited push-only applications in the Play Store or App Store.
\*Please download the unlimited push app and test it yourself. Please feedback if you have any problems.
\*Users who have previously released the app must update to the store and re-release.
4\) Apply for store upload
Please apply for upload to the store you want to release, such as the Play Store or App Store.
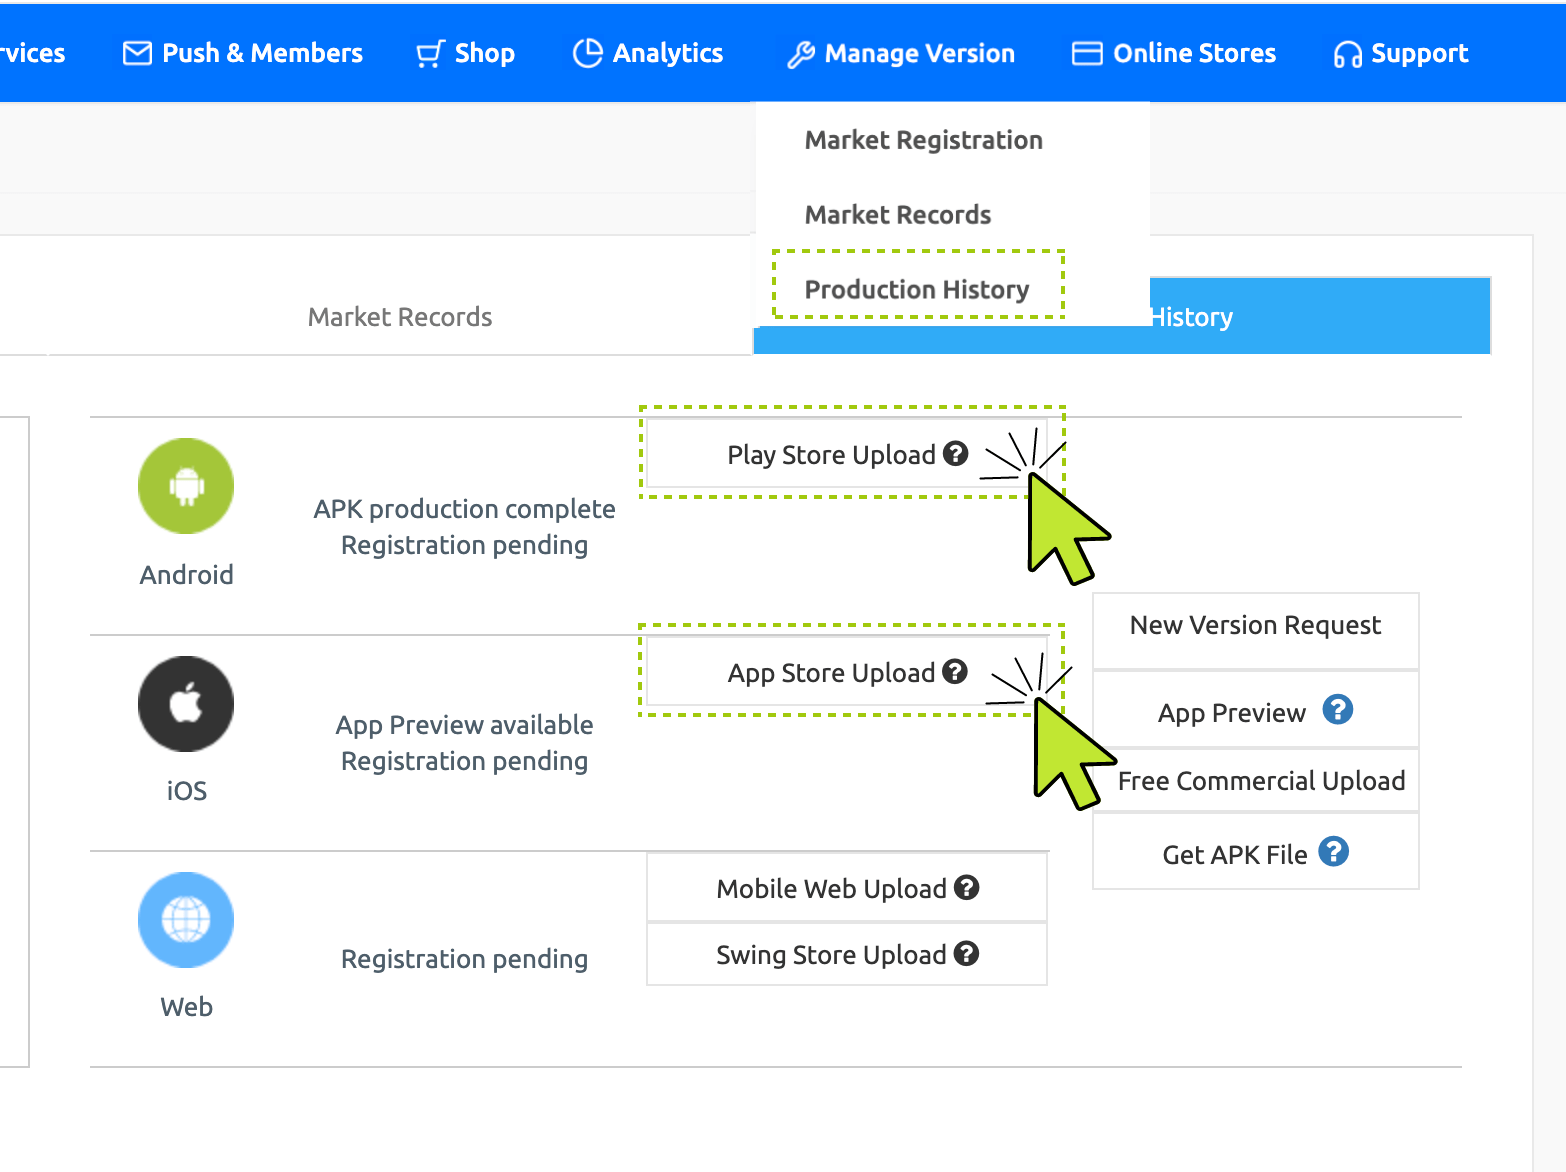
(1) Online Stores → Purchase a store upload ticket from the Vouchers & Tickets page
[**https://swing2app.com/view/shop\_list**](https://swing2app.com/view/shop_list)
(2) If you have purchased a ticket, go to the \*Manager – Manage Version – Production history [**https://swing2app.com/view/app\_work\_history**](https://swing2app.com/view/app_work_history)
Click the \[Play Store Upload] or \[App Store Upload] button to complete the application.
**\*If you can register directly on the Play Store, you do not need to purchase an upload ticket, just launch the app version directly.**
**\*The app store cannot be uploaded directly, and uploading can only be released through Swing.**
**\[Notes on store upload]**
1\) Store upload tickets are not included in push-only unlimited paid app products.
Store upload agency can apply for upload by purchasing \[Play Store upload ticket ($5), App store upload ticket ($20)].
[**\[Purchase Play Store upload tickets\]**](https://swing2app.com/view/order_info_action?product_id=4) **,** [**\[Purchase App Store upload tickets\]**](https://www.swing2app.com/view/order_info_action?product_id=3)
**2) To upload the Play Store, you must create your Google developer account (registration fee of 25$) in advance** [**\[View product details\]**](https://www.swing2app.com/view/order_info_action?product_id=4)
**3) You can create a developer account in the App Store or register as an agency with Hustay, our Swing2App company account..** [**\[View product details\]**](https://www.swing2app.com/view/order_info_action?product_id=3)
\*Please check the purchase page for details of each uploaded ticket.
### **3. Caution**
1. **When unlimited push is applied, the web link (site URL address) applied to the app home screen cannot be changed.**\
For example, If you create an app with the URL address and use it, you can continue to use it only with the site address.\
\*Even if you change the web link address, it is not reflected in the app.
2. **For push-only unlimited setting, we have re-created the app with a new version.**\
Users who have previously released the app must update to the corresponding version of the app on the store.\
The new version of the app must be uploaded to the store and updated before existing users can receive the update, and new users can also use the push-only unlimited app. (Update is required, not optional.)
3. **Push-only unlimited paid apps do not include store upload tickets.**\
If you need to update or launch the app on the store for a new one, you must apply after purchasing an upload ticket.
4. **If you want to change the app name, icon image, standby screen image, etc. while using an app with an unlimited push-only paid app??**\
Step 1 If you want to change the basic information of the app, please update it to the new version by making \[App Creation Request] to create an app.\
Apps released on the Play Store, App Store, etc. also need to be updated to the new version. (Play Store can be updated directly, App Store re-apply after purchasing upload ticket)
5. **Prototype cannot be changed during unlimited push-only use.**\
Only push apps are available, and other prototype changes such as web views are not allowed while using this product, so please consider carefully and purchase.
6. **You can change the conversion by purchasing a push-only unlimited paid app product while using the Swing Paid App Pass.**\
However, even if you purchase and use the Swing Paid App Pass, and then pay for the Push-only Unlimited Paid App, a partial refund for the remaining period is not made.\
Example) Even if only 10 days are used out of the total number of days and 20 days remain, the number of days will expire and the difference will not be refunded.\
Therefore, we recommend that you purchase and use the push-only unlimited paid app product immediately after creating the push app, and if you purchase a paid app license first, please use the date of use and purchase the unlimited product.\
If you are satisfied with the non-refundable information, you can purchase unlimited push-only paid app products even while using the voucher. (You can change it immediately while using it.)
7. **In the push-only app dashboard (Manager page dashboard), it is indicated as ‘unlimited’.**
8. **If you are updating an app made by another company by switching to a push app, please contact us before purchasing.**\
(Because the keystore is different, confirmation is required)
**What is a Push-only Unlimited Paid App?**

1. Push-only unlimited paid apps can be used **only with swing prototype-push style apps. \*Only push app available**
2. Push app is a web app style created by moving the website as it is, and can send push messages to users who have installed the app.
3. **It is an integrated application for Android + iPhone, and you can use the app with unlimited (limited period X) without paying monthly fees.**
4. **Push can be sent an unlimited number of times without any restrictions on the number of members or sending.**
5. Push-only unlimited paid app products cost $550(tax included).
6. Apps can be released on the Play Store and App Store.\
**If the cost of using the paid app that you have to pay monthly is a burden, you can use the app without any burden when you need to use the app for a long period of time.**
**Prototype: What is Push?**
Swing2App provides several styles of UI design-prototype.
‘Push’ only is a web app that is created by linking a website as it is with an app.
If you enter the website (homepage) URL without any other production function, it will be linked to the app and produced, and a push toolbar will be created at the bottom of the app.
Additionally, the push app can send push messages to users who have installed the app. \*Unlimited pushes are also sent.
* The first thing you should do is create a push version app, right? I’ll tell you how to make an app!
### **1. Creating a push version app**
**Step 1: App basic information**

After logging in to the Swing homepage \[Maker(V2)] Step 1 Basic App Information
1. Enter App ID: This is a unique app identifier and cannot be changed after setting.
2. Enter the app name
3. App icon image
4. App standby screen image registration
5. Select \[Save] button
6. Select the \[Next] button.
**\*For the app icon image and standby screen image, first create an image according to the size indicated on the screen and then register.**
Please see the production guideline manual first for the icon and standby screen before making it!
**\*Except for the app ID, the app name, icon, and standby screen image can be modified and updated without restrictions.**
The modification of basic app information is reflected only when you update to a new version by pressing the \[App Creation Request] button.
**Step 2: Design theme**

1. Prototype selection: Select’Push Only’
2\. Select whether to display the toolbar\
-Select whether to use toolbar or remove toolbar
3\. \[Save] button
4\. Select the \[Next] button.
**Step 3: Page menu**

1. Enter site address: Enter the URL address of the link you want to apply to the app.\
\*When entering a link, be sure to enter the hyperlink http\://
2\. \[Save] button
3\. \[App production request] button
4\. Select the \[Create] button to complete.

Push app production is completed within 10 minutes.
You can check the completed app by using the Swing2App official app \[App Preview] or downloading the APK file sent by email from your Android phone.
**\*Apps created by push and web view can only be checked on Android phones. (iPhone cannot be checked\~)**
\*Please check the manual below for how to install the app and download it to your Android phone.
[https://support.swing2app.com/documentation/appoperation/appinstall/](/appguide/appoperation/appinstall.md)
Since creating an app is simple, you can easily follow it by looking at the manual.
Production and operation are available for free at no extra cost, so first create an app for free, make it, and test it!
### **2. How to purchase and use push-only unlimited paid apps**
If there is no problem after checking the created app, you can purchase unlimited Android + iPhone products for Swing Push.
You must purchase this product to release it on the Play Store and App Store!

1\) After completing the app creation, go to the product purchase page for **\[Push-only Lifetime Paid App].**
On the Manager page → Online Store → Swing2App Plug-in purchase page → Select the Push-only Lifetime Paid App Android+iPhone product.
Click the \[Buy] button to go to the purchase detail page.


\*If you select to purchase the product, you can check the details related to the use.
2\) When the purchase is complete, the development team will re-create your app as a new version with the contents of the push-only unlimited paid app.
**Within 1 to 2 hours, the development team will process it separately and send you an email. (It doesn’t apply right away!)**
3\) After receiving the completion e-mail, you can register the new version of the app with unlimited push-only applications in the Play Store or App Store.
\*Please download the unlimited push app and test it yourself. Please feedback if you have any problems.
\*Users who have previously released the app must update to the store and re-release.
4\) Apply for store upload
Please apply for upload to the store you want to release, such as the Play Store or App Store.

(1) Online Stores → Purchase a store upload ticket from the Vouchers & Tickets page
[**https://swing2app.com/view/shop\_list**](https://swing2app.com/view/shop_list)
(2) If you have purchased a ticket, go to the \*Manager – Manage Version – Production history [**https://swing2app.com/view/app\_work\_history**](https://swing2app.com/view/app_work_history)
Click the \[Play Store Upload] or \[App Store Upload] button to complete the application.
**\*If you can register directly on the Play Store, you do not need to purchase an upload ticket, just launch the app version directly.**
**\*The app store cannot be uploaded directly, and uploading can only be released through Swing.**
**\[Notes on store upload]**
1\) Store upload tickets are not included in push-only unlimited paid app products.
Store upload agency can apply for upload by purchasing \[Play Store upload ticket ($5), App store upload ticket ($20)].
[**\[Purchase Play Store upload tickets\]**](https://swing2app.com/view/order_info_action?product_id=4) **,** [**\[Purchase App Store upload tickets\]**](https://www.swing2app.com/view/order_info_action?product_id=3)
**2) To upload the Play Store, you must create your Google developer account (registration fee of 25$) in advance** [**\[View product details\]**](https://www.swing2app.com/view/order_info_action?product_id=4)
**3) You can create a developer account in the App Store or register as an agency with Hustay, our Swing2App company account..** [**\[View product details\]**](https://www.swing2app.com/view/order_info_action?product_id=3)
\*Please check the purchase page for details of each uploaded ticket.
### **3. Caution**
1. **When unlimited push is applied, the web link (site URL address) applied to the app home screen cannot be changed.**\
For example, If you create an app with the URL address and use it, you can continue to use it only with the site address.\
\*Even if you change the web link address, it is not reflected in the app.
2. **For push-only unlimited setting, we have re-created the app with a new version.**\
Users who have previously released the app must update to the corresponding version of the app on the store.\
The new version of the app must be uploaded to the store and updated before existing users can receive the update, and new users can also use the push-only unlimited app. (Update is required, not optional.)
3. **Push-only unlimited paid apps do not include store upload tickets.**\
If you need to update or launch the app on the store for a new one, you must apply after purchasing an upload ticket.
4. **If you want to change the app name, icon image, standby screen image, etc. while using an app with an unlimited push-only paid app??**\
Step 1 If you want to change the basic information of the app, please update it to the new version by making \[App Creation Request] to create an app.\
Apps released on the Play Store, App Store, etc. also need to be updated to the new version. (Play Store can be updated directly, App Store re-apply after purchasing upload ticket)
5. **Prototype cannot be changed during unlimited push-only use.**\
Only push apps are available, and other prototype changes such as web views are not allowed while using this product, so please consider carefully and purchase.
6. **You can change the conversion by purchasing a push-only unlimited paid app product while using the Swing Paid App Pass.**\
However, even if you purchase and use the Swing Paid App Pass, and then pay for the Push-only Unlimited Paid App, a partial refund for the remaining period is not made.\
Example) Even if only 10 days are used out of the total number of days and 20 days remain, the number of days will expire and the difference will not be refunded.\
Therefore, we recommend that you purchase and use the push-only unlimited paid app product immediately after creating the push app, and if you purchase a paid app license first, please use the date of use and purchase the unlimited product.\
If you are satisfied with the non-refundable information, you can purchase unlimited push-only paid app products even while using the voucher. (You can change it immediately while using it.)
7. **In the push-only app dashboard (Manager page dashboard), it is indicated as ‘unlimited’.**
8. **If you are updating an app made by another company by switching to a push app, please contact us before purchasing.**\
(Because the keystore is different, confirmation is required)