> For the complete documentation index, see [llms.txt](https://documentation.swing2app.com/llms.txt). Markdown versions of documentation pages are available by appending `.md` to page URLs; this page is available as [Markdown](https://documentation.swing2app.com/manual/appmanage/board/create-bulletin-board-by-membership-level.md).
# Create bulletin board by membership level
**What is the bulletin board by grade?**\
When you use a bulletin board, you can split your membership level and use it when you want to give permission to use the bulletin board.\
For example, a school teacher should be able to see and write on all bulletin boards.\
And if you have bulletin boards in the first, second, and third grades, you can only use the third-grader without access to the third-grade board.\
In this case, it is to set the permission to use the bulletin board by giving a rating to each member.\
Therefore, dividing ratings by member and setting up bulletin boards is a frequent feature in the app.\
\
**Instruction to use**
1. Set up a group of members (create a grade to use among 1 – 9 grades).
2. Apply a grade to a member to what grade to apply to each member.
3. Once you have set up the membership grade, set the authority for each grade on the board.
**\[Summary of how to use]**
**STEP.1 Create a group**
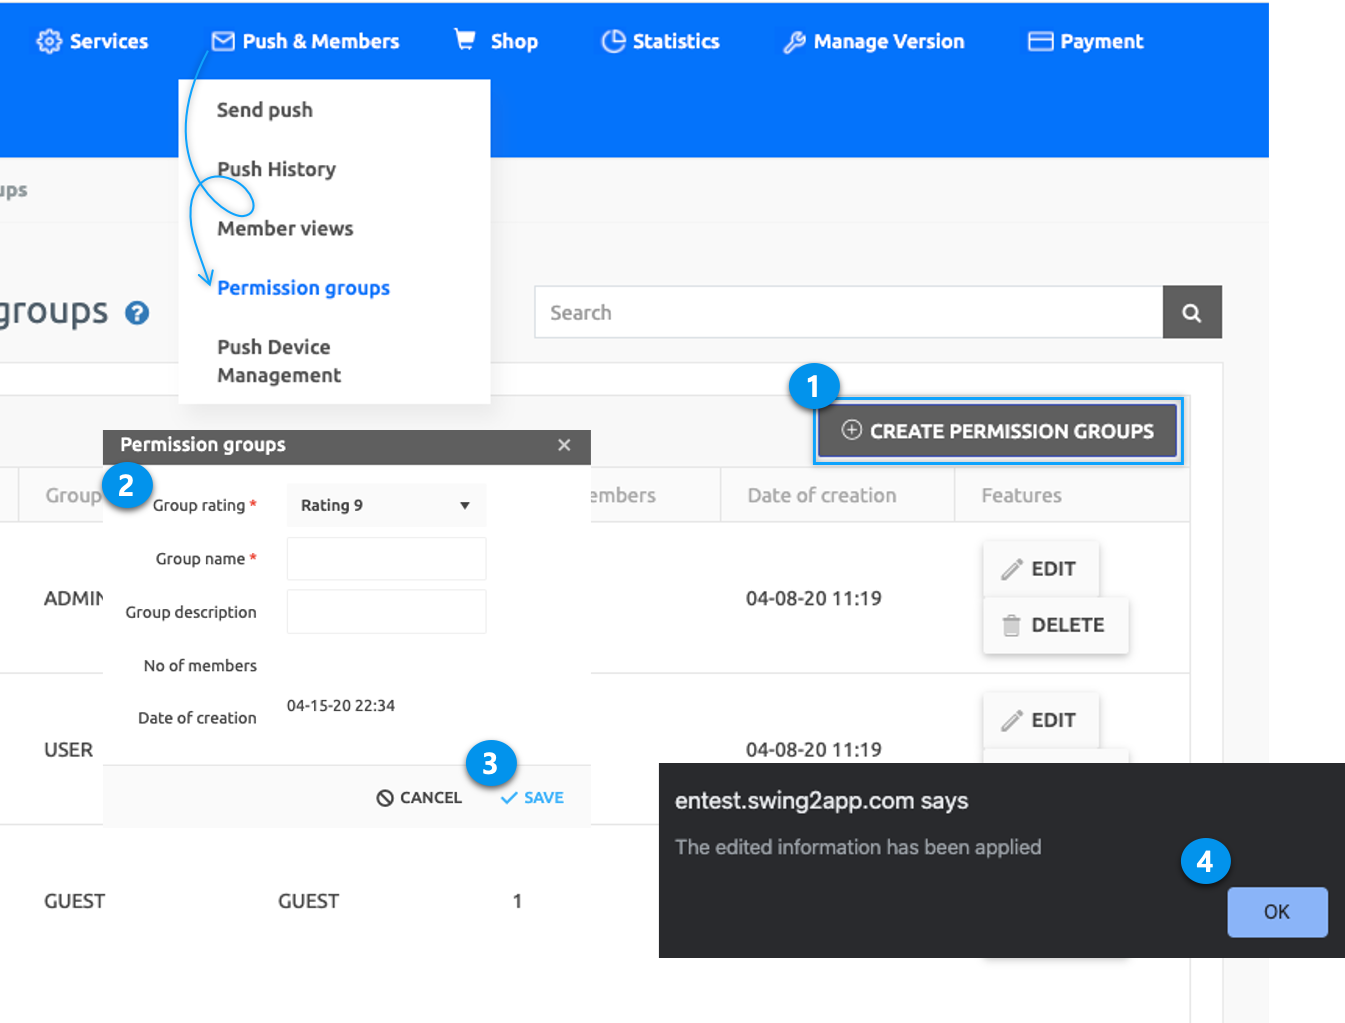
Go to the app operation page → Push\&Member → Permission Group Settings menu.
1\) If you select the \[Create permission group] button, the permission group setting window will appear.
2\)Enter the group name and
3\) group description, and then press the
4\) Save button to complete the group creation.
**STEP.2 Setting permission groups on the board**
App operation page → Service management → Board management menu
2\)Select the Create board button.
3\)Basic information settings in the board and function setting window (board name, board UI selection, etc.)
4\)Board permission setting items: writing permission, post detail view permission, list view permission setting
**STEP.3 Apply Groups to Users**
Go to the app operation page → Push\&Member → Member Inquiry menu.
1\)Select the user (member) to change the group, and the member information window will open.
2\)Select the group you want to change from the Current Group Information box.
3\)Click the \[Save Group Change] button to complete the change.
### **STEP.1 Create a member group**

1. Go to **Manager.**
2. Select **Push & Members.**
3. Click on **Permission groups.**
4. Click on **Create Permission Groups.**
You can create your membership level from 1-9.\
You can manage a total of 11 by operating grade (administrator) and guests (members who do not sign up after installing the app).
For example, let’s assume that there are students in the first, second, and third grades.\
Let’s add a member group with 8, 7, and 6 levels
1. Group Grade – The administrator, can set up to 1 – 9 grade. (Guests cannot be set up as users who are not logged in)
2. Group Name – Enter the group name.
3. Group Description – The additional description of the group.
4. Number of members – After registering a group, you can see how many members belong to the group.
5. Creation Date – Displays the group creation date.\
\
\&#xNAN;**\* Operation grade, general membership (members registered, the same as 9 grade), guest ratings can not be deleted by default.**\\
### **STEP.2 Apply Member Levels**
**If you’ve created a member group, why don’t you set up group permissions for each member who signed up for the app?**
1. Click on **Create Permission Group.**
2. Enter the details in **Permission Group** like Group rating, group name, and description.
3. Click the **Save.**
4. Click **OK.**
**Move to push & member → member inquiry page of the app operation page.**
1. Go to **Push & Members** and click on **Member inquiries.**
2. You can select multiple members.
3. Click on **Send Group.**
4. Select the group you want to move to.
5. Check the level to replace with the selected member.
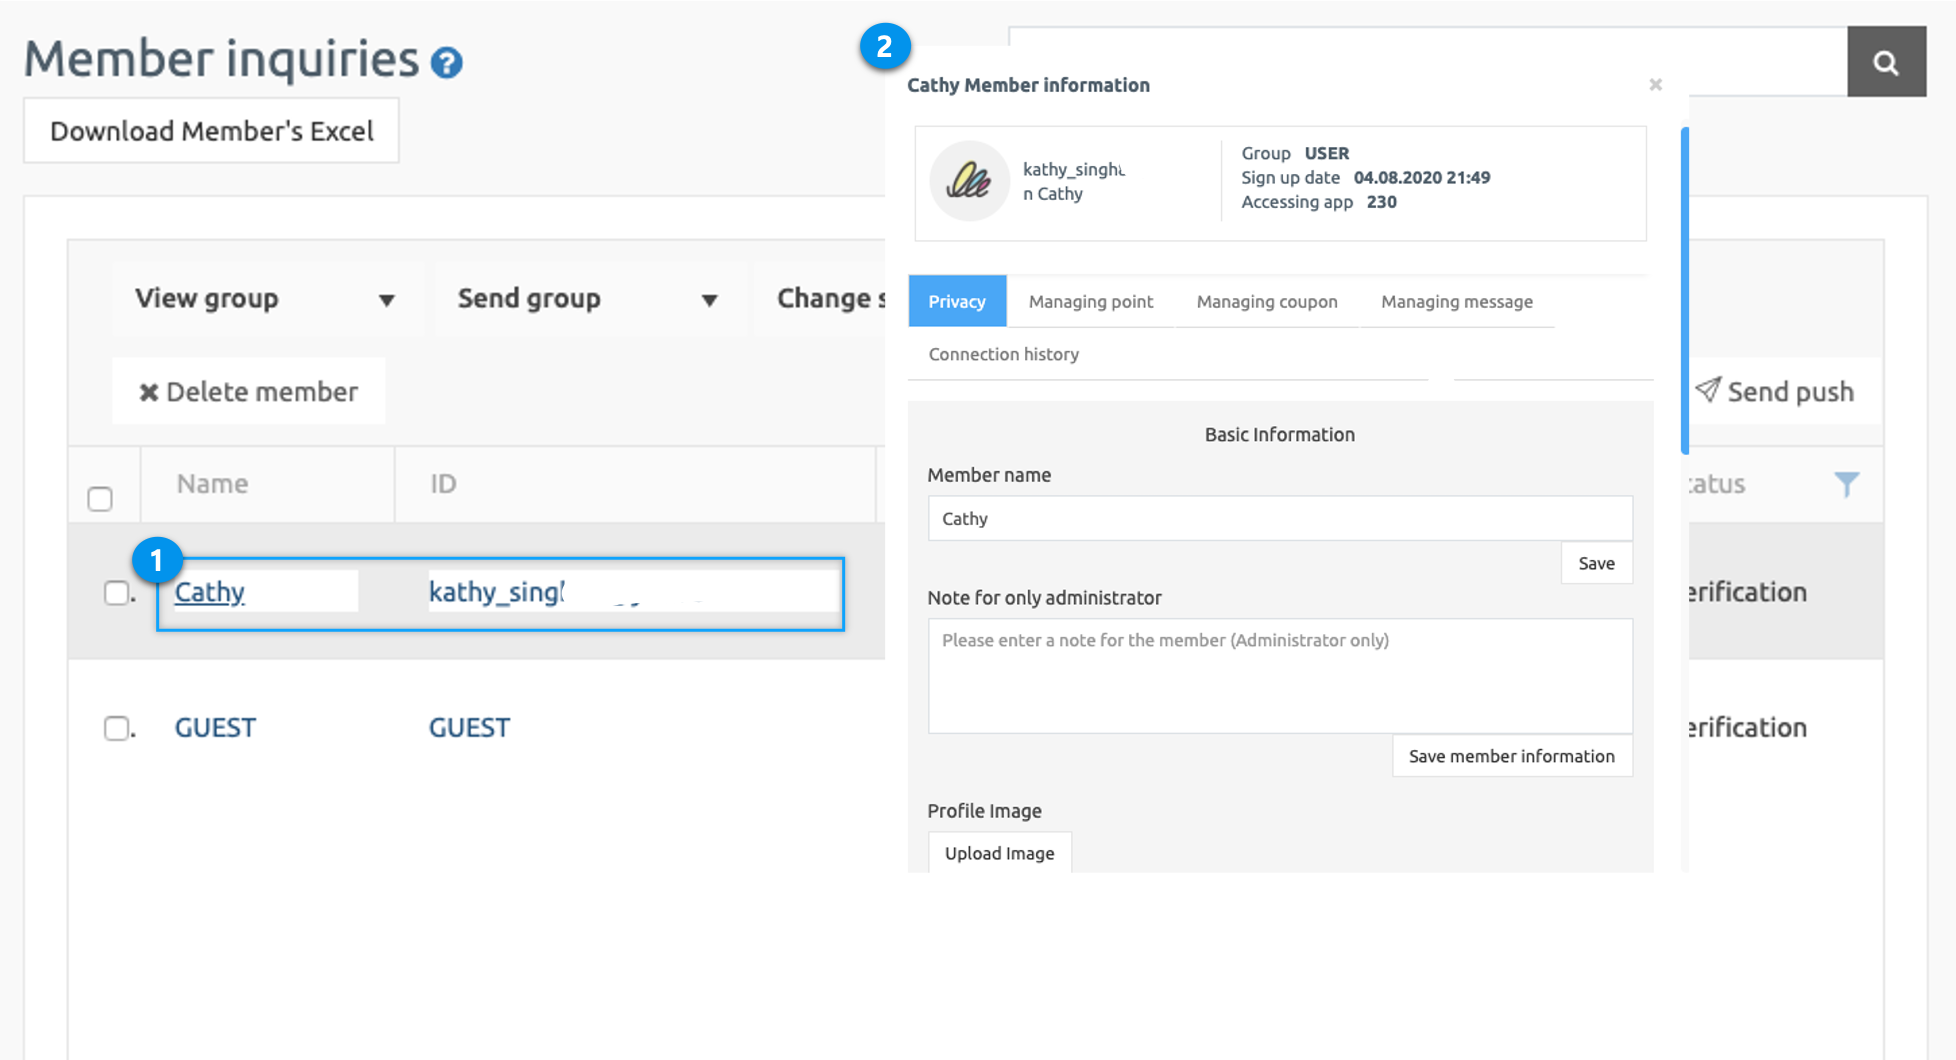
If the member’s name alone cannot determine the level
1. Click on the member’s name or ID to move to member information.
2. Confirm the membership details of the Privacy tab, and then
3. Change the current group of information group to the desired group, and
4. Click the \[Change Group] button.\
We will change to 2nd grade because it is the second year of the student’s registration.
5. View Member Information – Click on the member name and member ID to go to the member information screen.
6. Member Details – Displays the information entered during membership registration.\
You can find out how to set up the membership form according to the app in the help book >[**\[Setting up a registration form\].**](/manual/appmanage/service/membership-form.md)
7. Current Group Information – Groups are changed individually without changing the groups in a list.
### **STEP.3 Set Board Level Permissions**
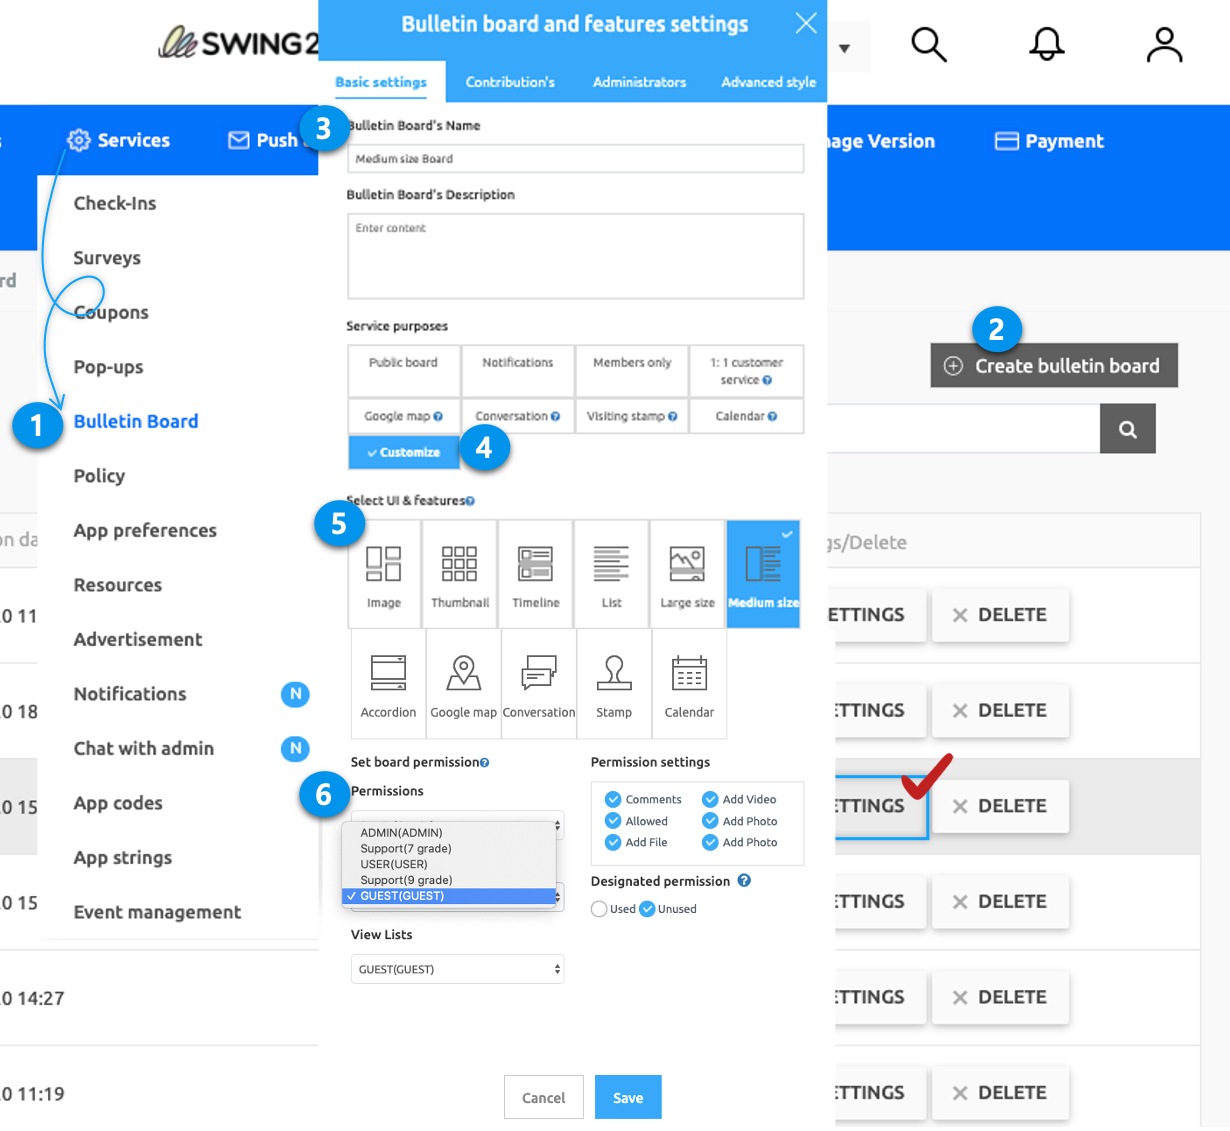
Go to **Manager.** Select **Services.**
1. Click on **Bulletin Board** from the list.
2. If you need to create a new board on the board management page, click on **Create Bulletin Board** button. If a bulletin board is created, click the **Settings** button on the bulletin board
3. Enter the board name
4. Select **Customize** from **Service Purpose.**
5. **Select the UI & Feature** for the board.
6. Select **Set Board Permission.** After setting permission to write, detail view, and list view rights in detail setting (all set in 2nd grade-7 grade), select Used Designated permission.
7. Click the **Save** button.
\*Closing Privilege Setting – If you set all privileges as corresponding privileges, only the upper group that includes them can use the menu.\
\*Partial permission setting – You can specify only the writing permission as the corresponding permission, and by setting the detail view and list view permission as the lower permission, more members can view but restrict the writing.
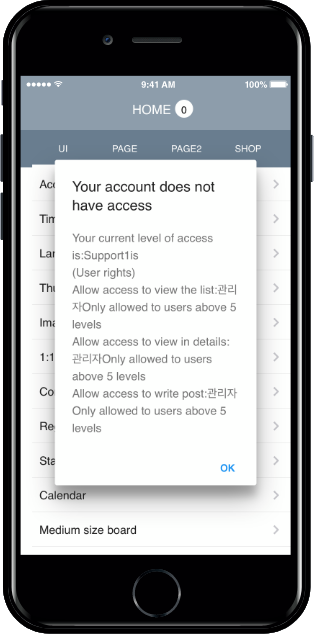
### **STEP.4 App Launch Screen**
When a member accesses a second-year bulletin board, you can see that the first-grader cannot access the board as follows.