> For the complete documentation index, see [llms.txt](https://documentation.swing2app.com/llms.txt). Markdown versions of documentation pages are available by appending `.md` to page URLs; this page is available as [Markdown](https://documentation.swing2app.com/manual/maual/pagemenu/image-page.md).
# How to create an Image Page
**We will tell you how to use the \[Image map] among the functions provided by the user page.**
**▶What is an image page?**
Image pages are custom editor tools that you create yourself.
You can edit an image to apply a link to it and a tooltip.
You can apply various links to images, which can be useful when creating an app.
**▶Utilization TIP**
1. When multiple web links need to be applied to one image ex) Applicable to multiple links instead of one, such as homepage and blog.
2. When applying multiple bulletin board links to one image ex) Bulletin board links such as notice boards and free bulletin boards can be applied.
3. If you want to put a more detailed description of the image, you can apply the tooltip so that the message appears.
4. Can work on a banner – Create an image in banner style and specify the area to apply the link.
**▶ If you want to put a full image on the home screen when creating an image page.**
When creating an image page, if you want to put a full image on the home screen, please work with the mobile screen resolution standard of 1080px horizontally and 1920-2200px vertically.
The vertical length may be slightly shorter depending on the design of the prototype and the mobile phone model.\
If the height is long, you can scroll down the page.
If you can scroll like this, you can just keep the horizontal and the vertical size.

 **Image page apply Step**

 **Image page application screen**

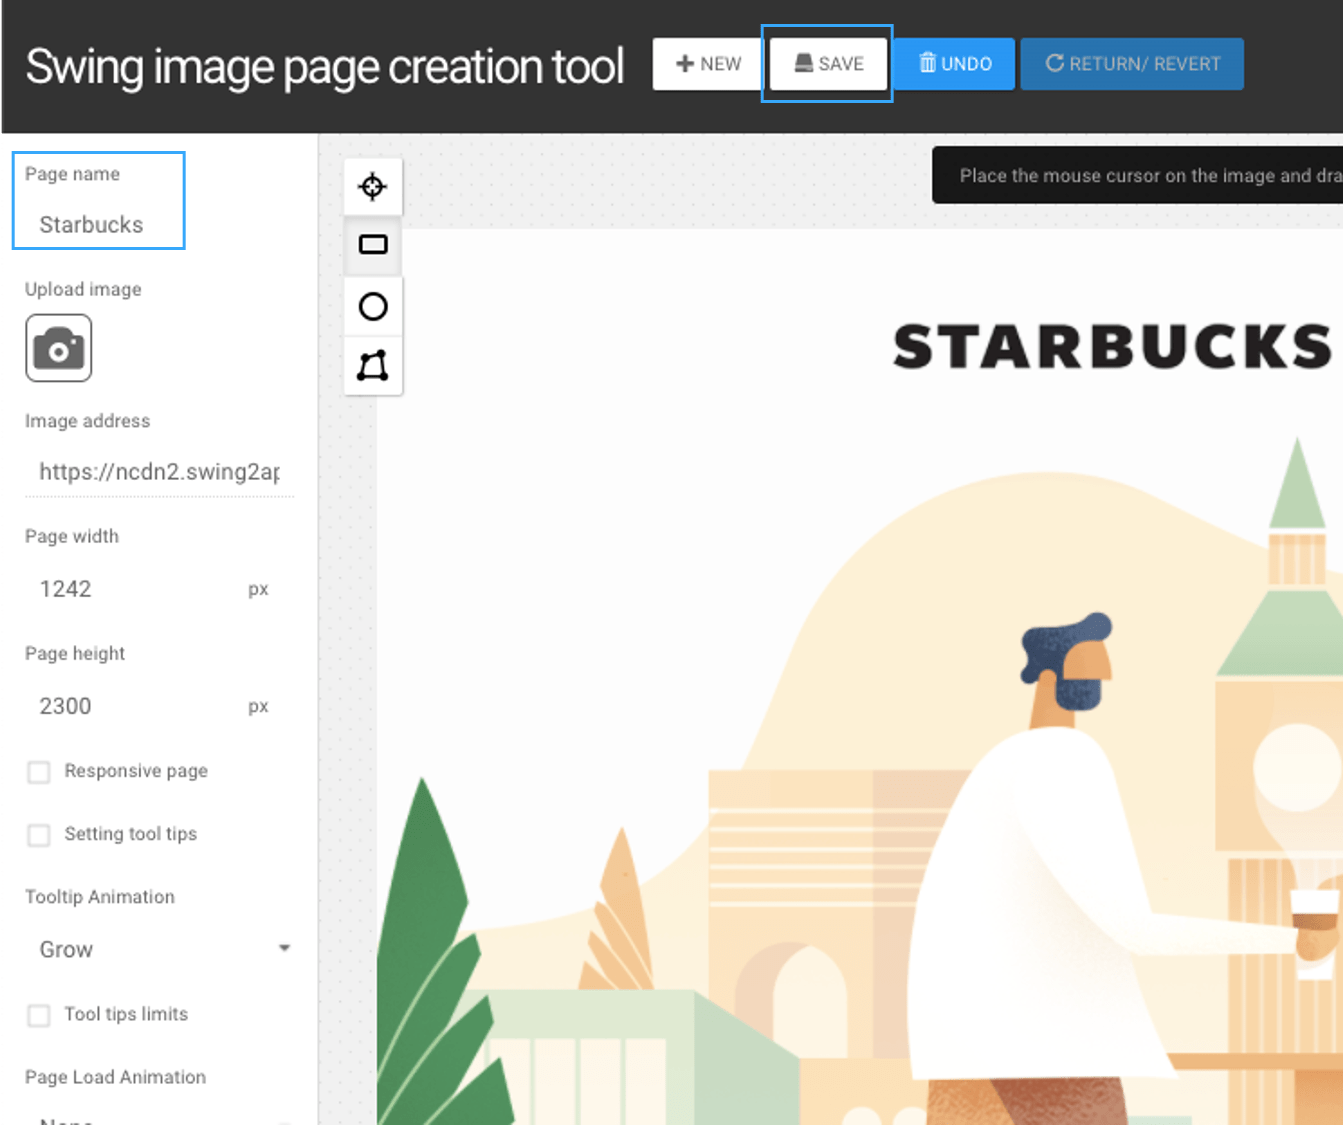
### **STEP 1. Add an image page**
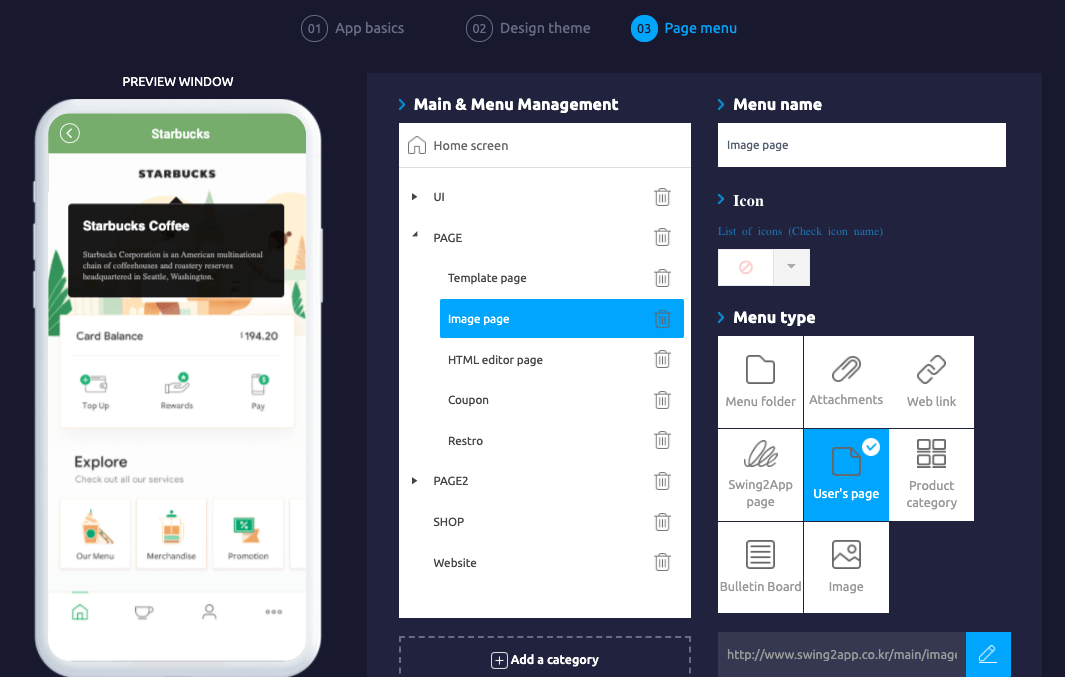
**\* Image page operation can be added to the image page on the app page (Page Menu).**
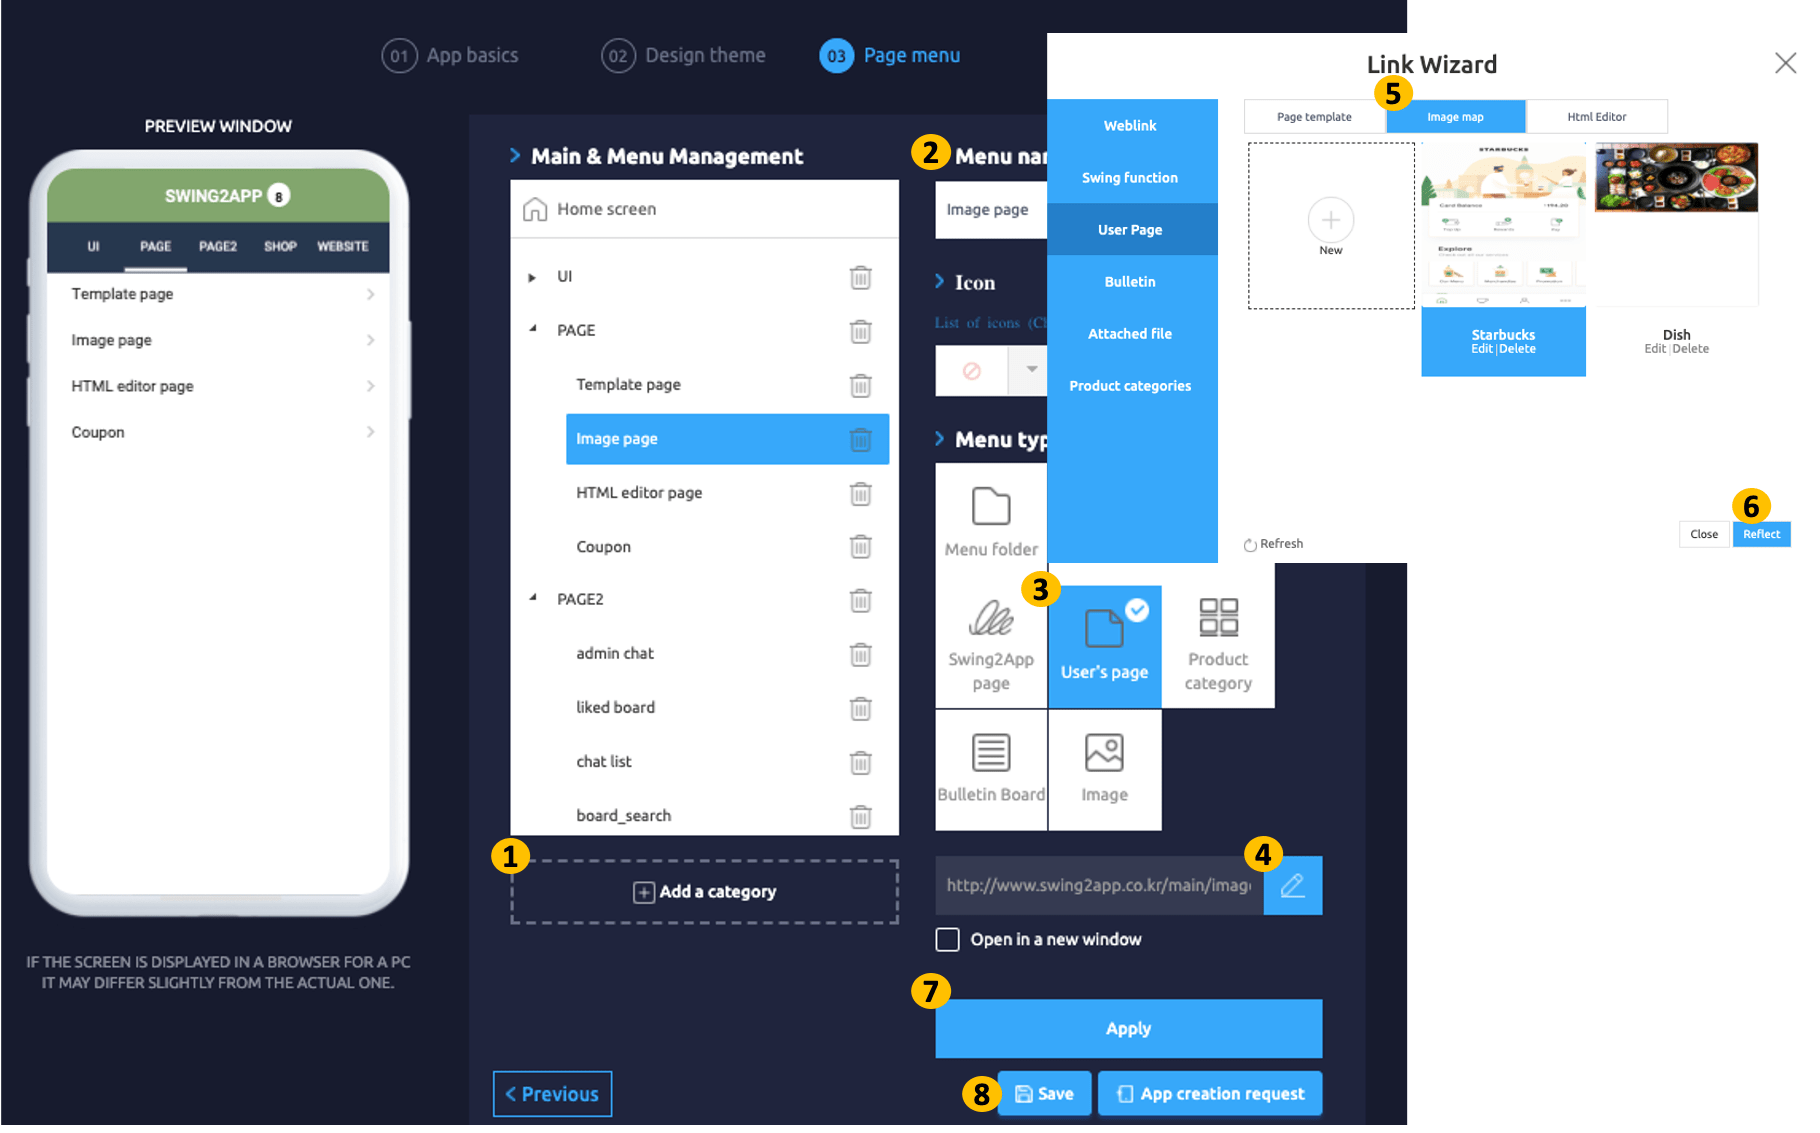
Go to **Maker(V2)** and click **Page Menu.**
1. Click **Add a category**.
2. You can change the menu name at the top of the home screen (unless you change the name, it will be displayed as the app name.)
3. Select the **User’s Page** menu in the **menu type.**
4. Click the **Link Wizard.**
5. When the Link wizard window appears, select the **Image Map** and click **New.**
6. Click on **Reflect.**
7. Press the **Apply** button.
8. Click on **Save.**
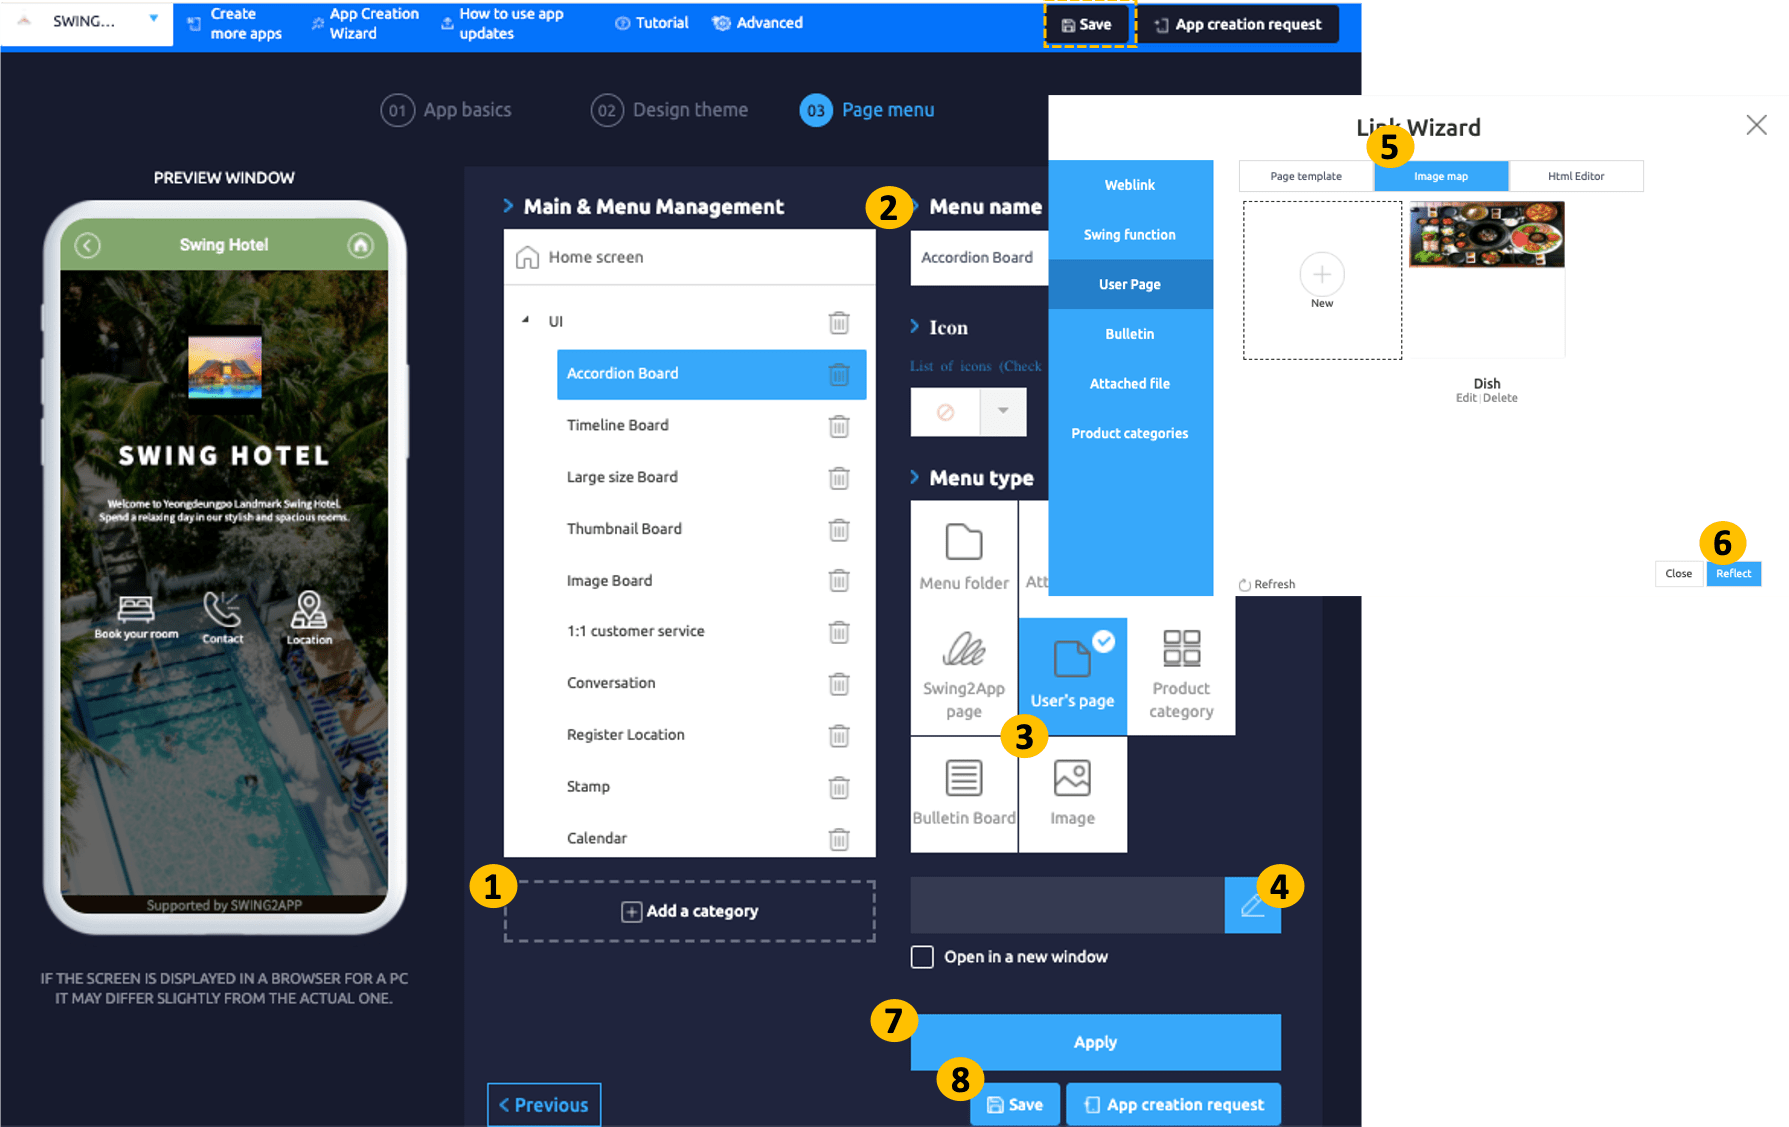
Since you need to create an image page first, just select the image page.
When you’re done creating your image page, we’ll show you how to apply it to your app again.
### **STEP 2. Creating an image page**
This will open a site where you can create an image page.
**1.Register an image**
Please register the image first.
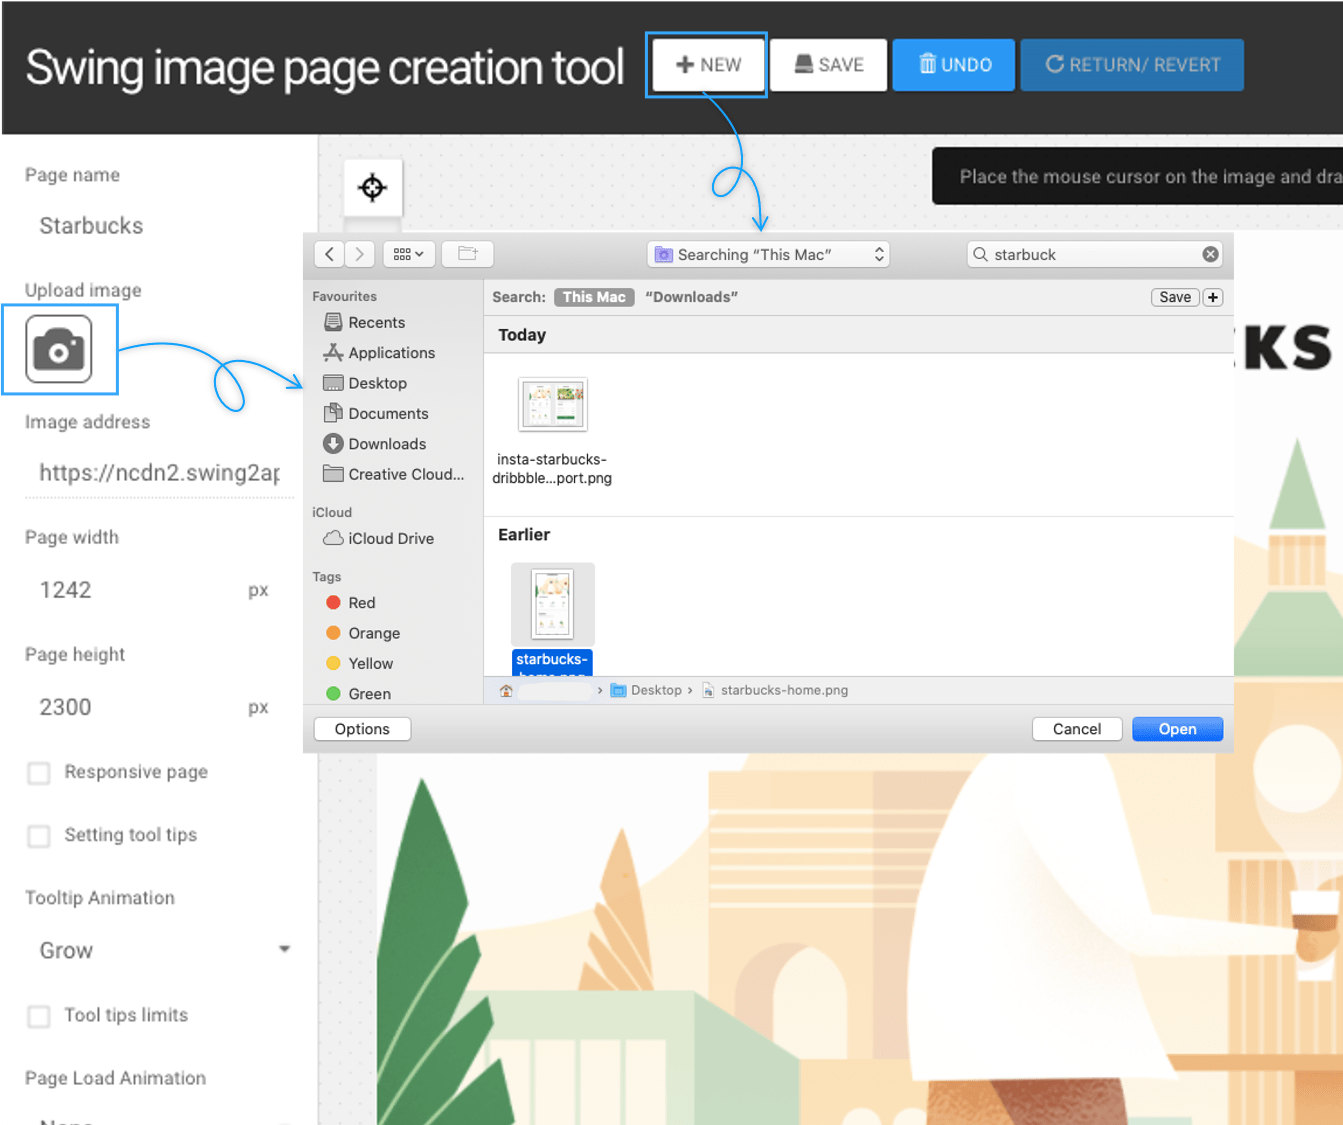
Select **the image you want to register** by selecting the **\[Upload Image]** button or **\[New]** button.
\*The image page is a function that puts a banner such as a link on the designed image, so you need to upload it as a completed image.
> If you are working for the first time, it is a good idea to select the New button.
>
> If you need to reload an edited image in addition to your previous work, we recommend using the Upload Image button.
**2. Create image pages**
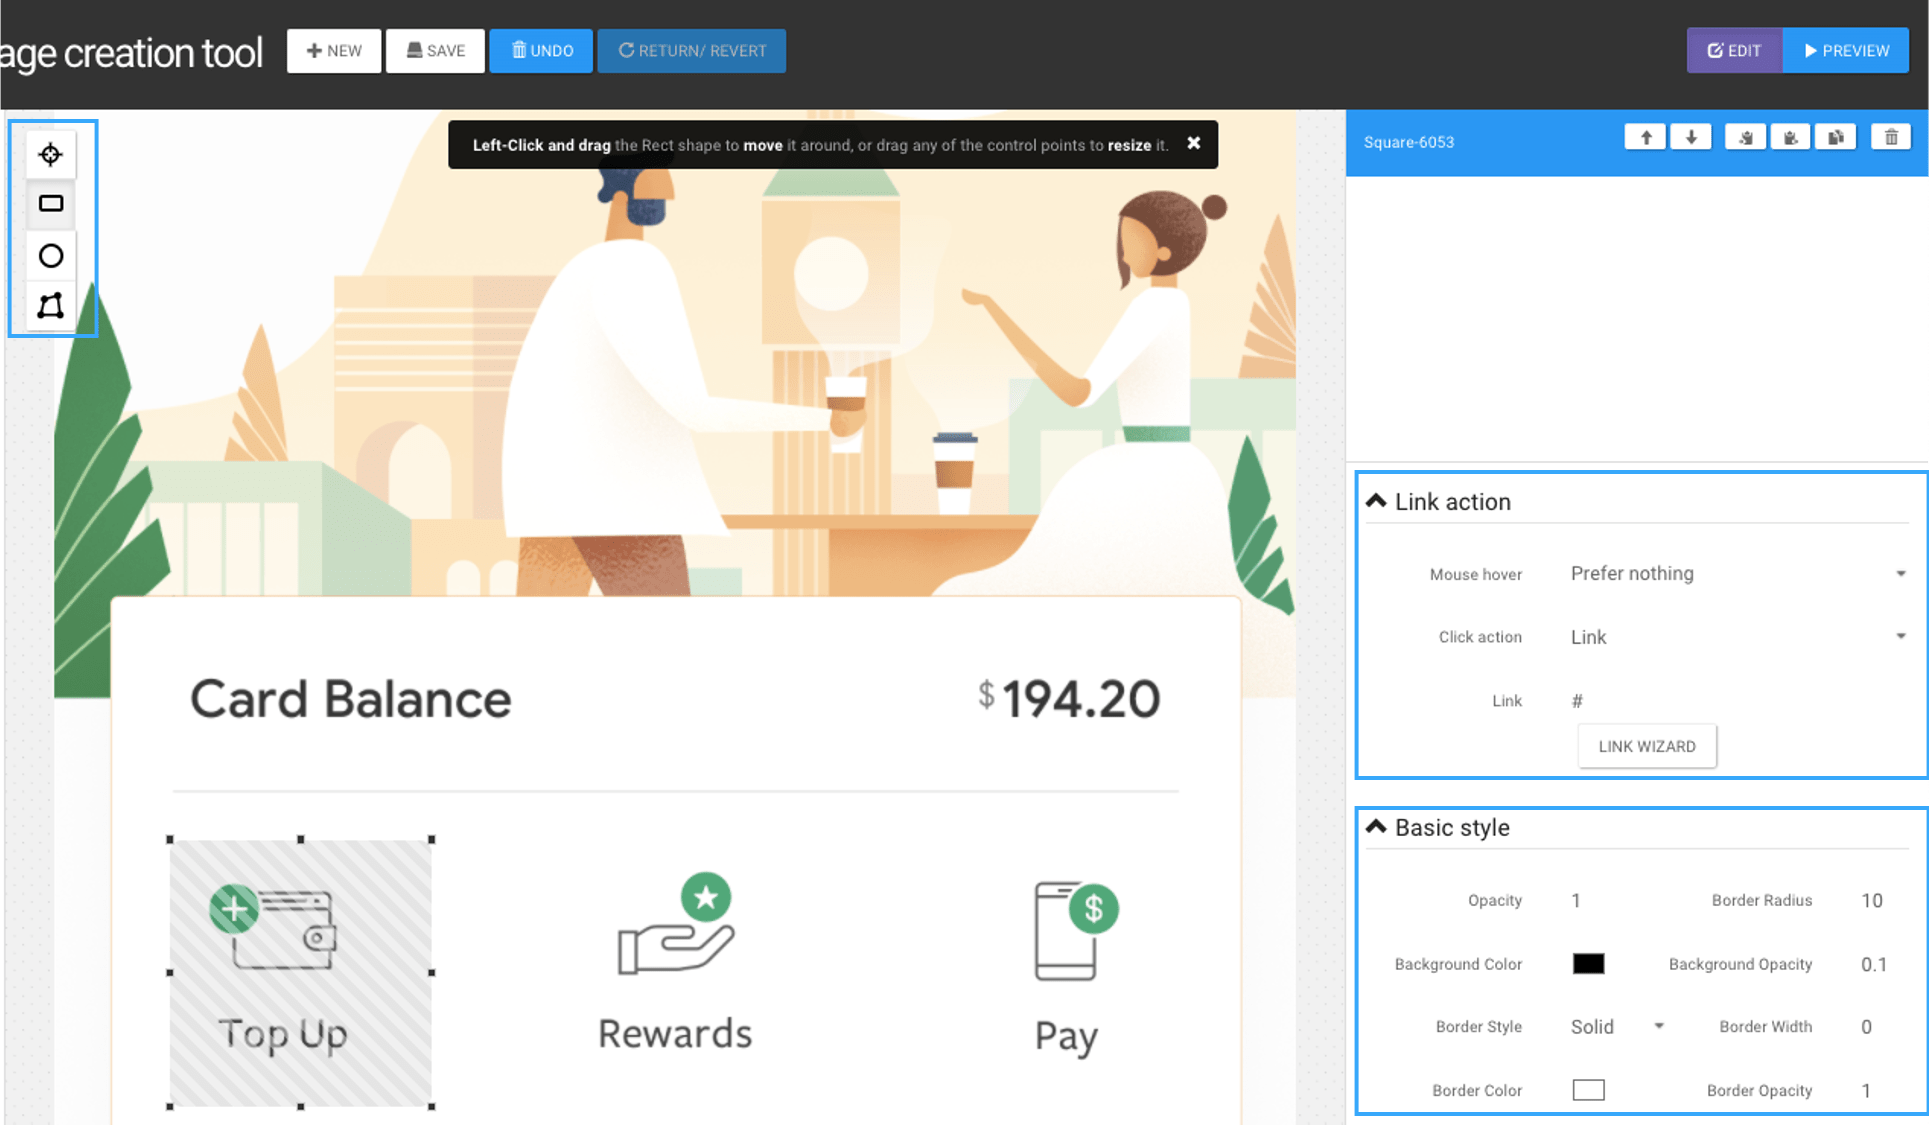
Image page operations
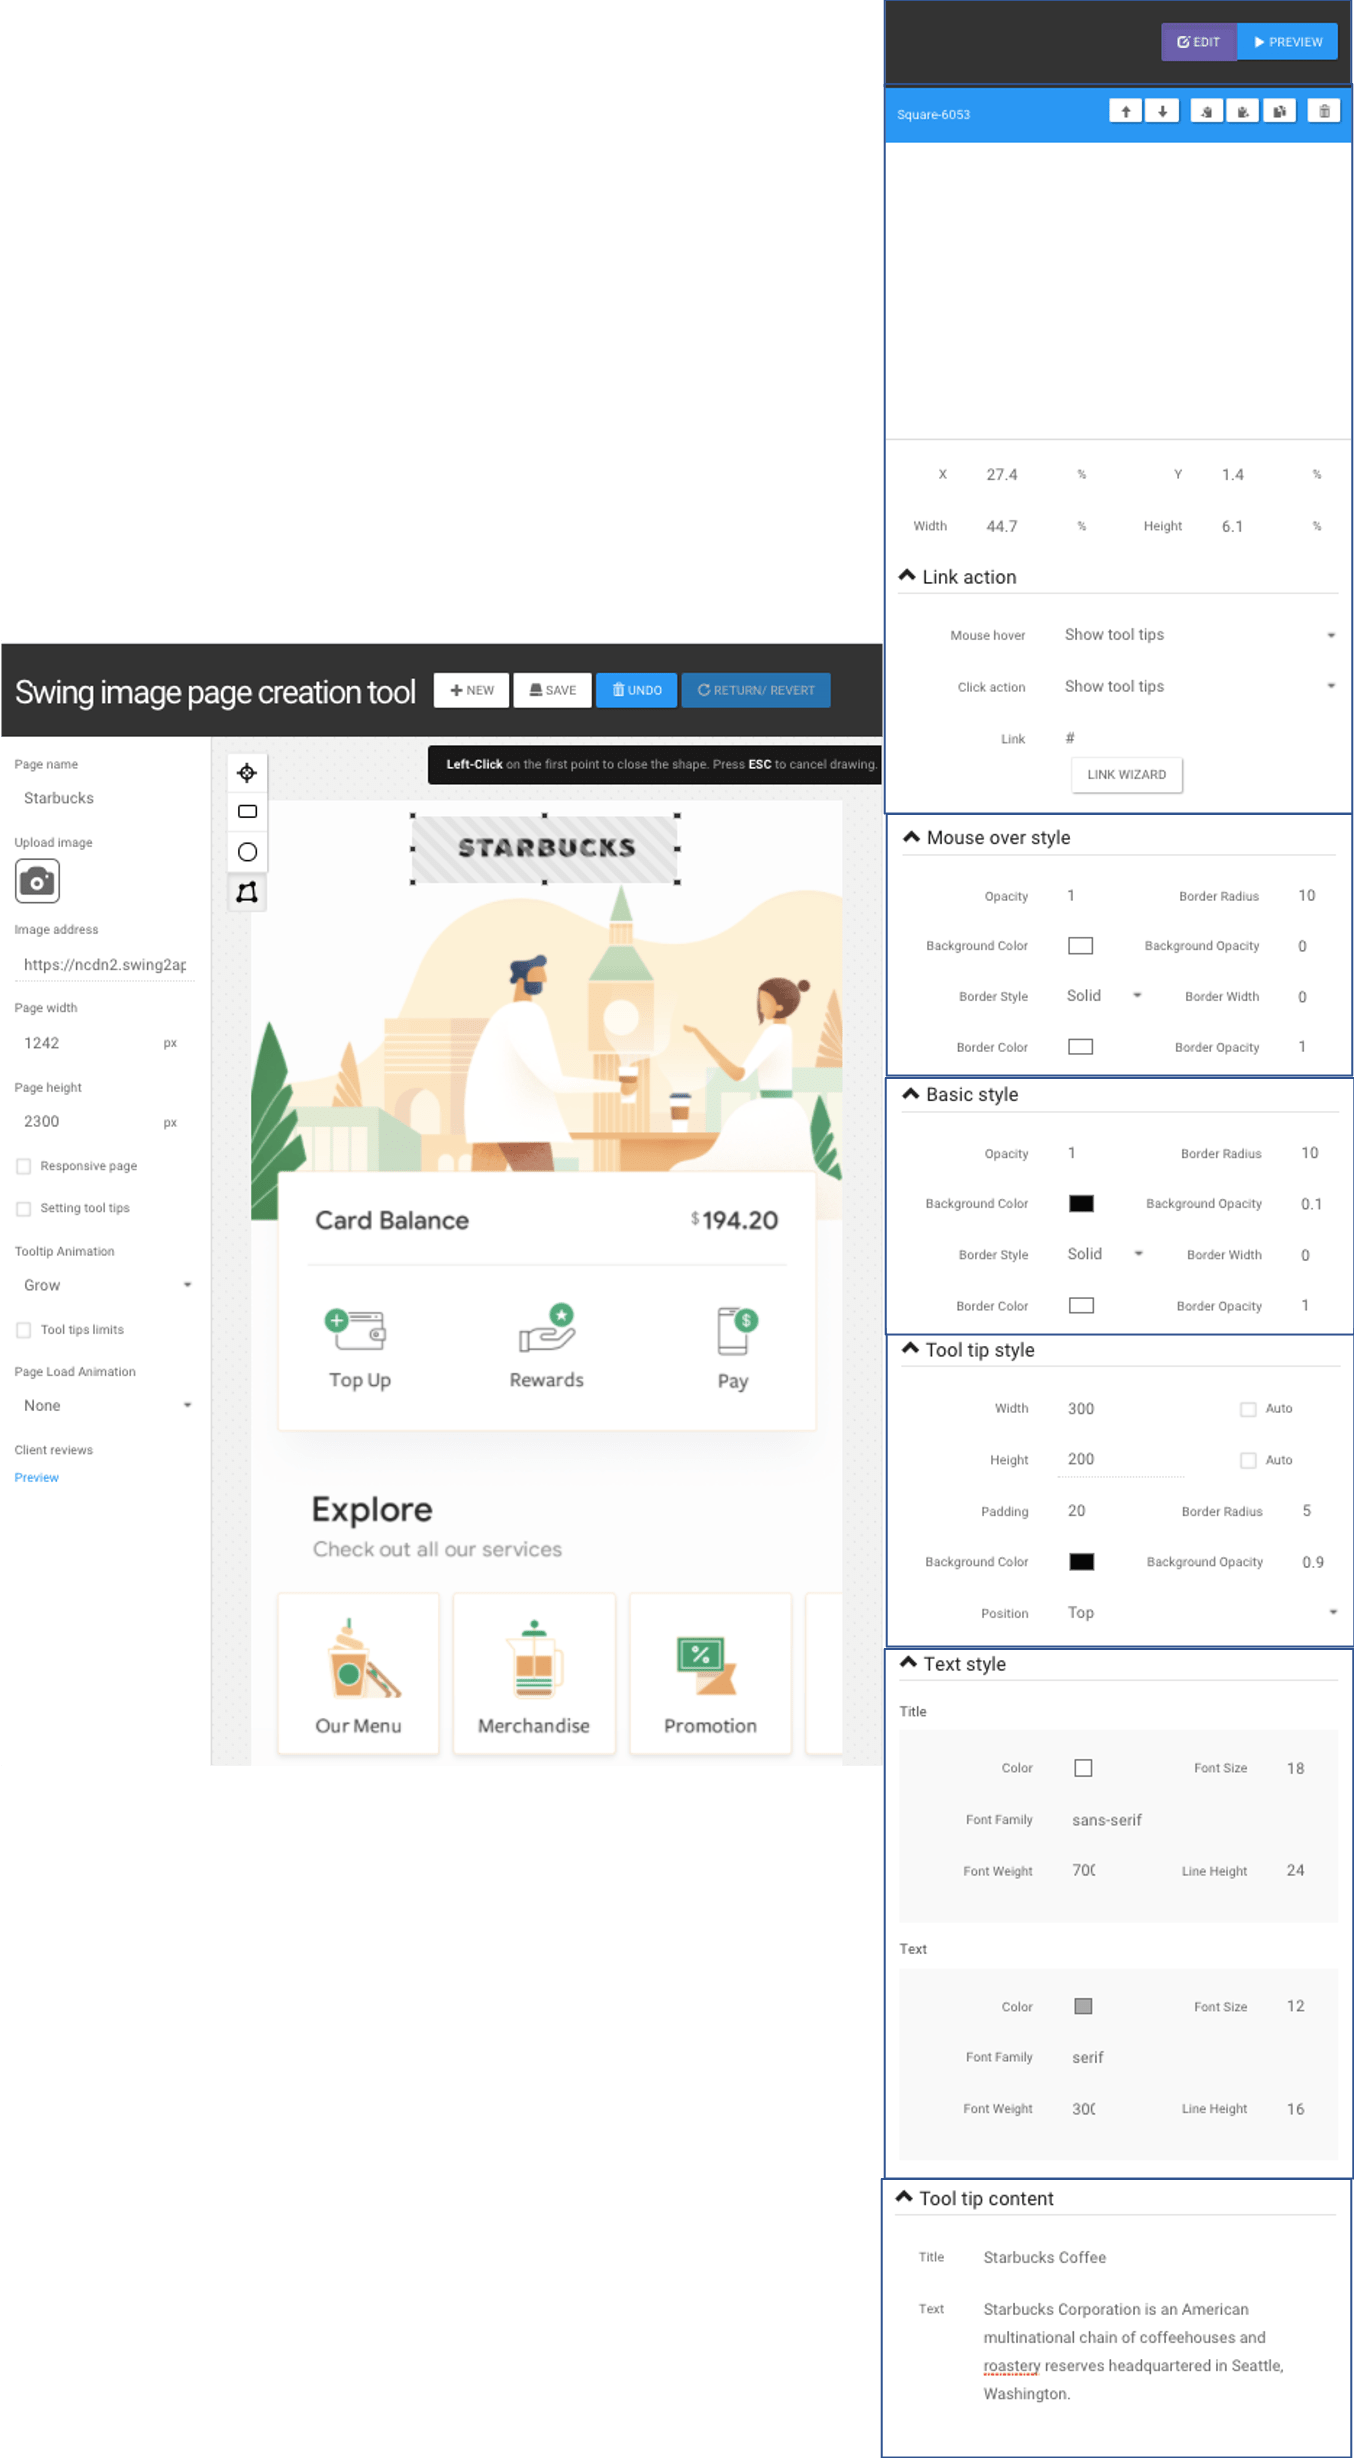
**Just check the “Shape Tool” to set the banner area on the image, the “Link action” to link to the area, and the “Default style” to set the area style.**
> **★Basic style**
>
> -Background Color : You can color the area set by the tool.
>
> -Background Opacity : You can specify the transparency of the area set by the tool.
>
> If you don’t want the tool to be visible when you select the mouse, you can set the transparency to ‘0’.
**3. Shape Tools – Check the Style**
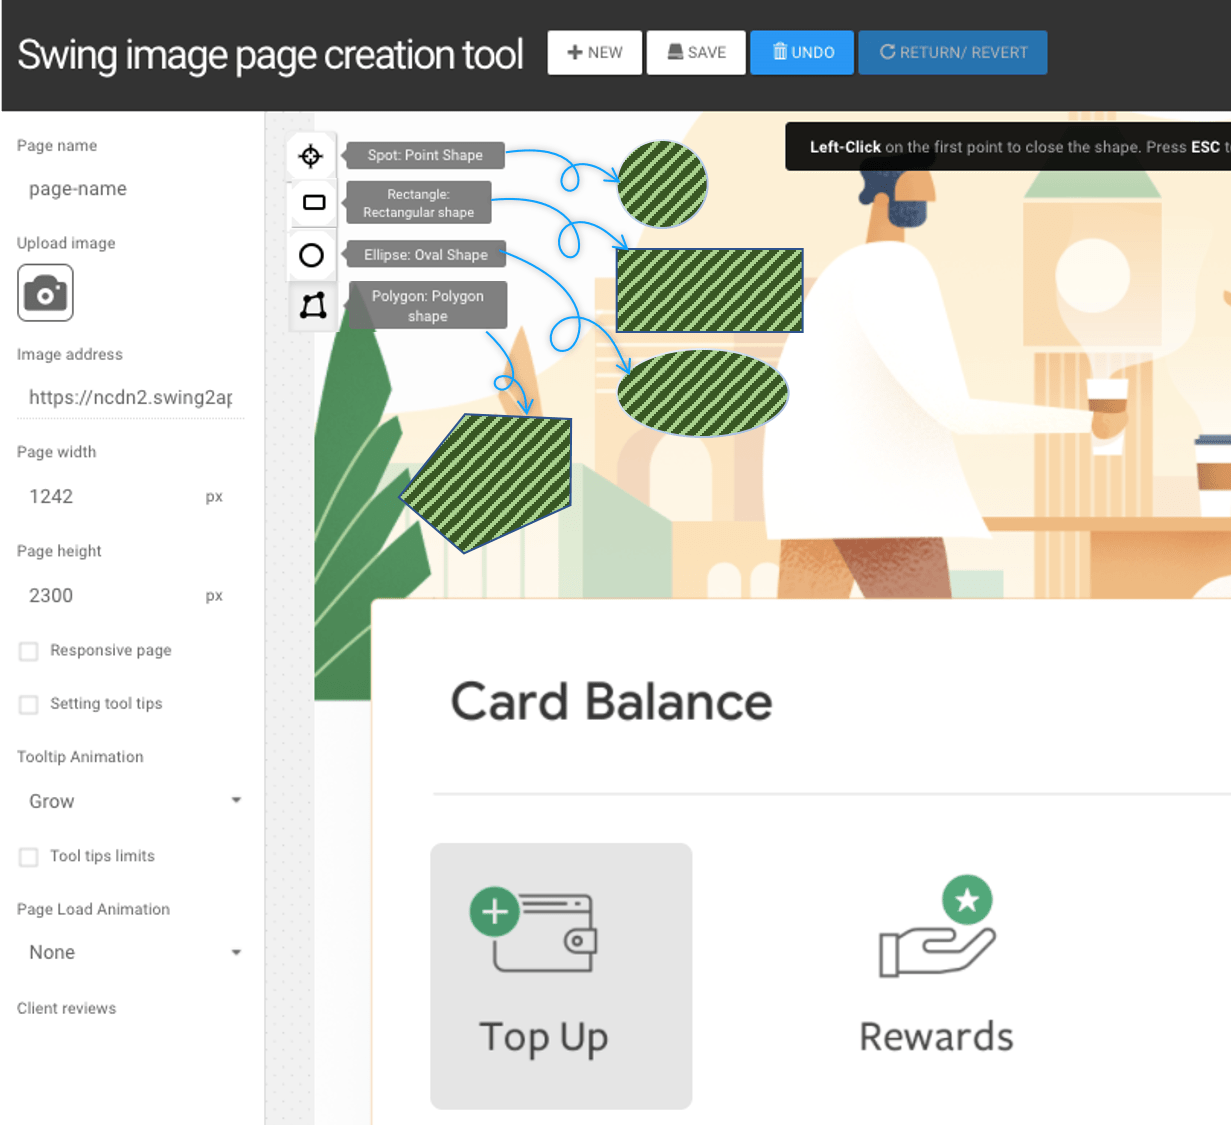
**Tool shapes are available in points, rectangles, ovals, and polygons.**
-When using a dot shape, click the mouse cursor on the image to create a dot.
-When using a square or oval shape, place the mouse cursor on the image and drag from the left to create an area.
-In the case of polygons, a point is drawn in several areas, and the point is again made to the point where the first point is taken to create a polygon area.
**4. Apply the link**
Once the zones are set up, let’s view how to apply links to them.
**To apply a link, select \[Link Action] on the right.**
1\) Mouse hover: A menu that applies how it works when hovering.
Select \[Do Nothing] because you will only apply the link \[View: Do nothing, show tool tip].
2\) Click Action: This menu is used to apply how to operate when the mouse is clicked.
\[View: Do nothing, show tooltips, move links] Select \[Move links] because you’ll need to go to the link when you select.
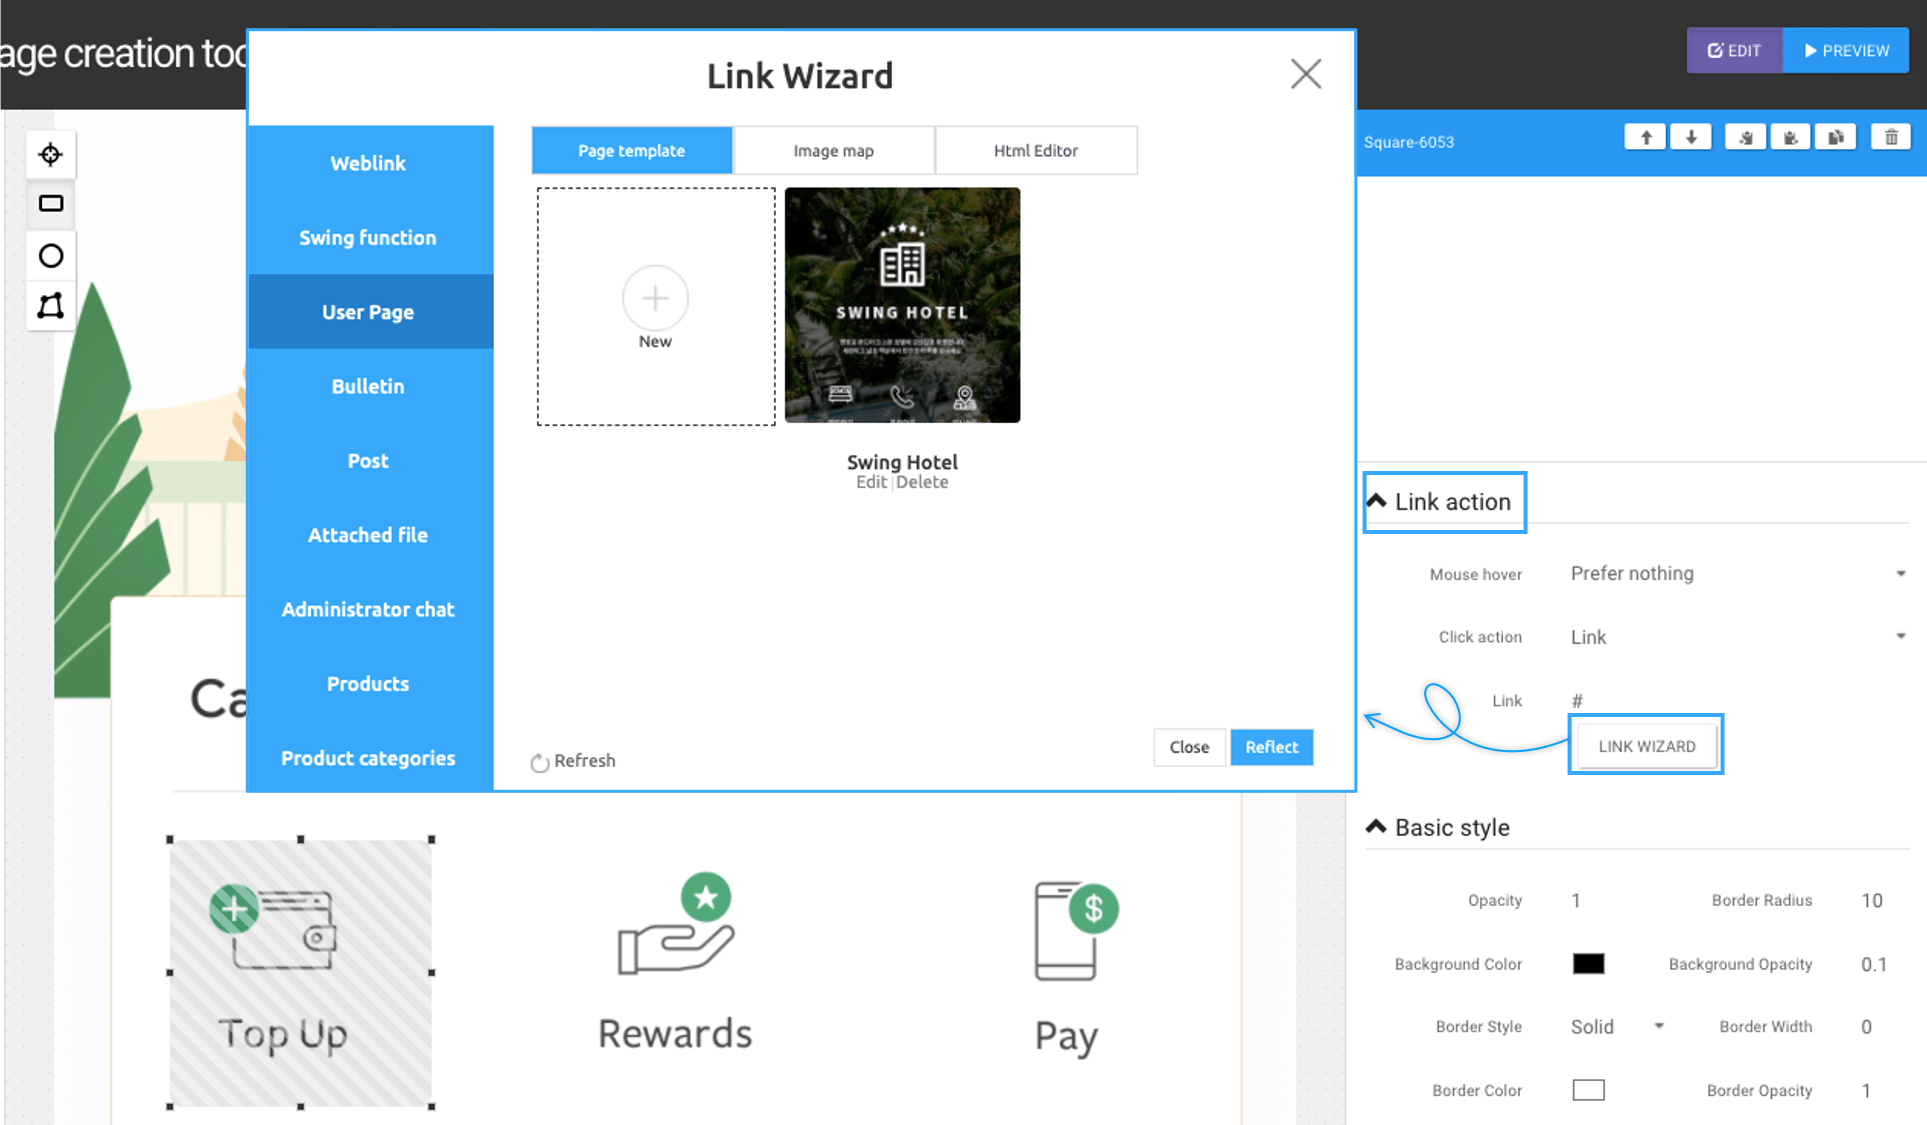
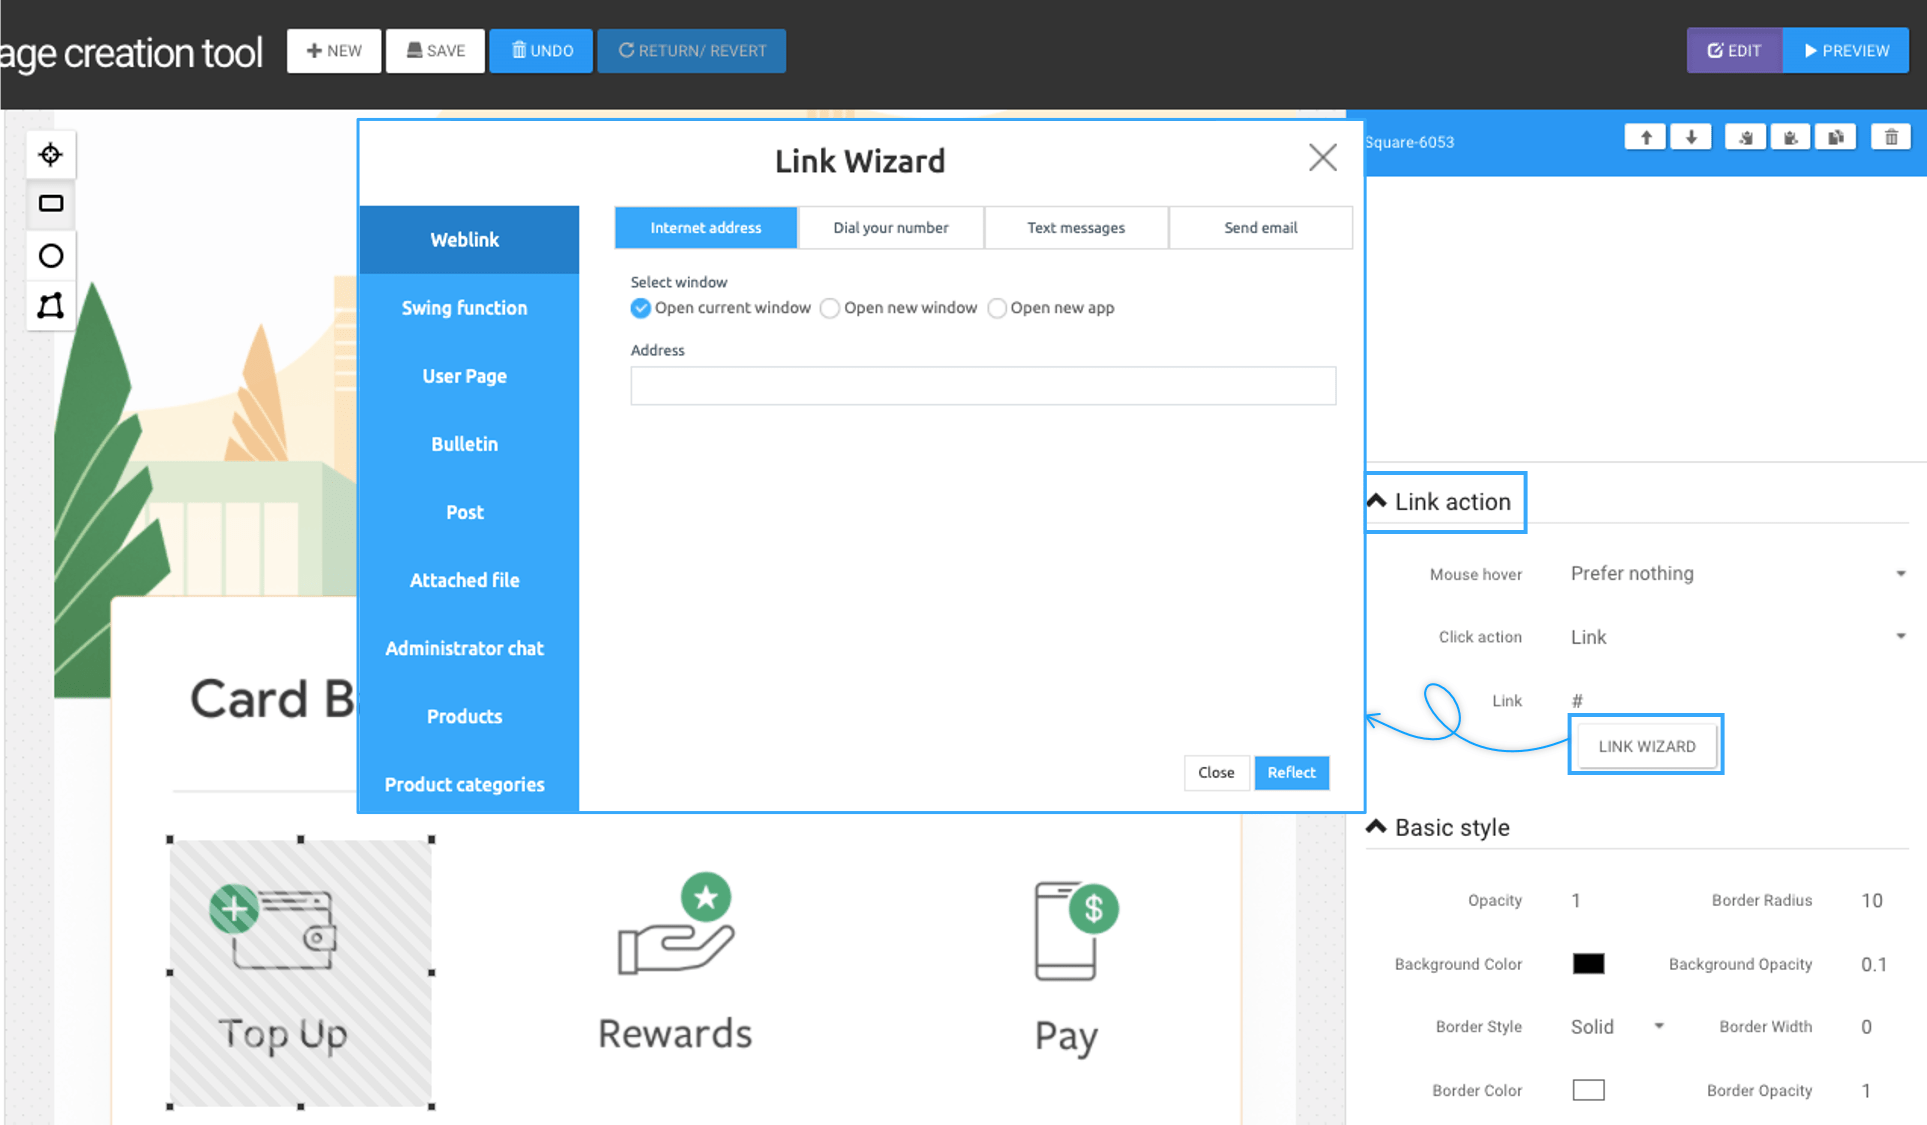
3\) Link Wizard: A tool that allows you to select pages such as app menus and web links.
Selecting the Link Wizard button brings up the ‘Link Wizard’ window as shown above.
Here you can select the menu you want to move when you select the banner.
**\*Precautions**
**Menus and content within the app must be completed.**
**If you haven’t done anything like bulletin boards or user pages, you won’t have a menu to choose from in the Link Wizard.**
**Therefore, please use the link wizard on the image page after completing the production of content for the app.**
In this manual, we chose the intro banner for the image, so we will select the ‘Swing2App Cafe Introduction’ template that we have worked with as a web template.
You can select \[Reflect].
Of course, in addition to the above menu, the link wizard can be applied to all other menus.
**For example, if you want to move to a blog when you select a banner, select \[Link Wizard] and then \[Web Link] – enter the URL of the blog site address and reflect it.**
**▶How to create an image page with GIFS**

**You can use the mouse ****hover style**** to color the background.**
**You can also make the banner transparent by setting it to ‘0’ in the Background Opacity.**
**▶Image Page Creation TIP**

Here is a TIP.
If you use the **\[Duplicate Style button]** in the list, you **can import the same area style and default style.**
You only need to change the link settings, so you can create it easily.
**5. Complete Production**
The image page has been applied.
Finally, enter the page name. (When the app is applied, it is displayed in the menu with the page name).
Press the Save button and you’re done.
Then go back to the app production page and apply the image page to the app.
### **STEP.3 Apply image pages to your app**
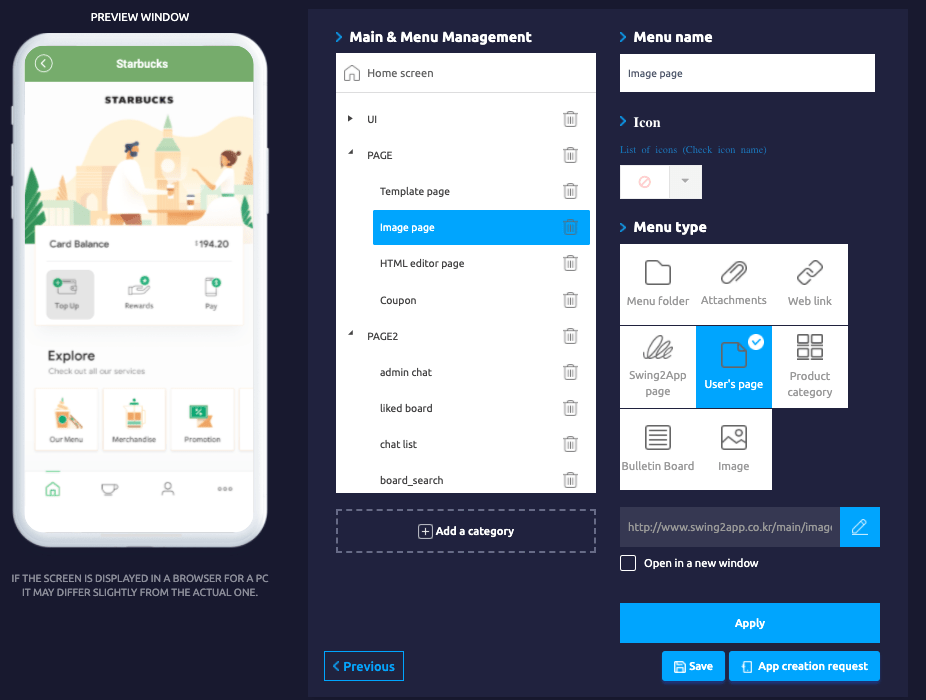
Go to **Maker(V2)** and click **Page Menu.**
1. Select the menu item for which you want to apply the Image page.
2. You can change the menu name at the top of the home screen.
3. Select the **User’s Page** menu in the **menu type.**
4. Click the **Link Wizard.**
5. Select the newly added image page in the User page window and select the ‘Apply’ button.\
(If you do not see the added image page, refresh it.)
6. Click on **Reflect.**
7. Press the **Apply** button.
8. Click on **Save.**
The image page has been applied to the home screen.
.
.
**Image Page Builder – Applying Tool Tips**
In addition to linking link banners to image pages, we will show you how to apply tooltips.
**What is a tooltip?**
**Tooltips are used as a way to attach a message window-shaped icon to the image and add a description.**
**▶ Tooltip application example) App launch screen**

**▶ Image page – How to apply Tooltips**
Like the web link method, select the area by dragging the area to the tool menu.
1. **Link Action**\
The Link Action is a menu that allows you to see how the tooltip will appear.
1. Mouse hover: Select \[Show Tool tips] view because the tooltip contents should be shown when mouse hover.
2. Click Action: Select the \[Do Nothing] view because only tooltips will be applied.\
\*Use TIP: You can create them using both the tooltip menu and the weblink menu.
2. **Text Style**\
Text Style is a menu for editing the text color, font, font size, tooltip box size, etc. created in the tooltip.\\
3. **Tooltip content**\
Enter what you want to enter in the tooltip box. The tooltip is divided into titles (titles) and text (body) to create content.\
Press the Save button after it’s complete. You can see the tooltips applied.
**As you can see in the image, you can hover over the specified area to see the tooltip box created.**
Image pages created with tooltips can also be applied to apps.
The method to apply to the app is the same as described above.
> Go back to the Maker(V2) page – page menu.\
> 1\) Select Home Screen\
> 2\) Select Menu: User Page\
> 3\) Select Link Wizard button\
> 4\) Please select the Apply button after selecting the image page created and add in the user’s page window.\
> 5\) Select the lower Apply button and press the Save button at the top.