> For the complete documentation index, see [llms.txt](https://documentation.swing2app.com/llms.txt). Markdown versions of documentation pages are available by appending `.md` to page URLs; this page is available as [Markdown](https://documentation.swing2app.com/manual/maual/pagemenu/survey.md).
# Swing2App Page - Survey

**What is a survey?**
Survey management is a feature that allows you to conduct a survey for users of the app.
Inquiry from users is possible, objective surveys are possible, and surveys can be conducted for various purposes, such as satisfaction surveys and public relation surveys.
Swing2App provides a tool for surveys, so you can simply create a questionnaire by entering your questions and answers.
### **01. \[Survey] – Apply App**
Go to Maker(V2) – Page Menu.
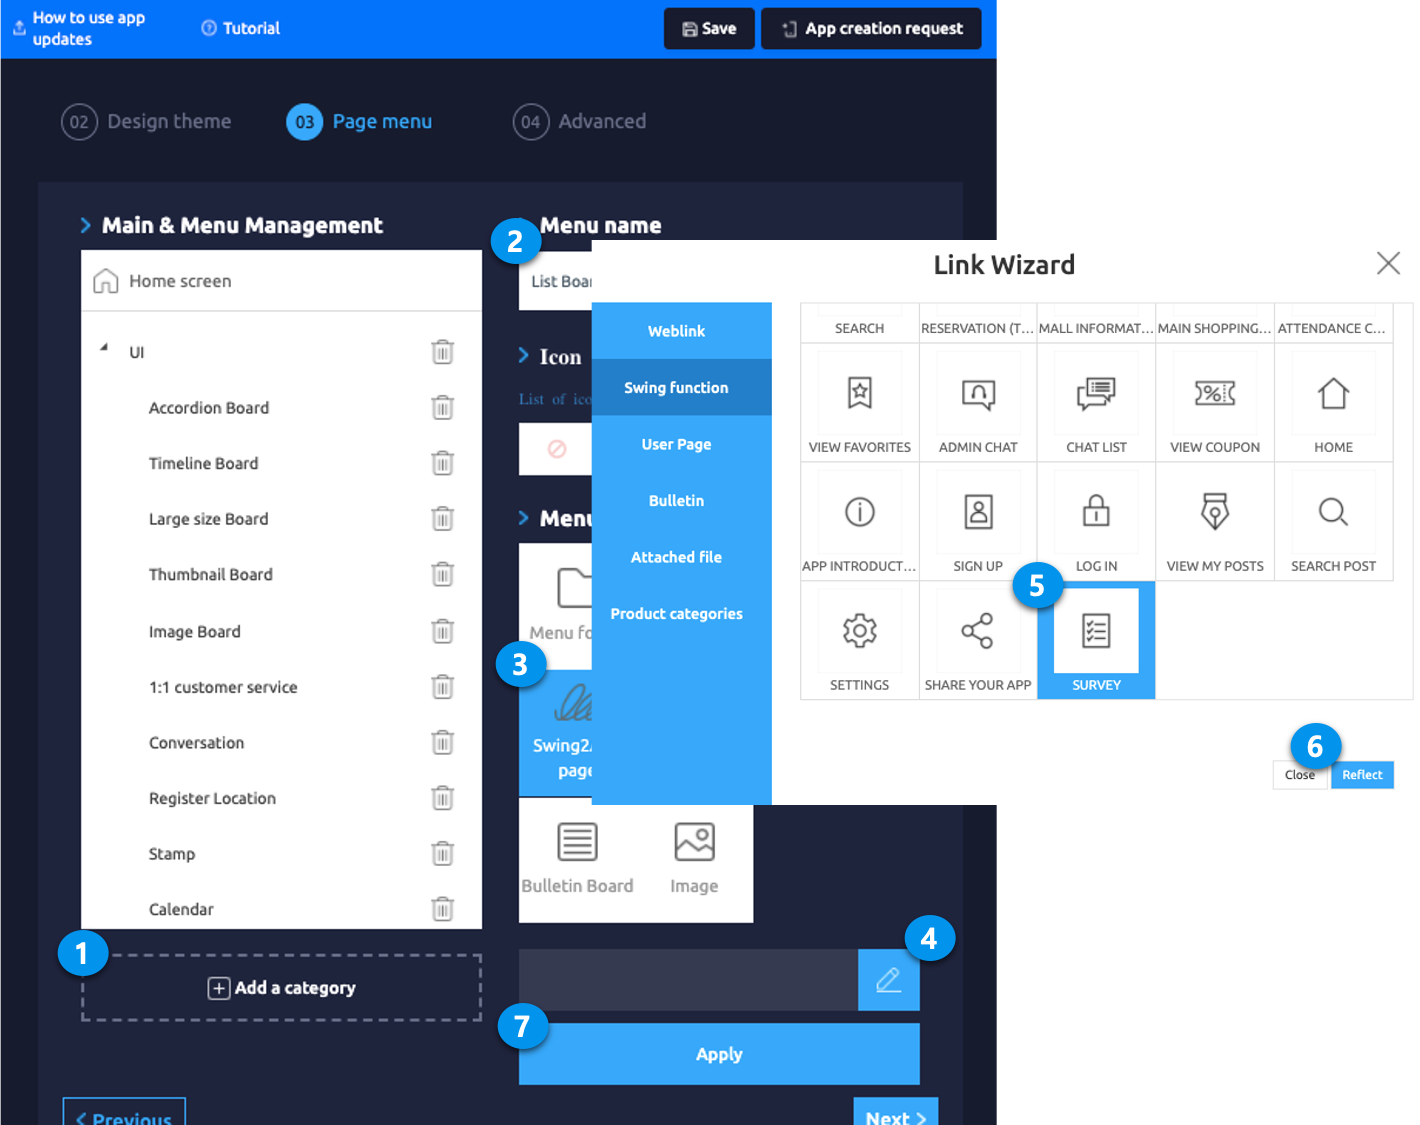
1. Select the menu item on the Home screen in which you need to enter a new menu item. Then click **Add a Category.**
2. Enter the name of the menu item in **Menu Name.**
3. Select **Swing2App Page** from **Menu Type.**
4. Click the **Link wizard icon.** The link wizard window will open.
5. Select **Survey** from the **Swing Function** list.
6. Click **Reflect.**
7. Click **Apply** and click **Save.**
### **02. App Launch Screen: Check Survey Page**
After applying the survey feature to the app, you’ll see the app (you can also check virtual machines) and you’ll see the message “No registered surveys”.
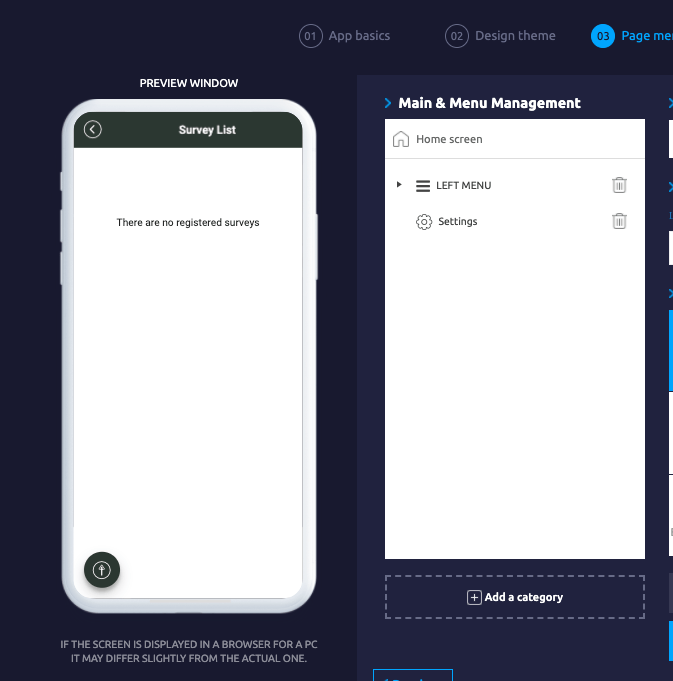
Surveys must be added on the Manager page before the survey will be visible in the app.
So if you’ve applied a – survey page to your app, \*Go to Manager → Services → Survey, and please add a questionnaire.
**\*Order does not matter.**
-You can create a survey first in your app, then apply the survey page in App creation.
-After applying the survey page in the app creation-You can create a form in the app operation.
### **03. Create a survey**
**Let’s go-to app operations and create a survey paper.**
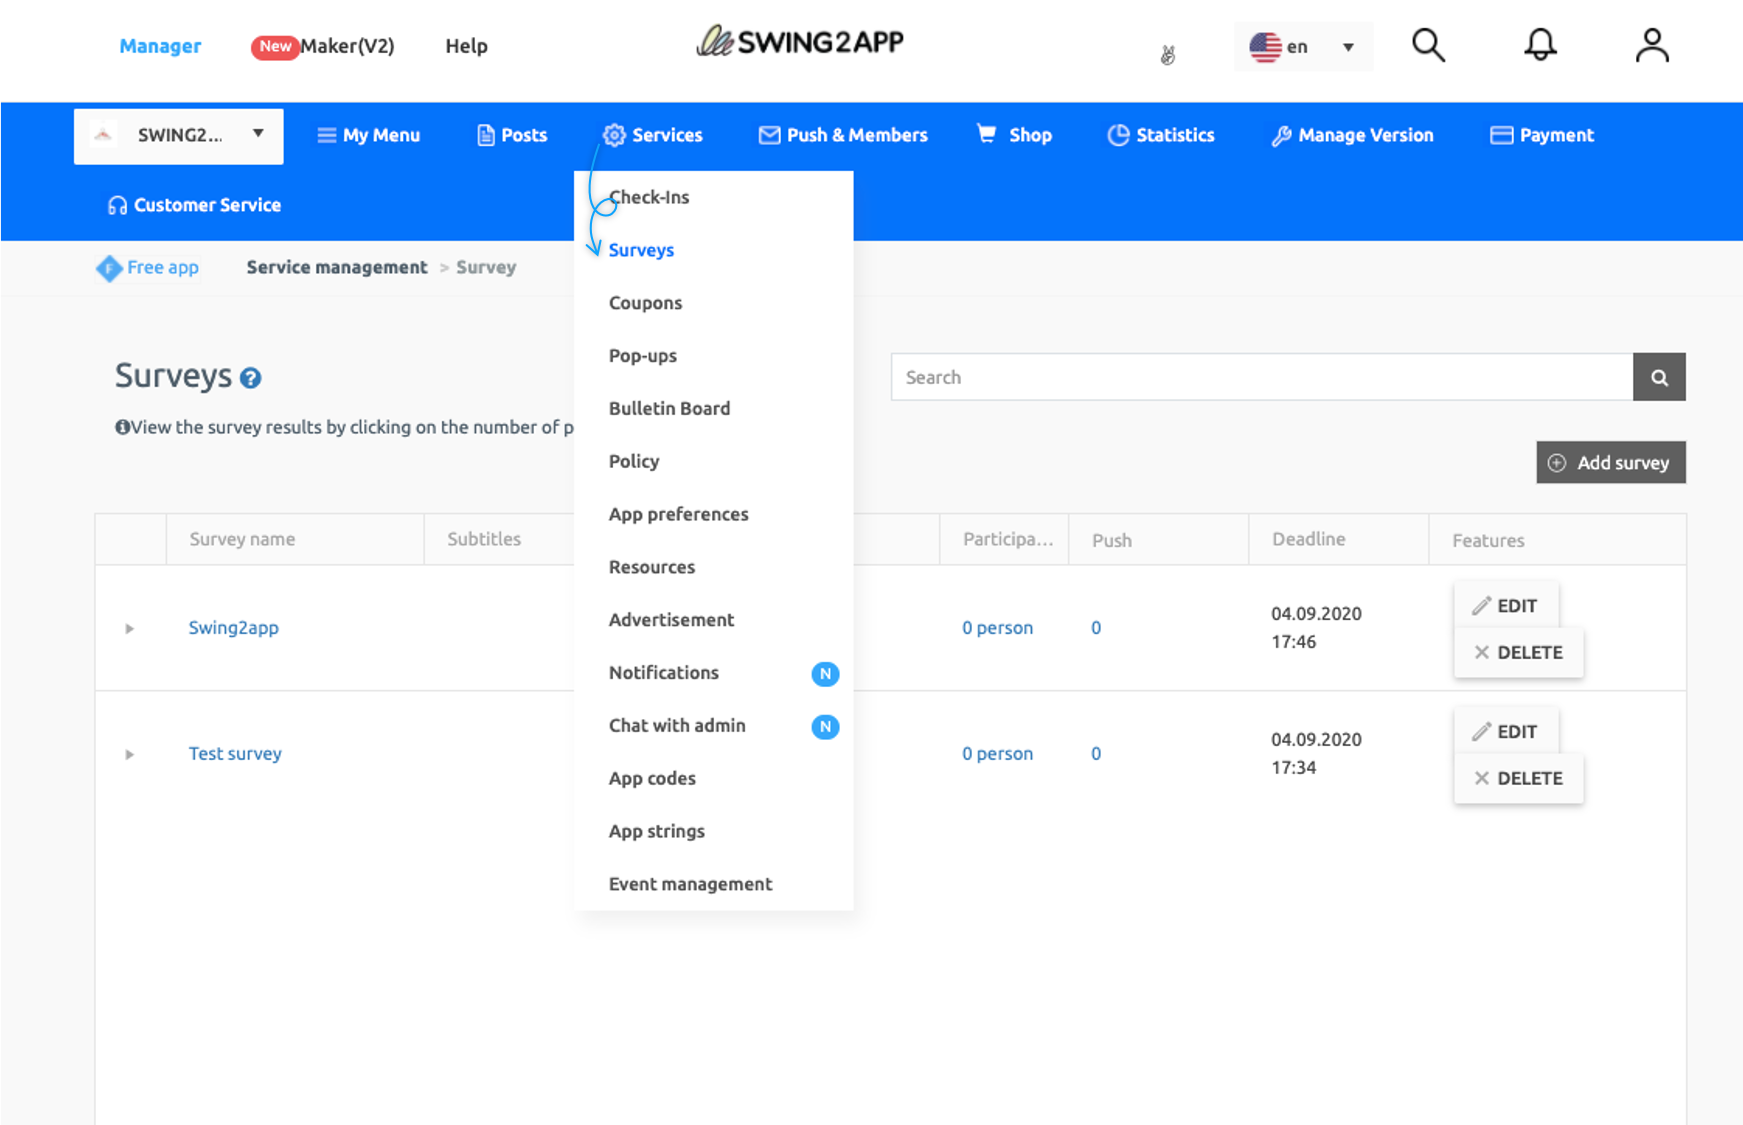
**1. Move survey management menu**
Move to Manager Page → Services → Surveys.
**2. Enter basic information**
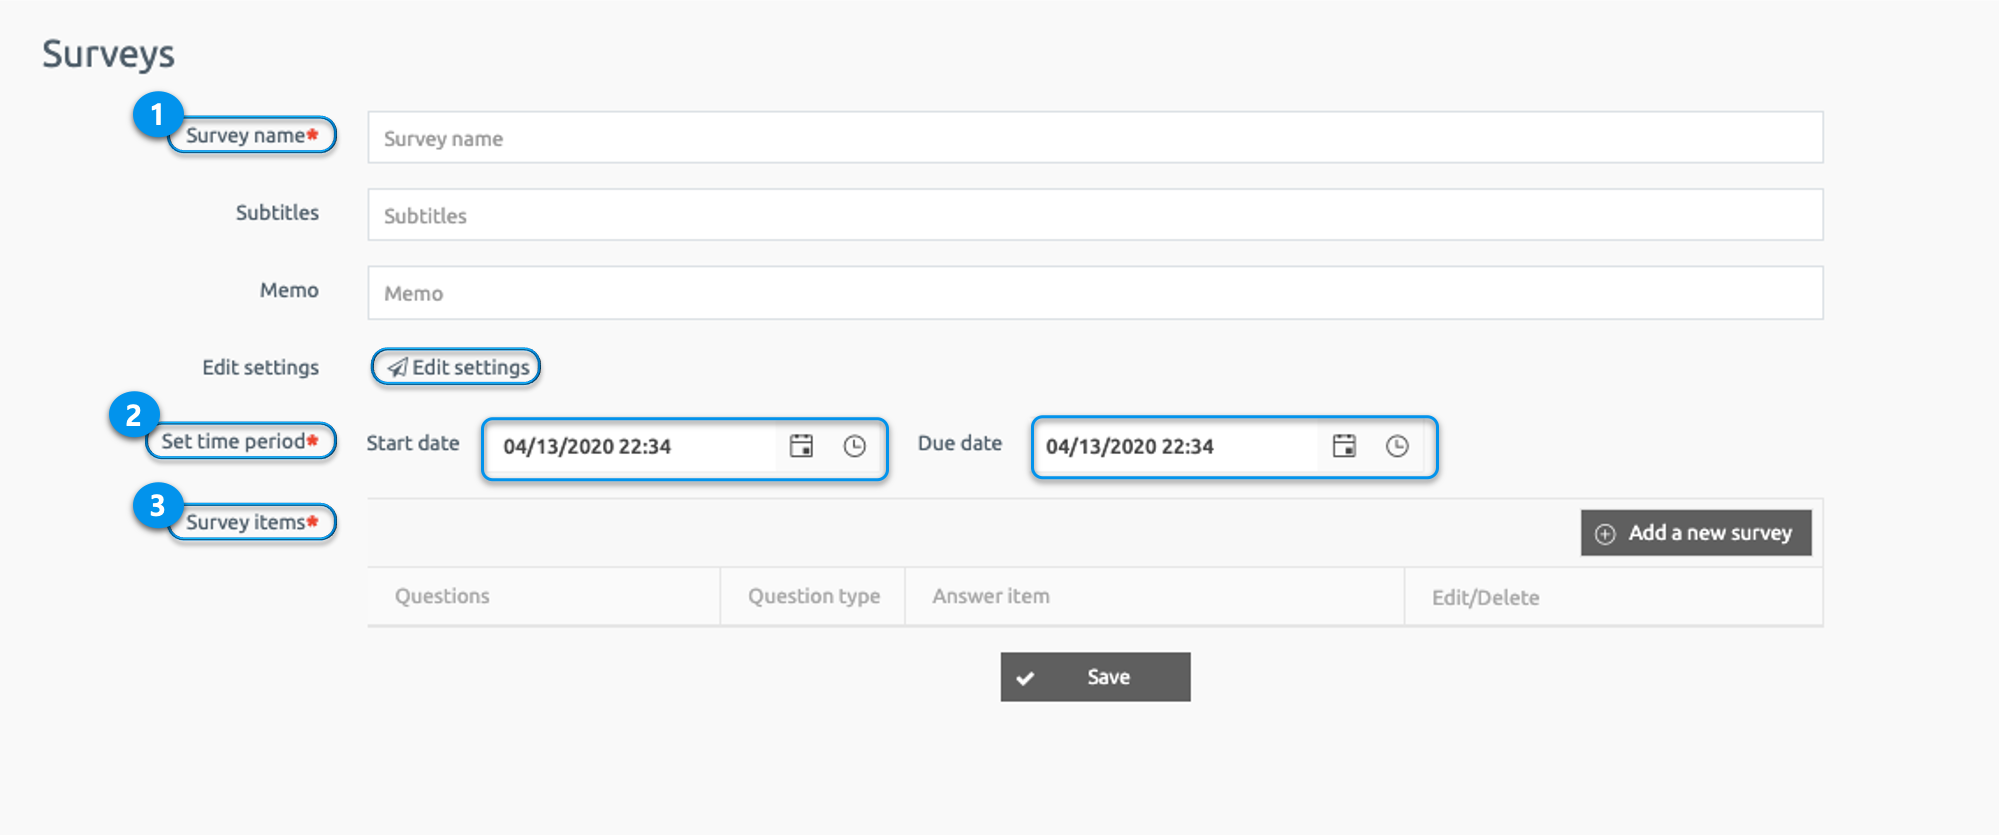
First of all, please enter the basic information required for the survey on the survey management page.
\* Items marked with \* are mandatory items.
1\)Name of Survey: Enter the title of the survey.
2\)Date range: Enter the date range for the survey and specify the start date and the end date and time.
3\) Manage survey items: Manage your survey items by entering what you want to enter in the questionnaire and click on the “Add new survey items” icon shown on the right.
**Surveys can be sent by push.**
**To send a push, select Push Settings, select a destination, and enter a title, content, and image.**
**If you need to notify a large audience about your survey with announcements, it’s a good idea to use push.**
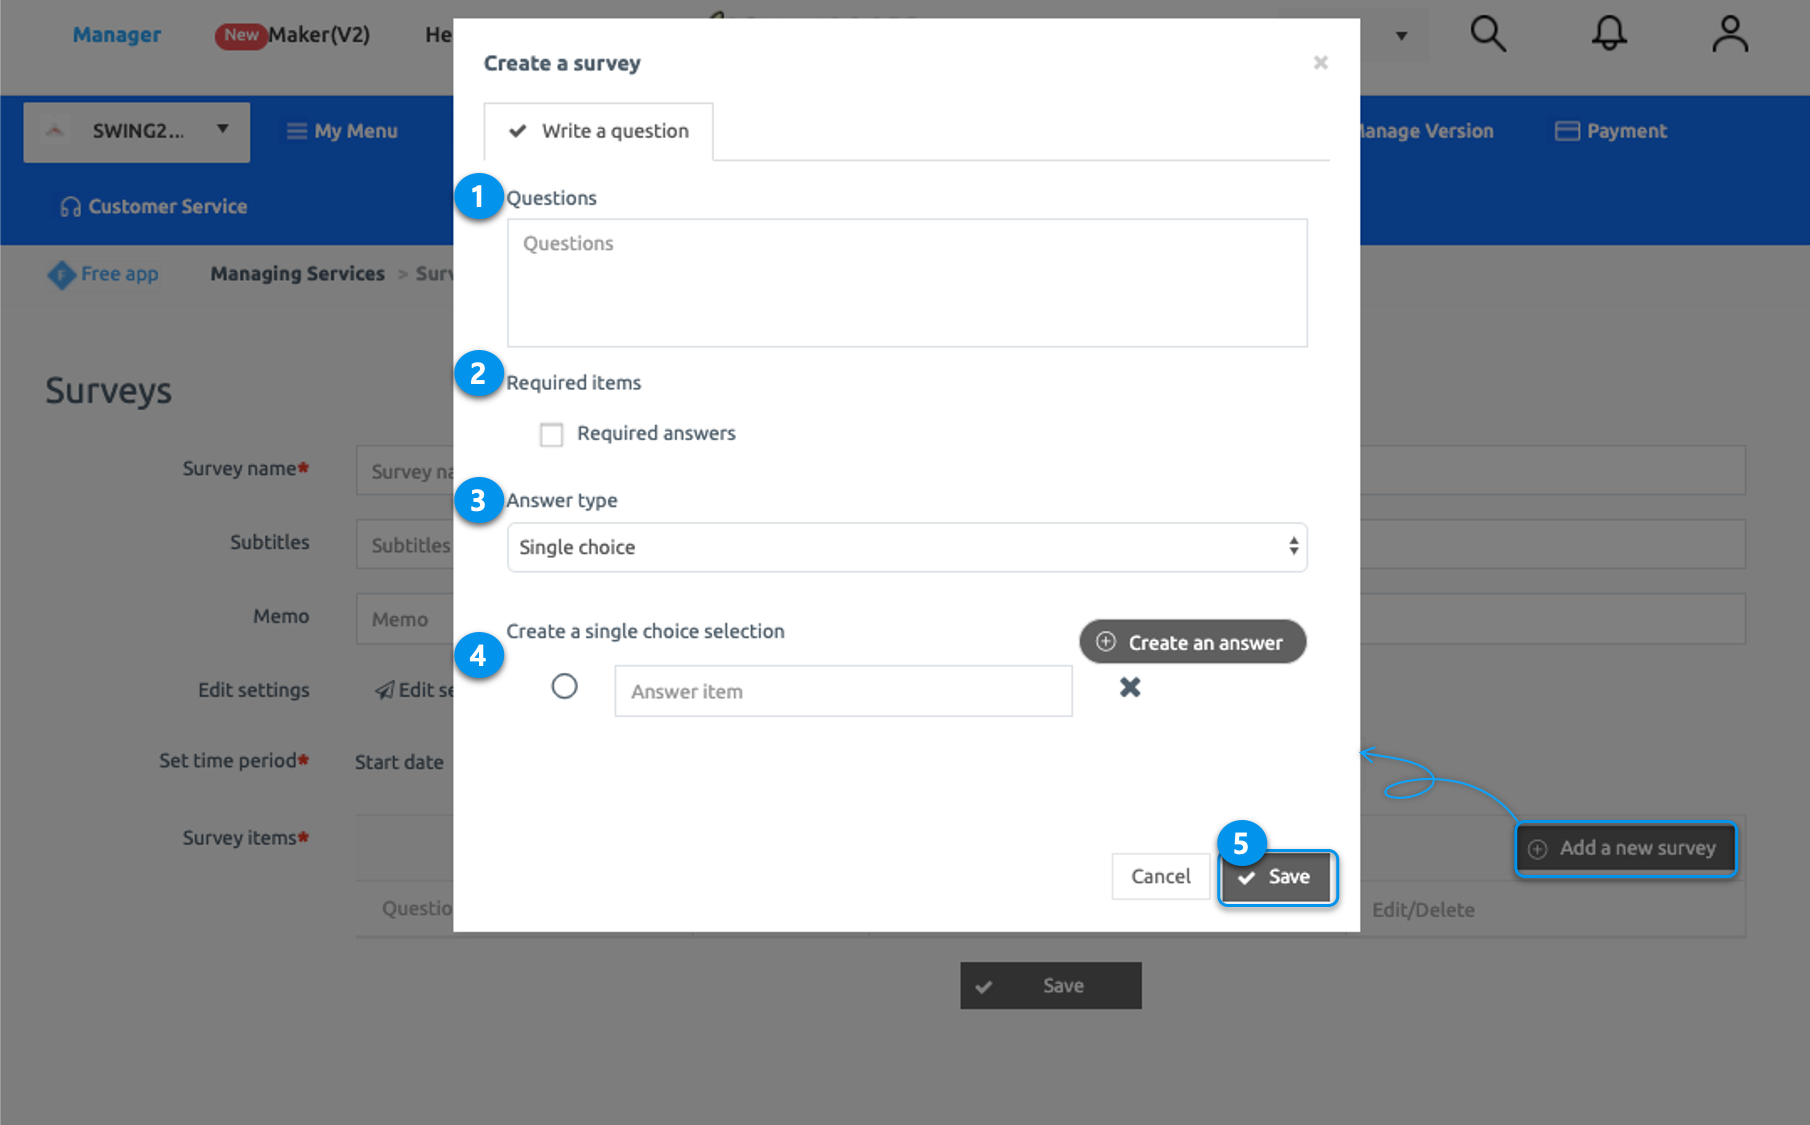
**3. Enter Survey Items**
1. Question Contents: Enter the question to enter in the questionnaire.
2. Mandatory item: Mandatory item is to select whether the question is mandatory to answer or not.\
Therefore, please check the ‘Required answer items’ if you must answer.
3. Answer Type: The Answer Type allows users to check whether they are single choice, multiple choices, or descriptive answers that need to be entered.
4. Create answer item: Select one item from a single type, multiple selections or action type to create.
5. Save: Press the ‘Save’ button when all contents are completed.
**4. Complete the questionnaire**
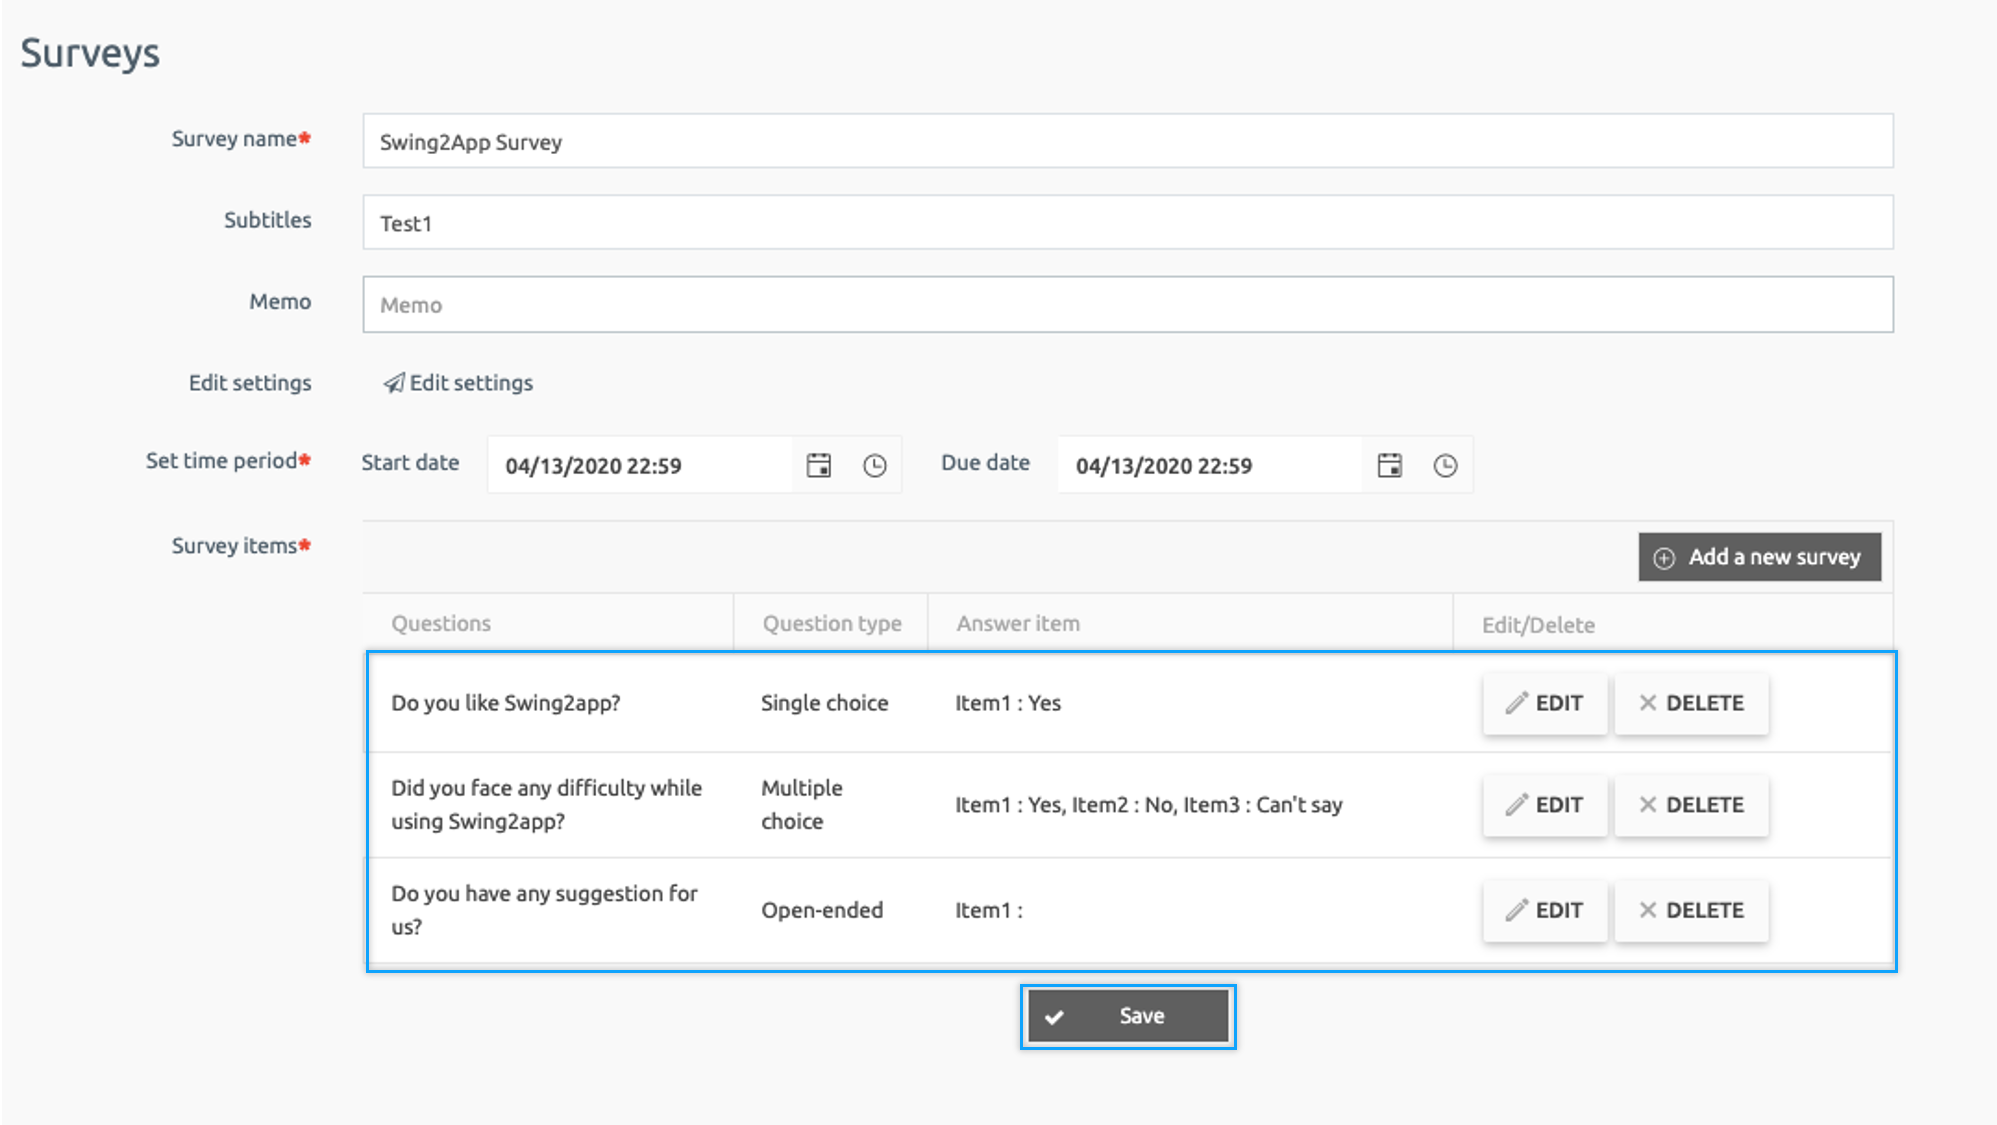
Please press ‘Save’ when you have completed the basic form and contents.
**5. App launch screen: Survey**
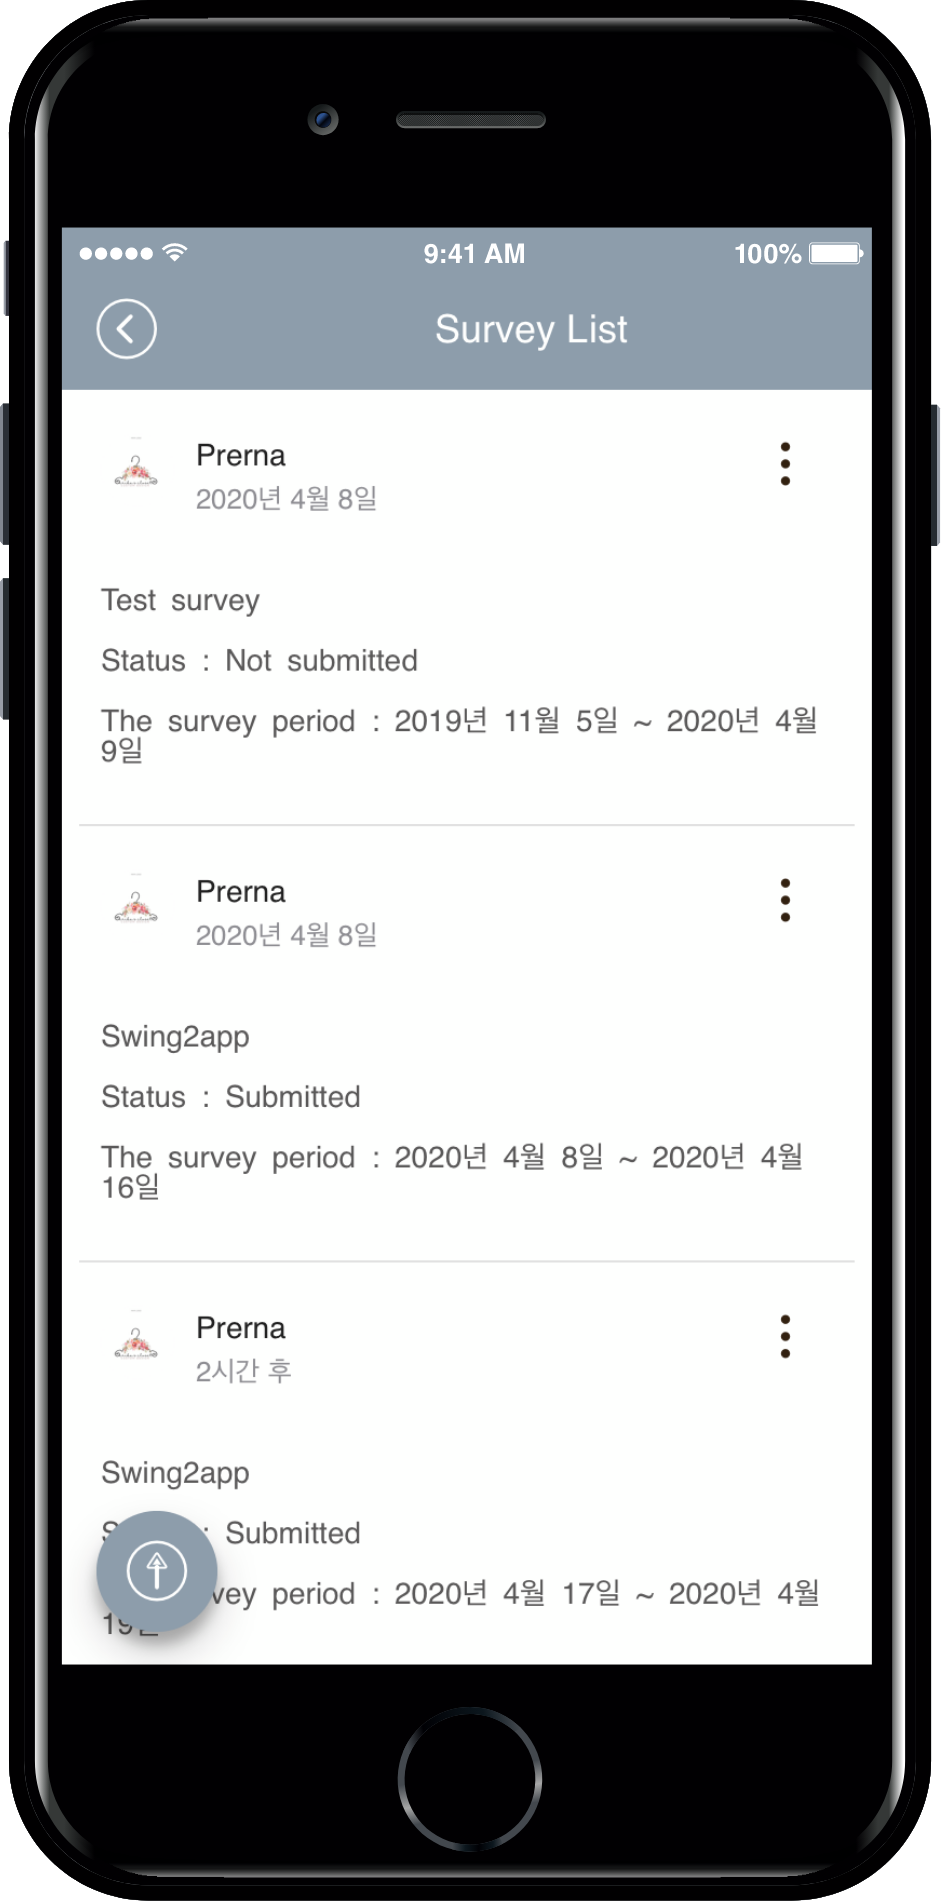
Once you’ve completed your survey, run the app again, and the survey you’ve entered will pop up.
When you select the item, you’ll be taken to the survey site.
**For more information on creating surveys and participating in the app, please check the link posted below!**
**☞** [**\[How to use survey registration, management and app launch screen\]**](/manual/appmanage/service/survey.md) **Go to details**
▶ Create a survey
Manager page → Services → Surveys → Select the ‘Add Survey’ Button → Survey name, set the survey period → Click the “Add new survey item” button to enter your question and answer item.
▶How to apply to the Forms app
Apply the created questionnaire to the app.
Maker(V2) page → Page menu → Add menu → Menu name → Load \[Swing2App page] → Select ‘Survey’ and save.
▶Take a survey from the app
After running the app, you can take surveys.
You can take a survey by selecting the menu and touching the screen.
\*Surveys are available for members who subscribe to the app-user ratings. Please note that guests are not allowed.
▶Checking the Survey Results Entered by Users
On the Manager page → Services → Surveys → Select ‘Number’ ‘ → ‘User’ from the participants can confirm the results of the survey.
Click on the link above to see all the details.