> For the complete documentation index, see [llms.txt](https://documentation.swing2app.com/llms.txt). Markdown versions of documentation pages are available by appending `.md` to page URLs; this page is available as [Markdown](https://documentation.swing2app.com/manual/appmanage/board/calendar.md).
# How to Use Calendar
**▶ Swing2App Calendar**
You can easily register important events on your calendar, and you can record your reservation status by date and time at companies that require reservation management.
You can also write important news and announcements.\
\\
**▶ Features provided by the calendar of swing2app**
* Easy event creation by calendar date
* Free schedule management – Convenient schedule editing and deletion
* Can add multiple events
* Different schedules can be divided into text and backgrounds of different colors
* Important announcements can be made as announcements
* Schedule creation is the same as post HTML editor (image attachment, link, video attachment can be done)
* Go to ‘View detailed schedule’ post when selecting a schedule\\
**▶ How to use the calendar of swing2app**
**1)Create a calendar**
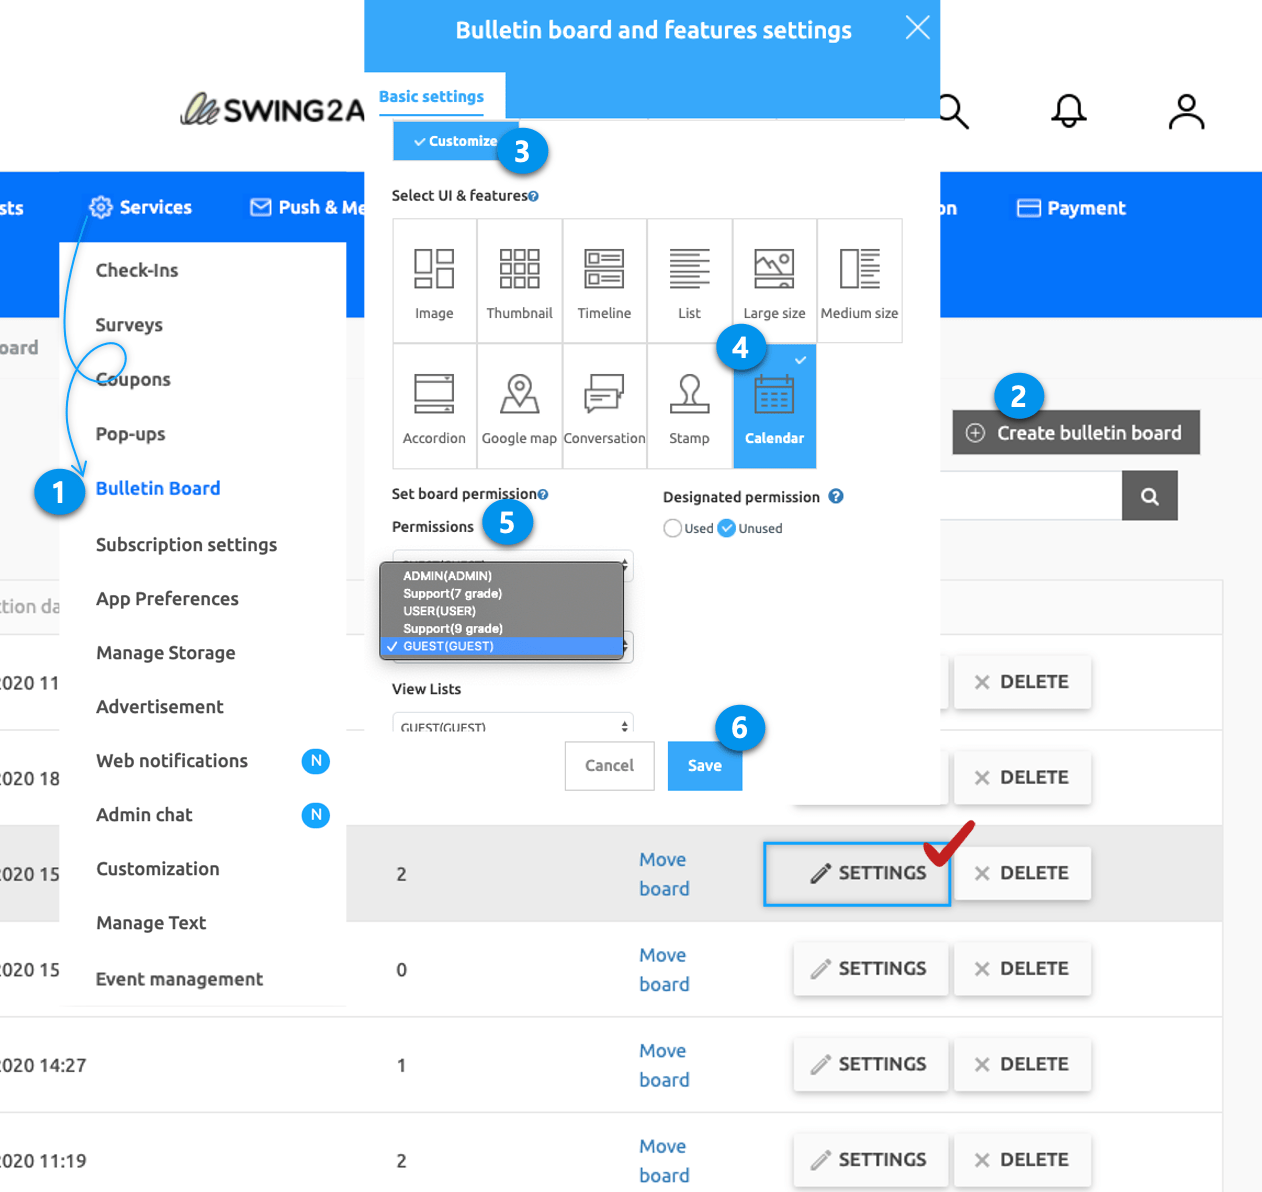
1. Go to **Manager.** Select **Services** and click on **Bulletin Board** from the list.
2. Either click on **Create Bulletin Board** to create a new board or click on **Settings** to edit the existing board.
3. Select **Customize.**
4. Select **Calendar**.
5. Set the permission for the board.
6. Click on **Save.**
**2) Create an event on your calendar**
The calendar is a bulletin board function, so you can use it the same as entering a post.
After saving the calendar board from above, you can enter the event below steps:
1. Go to **Manager.**
2. Select **Posts.**
3. Click on **Calendar.**
**3) How to apply the calendar app**
Go to **Maker(V2)** and click on **Page Menu.**
1\. From the menu set by default, click the **Add a category** to add a new menu.\
2\. Edit the name of the added item in **Menu Name.**\
3\. Select **Bulletin Board** in the **Menu Type.**\
4\. Click on **Link Wizard**(pencil icon).\
5\. Select the board from the list of Bulletin Boards in the Link Wizard window.\
6\. Click on **Reflect.**\
7\. Click on **Apply** and then **Save.**
***
### **1. Create a calendar**
1. Go to **Manager.** Select **Services** and click on **Bulletin Board** from the list.
2. Either click on **Create Bulletin Board** to create a new board or click on **Settings** to edit the existing board.
3. Select **Calendar.**
4. Select **Calendar.**
5. Click on **Save.**

**\*Calendar is a bulletin board function, so you can edit and use the detailed settings**.\
If you select ‘Custom’ in Service Purpose, the fixed grey shaded area will be solved. By selecting ‘Calendar’ again in the UI and function selection, you can edit the detail setting-writing permission, list view, and detail view permission. \\
***
### **2. Enter your calendar events**
1. Go to **Manager.**
2. Select **Posts.**
3. Click on **Calendar.**
**Once you’ve created a calendar, you’ll need to register your calendar. Calendar input is only available on the web.**

You can check the newly added calendar page.\\
The calendar is displayed based on the month.
You can choose the year, month, and day you want.\
You can add a schedule for each date with the schedule creation button and make major announcements through the notification creation button.
***
\ **1) Create a schedule**
You can create a schedule by selecting the \[Create Schedule] button at the top, or create a schedule by selecting a date area on the calendar.
1. Click on Create a Schedule.
2. Select the date and time (If all-day schedule, please select the ‘All-day’ button). Enter the title
3. Enter the details of the schedule
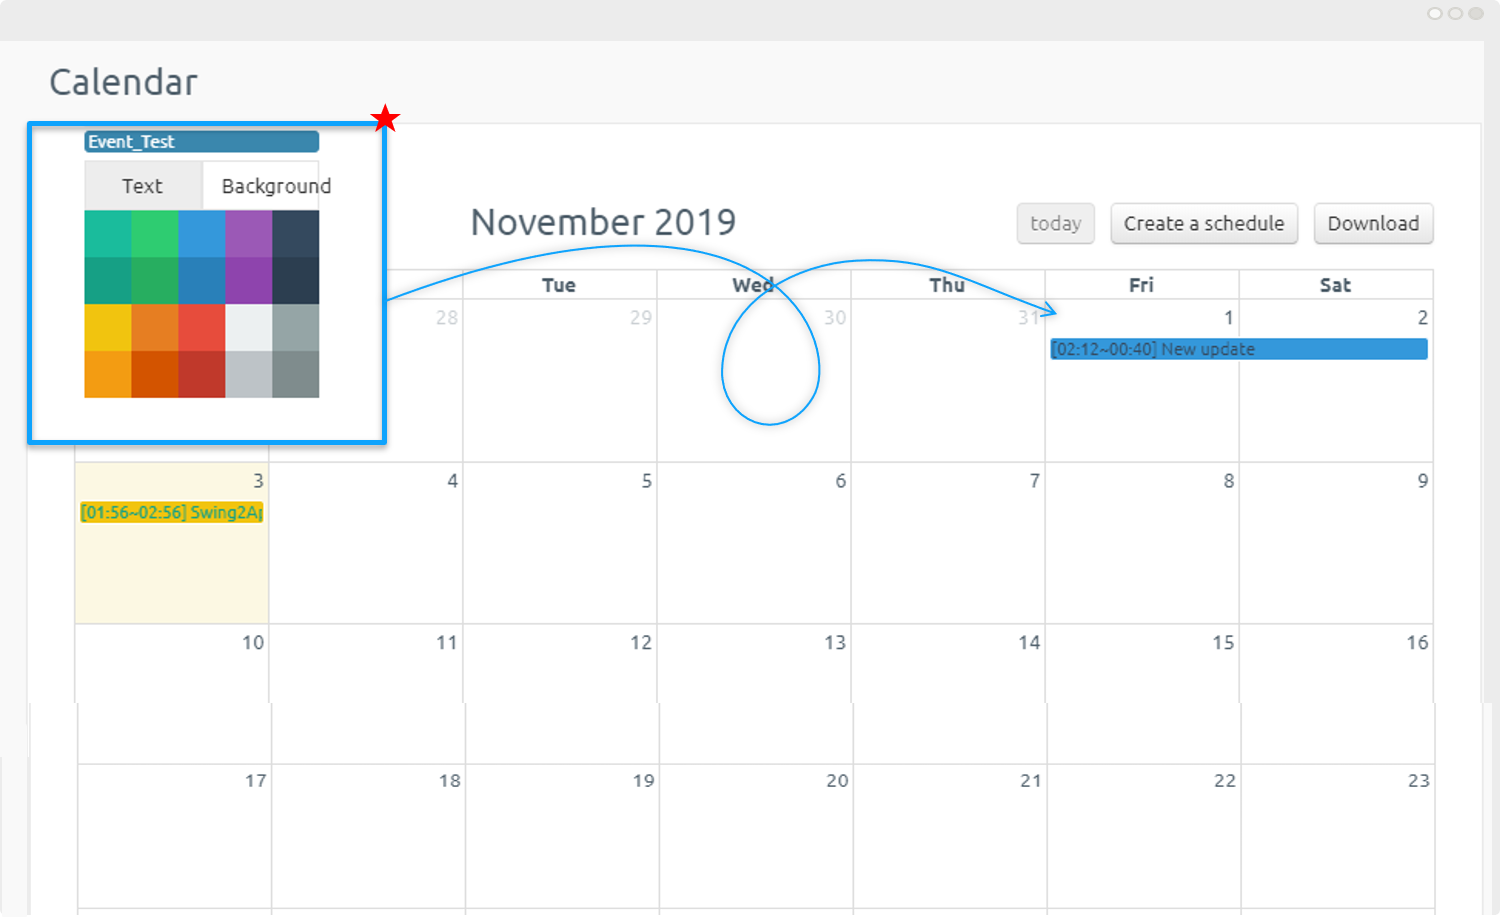
4. Set the text and background color of the schedule title (Check the color settings through the image below)
5. Save button to complete
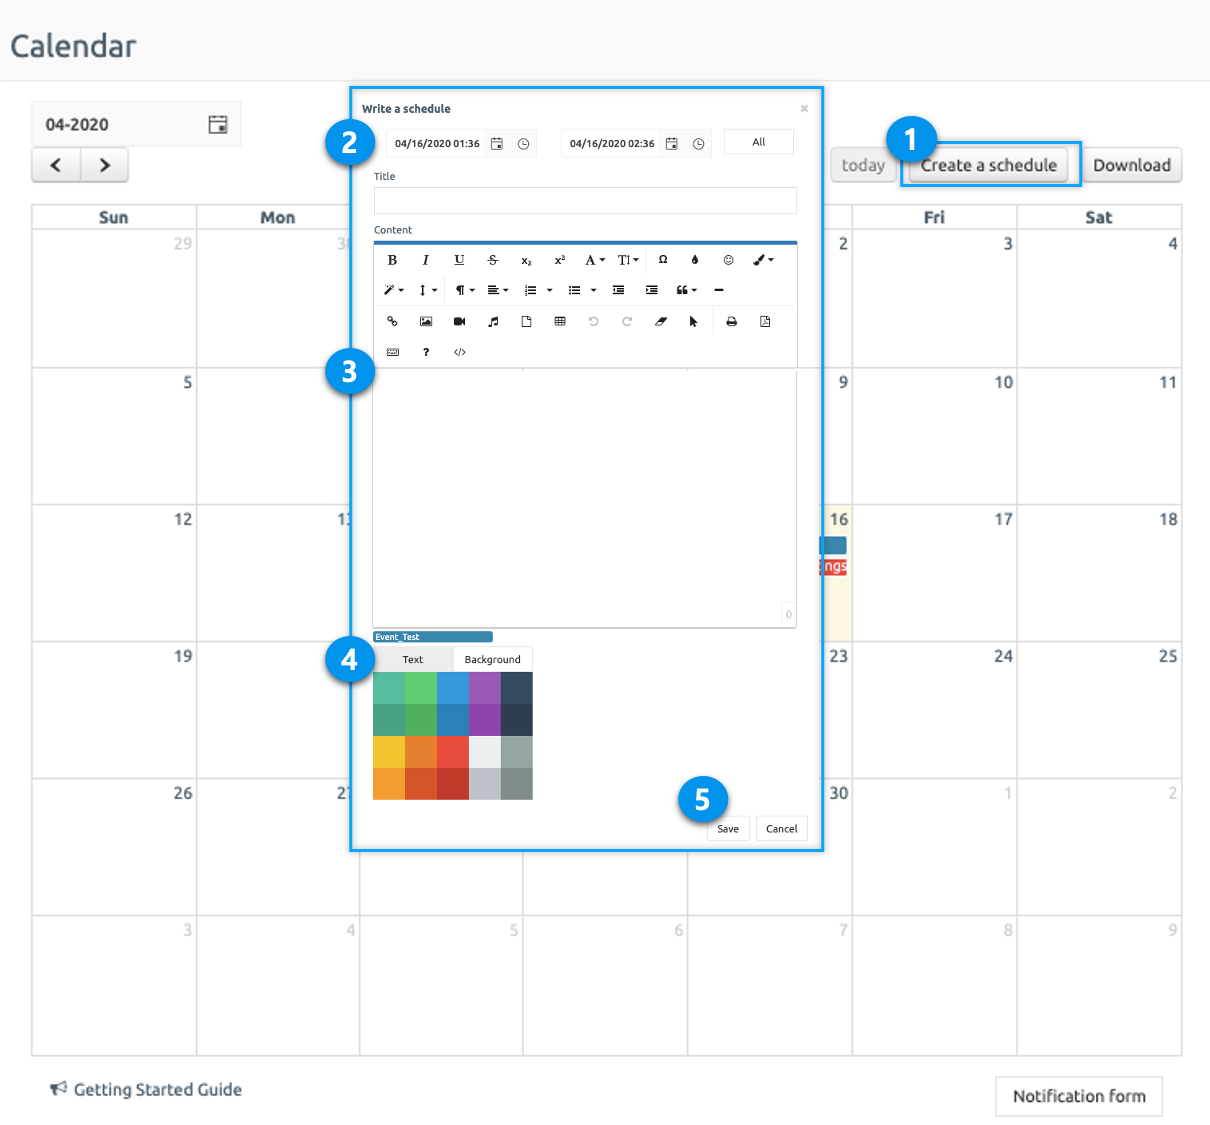
\ **▶ Set calendar event title text, background-color**
If there are multiple events on the same day, the color can be set differently so that the administrator can distinguish them.\
If you set the text color and background color, the calendar screen shows different colors for each event.
***
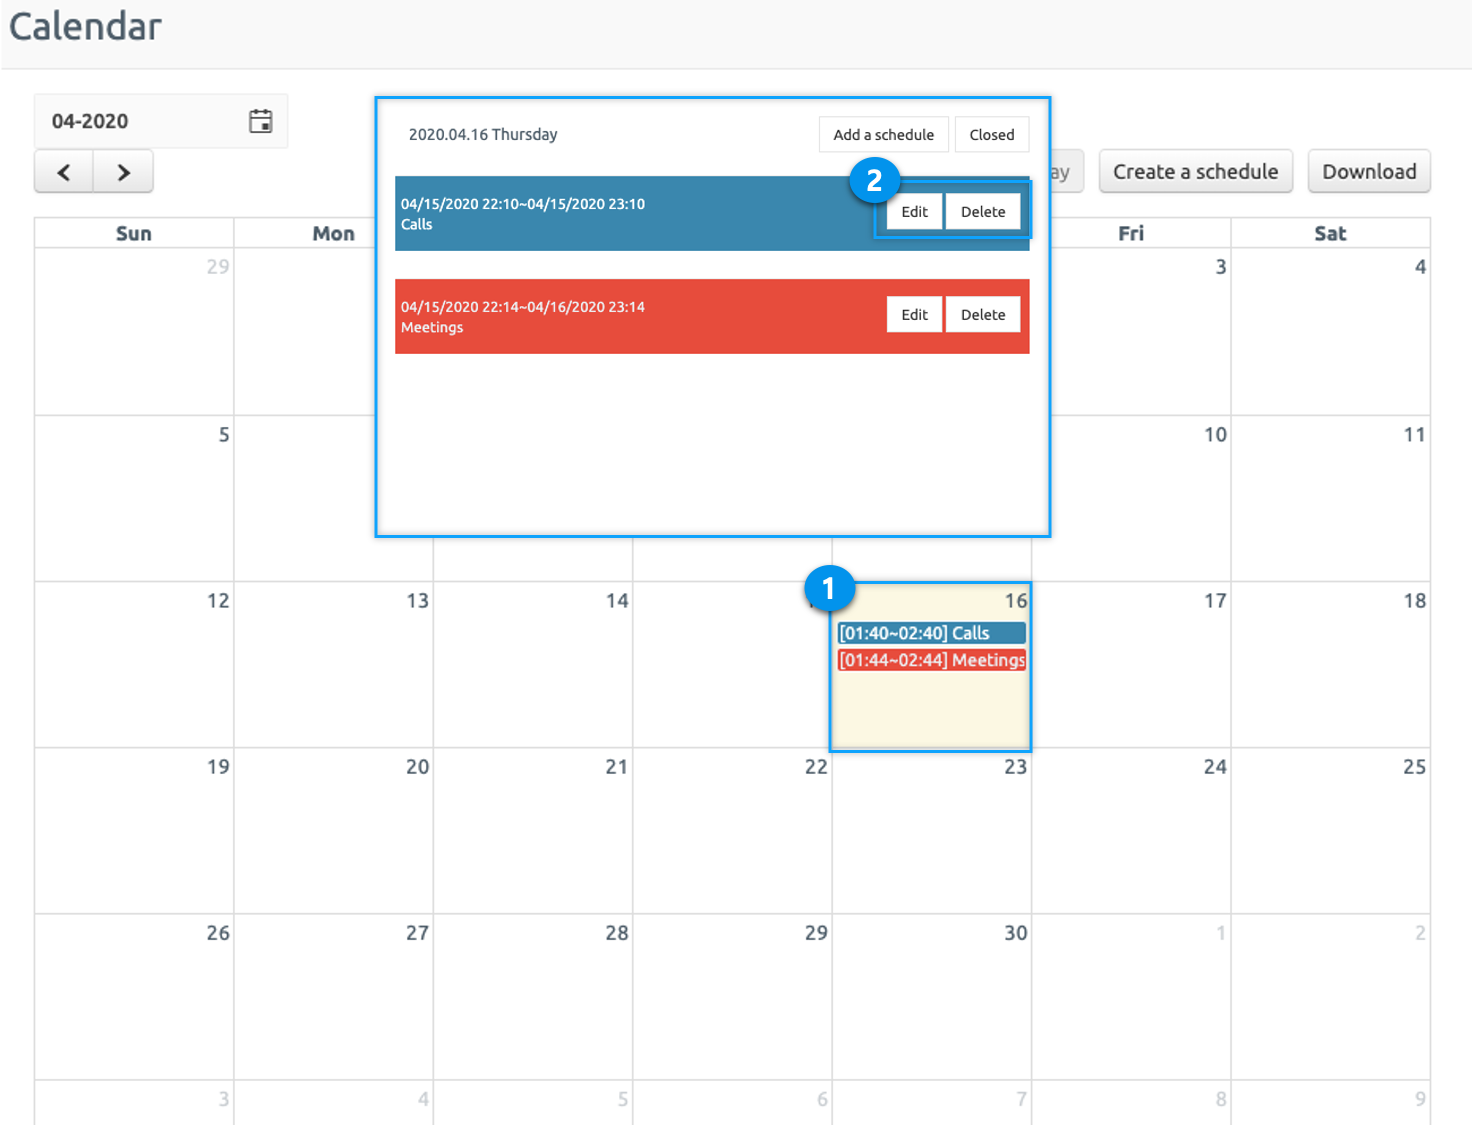
**2) Edit or delete a schedule**
If you select a saved schedule, edit and delete buttons are created.\
You can edit the schedule again, delete unnecessary schedules, etc. You can easily manage your schedule this way.
\
\
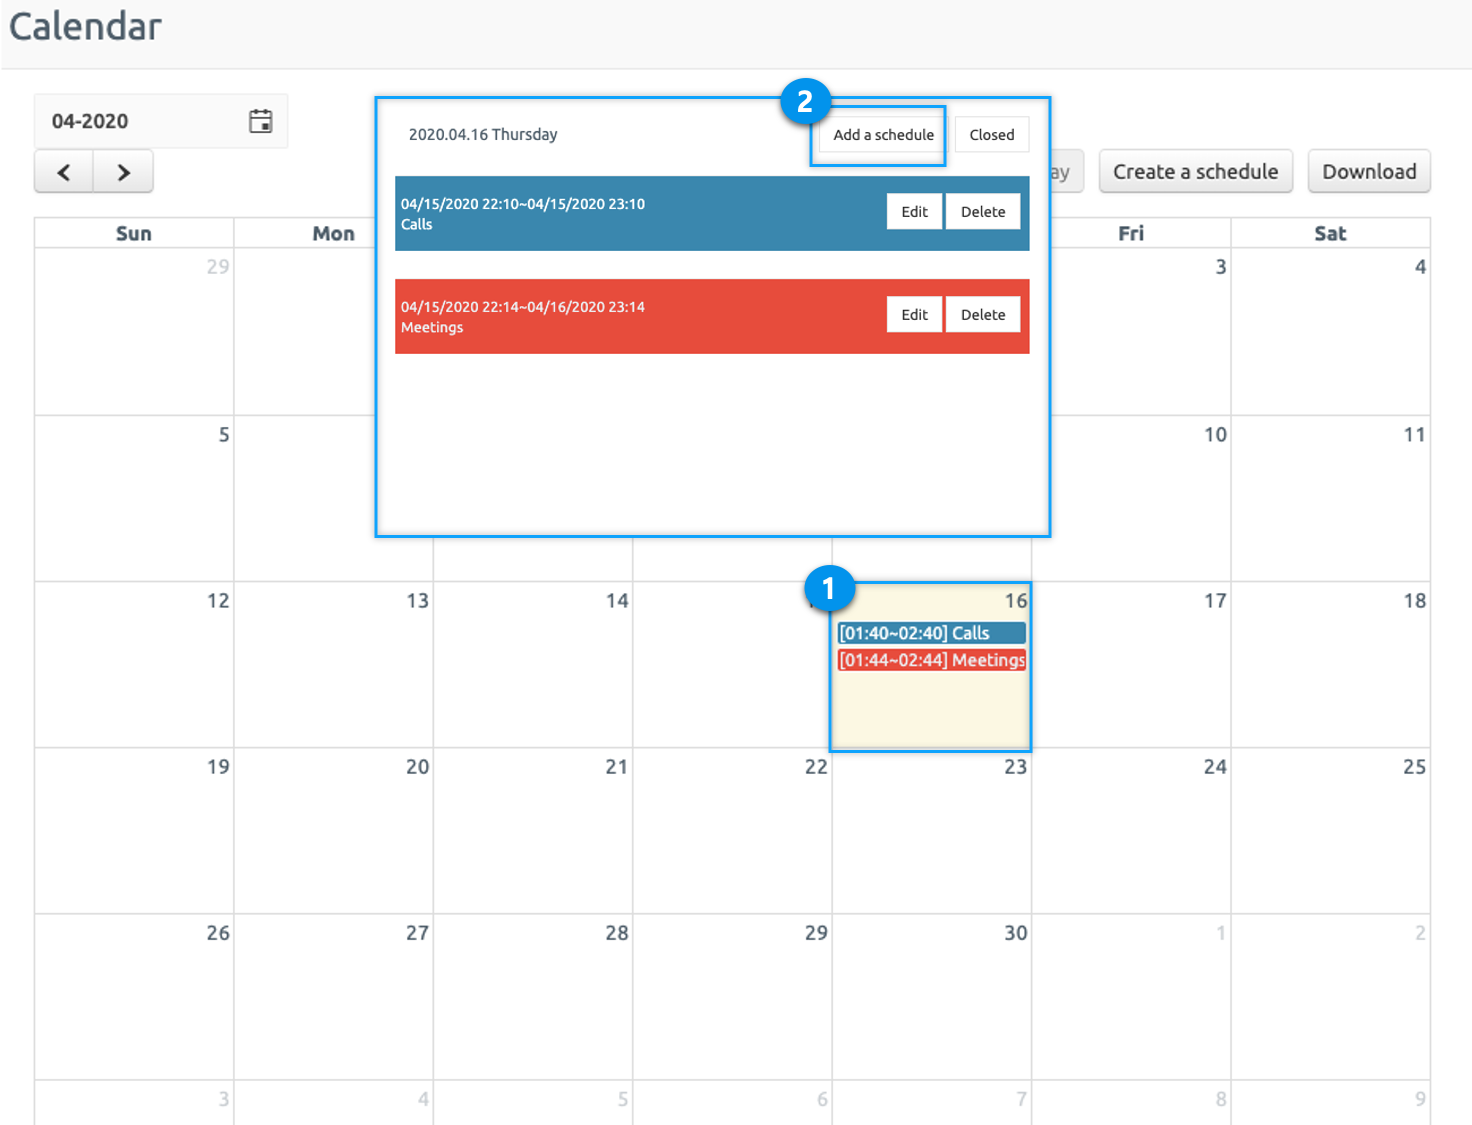
\ **3) Add Schedule**
If you have multiple schedules in one day, you can add more events with the Add event button.
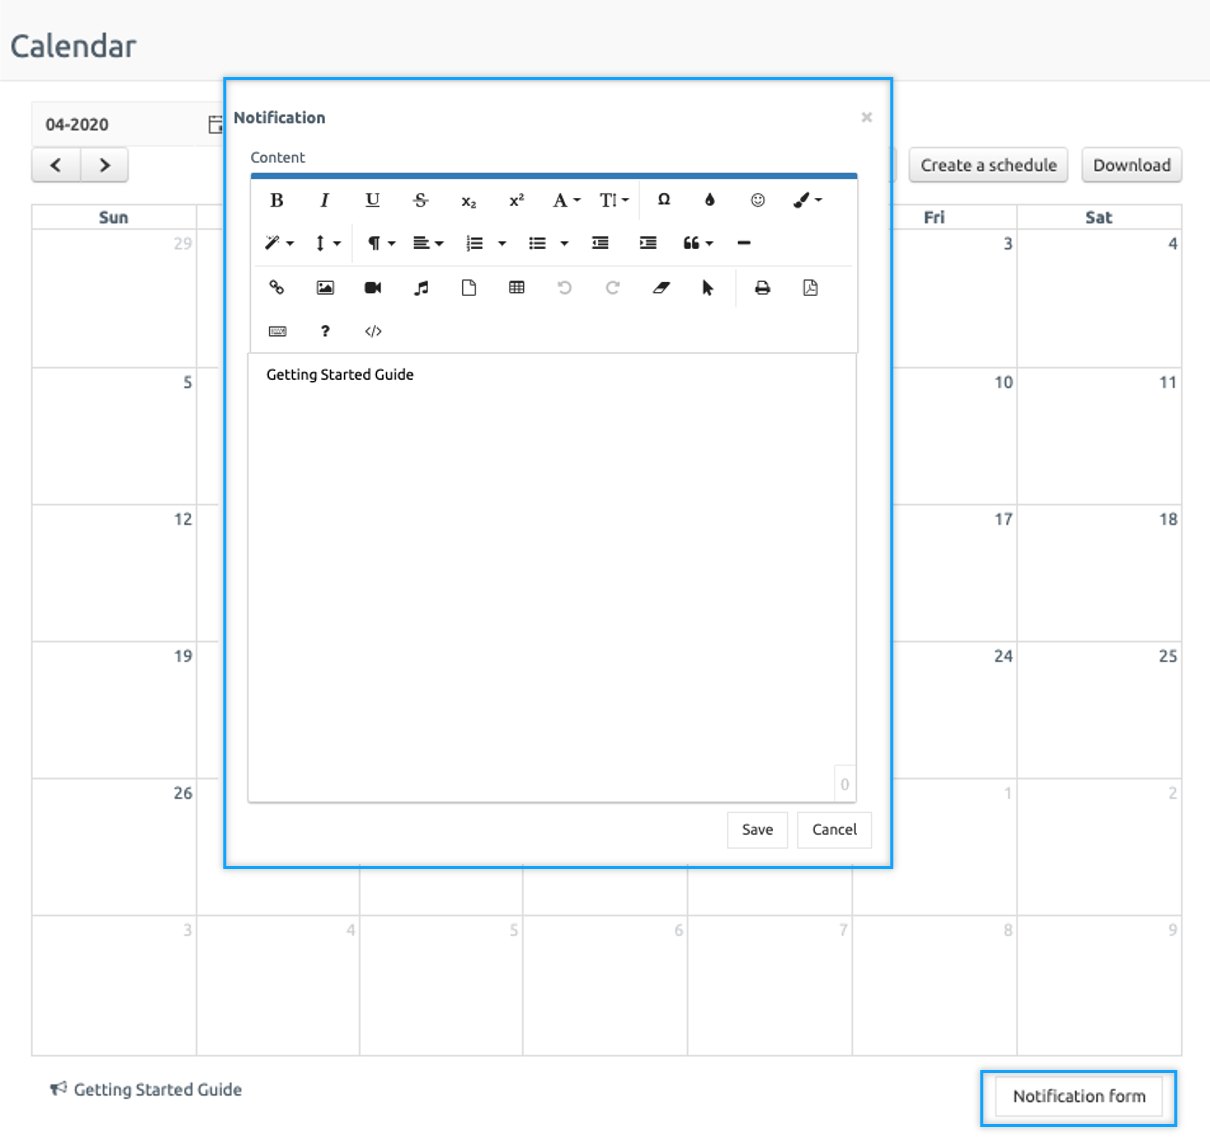
**4) Create Notification**
Important announcements can be made by selecting the **Notification Form** button.
Your calendar has been entered.\
This created calendar will be applied to the app.
***
***
### **3. Apply the calendar to the app**
Apply the calendar to the app.
**1)When using app production V3 version**
1\)App creation screen – Select STEP3 page
2\)Select Menu \*If you haven't created a menu yet, you can add a menu by selecting the + shape button.
3\)Enter a menu name.
4\)Select \[UI KIT] from the page design.
5\)Select \[Calendar].
6\) Check the calendar you created, and then select the \[Apply] button. (Hover over the mouse cursor on the page to open the Apply button)
\*Please create a calendar board first.
If you don't have a calendar created, it won't appear on the screen and can't be applied to the app.
\*You can select the \[New] button on the UI KIT screen, or create a board in App Operation-Service Management-Board Management.
7\) Press the \[Save] button at the top of the screen to apply it to the app.
\*Icons are optional, please select only when applying an icon in front of the menu.
**2)When using app production V2 version**
Go to **Maker(V2)** and click on **Page Menu.**
1. From the menu set by default, click the **Add a category** to add a new menu.
2. Edit the name of the added item in **Menu Name.**
3. Select **Bulletin Board** in the **Menu Type.**
4. Click on **Link Wizard**(pencil icon).
5. Select the board from the list of Bulletin Boards in the Link Wizard window.
6. Click on **Reflect.**
7. Click on **Apply** and then **Save.**
### **4. App Launch screen**
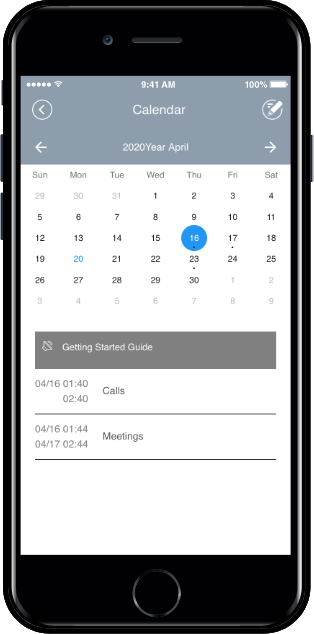
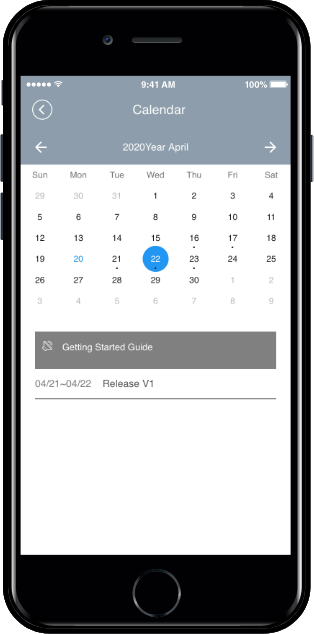
**After launching the app, go to the Calendar menu to see the calendars applied.**
Days with a scheduled date are marked.\
If you select the date, the events saved under the calendar are displayed.\
Once you have made an announcement, the announcement will appear as a fixed message on the calendar screen.
### **5. How to create a calendar event in the app**
Calendar events can also be created in the app.
1. Go to **Manager.** Select **Services** and click on **Bulletin Board** from the list.
2. Either click on **Create Bulletin Board** to create a new board or click on **Settings** to edit the existing board.
3. Select **Customize.**
4. Select **Calendar.**
5. Set the permission for the board.
6. Click on **Save.**
**Depending on how you run your calendar, your administrator can vary your settings.**
**Check out the example below.**
> 1. Only administrators create schedules, and app users only check the schedule\ **☞ Write permission: Select administrator, View detail permission, List view permission: Select user**
> 2. For community purposes, anyone using the app can create an event and everyone wants to share the event\ **☞ Write permission, detail view permission, list view permission: select ‘user’ for all**
> 3. My schedule cannot be seen by other people other than me (When using the calendar for personal use)\ **☞ Write permission: Select user, Detail view permission: Select user, List view permission: Select administrator**\
> \&#xNAN;**\*If you set permissions like the secret bulletin board (1:1 Customer Center), the user can check only his or her writings, and other users cannot see the writings of others. However, administrators can see the posts of all users**.
***
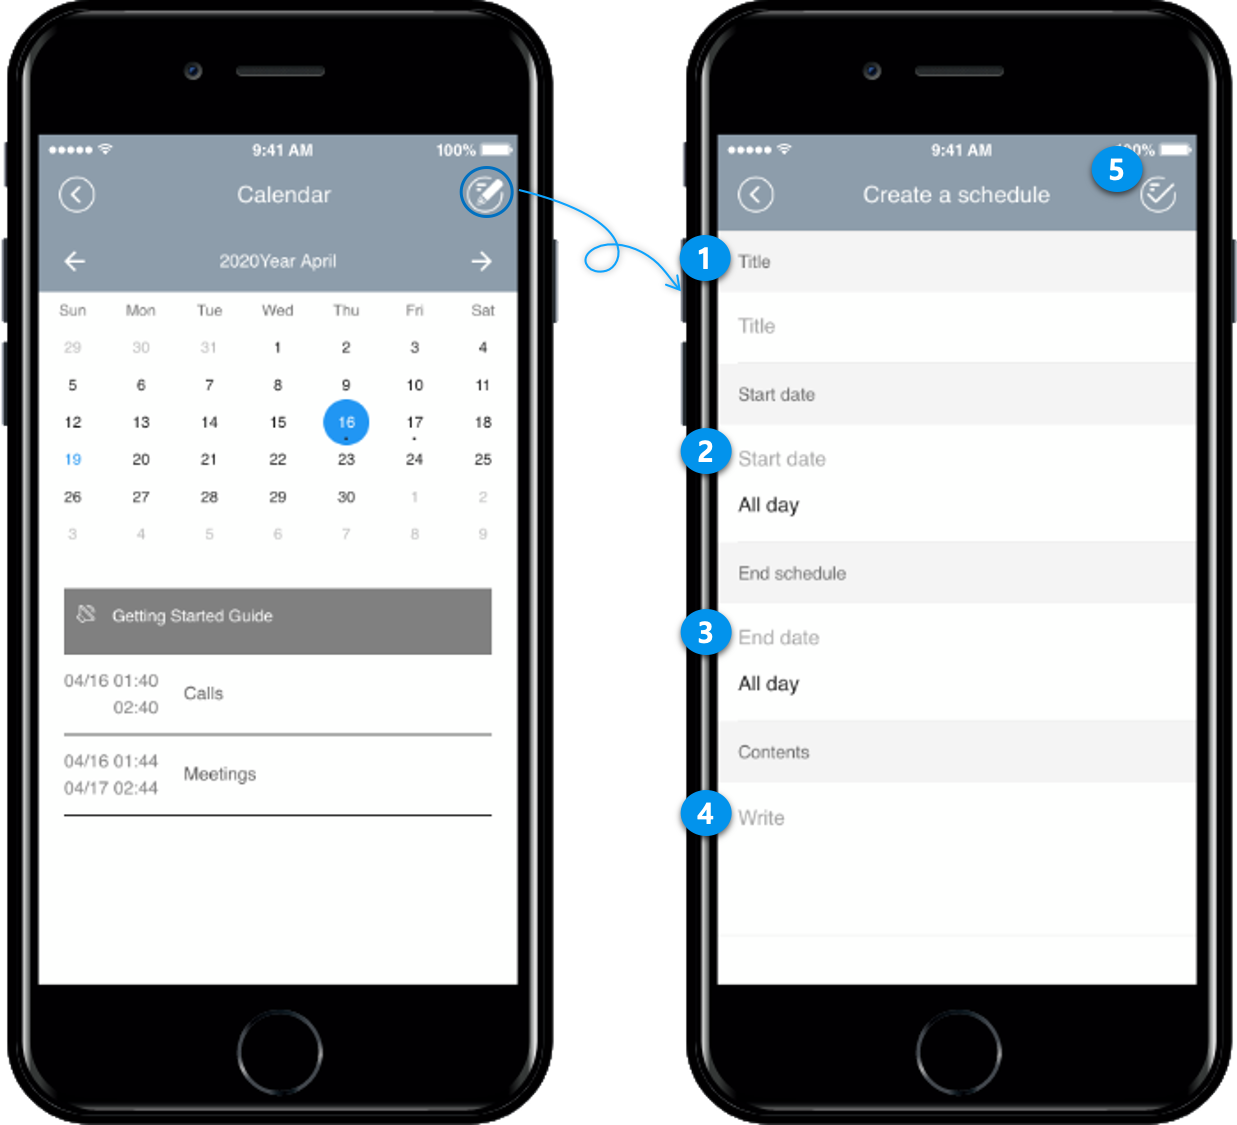
**▶How to create a calendar event in the app**
If you set the app to allow users to post, the Post button will appear at the top as shown in the image above.
Press the Write icon button in the upper right corner.
1. Title: Enter the event title.
2. Start Schedule: Enter the start date of the schedule (When you select a start schedule, you will see a calendar window where you can select a date and a time window where you can set the time)
3. End date: Enter the date when the schedule ends (You can set the same end date and time)
4. Content: Please fill in the details related to the schedule.
5. Press the Completed icon button on the upper right corner to save.
***
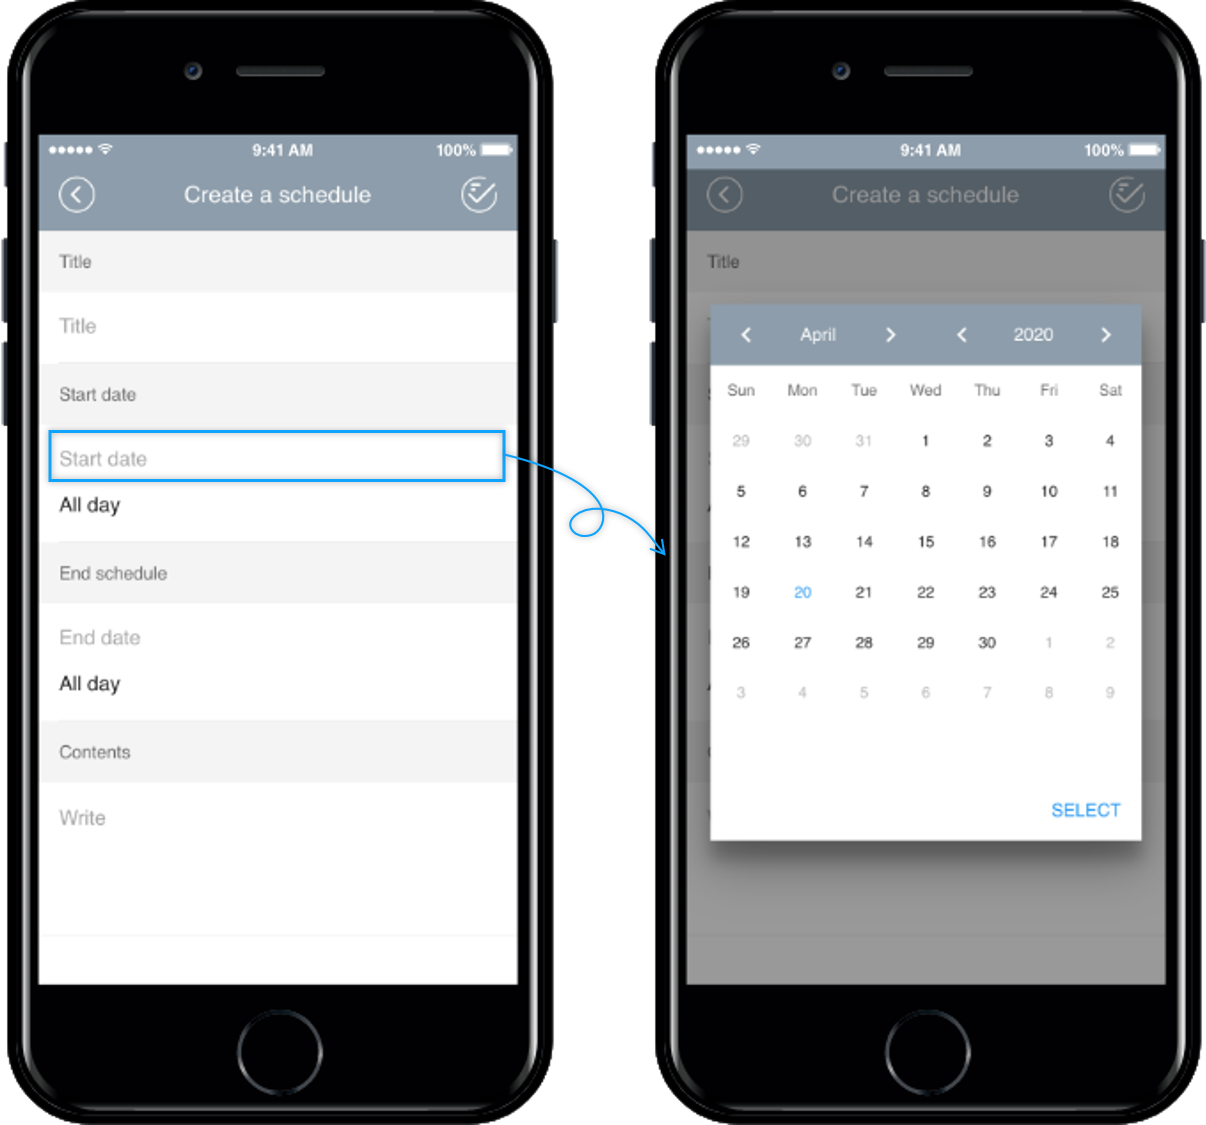
**1. How to set the date**
Select Start Date to open the Calendar window where you can select a date.
Please select the date you want.
***
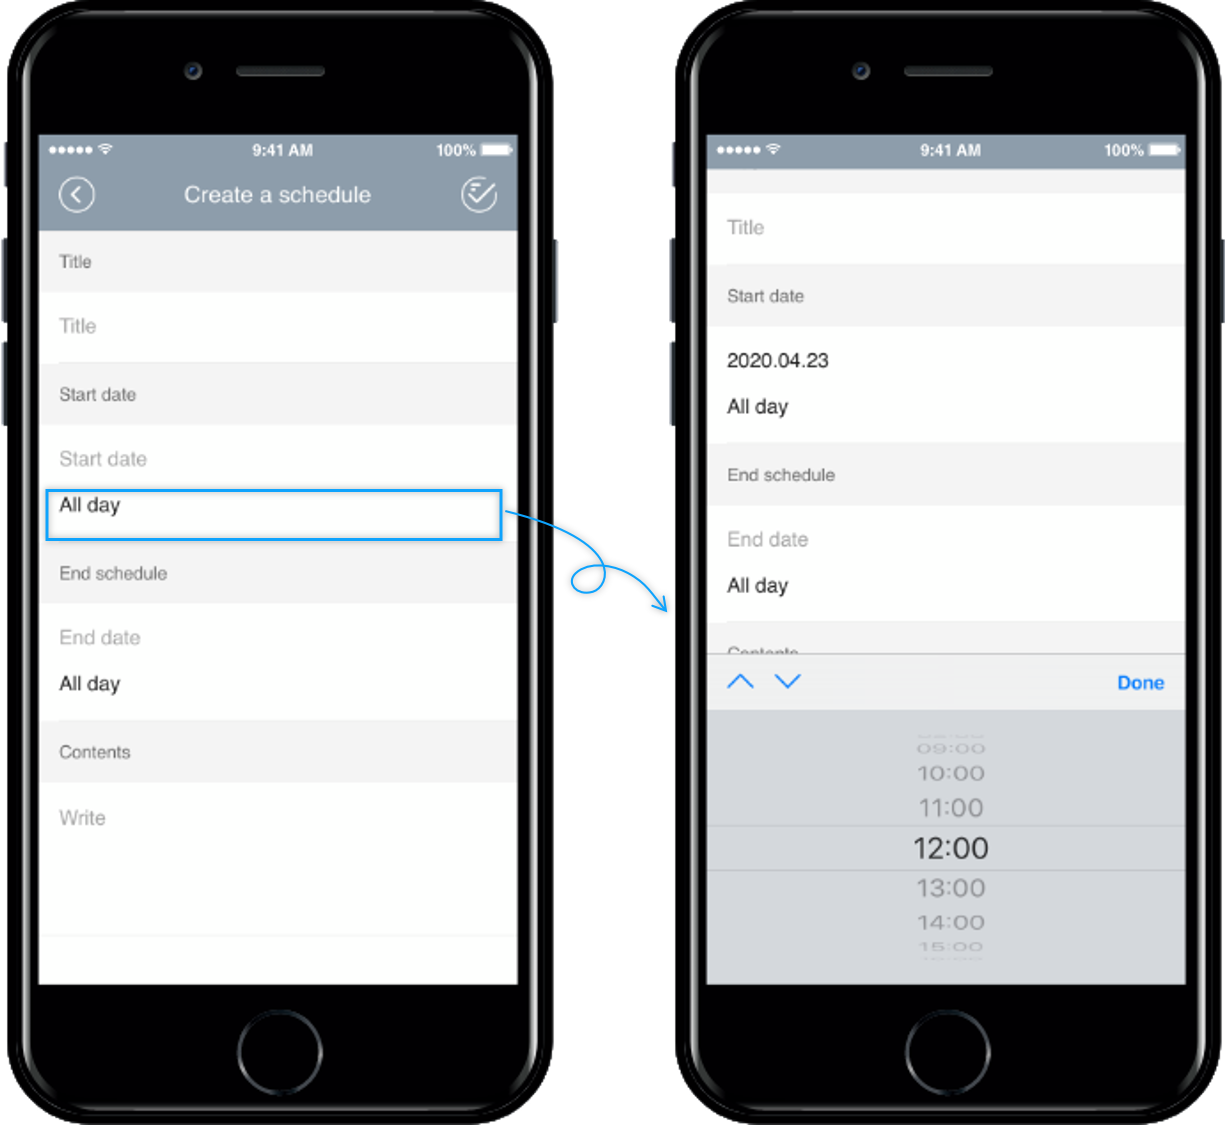
**2. How to set the time**
Select \[All Day] to open the time window where you can select the time.
You can choose the time you want, or if you don’t have a specific time, you can choose ‘all day’.
This way, you can create events and share calendar events in the app!
Since the calendar is also a bulletin board function, a user who creates an event can edit and delete his or her schedule.
***
{% hint style="danger" %} **Notice**
1. You can create a calendar, create an event, and manage everything on the web (swing2app homepage-Manager), and you can also create it in the app by setting the bulletin board permissions\*\*.\*\*
2. If you add, edit, delete a calendar event on the web and save it, the app will be automatically reflected.
{% endhint %}