> For the complete documentation index, see [llms.txt](https://documentation.swing2app.com/llms.txt). Markdown versions of documentation pages are available by appending `.md` to page URLs; this page is available as [Markdown](https://documentation.swing2app.com/store/playstore/update-playstore.md).
# Launching Play Store App

**App release on Google Play Store \_ Updated version in August 2021**
\* You must first create a Google Developer account to register the Play Store app.
**Google Developer Console Site:** [**https://play.google.com/console/developers**](https://play.google.com/console/developers)
Please register your account on the site and pay a $25 fee. (A one-time payment)
Once you’ve paid, you can go to the Google Play Store developer console screen and add the application.
\*Having a regular Gmail account doesn’t mean that it’s a Google developer account. The account you paid with the $25 registration fee on the Google Console will be your Developer account.
**Please refer to the help manual on how to register a Google Developer account.**
[**▶ Go to the Google Developer Account Registration Manual**](/store/playstore/google-developer.md)
The Play Store release is only available for Swing2App paid version app or free commercial version app!
Free apps are not available for store release.
**Google Developer Console Site**
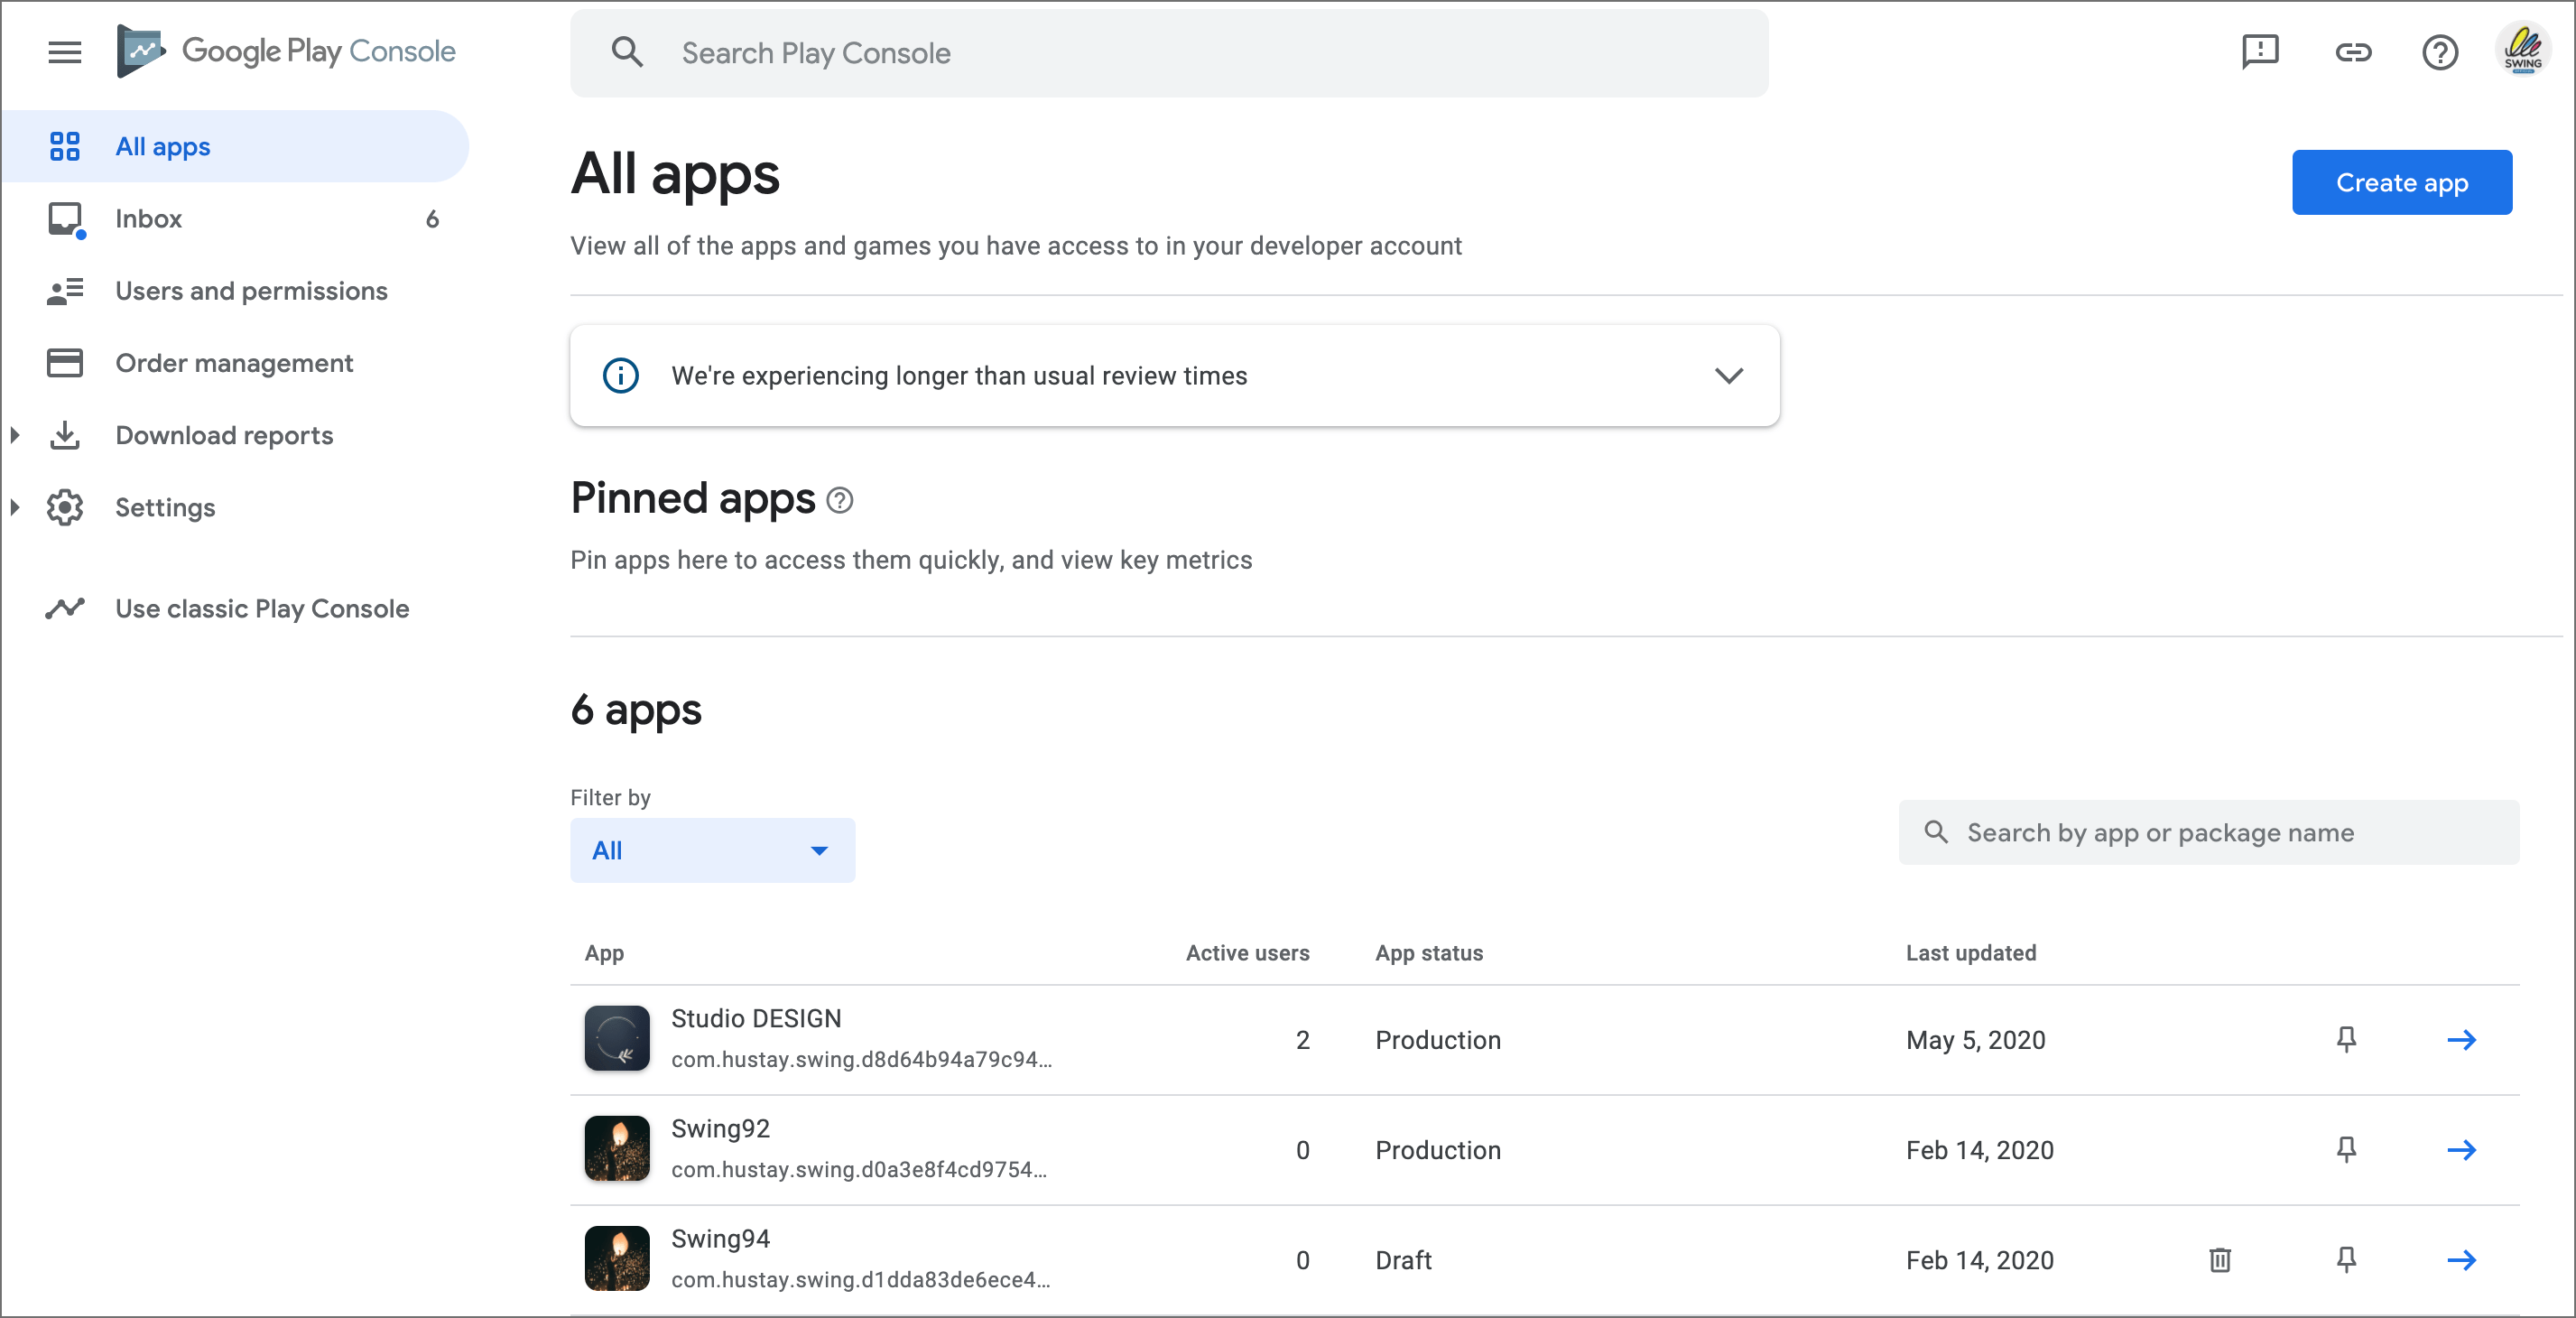
When you go to the console site, the first step is to create an app by selecting the **\[Create app]**\*\* button.\*\*
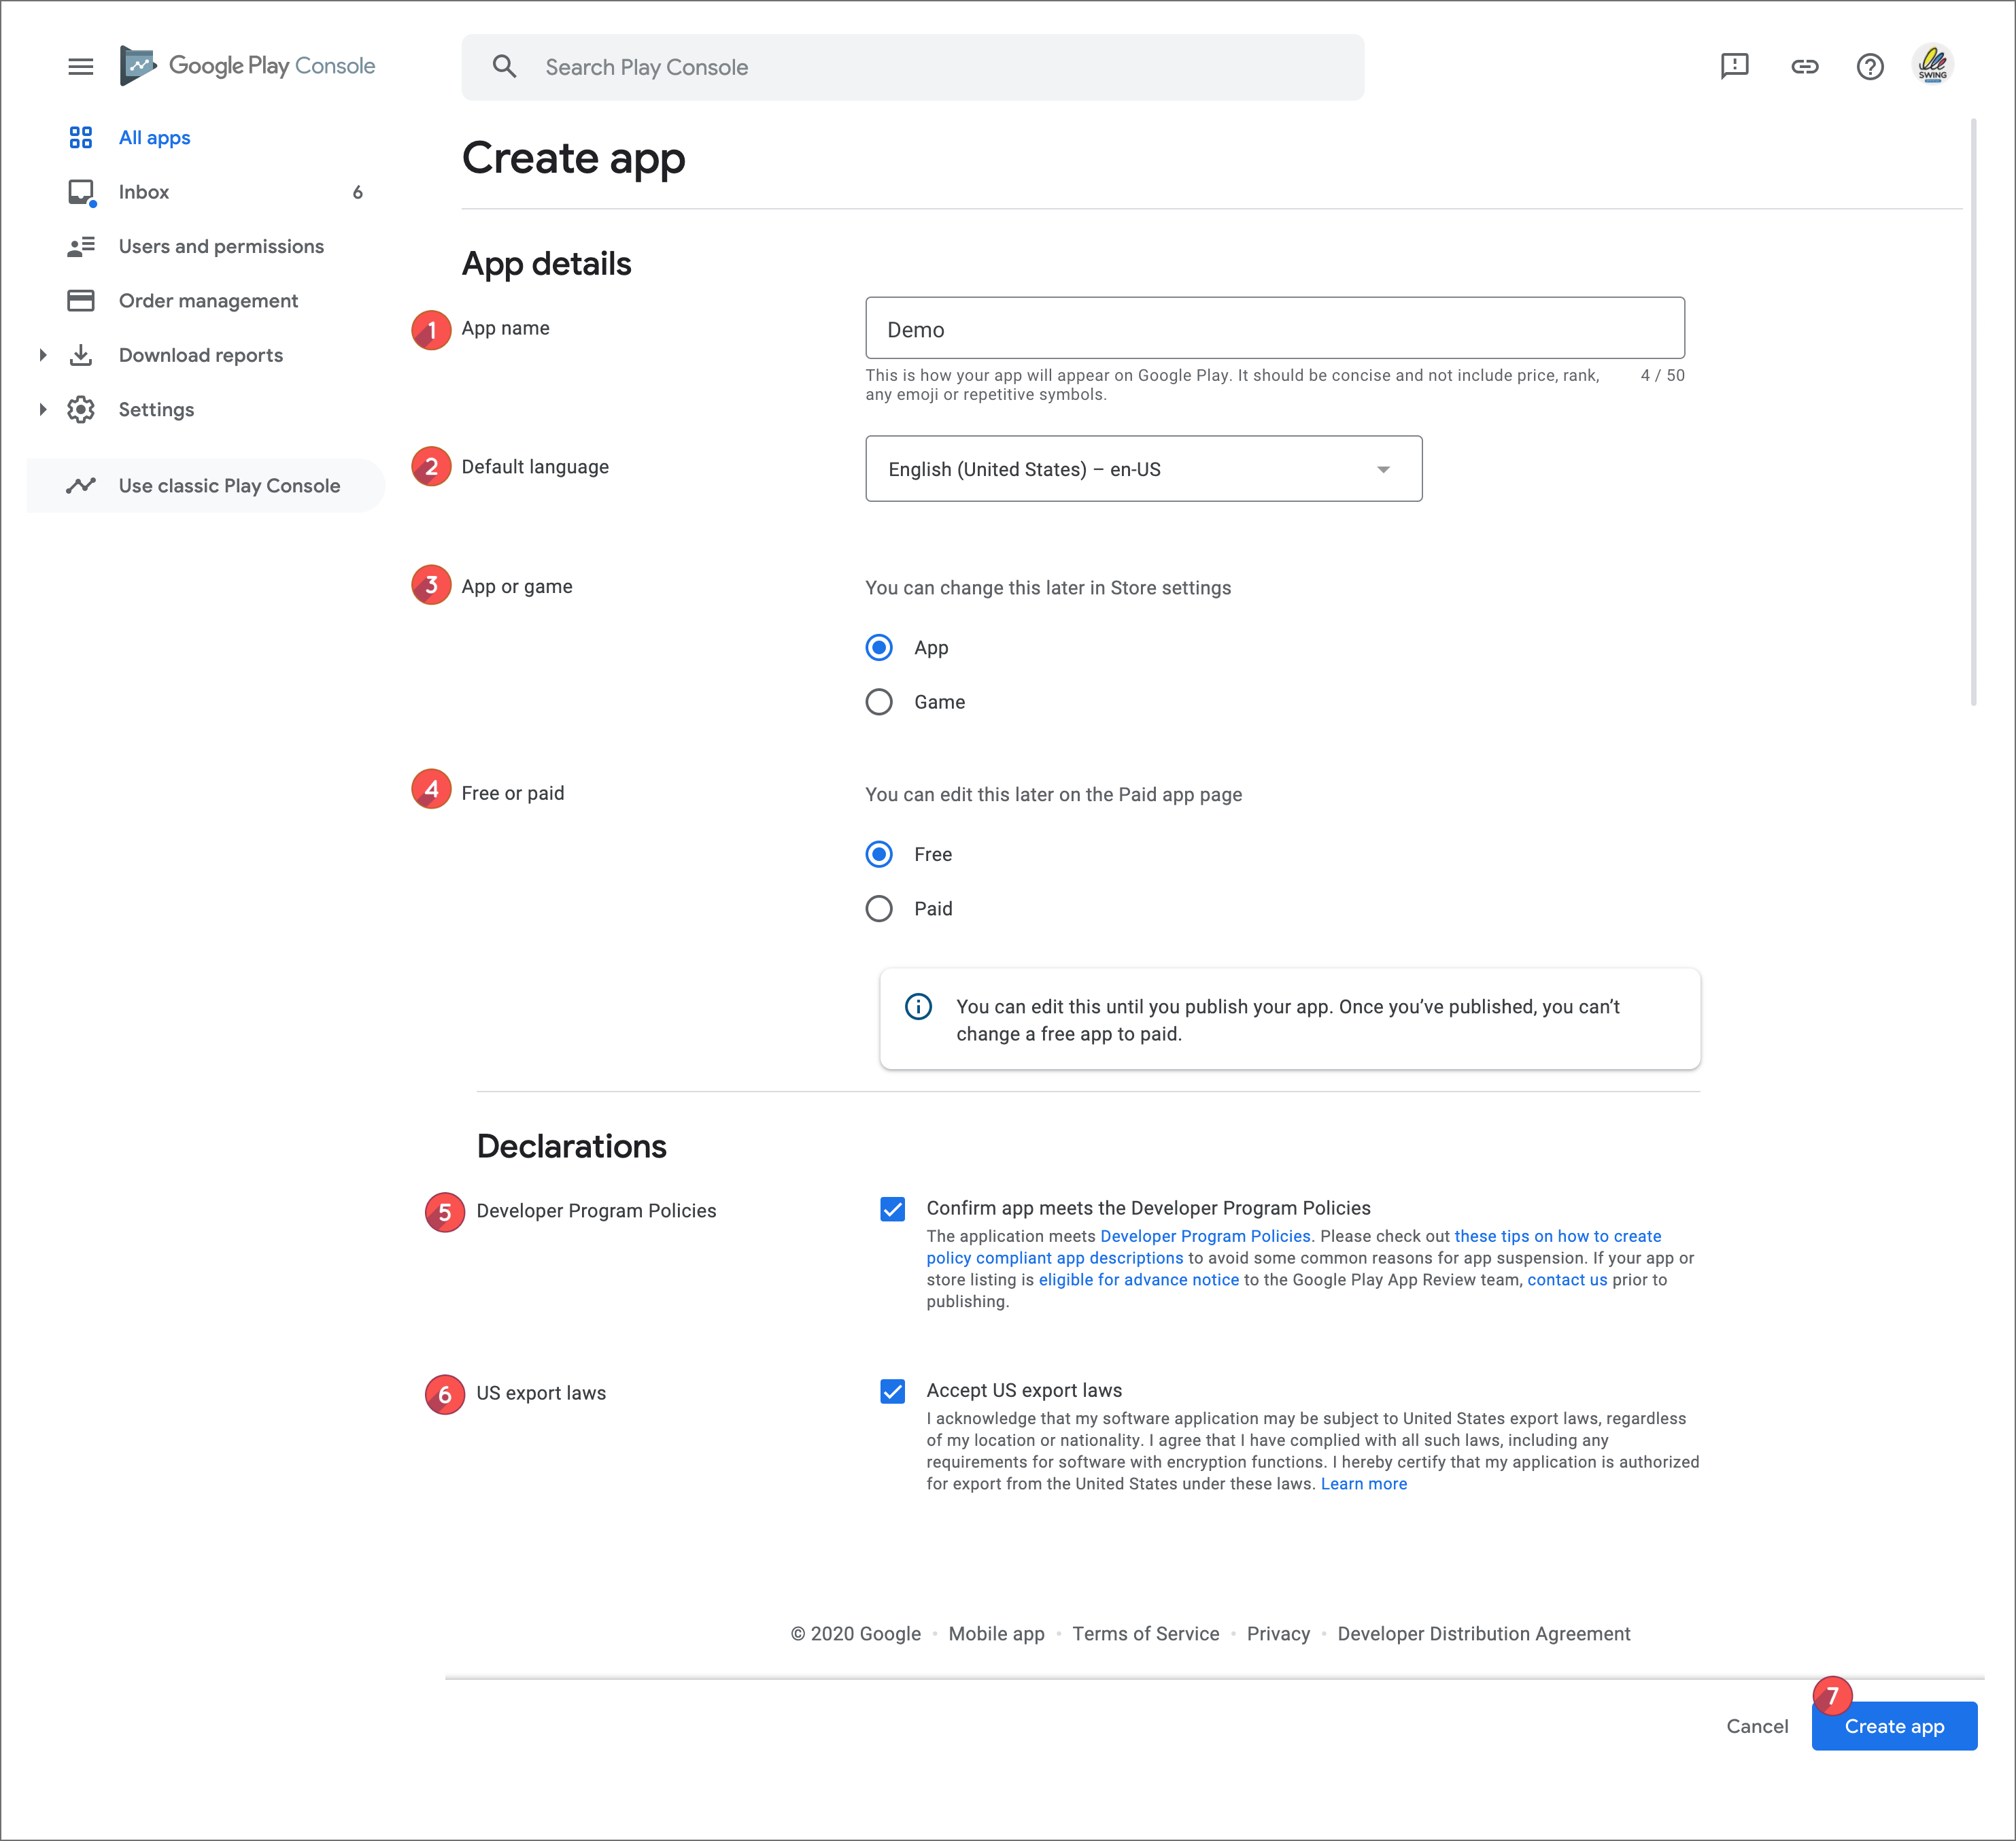
1. App name (play store release name)
2. Default language: Select Korean (if it needs to be distributed in a specific country, select it in that language, eg, USA)
3. Select an app or game: Select as an app.
4. Paid or free selection (If the app is sold for a fee, select ‘Paid’, and if you select ‘Free’, you cannot change to paid afterwards)
5. Developer program policy check
6. Check US export laws
7. Select the \[Create app] button.
###  **STEP.1 Initial Settings**
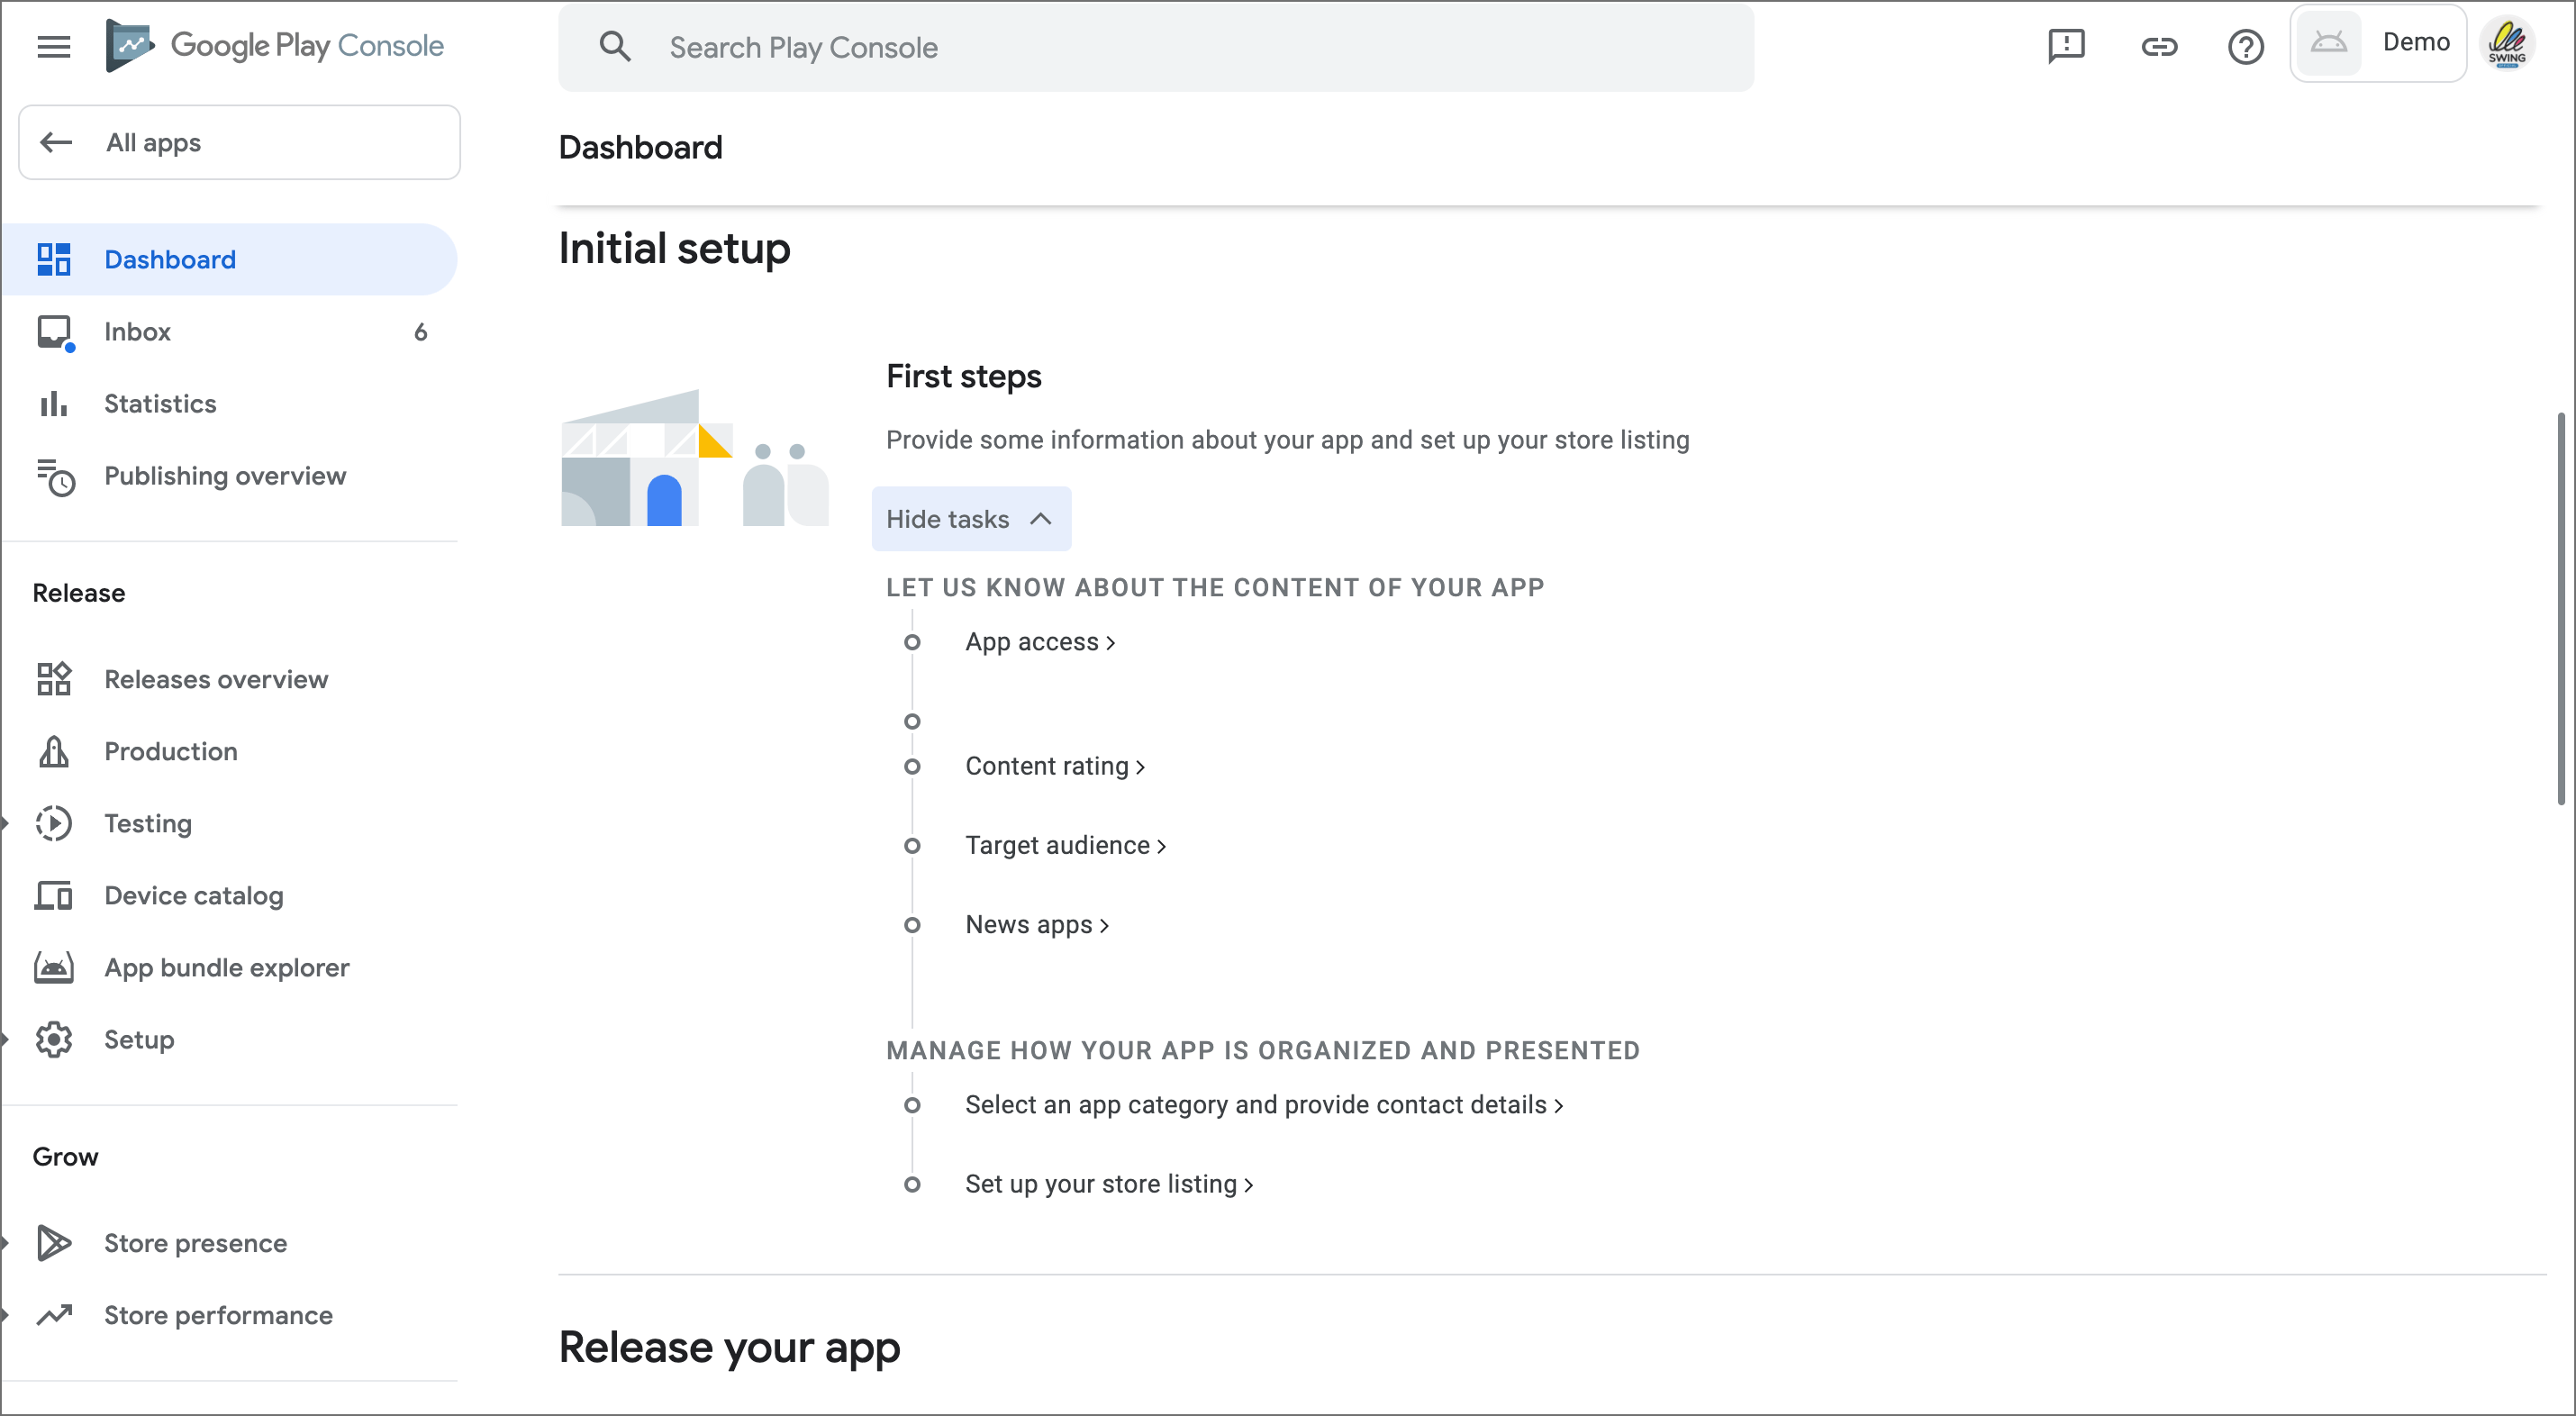
If you look at the dashboard, the step-by-step menu is listed in order.
Select one by one and complete the input.
****
**1. App access rights**
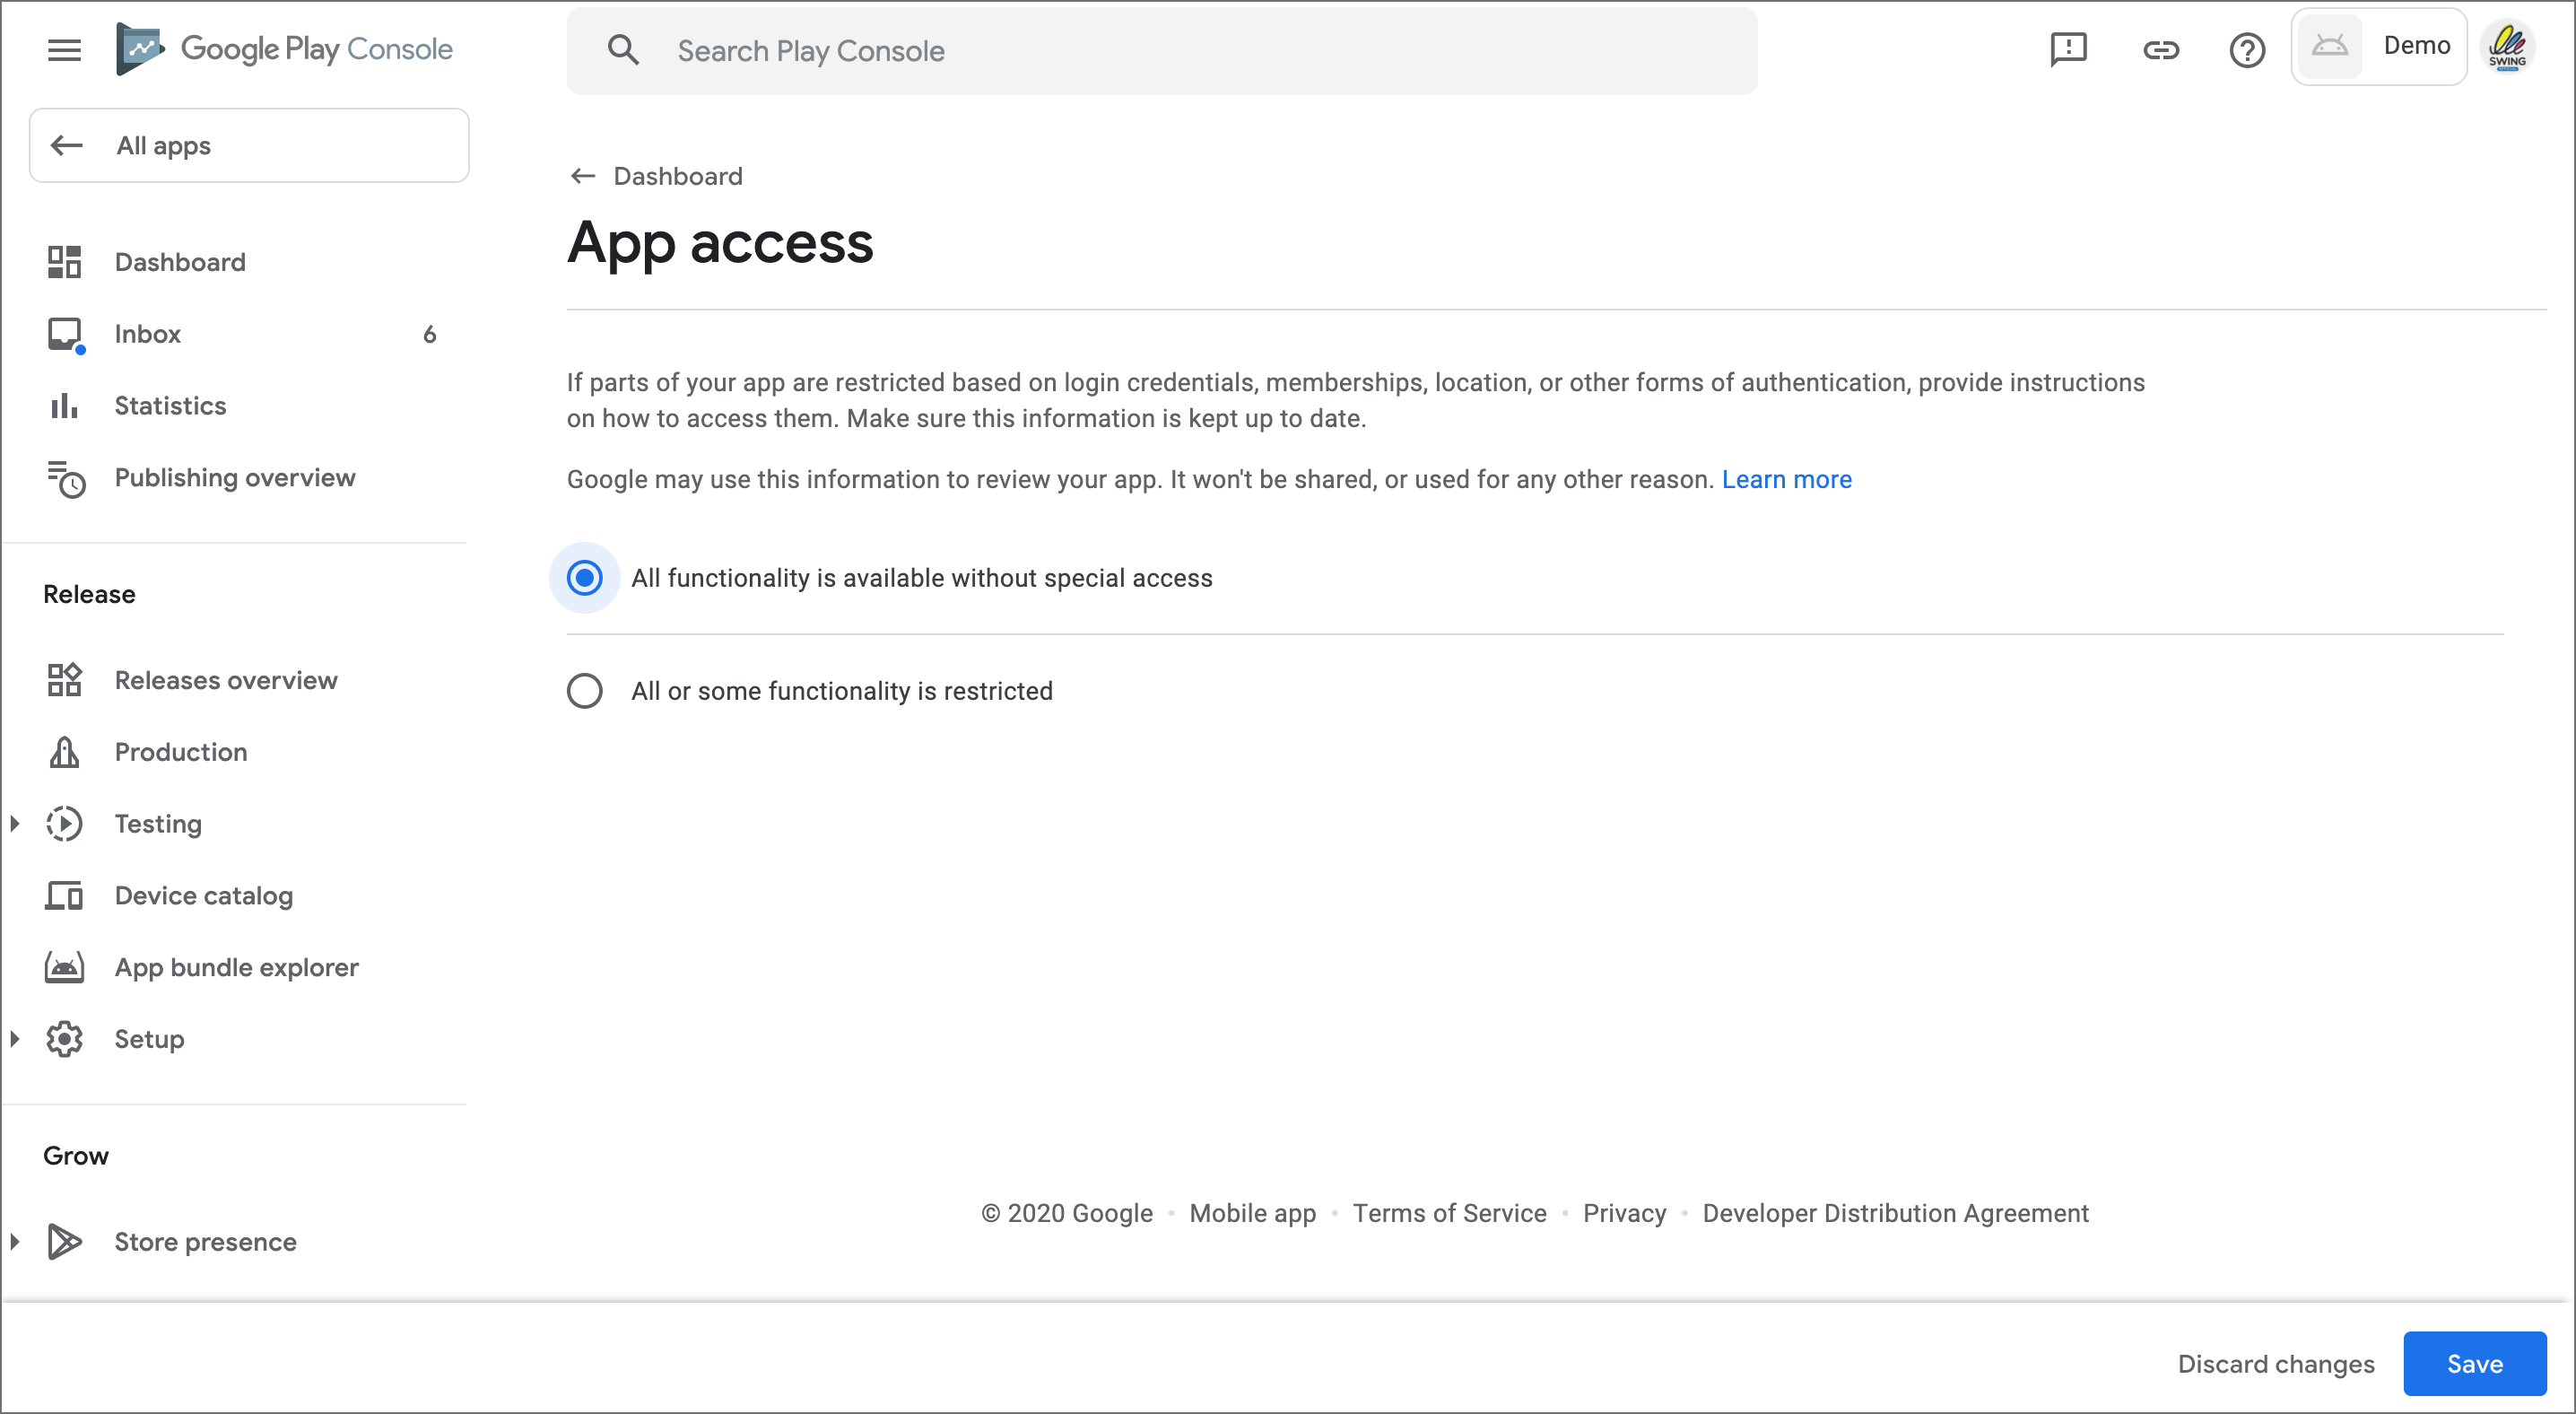
****Save after checking “All functions can be used without special access rights”
**2. Check for advertisement**
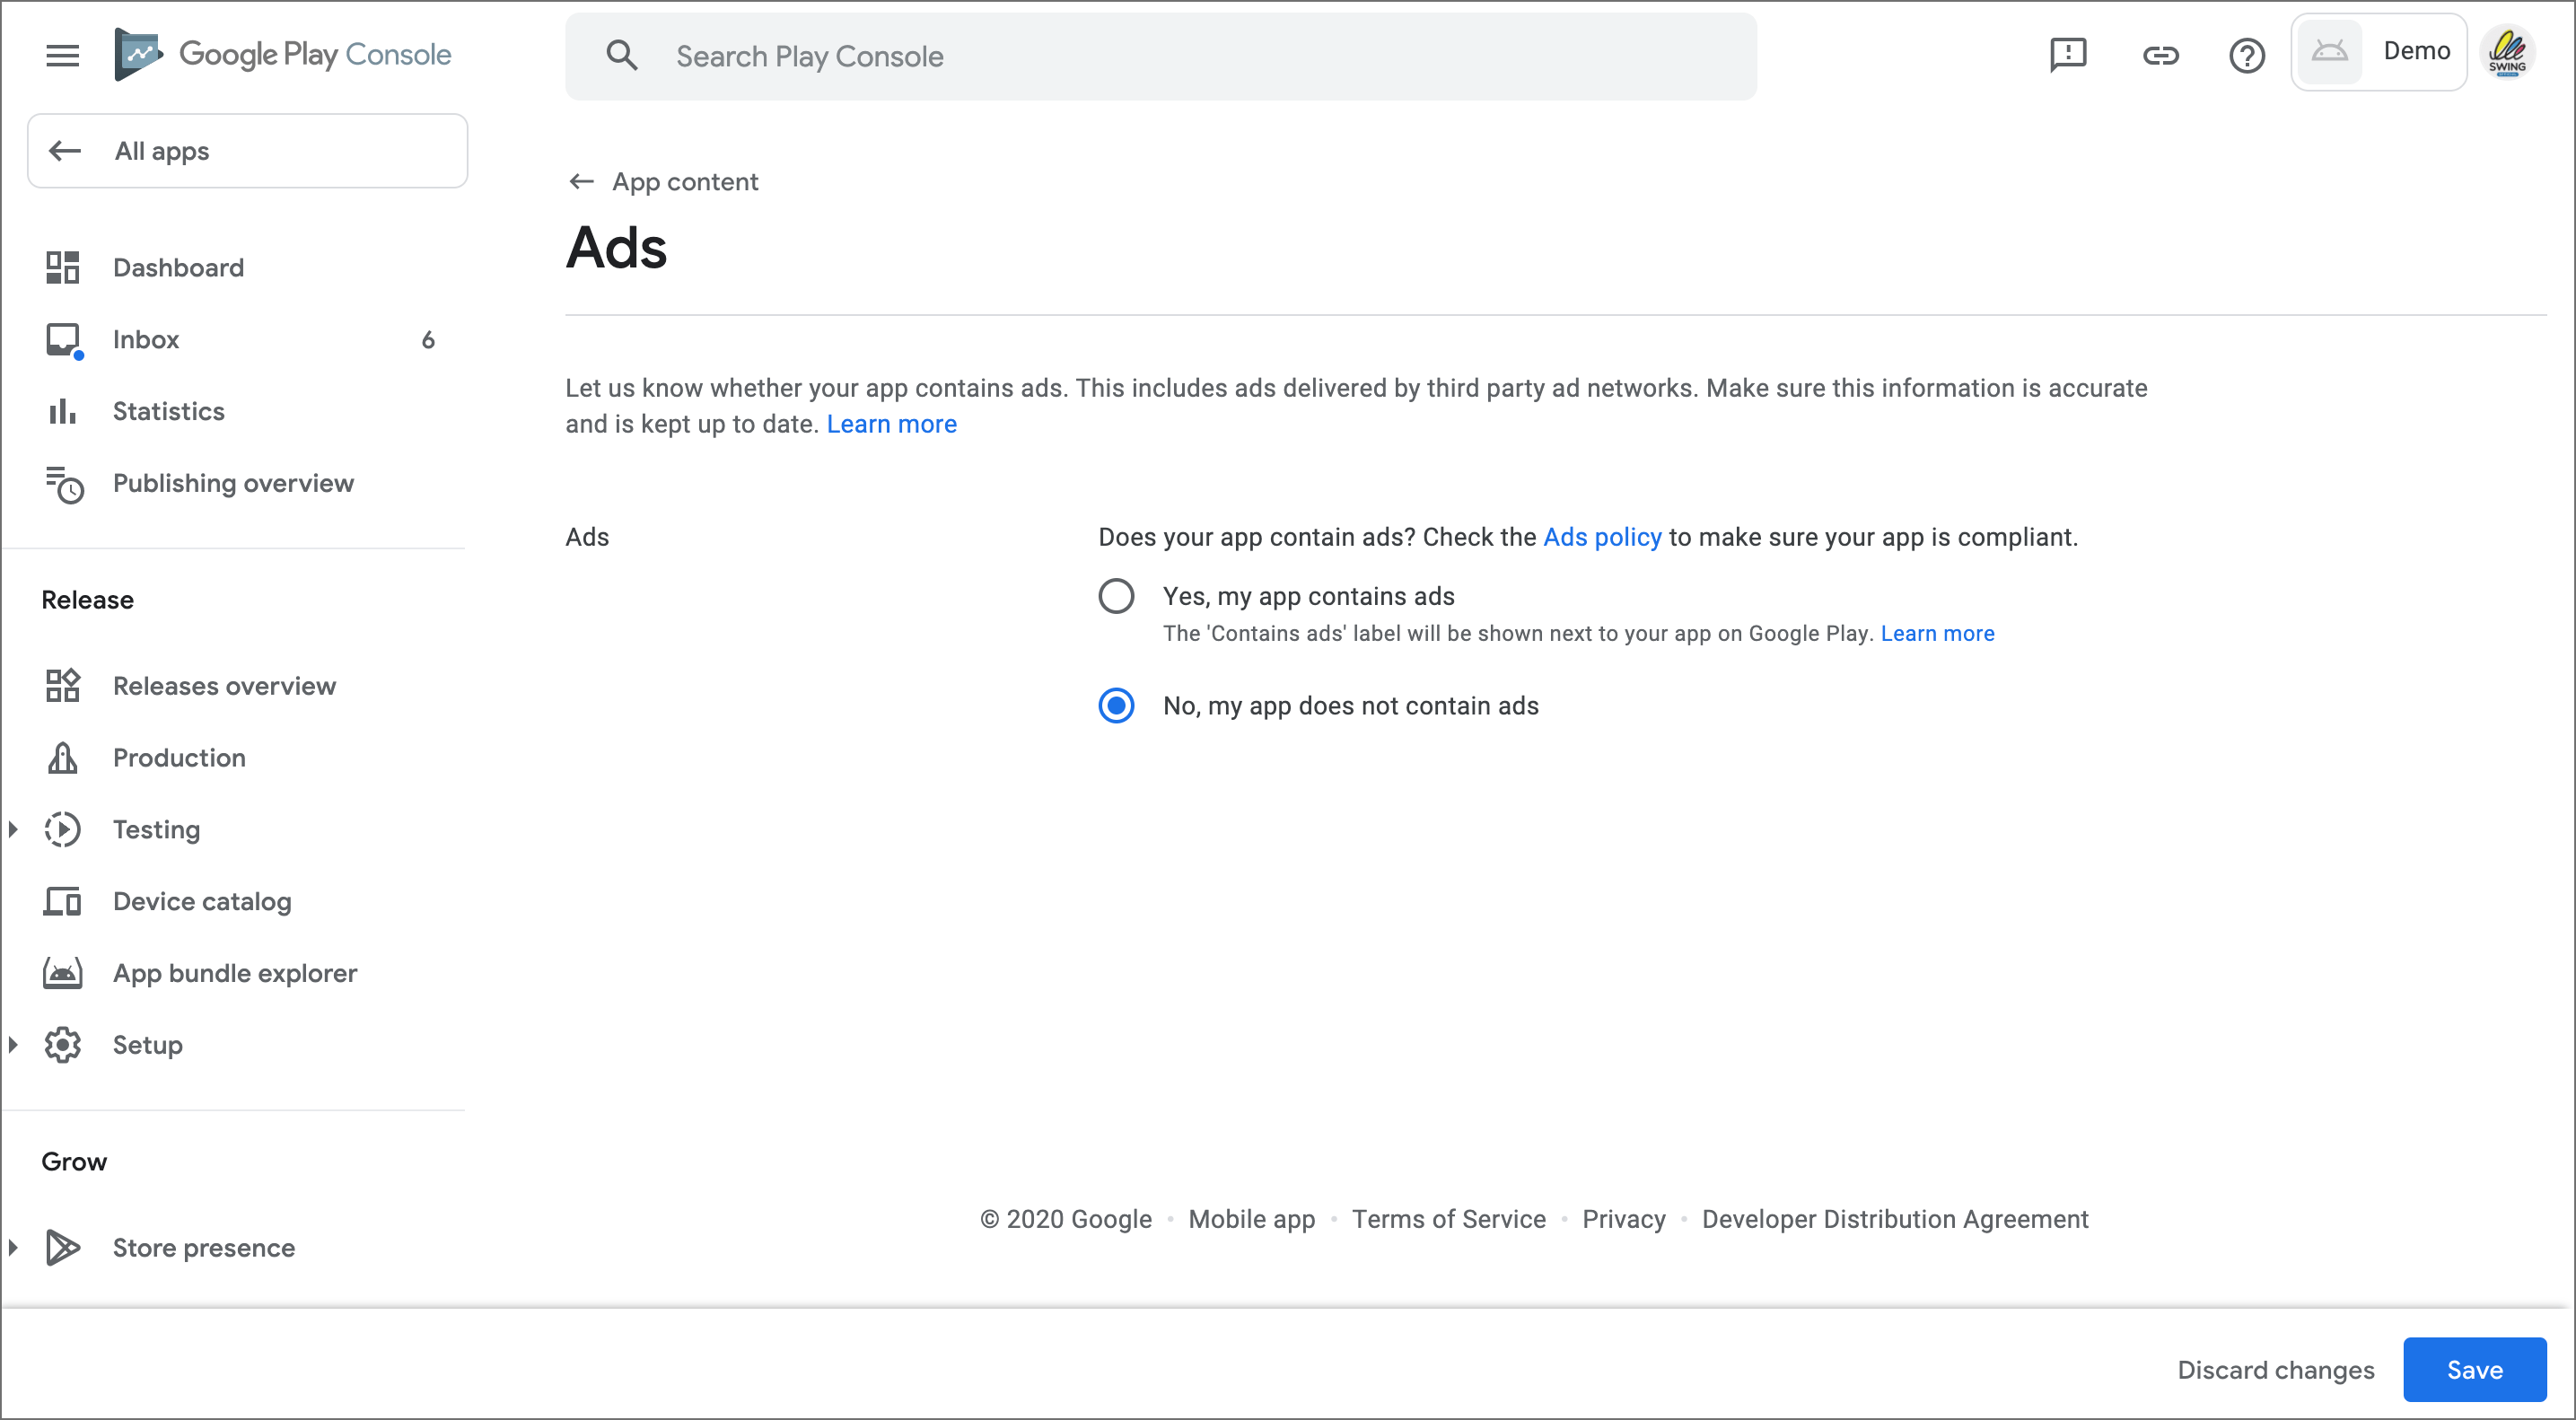
If there is an advertisement in the app, check “Yes, the app has advertisements”
If there are no ads, check “No, there are no ads in the app” and save
**3. Content Rating**
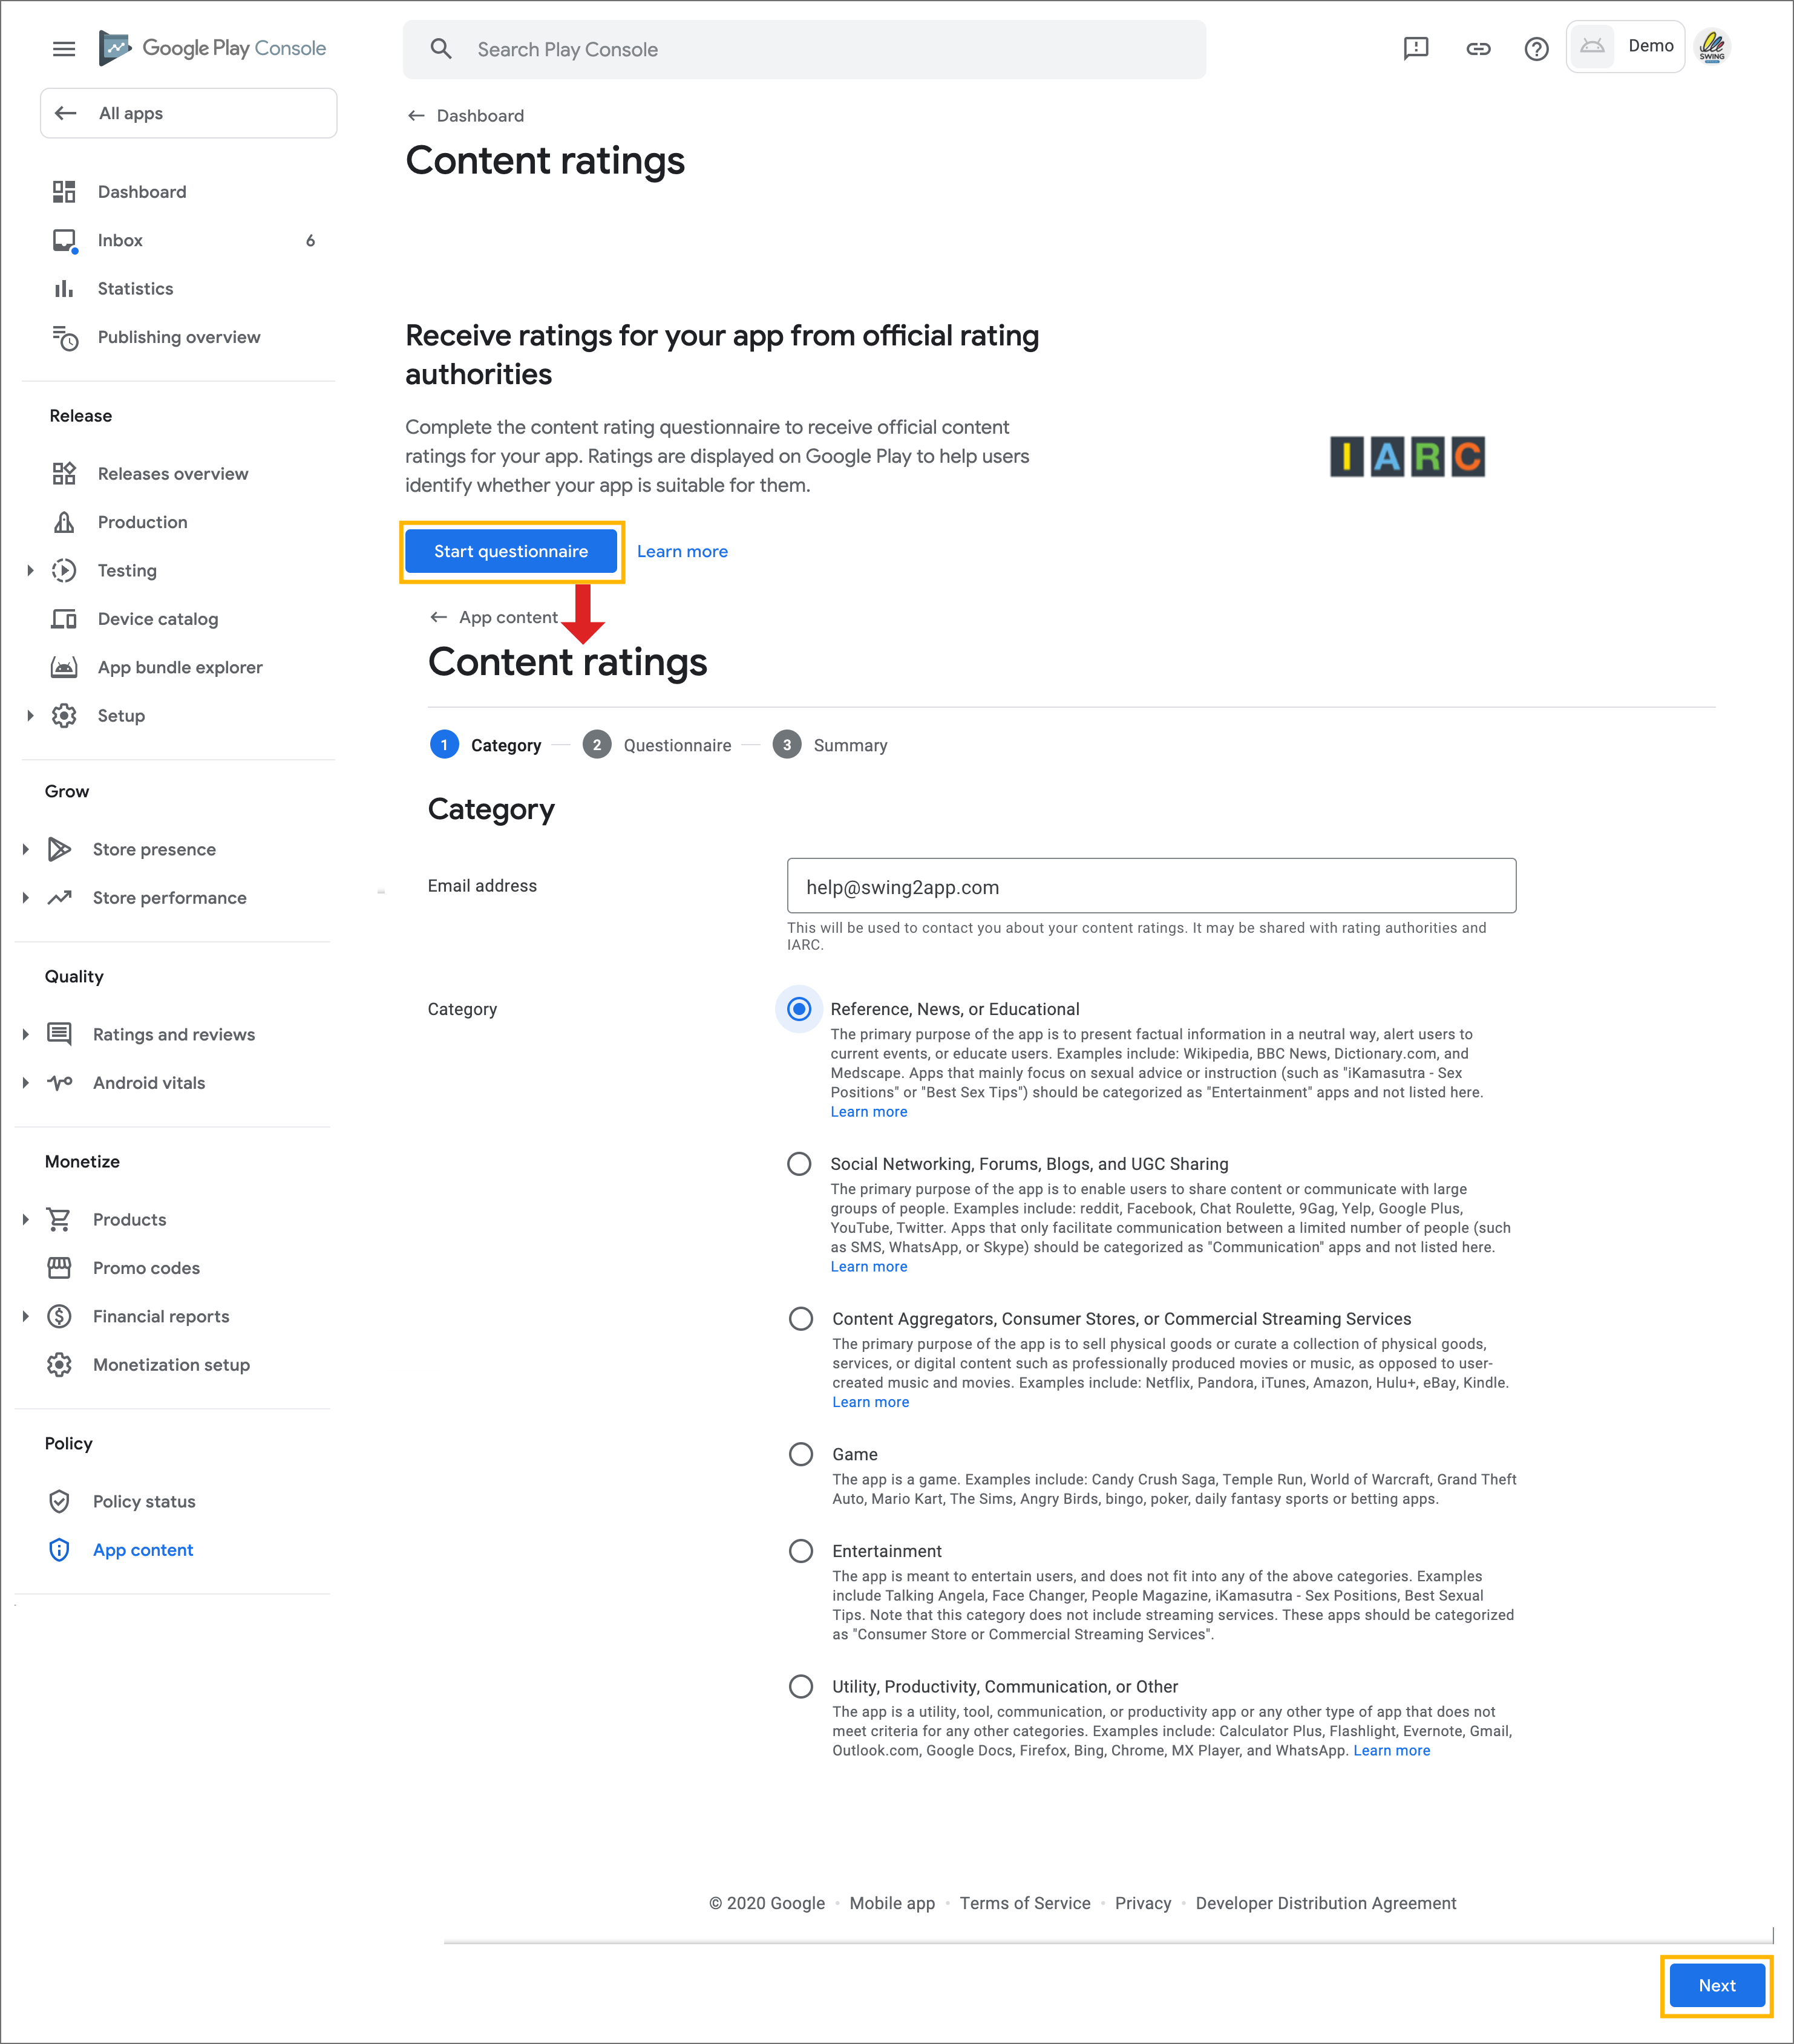
Select the \[Start Survey] button at the content rating level.
-Enter your email address and select a category.
Just select the app you want to upload and the category that best suits you.
If you don’t have a category that fits your app, check “Utilities, Productivity, Communication, and More” at the end. Choose the Next button.
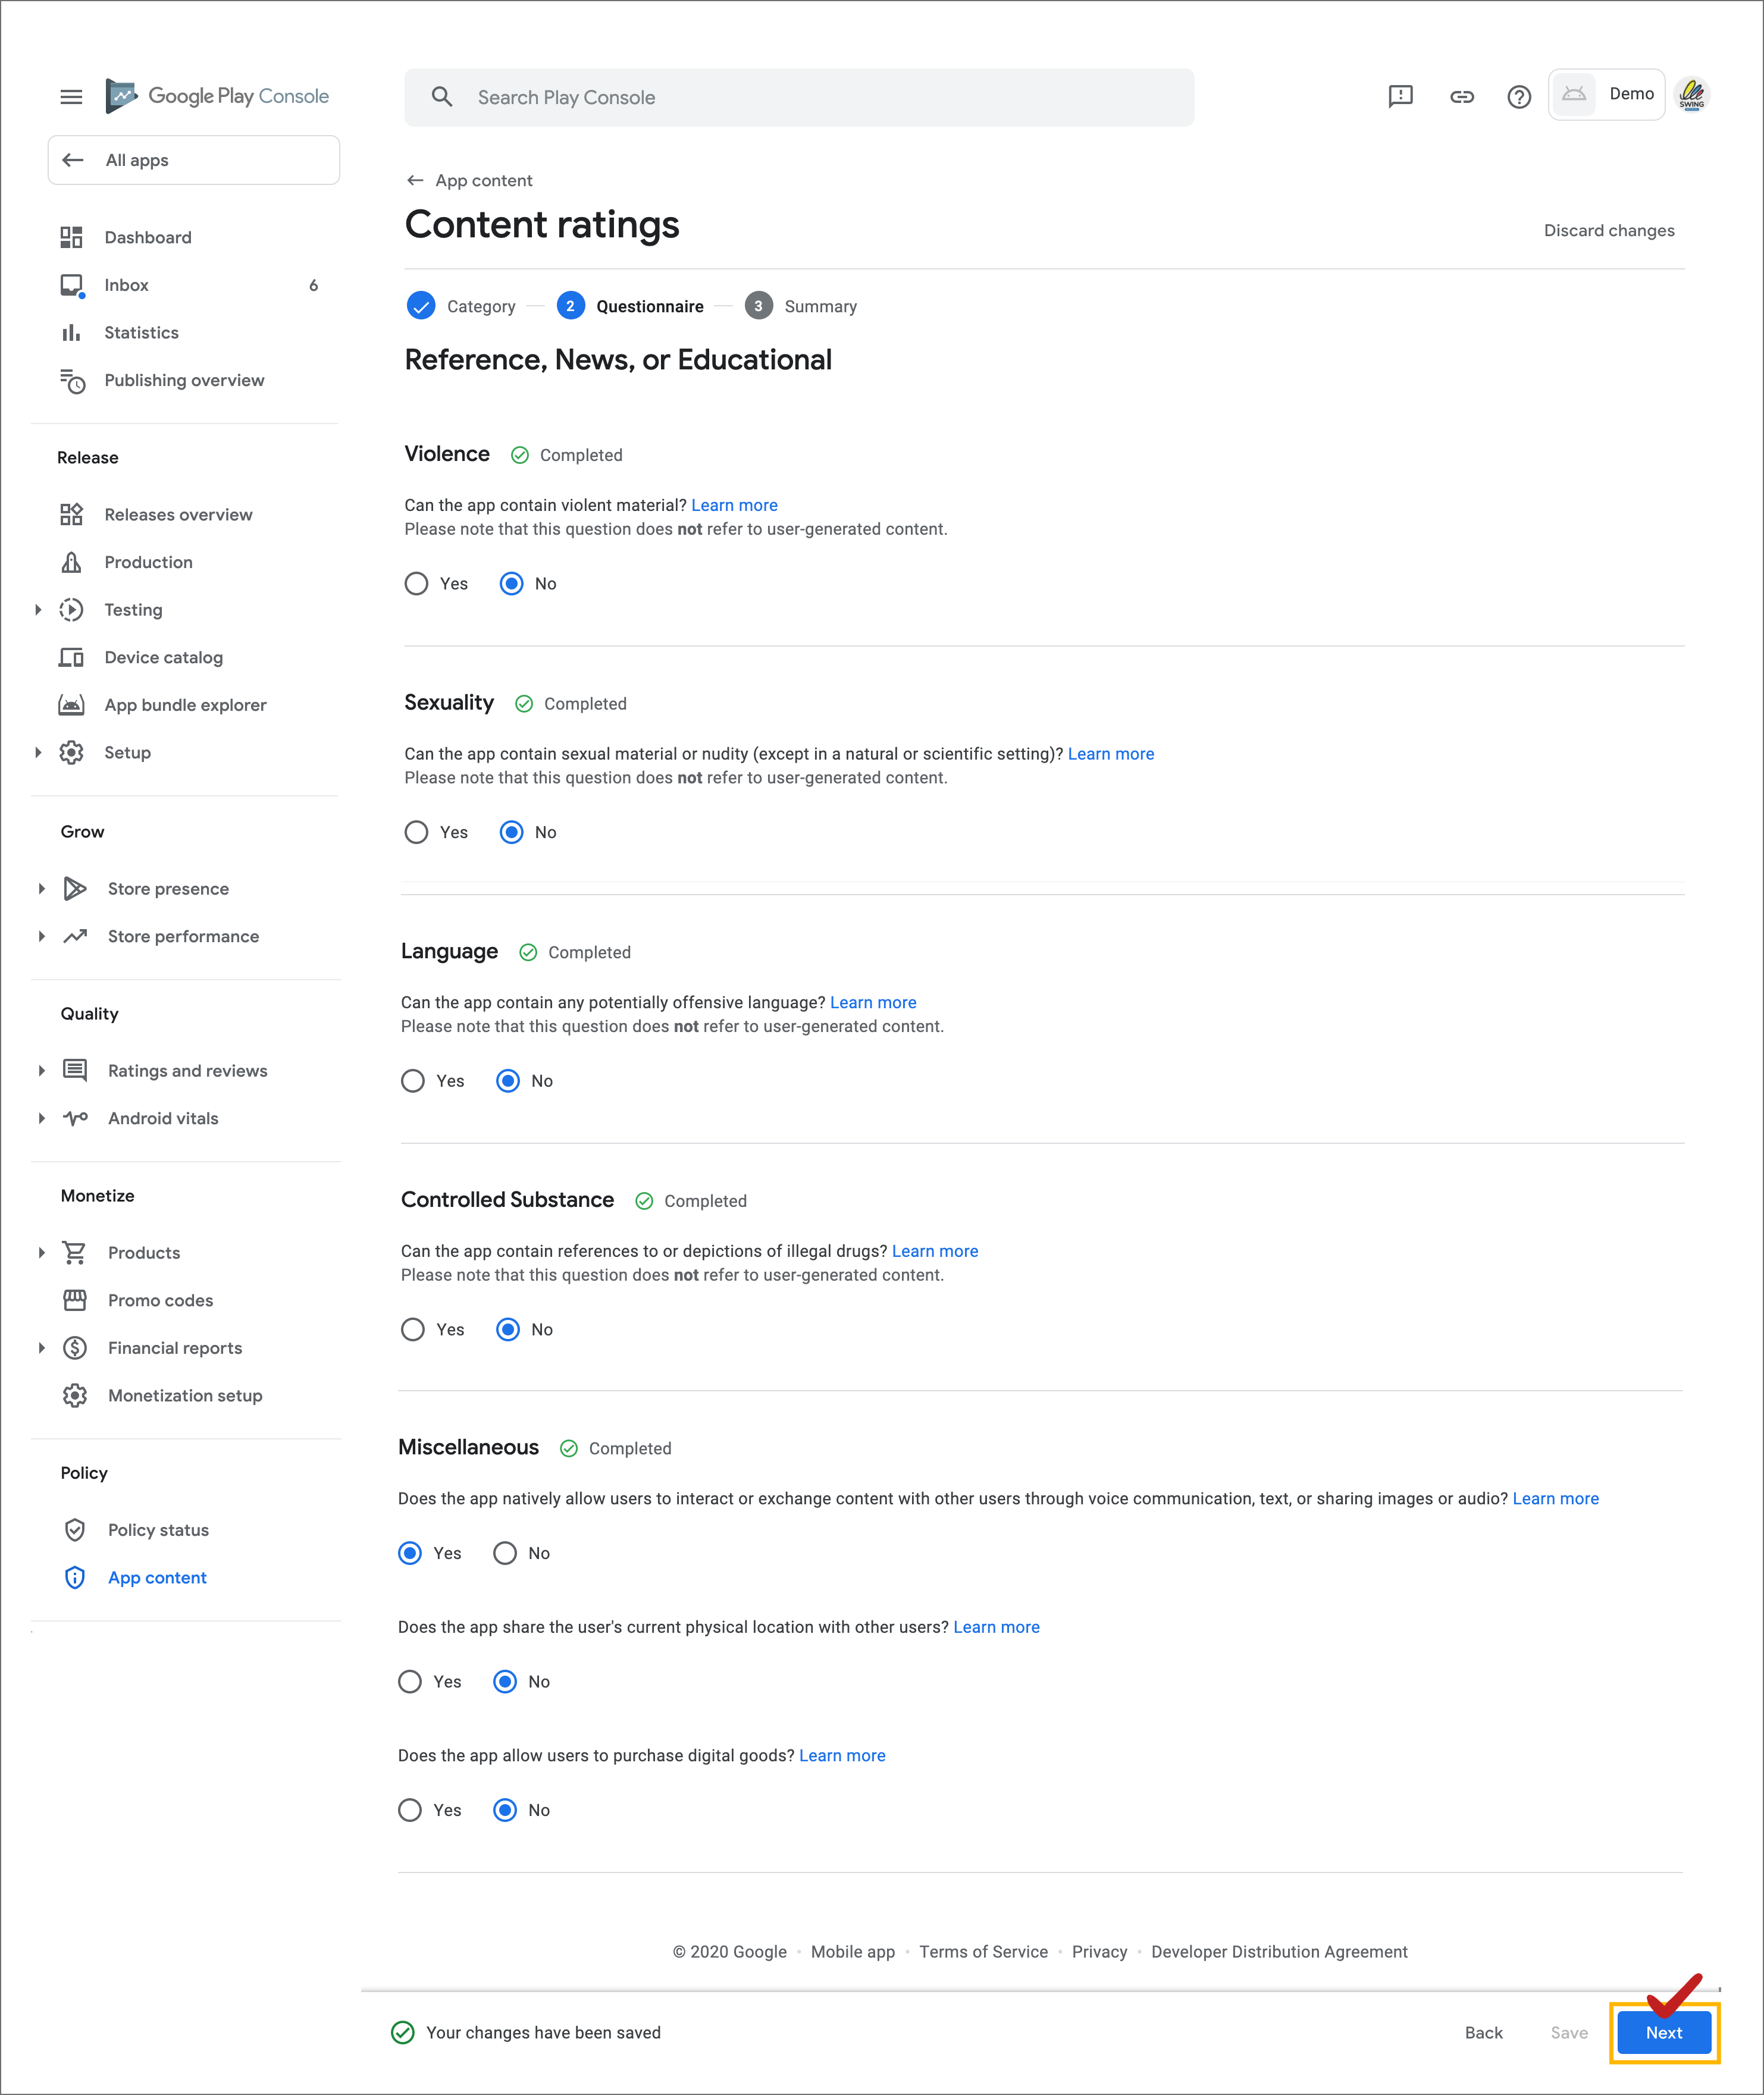
A questionnaire entry item for the category is created.
Check the questionnaire questionnaire, check Yes or No, and click the \[Next] button.
\*The questionnaire question must reflect the content provided by the app.
Example) If there is sexual material exposure in the app, you must check “Yes”, and if alcohol or drug content is included, you must check “Yes”.
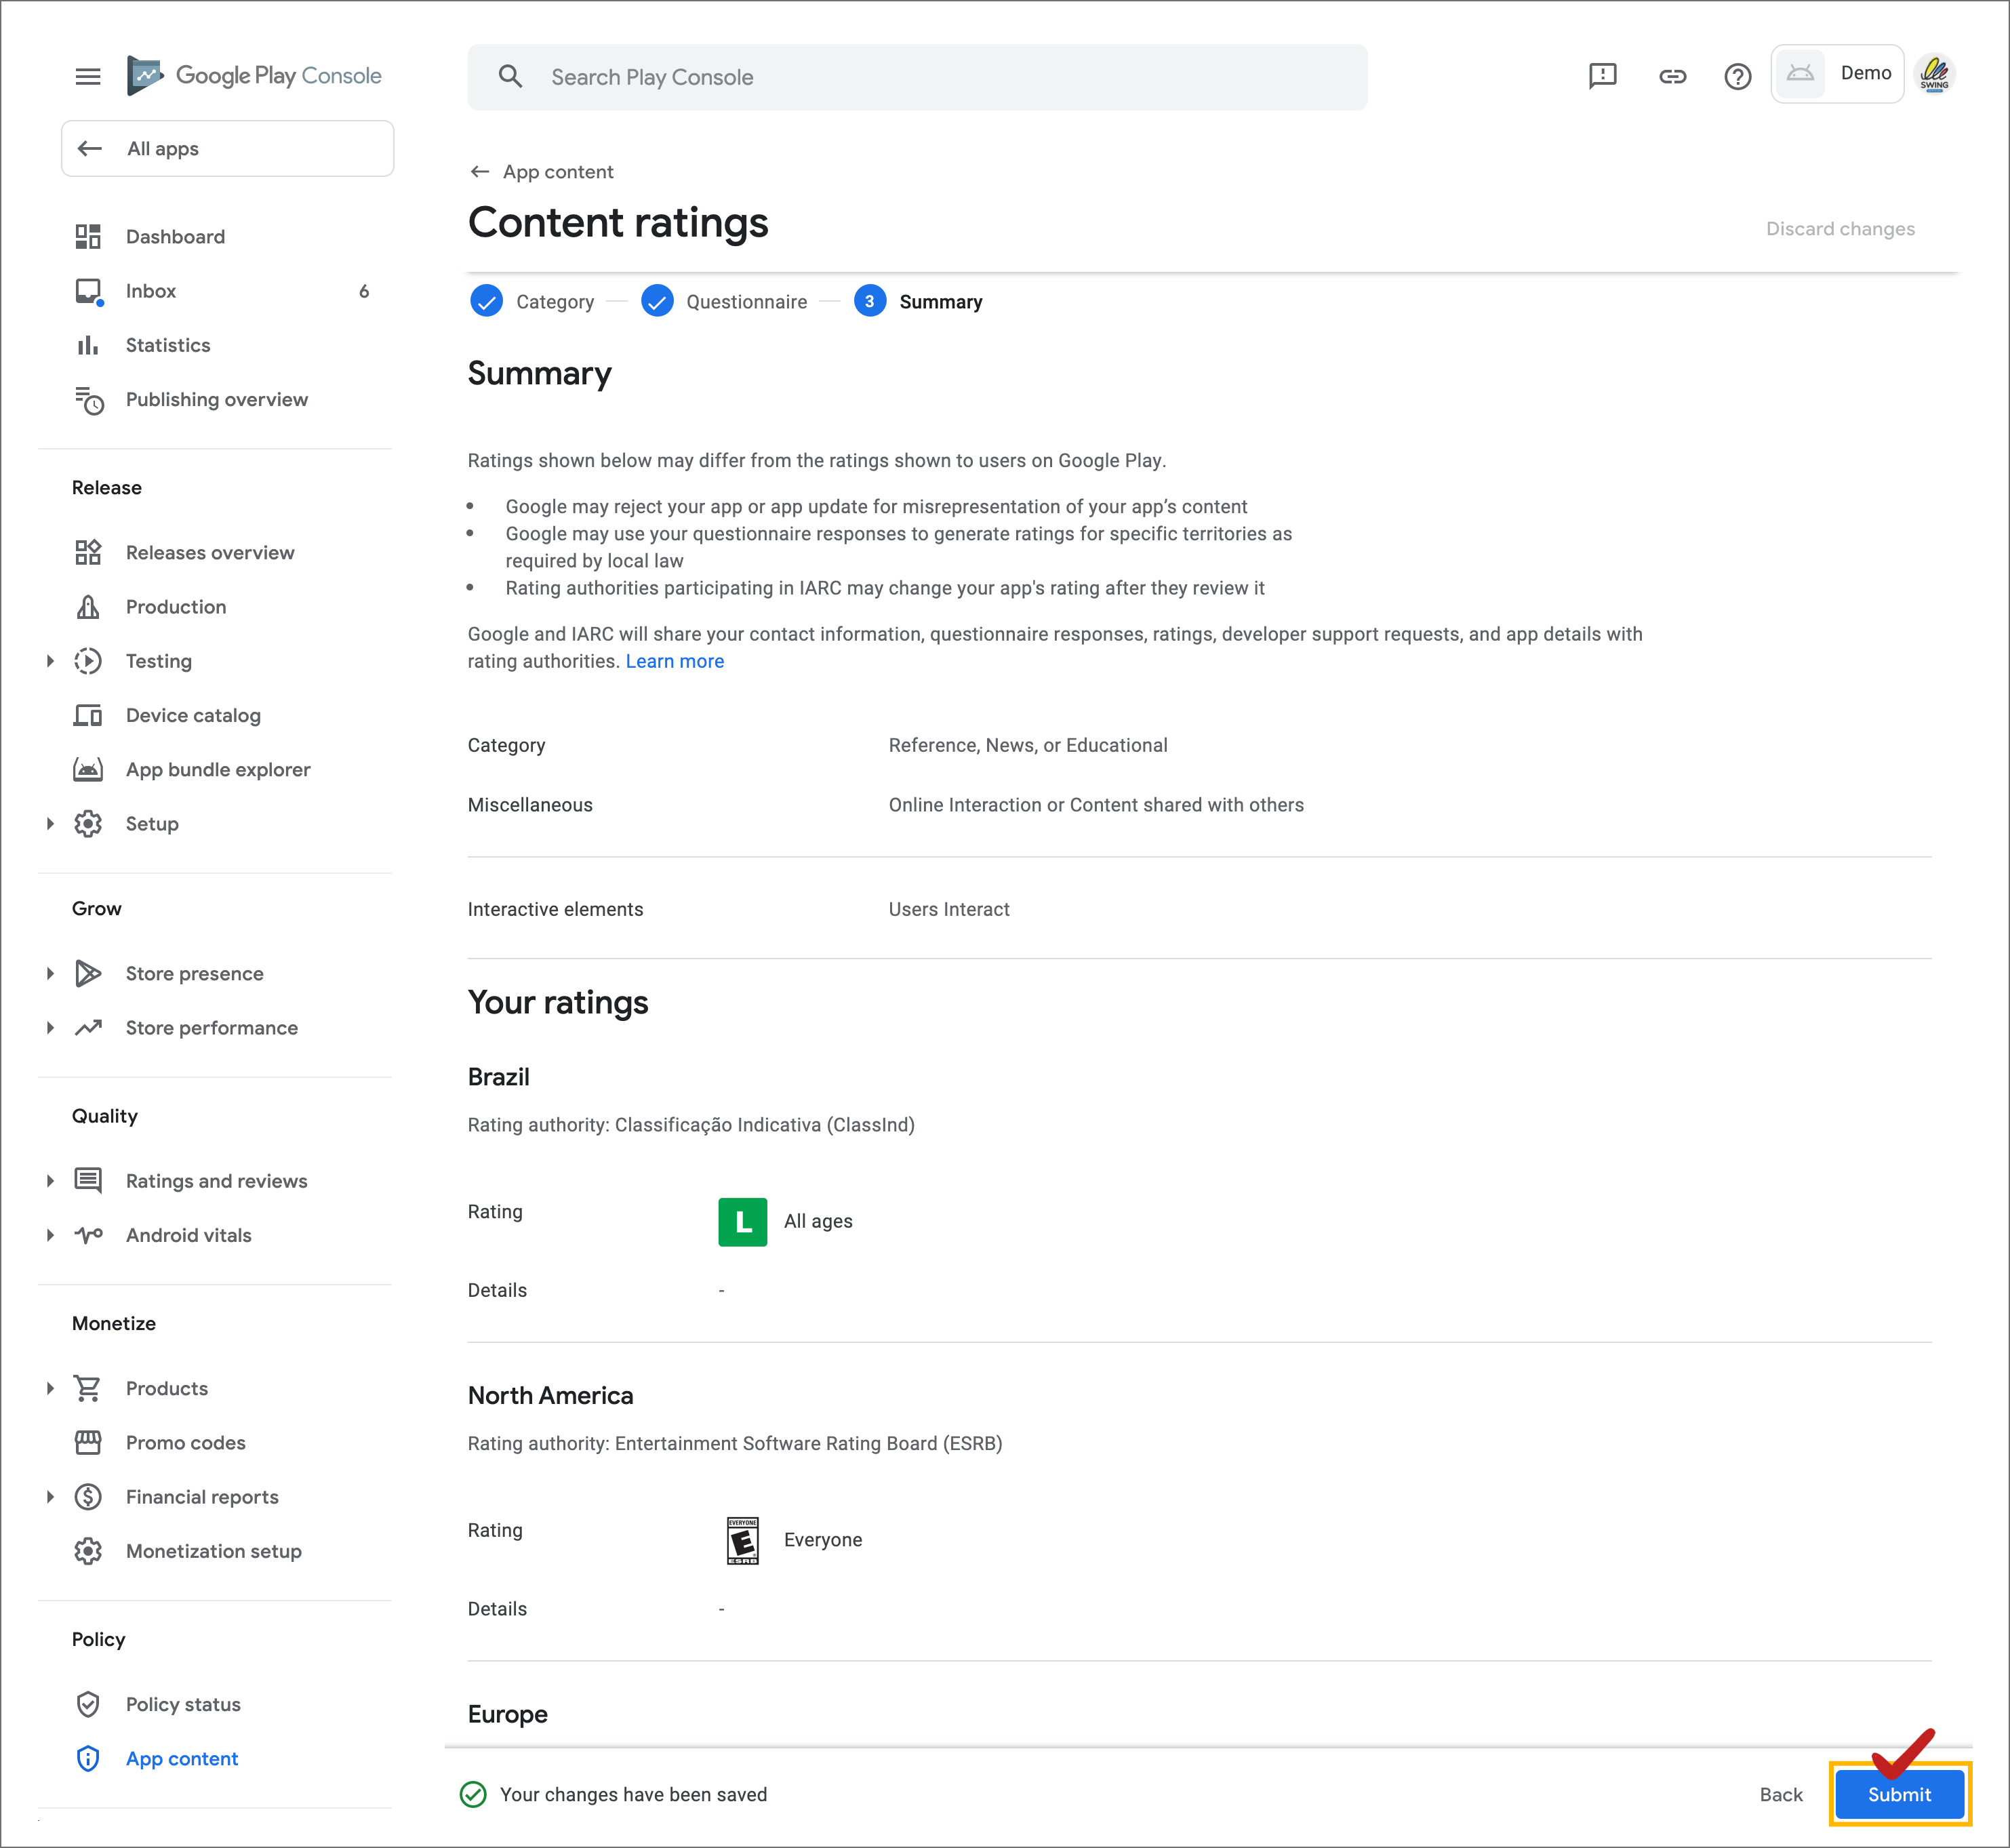
When you complete the questionnaire, a rating for your app will be calculated.
Please select the \[Submit] button.
**4. Privacy Policy**
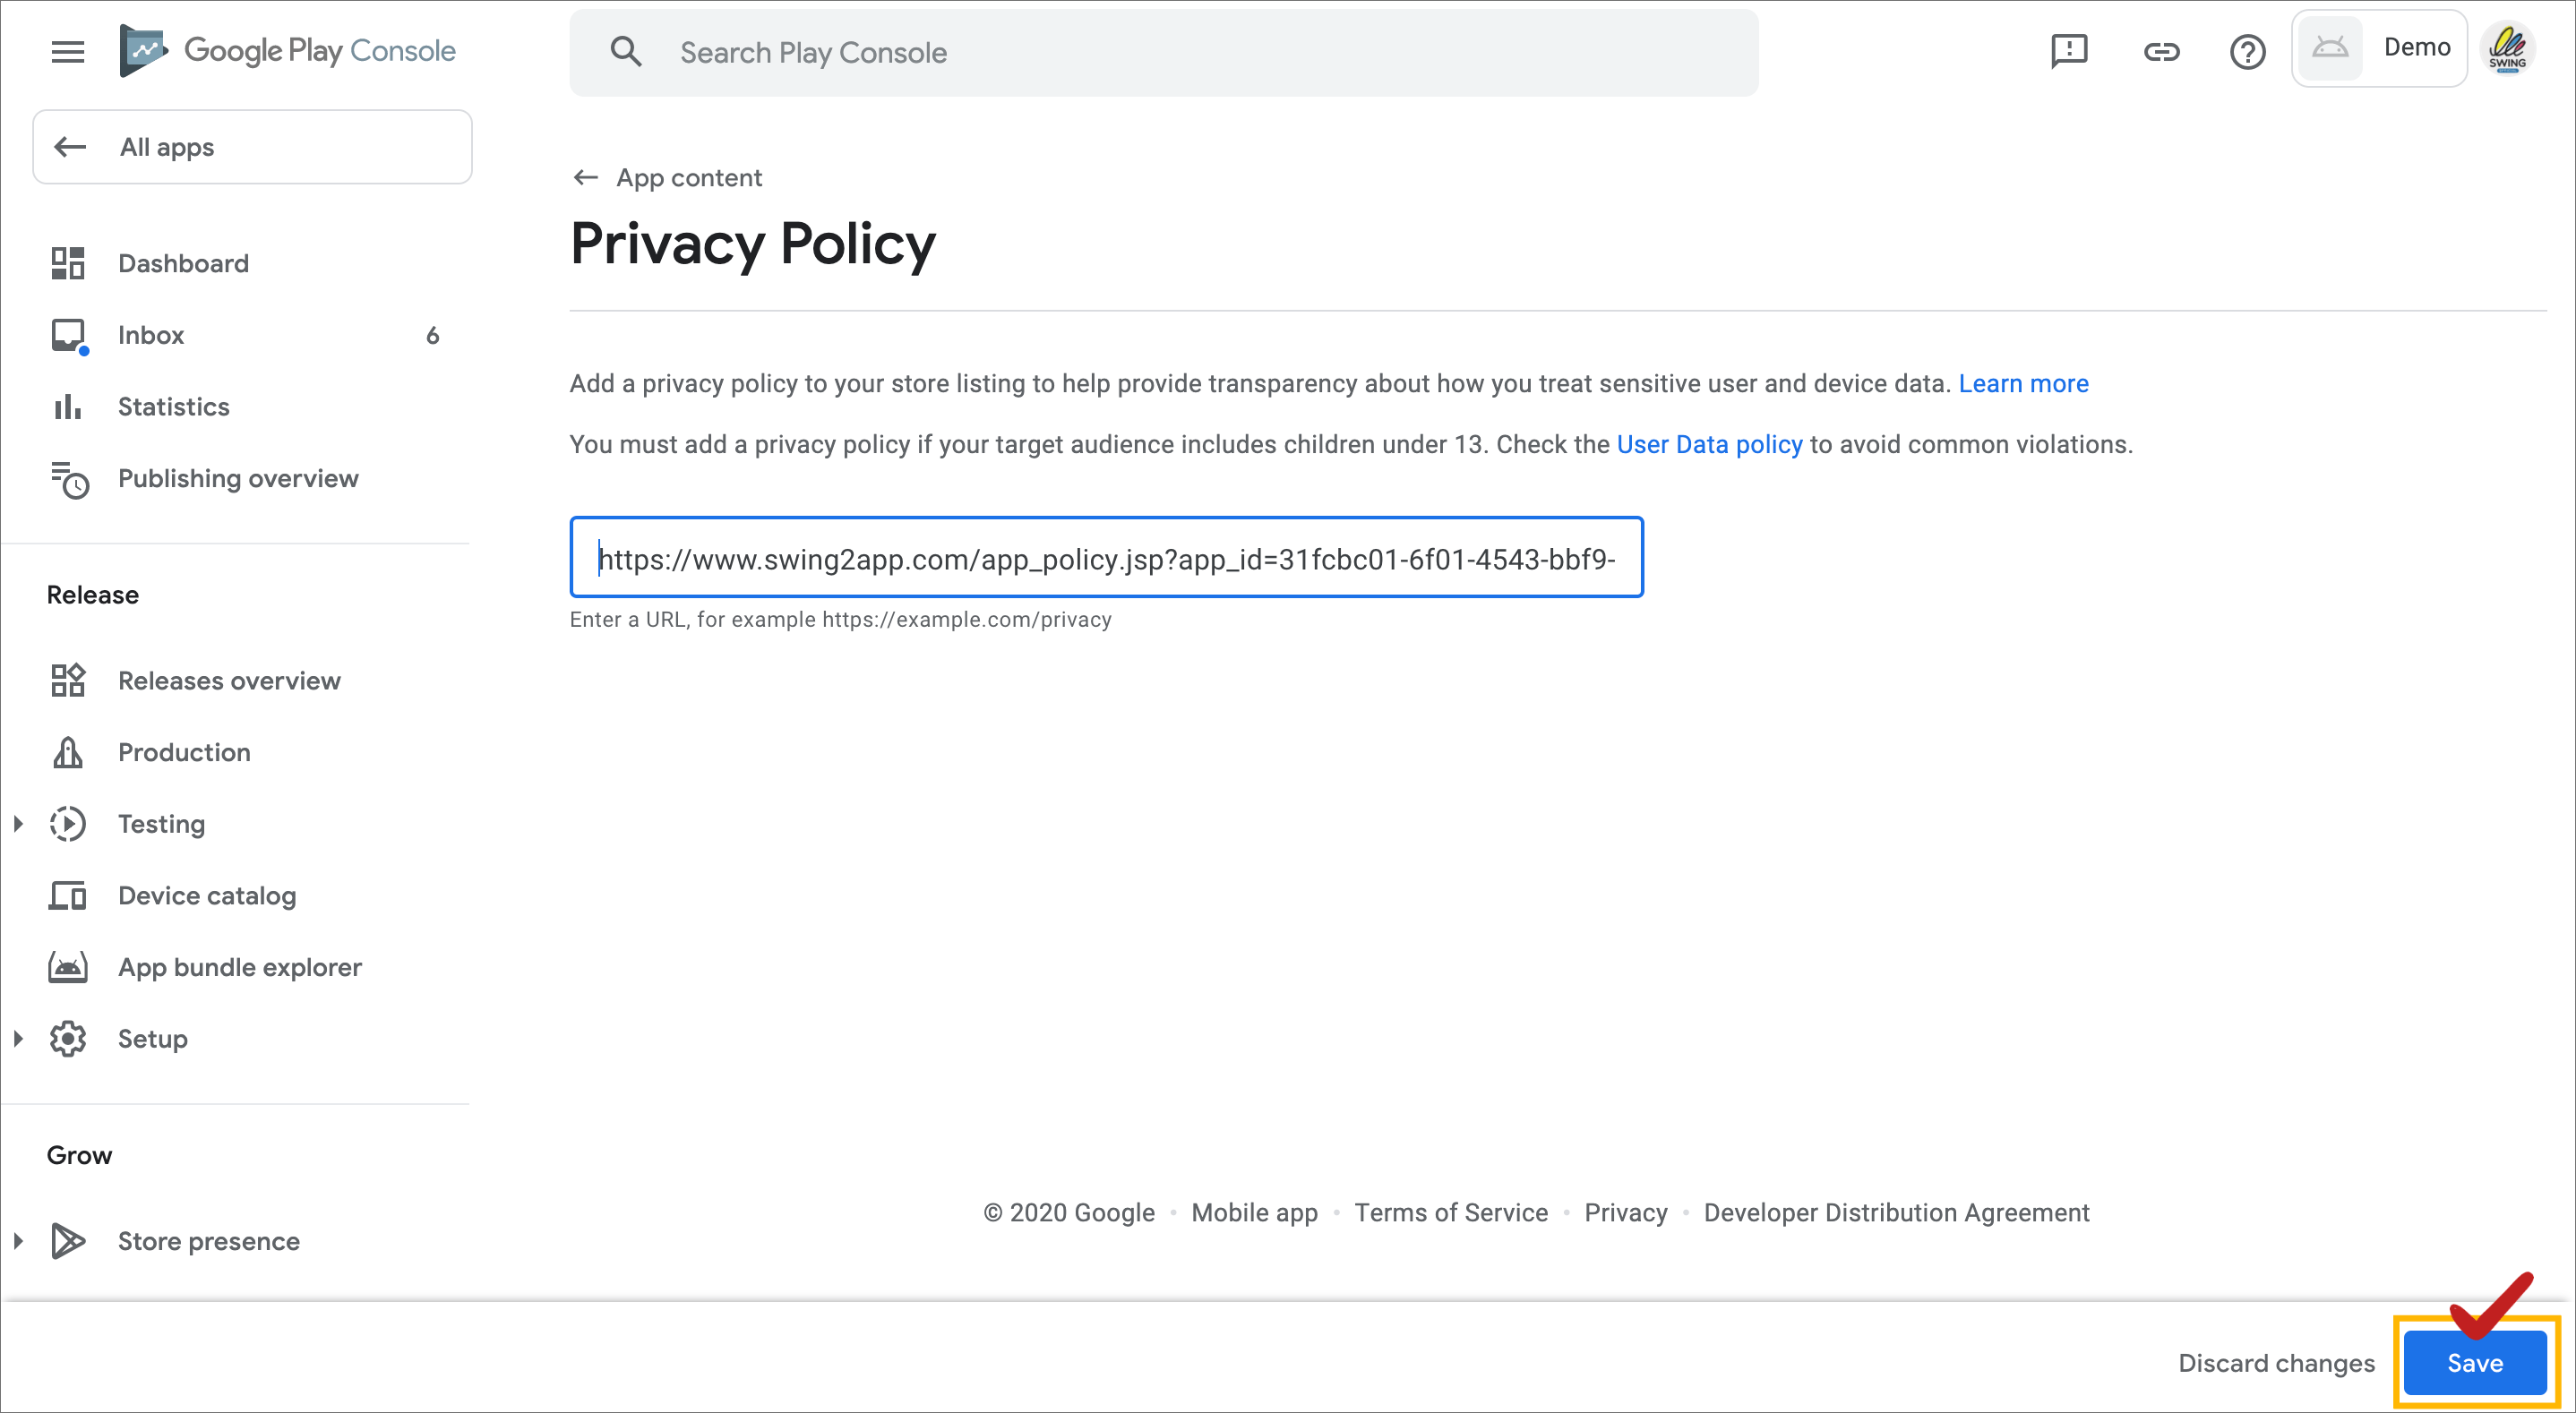
Enter the link to the privacy policy provided to the app.
For web apps (WebView, Push) created by hanging a website, please enter the link to the privacy policy provided by the website.
Those who have created a Swing2App general prototype (slide, footer, top, etc.) can enter the URL of the terms and conditions provided by Swing2App.
**Edit the \[Terms of Service]**\*\* on the Swing2App site and insert the link! (Applicable only to apps created with Swing-to-App)\*\*
**★ Important**
**For the URL item of the privacy policy, be sure to post the post! please note**
☞[ Go to see how to put the Play Store privacy policy URL](/manual/appmanage/service/app-policy.md)
****
**5. Target audience and content**

Please check the target age of the app.
Generally, you can check “Age 18 or older”.
\*Caution\* If you choose the app age 13 or younger, you will need to submit an additional family policy document in accordance with the Child Protection Policy.
Therefore, except in special cases, check the age of the app as over 18 and select the \[Next] button.
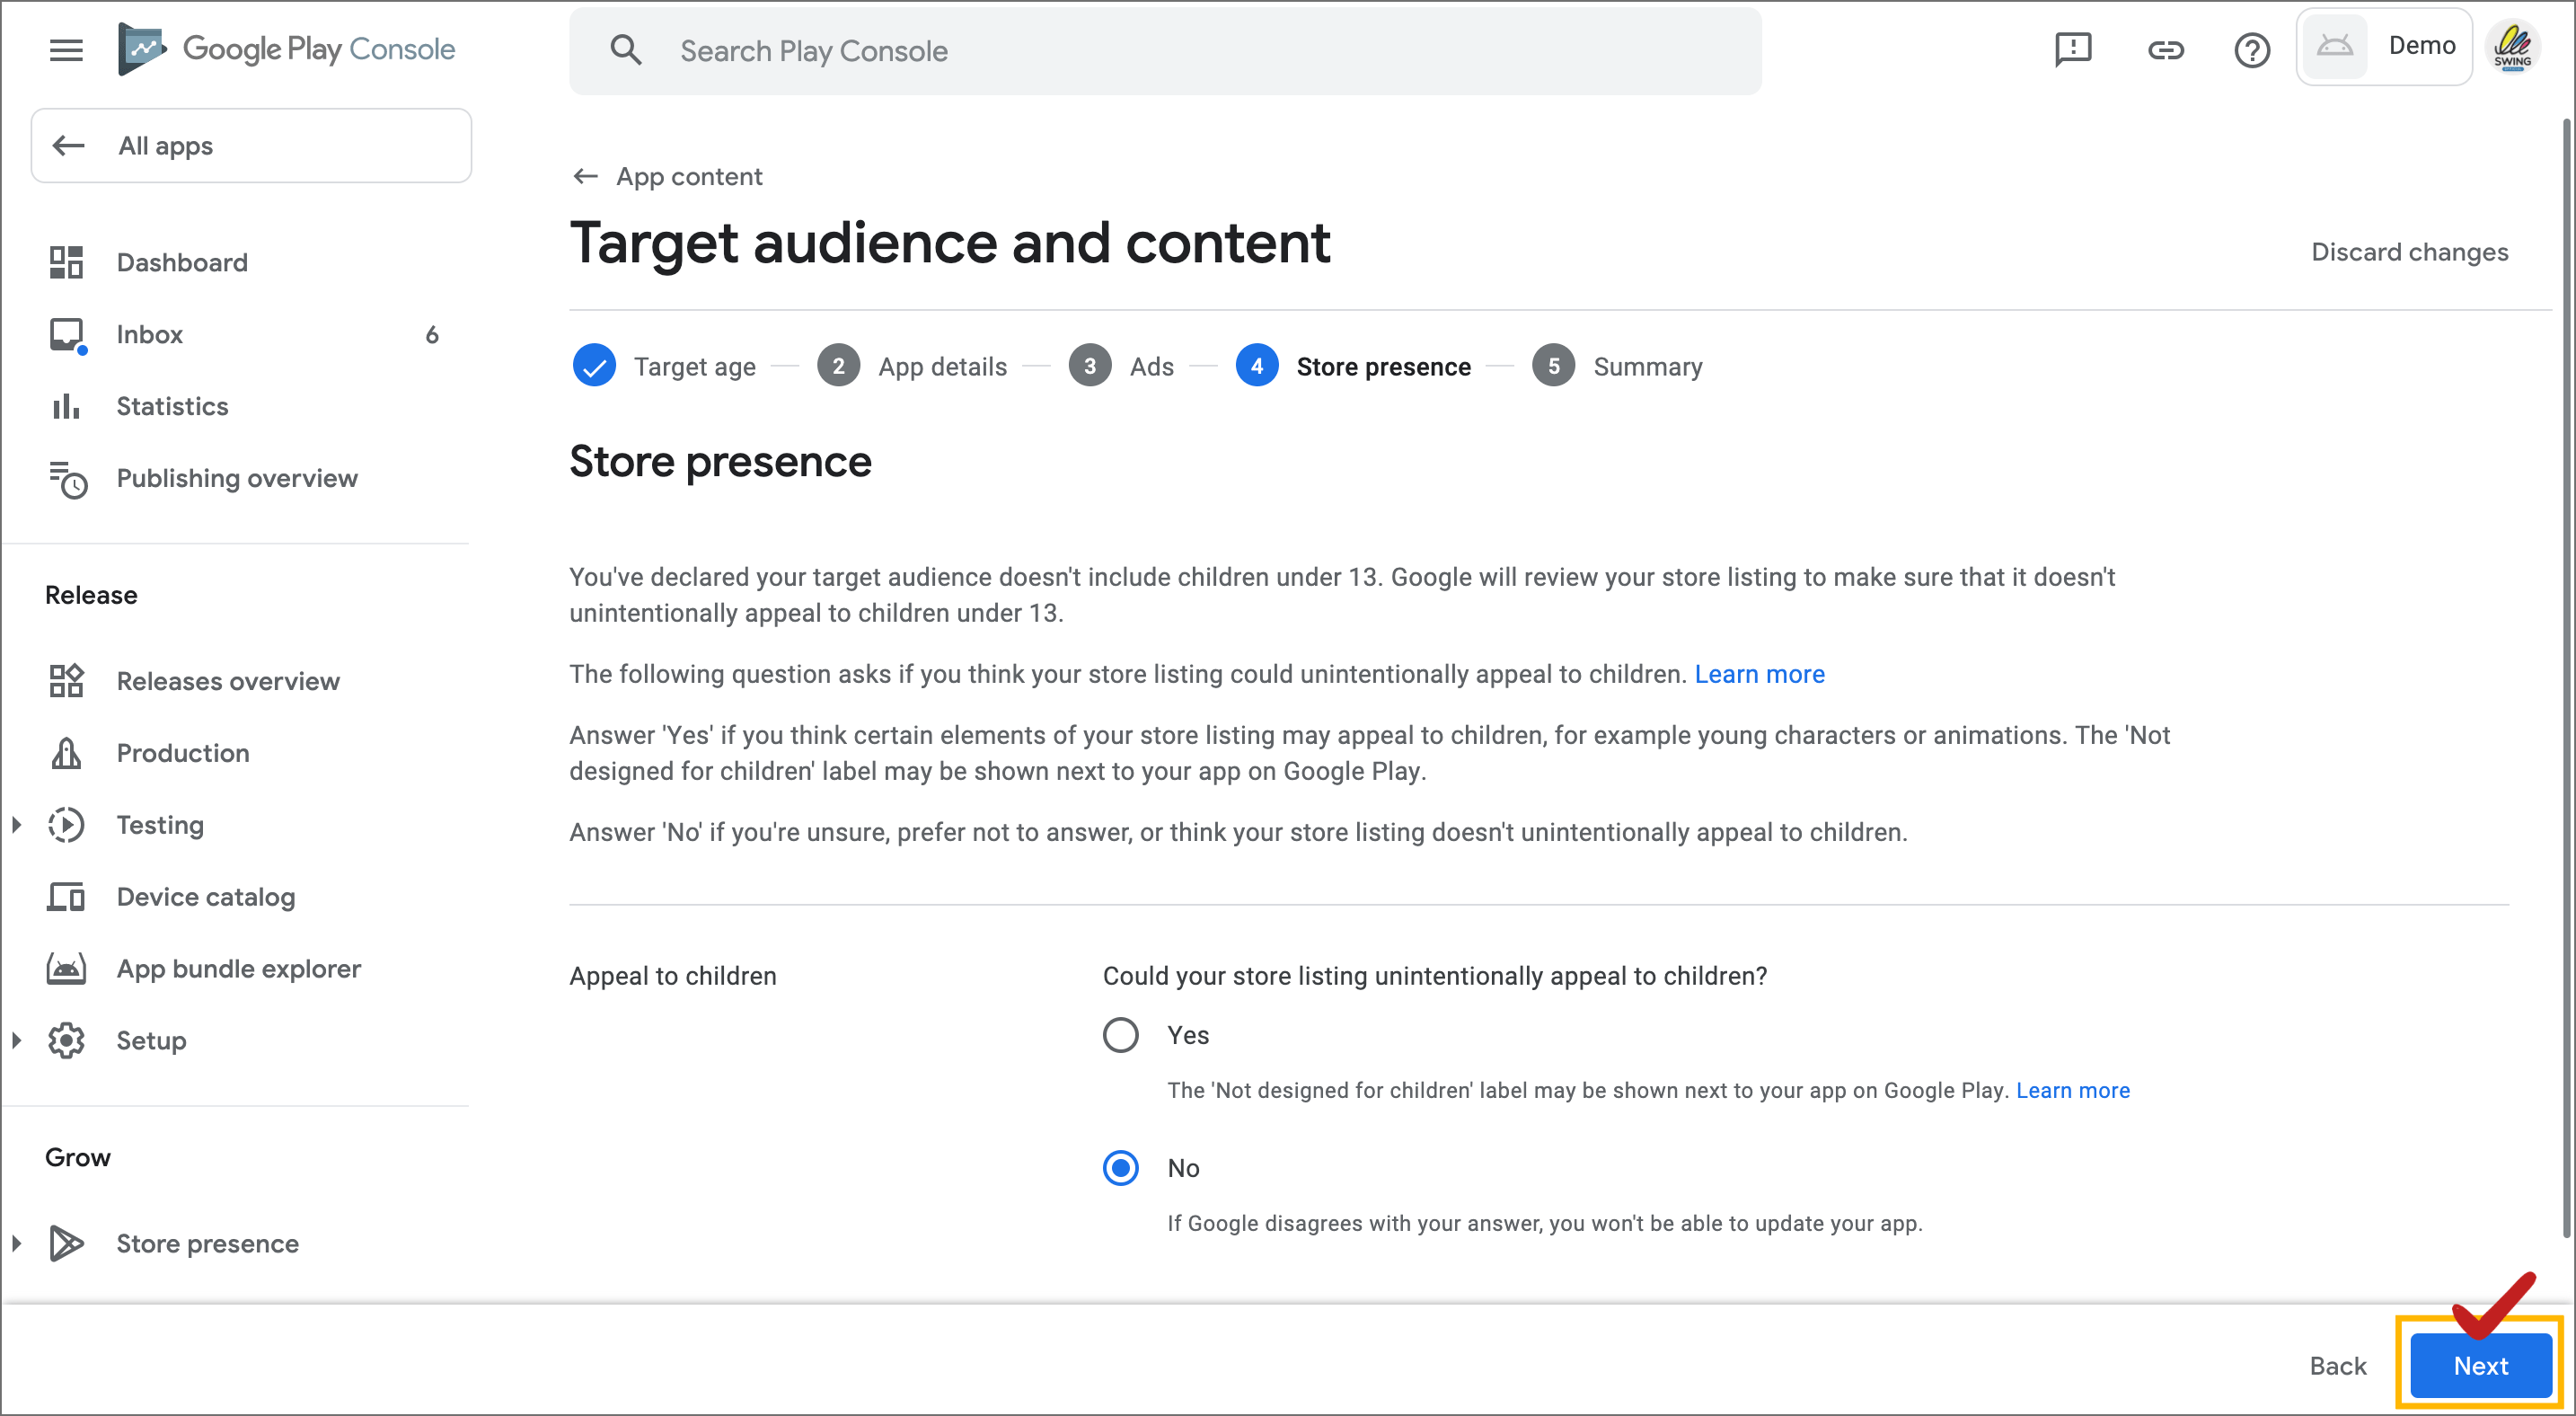
For the question that attracts children’s attention, check “No” and click the \[Next] button.
If the app you are submitting contains content that may attract children’s interest, or if you want to be confused, you should check “Yes”.
****
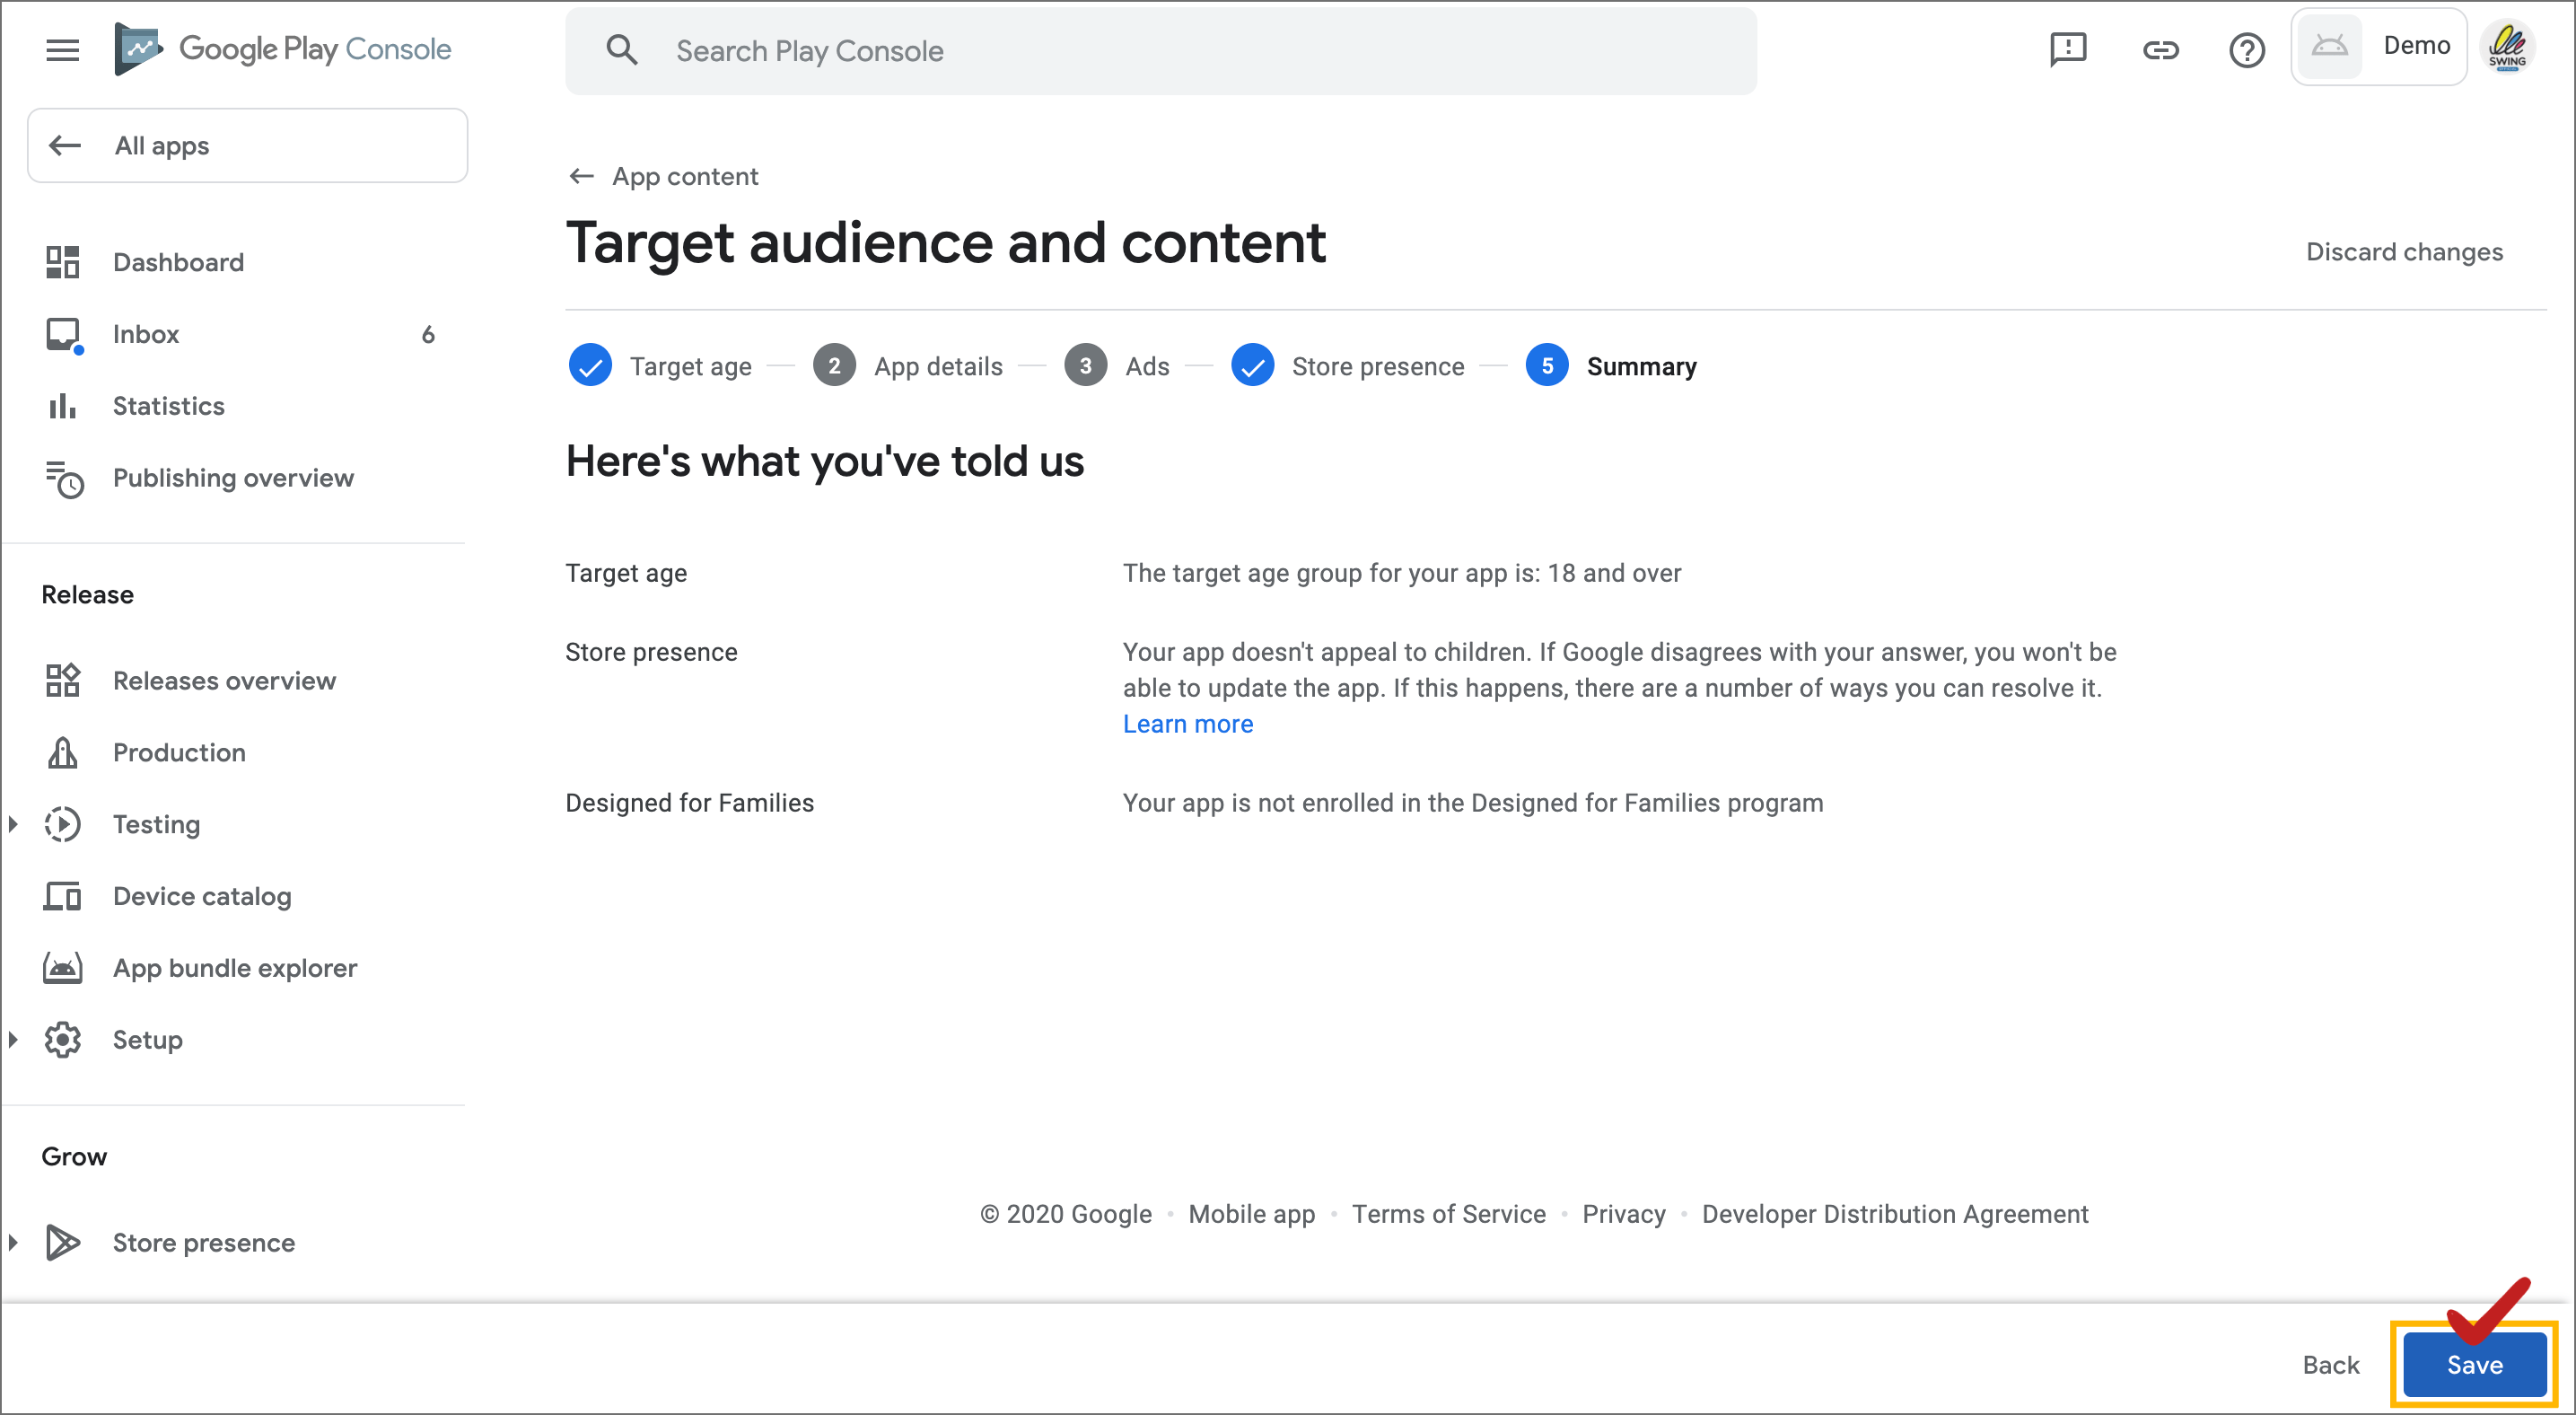
**\[Save]**\*\* done\*\*
**6. Check News App**

**News app is an item that checks whether the app you submit is a news app.**
Click the **\[Start]** button.

If the app you are submitting is not a news app, **check “No” and click the Save button.**

**If the app you are submitting is a news app, you need to check “Yes” and fill out the content that proves the news app.**
Just input that you would like to submit your business registration certificate and web domain registration confirmation as proof of prior notice.
\*Please check the link below for how to submit the Google Play Store advance notice document!!
**☞** [**Go to Google Play’s advance notice document submission method**](/store/playstore/playstore-priornotice.md)
**7. Check Corona related apps (21.08.16 additional menu)**


A shared app item has been added as a result of the COVID-19 contact tracking app test.
This item checks whether the app you want to submit is a corona-related app.
Check **“Not a public COVID-19 contact tracking app or history app”** and select the \[Save] button.
\*Corona related apps cannot be released due to Google policy.\_This app can only be released by certified national institutions such as the Ministry of Health and Welfare and the Korea Centers for Disease Control and Prevention.

**App content input complete!**
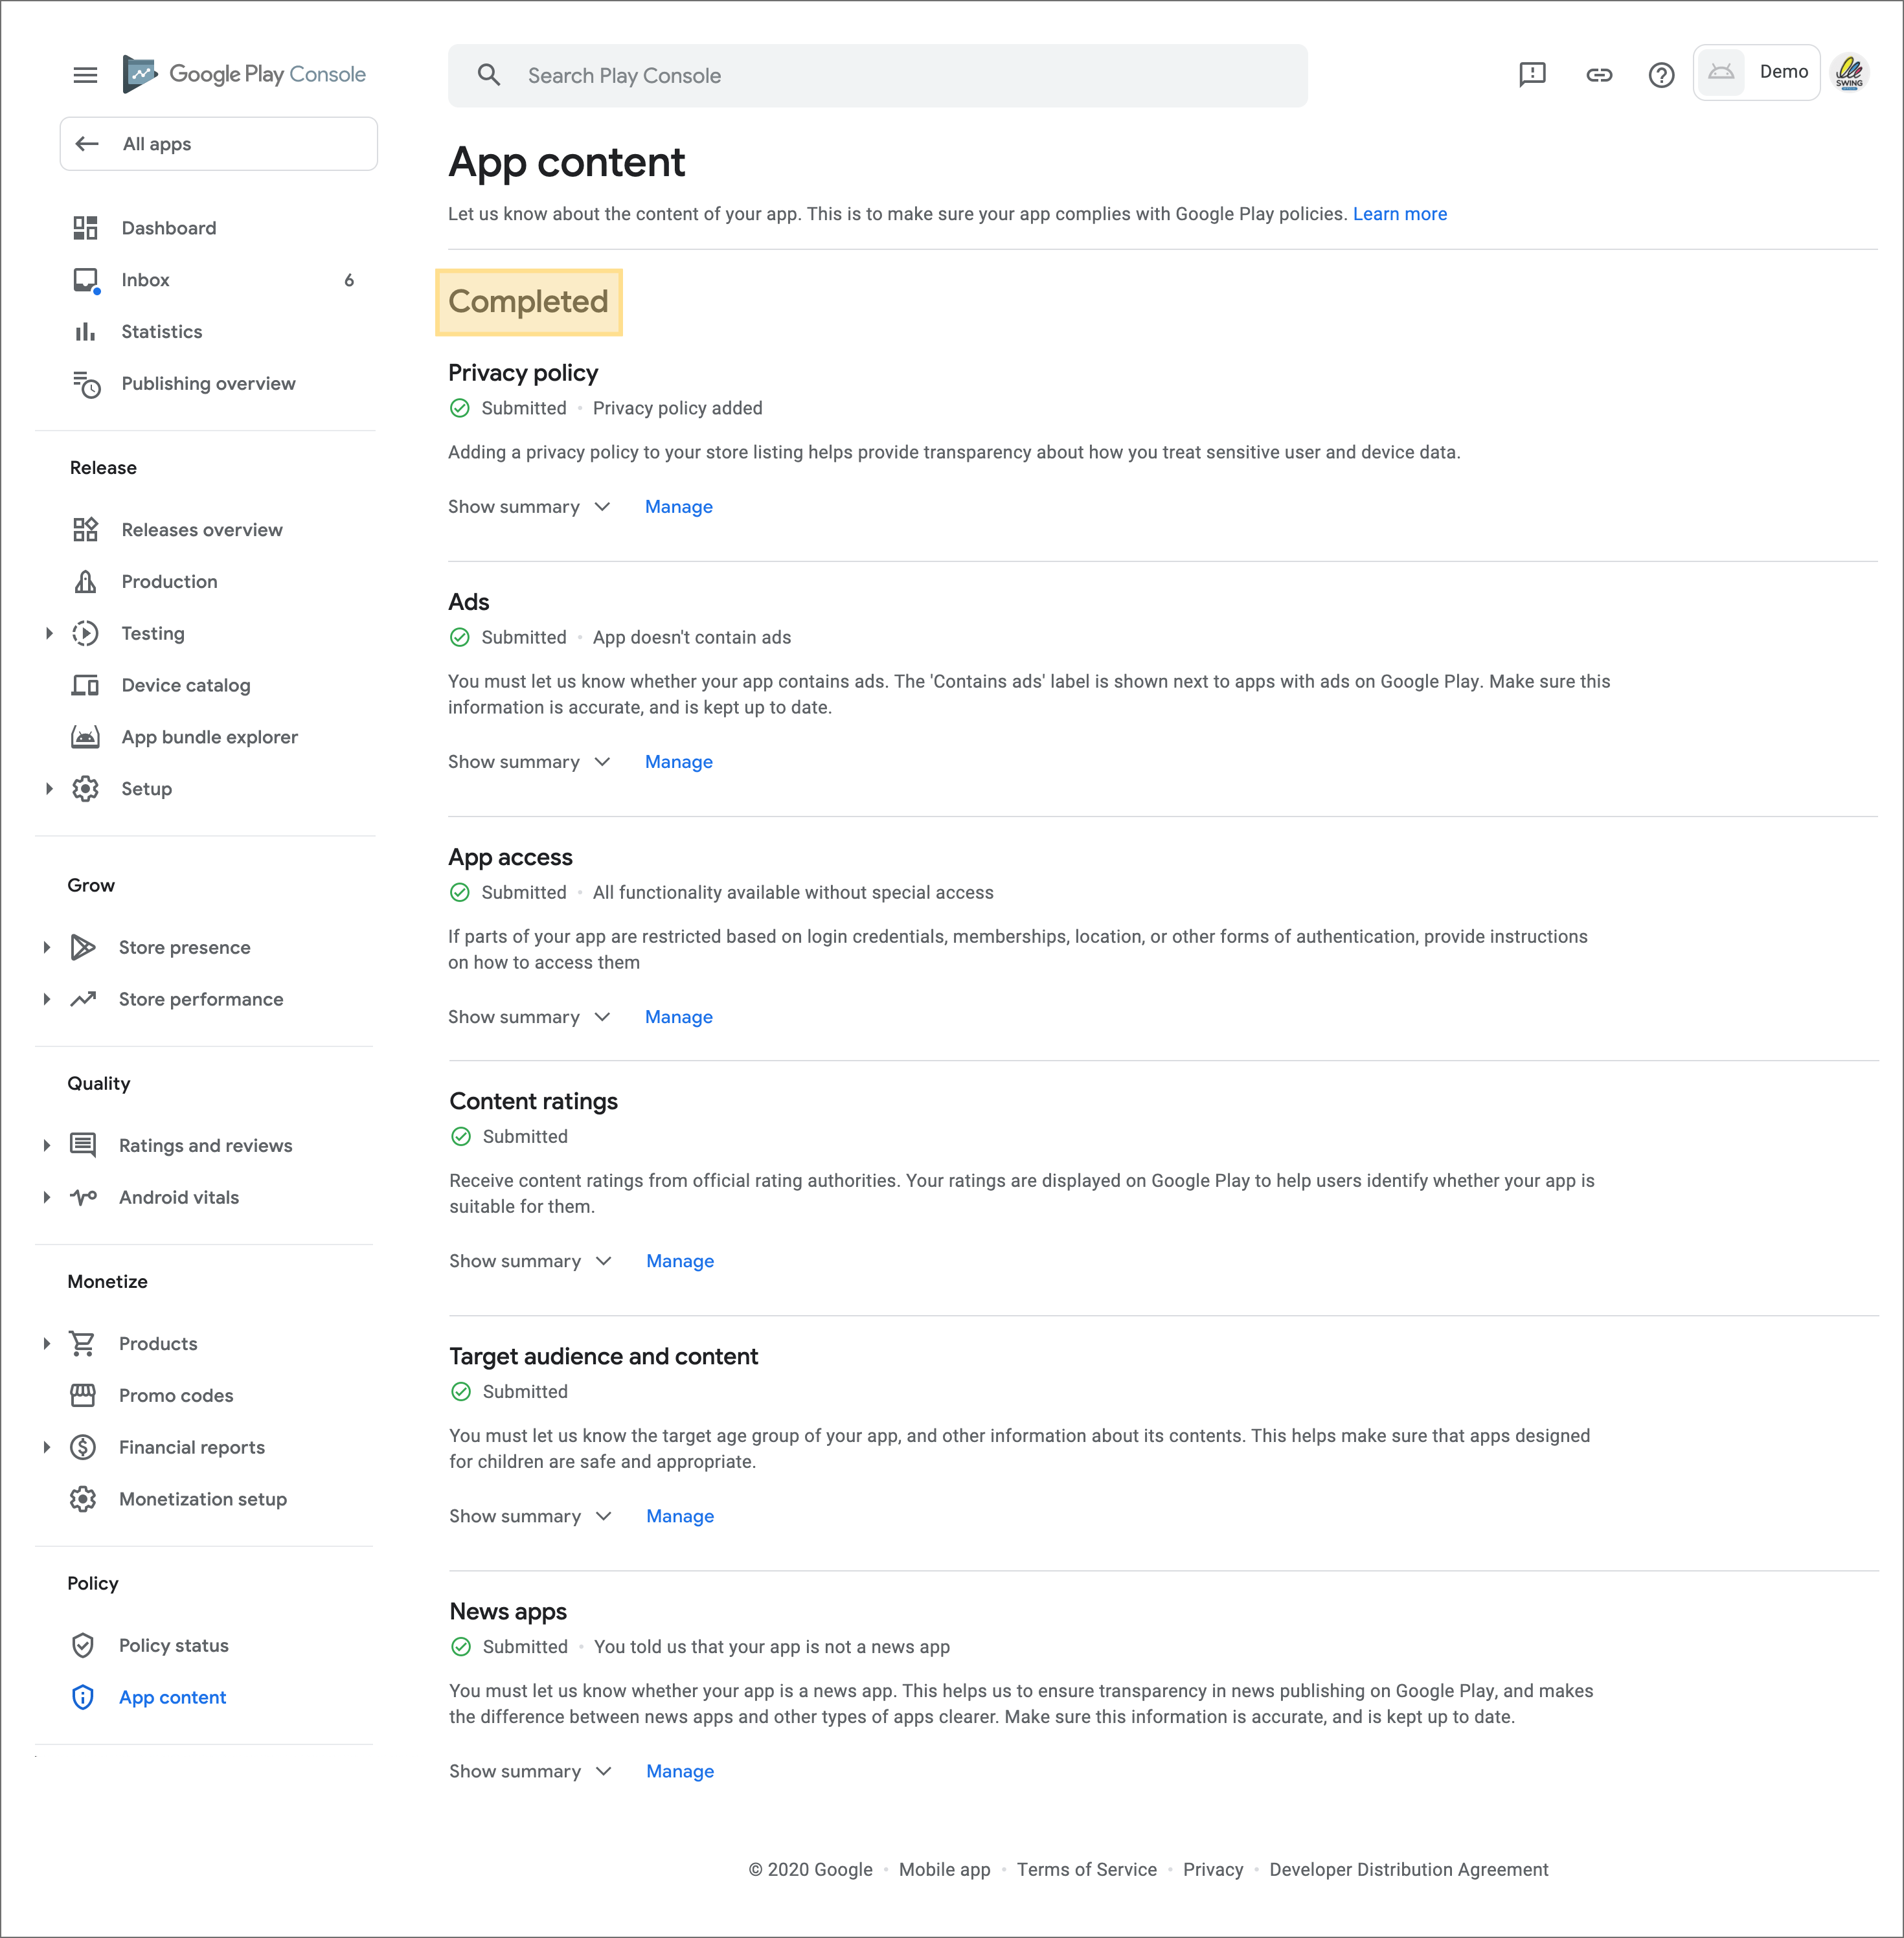
You are done when all of the app content items are illuminated in green and displayed as ‘completed’ at the top.
**——Go to the dashboard.**
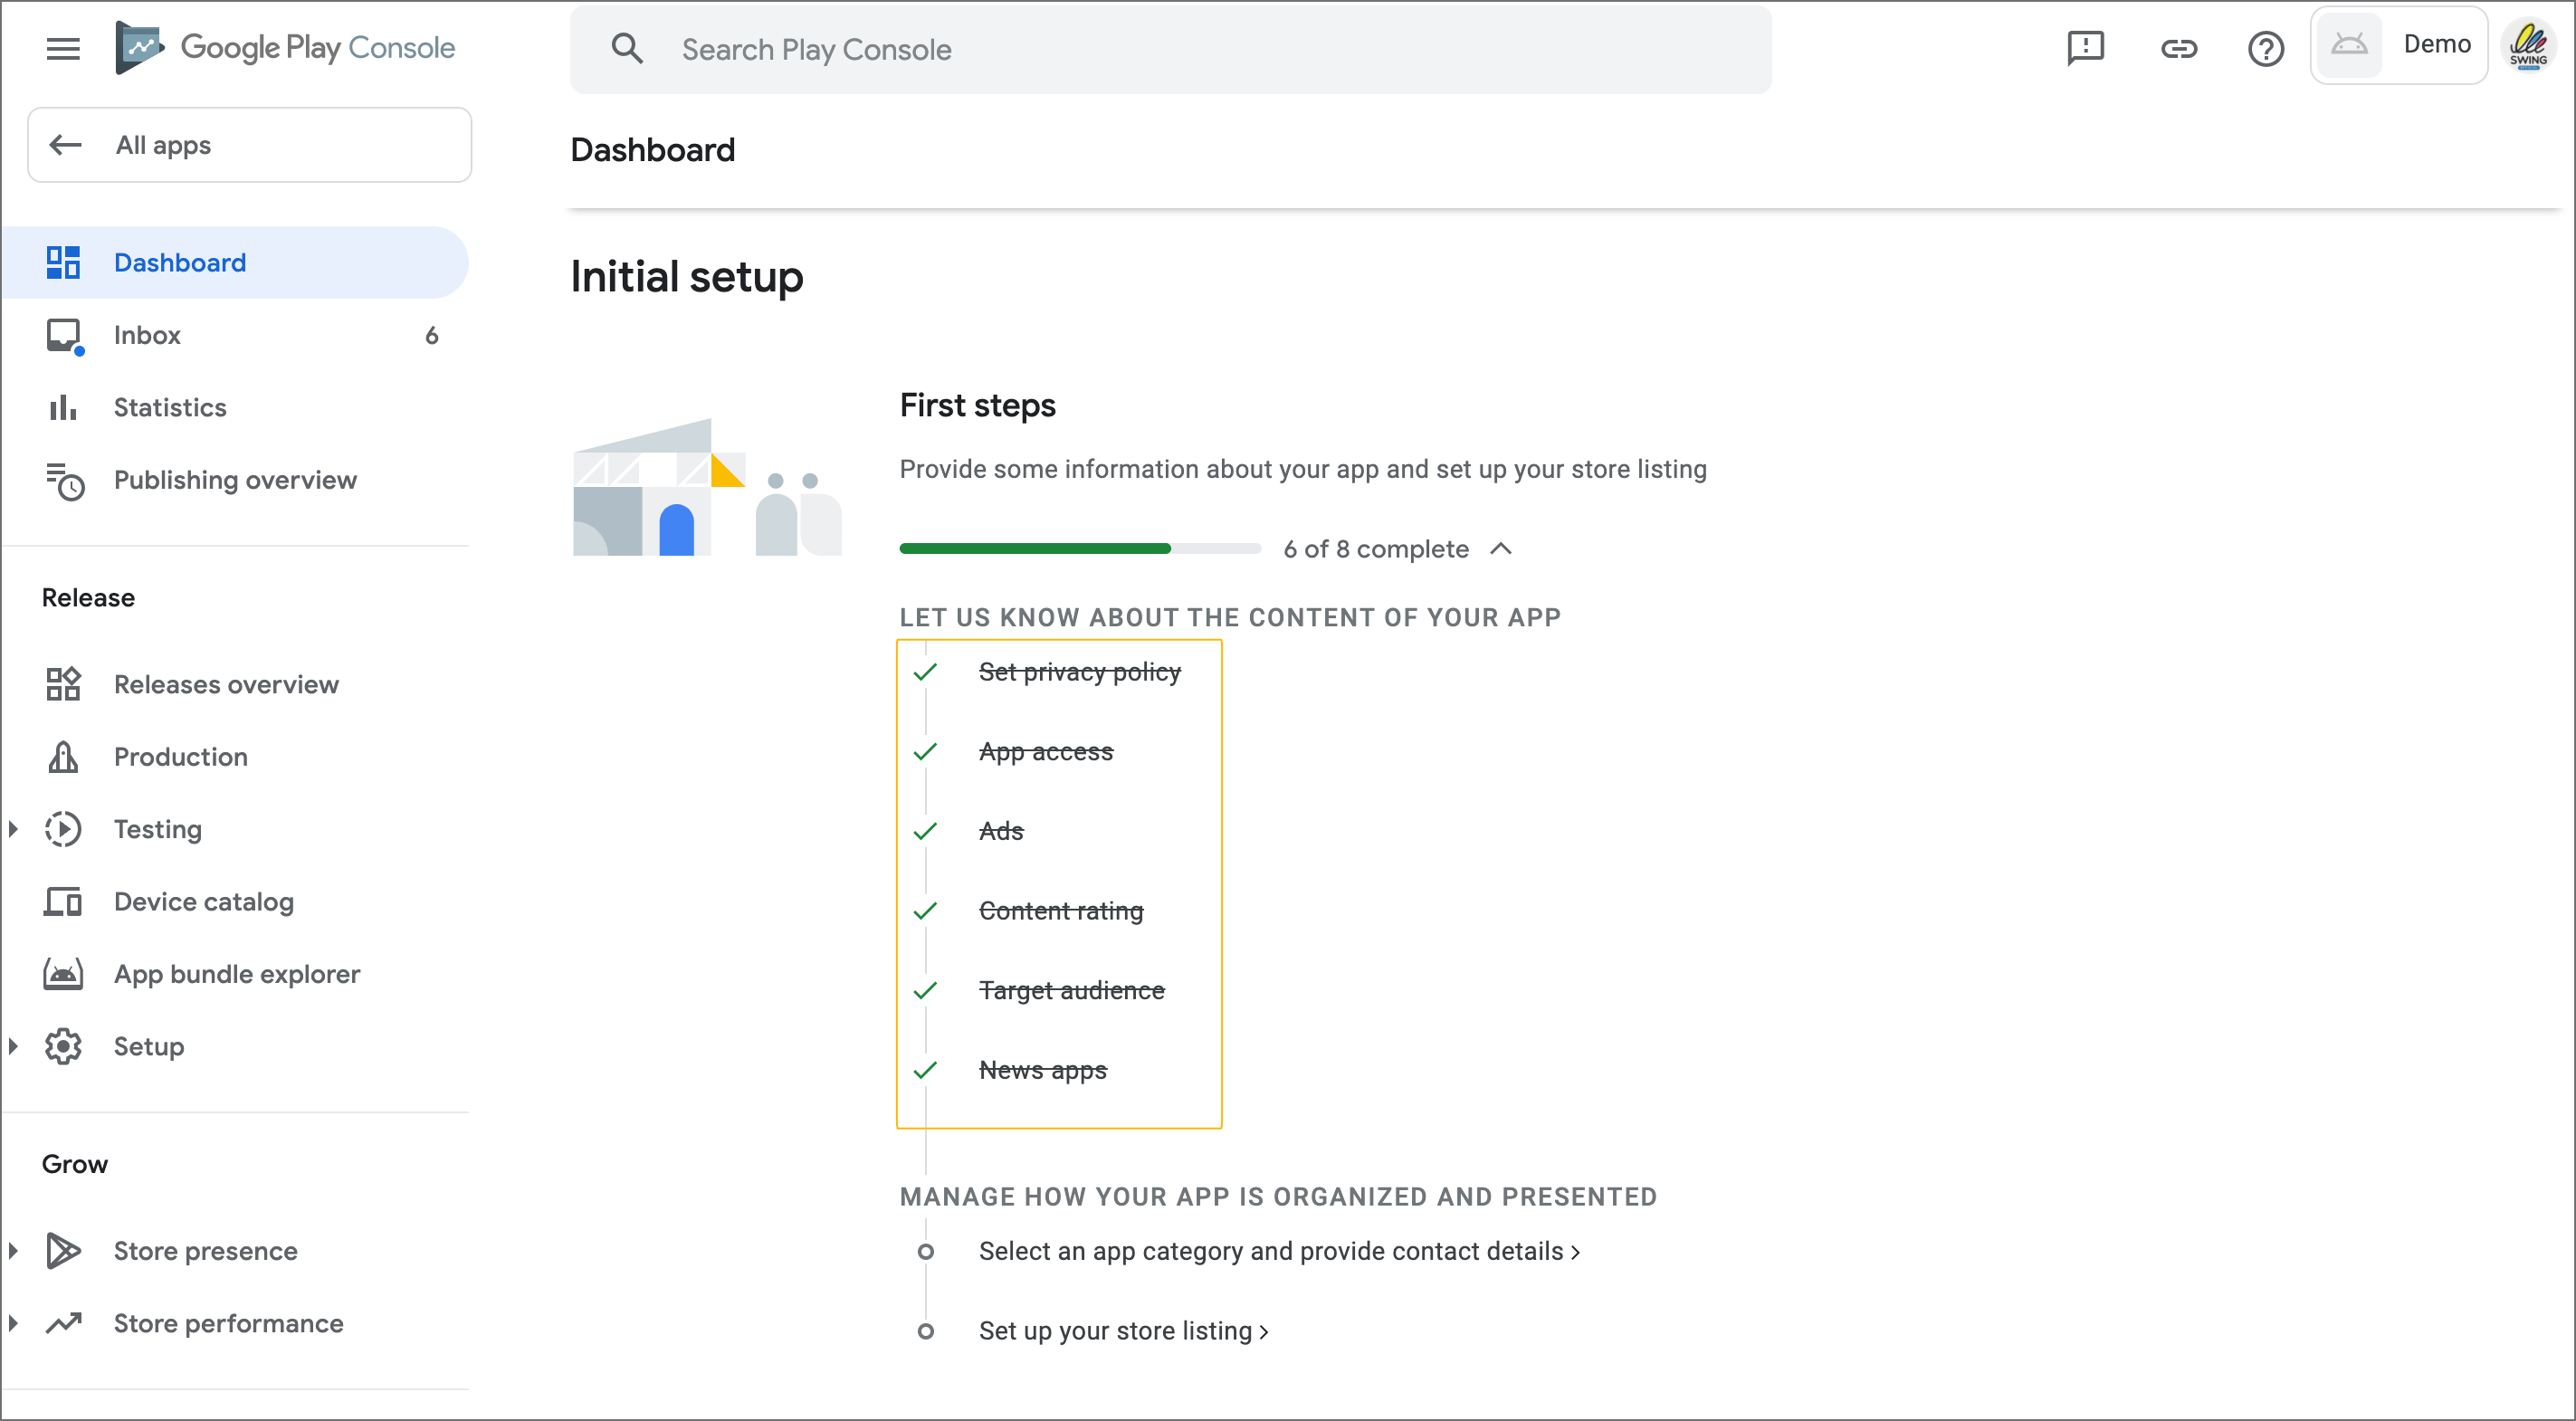
When step-by-step input is completed, it is checked as done.
###  **STEP.2 Store setup steps**
**1. Select app category and provide contact details**
1. Select an app
2. Select a category
3. Enter your email address
4. Check for external marketing
5. Select the \[Save] button.
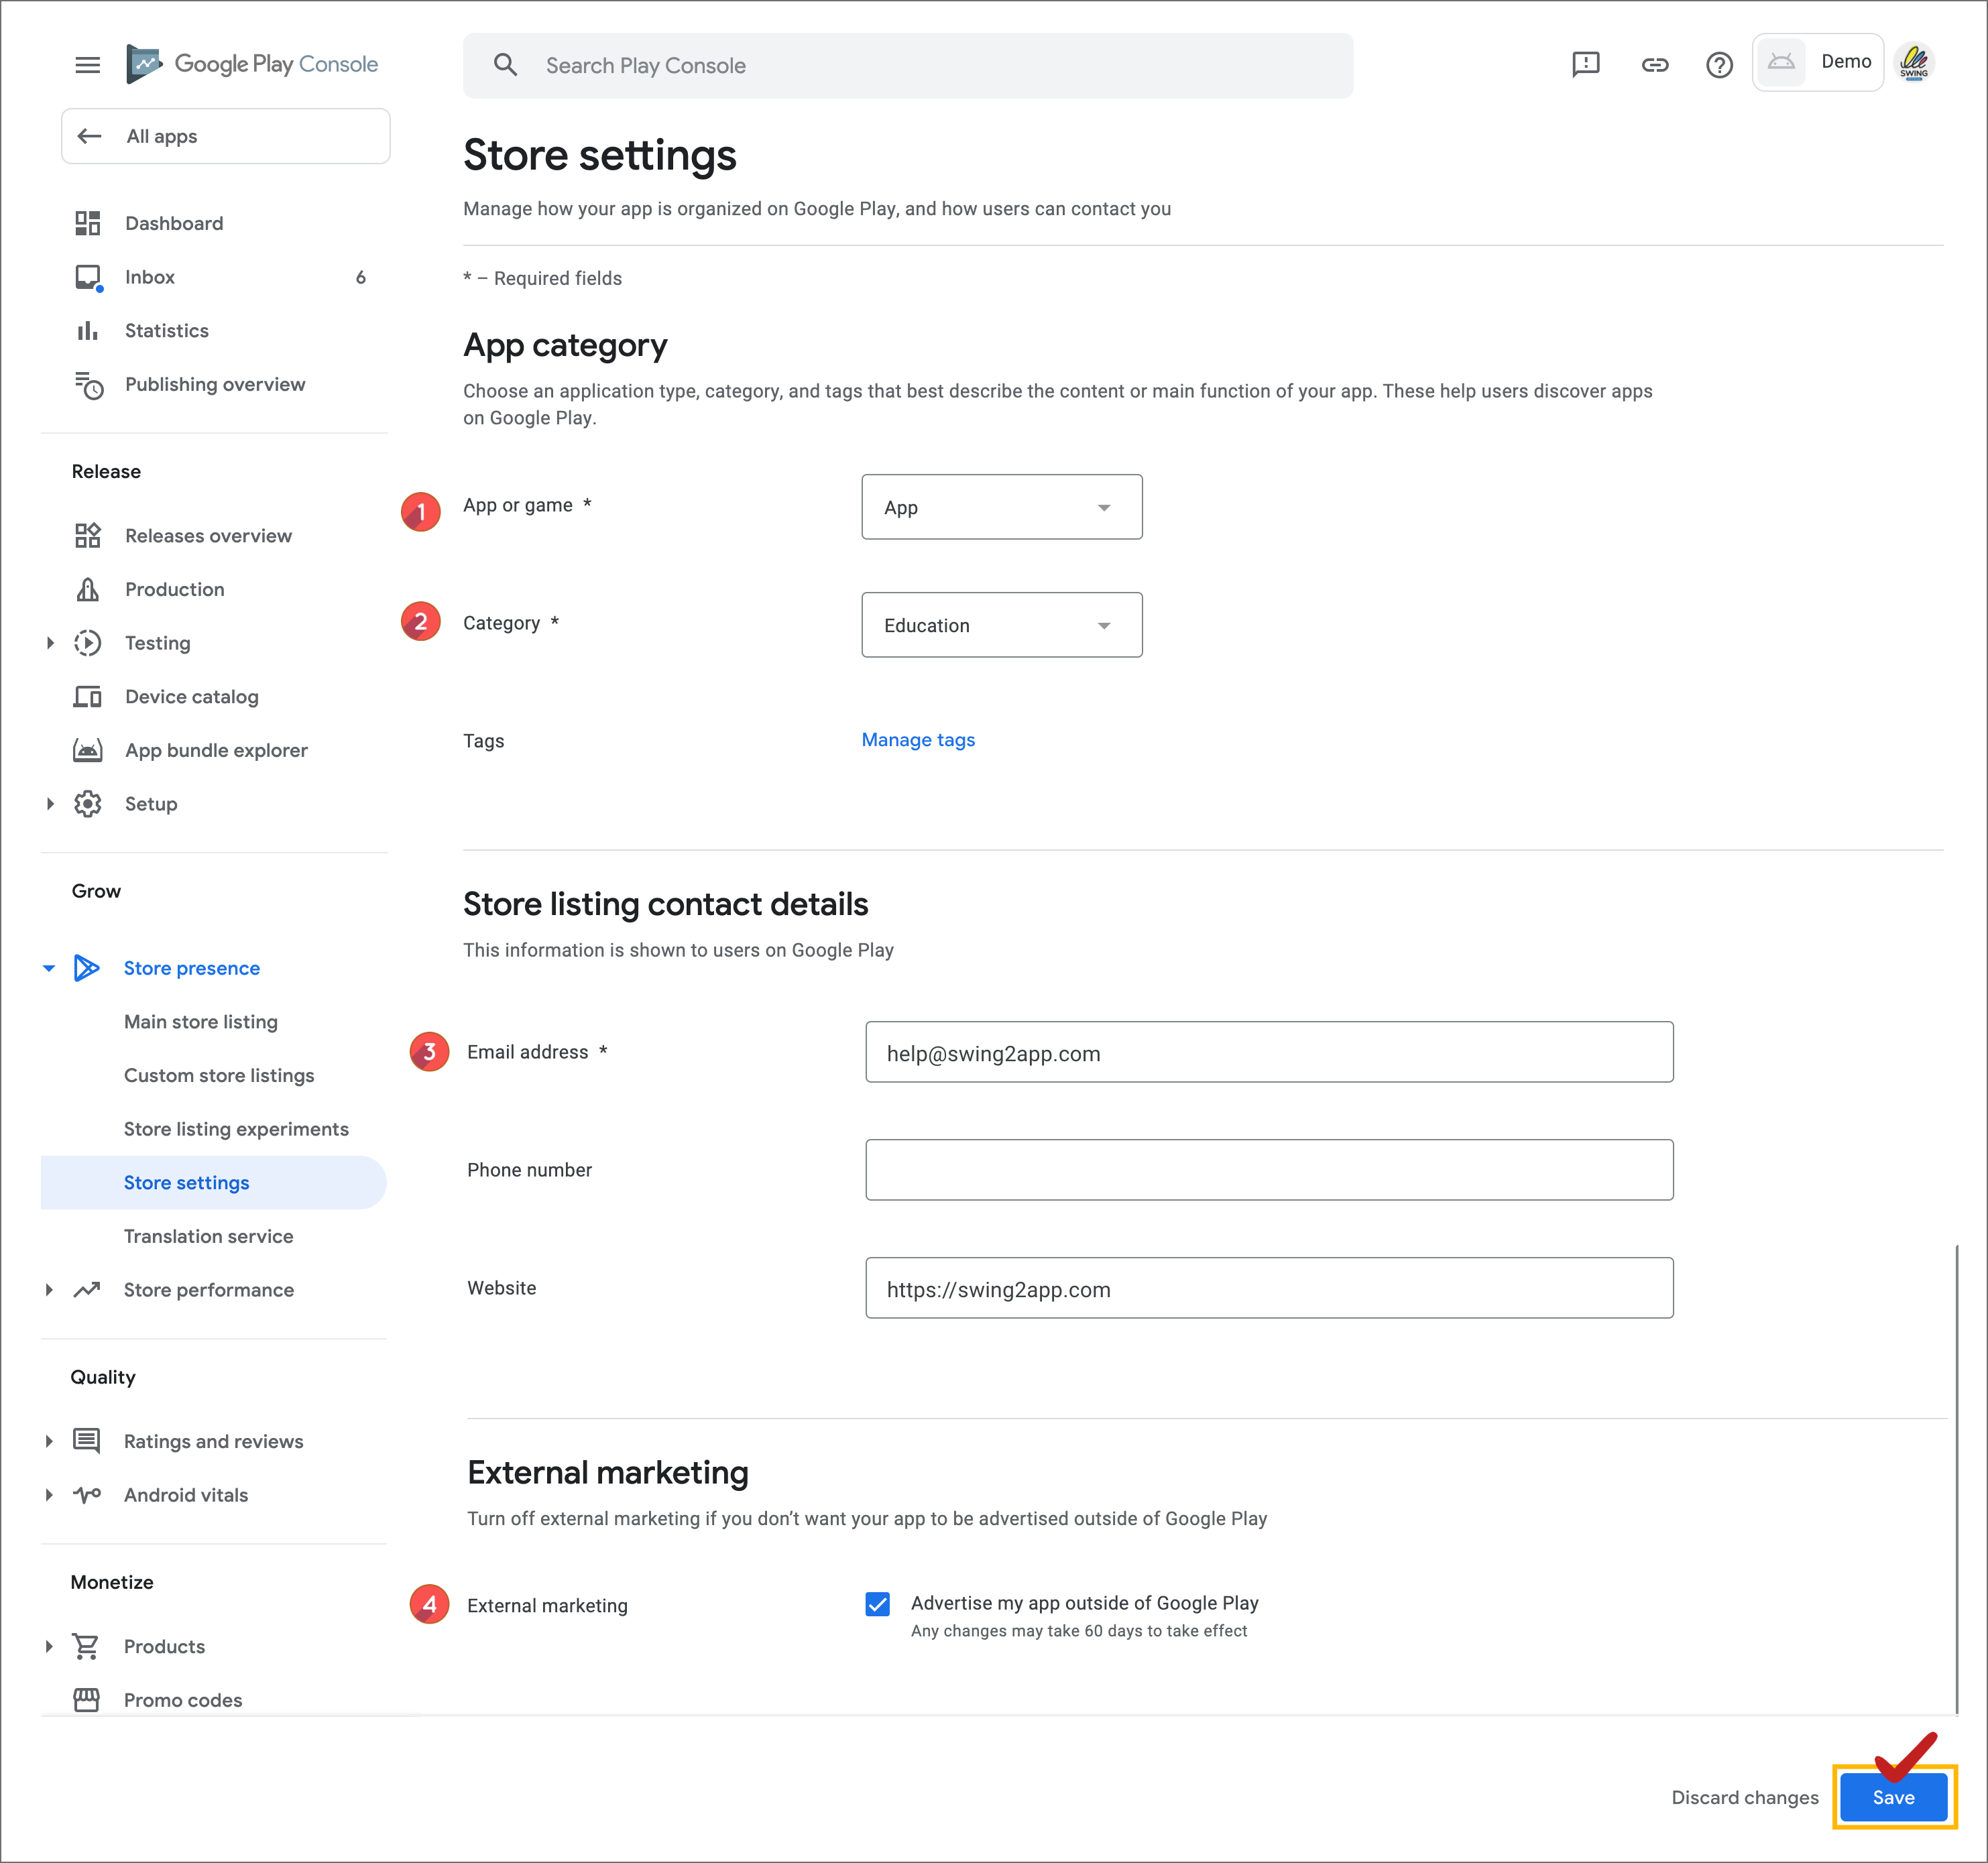
\* This is a required field, and other items are optional.
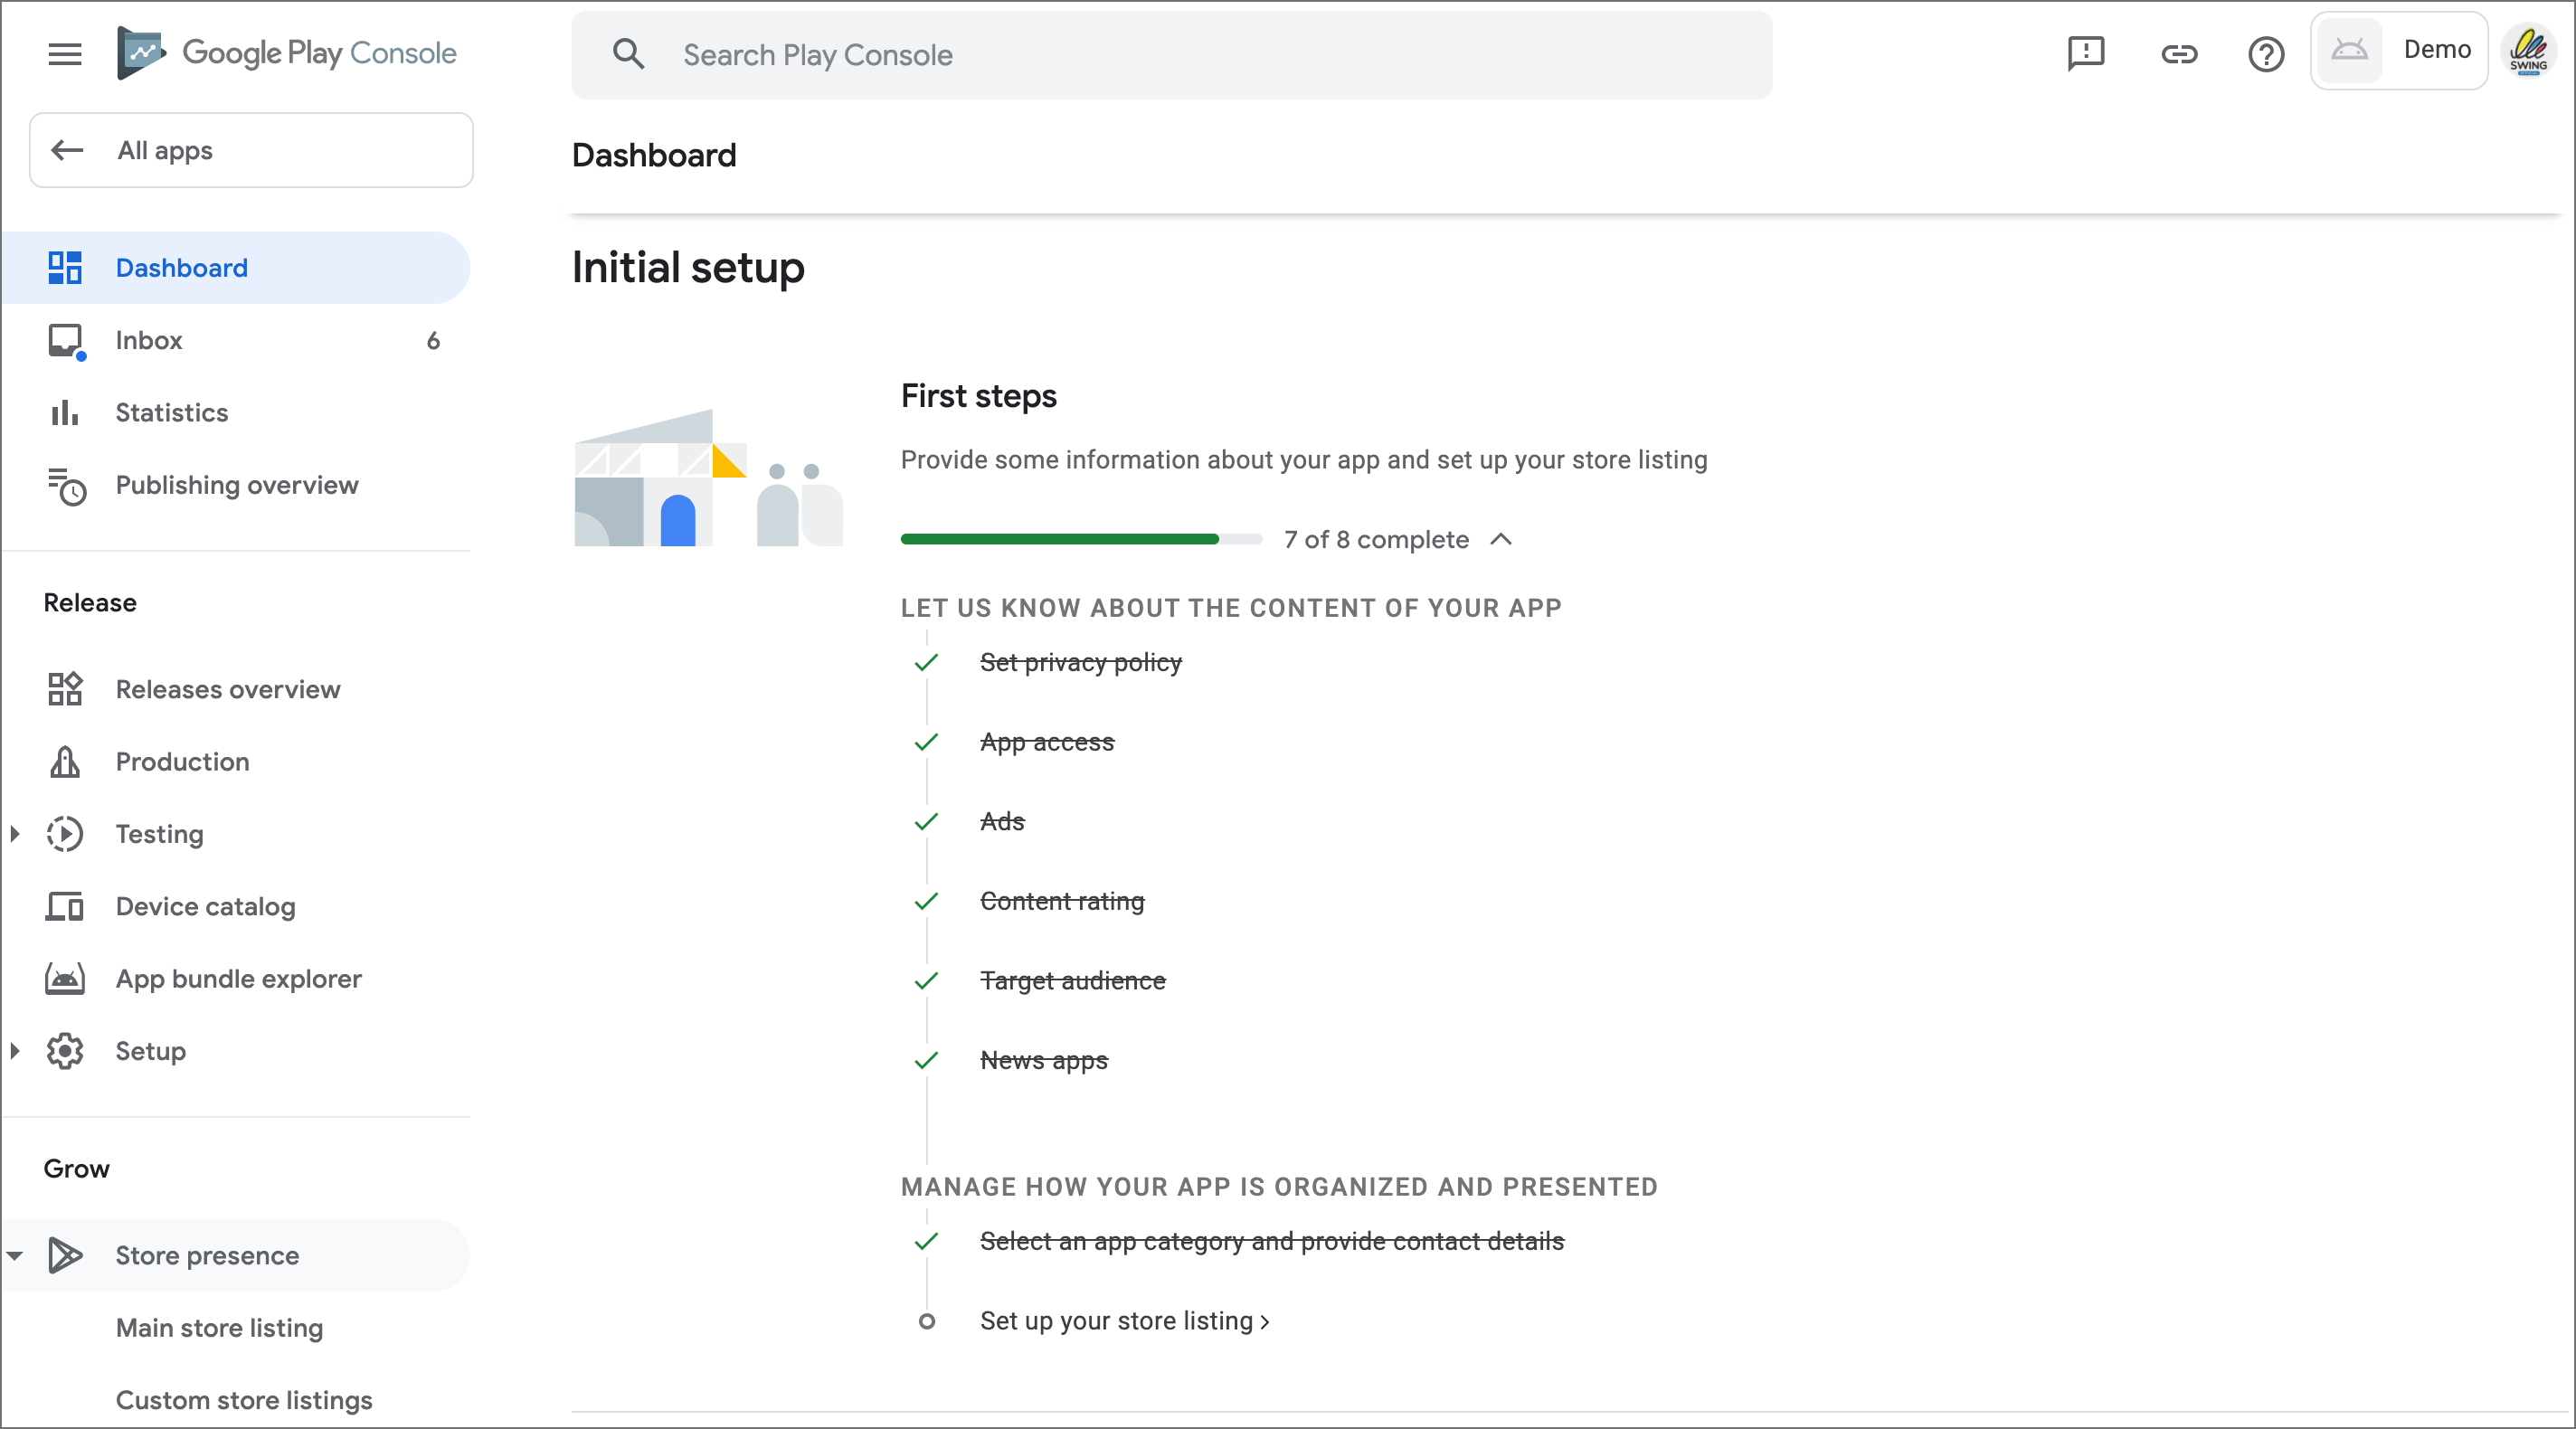
Selecting the app category and providing contact details were also completed.
**Next, select \[Store Registration Information Settings].**
**2. Store listing information**
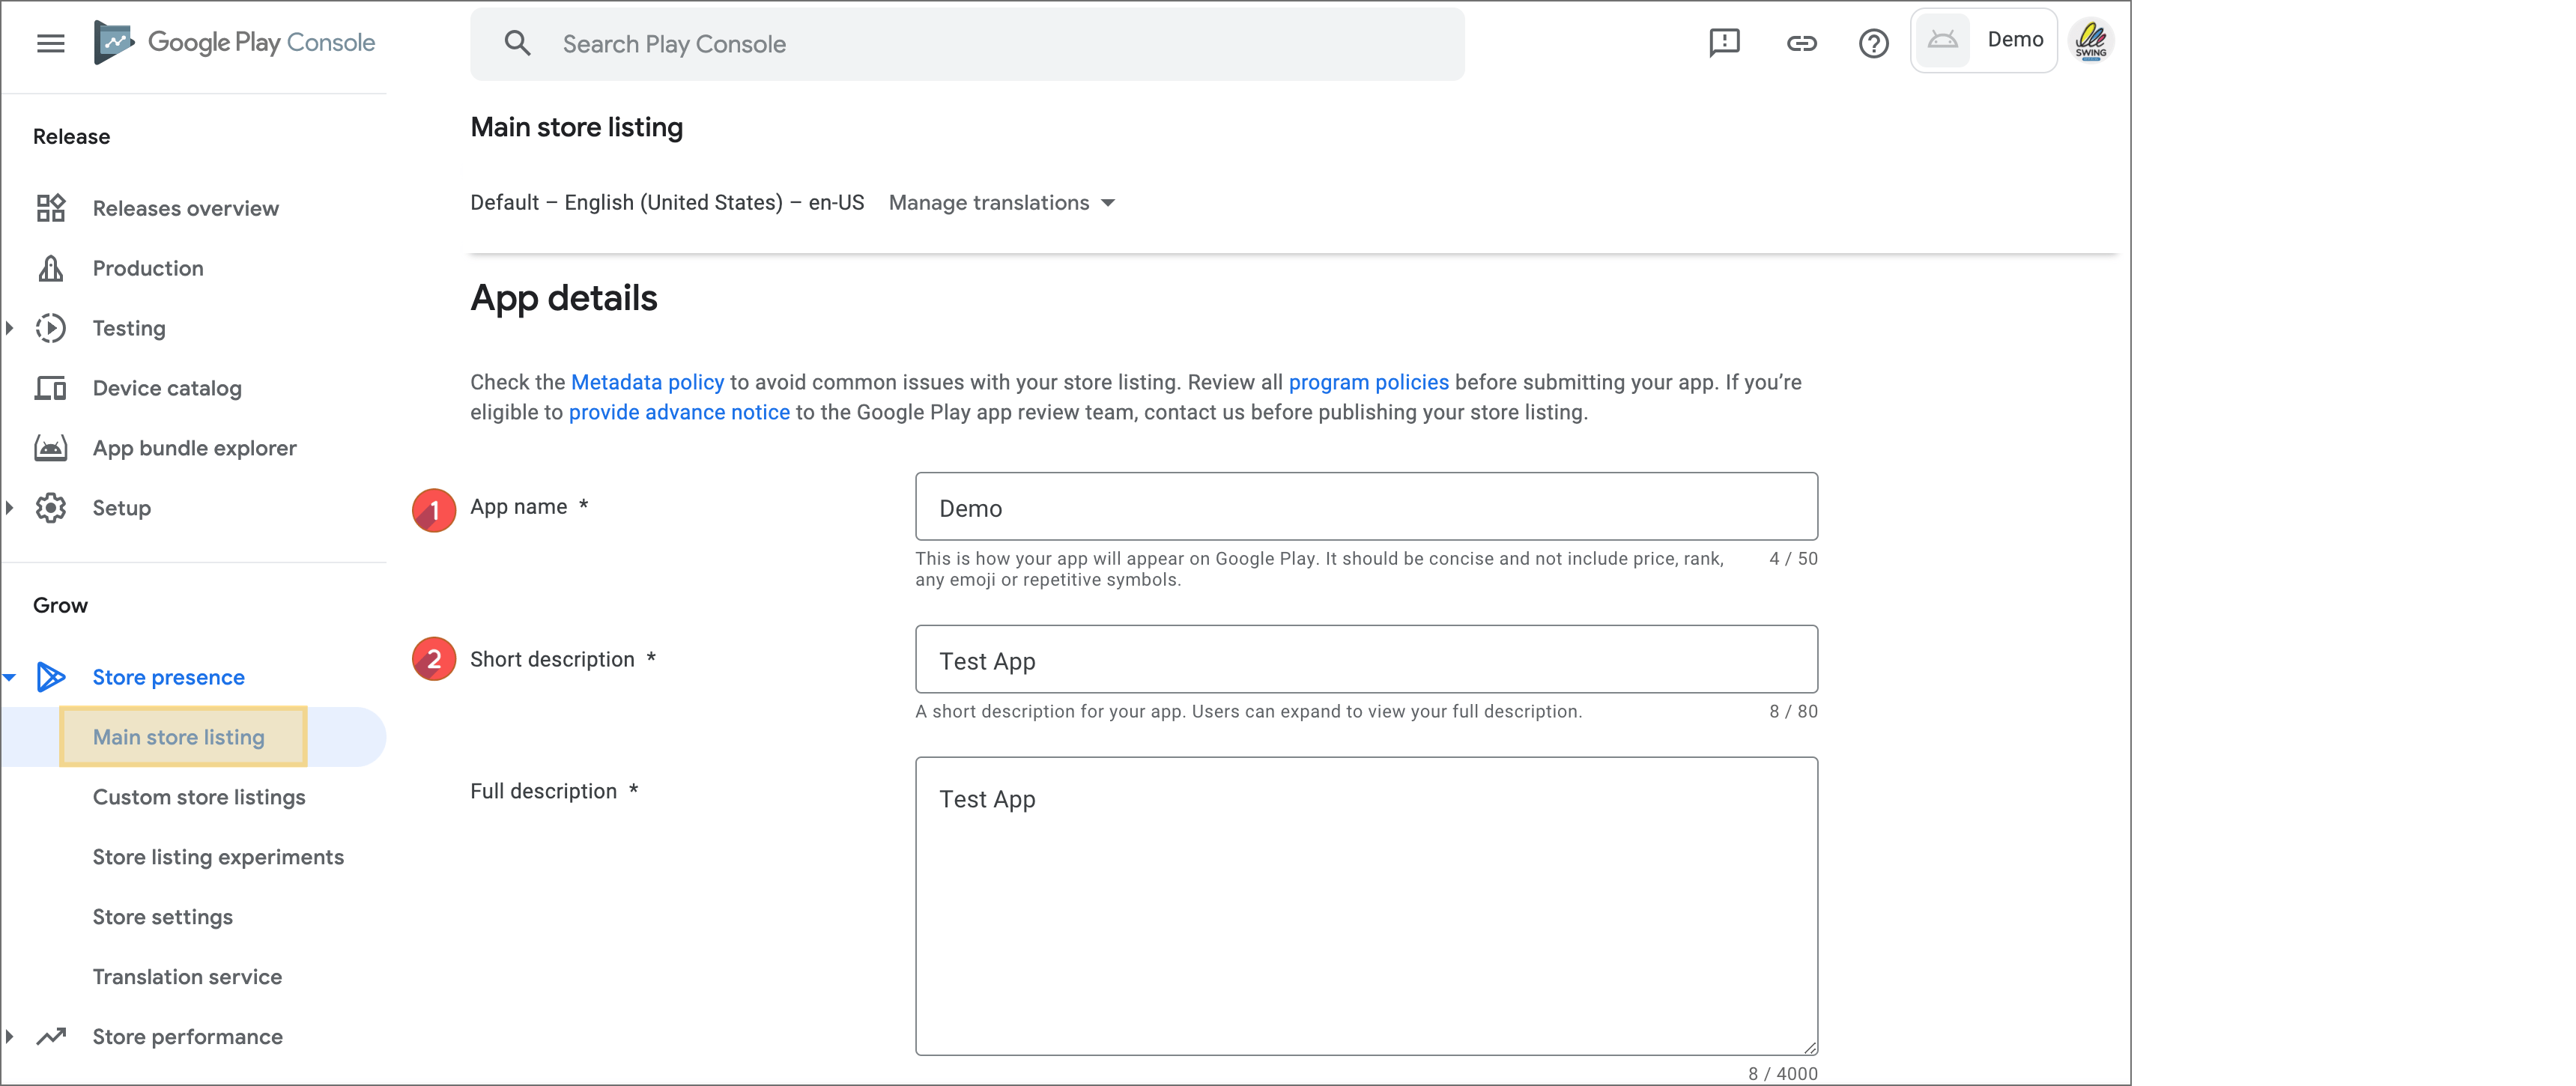
1. Enter the app name (app name displayed on the Play Store)
2. Brief description (app introduction content, written within 80 characters)\
Detailed description (Please write in more detail as the app introduction and within 4000 characters.
\*Note: Keyword types cannot be listed. Example) Puppy, dog, cat, pet dog, cat… # Prohibit entry of hashtags
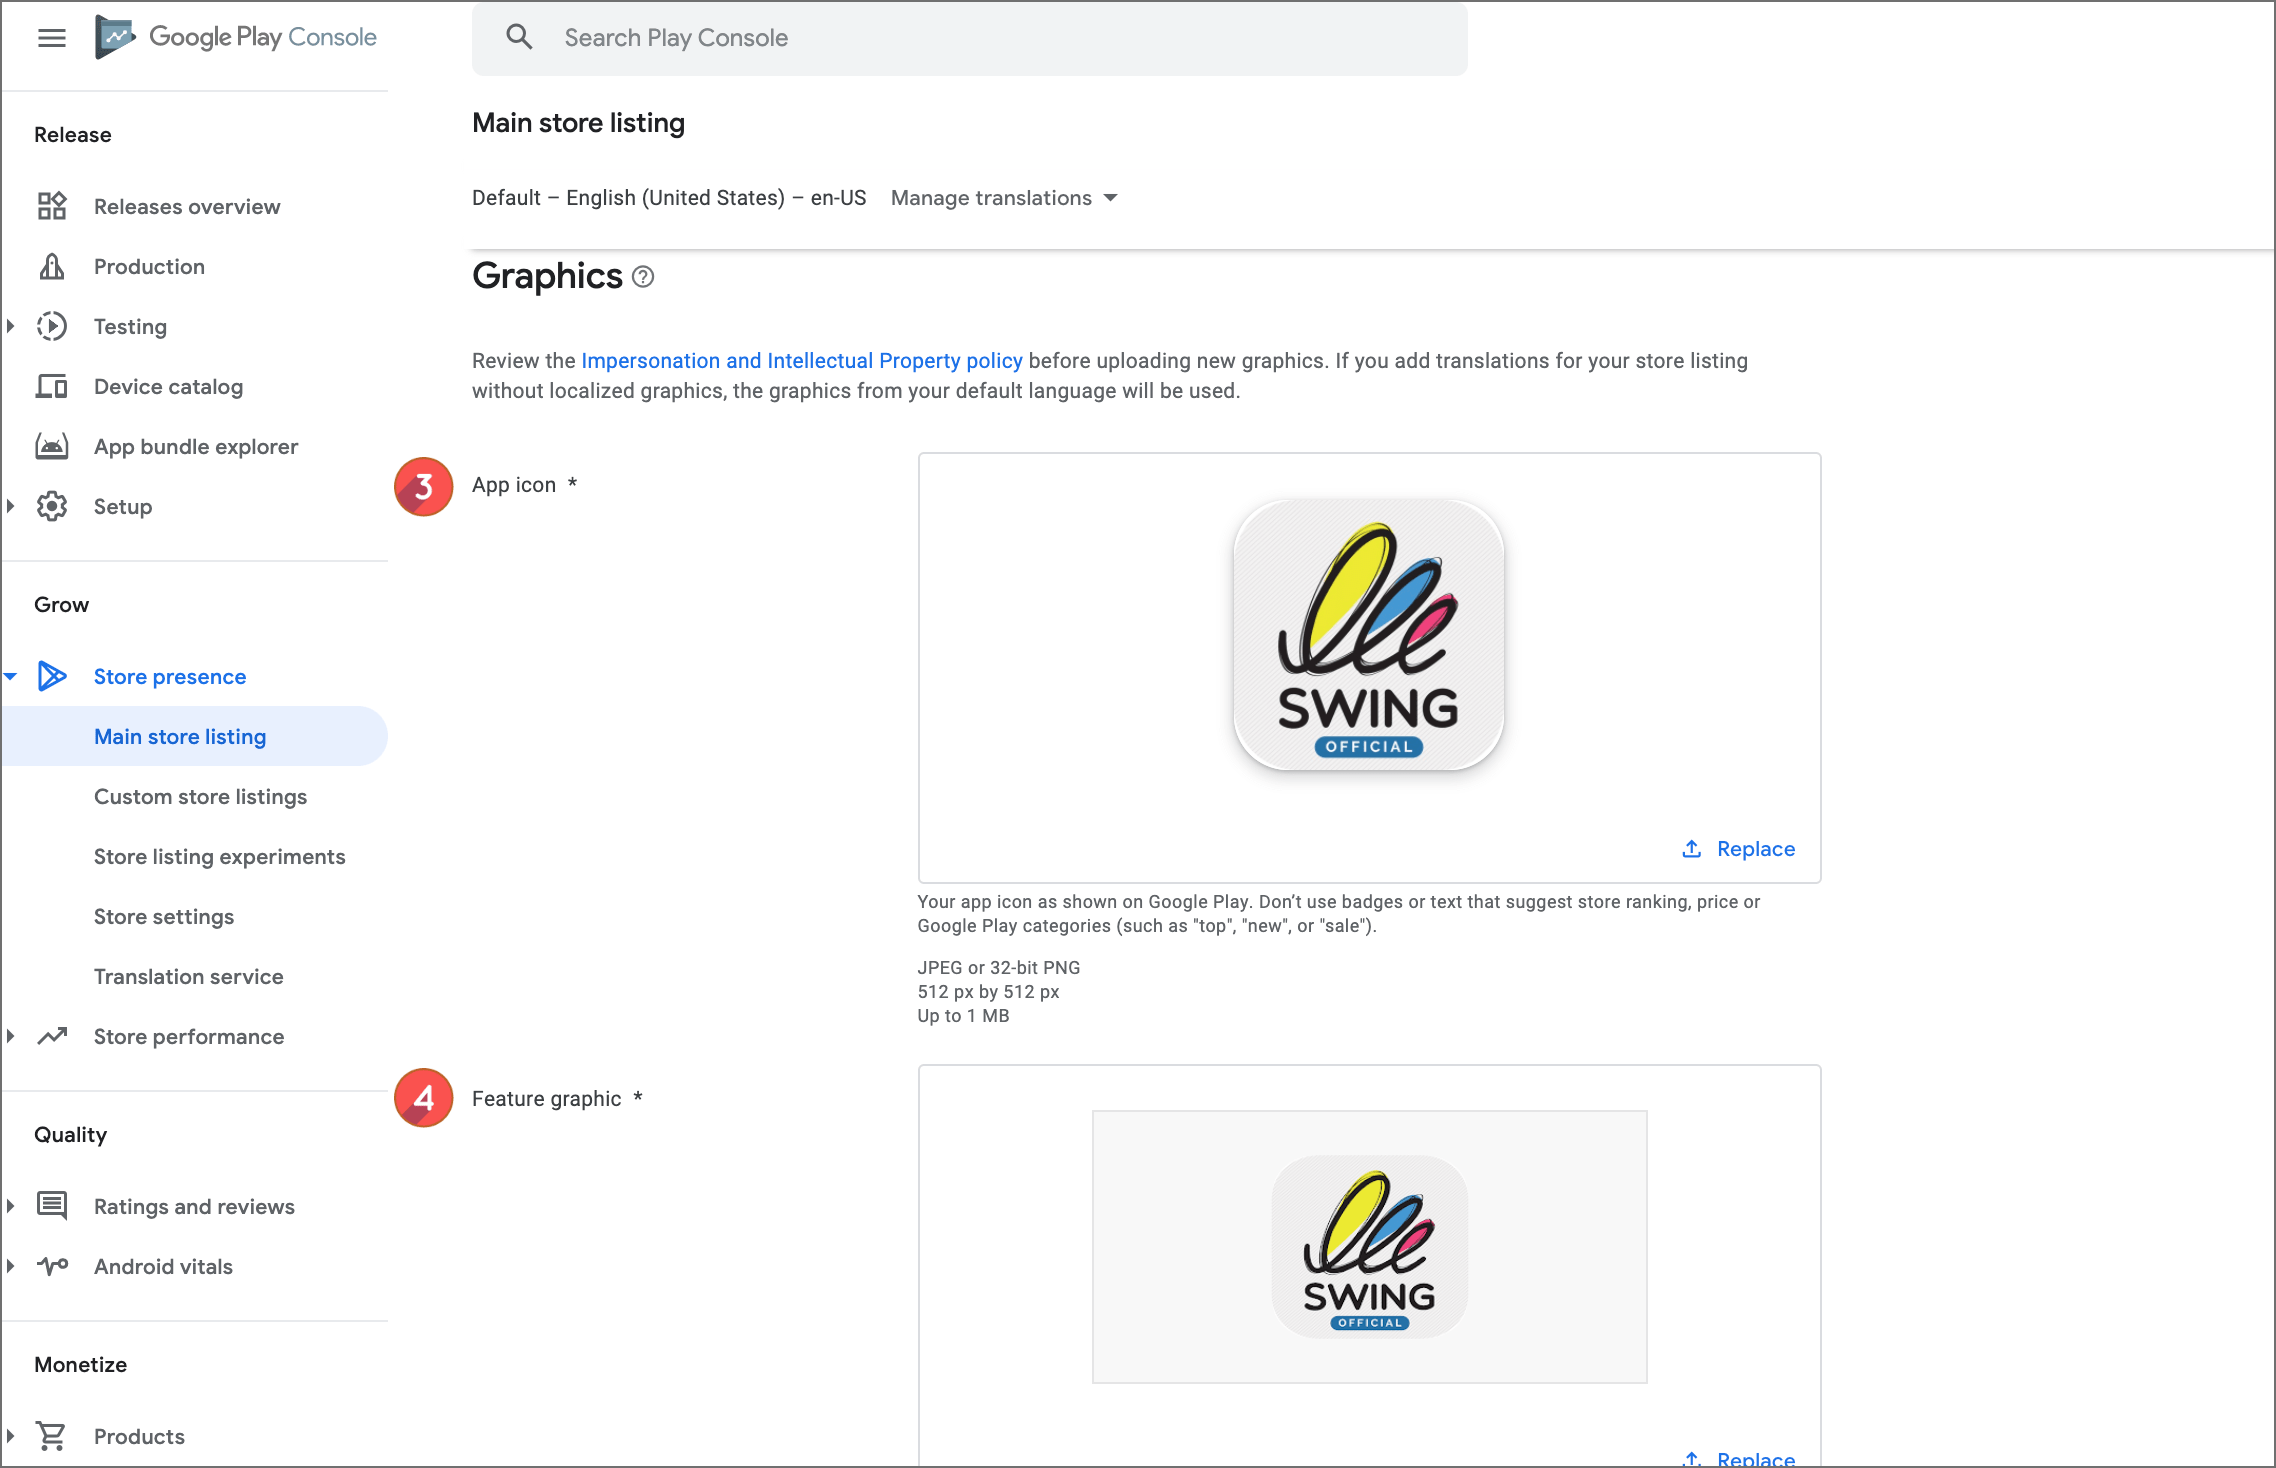
3\) Register the app icon image (app icon image displayed on the Play Store, 512px\*512px)
4\) Graphic image (thumbnail image 1024px\*500px displayed when sharing a released app)
\*How is the graphic image displayed?
 **What is the graphic image used for?**
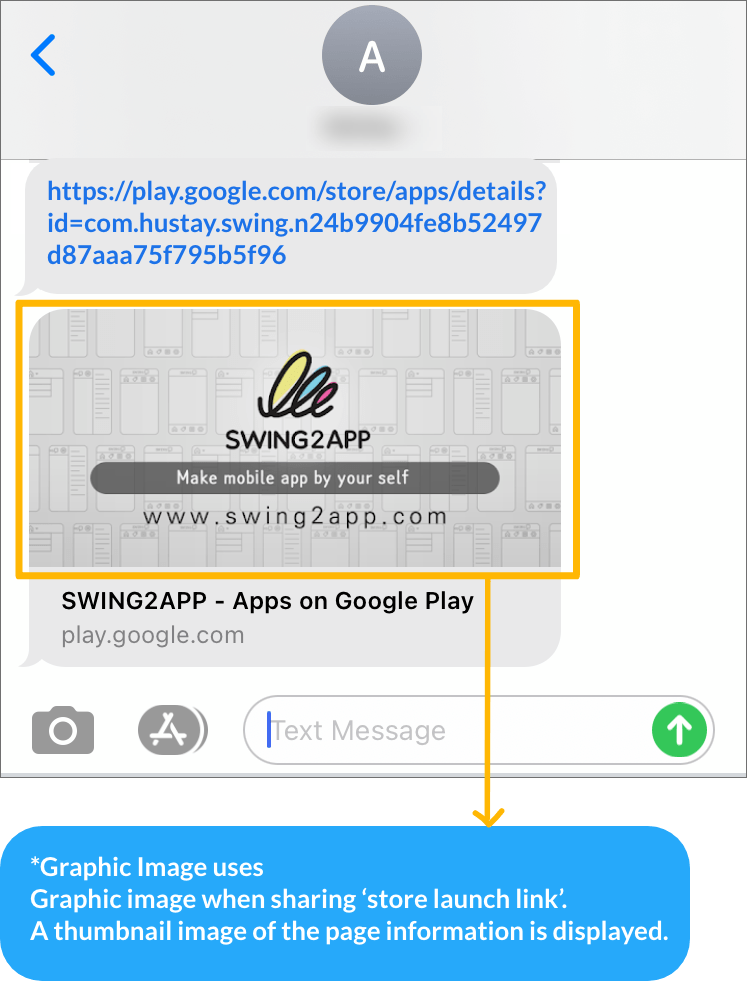
Graphic images are not images displayed on the Play Store.
If you share the store release link after launch, it will be displayed as a thumbnail image in the page information!
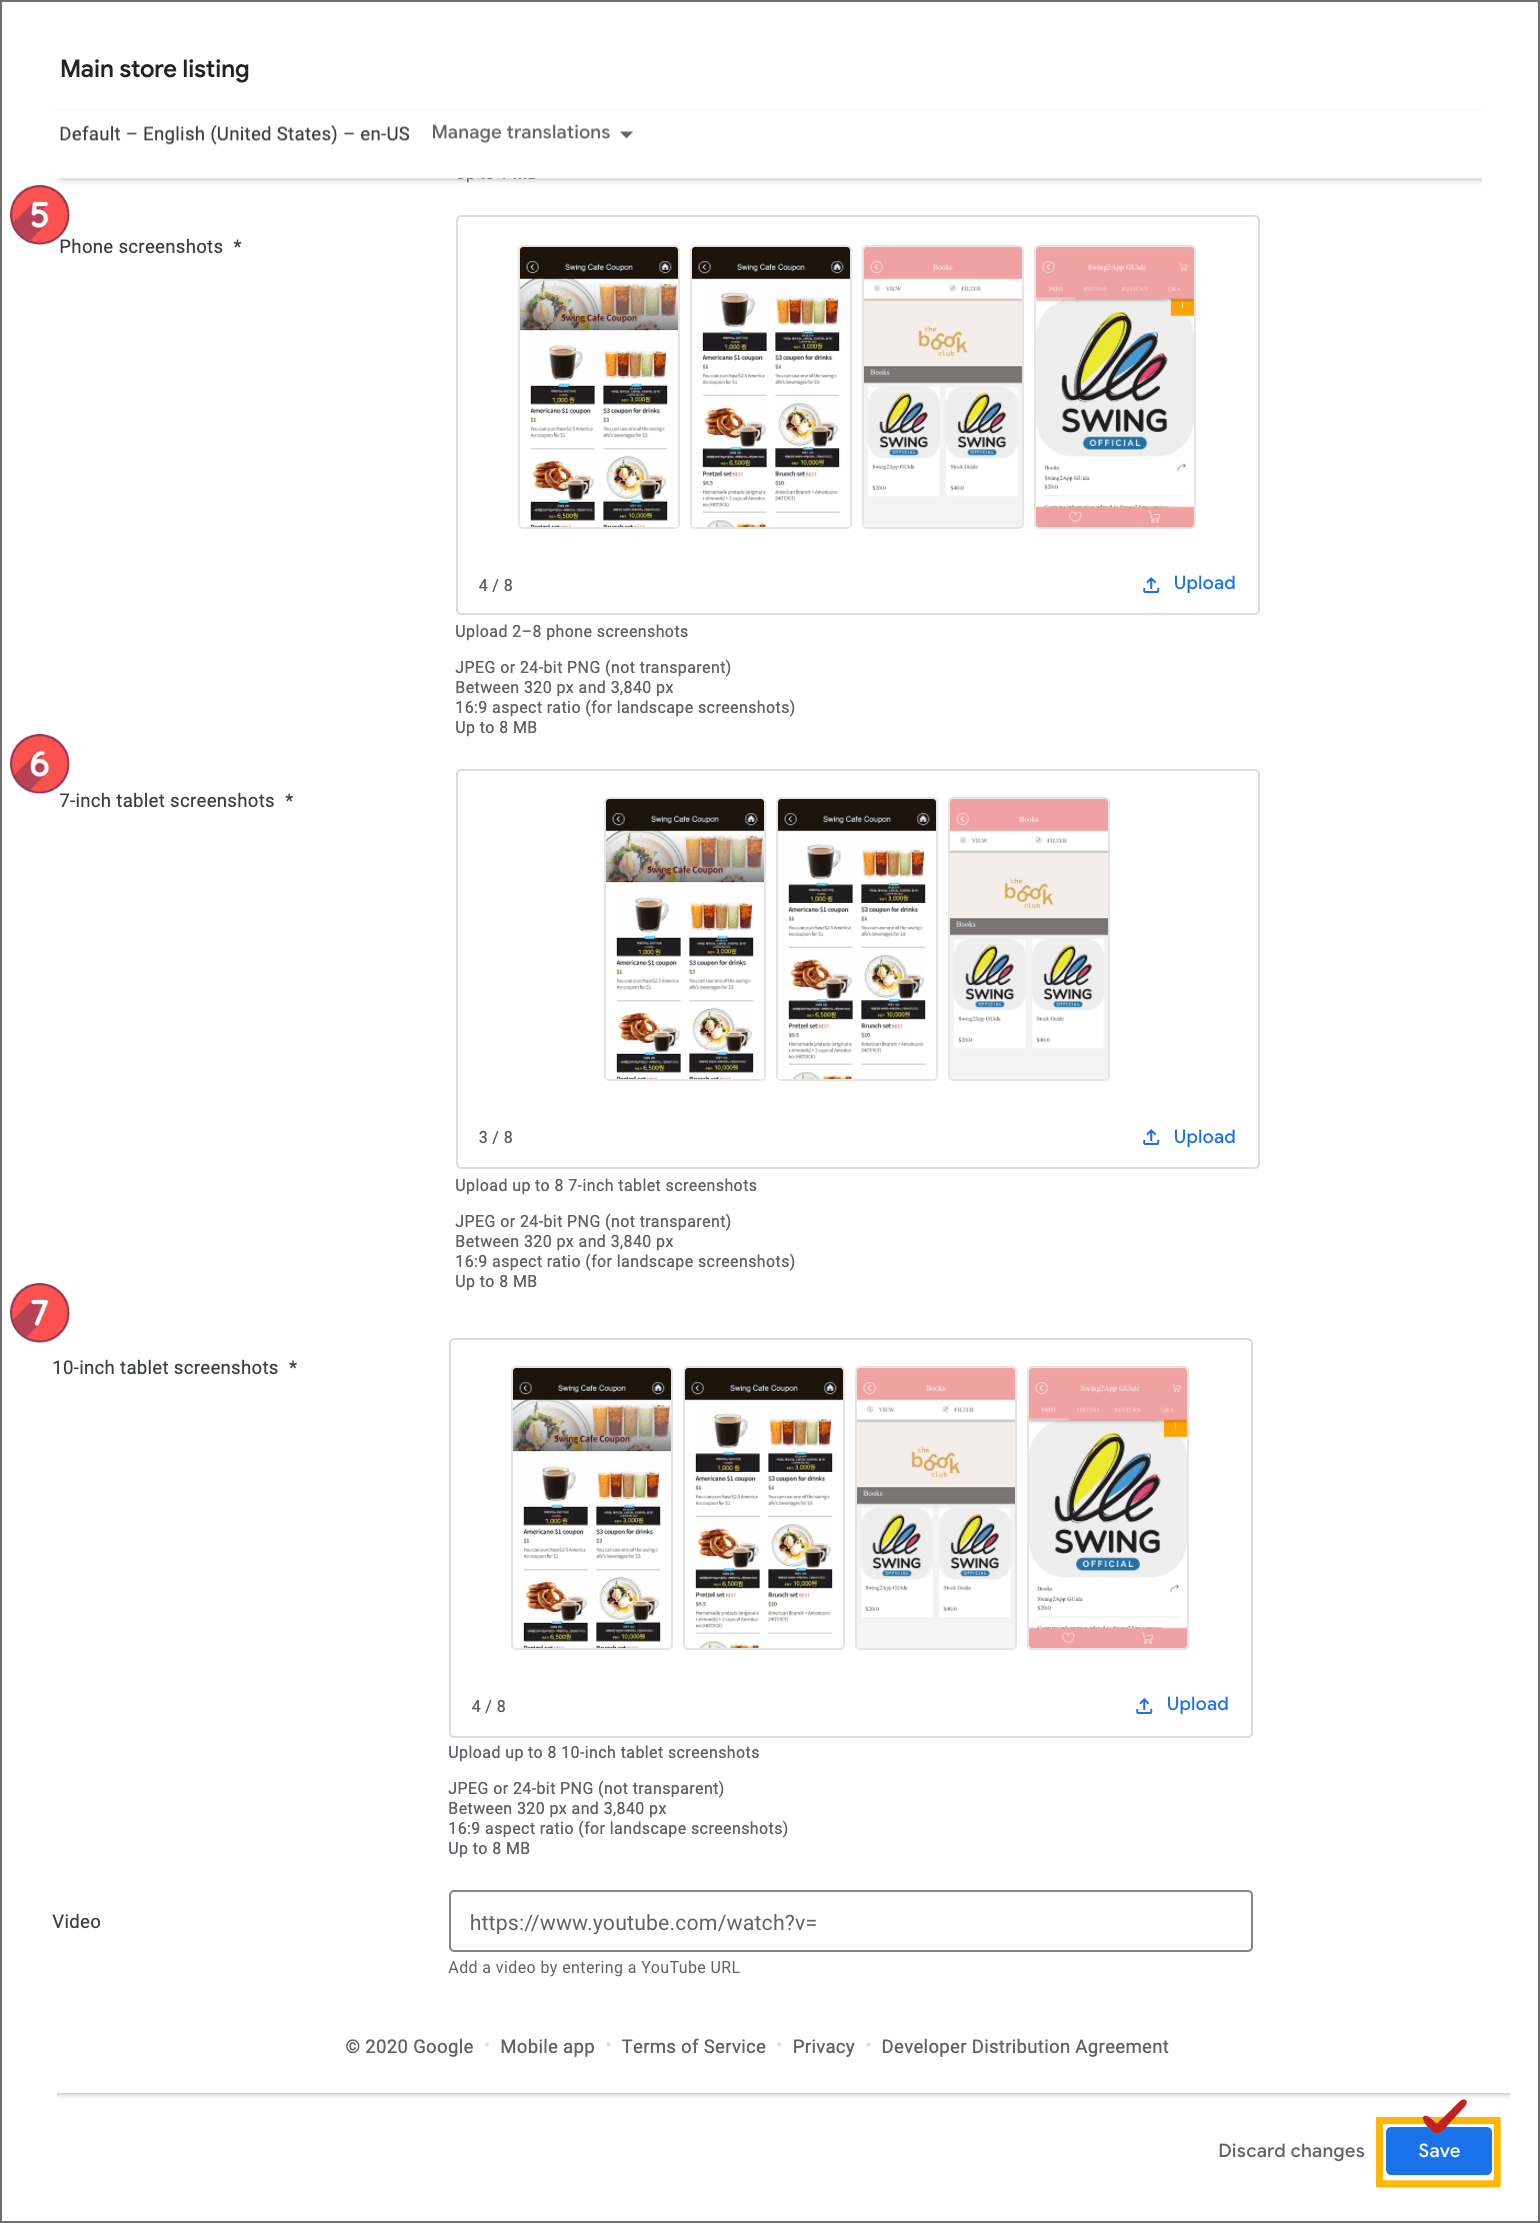
**5,6,7) Screenshot image registration**
All items 5, 6, and 7 are for registering screenshot images. Please register with the same image.
\* Screenshots must be registered as an image of the app execution screen. Images that are not related to the app are not allowed\~!
The image size should be between 320px and 3840px at the minimum.
And the length should not be more than twice the width.
Ex) If the width is 1000px, the height should not exceed 2000px.
8\) Press the \[Save] button to complete the store information entry.
All the information you need to enter in the play store is complete.
Finally, upload the app (AAB file).
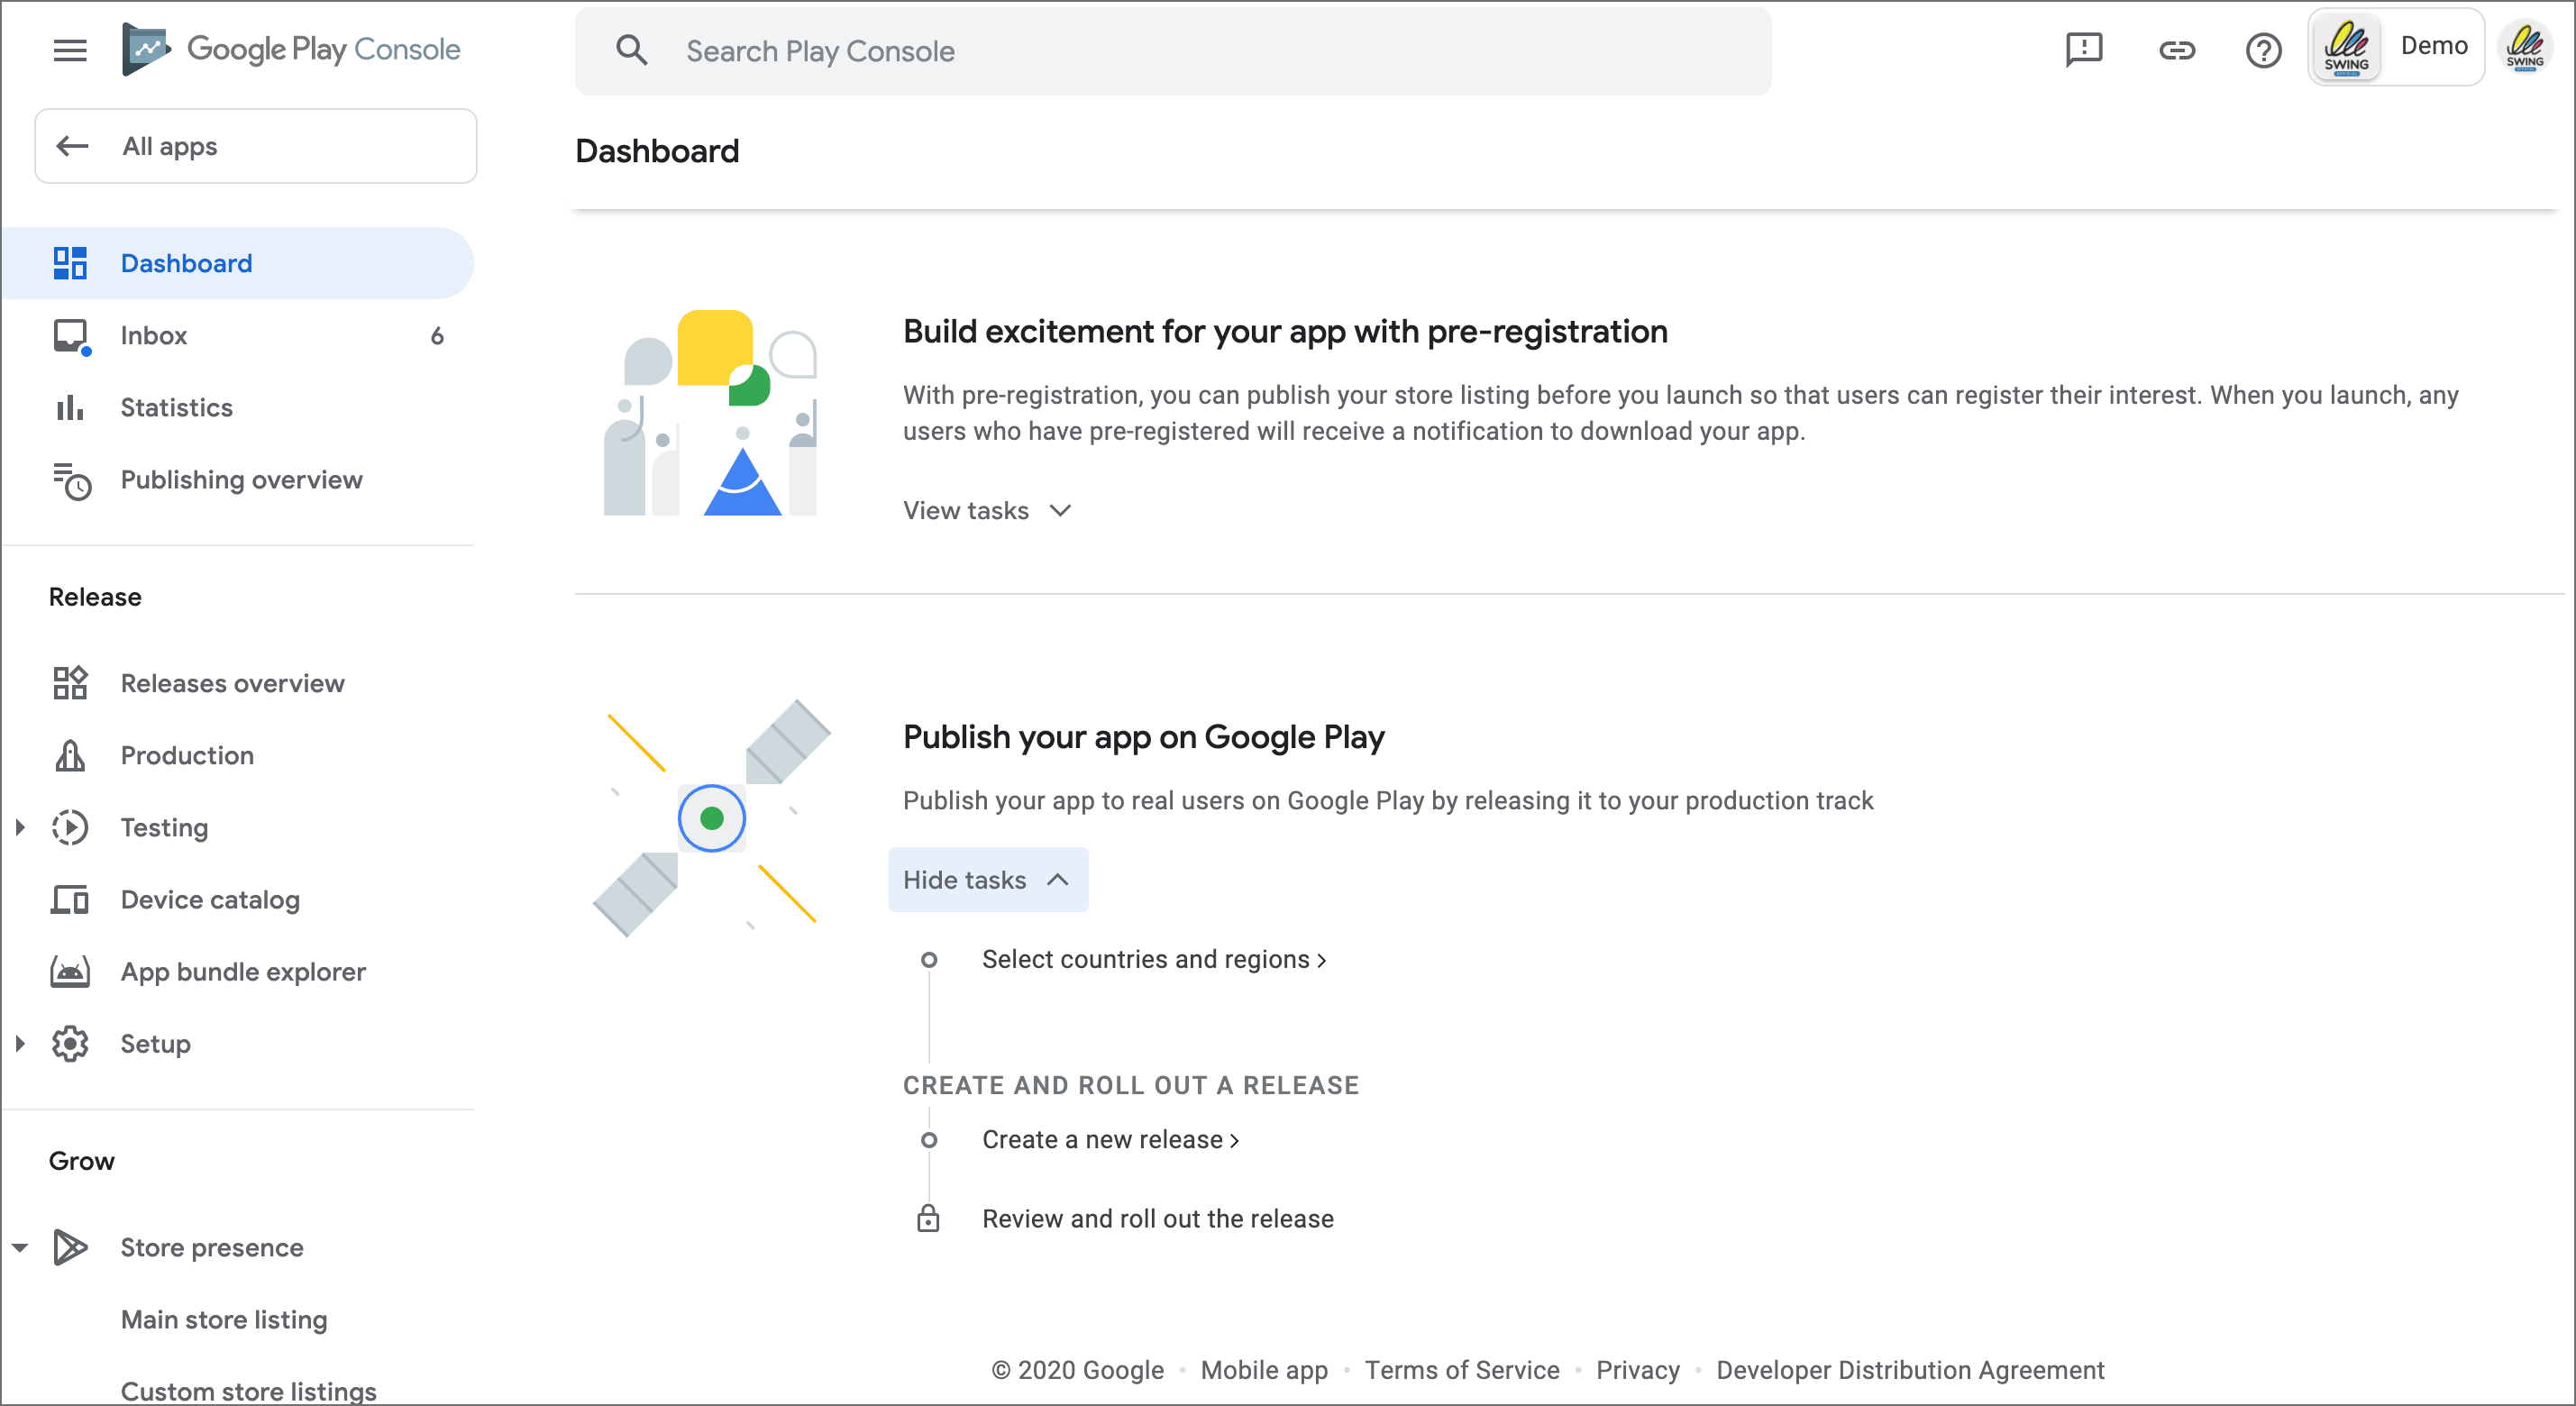
###  **STEP.3 Production-Registering the app**
**Go to Dashboard> Post Google Play App**
**1. Select country/region**
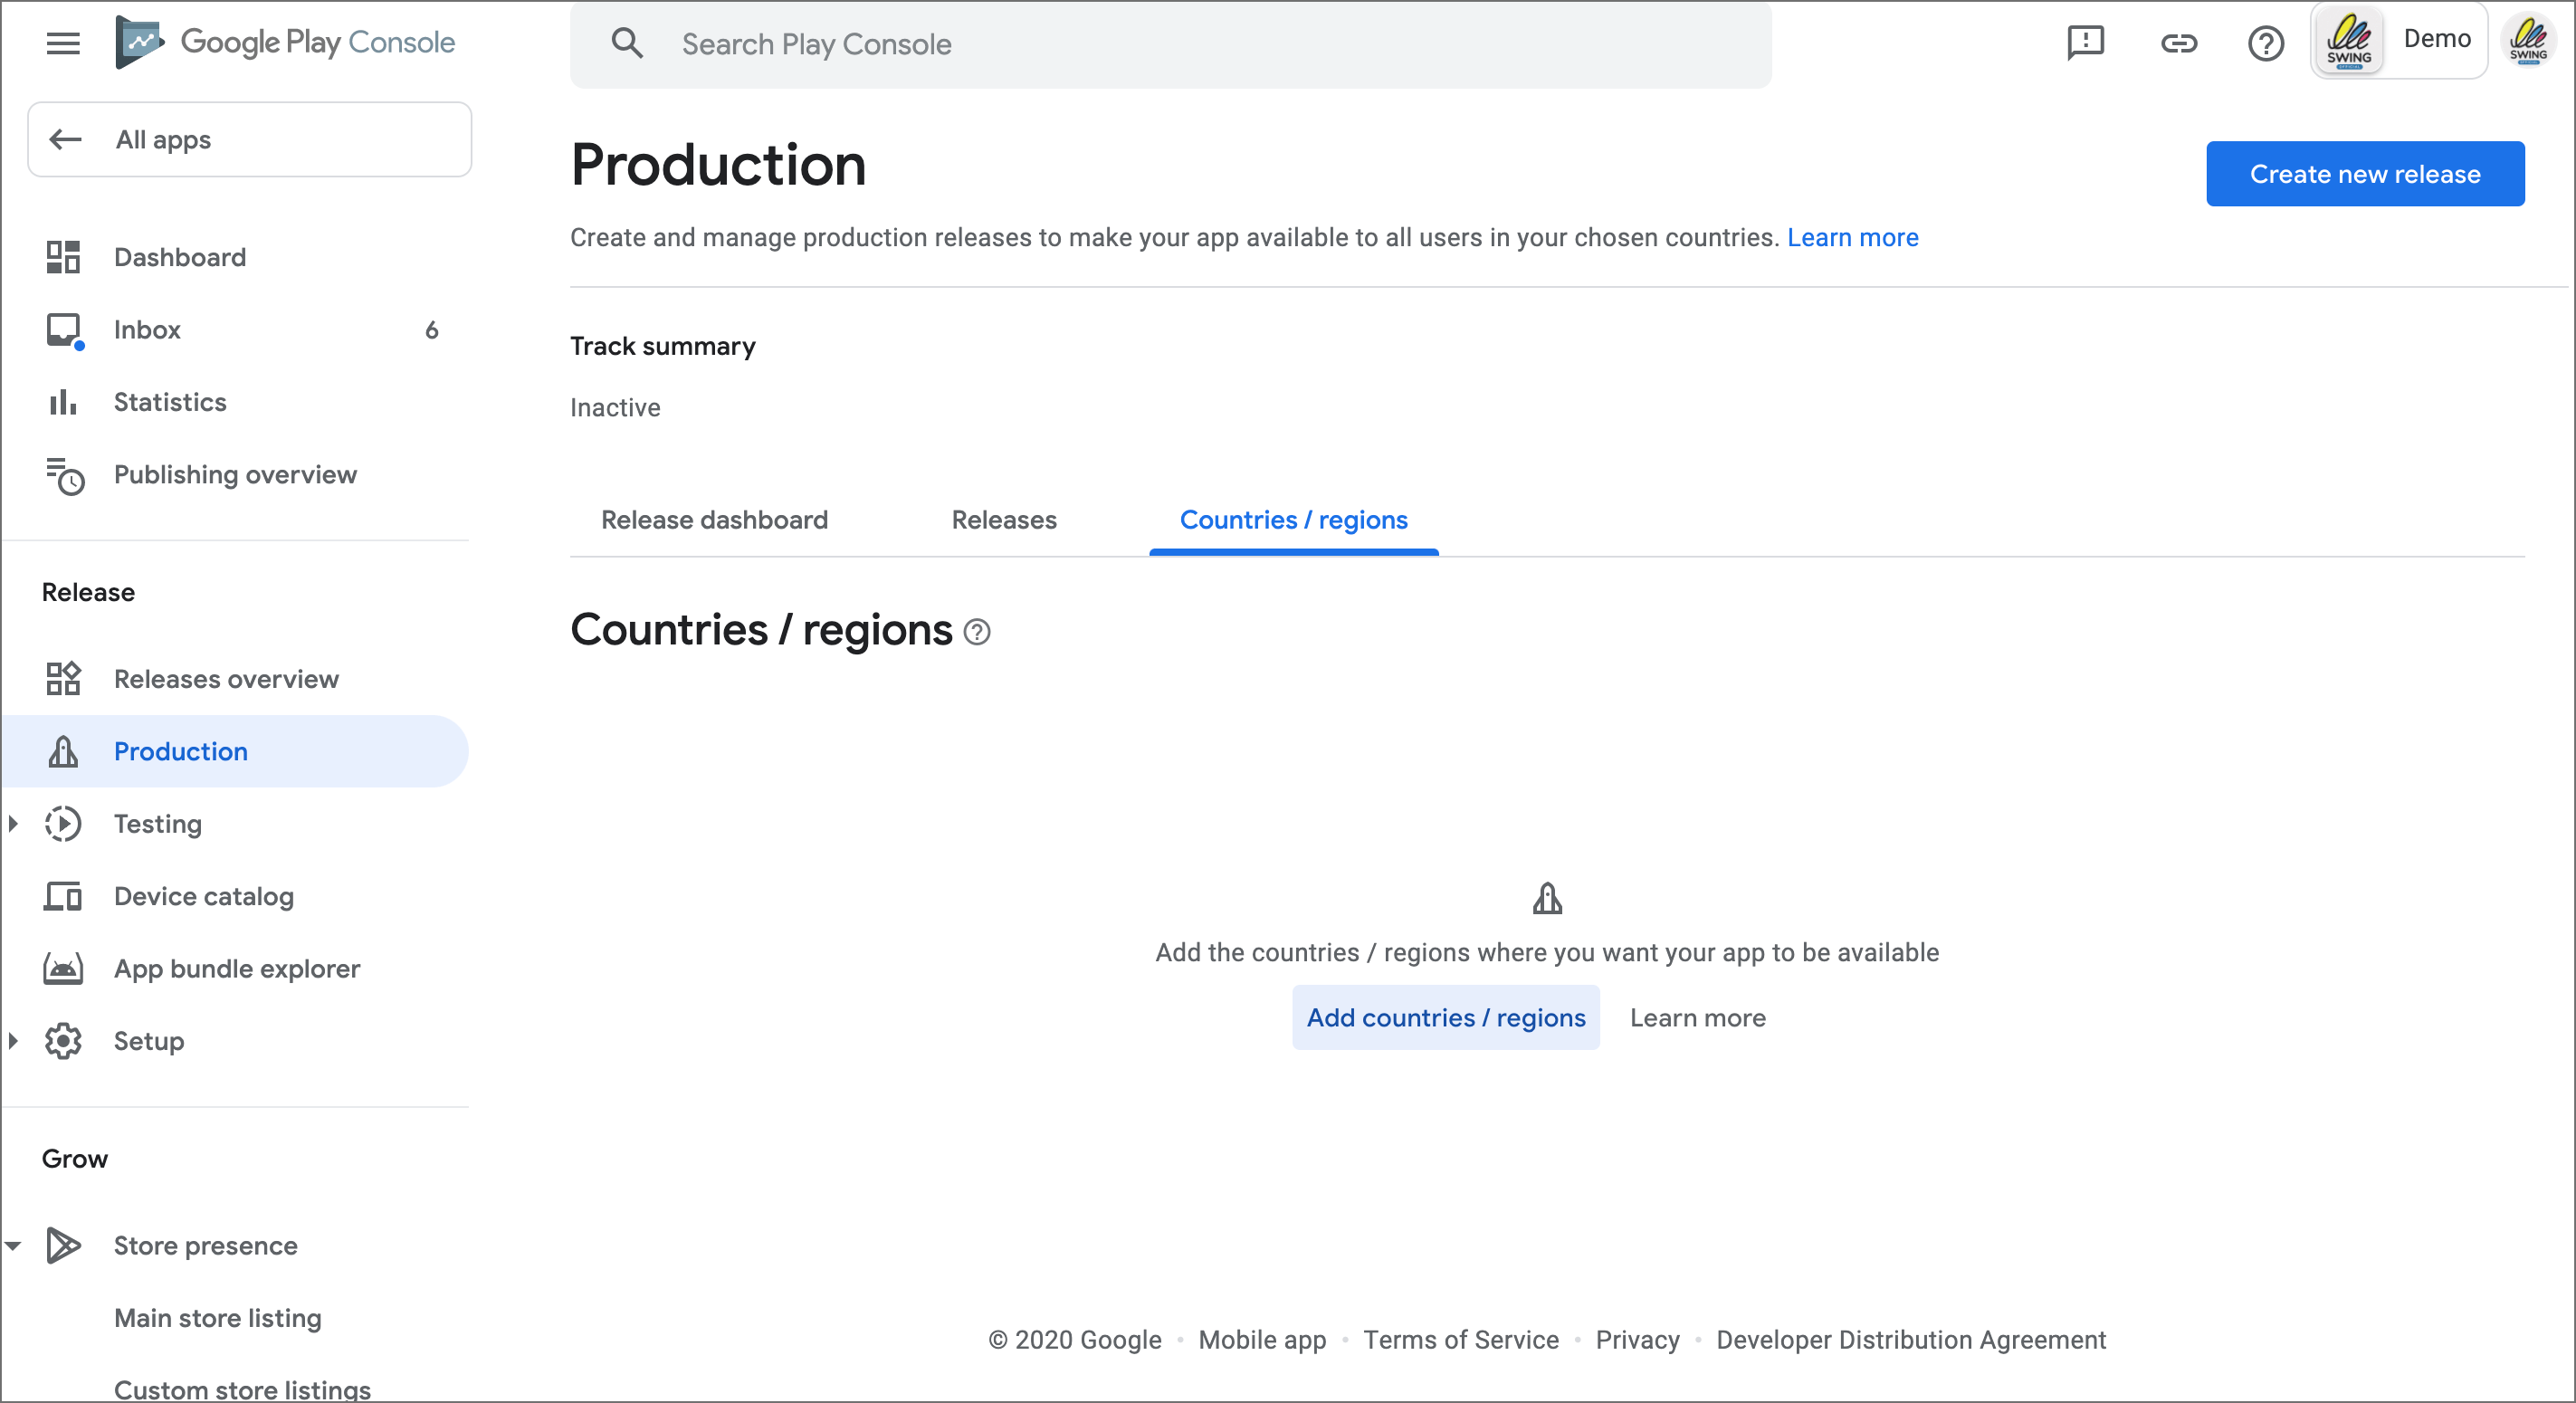
Select **Add Country/Region** in blue letters.
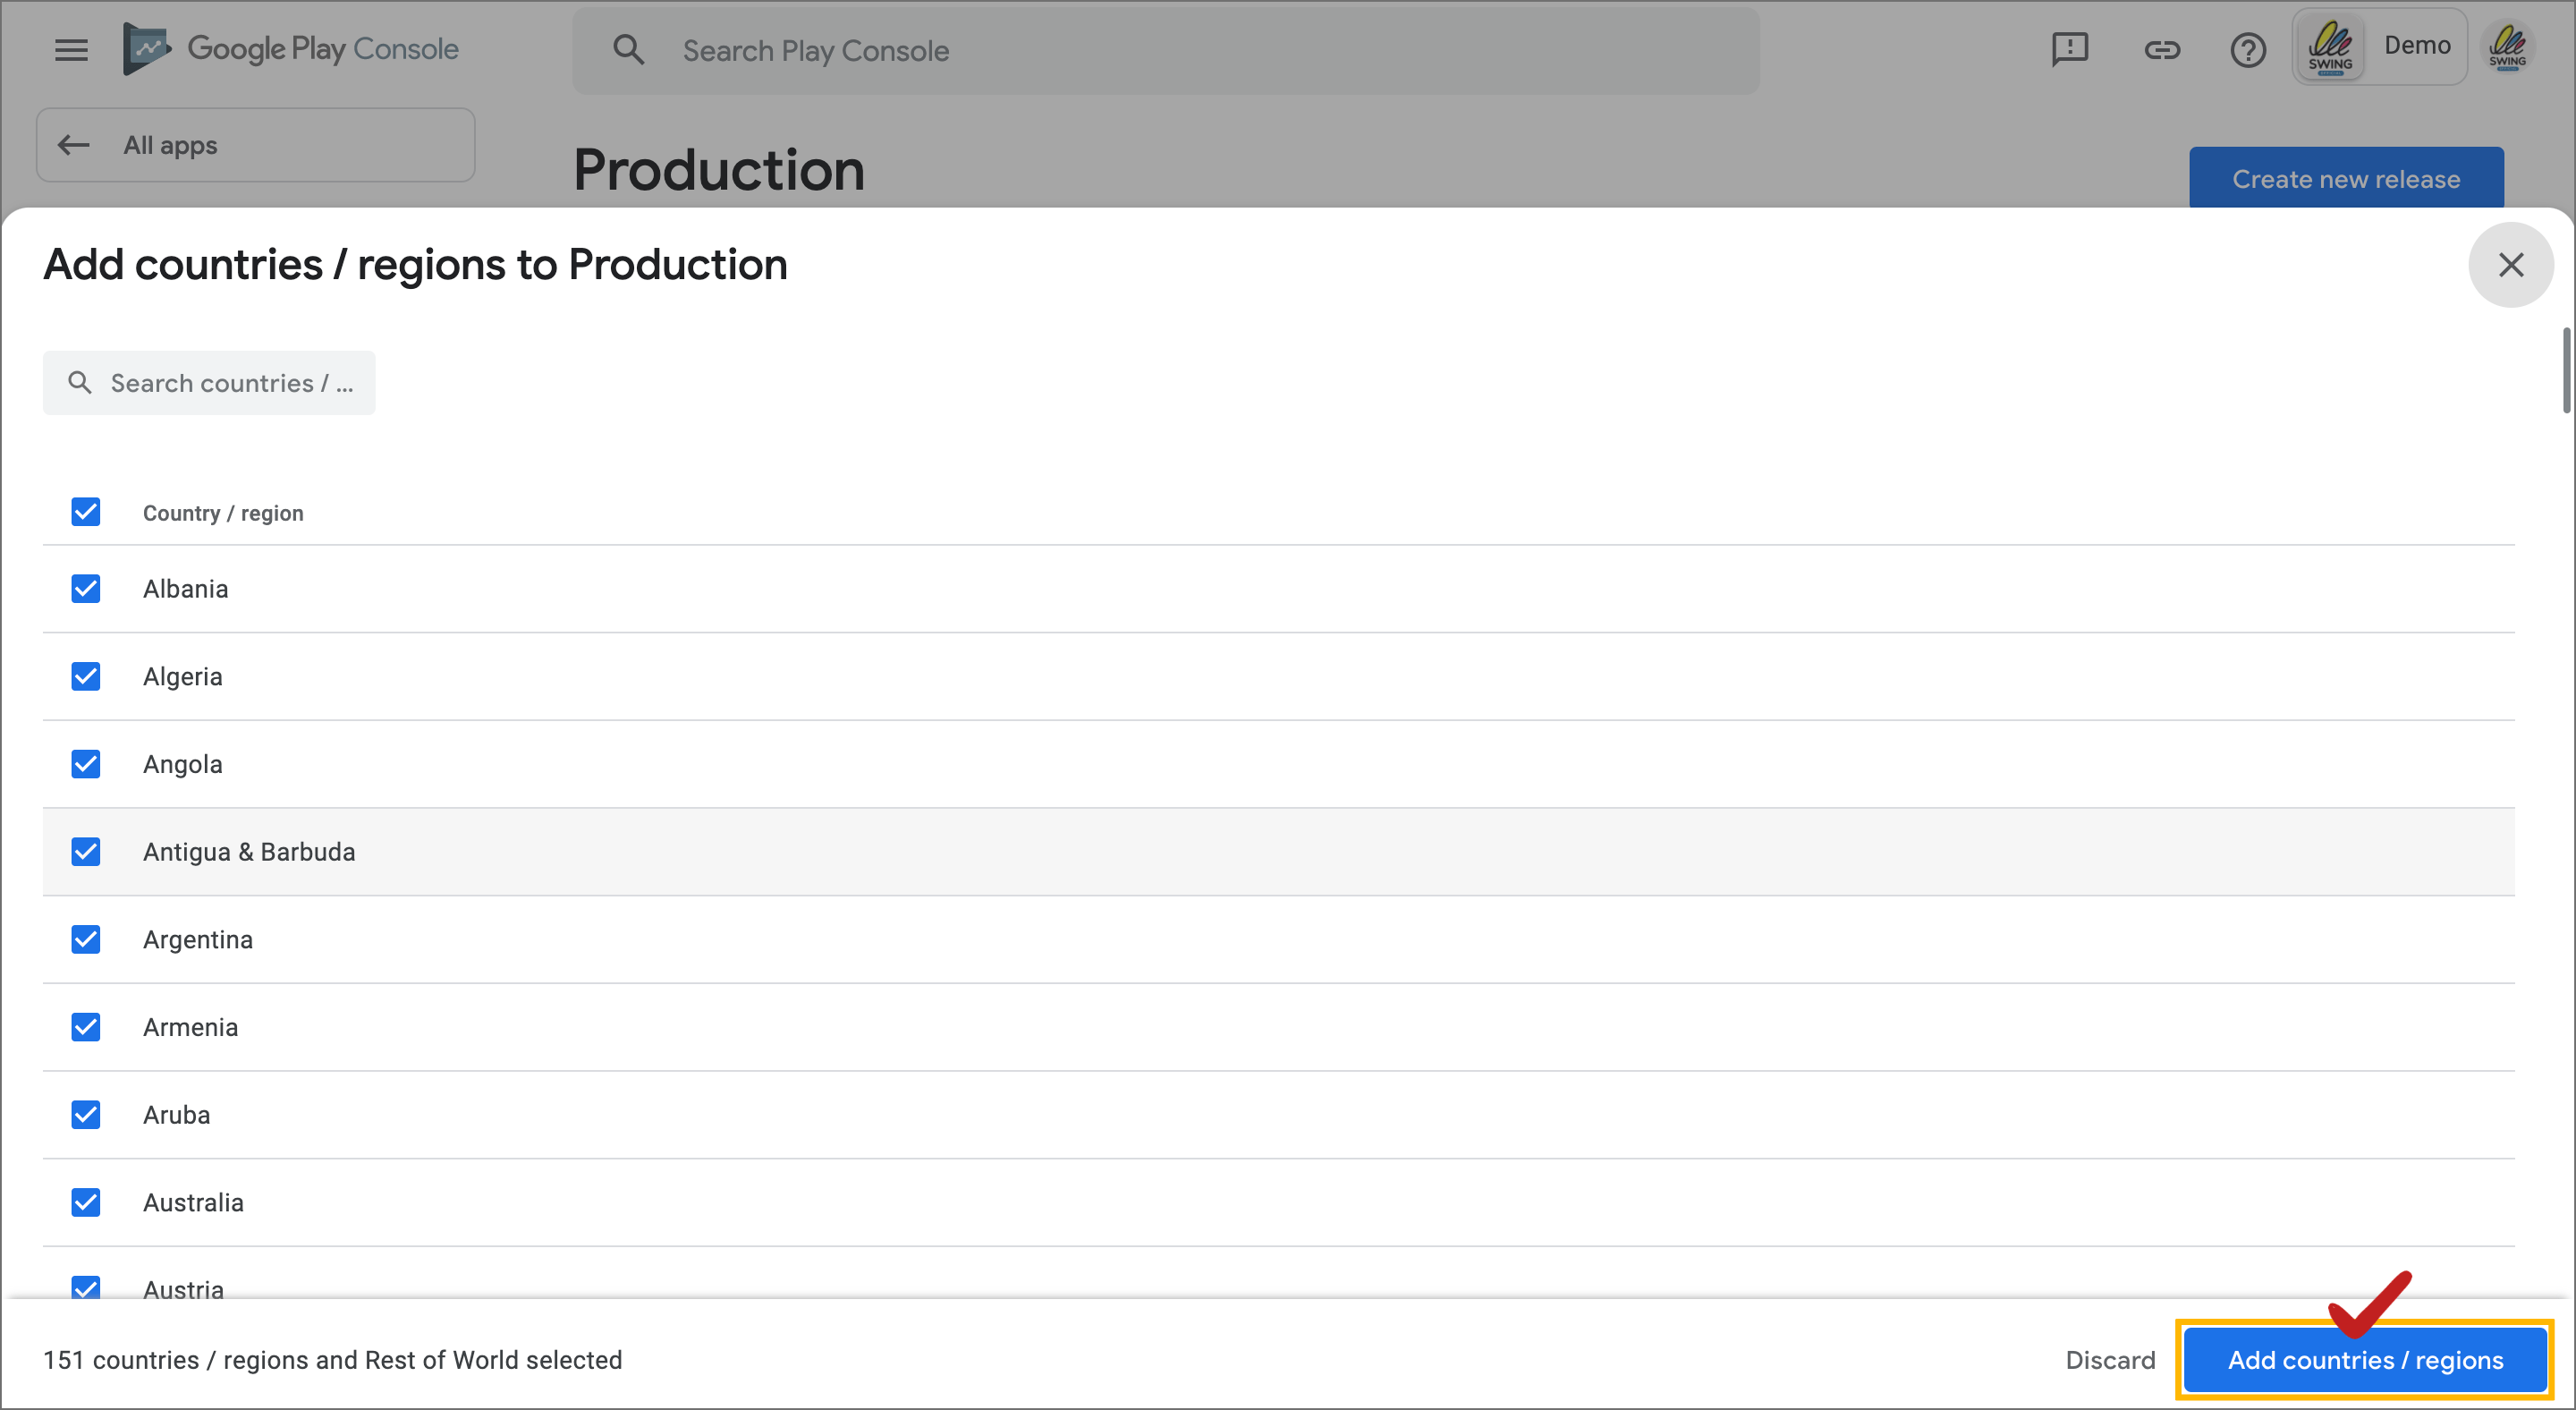
You choose which country to launch. You can select all countries.
If you are only launching in a specific country, please search for that country and select it.
Select the **\[Add Countries/Regions]** button.
**2. Production – AAB file registration**
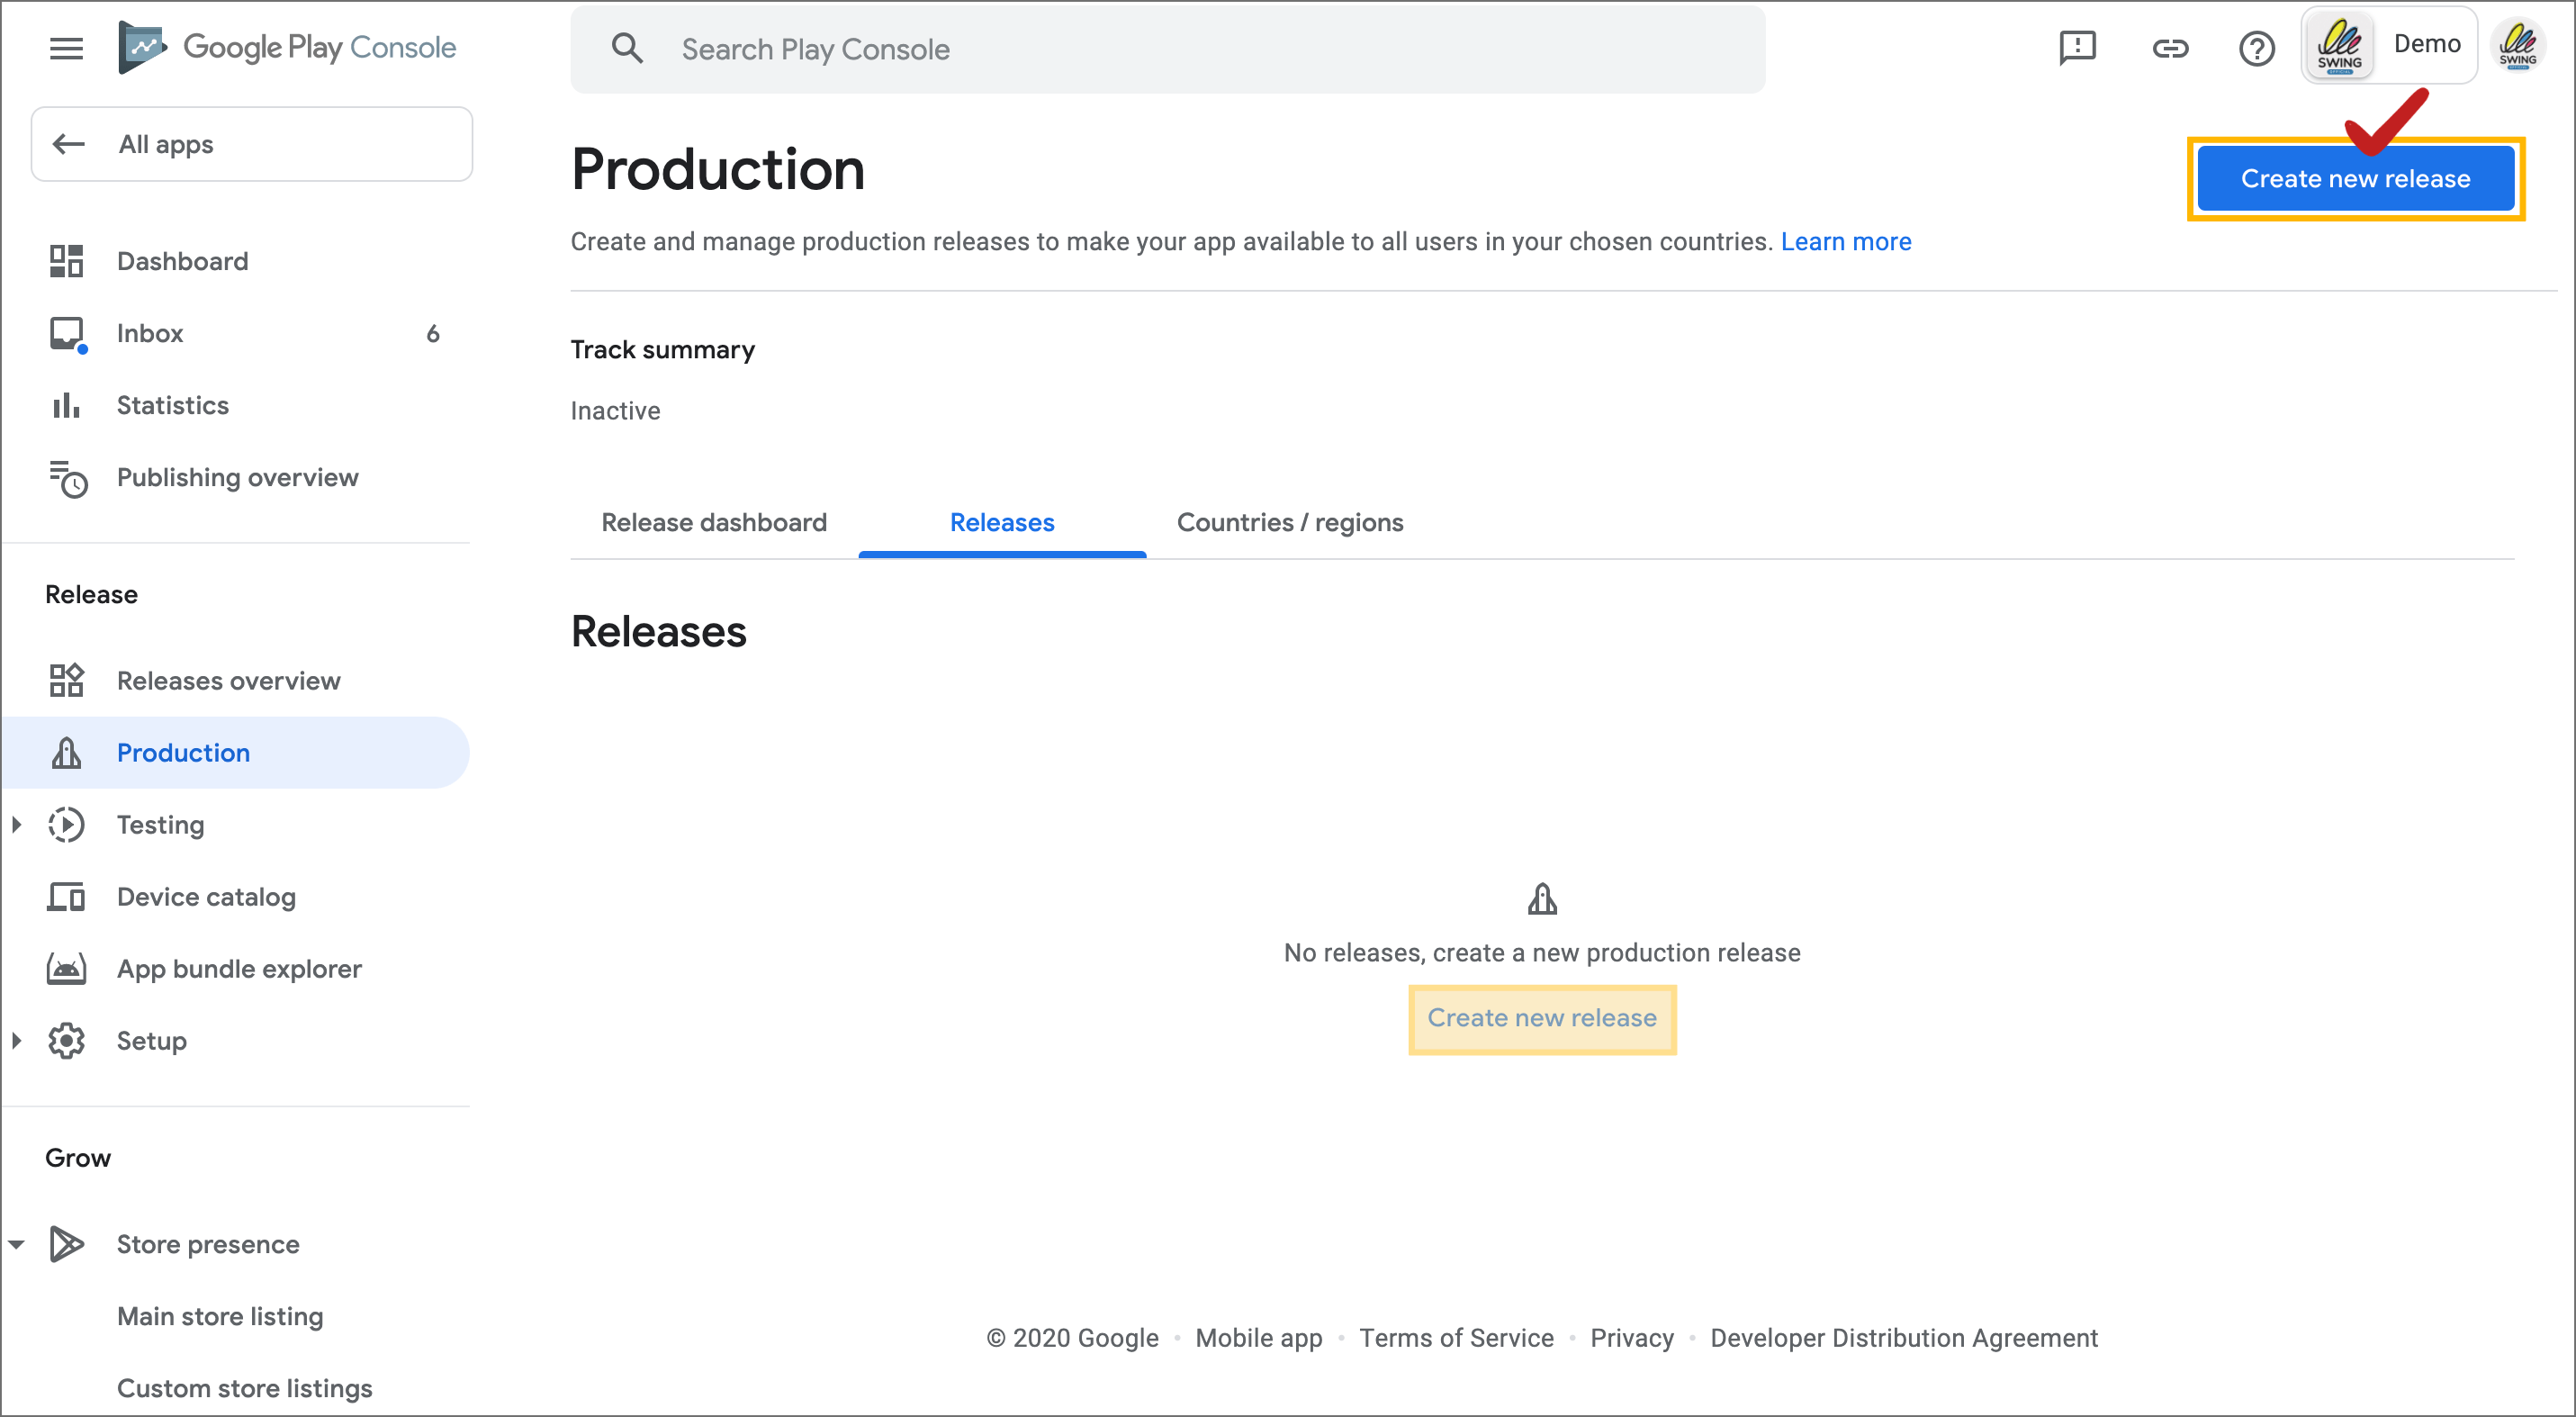
Next, select \[Release] on the production screen.
Select the **\[Create New Release]**button.
\*You can also select the \[Create new release] button at the top. It does not matter if you select the button in the middle of the text.

After selecting the upload button, upload the completed AAB file in Swing2App to the corresponding screen.
When the file upload is complete, select the \[Save] button at the bottom of the screen → select the \[Version Review] button.
**\* Where can I download the AAB file??**
For the AAB file, you can attach the AAB file sent by e-mail to Swing after requesting to make an app.
**You can download the AAB file directly from the** [**Swing homepage → Manager page → Manage Version → Production History**](https://www.swing2app.com/view/app_work_history) **page.**
\*AAB files can be downloaded only in the paid version app and the free commercial version app, and are not provided in the free version app.
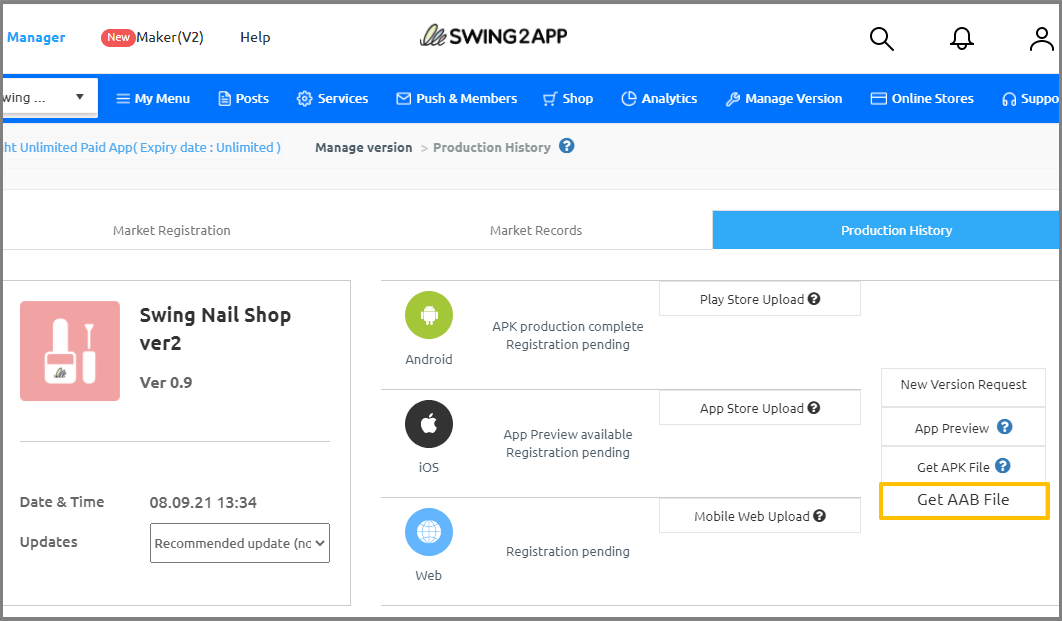
After app production is complete, go to the [Manager – Manage Version – Production History](https://www.swing2app.com/view/app_work_history) page.
Here, if you click \[Get AAB File], the file is downloaded to your PC.
You can upload the downloaded AAB file as **Google Play → Production → AAB file.**
\*Please use the Internet browser Chrome.
\ **\*Important Note**: Due to the update of the Play Store app registration system, the existing app registration file, APK file, has been changed to → AAB file.
AAB files are created from apps created after August 9, 21, in Swing2App.
Therefore, for apps created before 21.08.09, go to App Creation V2 and select the Create App button to re-create the app with a new version.
You can receive AAB files from the newly created app.
If registration is not successful, please leave an inquiry on the Swing2App inquiry board.
**TIP. Register by dragging AAB file**
Open the Google Play console screen and the Swing2App site 2 screens.
You can register the AAB file received from the Swing2App site as an app file on the Play Console screen by dragging (drag) it with your mouse.
You can work more conveniently than saving and loading a separate file, right?^^

Select the \[Start release with Production track] button → Select the \[Release] button in the production track release message window.
**★ Wait!**

Some of you may see this warning message.
This content has nothing to do with the release of the app, so you can ignore it.
**\* Play Store registration means that only apps that have been converted to the paid version can be registered!! You know? ^^ (Or you can register the free commercial version of the app as well)**

**3. Production registration completed**
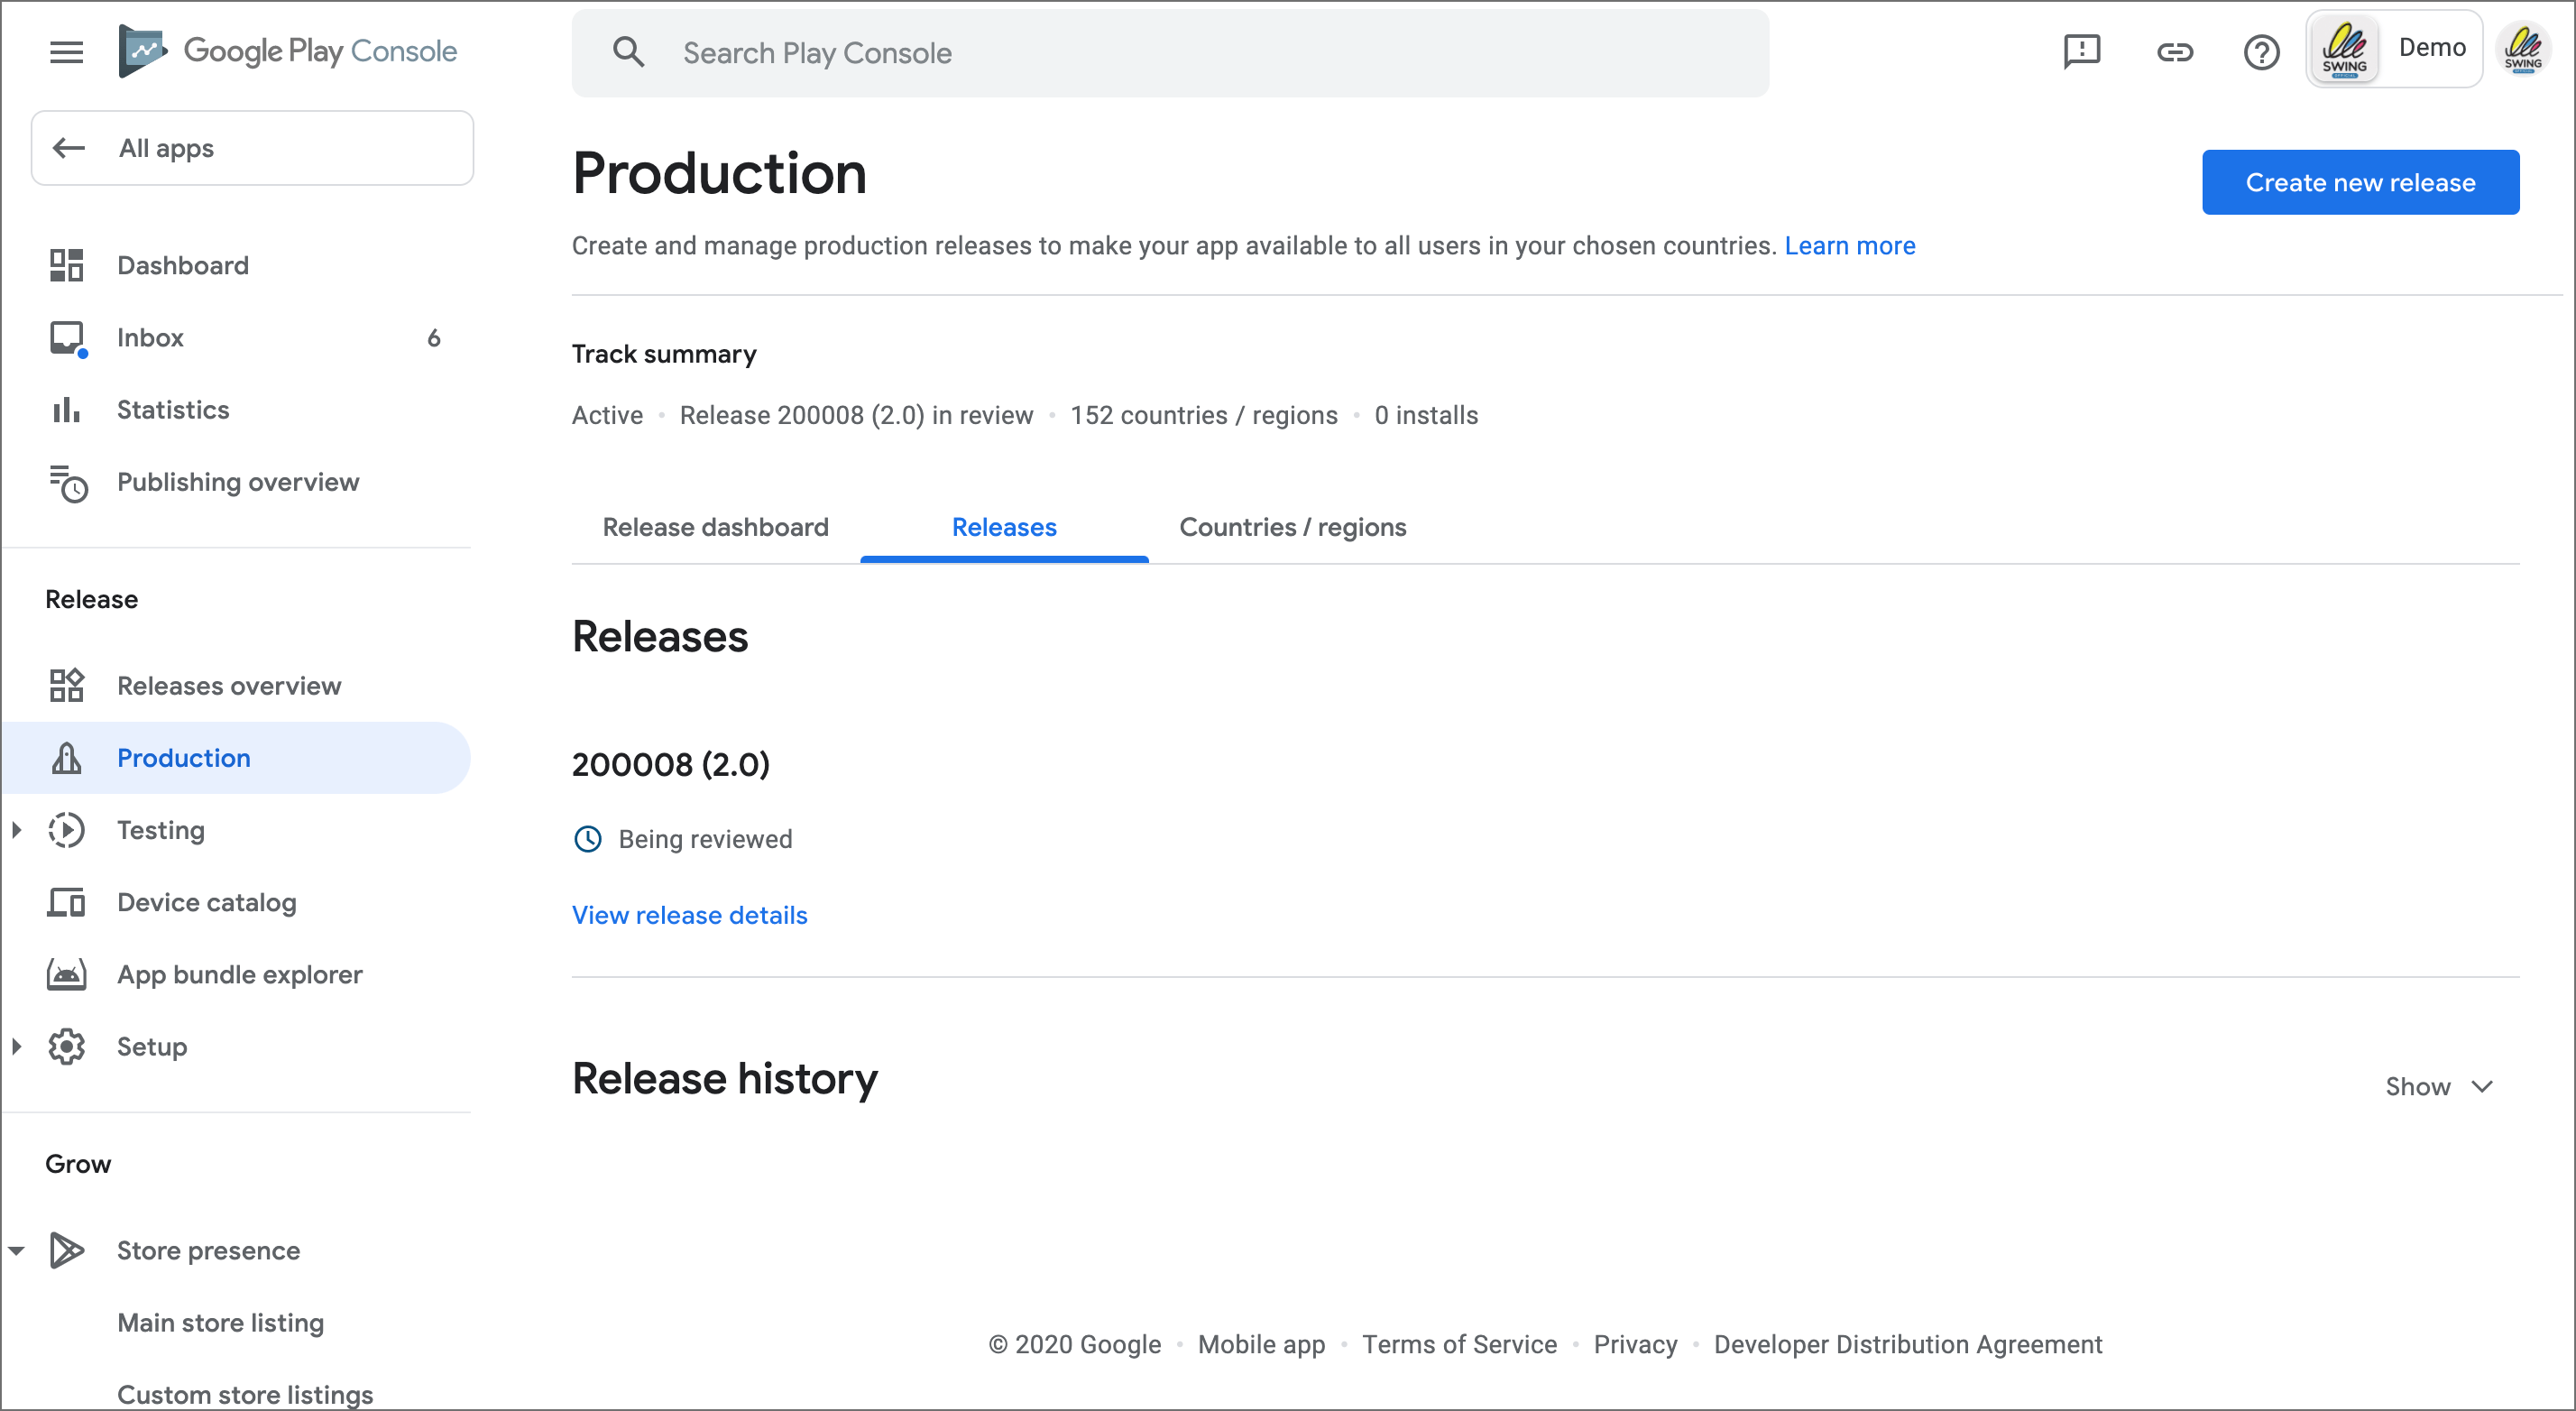
Registration is complete. **If you look at the release screen again, you can see that it is marked as ‘Being Reviewed’.**
App registration is successful only when the message appears.
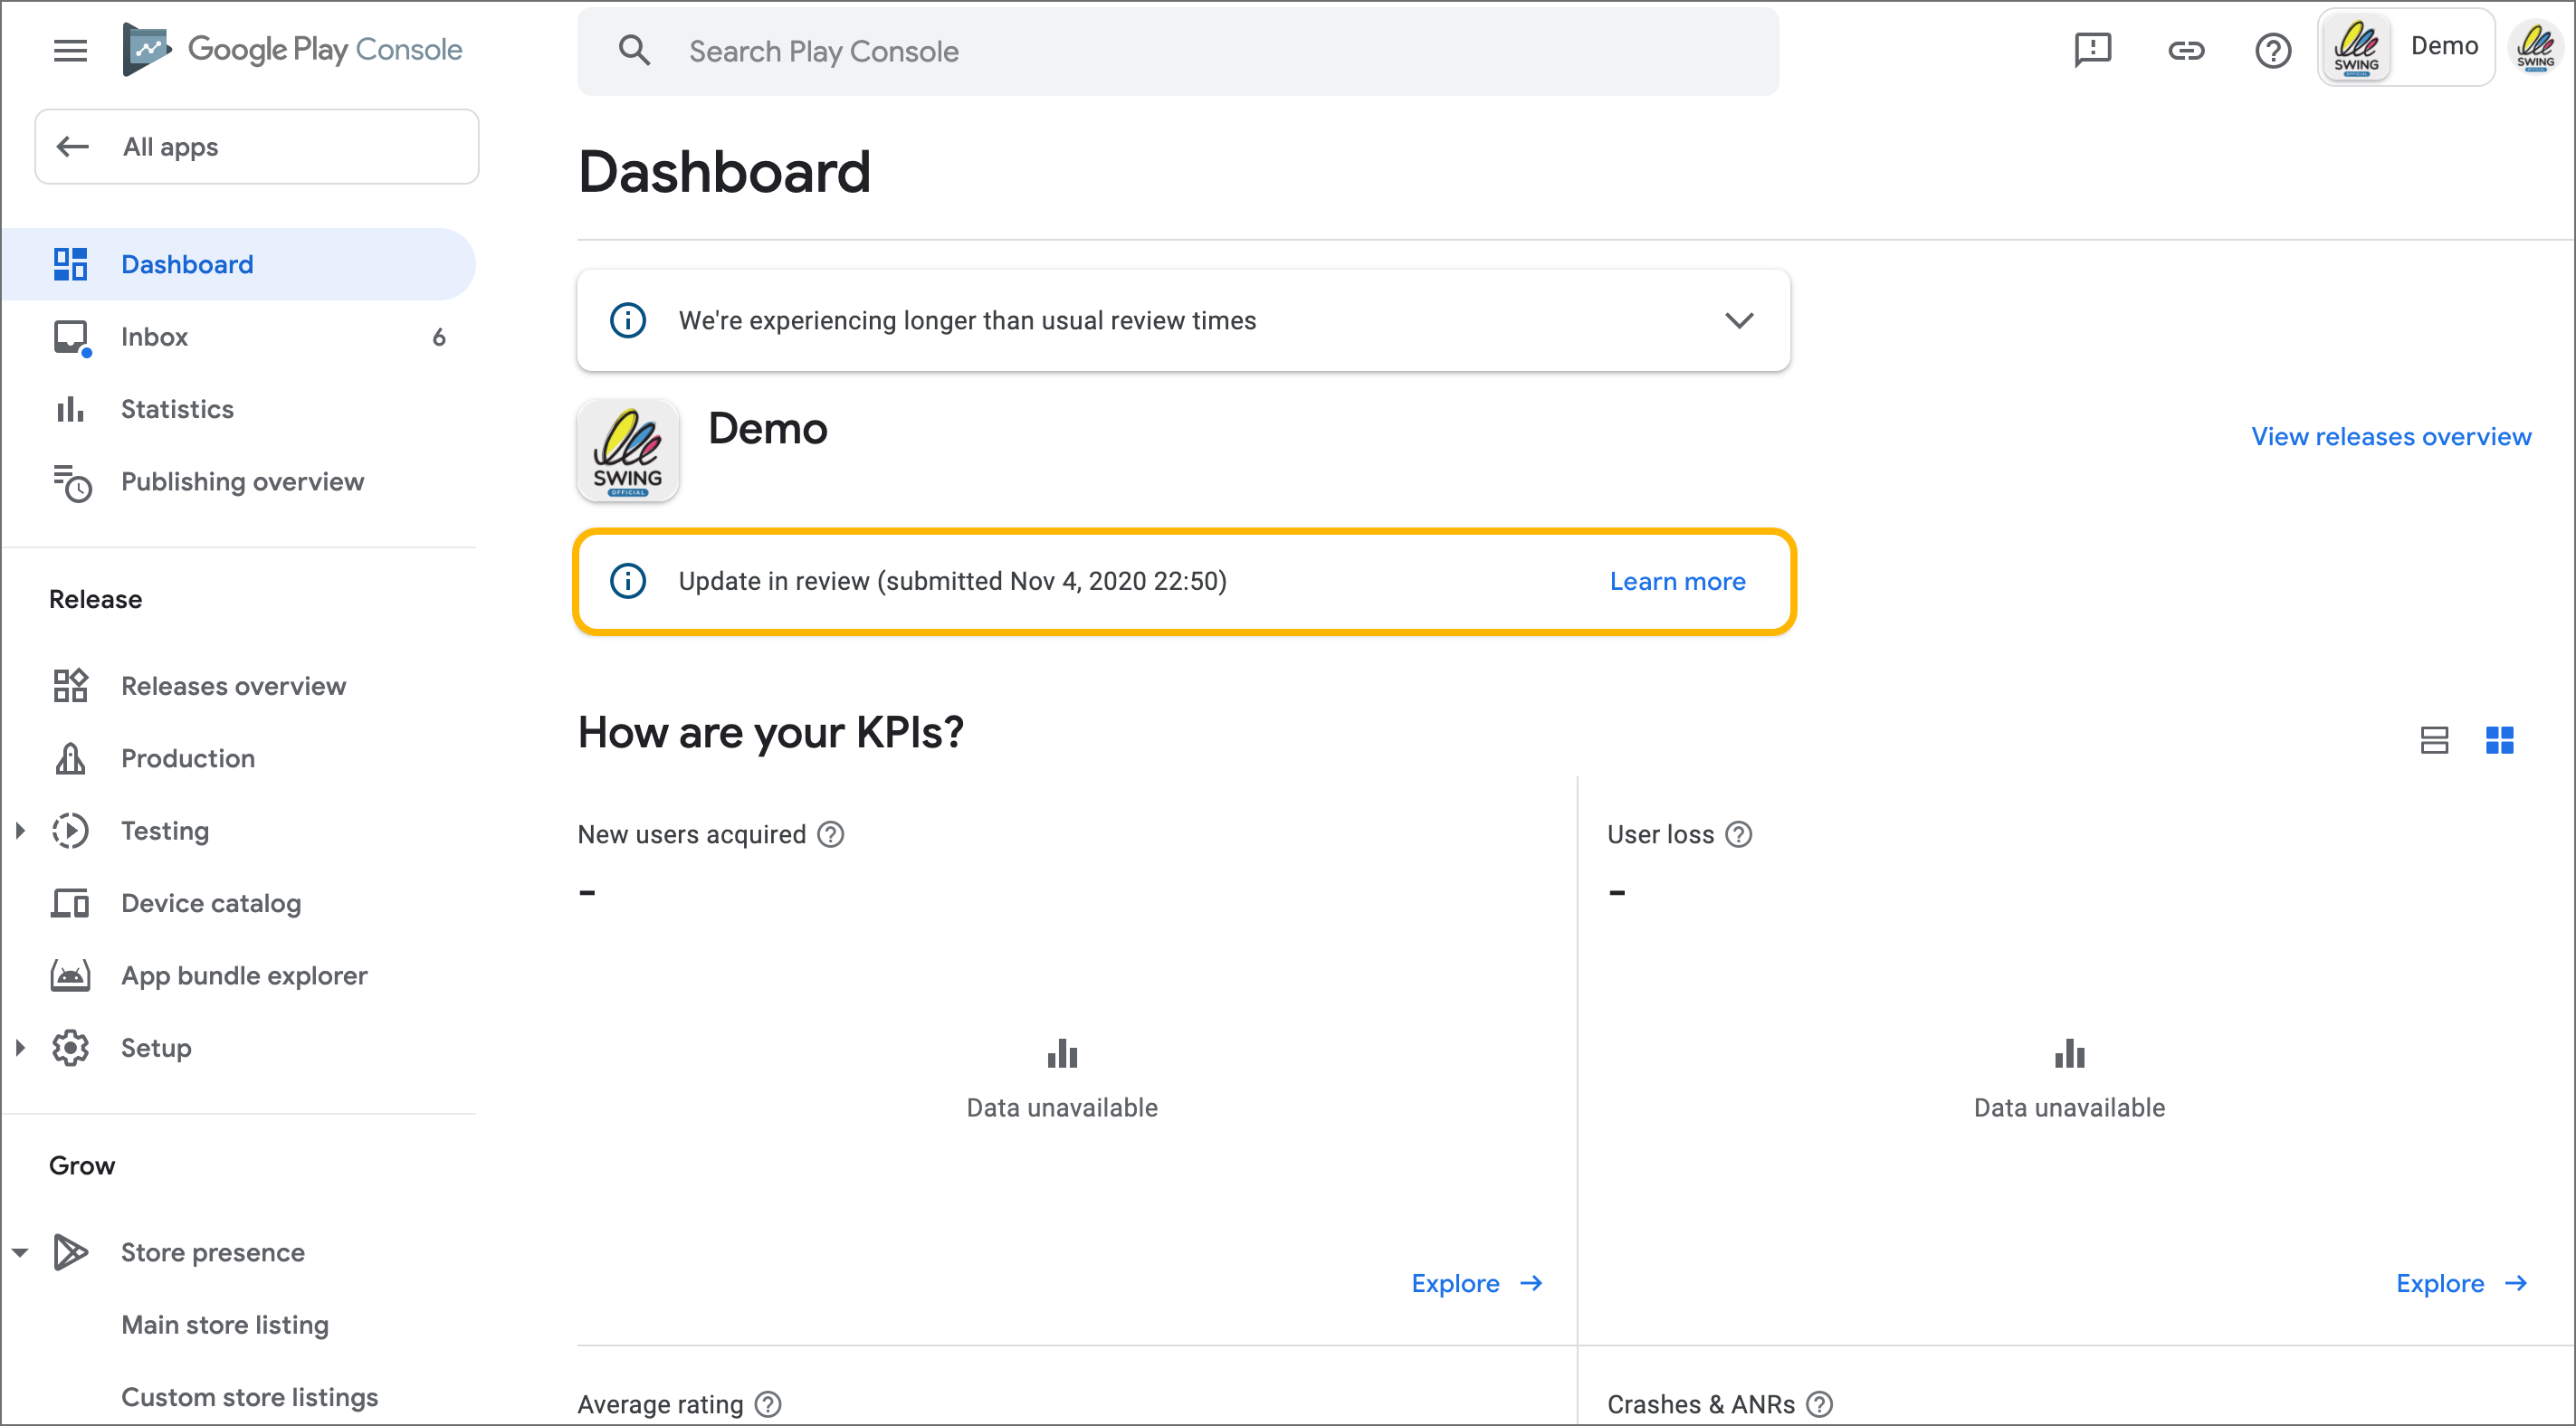
When you go to the dashboard screen, you can see the “Reviewing updates” message on the review screen.
###  **App release completed (within 7 days of review period)**
**\*The release is not immediate, but it is approved after Google screening, so you have to wait!**
**The play store review period takes about 7 days.**
If there is no problem in the review, it will be released after the relevant review period.
When the review passes and approval is normally completed, the status of the app will be changed to ‘released’.
If the review is rejected, the reason for rejection will be sent to the user’s Google developer email, so please check the email!
> **1. Important \[App search not exposed]**
**Even if the app is normally released on the Play Store, it is not immediately exposed in the store when searching for the app name. \*important!\***
\*After determining the degree of activation (number of app installations) of apps released due to Google algorithm change in September 2019, search exposure is being changed.
If the app is released normally, there is no problem. After the app is released, go to the release link and receive a lot of app installations, and please manage it by posting reviews and ratings.
If the app has been released and the number of activations using the app is low, the exposure of the app will be delayed.
If the search by app name does not work well for more than 2 weeks after installation and activation, please contact the Google Developer Customer Center for assistance.
\*If you have any difficulties in finding the app, please contact the Google Developer Support Team (Customer Center).
★I can’t find the app, how do I download the app from the Play Store?
\=After the app is released, the Play Store release link (URL) is created.
If you access the URL, you will be directed to the Play Store app download page.
So, until you search for the app name, you can share the release link with other users to encourage them to download the app directly from the Play Store.
> **2. Play store app upload proxy available**
If it is difficult to proceed directly after reading the manual, please apply for upload through Swing2App and we will upload it to the Play Store for you.
**\*\*Applicable only to Swing2App users. (Only apps created with Swing2App can be uploaded)**
After purchasing the Play Store upload ticket (KRW 5,000/one time cost), please leave the upload request, and your app will be registered and released on the Play Store.
Please refer to the manual below for how to apply for Play Store upload.
**★ If you need to update the Play Store app, please check the link below!**
**☞** [**\[ Go to Play Store App Update\]**](/store/playstore/update-playstore-1.md)
**What is the graphic image used for?**

Graphic images are not images displayed on the Play Store.
If you share the store release link after launch, it will be displayed as a thumbnail image in the page information!

**5,6,7) Screenshot image registration**
All items 5, 6, and 7 are for registering screenshot images. Please register with the same image.
\* Screenshots must be registered as an image of the app execution screen. Images that are not related to the app are not allowed\~!
The image size should be between 320px and 3840px at the minimum.
And the length should not be more than twice the width.
Ex) If the width is 1000px, the height should not exceed 2000px.
8\) Press the \[Save] button to complete the store information entry.
All the information you need to enter in the play store is complete.
Finally, upload the app (AAB file).
###  **STEP.3 Production-Registering the app**
**Go to Dashboard> Post Google Play App**

**1. Select country/region**

Select **Add Country/Region** in blue letters.

You choose which country to launch. You can select all countries.
If you are only launching in a specific country, please search for that country and select it.
Select the **\[Add Countries/Regions]** button.

**2. Production – AAB file registration**

Next, select \[Release] on the production screen.
Select the **\[Create New Release]**button.
\*You can also select the \[Create new release] button at the top. It does not matter if you select the button in the middle of the text.

After selecting the upload button, upload the completed AAB file in Swing2App to the corresponding screen.
When the file upload is complete, select the \[Save] button at the bottom of the screen → select the \[Version Review] button.
**\* Where can I download the AAB file??**
For the AAB file, you can attach the AAB file sent by e-mail to Swing after requesting to make an app.
**You can download the AAB file directly from the** [**Swing homepage → Manager page → Manage Version → Production History**](https://www.swing2app.com/view/app_work_history) **page.**
\*AAB files can be downloaded only in the paid version app and the free commercial version app, and are not provided in the free version app.

After app production is complete, go to the [Manager – Manage Version – Production History](https://www.swing2app.com/view/app_work_history) page.
Here, if you click \[Get AAB File], the file is downloaded to your PC.
You can upload the downloaded AAB file as **Google Play → Production → AAB file.**
\*Please use the Internet browser Chrome.
\ **\*Important Note**: Due to the update of the Play Store app registration system, the existing app registration file, APK file, has been changed to → AAB file.
AAB files are created from apps created after August 9, 21, in Swing2App.
Therefore, for apps created before 21.08.09, go to App Creation V2 and select the Create App button to re-create the app with a new version.
You can receive AAB files from the newly created app.
If registration is not successful, please leave an inquiry on the Swing2App inquiry board.
**TIP. Register by dragging AAB file**
Open the Google Play console screen and the Swing2App site 2 screens.
You can register the AAB file received from the Swing2App site as an app file on the Play Console screen by dragging (drag) it with your mouse.
You can work more conveniently than saving and loading a separate file, right?^^

Select the \[Start release with Production track] button → Select the \[Release] button in the production track release message window.
**★ Wait!**

Some of you may see this warning message.
This content has nothing to do with the release of the app, so you can ignore it.
**\* Play Store registration means that only apps that have been converted to the paid version can be registered!! You know? ^^ (Or you can register the free commercial version of the app as well)**

**3. Production registration completed**

Registration is complete. **If you look at the release screen again, you can see that it is marked as ‘Being Reviewed’.**
App registration is successful only when the message appears.

When you go to the dashboard screen, you can see the “Reviewing updates” message on the review screen.
###  **App release completed (within 7 days of review period)**
**\*The release is not immediate, but it is approved after Google screening, so you have to wait!**
**The play store review period takes about 7 days.**
If there is no problem in the review, it will be released after the relevant review period.
When the review passes and approval is normally completed, the status of the app will be changed to ‘released’.
If the review is rejected, the reason for rejection will be sent to the user’s Google developer email, so please check the email!
> **1. Important \[App search not exposed]**
**Even if the app is normally released on the Play Store, it is not immediately exposed in the store when searching for the app name. \*important!\***
\*After determining the degree of activation (number of app installations) of apps released due to Google algorithm change in September 2019, search exposure is being changed.
If the app is released normally, there is no problem. After the app is released, go to the release link and receive a lot of app installations, and please manage it by posting reviews and ratings.
If the app has been released and the number of activations using the app is low, the exposure of the app will be delayed.
If the search by app name does not work well for more than 2 weeks after installation and activation, please contact the Google Developer Customer Center for assistance.
\*If you have any difficulties in finding the app, please contact the Google Developer Support Team (Customer Center).
★I can’t find the app, how do I download the app from the Play Store?
\=After the app is released, the Play Store release link (URL) is created.
If you access the URL, you will be directed to the Play Store app download page.
So, until you search for the app name, you can share the release link with other users to encourage them to download the app directly from the Play Store.
> **2. Play store app upload proxy available**
If it is difficult to proceed directly after reading the manual, please apply for upload through Swing2App and we will upload it to the Play Store for you.
**\*\*Applicable only to Swing2App users. (Only apps created with Swing2App can be uploaded)**
After purchasing the Play Store upload ticket (KRW 5,000/one time cost), please leave the upload request, and your app will be registered and released on the Play Store.
Please refer to the manual below for how to apply for Play Store upload.
**★ If you need to update the Play Store app, please check the link below!**
**☞** [**\[ Go to Play Store App Update\]**](/store/playstore/update-playstore-1.md)