> For the complete documentation index, see [llms.txt](https://documentation.swing2app.com/llms.txt). Markdown versions of documentation pages are available by appending `.md` to page URLs; this page is available as [Markdown](https://documentation.swing2app.com/manual/maual/appbasic/webviewapp-manual.md).
# WebView App Manual(production and operation)
**WebView app production, store release method, Q\&A**
We will tell you how to make a WebView app (a web app made by walking a website) and how to release it to the store.
Swing2App is a user-created app builder, and you must create your app with the app-creation tool provided by Swing2App.
If you sign up as a member after accessing the homepage, the app production page will open, and you can make the app for free right away!
### **STEP.1 Web view app production**
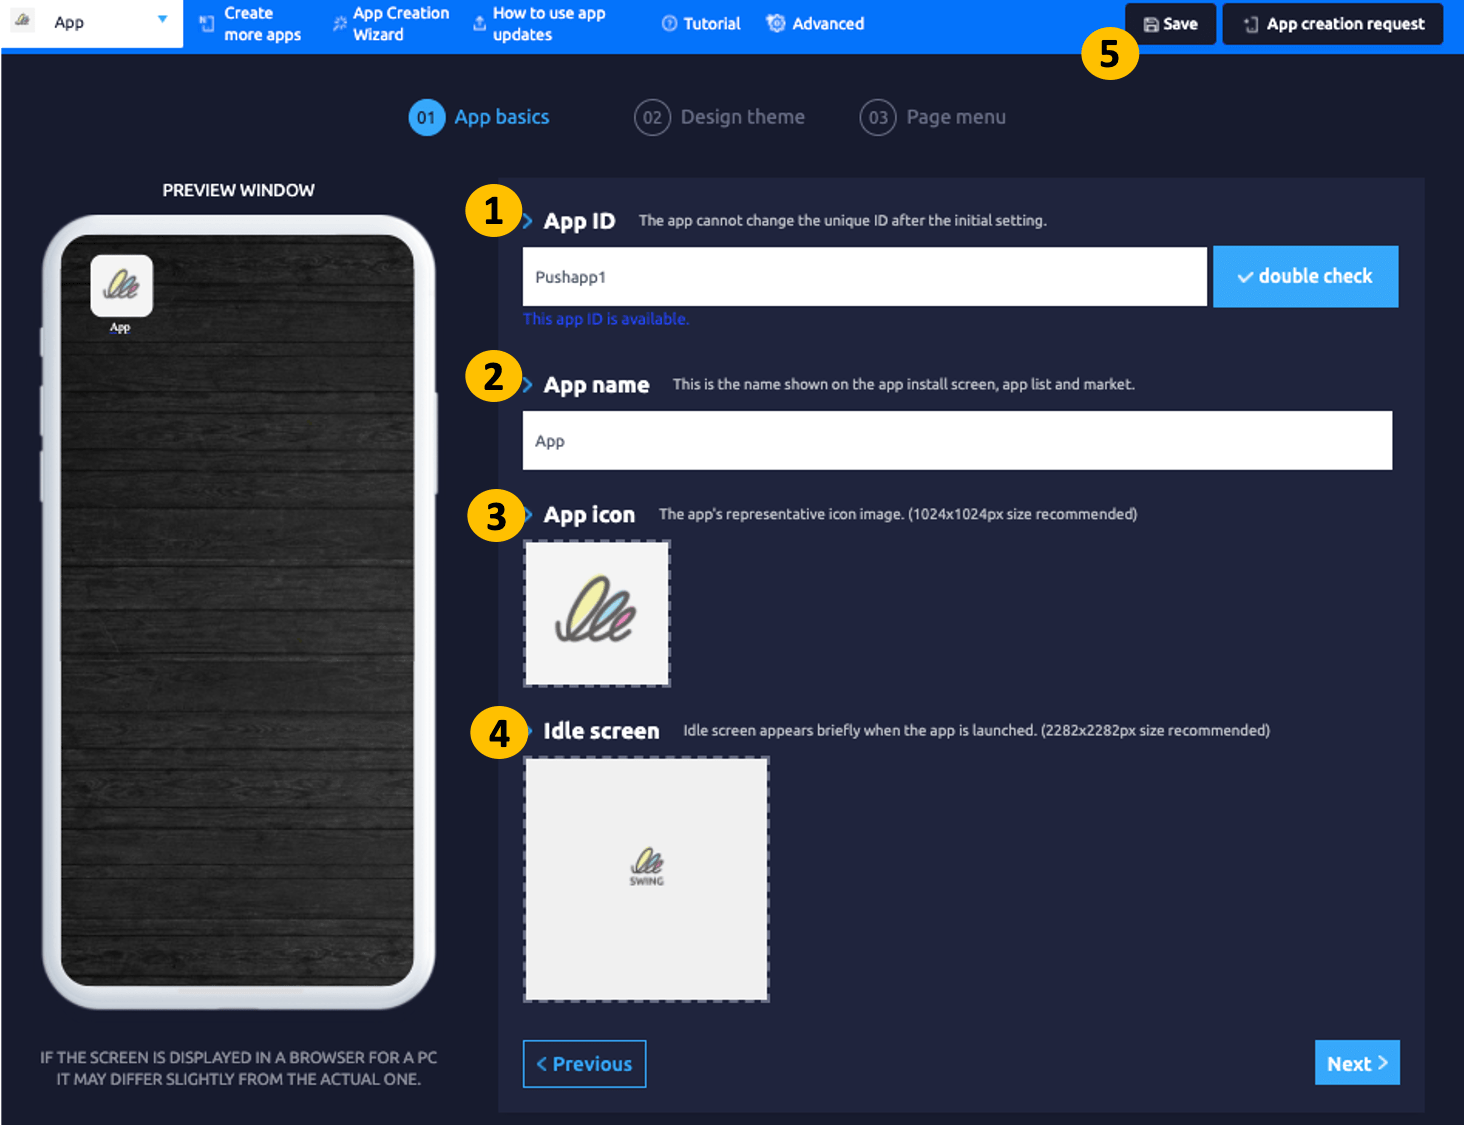
**Step 1: Basic App Information**
After logging in to the Swing2App homepage, \[Maker(V2)] Step 1 Basic Information
**Enter the App ID → App name → App icon image → App standby screen image, and save.**
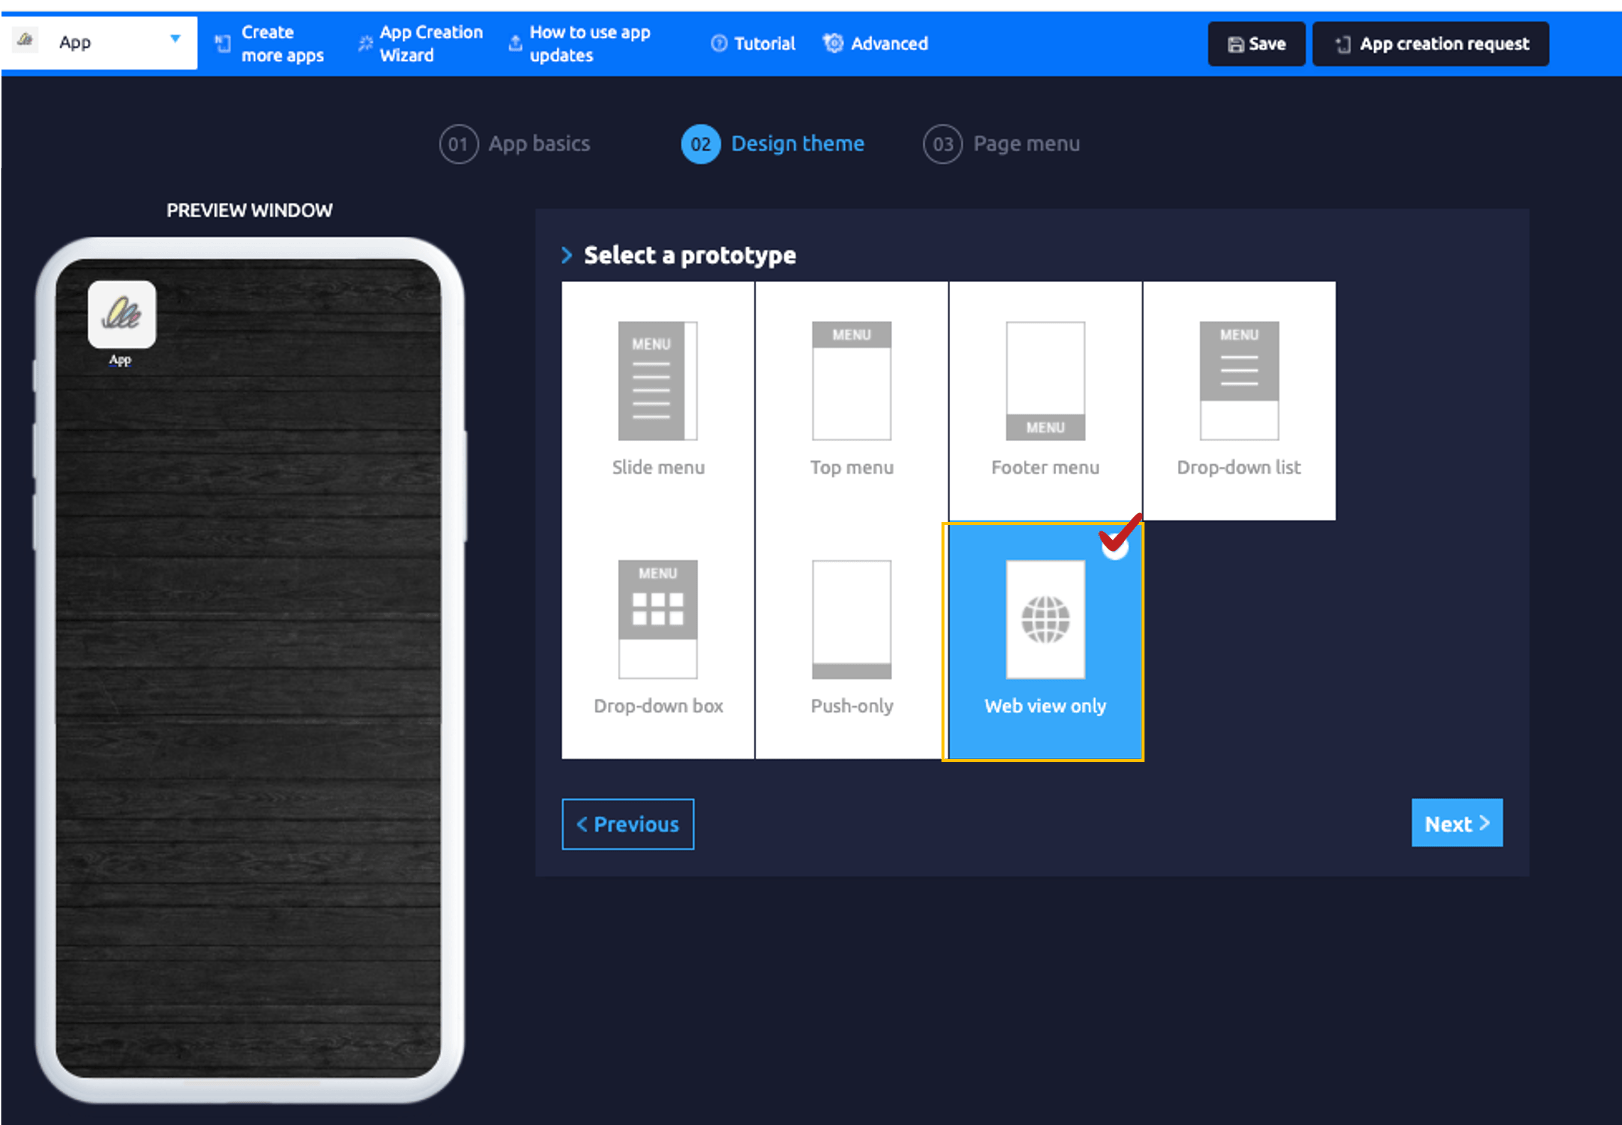
**Step 2: Design Theme**
\*Prototype: Select ‘WebView only’
\*Design skin color: You don’t need to select a color.
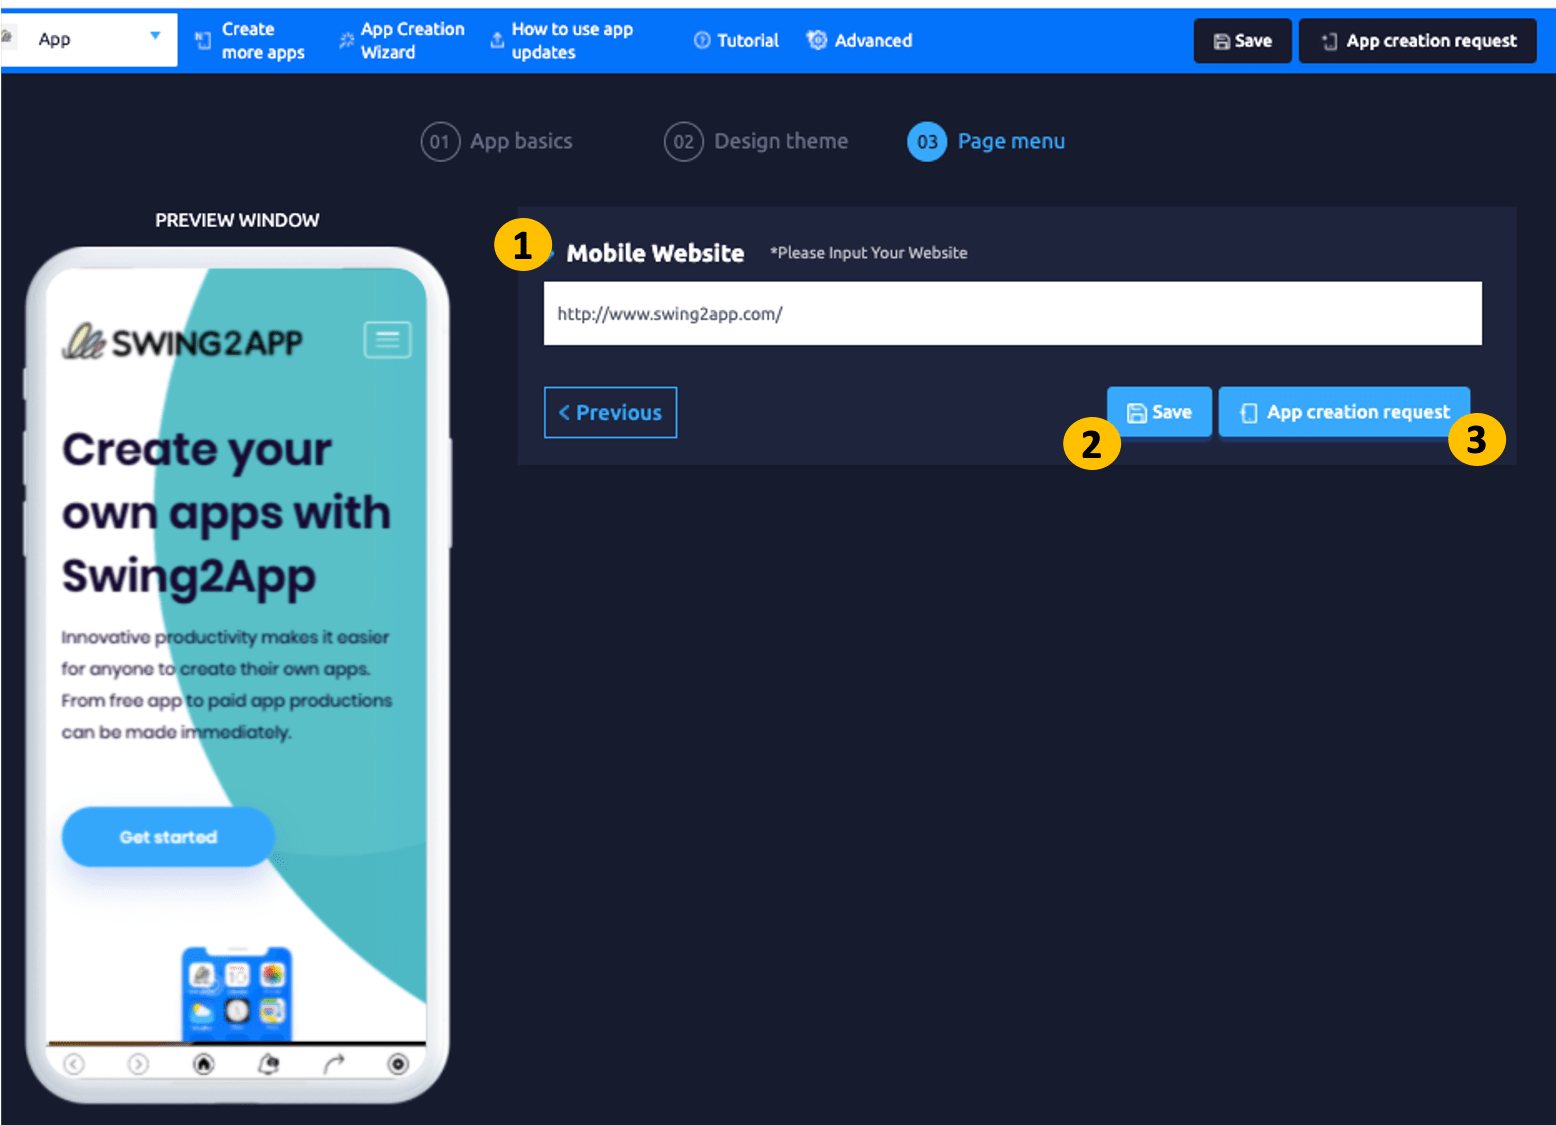
**Step 3: Page Menu**
1. Select the Home Screen and select the web link in the **Page menu.**
2. Enter URL address in weblink field.
3. Select the Save button
4. Click on the App Creation button for app production.
### **STEP.2 Check the App**
\*WebViews and push-made apps can only be found on Android phones. (You can’t check on iPhone.)
Download and check the app you created on Swing2App Official App – \[App Preview].
If you don’t have any problems after testing, you can purchase a pass and upload a ticket.

1\) Download the official ‘Swing2App’ from the Play Store. \*If the app is already installed, please update it to the latest version.
 [**Play Store release link(URL)**](https://play.google.com/store/apps/details?id=com.hustay.swing.pbf061408642545519fc0306f1985d1bf)
2\) After launching the app → select the \[App Preview] menu at the top of the category and login with your Swing2App website subscription account (ID, password).
\*Caution: You must enter the account you signed up on at the Swing2App website .
This is not an account signed up for the official Swing2App app!
3\) When login is complete, the app preview page opens, and you can check the list of apps you have created.
4\) You can install the app on your phone by pressing the \[Download App] button.
\*WebView app is only available on Android phones. (iPhone not available)
After testing, if there are no problems, you can prepare to launch the store.
When launching the App Store or Play Store app, you need to switch from the free version app to the paid version.
To convert the paid version, simply purchase a Swing2App paid app pass, please check below.
### **STEP.3 Purchasing passes and tickets**
There are two types of products that can be purchased from the web view app.
You can purchase the product you want from the two.
Please go to the Manager → Online Stores → Vouchers & Tickets, ticket purchase page.
**1) Basic Swing2App pass (one-month pass purchased monthly)**

**\*Basic swing ticket (1 month) $33 + Play store upload ticket $5 + App store upload ticket $20**
-A paid app ticket is a product with one month, so you must pay $33 per month.
Alternatively, you can purchase by choosing the number of months, such as 6 months or 12 months.
-Upload ticket is an optional product (the cost of uploading your app to the store instead of Swing2App), so you only have to pay once for the first registration.
\*However, if there is an app update, the uploaded app must also be updated.
-Which store to launch is an option of the user, so if you only release the App Store, you can purchase only the App Store upload ticket.
-If you can upload the Play Store yourself, you only need to purchase the pass and upload it directly. (You do not need to purchase an upload ticket)
-App Store is only available for uploading, so if you are going to release it, be sure to purchase the App Store upload ticket and apply.
**or**

**2) Unlimited plug-in for WebView (Unlimited use for a single payment, unlimited use)**
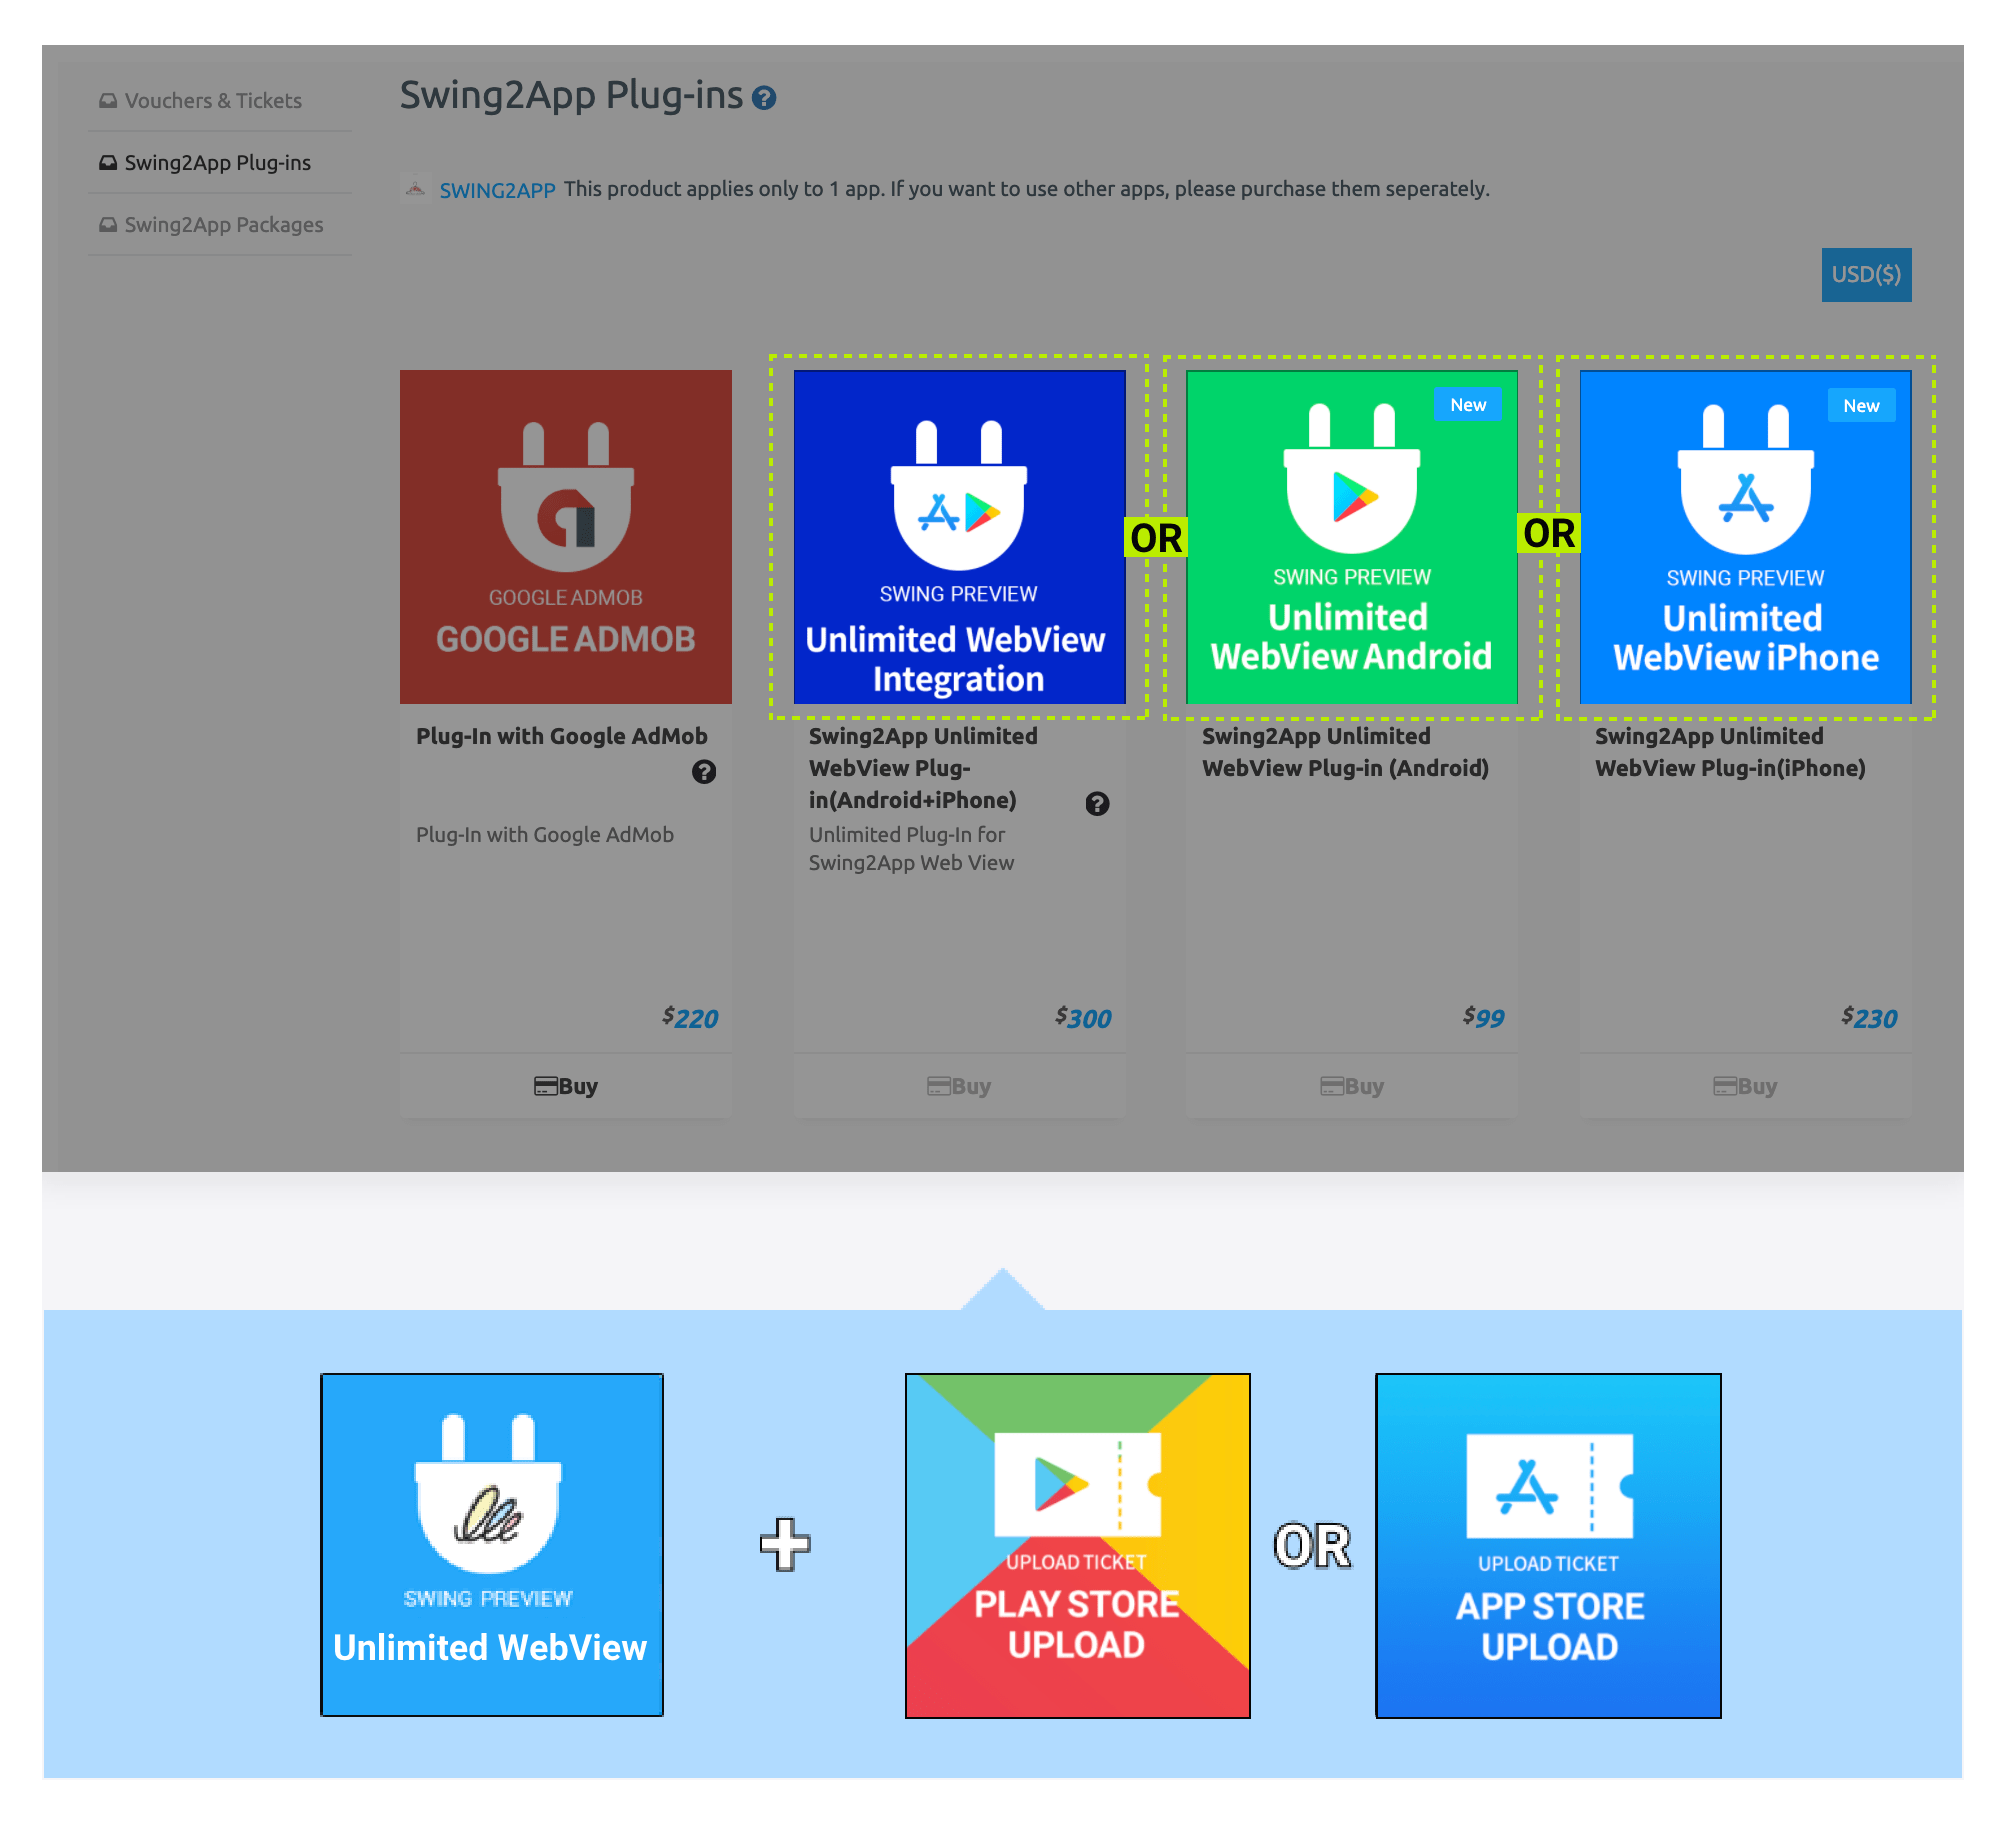
If you want to continue using the WebView app for an unlimited period, there is a ‘WebView unlimited plugin’ product on the Swing2App plugin purchase page.
Unlimited purchase of WebView plugin products once purchased! No restrictions on the period of use! Unlimited!
There are three types of products, and you can purchase products according to the platform you want to launch!
**1) If you are going to release both the App Store and Play Store → Buy an unlimited WebView (iPhone + Android) $300.**
**2) If only App Store is released → Unlimited plugin for web view (iPhone) $230**
**3) If only the Play Store is released → Unlimited plugin for web view (Android) $99**
Therefore, we plan to operate the app for a long time, and if you operate without restrictions, we recommend that you purchase the ‘Unlimited use of WebView plugin’ product.
Depending on whether the Play Store or App Store is released, you can purchase products for each platform, so you can use them reasonably.
You can purchase the upload ticket in the same way. Play store upload ticket $5 + App store upload ticket $20
**For web view unlimited plug-in products, please check the precautions and usage.**
[**☞ Go to see how to use the WebView unlimited plug-in product**](/manual/appmanage/pay/webview-unlimited.md)
**\* In addition to the cost of paying for Swing-to-App, the Apple developer account registration fee ($129 per year) and Google developer registration fee ($25, lifetime use) must be paid by the user.**
If you click the \[Buy] button, you can check the details of the service and usage guide provided by the ticket.
Therefore, be sure to check the product before purchasing it.
If you are not sure if you look at the contents, please leave an inquiry on the bulletin board. We will help you in detail. ^^
### **STEP. 4 Store upload request**
If you have purchased all the tickets and tickets above! You must apply for an upload to submit your application to Swing2App.
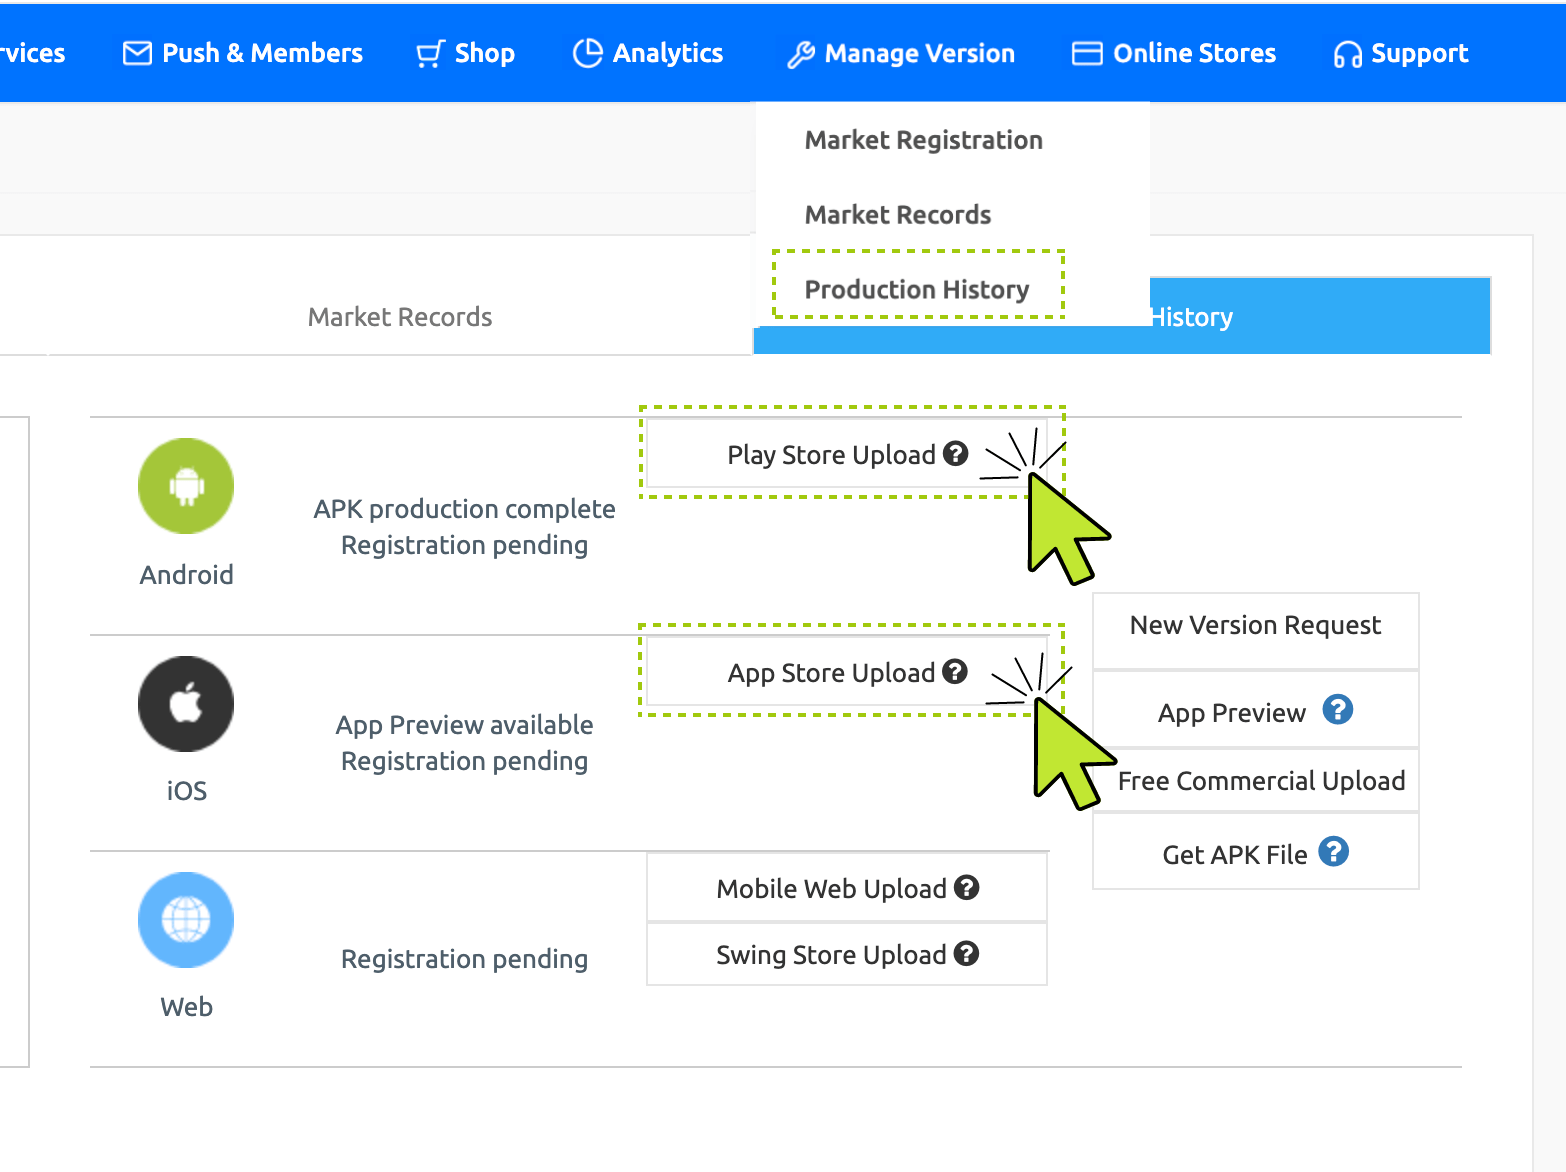
\* Go to App Operation → Version Control → App Production History menu, and select the \[Apply for Uploading Play Store] or \[Apply for Uploading App Store] button in the Market Registration field.
An application pop-up will appear, and you must fill in the content according to the application form and submit the upload request to the Swing2App.
\*Please make sure to upload after payment
[☞ \[How to apply for Play Store upload\]](/manual/appmanage/version/playstore-upload.md)
[☞ \[How to apply for App Store upload\]](/manual/appmanage/version/appstore-upload.md)
If you apply for the Play Store or App Store upload after purchasing all products, such as a voucher, we will act for you and upload your app to the store.
You must check the policy of each store.
\*Store registration policy:
### **STEP.5 Store launch completion (release after review)**
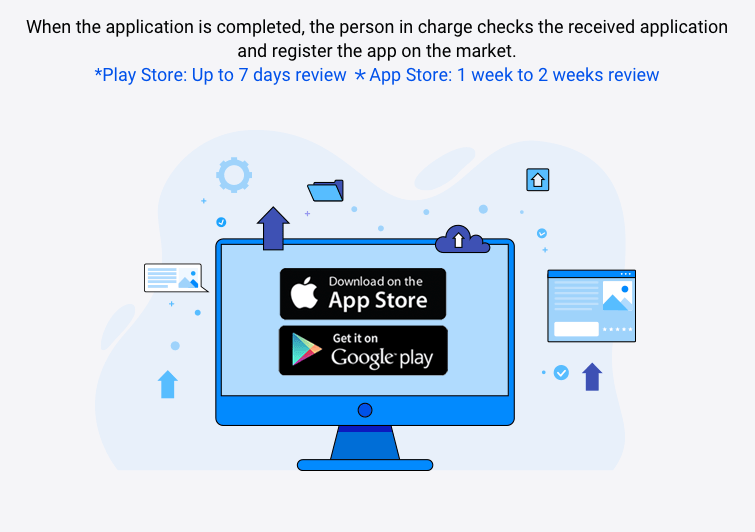
When the application is completed, Swing2App’s Play Store Uploader / App Store Uploader starts uploading your app to the store.
\*Play Store review period: 7 days
\*App store review period: 1 week to 2 weeks
Since each store has a long review time, you must wait for the review period after uploading.
**-When the upload process starts, an email will be sent to each store’s policies and important notices.**
**-After the normal launch, an e-mail and text (if a user number is registered) will be sent out.**
**-If the review is rejected, the reason for the rejection and measures will be provided.**

When the store launch is complete, you can check the apps released from the Play Store and App Store.
The App Store is exposed when searching for the app name immediately after the app is released.
The Play Store does not immediately search for names even when the app is released.
\*Google converts it to exposure after checking how actively the app operates to prevent indiscriminate launch even when the app is released.
Therefore, you have to install a lot of apps and manage reviews, ratings, etc. After a while, the app name search is exposed.
Make sure to check the contents of the store policy, so there will be no problem when using the app release later.
Please check. [**☞ \[Check the store terms and conditions\]**](https://support.swing2app.com/market-policy/)
**Precautions and WebView app production Q\&A**
**Q. Web view app is said to be difficult to release on the App Store and Play Store, right?**
**–Play Store**
Web view and push version app (web app connected to the website) must submit supporting documents (advance notice document) according to Google web view policy.
To prove that the site connected to the app is owned by you or your company (company), you must submit documents such as business registration certificate or website domain registration confirmation.
When submitting documents, the WebView app can also be released on the Play Store without any problems.
**–App Store–**
Because Apple does not approve the WebView app by policy, it is often rejected by the review and may not be released.
However, some apps are released, so the WebView app needs to be reviewed to know whether it will be released.
We will help you to launch the App Store with your appeal as much as possible.
\* PC version web, not the mobile web, will be rejected. The website must be connected to the mobile web.
\* Web apps with only simple promotional or marketing content, no content, or limited user participation are rejected.
\* Please note that even if the store release is rejected, the usage fee and upload ticket cost will not be refunded for apps that have registered for the App Store.
**Q. Is it possible to connect to any website and make it when creating a web view app?**
When creating a web view app, you must be careful not to use other companies or sites of famous brands like I made!
You can only use the website operated by our company, the website I made (using a hosting company), etc.
Many users want to link their own Naver blog or Daum Cafe with a web view or push.
If these sites are linked to the app, there will be an error or it will not work properly.
\* These apps cannot be released in the Play Store or App Store. (Rejected for copyright or brand imitation)
And some web links do not work with the app, that is, forbids embedding.
\*Naver, Daum portal sites and sites provided by the portal (modoo, store farm web, etc.), YouTube, SNS sites (Instagram, Kakao Talk, Facebook) are representative sites that prohibit the spread!
Therefore, you need to apply a homepage that can prove that it is a site I created with domain registration information, and a website (homepage) that can be verified with a business registration certificate if the company makes it.
**Q. Can’t I send a WebView app?**
Yes, the WebView app cannot be pushed because other functions of the app cannot be used.
If you need to send a push, you must make it a push version app, not a web view app.
**Q. Can I change the web link when purchasing a WebView unlimited plug-in product?**
Yes, that’s right.
The WebView unlimited product does not change the homepage URL applied to the app, so please use it carefully.
The weblink can be changed if purchased with a general pass.
**Q. If it is difficult to make it yourself if you pay for the development, can you do all of the above in Swing2App?**
Yes, if you request production, we will do all of it for you.
From icon and standby screen image design to app production and store upload, we will proceed.
App production costs and labor costs for production agencies are incurred separately, so please contact us for help.
However, you need to create your own Google Developer account to be uploaded to the Play Store and inform your account.
The Apple Store account is optional for the App Store, but if you use your account, you must also create your account to inform us.
Accounts are not created by Swing2App.
**Q. Can I switch from web view to push version or update from push version to web view version?**
Yes, it is possible. After making the app production-design theme-prototype, save, and re-app request.
When a new version app is created, you can update the store again with the version app.
However, users who use the WebView unlimited plugin cannot change it.
**Q. How do I change the web link address after creating a web view app?**
Changing the web link address applied to the app is the same.
Page menu 1)\[Home screen] button selection → 2)Menu type: Weblink selection → 3) Enter URL address in weblink column → 4) Apply button → 5) Select save button
\*Weblink address modification is automatically reflected in the app by pressing the save button.
\*Relaunch after the app is closed and the changed website will be applied.
However, it is not possible to change the web link address in the app using the WebView unlimited plugin product.
**Q. Will it change from a WebView app to a general prototype?**
After making a WebView-based (push, WebView) prototype → You cannot change it with a general prototype (slide, top, footer, drop-down list, drop-down box).
\*If you need to change from a WebView-based prototype to another, you need to create a new app.
**Q. Is it not possible to apply for a free commercial WebView app?**
WebView free commercial version can only be applied to apps created with the general prototype, and push version apps cannot be applied.
**Q. Can I change the WebView to unlimited plug-in after using the basic license?**
Yes, it is possible.
If you purchase the WebView unlimited plug-in after using the basic license, it will be produced with unlimited settings.
\*Precautions
1\) This is a new version of the app created with an unlimited web view, and you must update it on the app store and play store again.
Existing license applications and WebView unrestricted apps are not compatible with each other, so users need to update to the new version to receive updates.
2\) Even if you purchase and use the Swing2App Paid App voucher, you will not receive a partial refund for the remaining period even if you pay for the unlimited WebView plugin.
Therefore, we recommend that you purchase unlimited tickets for the WebView after using the paid application ticket.
**Q. Is the WebView app modified or updated on the website directly reflected in the app?**
Yes, since the web app is an application-driven by a website, the screen displayed on the website is reflected in the app.
Updates from the web are automatically reflected in the app even if you don’t have to do anything in the app.
**Q. Is it not possible for the app to operate normally on the mobile web?**
If there are no problems on the web, the problem will not occur in the app. However, technical errors can occur at any time.
Therefore, if you have any problems with testing before launching the app, please leave it as an inquiry board.
We are helping to confirm the symptoms.
[**Play Store release link(URL)**](https://play.google.com/store/apps/details?id=com.hustay.swing.pbf061408642545519fc0306f1985d1bf)
2\) After launching the app → select the \[App Preview] menu at the top of the category and login with your Swing2App website subscription account (ID, password).
\*Caution: You must enter the account you signed up on at the Swing2App website .
This is not an account signed up for the official Swing2App app!
3\) When login is complete, the app preview page opens, and you can check the list of apps you have created.
4\) You can install the app on your phone by pressing the \[Download App] button.
\*WebView app is only available on Android phones. (iPhone not available)
After testing, if there are no problems, you can prepare to launch the store.
When launching the App Store or Play Store app, you need to switch from the free version app to the paid version.
To convert the paid version, simply purchase a Swing2App paid app pass, please check below.
### **STEP.3 Purchasing passes and tickets**
There are two types of products that can be purchased from the web view app.
You can purchase the product you want from the two.
Please go to the Manager → Online Stores → Vouchers & Tickets, ticket purchase page.
**1) Basic Swing2App pass (one-month pass purchased monthly)**

**\*Basic swing ticket (1 month) $33 + Play store upload ticket $5 + App store upload ticket $20**
-A paid app ticket is a product with one month, so you must pay $33 per month.
Alternatively, you can purchase by choosing the number of months, such as 6 months or 12 months.
-Upload ticket is an optional product (the cost of uploading your app to the store instead of Swing2App), so you only have to pay once for the first registration.
\*However, if there is an app update, the uploaded app must also be updated.
-Which store to launch is an option of the user, so if you only release the App Store, you can purchase only the App Store upload ticket.
-If you can upload the Play Store yourself, you only need to purchase the pass and upload it directly. (You do not need to purchase an upload ticket)
-App Store is only available for uploading, so if you are going to release it, be sure to purchase the App Store upload ticket and apply.
**or**

**2) Unlimited plug-in for WebView (Unlimited use for a single payment, unlimited use)**

If you want to continue using the WebView app for an unlimited period, there is a ‘WebView unlimited plugin’ product on the Swing2App plugin purchase page.
Unlimited purchase of WebView plugin products once purchased! No restrictions on the period of use! Unlimited!
There are three types of products, and you can purchase products according to the platform you want to launch!
**1) If you are going to release both the App Store and Play Store → Buy an unlimited WebView (iPhone + Android) $300.**
**2) If only App Store is released → Unlimited plugin for web view (iPhone) $230**
**3) If only the Play Store is released → Unlimited plugin for web view (Android) $99**
Therefore, we plan to operate the app for a long time, and if you operate without restrictions, we recommend that you purchase the ‘Unlimited use of WebView plugin’ product.
Depending on whether the Play Store or App Store is released, you can purchase products for each platform, so you can use them reasonably.
You can purchase the upload ticket in the same way. Play store upload ticket $5 + App store upload ticket $20
**For web view unlimited plug-in products, please check the precautions and usage.**
[**☞ Go to see how to use the WebView unlimited plug-in product**](/manual/appmanage/pay/webview-unlimited.md)
**\* In addition to the cost of paying for Swing-to-App, the Apple developer account registration fee ($129 per year) and Google developer registration fee ($25, lifetime use) must be paid by the user.**
If you click the \[Buy] button, you can check the details of the service and usage guide provided by the ticket.
Therefore, be sure to check the product before purchasing it.
If you are not sure if you look at the contents, please leave an inquiry on the bulletin board. We will help you in detail. ^^
### **STEP. 4 Store upload request**
If you have purchased all the tickets and tickets above! You must apply for an upload to submit your application to Swing2App.

\* Go to App Operation → Version Control → App Production History menu, and select the \[Apply for Uploading Play Store] or \[Apply for Uploading App Store] button in the Market Registration field.
An application pop-up will appear, and you must fill in the content according to the application form and submit the upload request to the Swing2App.
\*Please make sure to upload after payment
[☞ \[How to apply for Play Store upload\]](/manual/appmanage/version/playstore-upload.md)
[☞ \[How to apply for App Store upload\]](/manual/appmanage/version/appstore-upload.md)
If you apply for the Play Store or App Store upload after purchasing all products, such as a voucher, we will act for you and upload your app to the store.
You must check the policy of each store.
\*Store registration policy:
### **STEP.5 Store launch completion (release after review)**

When the application is completed, Swing2App’s Play Store Uploader / App Store Uploader starts uploading your app to the store.
\*Play Store review period: 7 days
\*App store review period: 1 week to 2 weeks
Since each store has a long review time, you must wait for the review period after uploading.
**-When the upload process starts, an email will be sent to each store’s policies and important notices.**
**-After the normal launch, an e-mail and text (if a user number is registered) will be sent out.**
**-If the review is rejected, the reason for the rejection and measures will be provided.**

When the store launch is complete, you can check the apps released from the Play Store and App Store.
The App Store is exposed when searching for the app name immediately after the app is released.
The Play Store does not immediately search for names even when the app is released.
\*Google converts it to exposure after checking how actively the app operates to prevent indiscriminate launch even when the app is released.
Therefore, you have to install a lot of apps and manage reviews, ratings, etc. After a while, the app name search is exposed.
Make sure to check the contents of the store policy, so there will be no problem when using the app release later.
Please check. [**☞ \[Check the store terms and conditions\]**](https://support.swing2app.com/market-policy/)
**Precautions and WebView app production Q\&A**
**Q. Web view app is said to be difficult to release on the App Store and Play Store, right?**
**–Play Store**
Web view and push version app (web app connected to the website) must submit supporting documents (advance notice document) according to Google web view policy.
To prove that the site connected to the app is owned by you or your company (company), you must submit documents such as business registration certificate or website domain registration confirmation.
When submitting documents, the WebView app can also be released on the Play Store without any problems.
**–App Store–**
Because Apple does not approve the WebView app by policy, it is often rejected by the review and may not be released.
However, some apps are released, so the WebView app needs to be reviewed to know whether it will be released.
We will help you to launch the App Store with your appeal as much as possible.
\* PC version web, not the mobile web, will be rejected. The website must be connected to the mobile web.
\* Web apps with only simple promotional or marketing content, no content, or limited user participation are rejected.
\* Please note that even if the store release is rejected, the usage fee and upload ticket cost will not be refunded for apps that have registered for the App Store.
**Q. Is it possible to connect to any website and make it when creating a web view app?**
When creating a web view app, you must be careful not to use other companies or sites of famous brands like I made!
You can only use the website operated by our company, the website I made (using a hosting company), etc.
Many users want to link their own Naver blog or Daum Cafe with a web view or push.
If these sites are linked to the app, there will be an error or it will not work properly.
\* These apps cannot be released in the Play Store or App Store. (Rejected for copyright or brand imitation)
And some web links do not work with the app, that is, forbids embedding.
\*Naver, Daum portal sites and sites provided by the portal (modoo, store farm web, etc.), YouTube, SNS sites (Instagram, Kakao Talk, Facebook) are representative sites that prohibit the spread!
Therefore, you need to apply a homepage that can prove that it is a site I created with domain registration information, and a website (homepage) that can be verified with a business registration certificate if the company makes it.
**Q. Can’t I send a WebView app?**
Yes, the WebView app cannot be pushed because other functions of the app cannot be used.
If you need to send a push, you must make it a push version app, not a web view app.
**Q. Can I change the web link when purchasing a WebView unlimited plug-in product?**
Yes, that’s right.
The WebView unlimited product does not change the homepage URL applied to the app, so please use it carefully.
The weblink can be changed if purchased with a general pass.
**Q. If it is difficult to make it yourself if you pay for the development, can you do all of the above in Swing2App?**
Yes, if you request production, we will do all of it for you.
From icon and standby screen image design to app production and store upload, we will proceed.
App production costs and labor costs for production agencies are incurred separately, so please contact us for help.
However, you need to create your own Google Developer account to be uploaded to the Play Store and inform your account.
The Apple Store account is optional for the App Store, but if you use your account, you must also create your account to inform us.
Accounts are not created by Swing2App.
**Q. Can I switch from web view to push version or update from push version to web view version?**
Yes, it is possible. After making the app production-design theme-prototype, save, and re-app request.
When a new version app is created, you can update the store again with the version app.
However, users who use the WebView unlimited plugin cannot change it.
**Q. How do I change the web link address after creating a web view app?**
Changing the web link address applied to the app is the same.
Page menu 1)\[Home screen] button selection → 2)Menu type: Weblink selection → 3) Enter URL address in weblink column → 4) Apply button → 5) Select save button
\*Weblink address modification is automatically reflected in the app by pressing the save button.
\*Relaunch after the app is closed and the changed website will be applied.
However, it is not possible to change the web link address in the app using the WebView unlimited plugin product.
**Q. Will it change from a WebView app to a general prototype?**
After making a WebView-based (push, WebView) prototype → You cannot change it with a general prototype (slide, top, footer, drop-down list, drop-down box).
\*If you need to change from a WebView-based prototype to another, you need to create a new app.
**Q. Is it not possible to apply for a free commercial WebView app?**
WebView free commercial version can only be applied to apps created with the general prototype, and push version apps cannot be applied.
**Q. Can I change the WebView to unlimited plug-in after using the basic license?**
Yes, it is possible.
If you purchase the WebView unlimited plug-in after using the basic license, it will be produced with unlimited settings.
\*Precautions
1\) This is a new version of the app created with an unlimited web view, and you must update it on the app store and play store again.
Existing license applications and WebView unrestricted apps are not compatible with each other, so users need to update to the new version to receive updates.
2\) Even if you purchase and use the Swing2App Paid App voucher, you will not receive a partial refund for the remaining period even if you pay for the unlimited WebView plugin.
Therefore, we recommend that you purchase unlimited tickets for the WebView after using the paid application ticket.
**Q. Is the WebView app modified or updated on the website directly reflected in the app?**
Yes, since the web app is an application-driven by a website, the screen displayed on the website is reflected in the app.
Updates from the web are automatically reflected in the app even if you don’t have to do anything in the app.
**Q. Is it not possible for the app to operate normally on the mobile web?**
If there are no problems on the web, the problem will not occur in the app. However, technical errors can occur at any time.
Therefore, if you have any problems with testing before launching the app, please leave it as an inquiry board.
We are helping to confirm the symptoms.