> For the complete documentation index, see [llms.txt](https://documentation.swing2app.com/llms.txt). Markdown versions of documentation pages are available by appending `.md` to page URLs; this page is available as [Markdown](https://documentation.swing2app.com/manual/appmanage/pay/paid-products.md).
# Introduction of paid products and payment methods
Swing2App offers paid app vouchers and various paid products. Users can select and use the products they need.
**Vouchers and Tickets**
1. Go to **Manager.**
2. Select **Online Store.**
3. Click on **Vouchers & Tickets.**
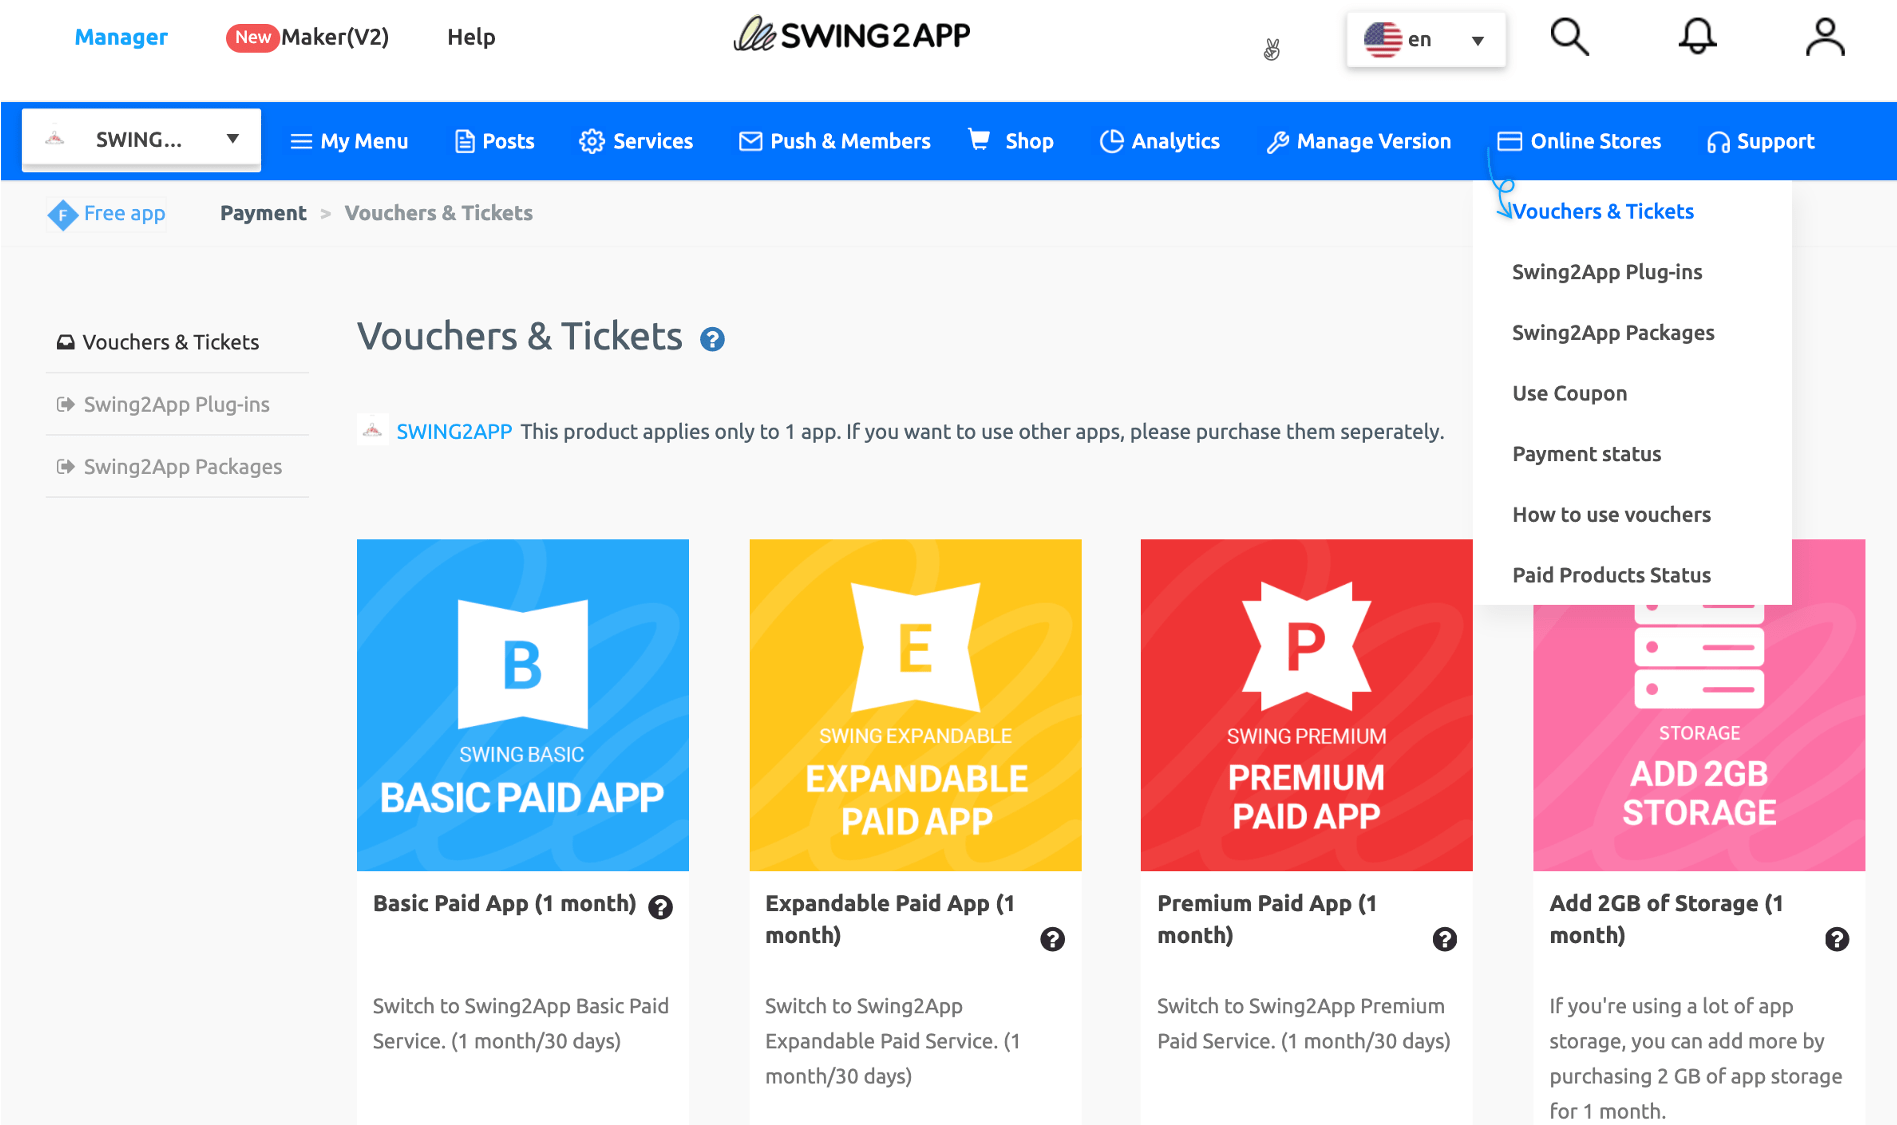
### **1. Introduction to Paid Products**
You can find a total of 9 Swing2App paid product types in Vouchers & Tickets pages.
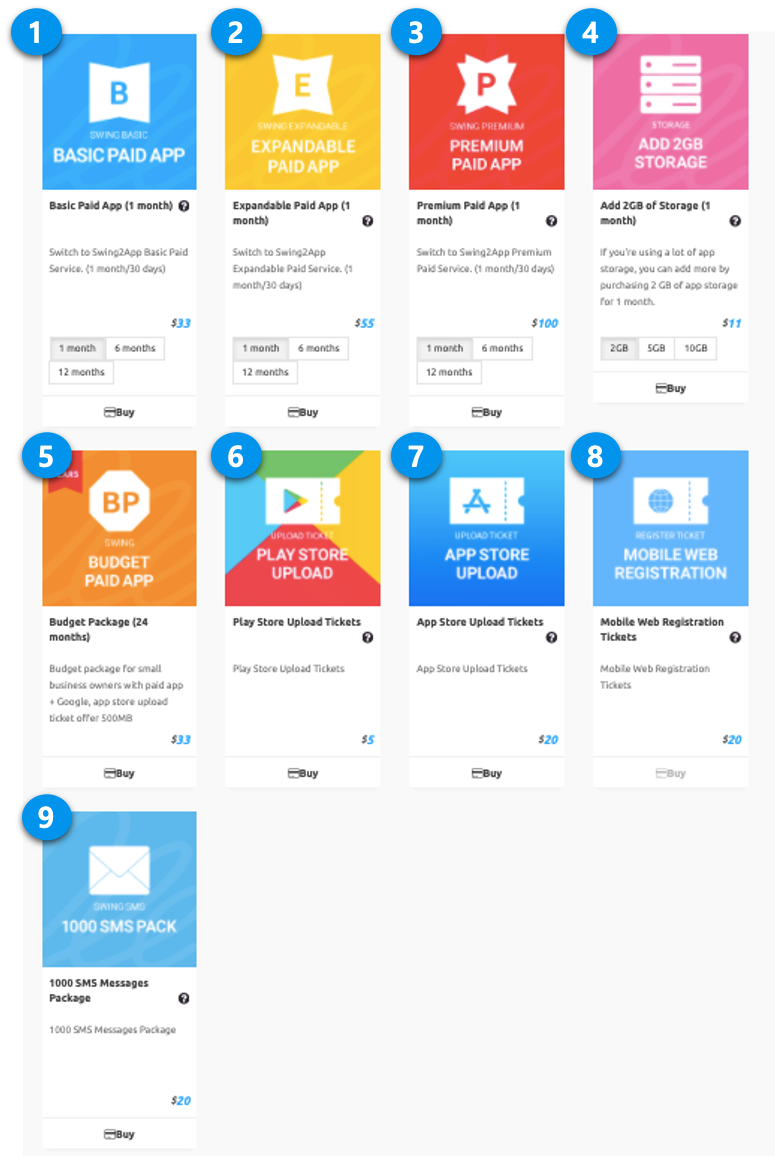
1. **Basic Paid App(1 month): $33**\
To register the app in the market, the user must purchase this voucher. Users can use the paid app for 1 month or can pay monthly. If you have purchased a one-month voucher, you can use the paid version only if you purchase the same ticket again next month.\
**TIP:** If you want to purchase a paid app for two months, check the usage quantity to two and pay.\\
2. **Expandable Paid App(1 Month): $55**\
To register the app in the market, the user must purchase this voucher.\\
3. **Premium Paid App(1 month): $100**\
To register the app in the market, the user must purchase this voucher.\\
4. **Add 2GB Storage(1 month): $11**\
If you do not have enough capacity when using the app, you can purchase more storage to add products. Available in additional capacity for one month:\
2GB(1 month) $11\
5GB(1 month) $22\
10GB(1 month) $44
5. **Budget Package(24 months): $33**\
Budget package for small business owners with paid app + Play Store and App Store upload ticket offer 500MB.\\
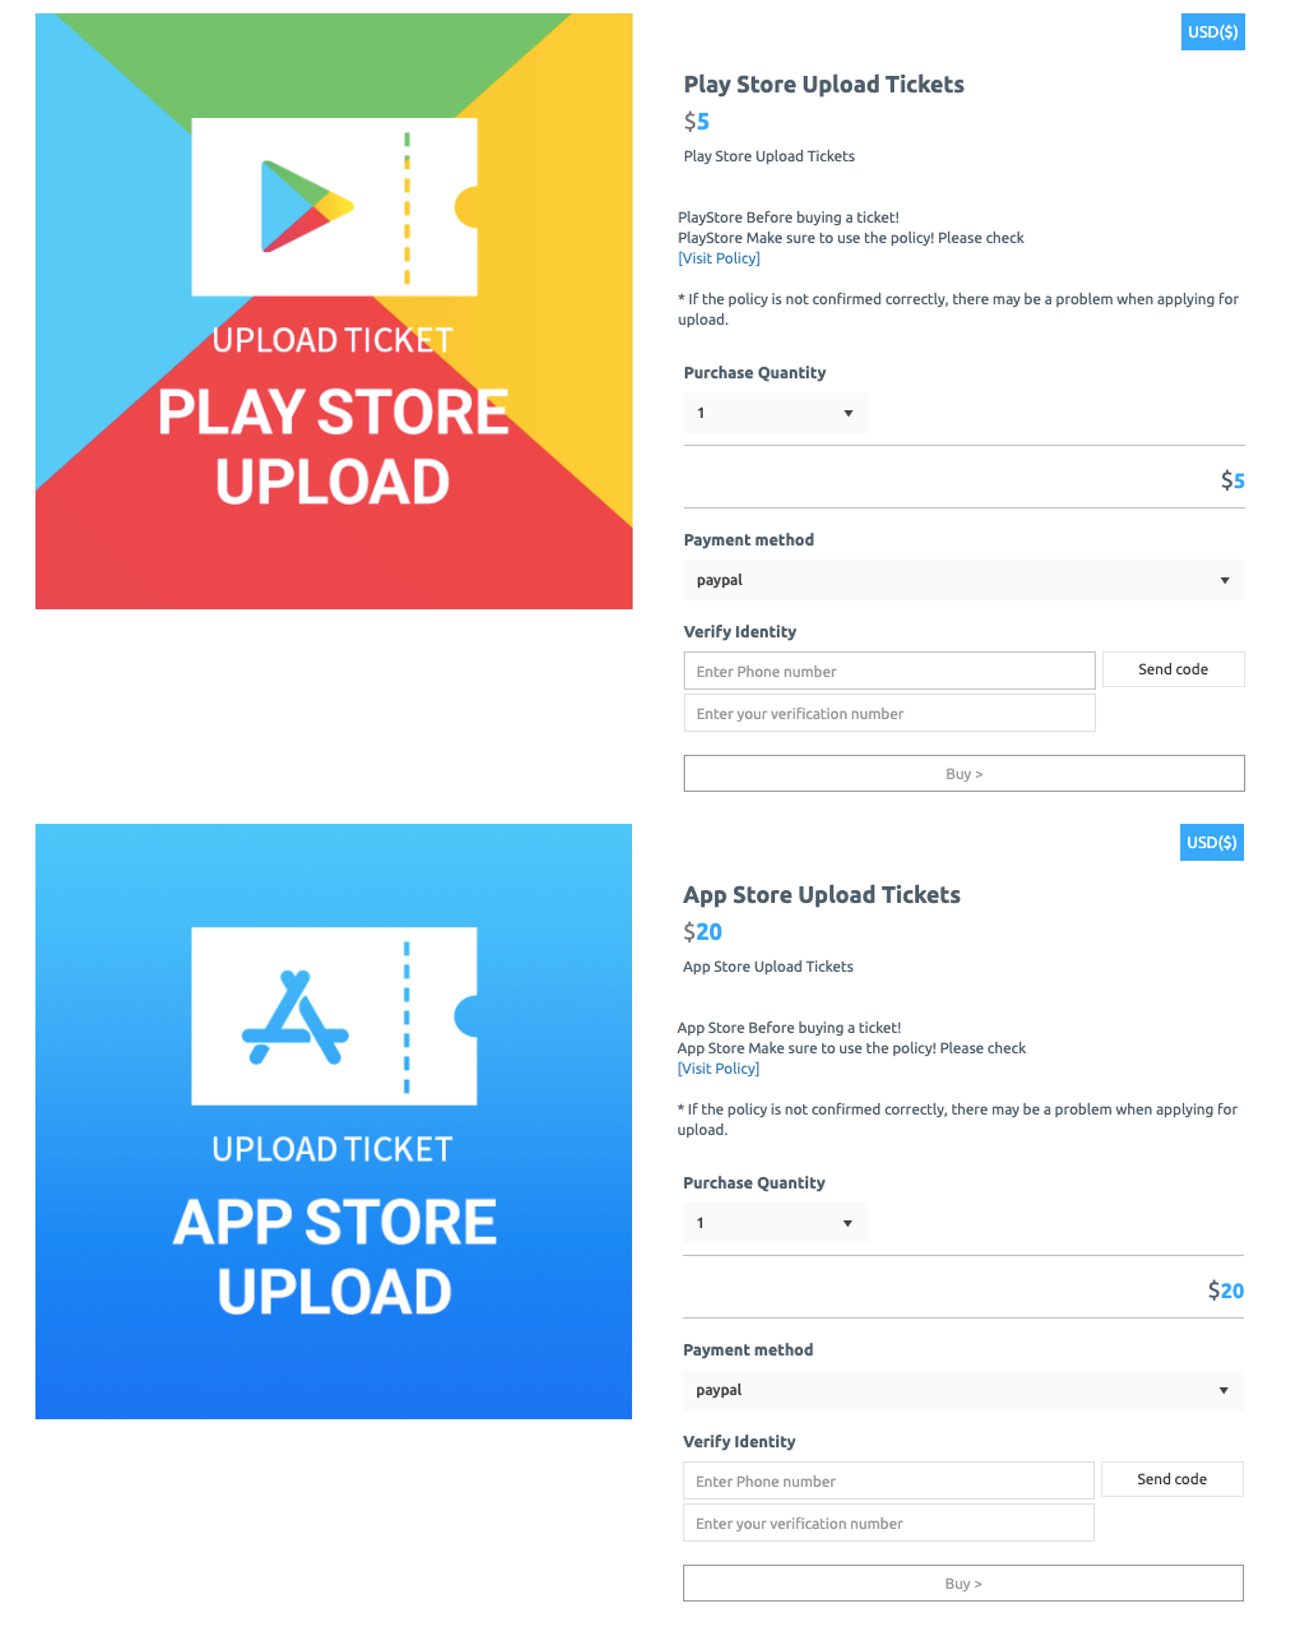
6. **Play Store Upload Ticket: $5**\
(Android only) This is a fee to register your app on the Play Store Market.\
**TIP.** Upload tickets are a way for Swing2App to put your app on the market. Therefore, if the user can directly upload the app to the Play Store, you do not need to buy a ticket. You only need to purchase a paid app vouchers.
7. **App Store Upload Ticket: $20**\
(IOS only) This is a fee to register your app on the App Store Market. The App Store cannot be uploaded by users directly, so the user must purchase an upload ticket when they want to release their app on the App Store.
8. **Mobile Web Registration Ticket: $20**\
This product is required for users who do not have a website. It is a product that registers the created app as a mobile website. If you purchase a ticket after purchasing a domain, we will register the mobile web in Swing2App.
9. **Send 1000 SMS: $20**\
It is a message voucher to send SMS messages to app members. You can also purchase multiple quantities through quantity checks.
**Note: Swing2App Custom:** This product is a ‘sample’ price product made as a request by another user as a sample. No actual amount. Custom production costs vary depending on the quote, so if you are interested in custom please contact Swing2App and get a quote.
**Please check the relevant posts for more information on paid products.**
**☞** [**Click here to view Swing2App Ticket FAQ**](https://support.swing2app.com/faq/%E2%96%B6swing2app-paid-product-voucher-faq/)
### **2. Purchase a swing2app paid product**
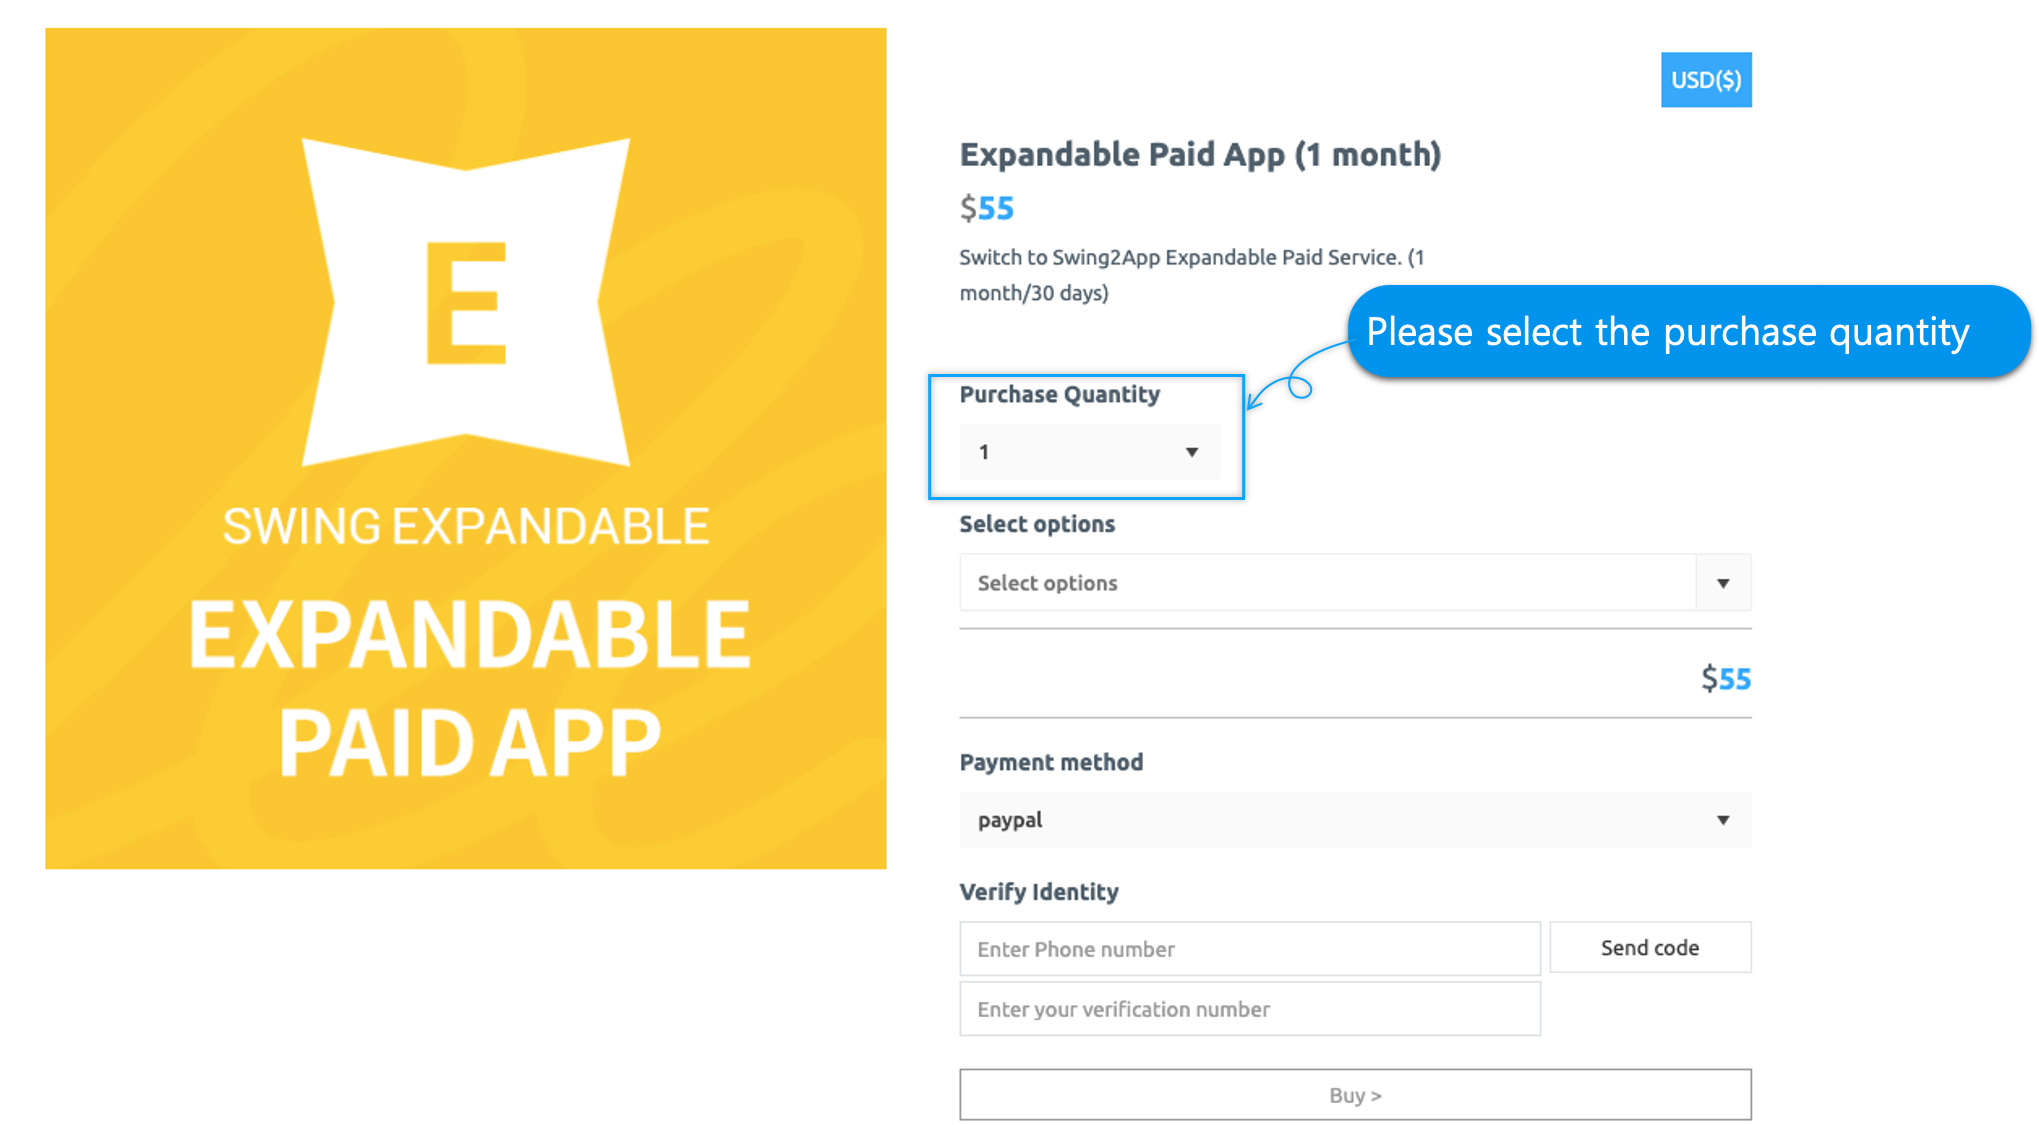
**When you select a product for purchase, you’ll be taken to a payment page.**
1\) You can check the purchase amount and pay for as many months as you want.
Example: If you want to buy 3 months, please check 3 and check the purchased quantity.
2) First-time users who purchase the vouchers will see the Market Upload ticket under the voucher.
**▶ Voucher Purchase Option \[Upload Ticket Purchase]**
What is an upload ticket? Swing2App is an agency that puts your app on the App Store and Play Store instead.
**\*If you want to upload to the market with a paid voucher, you must also purchase an upload ticket.**
**Ex) Swing2App paid app 1 month($33) + Play store upload ticket ($5) = $38**
-Please check whether the upload ticket is for Android or iPhone.
-Play Store does not charge for uploading, but if you upload it yourself, you only need to purchase a paid app voucher.
-The App Store can only be uploaded. (You can’t upload it yourself).
**\* Upload tickets will only be displayed for first-time buyers.**
If you have paid at least once, upload ticket items will not be displayed.
Therefore, if you would like to purchase an upload ticket, please select the upload ticket item on the payment page.
**3) If you have selected a product above and checked the purchased quantity, please proceed to the next payment.**

(1)Please select a payment method. \* Swing2App provides 6 payment methods.
-Mobile phone, credit card, Direct account transfer, bank deposit, Kakao Pay, swing2app (pay app) payment.
(2)Enter your mobile phone number and press the Send Verification Number.
(3)After entering the authentication number received in text,
(4)Please select.
**4) Check your payment information**
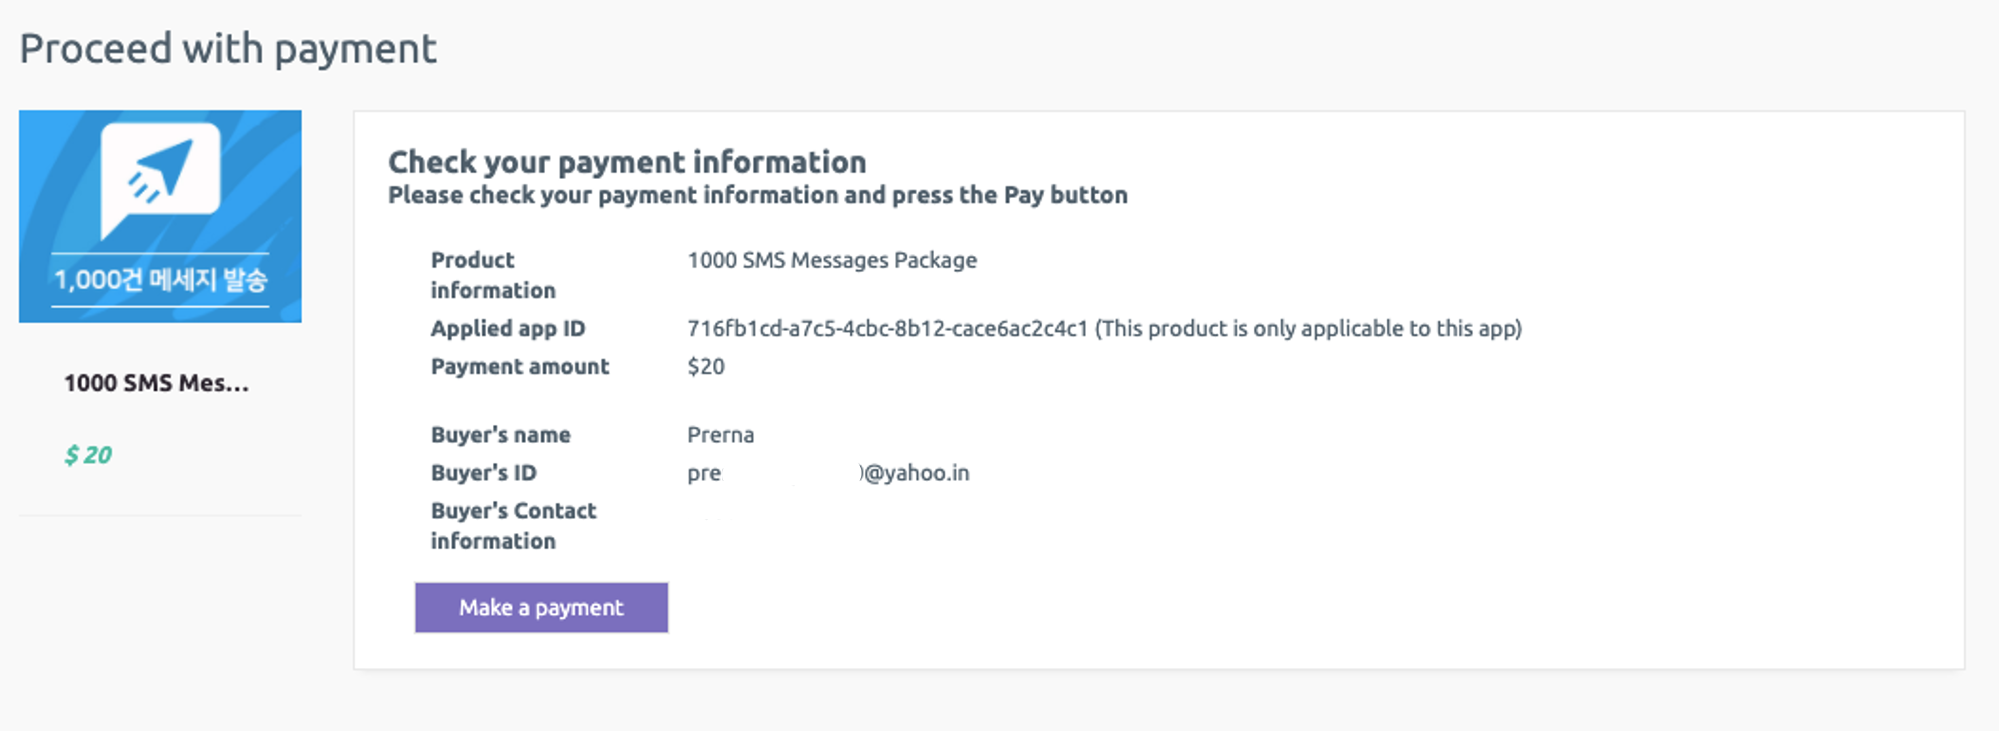
On the payment information confirmation page, please check if the item was selected correctly, the app you want to apply is correct, and the amount.
If you select **Make a Payment**, payment will be made to the selected payment method.
**\*Please check your deposit!!**
If you choose Bank Deposit, your bank details will appear on your payment information confirmation page.
Please deposit after verifying your account number.
**After deposit, please select \[Send Deposit to E-mail] button.**
If you do not select the button, you will only need to make a deposit and it will not work with the app.
Therefore, it is not possible to confirm which customer paid which product and which app to apply to.
Please do not forget to press the button.
### **3. Buy Swing2App Plug-in**
1. Go to **Manager.**
2. Select **Online Store.**
3. Click on **Swing2App Plug-ins.**
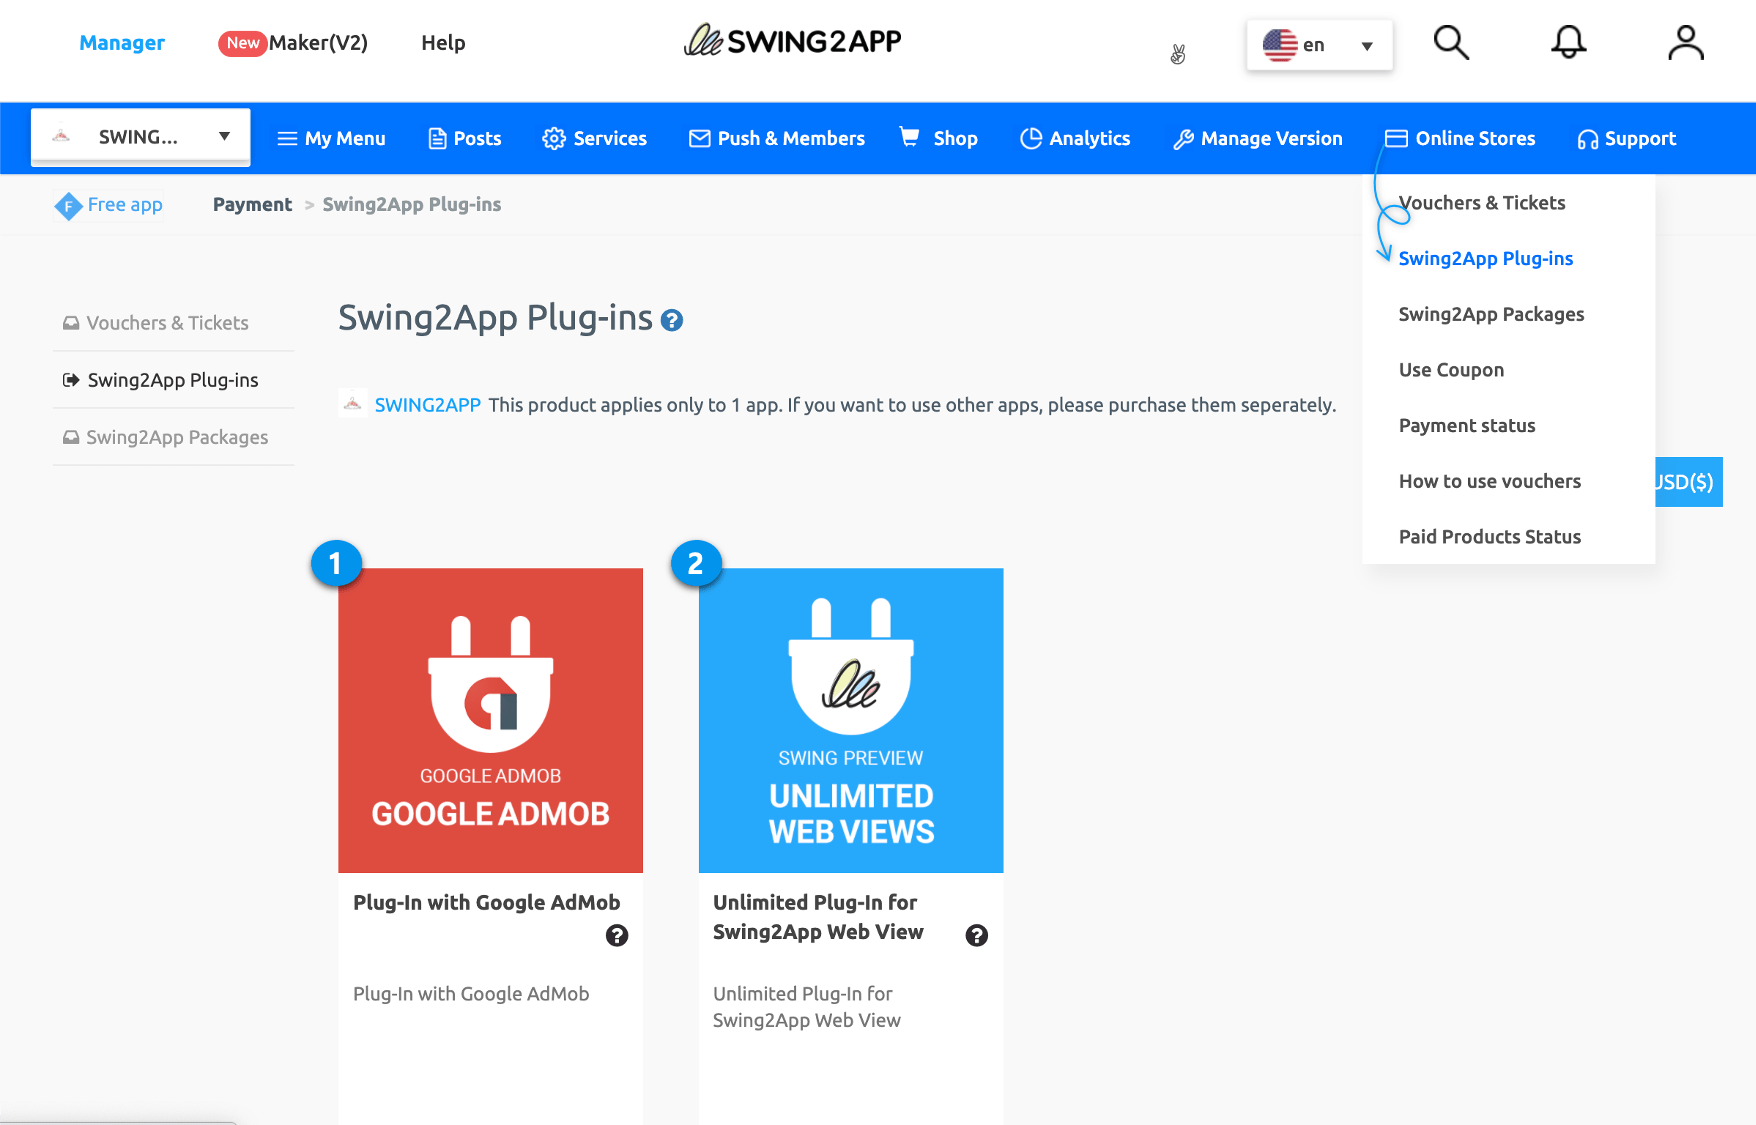
**Swing2App plug-in products are optional products that include custom development by the development team, not regular paid products.**
**1) Google Admob plug-in cost $220 (additional cell included)**
It is a custom product that can be equipped with Google AdMob ads in the app.
AdMob application fee is $220 (additional cell) per app.
**2) $300 web view unlimited plug-in (added cell)**
Swing2App Prototypes – Only available for apps built-in web view style.
This product is available without a limited period and you can use the swing2app unlimited without paying a monthly fee.
The usage fee is $300. (Tax included)
**\* Please check the relevant post for more information about Swing2App plug-in products.**
**☞** [**Click here to view Swing2App ticket FAQ**](https://support.swing2app.com/faq/%E2%96%B6swing2app-paid-product-voucher-faq/)
### **4. Payment – My Payment Status**
1. Go to **Manager.**
2. Select **Online Store.**
3. Click on **Payment Status.**
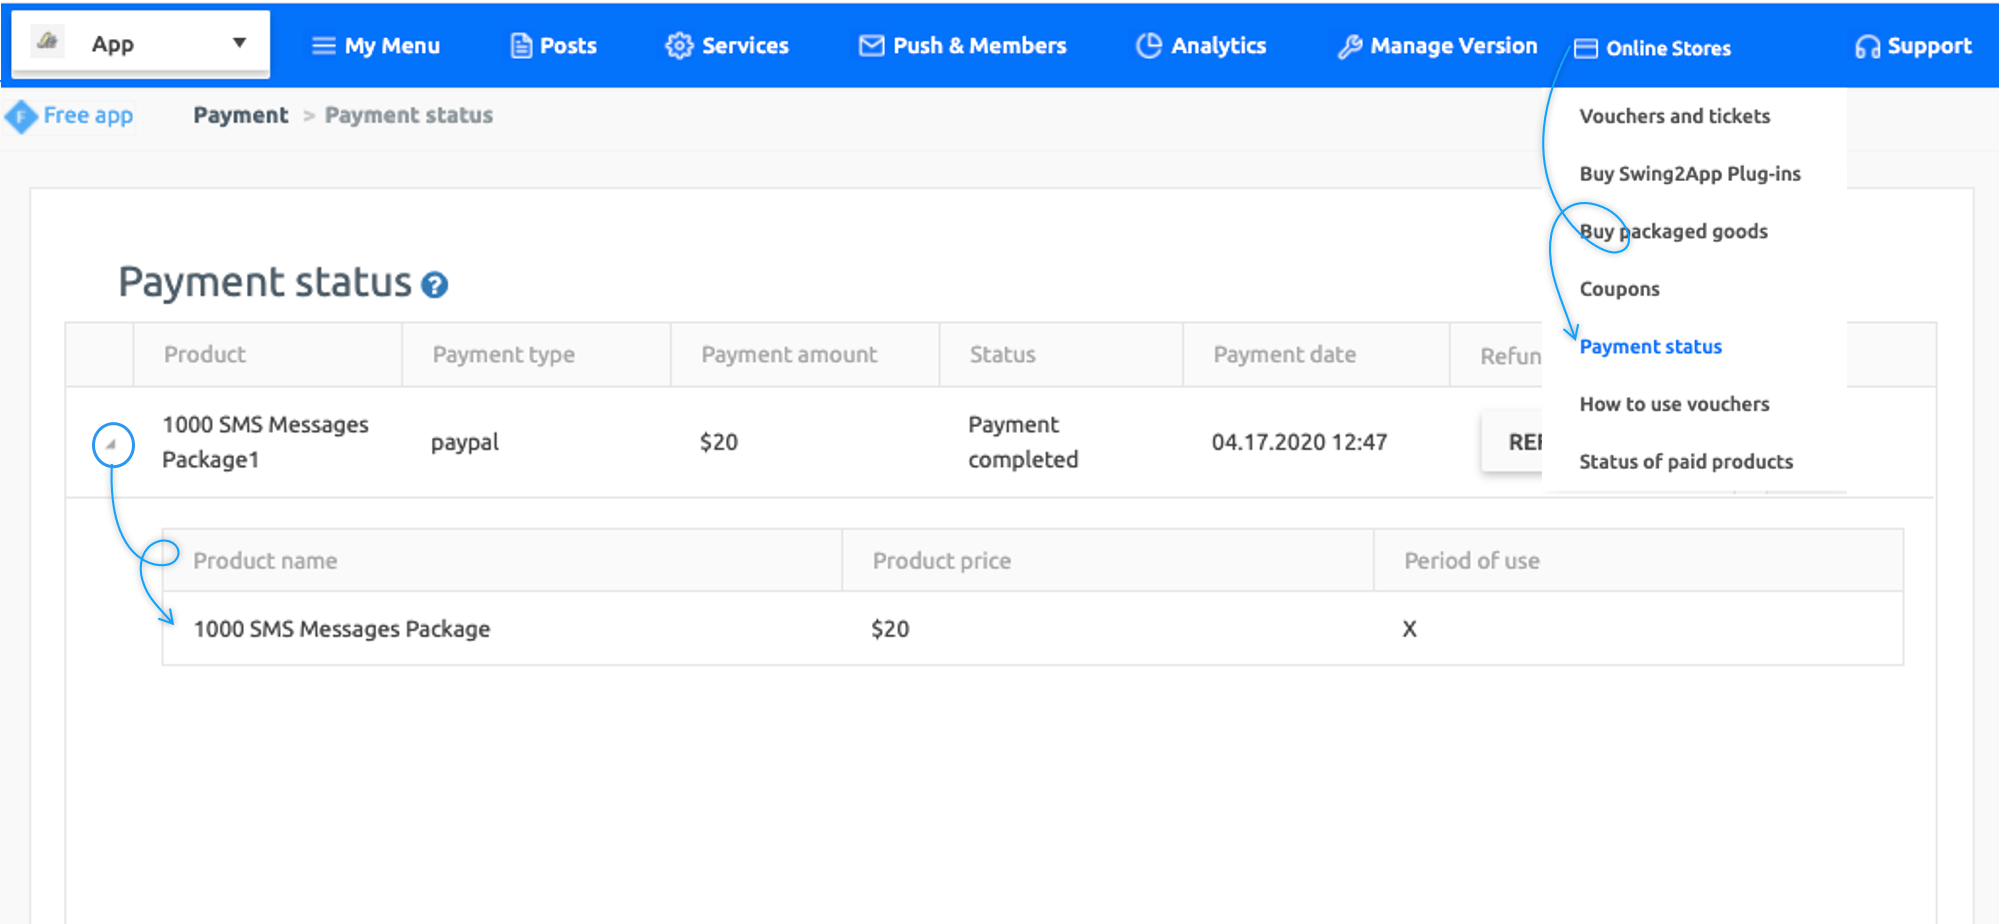
On the My Payment Status page, you can check the details of receipts and payments along with receipts.
You can also request a refund from this page.
In the case of paid app vouchers and storage products, the usage period is fixed, and you can check the usage period of the paid product.
If you select the small triangular icon on the left side of the payment list, you can check the detailed usage period of the product.
**\*Receipt can only be checked for payments made by electronic payment, excluding bankbooks and direct account transfer payments.**
**\*\* Please note when paying \*\***
1. If you have created multiple apps in one account, make sure to check and pay for the apps you want to apply. If you want to apply a paid voucher to an app called ‘A’, you need to select the right app before purchasing.
2. The paid product is only applied to one app. Swing2App paid app voucher is applied to one app, so if you convert 3 apps to pay, you have to pay for each to use it.
3. If you purchased a paid app voucher for 1 month, you can use the paid version for only 1 month.
Since it is not an automatic payment, please check the expiration date of the app.
The usage period is displayed at the top of the swing2app operation page dashboard.
Notification emails and text messages (if you have a phone number) will be sent to you 7 days before the remaining days of use.
If the paid period is over and repayment is not done, there are restrictions on usage of the app.
Therefore, if you do not check the usage period in advance, it may cause inconvenience to existing users.