> For the complete documentation index, see [llms.txt](https://documentation.swing2app.com/llms.txt). Markdown versions of documentation pages are available by appending `.md` to page URLs; this page is available as [Markdown](https://documentation.swing2app.com/manual/appmanage/board/bulletinboard-form.md).
# How to write a bulletin board
**How to write a bulletin board**
**▶ What is the Bulletin Board?**\
If there is a list of answers that all users should receive,\
the administrator can provide the users with the questionnaire on the bulletin board in advance.\
\
\&#xNAN;**▶How is it different from the bulletin board form?**\
The filling form is an updated feature in the writing.\
Like the article, the administrator sets the items to be answered.\
The difference is since the bulletin board form is provided **a tool is created in the bulletin board and you can use it by adding an image or adding a calendar (date setting).**
**☞**[ ](https://swing2app.blog.me/220840148356)[**Refer to the post on how to set up and use the form.**](/manual/appmanage/board/filling-form.md)
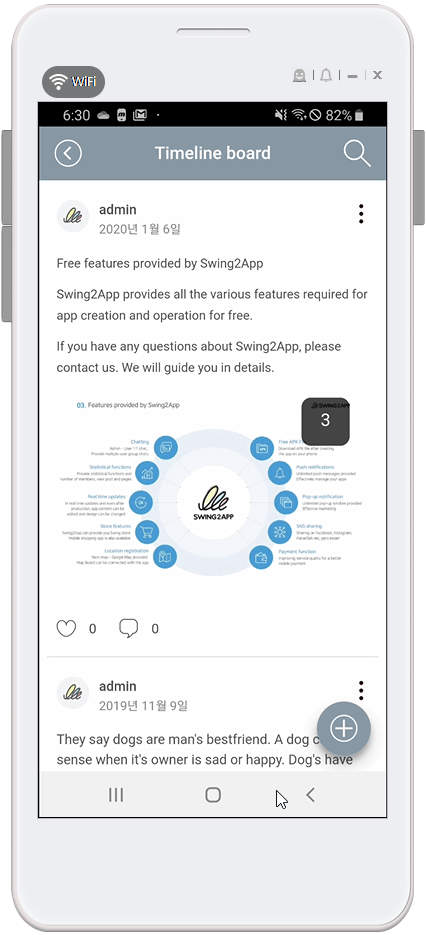
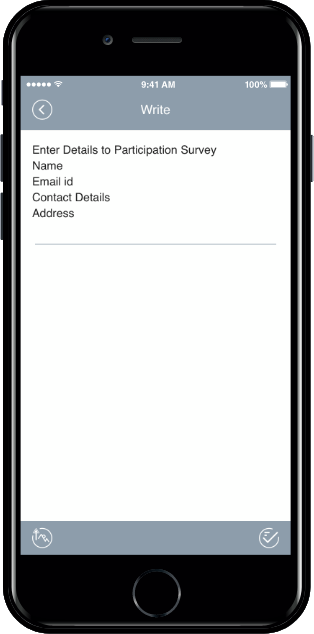
**▶ Writing app launch screen**
As you can see from the above app launch screen, when you write a post, the question items are pre-filled like a questionnaire.\
Depending on the question, the user can enter and save the answer.
## **1. How to write a bulletin board**
1. Go to **Manager** and select **Services.** From the drop-down list select **Bulletin Board.**
2. If you need to create a new board on the board management page, click on **Create Bulletin Board** button. If a bulletin board is created, click the **Settings** button on the bulletin board.
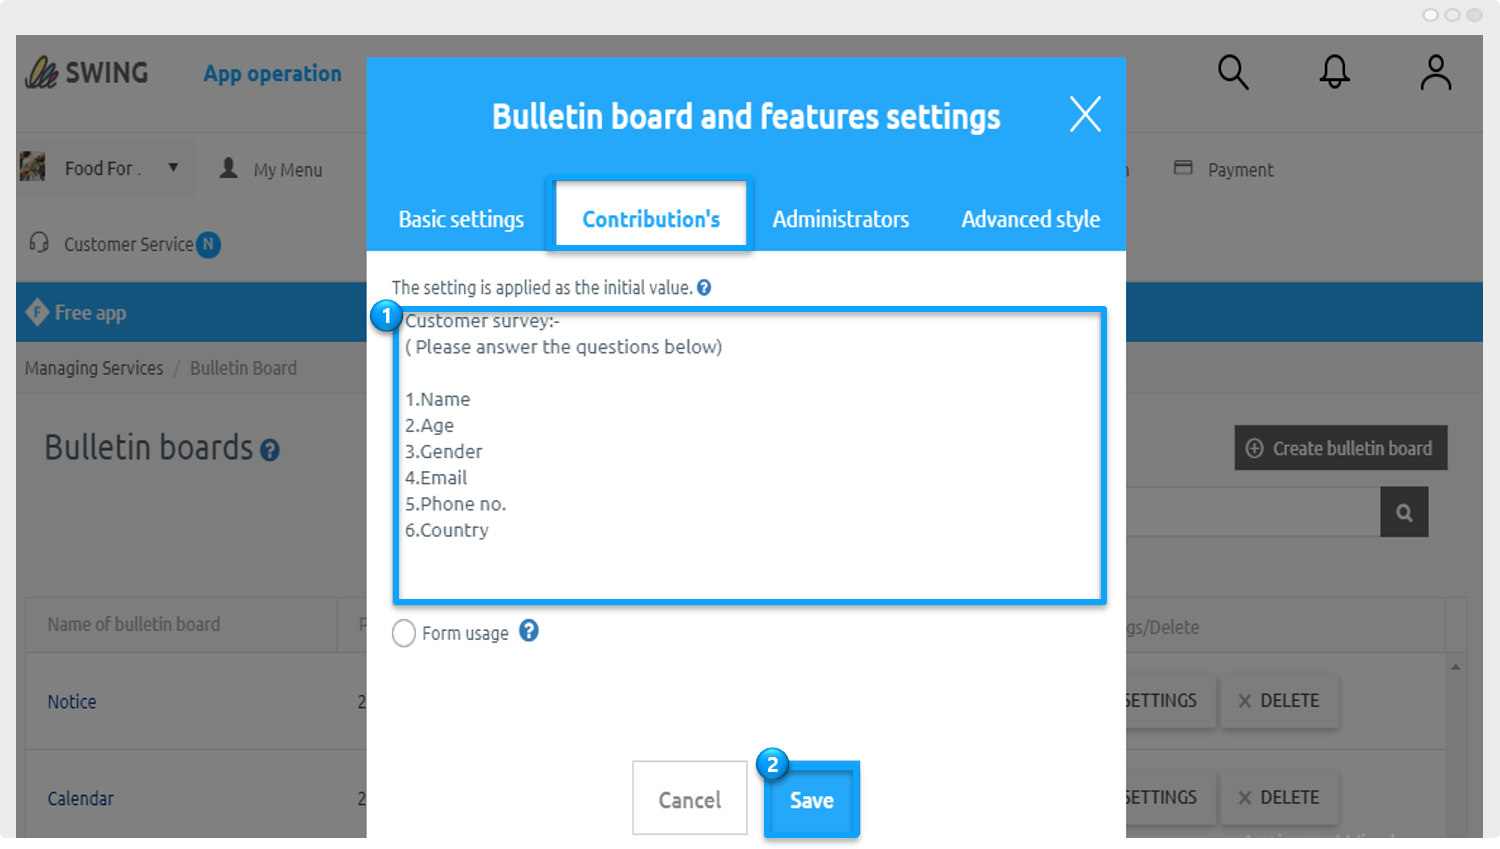
3. Select **Contribution’s** tab from the **Bulletin Board and Features Settings** window. On the Contribution’s page, enter the details in **Settings applied as an initial value.**
4. If you select the button, the bulletin board and function setting window will open. The first function setting menu is to set the board name, board UI style, and permissions. Please refer to the bulletin board making manual to select the corresponding menus.
5. When the entry is complete, select the second menu **\[Contribution’s]** Settings.
**☞** [**\[Go to see the bulletin board making\]**](/manual/appmanage/board/create-bulletinboard.md)
\\

In the article setting menu, enter the desired content. \*Enter the information you need to receive in the form of a questionnaire.
1\) The administrator can directly enter the contents to be displayed as the initial values on the relevant bulletin board.
2\) Click the Save button to complete.
\*Please refer to the manual below for how to use the creation form.
[**☞ \[Go to see how to use the creation form\]**](/manual/appmanage/board/filling-form.md)
In the app creation page, you need to link the relevant bulletin board to the app to be reflected. Please check how to apply it to the app below.
In the **Maker(V2)** page, you need to link the relevant bulletin board to the app to be reflected. Please check the way to apply to the app below.
## **2. Applying a bulletin board to the app**
**When using app production V3 version**
1\) APP CREATION STEP3 Select page
2\) Menu selection
\*If you're not ready to create a menu, create a new one. (Select the + shape button to add menu)
3\) Please enter a menu name.
4\) Select \[UI KIT] in the page design
5\) Please select \[Bulletin Board].
6\) Check the board to register, and then select the \[Apply] button. (Hover over the mouse cursor on the page to open the Apply button)
7\) Press the \[Save] button at the top of the screen to apply it to the app.
\*The icon is optional, only select it if you want to apply an icon in front of the menu.
**When using app production V2 version**
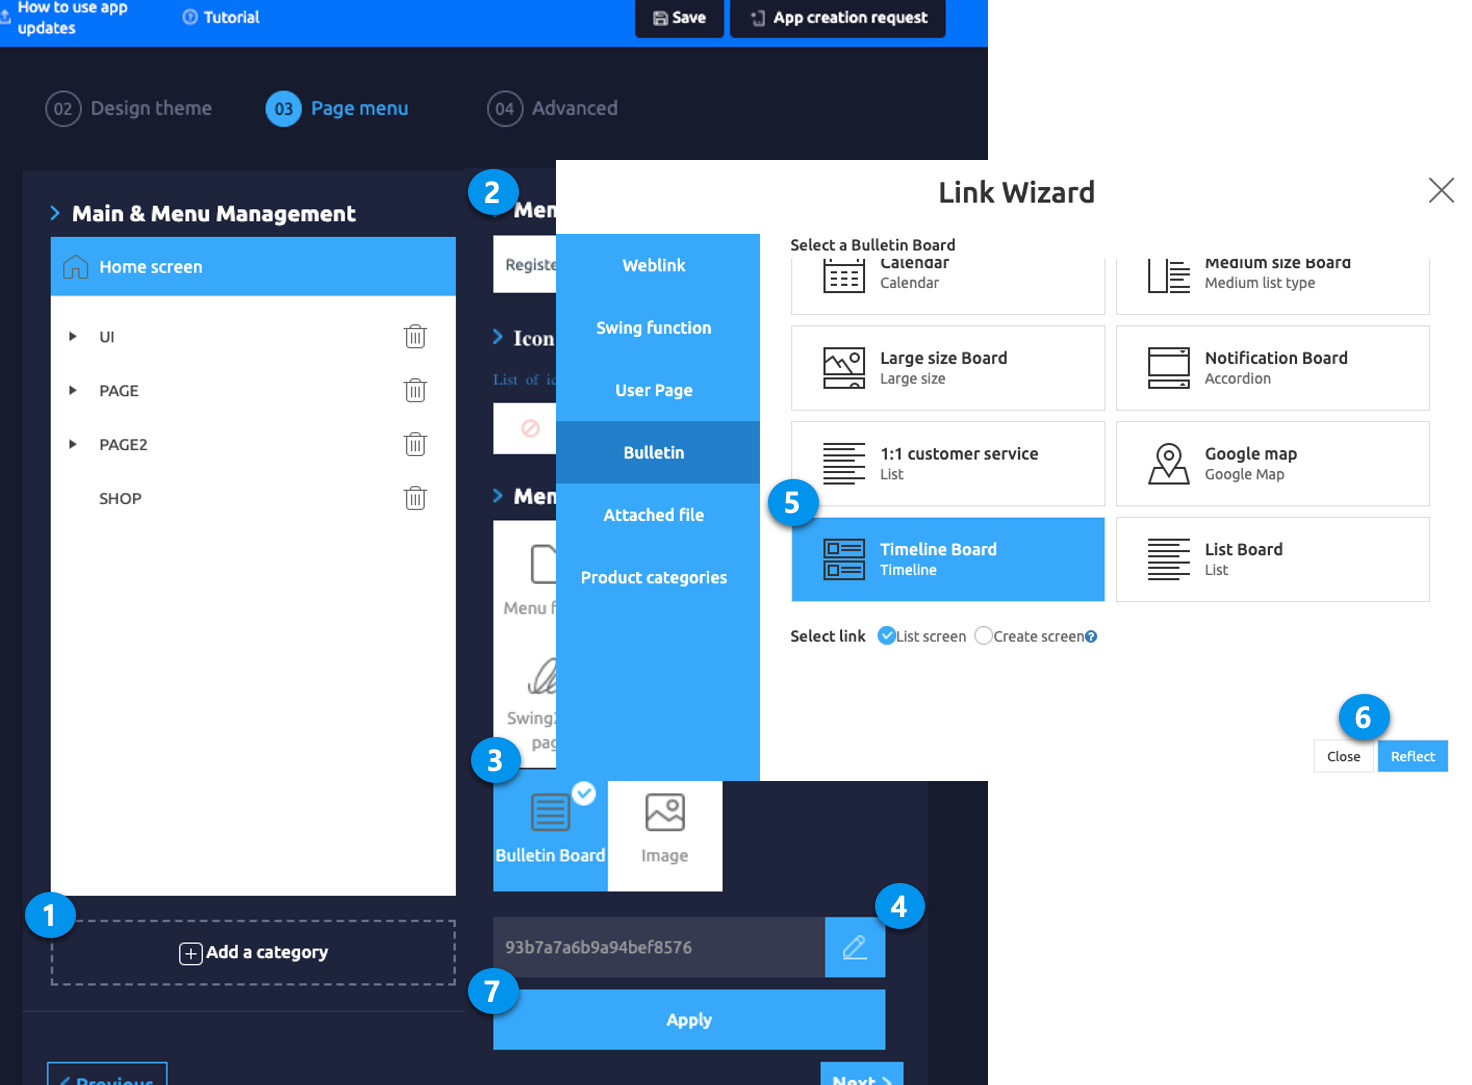
On the Swing2App **Maker(V2),** go to the **Page menu.**
1\. From the menu set by default, click the **Add a category** to add a new menu.\
2\. Edit the name of the added item in **Menu Name.**\
3\. Select **Bulletin Board** in the **Menu Type.**\
4\. Click on **Link Wizard**(pencil icon).\
5\. Select the board from the list of Bulletin Boards in the Link Wizard window.\
6\. Click on **Reflect.**\
7\. Click on **Apply** and then **Save.**
## **3. App Launch Screen**
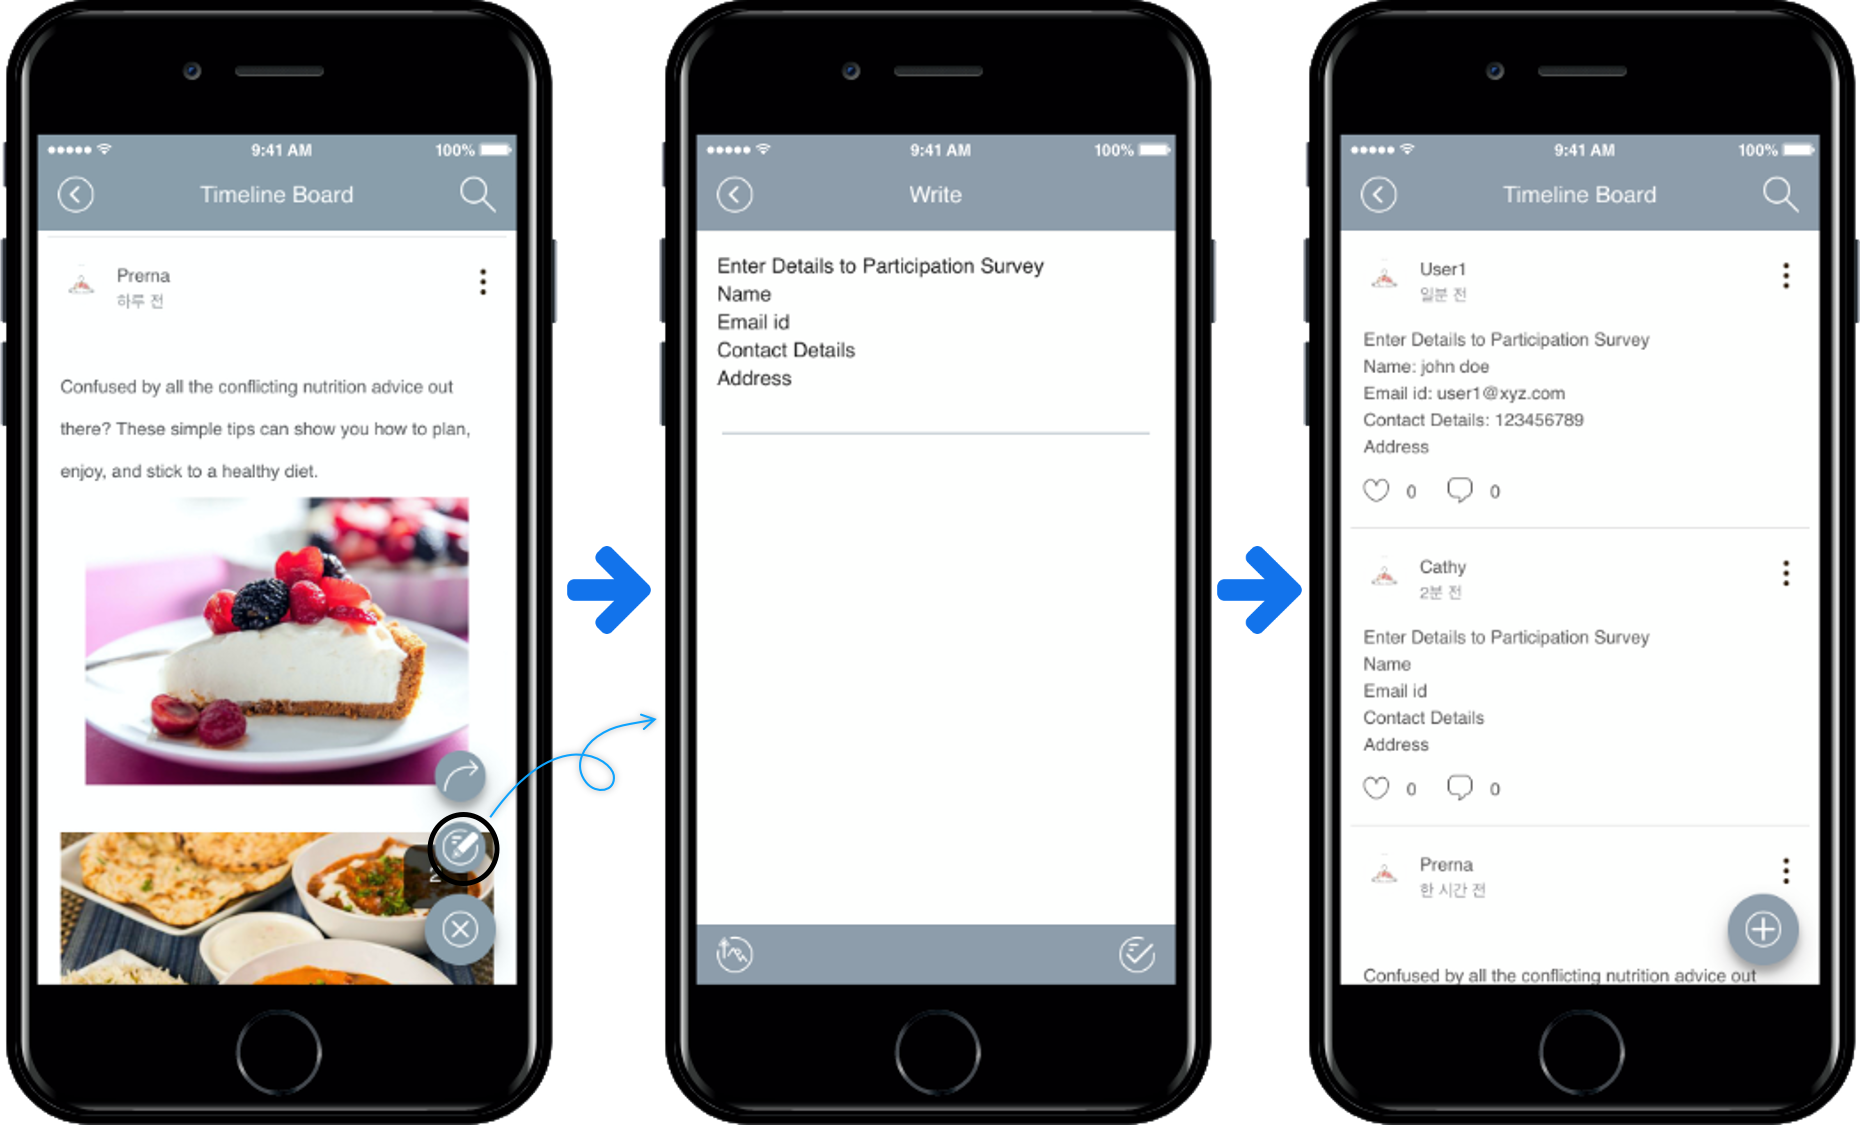
Run the app and select the member self-introduction board.
★ The corresponding article form is not shown in the bulletin board list\~!
You need to select the writing button to check the writing on the writing screen.
Therefore, the user can write an answer according to the written form written on the bulletin board.
**Checking the writing screen with a moving image**
Bulletin board writing is to set a form for writing, and users can enter text according to the form.
If you set the default text to match the characteristics of the bulletin board, the bulletin board can become a more active communication space. ^^
 **Checking the writing screen with a moving image**