> For the complete documentation index, see [llms.txt](https://documentation.swing2app.com/llms.txt). Markdown versions of documentation pages are available by appending `.md` to page URLs; this page is available as [Markdown](https://documentation.swing2app.com/manual/maual/pagemenu/weblink-linkeditor.md).
# How to use Weblink-linkeditor
**Web Link Link Wizard: How to apply Internet address, phone number, text message, email address**
The web link provided by Swing2App can apply to a phone number, text message number, and email address in addition to the general website URL.
This feature is available in the Link Wizard.
Create an app-We will show you how to apply a web link using the link wizard at the page menu level.
> **Link Wizard: Where can I apply Internet link addresses, phone numbers, text messages, and emails?**
**Manager page -> Step 3 Page If you come to the menu level, you can apply the menu.**
**At this time, select Menu Type: Web Link and click the Load button at the bottom to open the Link Wizard window.**
In the first web link category-you can use web link features such as Internet address, dialling phone number, sending text message, sending email, etc.
Please check the application method for each menu and the app execution screen!!
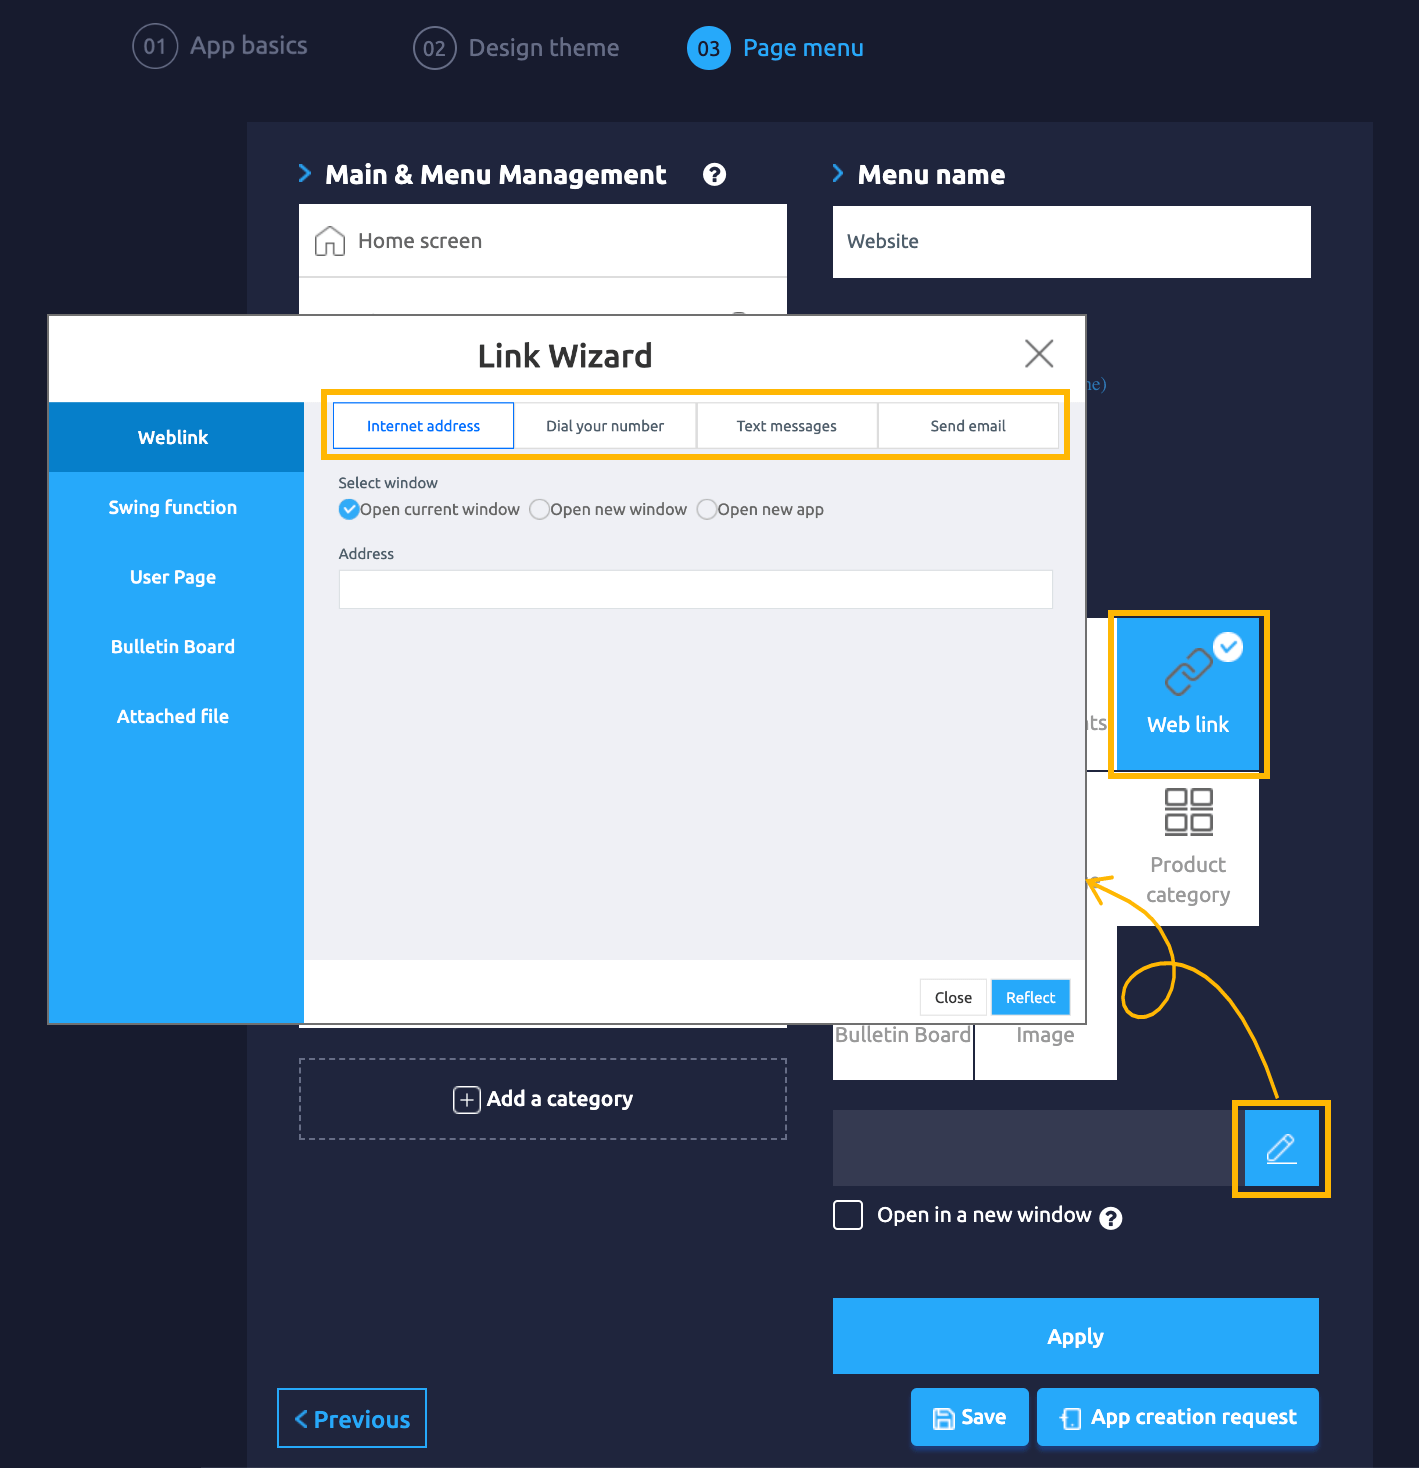
### **1. Applying Internet Address (Site URL) Link**
1. From the menu set by default, click the **Add a category** to add a new menu.
2. Edit the name of the added item in **Menu Name.**
3. Select **Weblink** in the **Menu Type.**
4. Click on **Link Wizard**(pencil icon).
5. Select the **Internet Address** tab in the Link Wizard window.
6. Enter the website URL link in the address field.\
(This is the address of a website such as the homepage, and when entering, please put the http\:// hyperlink)
7. Click on **Reflect.**
8. Click on **Apply**
9. Click **Save.**
\* When entering the website’s Internet address, select ‘View in New Window’ to open the window.
For SNS(social media) links such as YouTube and Instagram, please select ‘Open with an external app’.

 **App execution screen – Internet address application screen**

We ran the app after connecting ‘Internet address’ in the link wizard.
When selecting the web link menu, it moves to the applied website page.
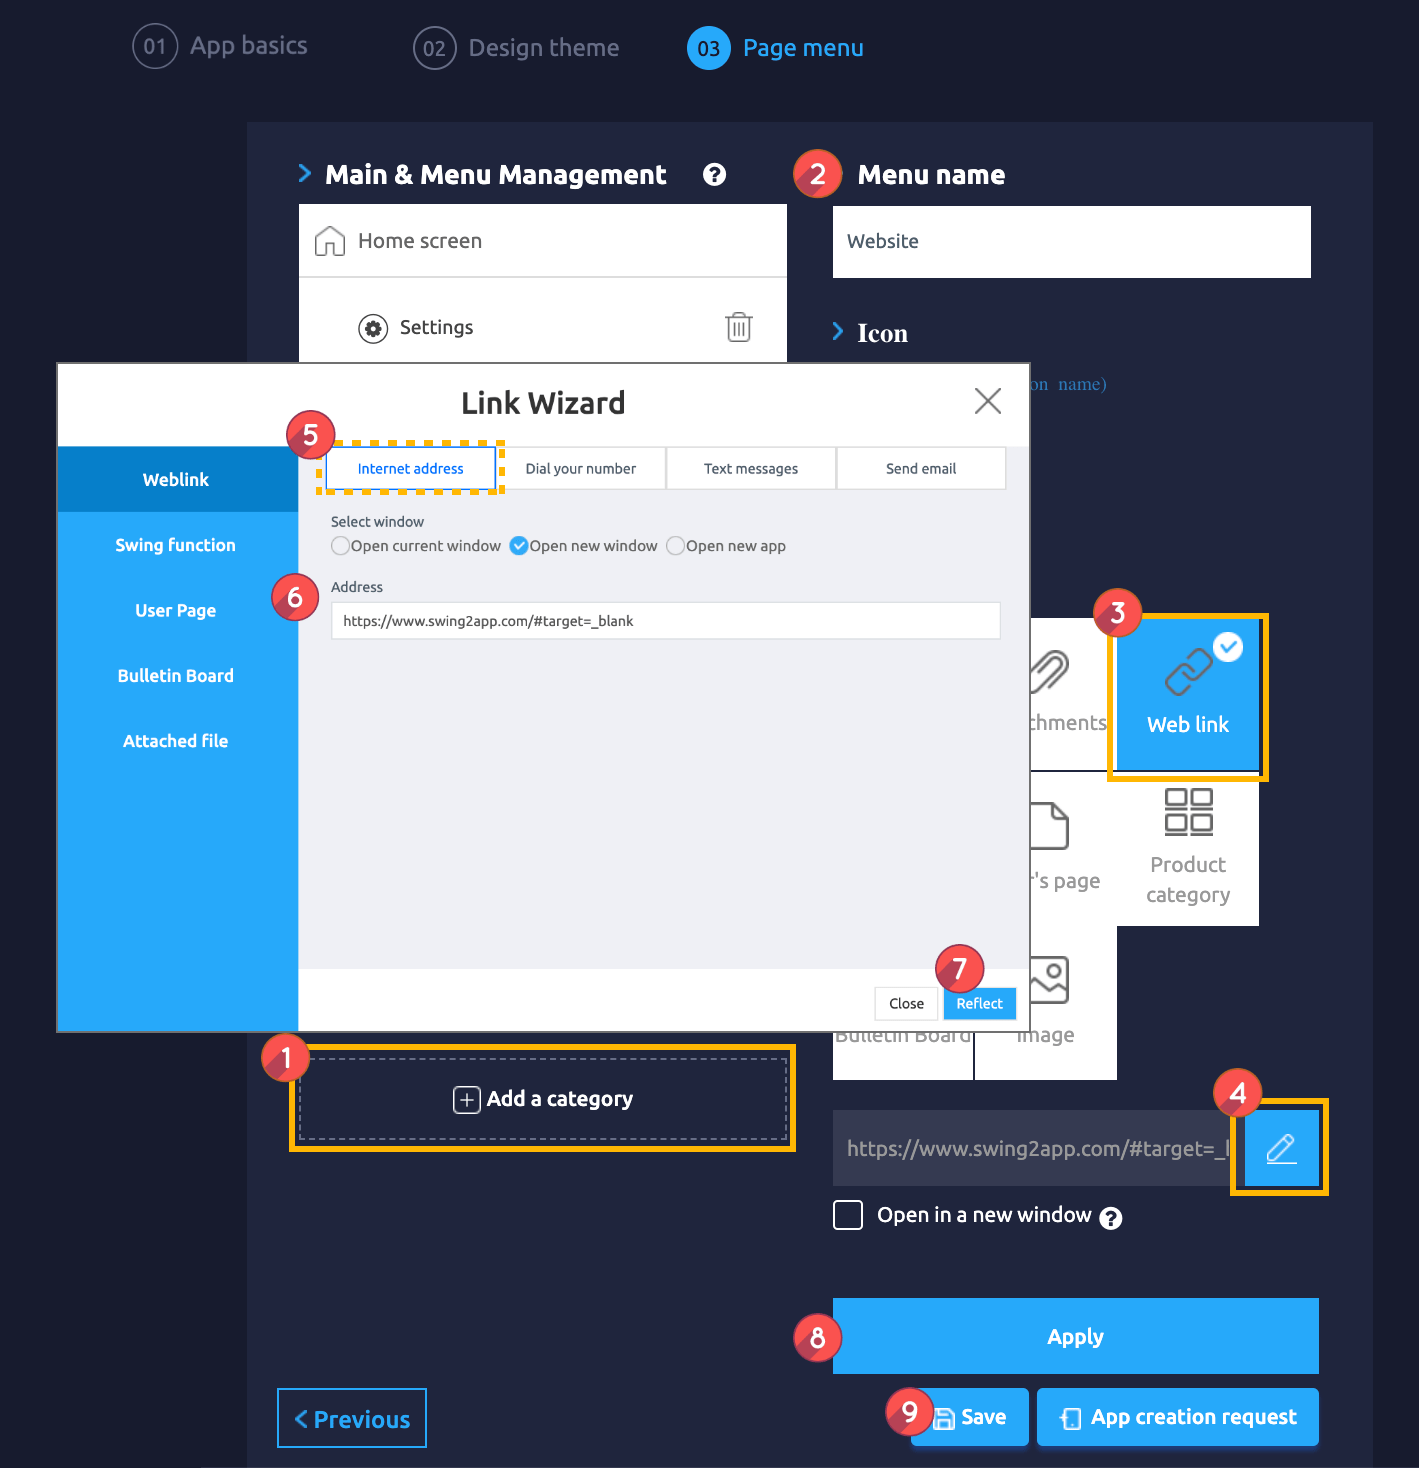
### **2. Apply phone number**
1. From the menu set by default, click the **Add a category** to add a new menu.
2. Edit the name of the added item in **Menu Name.**
3. Select **Weblink** in the **Menu Type.**
4. Click on **Link Wizard**(pencil icon).
5. Select the **Dial Your Number** tab in the Link Wizard window.
6. Enter the recipient’s phone number.\
\*Enter the number to be connected to the actual phone.\
\*Please enter only the number ‘–‘ Please do not enter special order characters!!
7. Click on **Reflect.**
8. Click on **Apply**
9. Click **Save.**

**App execution screen – Phone number application screen**
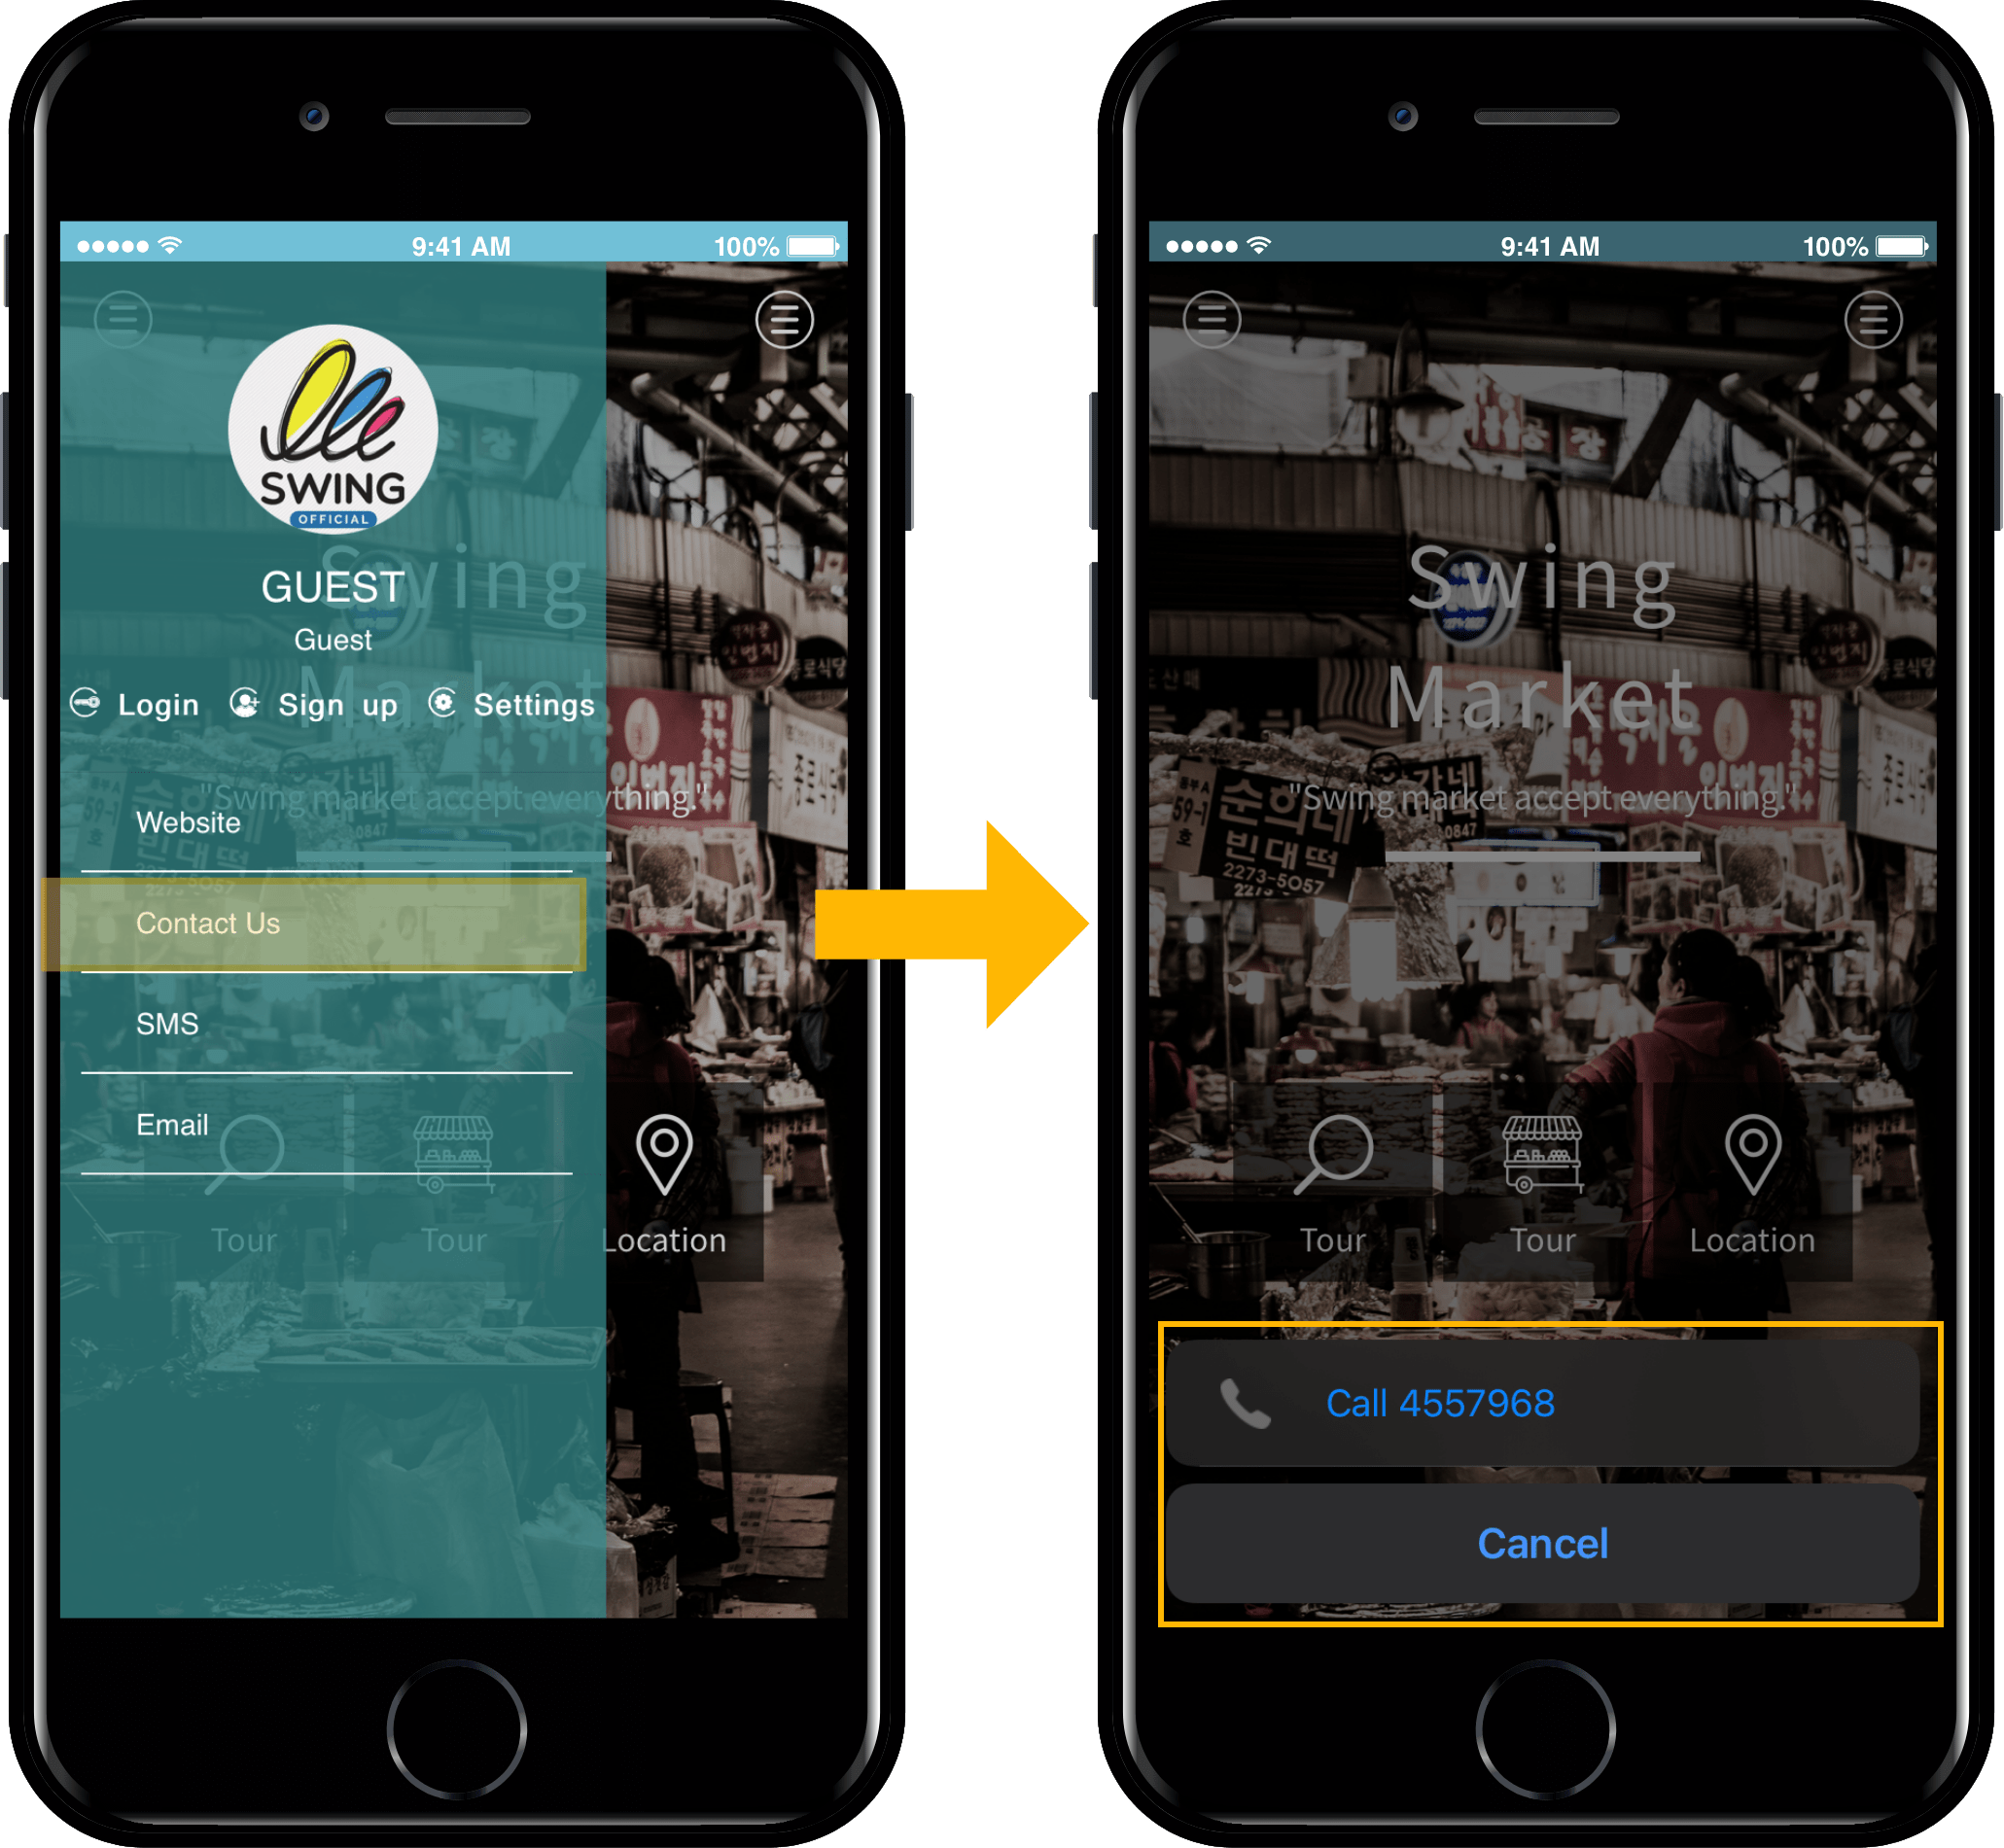
We ran the app after connecting the ‘phone number’ in the link wizard.
When you select the dialling menu, the call is connected to the number you applied.
### **3.Apply text message number**
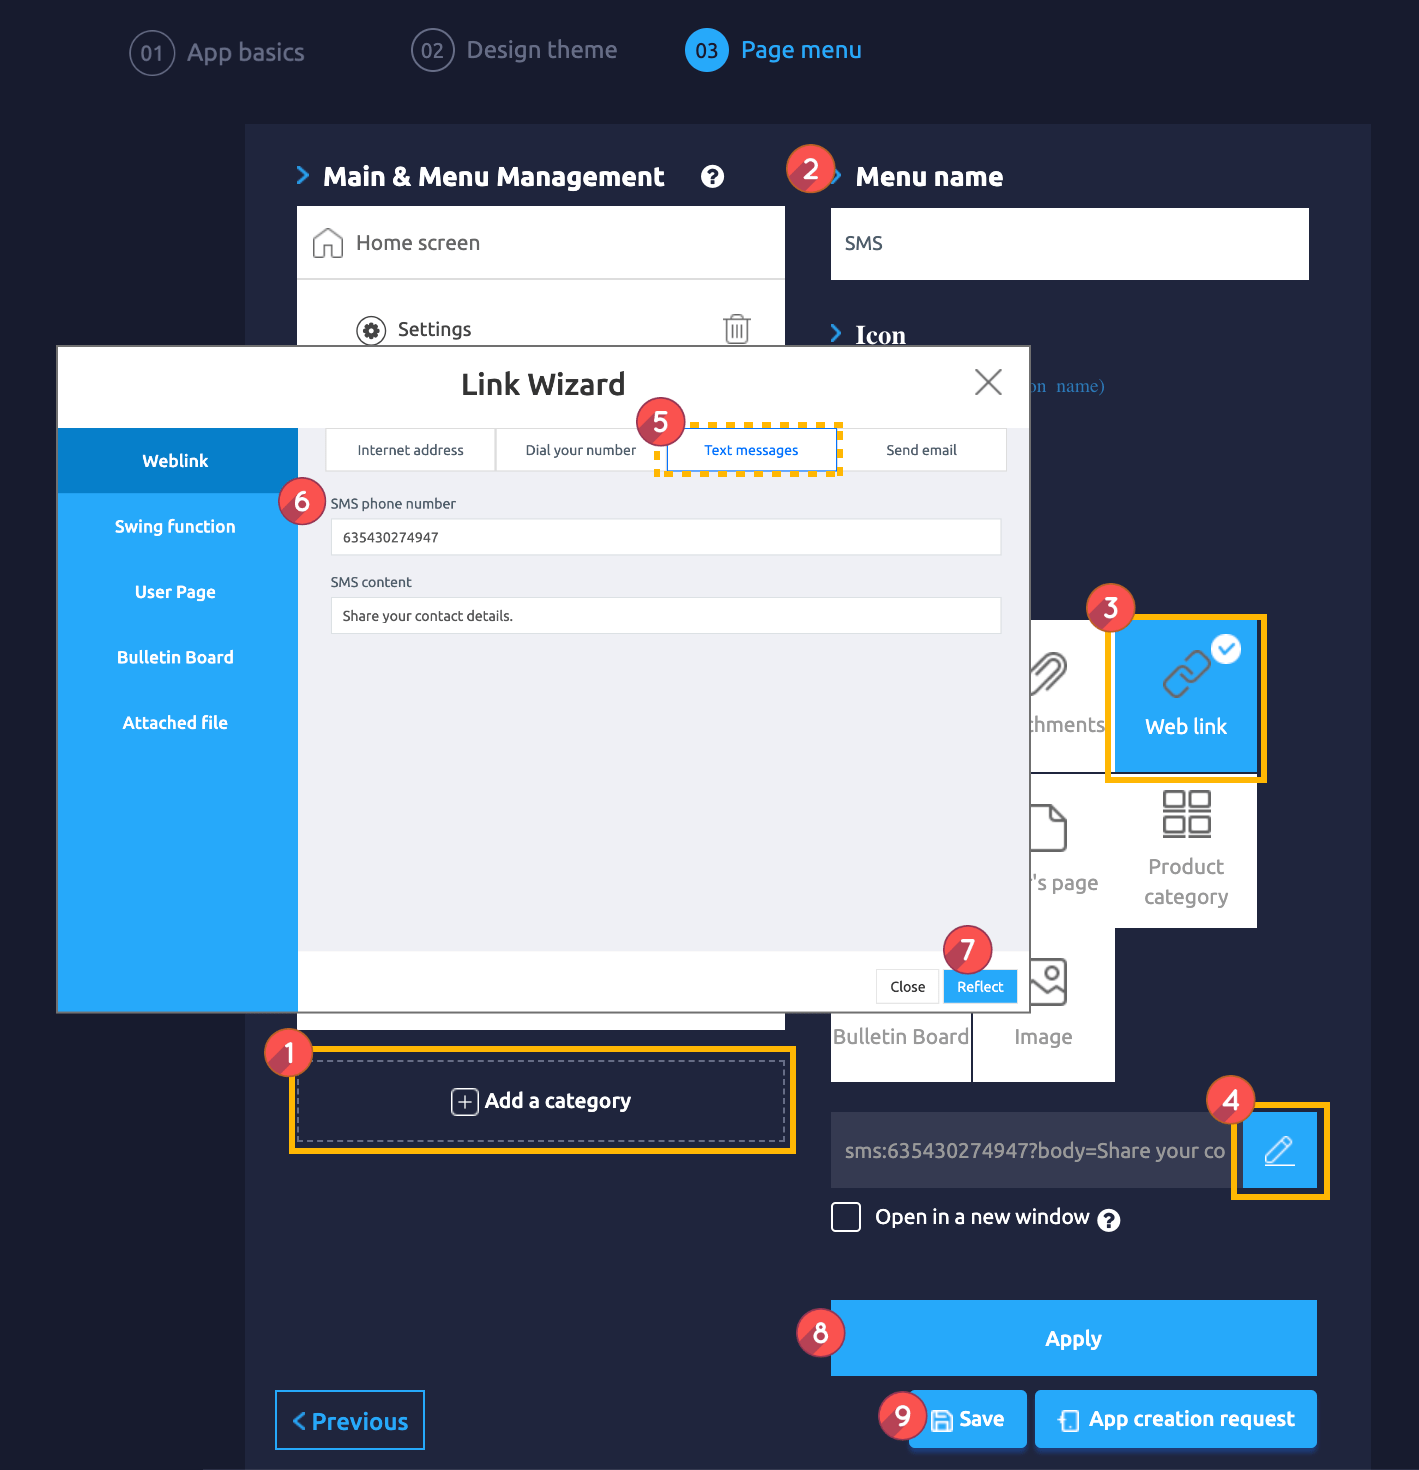
1. From the menu set by default, click the **Add a category** to add a new menu.
2. Edit the name of the added item in **Menu Name.**
3. Select **Weblink** in the **Menu Type.**
4. Click on **Link Wizard**(pencil icon).
5. Select the **Text Messages** tab in the Link Wizard window.
6. Enter SMS outgoing phone number.\
\*Enter the number where you can send the actual text message.\
\*Please enter only the number ‘–‘ Please do not enter special order characters!!
7. Click on **Reflect.**
8. Click on **Apply**
9. Click **Save.**

**App execution screen – Text message number applied**
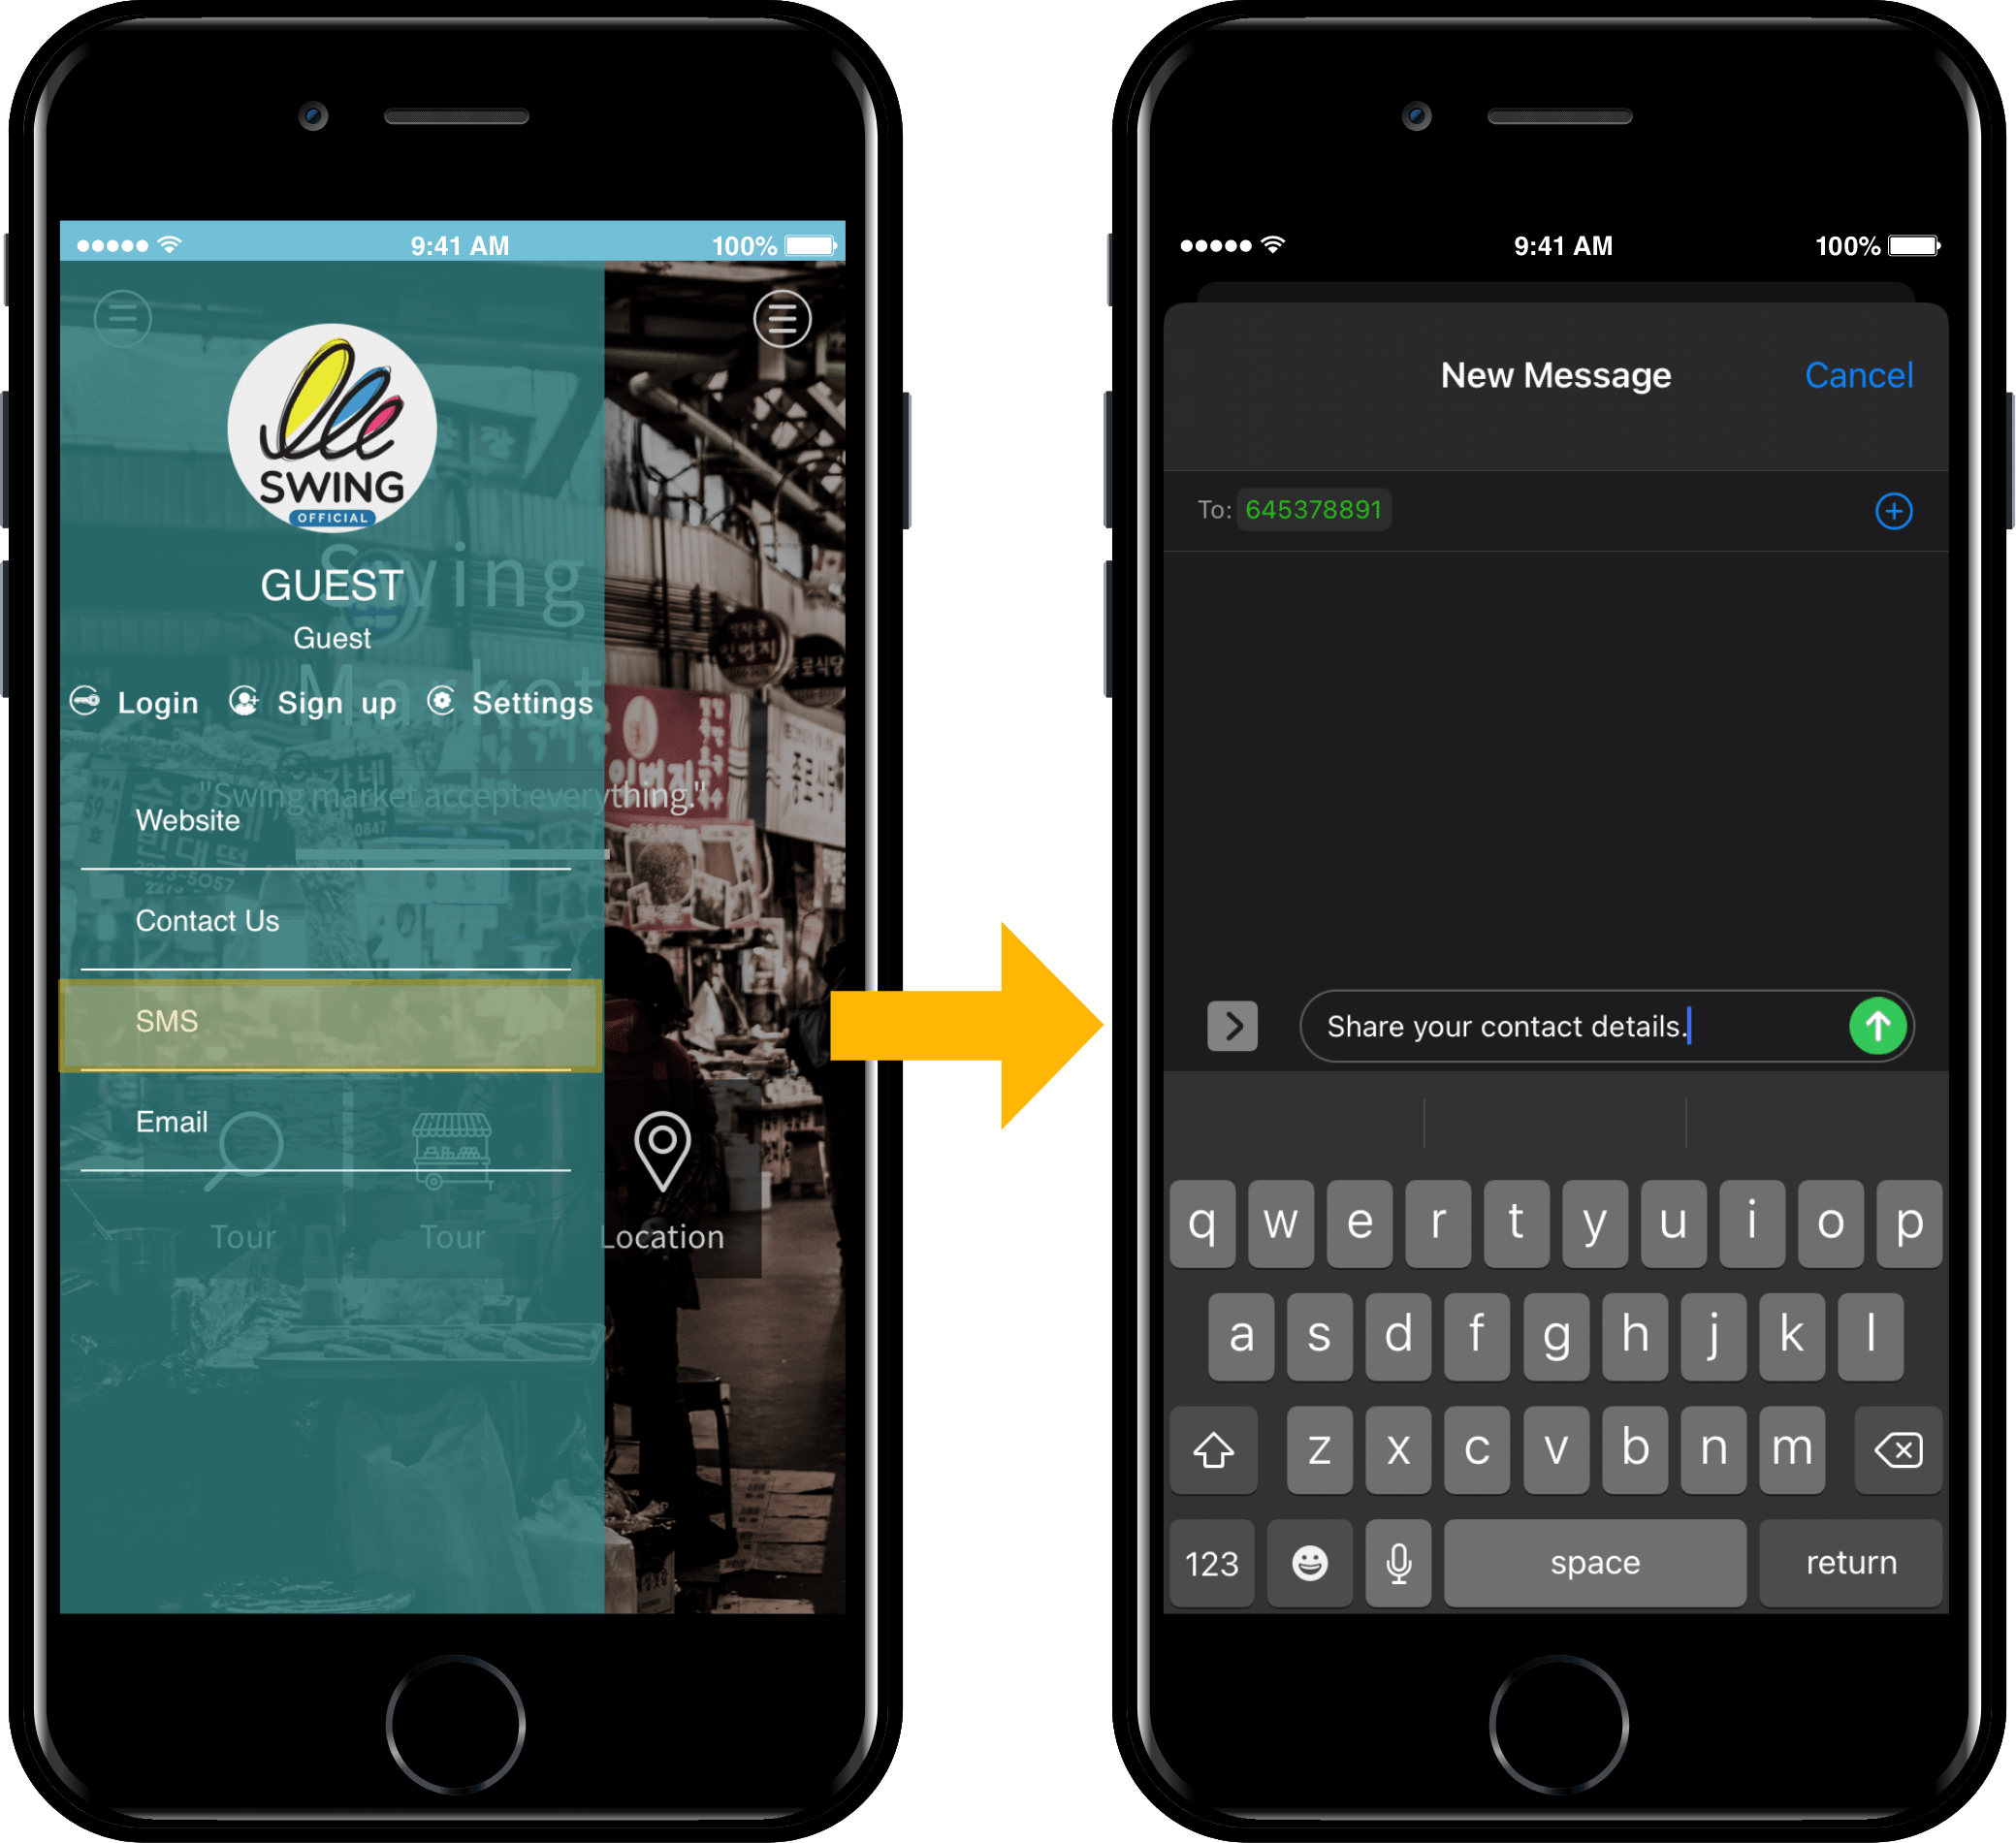
we ran the app after connecting the ‘text message number’ in the link wizard.
When you select the Send Text menu, you can send a text message to the number applied.
Please enter your mobile phone number where you can receive text messages! Screenshots are for testing purposes only.
### **4. Apply email address**
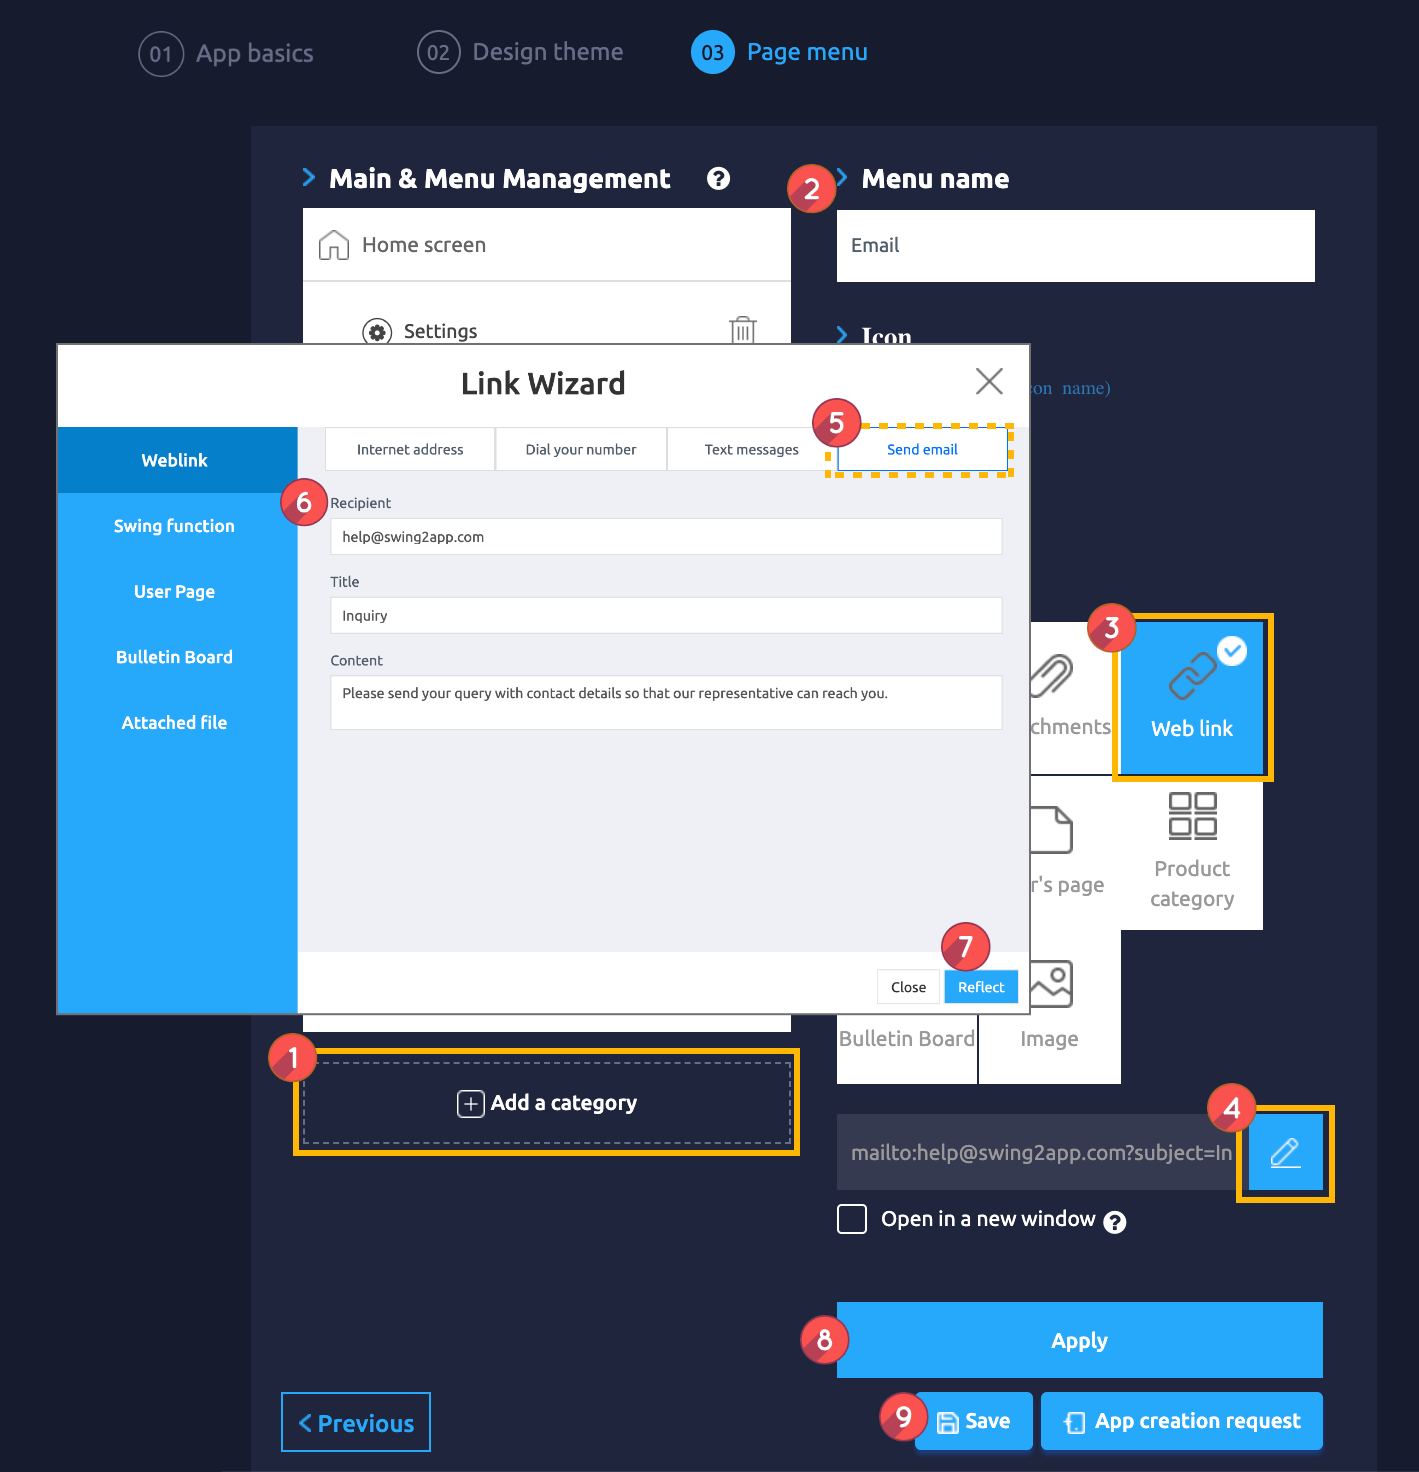
1. From the menu set by default, click the **Add a category** to add a new menu.
2. Edit the name of the added item in **Menu Name.**
3. Select **Weblink** in the **Menu Type.**
4. Click on **Link Wizard**(pencil icon).
5. Select the **Send Email** tab in the Link Wizard window.
6. Enter SMS outgoing phone number.
7. Click on **Reflect.**
8. Click on **Apply**
9. Click **Save.**

**App launch screen – Email address application screen**
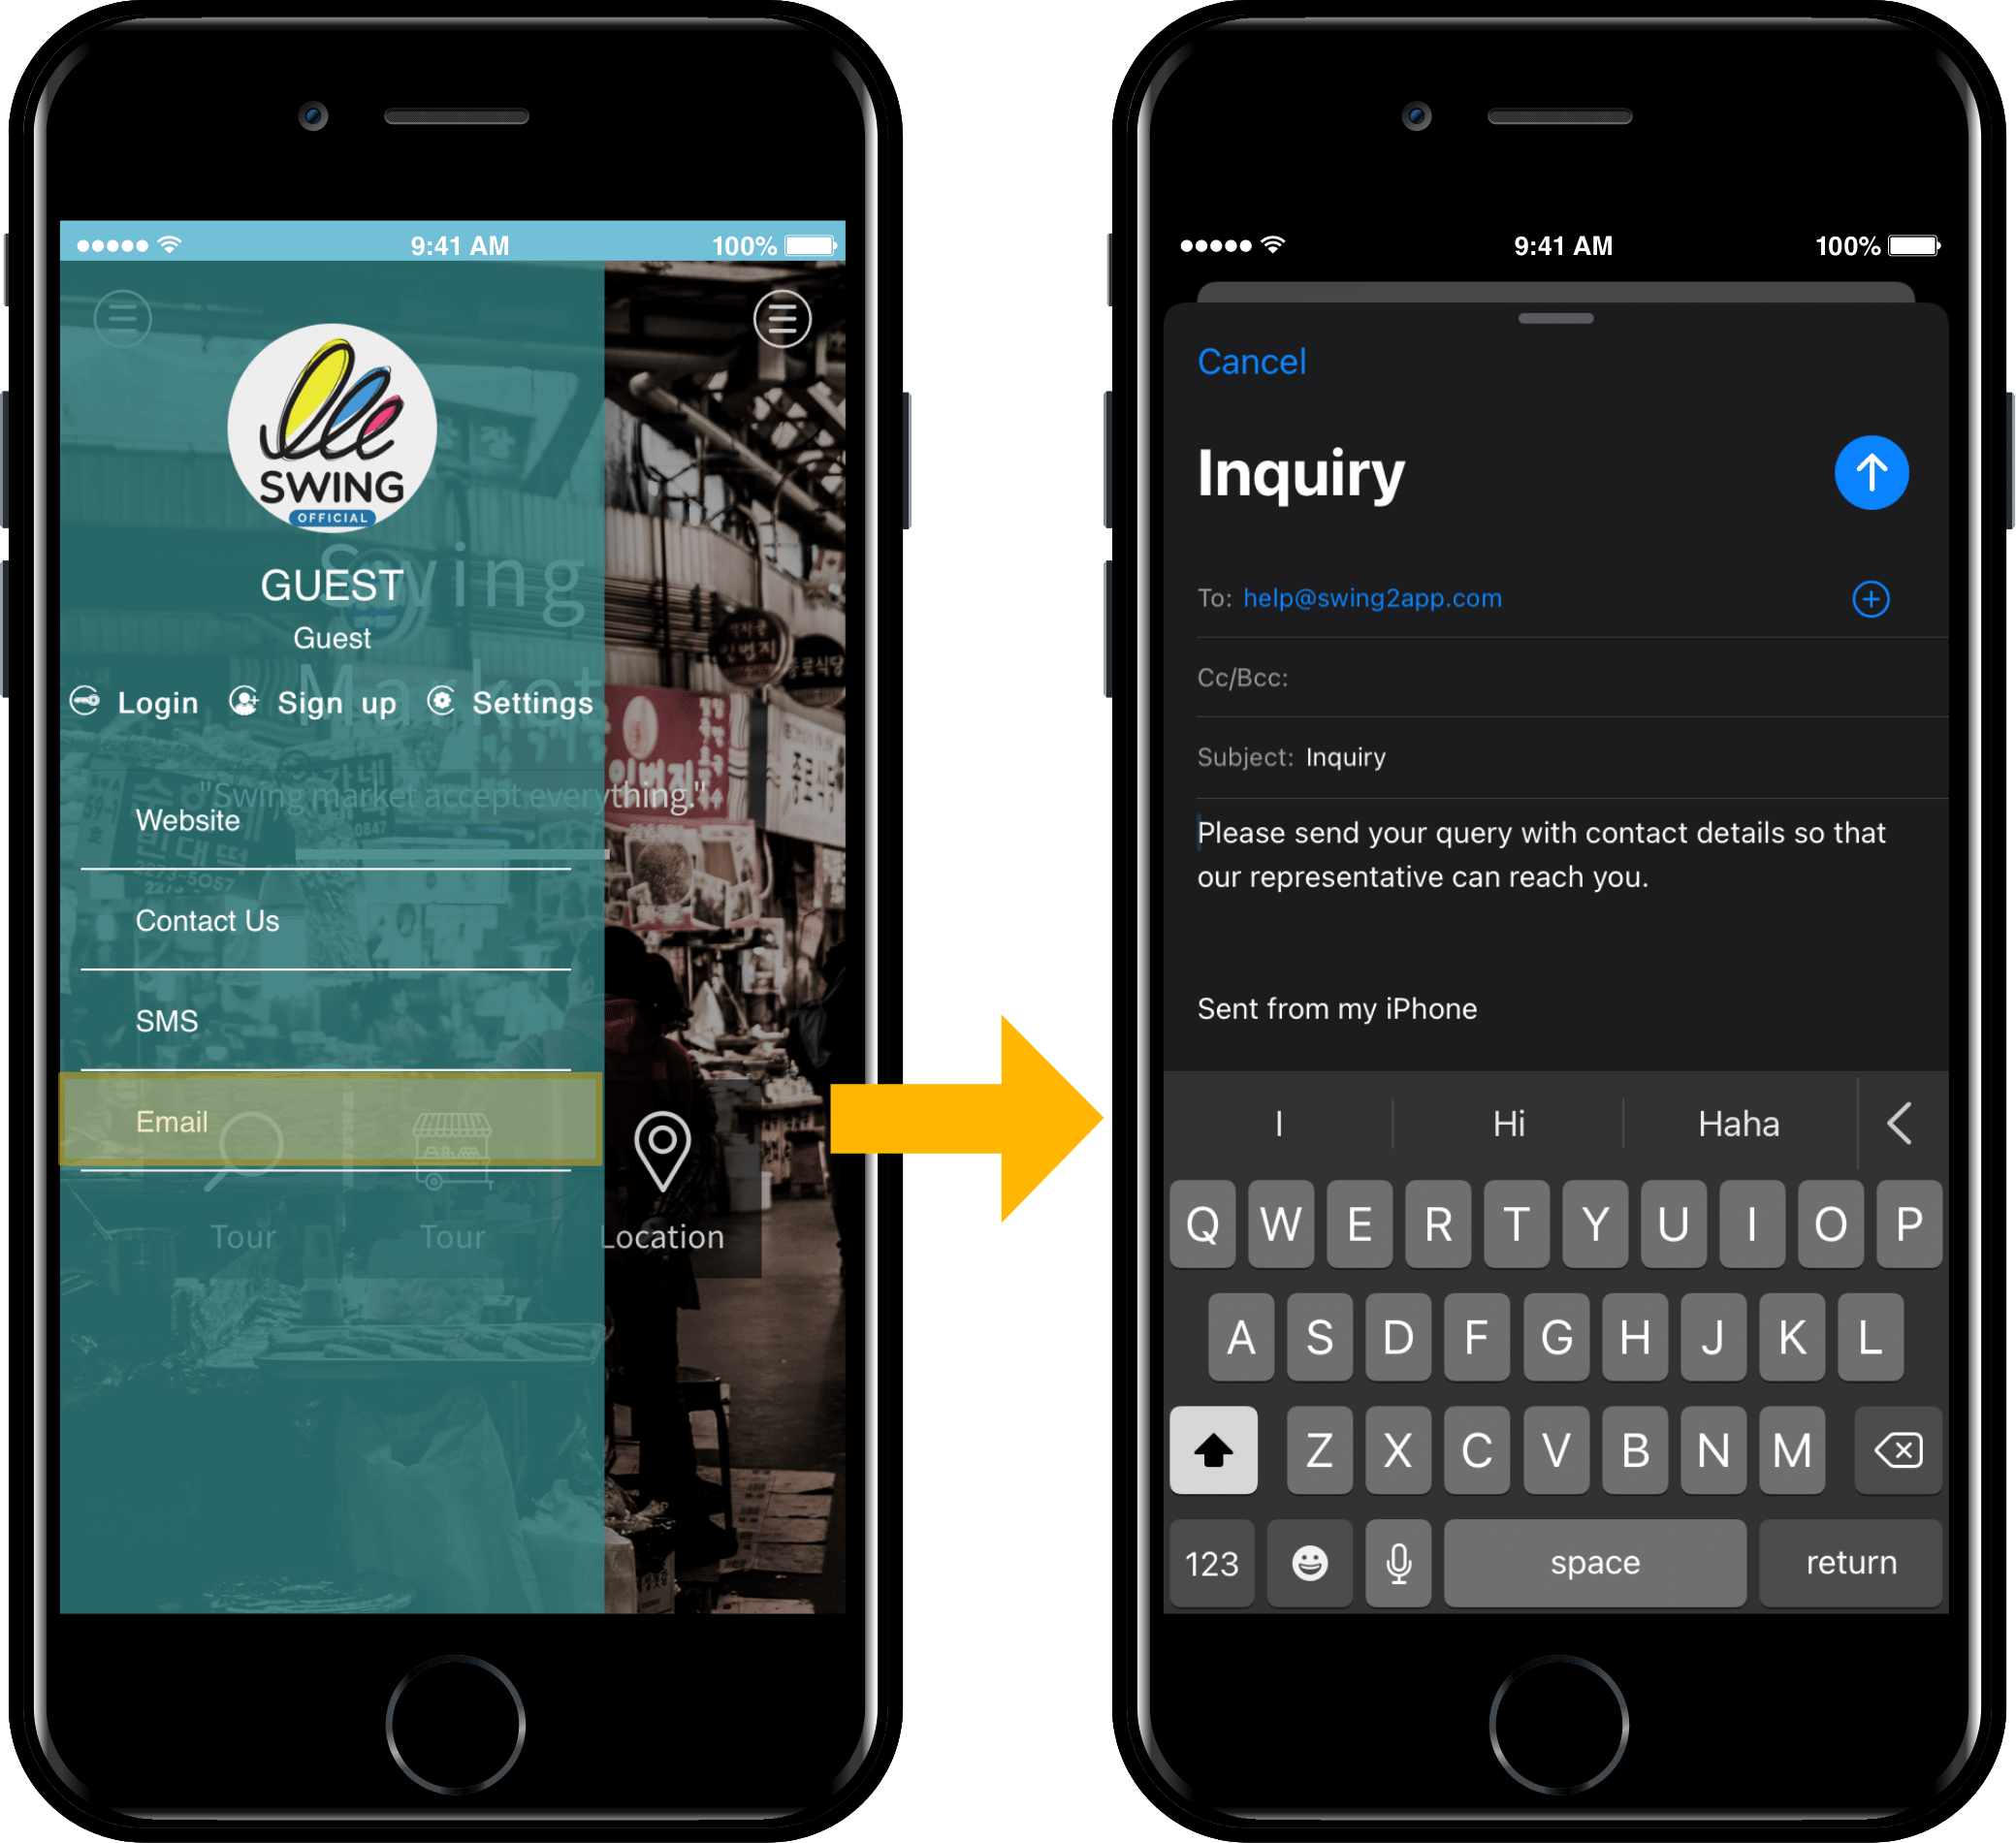
We ran the app after connecting ‘email address’ in the link wizard.
When you select the Send Email menu, you can send the email to the applied email.
**\*On your phone, you can send mail by running the mail application connected to the phone.**
Example) When Google mail is linked, send after running gmail application / Send after running outlook mail when linked to Outlook
It is sent from an email set for each user’s phone.
**\*Important information**
Please note that the web link link wizard cannot be applied to the app home screen and can only be applied to the menu.
**App execution screen – Internet address application screen**

We ran the app after connecting ‘Internet address’ in the link wizard.
When selecting the web link menu, it moves to the applied website page.
### **2. Apply phone number**

1. From the menu set by default, click the **Add a category** to add a new menu.
2. Edit the name of the added item in **Menu Name.**
3. Select **Weblink** in the **Menu Type.**
4. Click on **Link Wizard**(pencil icon).
5. Select the **Dial Your Number** tab in the Link Wizard window.
6. Enter the recipient’s phone number.\
\*Enter the number to be connected to the actual phone.\
\*Please enter only the number ‘–‘ Please do not enter special order characters!!
7. Click on **Reflect.**
8. Click on **Apply**
9. Click **Save.**

**App execution screen – Phone number application screen**

We ran the app after connecting the ‘phone number’ in the link wizard.
When you select the dialling menu, the call is connected to the number you applied.
### **3.Apply text message number**

1. From the menu set by default, click the **Add a category** to add a new menu.
2. Edit the name of the added item in **Menu Name.**
3. Select **Weblink** in the **Menu Type.**
4. Click on **Link Wizard**(pencil icon).
5. Select the **Text Messages** tab in the Link Wizard window.
6. Enter SMS outgoing phone number.\
\*Enter the number where you can send the actual text message.\
\*Please enter only the number ‘–‘ Please do not enter special order characters!!
7. Click on **Reflect.**
8. Click on **Apply**
9. Click **Save.**

**App execution screen – Text message number applied**

we ran the app after connecting the ‘text message number’ in the link wizard.
When you select the Send Text menu, you can send a text message to the number applied.
Please enter your mobile phone number where you can receive text messages! Screenshots are for testing purposes only.
### **4. Apply email address**

1. From the menu set by default, click the **Add a category** to add a new menu.
2. Edit the name of the added item in **Menu Name.**
3. Select **Weblink** in the **Menu Type.**
4. Click on **Link Wizard**(pencil icon).
5. Select the **Send Email** tab in the Link Wizard window.
6. Enter SMS outgoing phone number.
7. Click on **Reflect.**
8. Click on **Apply**
9. Click **Save.**

**App launch screen – Email address application screen**

We ran the app after connecting ‘email address’ in the link wizard.
When you select the Send Email menu, you can send the email to the applied email.
**\*On your phone, you can send mail by running the mail application connected to the phone.**
Example) When Google mail is linked, send after running gmail application / Send after running outlook mail when linked to Outlook
It is sent from an email set for each user’s phone.
**\*Important information**
Please note that the web link link wizard cannot be applied to the app home screen and can only be applied to the menu.