> For the complete documentation index, see [llms.txt](https://documentation.swing2app.com/llms.txt). Markdown versions of documentation pages are available by appending `.md` to page URLs; this page is available as [Markdown](https://documentation.swing2app.com/manual/appmanage/pay/admob-powerpackage.md).
# AdMob Power Package
**How to use AdMob Power Package product**
### **01. What is AdMob Power Package? Offer service?**
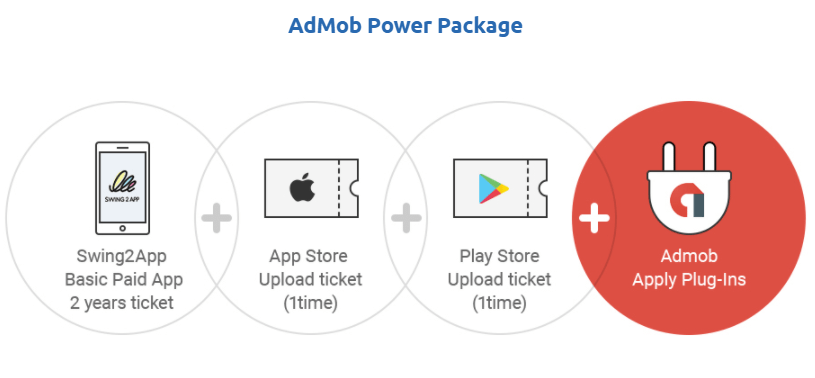
The AdMob Power Package is a product that consists of a **Swing2App long-term license + AdMob ad plug-in setting products as a package!**
**It is a product that can be used as a package at a lower price than purchasing individually.**
It is recommended if you use the app for a long time and operate it by applying AdMob ads.
It is offered at a discount of $275 compared to purchasing as an individual product. $~~825~~ → $580
**▶Service provided**
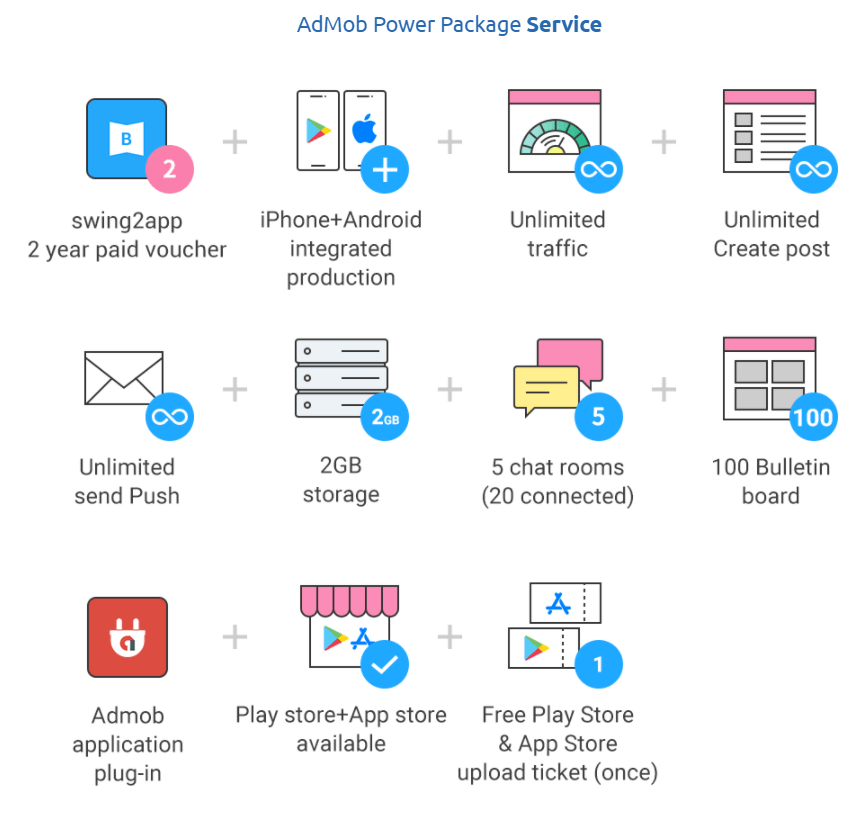
**1) A Basic paid app subscription, which is a swing to app subscription, is provided for a period of 2 years (720 days).**
\*Functions provided in the Basic Paid App pass are the same. (Capacity: 2GB, open 100 bulletin boards, 5 group chat rooms, etc.)
**2) App Store upload ticket + Play Store upload ticket are provided once each.**
\*You do not need to purchase a separate upload ticket.
**3) Provide AdMob application plug-in (app advertisement setting)**
\*The AdMob application method is the same.
\*AdMop plug-in single product $220 for purchase
### **02. How to use AdMob Power Package**
**1) Please complete the test after final production of the app.**
When purchasing a pass, the date of use is counted from the date of purchase, so you must make the app and finally purchase the pass.
\*Purchase package products can only be applied for apps made with general prototypes – Push-only and Web-view version apps cannot be purchased.
2\) [Manager → Online Stores → Swing2App Packages](https://www.swing2app.com/view/shop_list_by_package) please choose to purchase **‘AdMob Power Package’ ($580).**
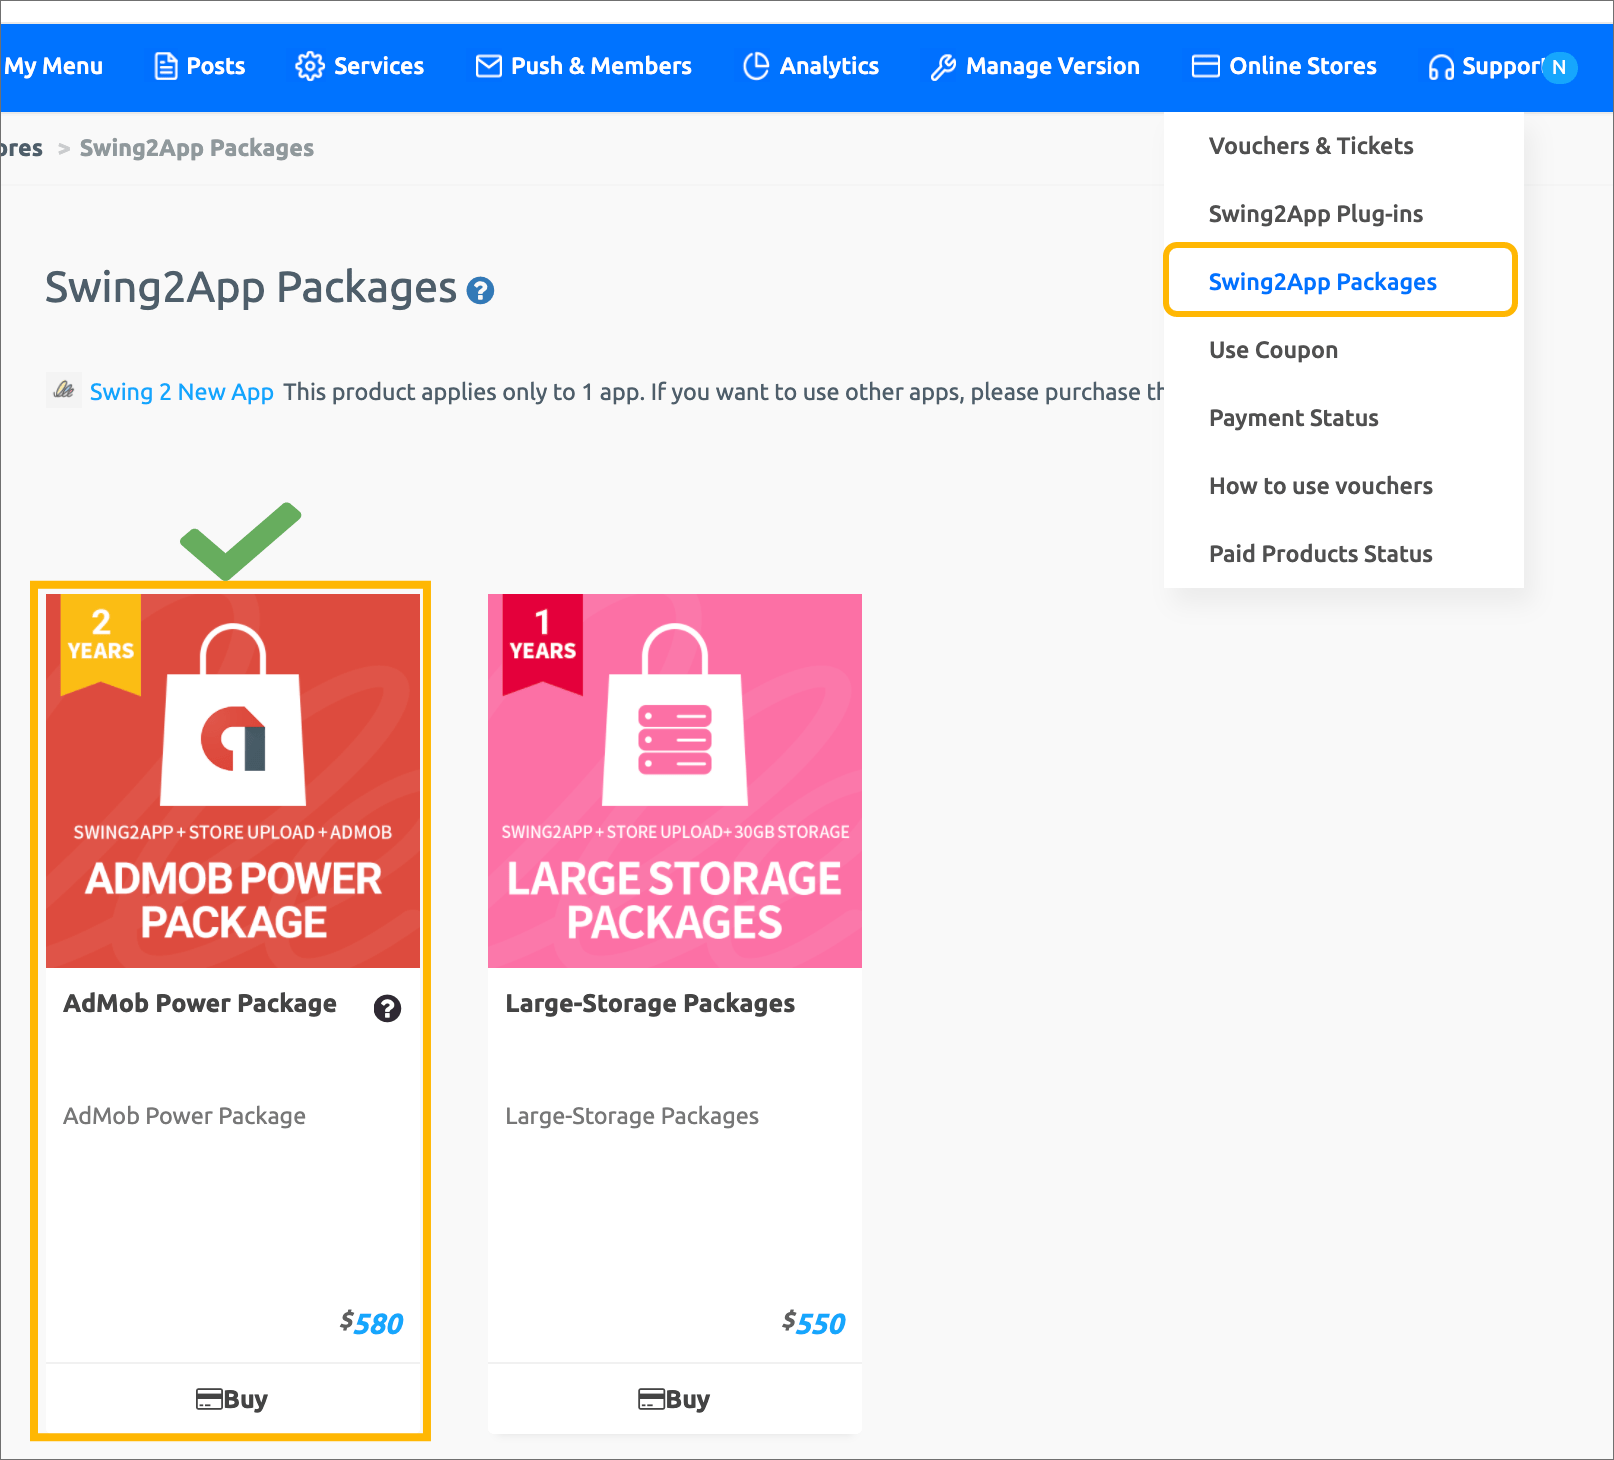
\*If you choose to purchase a product, you can check details related to use.
Please check the contents before making a purchase before proceeding with the purchase.
**3) Sign up for AdMob official site → Create ad unit ID, copy app ID for each platform**
To set up AdMob ads in your app, you need the following information:
(1) Interstitial ad unit ID (Android, iPhone)
(2) ID of banner ad ad unit (Android, iPhone)
(3) Android App ID , IOS App ID
\*Please refer to the manual below for how to sign up for AdMob and create an ad unit ID.
**☞** [**Go to how to sign up for Google AdMob and how to create an ad unit ID**](https://support.swing2app.com/knowledgebase/admob-register/)
**4) If you have created all ad unit IDs in AdMob, complete the AdMob plugin settings.**
Go to Manager → Services → AdMob plugin settings, enter \[ad unit ID settings] and \[ad exposure pattern settings] and save.
\*AdMob plug-in settings You can check the details of how to set up ads in the post below.
**☞** [**See how to set up AdMob plugin ads**](https://support.swing2app.com/knowledgebase/admob-plugin-apply/)
**5) Install the newly created version of the app on your Android phone and check if the ads are displayed properly.** (Only available for testing with Android phone)
**6) If there is no problem after testing, please apply for store upload.**
If you apply for store upload with the ticket (Play Store, App Store) you received when purchasing the AdMob Power Package product, we will release the app to the store on your behalf.
\*Upload tickets are provided only one-time.
**\[How to apply for store upload]**
[Manager → Manage Version → Production History → Select \[Play Store upload\], \[App Store upload\] button.](https://www.swing2app.com/view/app_work_history)
After filling out the contents according to the application form, you must apply for upload to be delivered to Swing2App.
When you complete the store upload application, all you need to do is complete it!
Please check as the person in charge will send you a separate e-mail for the subsequent process such as the store process.
Please check the store registration policy and usage policy in advance.
### **03. AdMob Power Package Usage Guide and Precautions**
\* AdMob package products are recommended if you operate an app for monetization by applying AdMob ads to the app.
\* AdMob setting cost only $220. However, if you purchase a package product, AdMob setting + 2 year subscription ($580) is additionally reflected, so it is much cheaper\~!
1\) A voucher that converts a free app to a paid version and is a package product. Purchase when commercialized in markets such as Play Store and App Store.
2\) AdMob Power Package includes \[Swing Basic Paid App 2 Years Pass + App Store Upload Ticket + Play Store Upload Ticket + AdMob Application Plug-in]
It is offered at a discount of $245 compared to purchasing individual products. $~~825~~ → $580
3\) When purchasing a paid app, the number of days of use is counted immediately upon purchase, so please pay after making the final app.
4\) You can use the app as a paid version for 24 months (720 days) with a 2-year subscription.
If you continue to operate the app after the two-year (720 days) period of use is over, you do not need to purchase the package product again. (because AdMob is already set up)
**Please purchase with Swing2App general use tickets (Basic, Expandable, Premium).**
General tickets can also be paid for by selecting a period. (you can buy it every 1 month or for a long time, such as 6 months, 12 months, etc.)
5\) When purchasing a ticket, the app is converted to the paid version, and the paid version of the app (APK file) can be registered and released in the Play Store/App Store.
6\) If you apply for store upload with the ticket (Play Store, App Store) received with the purchase of the AdMob package product, we will act on your behalf
We release the app.
\*Play Store can be directly released by users, and App Store can only be uploaded by proxy.
7\) You must create your Google developer account (registration fee of $25) in advance to upload to Play Store. [\[View Product Details\]](https://www.swing2app.com/view/swing_notice_detail?notice_id=380\¬ice_type=paymentNotice)
In the App Store, you can register with your developer account or register with our Swing2App company account by choosing to register. [\[View Product Details\]](https://www.swing2app.com/view/swing_notice_detail?notice_id=381\¬ice_type=paymentNotice)
\*Please check the purchase page for details of each uploaded ticket.
8\) For AdMob Power Package products, the app storage capacity provided by the basic subscription is applied. → **2GB capacity provided**
If the capacity is exceeded, the use of the app will be suspended regardless of the number of days remaining in the app, so please always check the usage capacity. \*Check the capacity in [Manager → Services → Manage Storage](https://www.swing2app.com/view/storage_manager)
If the capacity provided for the app is exceeded, the use of the app will be suspended regardless of the number of days remaining, so please always check the app capacity.
9\) The voucher is non-refundable if the number of days of use has passed, and the remaining number of days will not be refunded or withheld.
Therefore, please consider carefully before purchasing.
10\) You can check the purchase history and period of use of the purchased ticket on the [Manager → Online Stores → Payment Status.](https://swing2app.com/view/payment_list)
The period of use will be extended only if you purchase the pass again before the period of use expires.
(It is not an automatic payment, so please check the date of the period of use accurately before payment.)
11\) If you do not repurchase the ticket again before the end of the paid use, the paid version will be terminated and the use of the app will be suspended.
We will notify you of the expiration date by email and text message from the user 7 days before the expiration date of the paid app usage period.
Emails are sent to the email registered with Swing2App, and since phone numbers are not collected separately, text messages cannot be sent to users without contact information.
12\) AdMob package products can be purchased only in apps made with general prototypes – top, footer, slide, drop-down list & box.
\*You cannot purchase apps made in the push version or web-view version.
13\) All paid products including AdMob package products are applied per app.
If you want to apply a package product to three apps, you must purchase the package product separately for each app.
14\) AdMob Power Package products are non-refundable if the period of use is deducted even for one day after completing AdMob setting.
Therefore, a refund is only possible before the AdMob setting work.
### **04. Notes on AdMob Ad Settings**
1\) Swing2App does not provide information related to AdMob operation, such as advertising revenue costs, operating methods, and policies related to AdMob.
Please apply after thoroughly checking the contents and precautions on the Google AdMob official site.
\*Since Swing2App only sets up AdMob advertisements in the app, we do not provide consultations related to AdMob operation.
2\) If you have any questions about the application of AdMob to the app, please contact the customer center before proceeding.
3\) After payment, once the setting of the AdMob plugin is completed, AdMob suspension or payment cannot be refunded, so please consider it thoroughly before proceeding.
4\) Ads cannot be selected by users and are randomly displayed on Google.
5\) Advertisement setting- It proceeds with interstitial advertisement and banner advertisement, and the user can directly set the exposure pattern for interstitial advertisement.
6\) Advertisement setting is applied by integrating Android + iPhone, and it can also be applied to one platform of Android or iPhone.
(Even if it is applied to only one platform, the price applied to AdMob is the same.)
7\) Do not artificially click advertisements in apps with AdMob applied. If the artificial number increases, Google will drop the ad.
8\) Apps to which AdMob is applied must be released on the Play Store or App Store to generate app advertising revenue.
After applying AdMob, be sure to release the app to the store and use it.
9\) Swing2App does not handle AdMob registration and ad unit ID creation.
Users are requested to check the manual and register directly.
10\) AdMob does not immediately make ad revenue just by installing it in the app.
There are a number of conditions, and you need to promote the app and get users to use it to get a lot of installs.
-You must have a certain app installation rate, and you must earn a certain amount of money to receive payment.
-If the installation and use of the app is poor, the app advertisement may go down, and Google may sanction the sending of the advertisement. (low traffic, etc.)
-Therefore, you must fully understand the contents of the AdMob official site.\\