Swing2App Manual
Help CenterFAQContact UsBuild an app
  • Swing2App
  • Swing2App Update
  • FAQ
    • FAQ(Frequently Asked Questions)
      • Frequently Asked Questions (FAQ)
      • App Creation FAQ
      • App Operations & Features FAQ
      • App installation and download FAQ
      • Registration and Login FAQ
      • App Preview FAQ
      • Swing Shop FAQ
      • Billing FAQs
      • Paid App Passes & Tickets FAQ
      • Paid usage and uploading FAQ
      • Unlimited Usage and Package FAQ
      • Push sending FAQs
      • PlayStore FAQ
      • App Store FAQ
      • AdMob FAQ
      • Affiliate Program FAQ
      • Customization FAQ
  • Manual
    • App production manual (V3)
      • Start App Creation With MakerV3 Screen
      • Manual on How to Create an App In MakerV3 Screen
      • STEP1 Basic Information
      • STEP2 Prototype
      • STEP3 Page
        • How to Create a Home Screen For an App
        • Registering a menu icon image
        • How to use: Menu Exposure Settings
        • Set menu settings: Access permissions
        • Page Design - UI KIT
        • Page Design - eStore Page
        • Page Design - eStore Deals
        • Page Design - Product Category
        • Page Design- Page Templates
        • Page Design - Image Page
        • Page Design - HTML Editor
        • Page Design - Sign Up, login & Settings Page.
        • Page Design - Search Posts Page
        • Page Design - View Favorite Page
        • Page Design - View Coupons Page
        • Page Design - Share Your App Function
        • Page Design - App Introduction Page
        • Page Design - Admin Chat Page
        • Page Design - Chat List Page
        • Page Design - Surveys Page
        • Page Design - View My Posts Page
        • Page Design - Attendance Check Page
        • Page Design- Web Link
      • STEP4 Complete App Creation
        • How to create an additional app
        • How to update an app
        • App launch screen by update type
    • App production manual(V2)
      • App basics
        • Guide to create an app
        • App Update Type And Method
        • App Launch Screen Update Type
        • Push or WebView version creation method (super simple app creation)
        • WebView App Manual(production and operation)
        • Push App Manual(production and operation)
        • Remove Push App Toolbar
        • App Production
        • Guide to create App Icon Image
        • Guide to Create an Idle Screen Image
        • Image Editing Tool
      • Design Theme
        • Prototype UI Design
        • App Main Design Style
        • App Navigation Styles
        • Applying Slide Prototype
      • Page Menu
        • Page Menu – Main Menu Management
        • Creating an App Home Screen
        • How to use Web Link
        • Home screen: Applying App Introduction Page
        • How to use file attachment
        • How to use the image attachment
        • How to use Product category
        • How to use Weblink-linkeditor
        • How to use User Page
        • How to create an Image Page
        • How to create a web template page
        • How to create HTML editor page
        • Swing2App Page – Signup, Login, Settings
        • Swing2App Page – Search Post
        • Swing2App Page – View Favorites
        • Swing2App Page – View Coupon
        • Swing2App Page – Share App
        • Swing2App Page – App Introduction
        • Swing2App Page – Admin Chat
        • Swing2App Page – How to read my article
        • Swing2App Page - Survey
    • App Production Application TIP
      • Sending a push using the push API
      • Insert GIF image
      • Create a Flash style home screen
      • Change App Loading Icon
      • Set device mode (switch app screens)
      • How to use the app review button
    • App operation manual
      • Bulletin board management
        • Create a bulletin board
        • Bulletin board type, design style
        • Bulletin Board – How to Enter Posts
        • Bulletin Board – Post Schedule Settings
        • Set post detail options
        • Bulletin Board – How to Attach Files
        • Register video post(how to register a video)
        • Bulletin Board – How to Attach Music Files
        • How to enter post comments and comments
        • How to set up Bulletin Board Permission
        • Bulletin board authority setting
        • How to create a Form in Bulletin Board
        • How to write a bulletin board
        • How to use the list screen and creation screen
        • How to set up a bulletin board post alarm
        • Set Up a Board Administrator
        • Google Map Bulletin Board
        • Google Map Bulletin Board Advanced setting
        • HTML Editor Writing
        • Report and manage posts
        • Block posts
        • Create bulletin board by membership level
        • Bulletin board thumbnail image registration
        • Search Post Functions
        • Post Management Options
        • How to use the bulk registration bulletin board
        • Copy Bulletin Board
        • Copy Post
        • Move a post
        • How to delete bulk posts
        • Group Chat
        • Create a Secret Bulletin Board (1:1 Customer Service)
        • Create a link for a post
        • How to Use Calendar
        • Calendar Application - How To Use
        • How to create and register a stamp
        • Stamp application: Issue coupons upon completion of stamps
        • How to use the bulletin board header
        • Using 2 hash-tags Options
        • How to use hashtag search option
        • Download Posts
      • Service management
        • How to use Pop-up
        • Check-ins
        • Surveys
        • Resource Management – Capacity Management
        • Coupon Management: Create and Issue Coupon
        • How to use Admin Chat [1:1 Chat]
        • Chat Administrator Page – Chat List
        • Chat Administrator page – Chat settings
        • How to use chat list
        • Unified Notification Settings
        • App Policy Management – App Subscription Policy
        • App Terms of Use And Privacy Policy
        • App Policy Management-Membership Form
        • App policy management – How to set up a membership completion message
        • Membership Form-ID Setting
        • App Terms and Conditions, Privacy Policy
        • Create a Private App
        • App string management
        • Link Wizard
      • Push & Member Menu
        • Send push
        • Send Push from Push Version App
        • Push Posts
        • Display messages after getting push notifications
        • Delete or Mark as Read Push Notifications
        • Push history
        • Member Inquiry - Check Member Information
        • Member Inquiry - Setting up an Associate Administrator
        • Member Inquiry - Create User Account
        • Setting up an App Administrator
        • Permission Group Settings-Membership Rating
        • Admin Screen: Change App member's name
        • How to use Push device management
      • Analytics
      • Version control
        • Version management-App production and market registration history
        • How to apply for App Store Upload
        • How to apply for Google Play Store Upload
        • How to apply for a mobile web upload
      • Payment
        • Introduction of paid products and payment methods
        • Payment-How to use my payment status
        • How to Use 1000 SMS Tickets
        • WebView Lifetime Paid App
        • PushOnly Lifetime Paid App
        • How to use mobile web registration
        • Budget package
        • AdMob Power Package
        • Large Storage Packages
        • Online Stores – Coupon
      • Full Search Function
    • SwingShop
      • Apply for Swing Store
      • Swing Store Product Type
      • Introduction of pages provided by Swing Shop
      • How to Apply a Swing Store Menu to your App
      • Swing Shop - Shopping Mall Main Page How to Use
      • Shopping Mall Main Page Slide Image
      • Store Management - Basic Information Settings
      • Store Management - Shipping Management
      • Product Management - Set how to receive goods
      • Product Management - Product Category Registration
      • Store Management-Policy Settings
      • Product Management - Physical Product Registration
      • Product Management - Digital Products: PDF File Registration
      • Product Management - Digital Products: Video Files Registration
      • Product Management-Digital Products: Authorized Sales
      • Product Management-Digital Products: Coupon Registration
      • Product Management-Reservation system product registration
      • Product management - Reservation system, Time reservation product registration
      • Product management-Reservation System Operation TIP
      • Product Management - Product Post Management
      • Product Management- Product Inquiry, Reservation Product Inquiry
      • Product Management - Product Exposure Management
      • Order Management
      • Reservation Order Management
      • Store Statistics
      • Swing2App Page-shopinfo
      • Swing2App Page-Search
      • Swing2App Page - Category List
      • Swing2App Page-mypage
      • Swing2App Page - Cart
      • Swing2App Page-digital products
      • Product Modification - Modify a registered product
    • Affiliate program
      • How to apply for affiliate program
  • Web App - Webview, Push
    • Web App - Webview, Push
      • Swing2App WebView App
      • Swing2App Push App
      • webview app manual
      • Pushapp manual
      • How to create a push app or webview app easily
      • Push-app toolbar
      • How to use the first run address in webview and push app
      • WebviewApp basic settings and advanced setting options
      • Push App Toolbar - Introduction: How to Use and Functions
      • Registering a Push Notification Icon Image
      • Progress Bar Color Settings
      • Remove progress bar (not in use)
  • App Guide
    • How to use Swing2App Preview
    • Application operation
      • How to convert and use paid apps.
      • How to install APK file on your phone
      • How to install apps by sharing
      • Free app conversion method after Paid period ends/expires
      • Download the app after accessing the mobile Swing2App site
      • Download the app using the app installation link address
      • If you can not install the free version of the app (APK file), please check!
      • If you can not install the paid version app (APK file), please check!
      • Find App Password
      • Registering and changing your app profile picture
      • How to re-register with the same ID after leaving the app
      • Share app
      • App – Share your Bulletin Board Posts
      • How to use the App Administrator menu
      • App Administrator menu: Chat
      • App Administrator Menu: Registering Stamp
      • App Administrator Menu: Use Coupon
  • STORE
    • Play Store
      • How to create a Google Developer Account
      • Create a Google Developer - Business Account
      • Google Developer Account Identity Verification
      • Launching Play Store App
      • Setting up Play Store app auto-updates
      • Transfer your app to another developer account on the Play Store
      • How to change the name of Play Store Developer
      • Delete Play Store app
      • How to use Google Help Center
      • Issuing Google Maps API Key
      • Invite a Play Store Developer Account
      • How to get app updates released on the Play Store
      • Launch the Play Store Private App (Alpha release)
      • Check Play Store App Installs
      • Reply to Play Store app reviews
      • Play Store Developer Page
      • Play Store prior notice
      • Linking Play Store Privacy Links
      • Play Store App Search TIP
      • How to restore Play Store app
      • Update the Play Store App
    • App Store
      • App Store Apple Developer Account Registration
      • Check app store app downloads
      • How to use the App Store Customer Center
      • Delete apps from the App Store
      • AppStore App Rejection Cases
      • App Store TestFlight
      • How to invite Swing2App account on App Store Connect and share information on App Store Upload form
    • AdMob (Google AdMob Ads)
      • Admob Banner Ad Frequency Settings
      • Admob Operation Precautions
      • How to apply AdMob plug-in
      • AdMob Plug-in check
      • What is AdMob plugin setting?
      • How to join AdMobs, create an Ad Unit ID
  • Developer Document
    • Server Side API Specifications
      • Sending a push notification By API
    • Webview (Webview, Push only) Development tool
      • Implementing Google and Facebook Login in WebView
      • Website Member Integration Guide
        • Wix Website User Integration Guide
        • WordPress Website Member Integration Guide
      • Javascript API Documentation
  • Policy
    • Store Policy
    • Limit on the Number of Devices for Free User
    • Swing Store Terms and Conditions
Powered by GitBook
On this page
Edit on GitHub
  1. Manual
  2. SwingShop

Introduction of pages provided by Swing Shop

Last updated 2 years ago

Introduction of pages provided by Swing Shop

Introducing the basic page required when creating a shopping mall app and telling you how to apply the app~!!

Since Swing2App can build a shopping mall app, many people apply for and use Swing Shop, a shopping mall function.

One of the most frequently asked questions while building a shopping mall app!

After applying for Swing Shop, I registered the product.

How can I apply the basic pages needed in the shopping mall, such as shopping cart and check my purchase history, to the app?

In this way, they give us a lot of inquiries to create the basic page needed in the shopping mall app.

If you apply for Swing Shop, all pages necessary for the shopping mall are provided by default, so users only need to add a menu and apply only the pages they want to the app. ^^

Please look at the manual and check what pages there are, and we will guide you with the application screen of the app.

Q. Where do I check the Swing Shop page and how do I apply it to the app?

When you apply for Swing Shop, basic pages that can be operated in the shopping mall are provided.

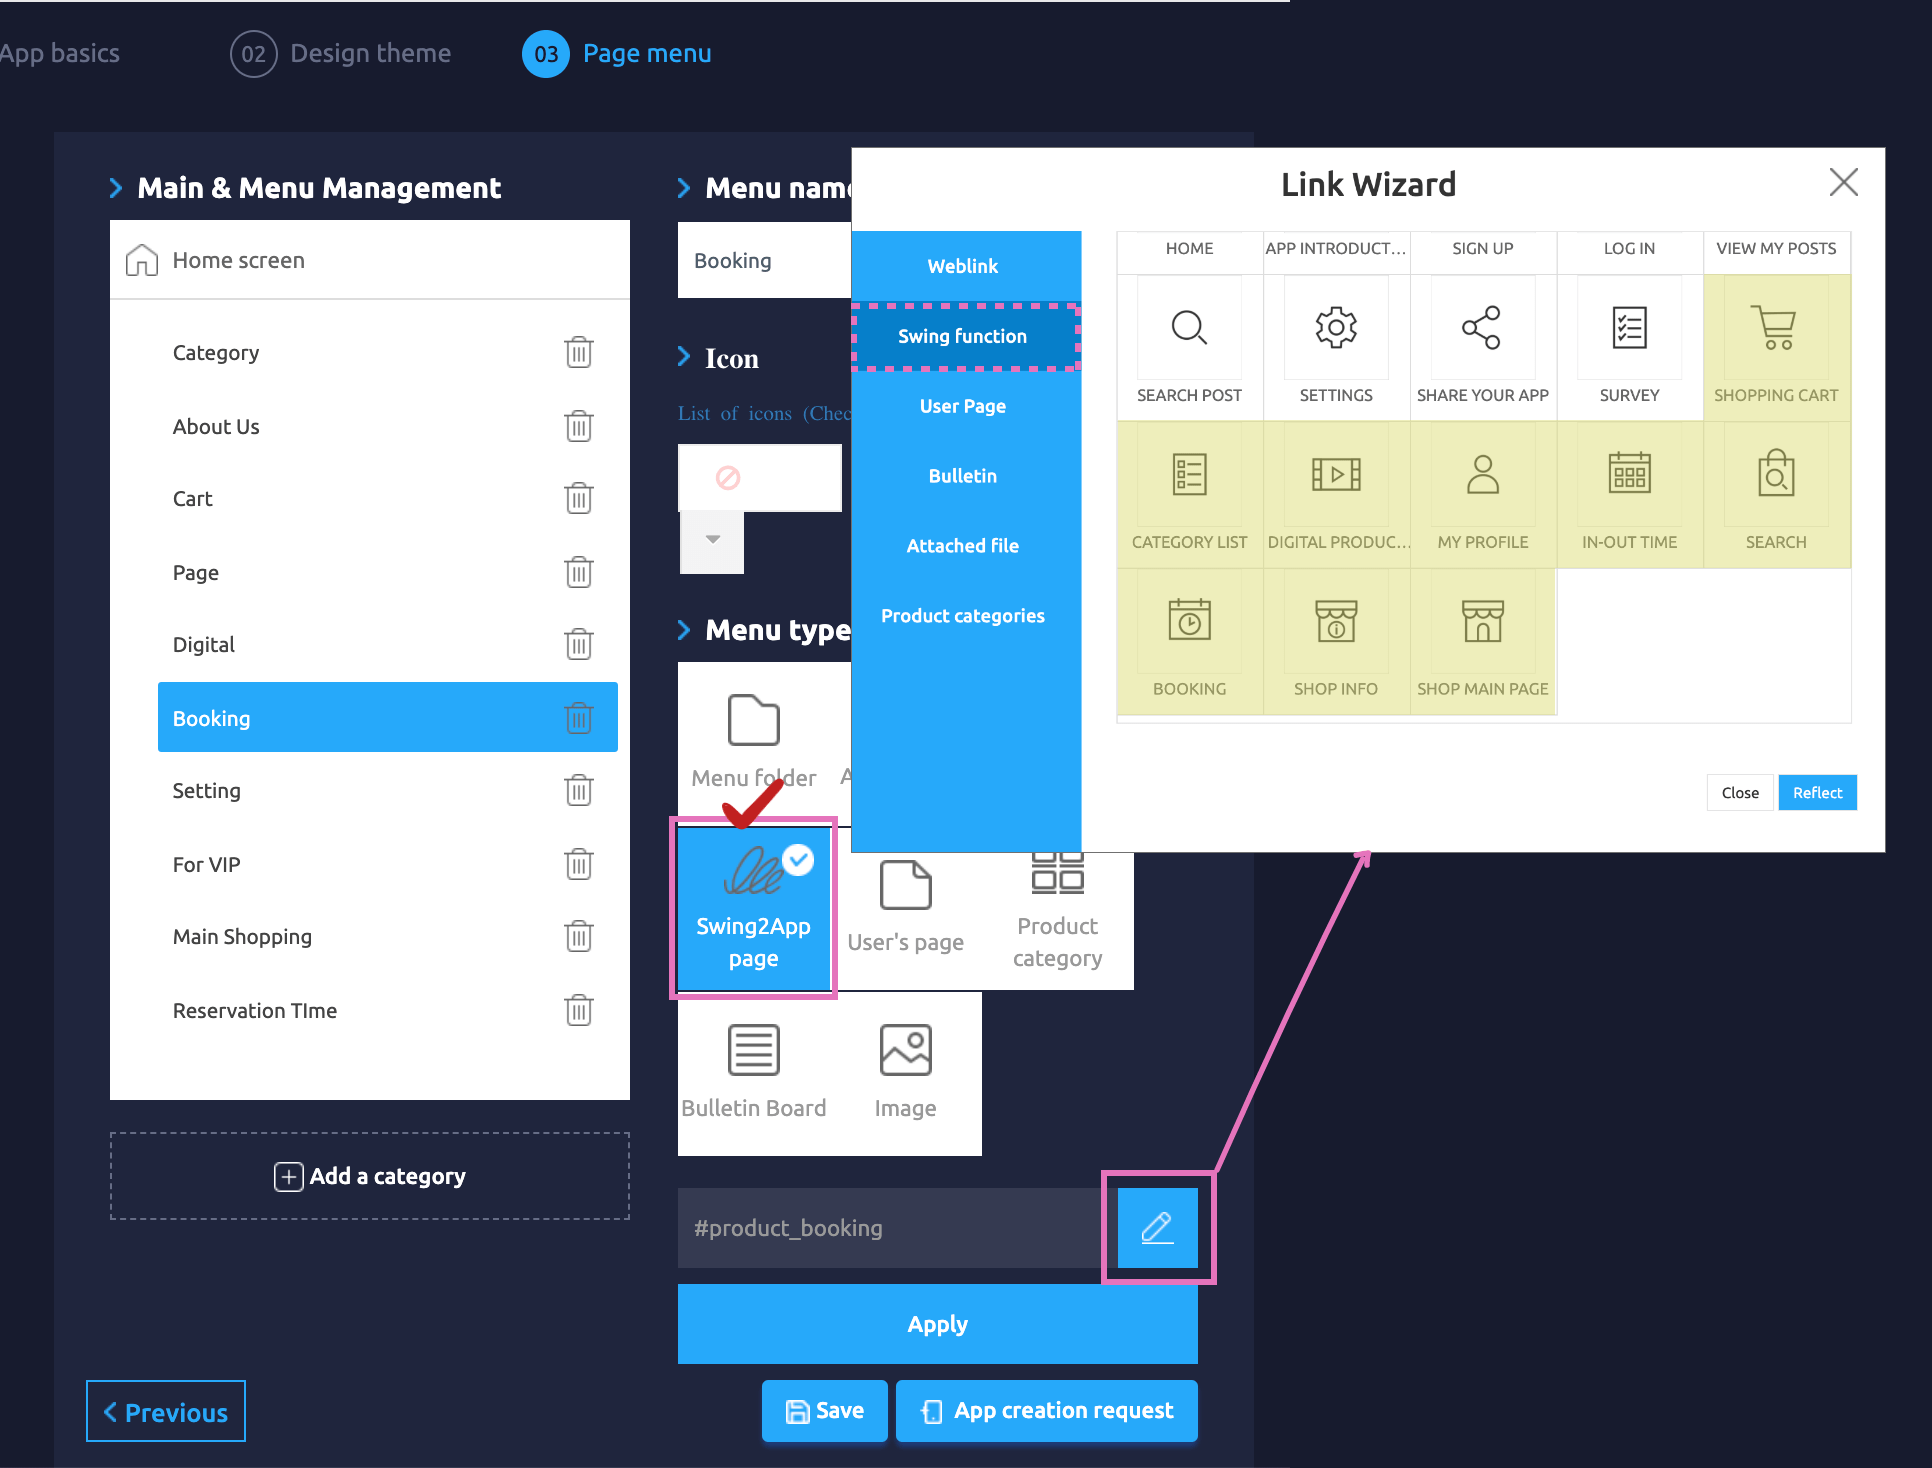
You can check the page by selecting the Swing2App Maker(V2) page-page menu level-Load Swing Page

↓

When you apply for Swing Shop, all shopping mall related pages are provided by default. !!

*Maker(V2) page – At the page menu level – Menu type: Select [Swing Page] and then select Import to automatically create pages related to Swing Shop (page required for shopping mall operation).

[Swing Shop Page Guide provided]

-Customer (user) page: shopping cart, my page(My Profile)

-Shopping mall main(Shop Main Page), shopping mall information(Shop Info)

-Category list

-Digital product purchase completion page

-Date reservation product reservation(Booking), Date+time reservation product reservation(In-out Time)

-Product search

Therefore, if you use Swing Shop, you can check all the menus related to Swing Shop by choosing Swing Page from the app production page.

You can apply the required menu to the app and use it.

Each page is applied to the menu, and if you look at the virtual machine on the right, you can see how the page looks on the app in real time.

So, as you build the app, you can apply several pages to the menu and see how it works through a virtual machine.

I’ll show you the app execution screen for each page through the manual below~!!

1. Shopping Cart

Everyone knows the shopping cart without explaining it? ^^

This is a page where you can check the items you have placed in your shopping cart or before purchasing a product.

2. Category list

Category list is a page that shows categories as a list, not individual products.

When you register a product, you create a category first and then register the product for each category.

Clothing shopping malls, for example.

-TOP: T-shirts, blouses, knitwear

-DRESS: One Piece

-BOTTOM: Pants, skirts, shorts, jeans

After organizing the categories like this, you will register the appropriate products for each category.

Therefore, even the categories that have been created like this can be configured as well.

3. Digital product purchase completion page

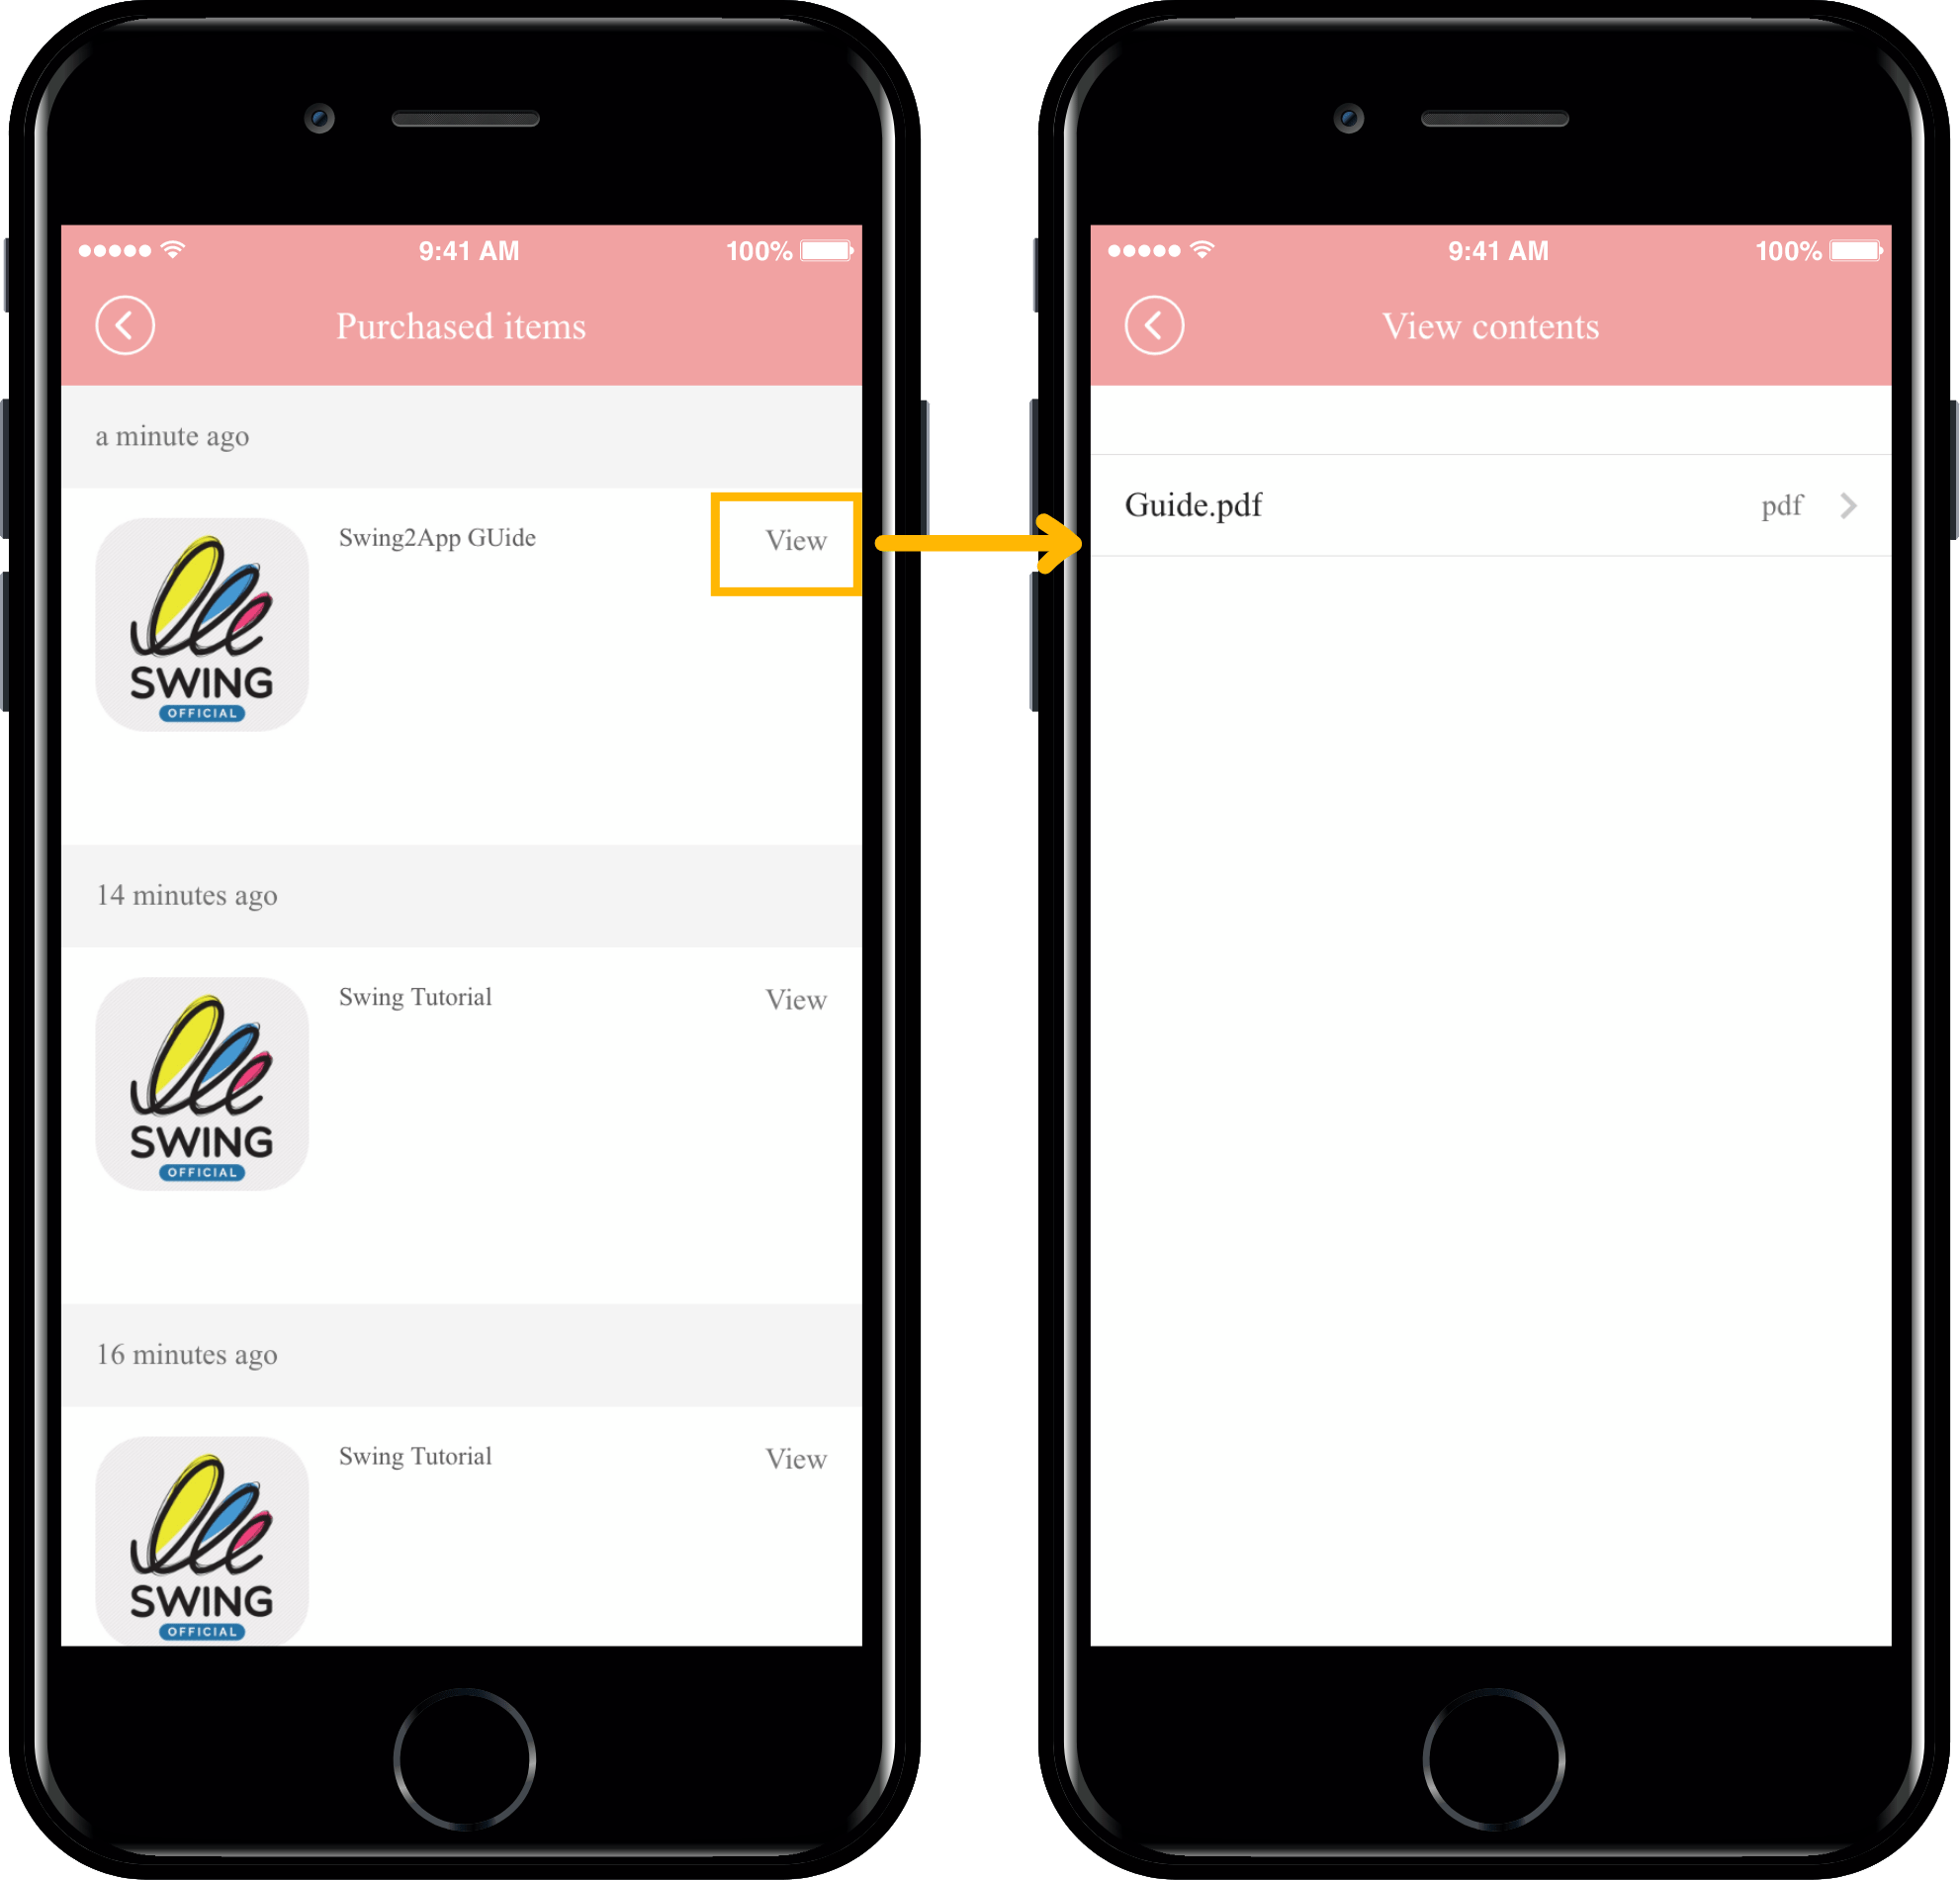
This page is available only if you have registered your digital product._Page dedicated to digital products

*Digital products: products such as pdf, video, files, coupons, etc.

You can’t use physical or pre-order products even if you apply the page.

This page is for checking and viewing the contents you purchased.

You need to apply the page to check the contents purchased by the users in the app.

4. My Profile

[My Page] is a page where you can check all the details of your purchase, payment, and delivery.

So on the shopping mall app, make sure!! It’s a function that you have to put in.

As you can see in the image, it provides functions such as order status, delivery inquiry, delivery completion, purchase completion, and exchange inquiry.

5. Shopping Mall Main

The shopping mall main page is a main home screen page suitable for applying to the home screen.

We offer it as a shopping mall gateway.

A menu of popular products, categories, and major products is provided.

Because it’s a fixed style, you can’t modify the design separately.

This page does not have to be applied as a home screen, so you can decorate it according to your app style. ^^

6. Shopping Mall Information

It’s the store information page.

The page consists of basic shopping mall information and provides customer center and operating hours.

7. Search for a product

This is a product search page where you can search for registered products in the app.

You can search for the product name by touching the magnifying glass icon button.

*Select the list from the top menu to view the screen in various styles.

*Select Filter – Filter by priority, latest, price, and popularity.

8. Period (Date) Reservation

The page is available only if you have registered the reservation system._Scheduled System Only page

The reservation system is provided with a date reservation, a date reservation product, and a date and time reservation + two kinds of date reservation products.

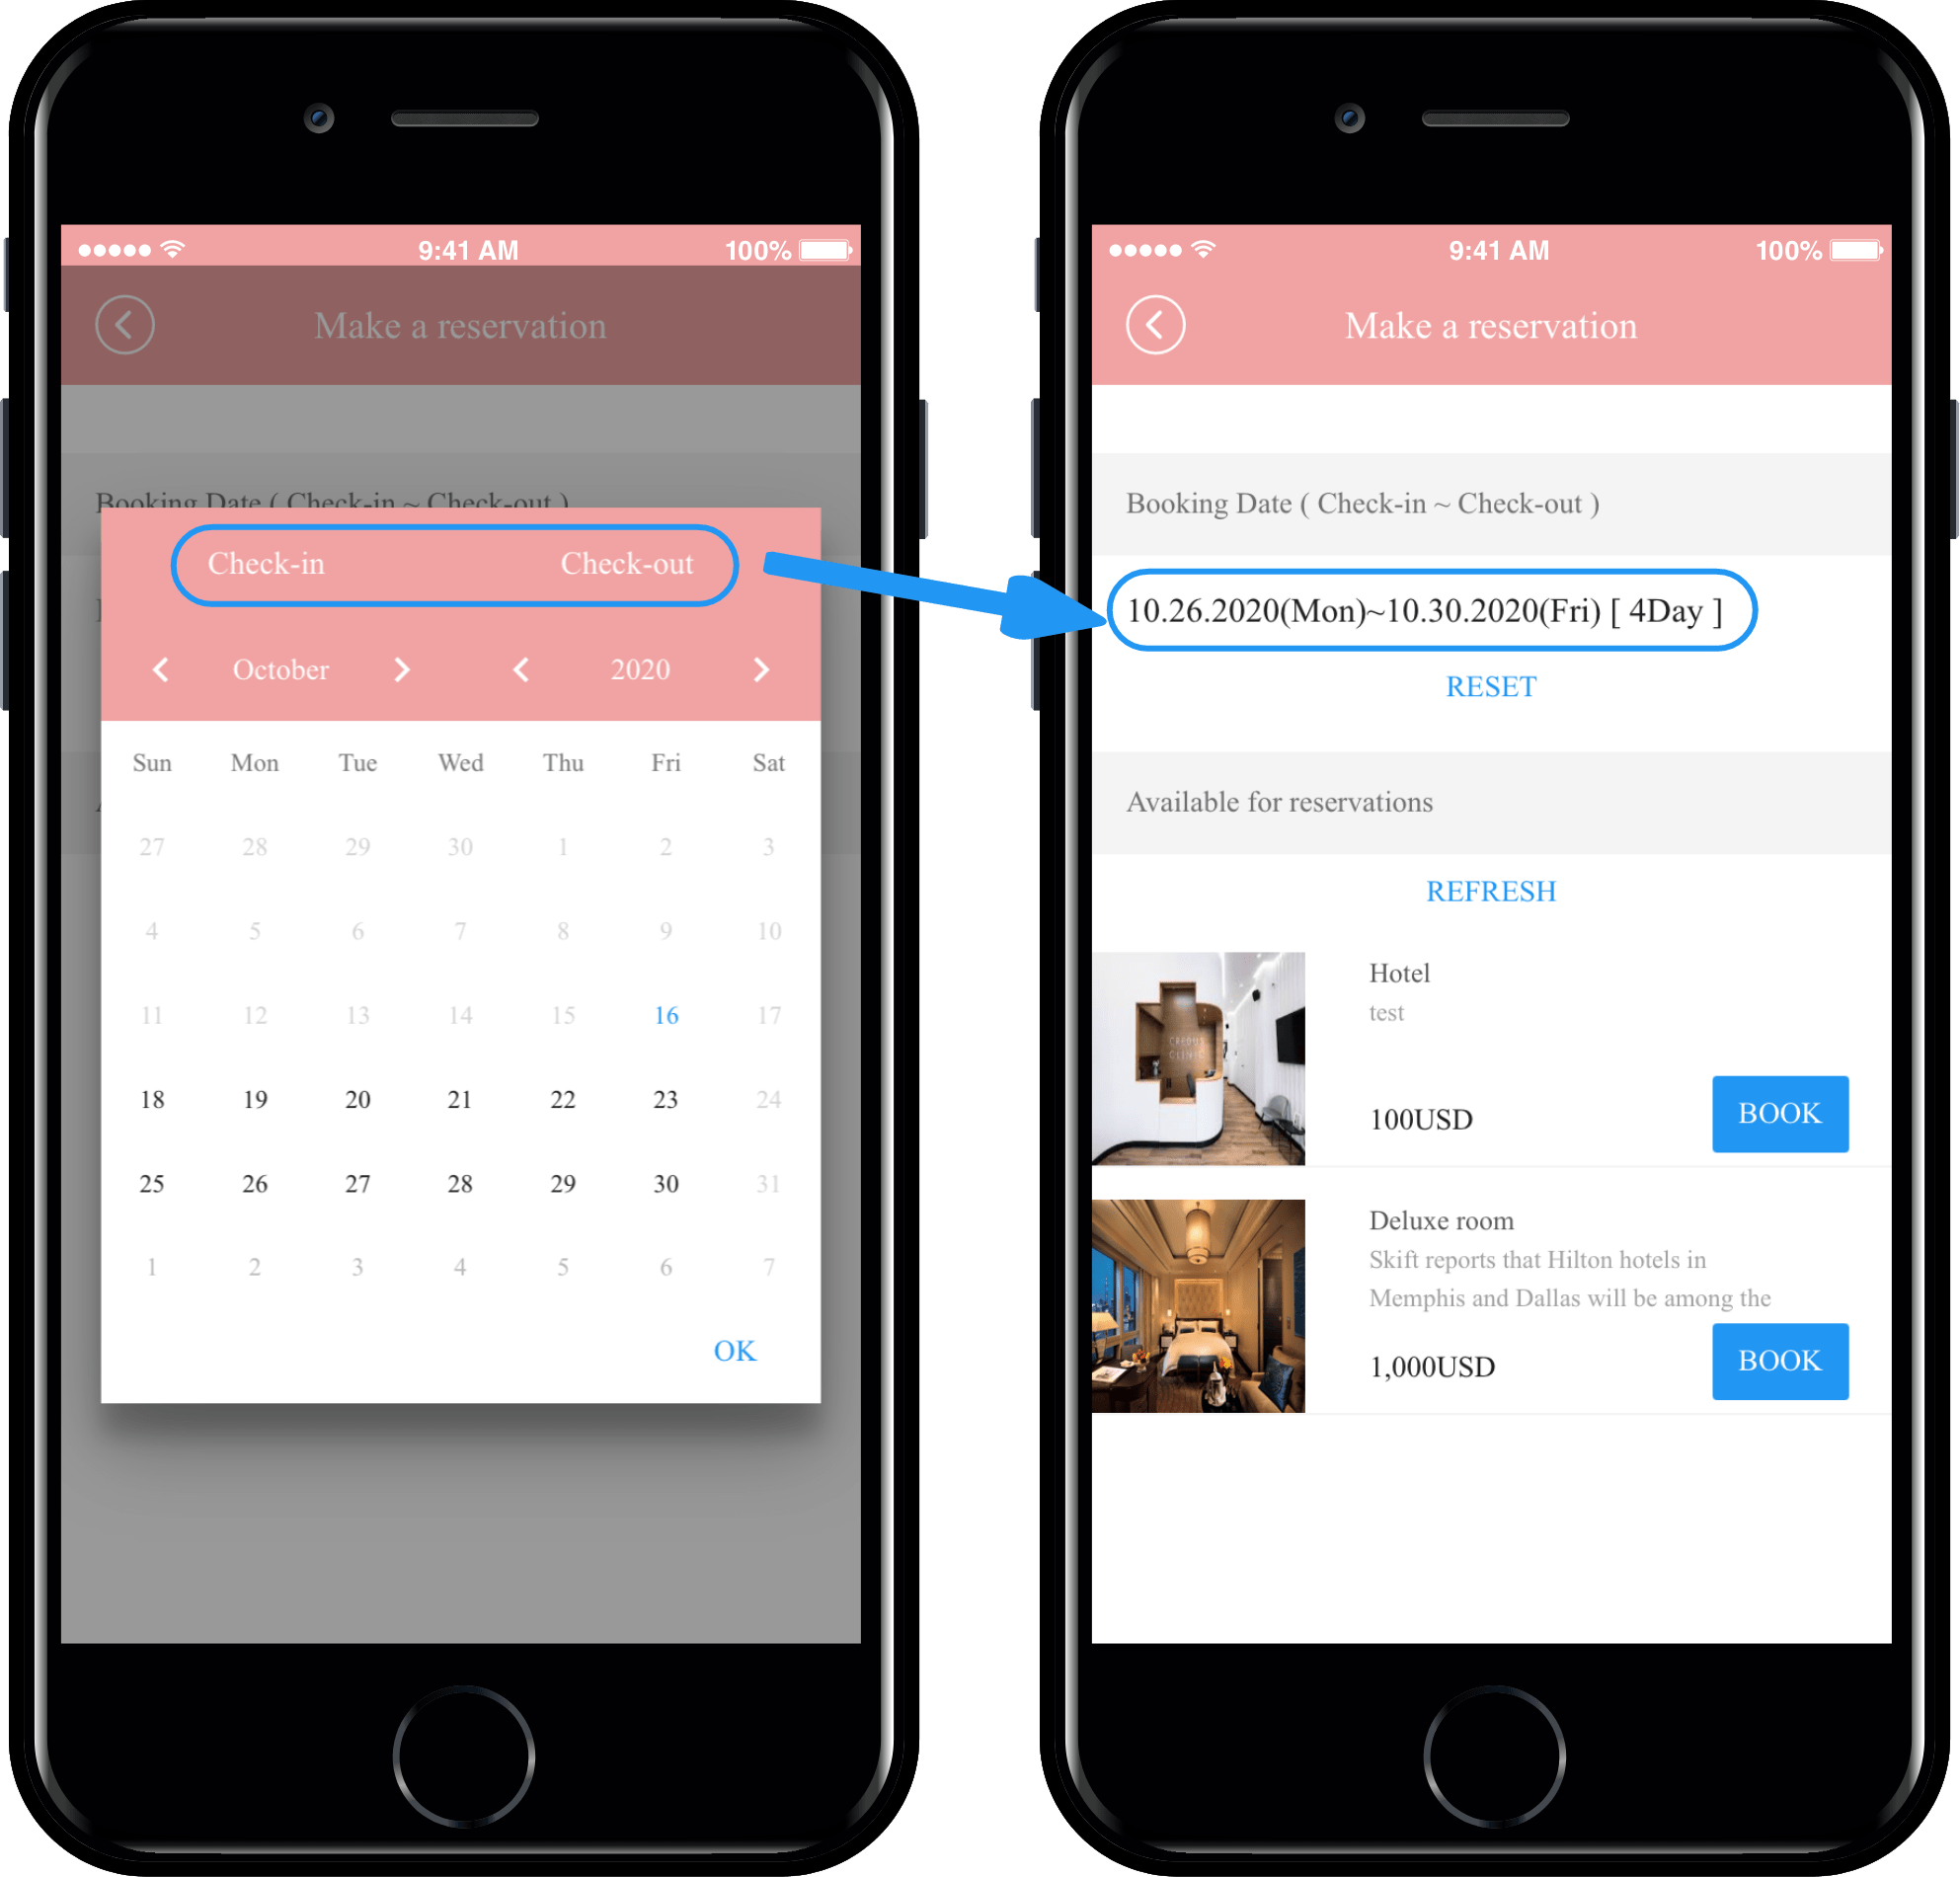
The first page I’m going to show you is [booking a time-to-date subscription].

You can apply it if you have registered a hotel or other accommodations or a product that makes a reservation for the entire day.

As you can see in the image above, check-in and check-out are displayed in the calendar window.

When the date lookup is completed, the products available for reservation on that date will be inquired..

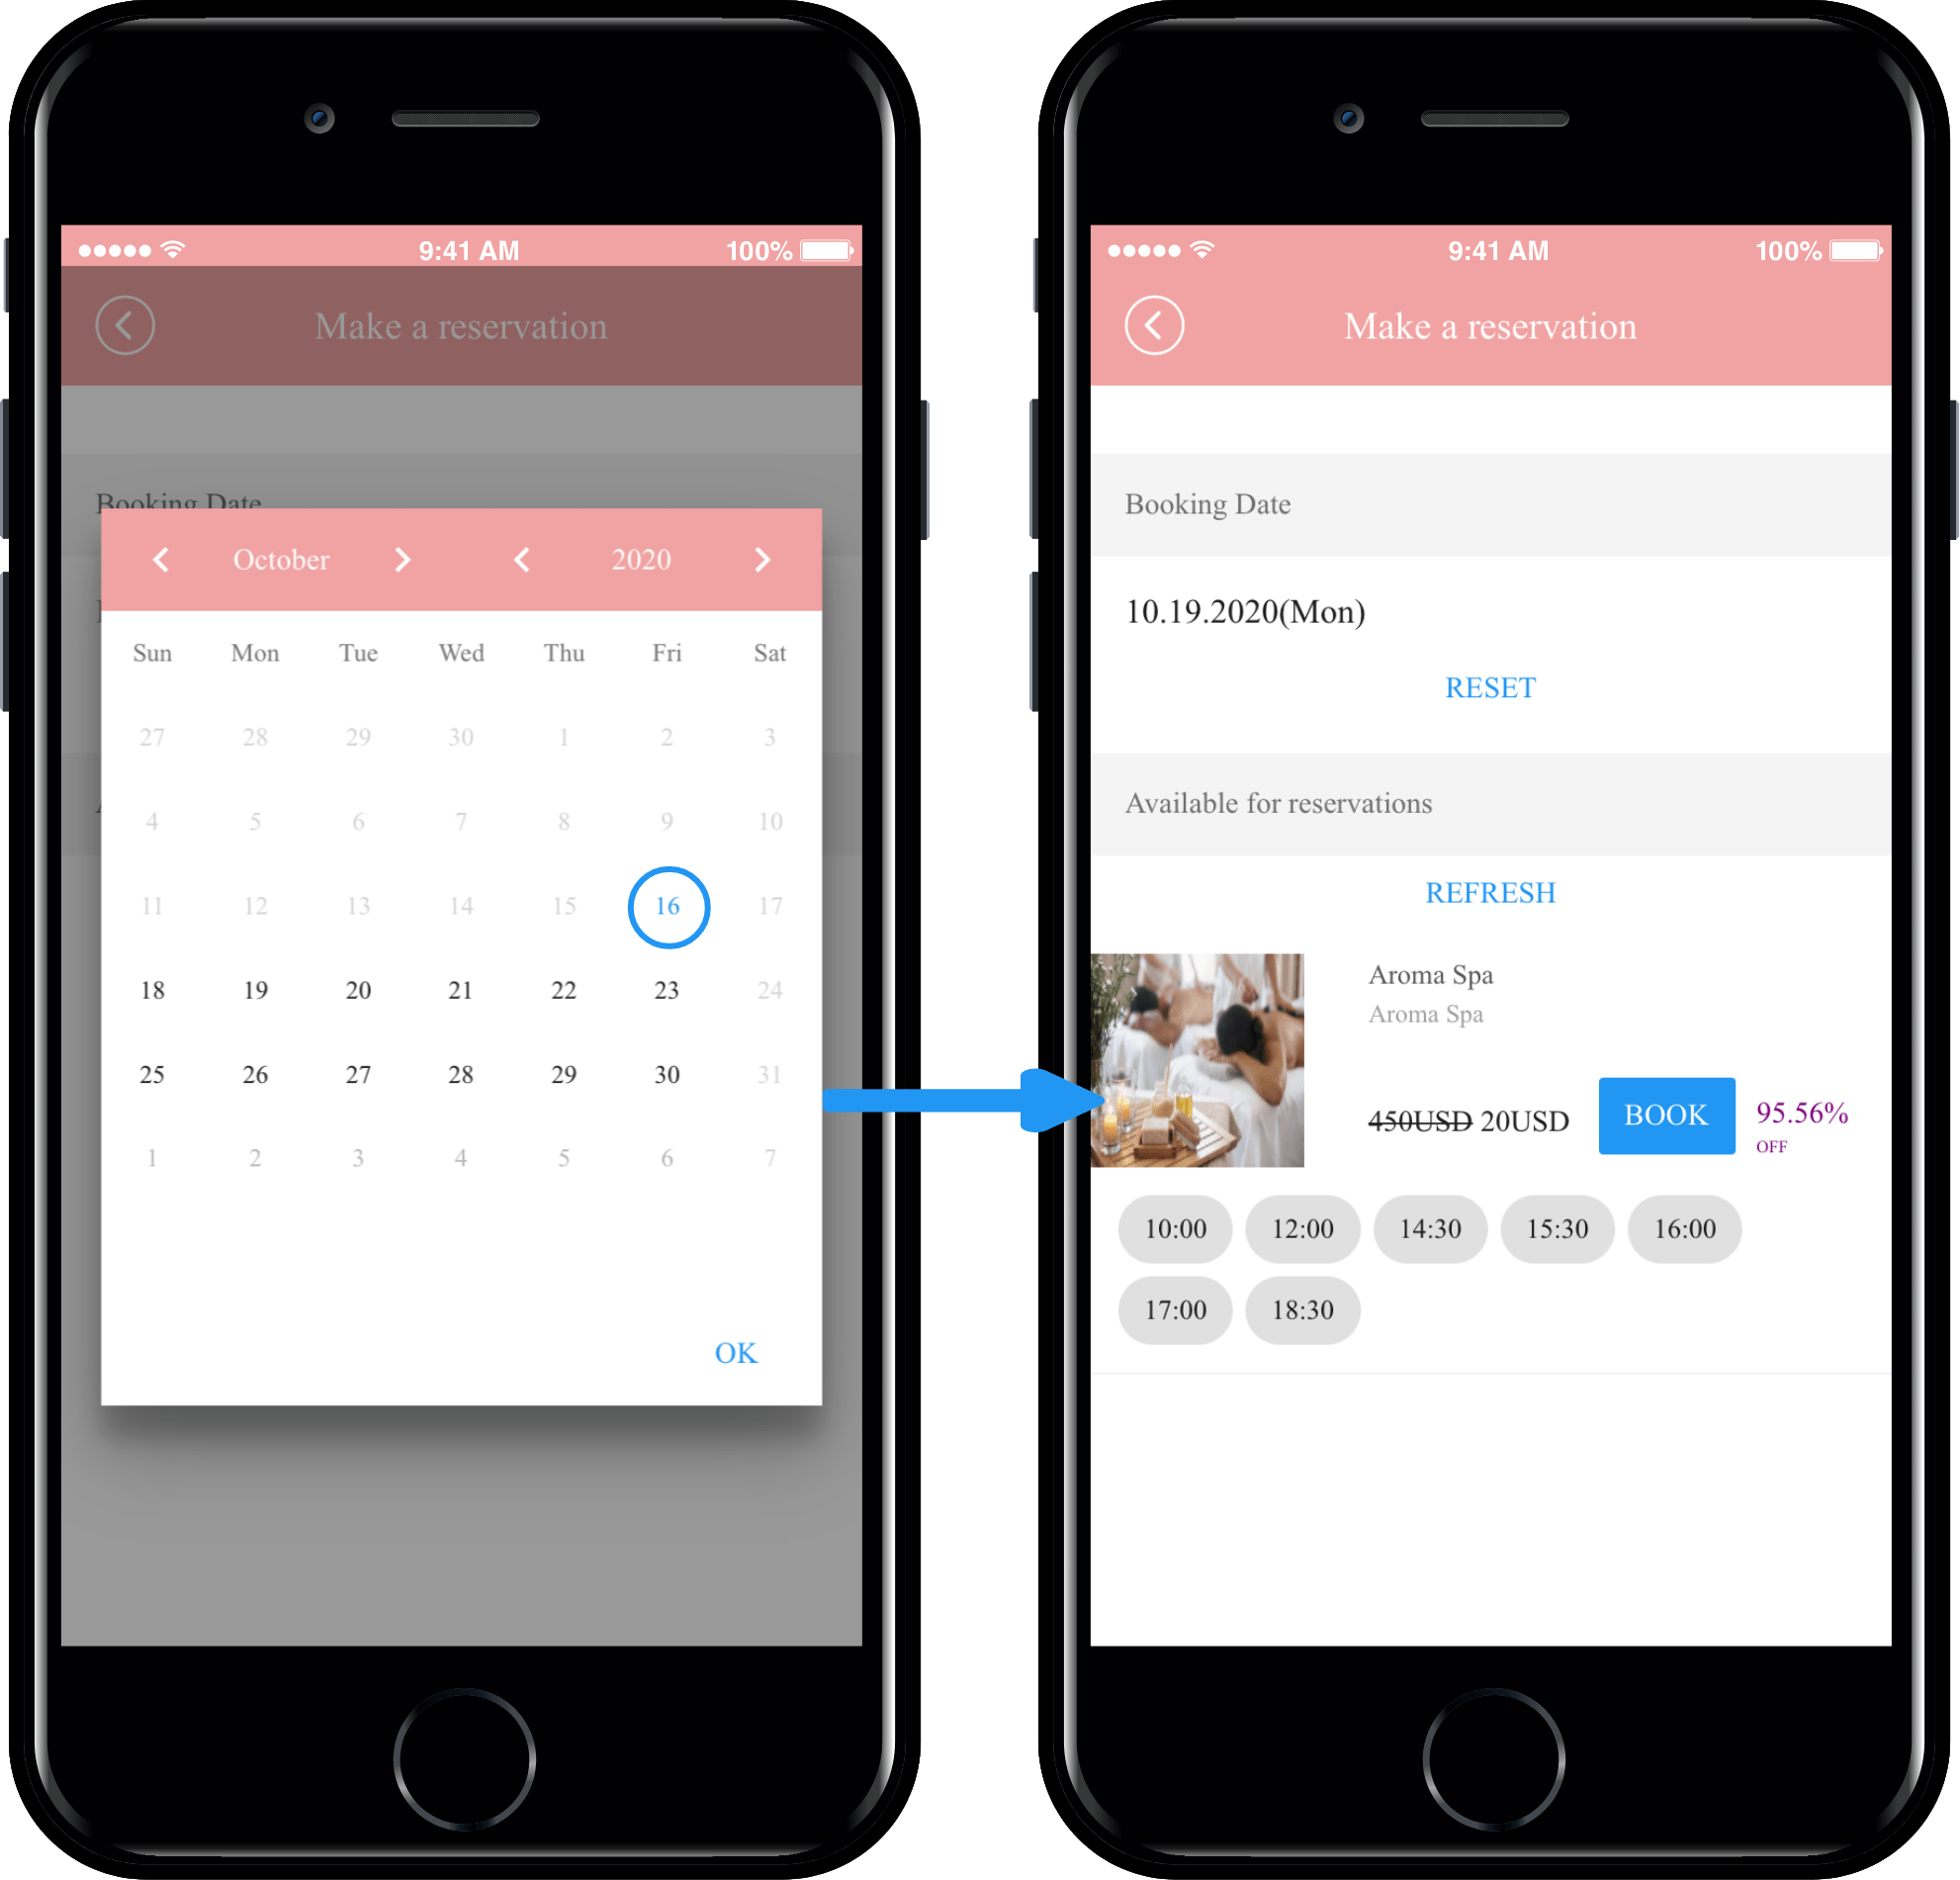
9. Booking(Time+Date Booking of Reservation)

The page is available only if you have registered the reservation system._Scheduled System Only page

The second page is Time+Date Booking.

As you can see in the image above, you can select a date in the calendar window to view it.

Products available for reservation on that date will be inquired. This is the structure of making a reservation by selecting the time set by the administrator.

Therefore, if you have registered a date and time reservation product, you can apply page 2!

Swing Shop (shopping mall) Basic Page Guidelines

1)The swing page provided in Swing Shop cannot be designed or modified separately. It’s not a production tool, it’s a design page that’s already completed, so you can’t change it to the desired form. If you need individual modification on the page provided, please request customization. Or adding a new page in addition to the page modification provided by Swing to App also requires customization.

2)Some pages provided by Swing Shop must be put into the app, and others are checked with options. Therefore, when you make an app, you can check what page you need for the app and insert the right page considering the style. However, there are pages that are absolutely necessary! Shopping carts, My Page is a must! Depending on the type of product, you need to put the reservation system on the purchase page. For digital products, you need to put in the complete digital product purchase page. There are pages you need depending on which product you are selling, so please check and operate them.

3) You can check the screen applied with the virtual machine, so please use the virtual machine 100% when manufacturing. ^^