> For the complete documentation index, see [llms.txt](https://documentation.swing2app.com/llms.txt). Markdown versions of documentation pages are available by appending `.md` to page URLs; this page is available as [Markdown](https://documentation.swing2app.com/manual/maual/pagemenu/apphomescreen.md).
# Creating an App Home Screen
**How to create your app home screen**
Maker(V2) – The first thing on the page menu is to create the home screen.
Since the home screen is the first app main screen that appears when you launch the app, you need to apply the menu to match your app design and style.
Swing2App provides a variety of menus to configure the home screen.
If you are new to swing2app, you’ll have a hard time deciding what to use.
This post will show you a variety of menus that can be applied to your home screen.
**▶Menu Applied to Home screen**
> 1. Web link application
> 2. Applying Image
> 3. Applying Bulletin Board
> 4. User Page – Image Page
> 5. User Page – Web Template
> 6. User Page – Editor’s Page
> 7. App Introduction Page
> **Swing2App home screen production can be applied from the Swing2App Maker(V2) page → page menu → Main & Menu Management → Home screen.**
### **1. Apply Web Link**
**The first step to decorate your home screen. Let’s create a web link!**
**Production Method**
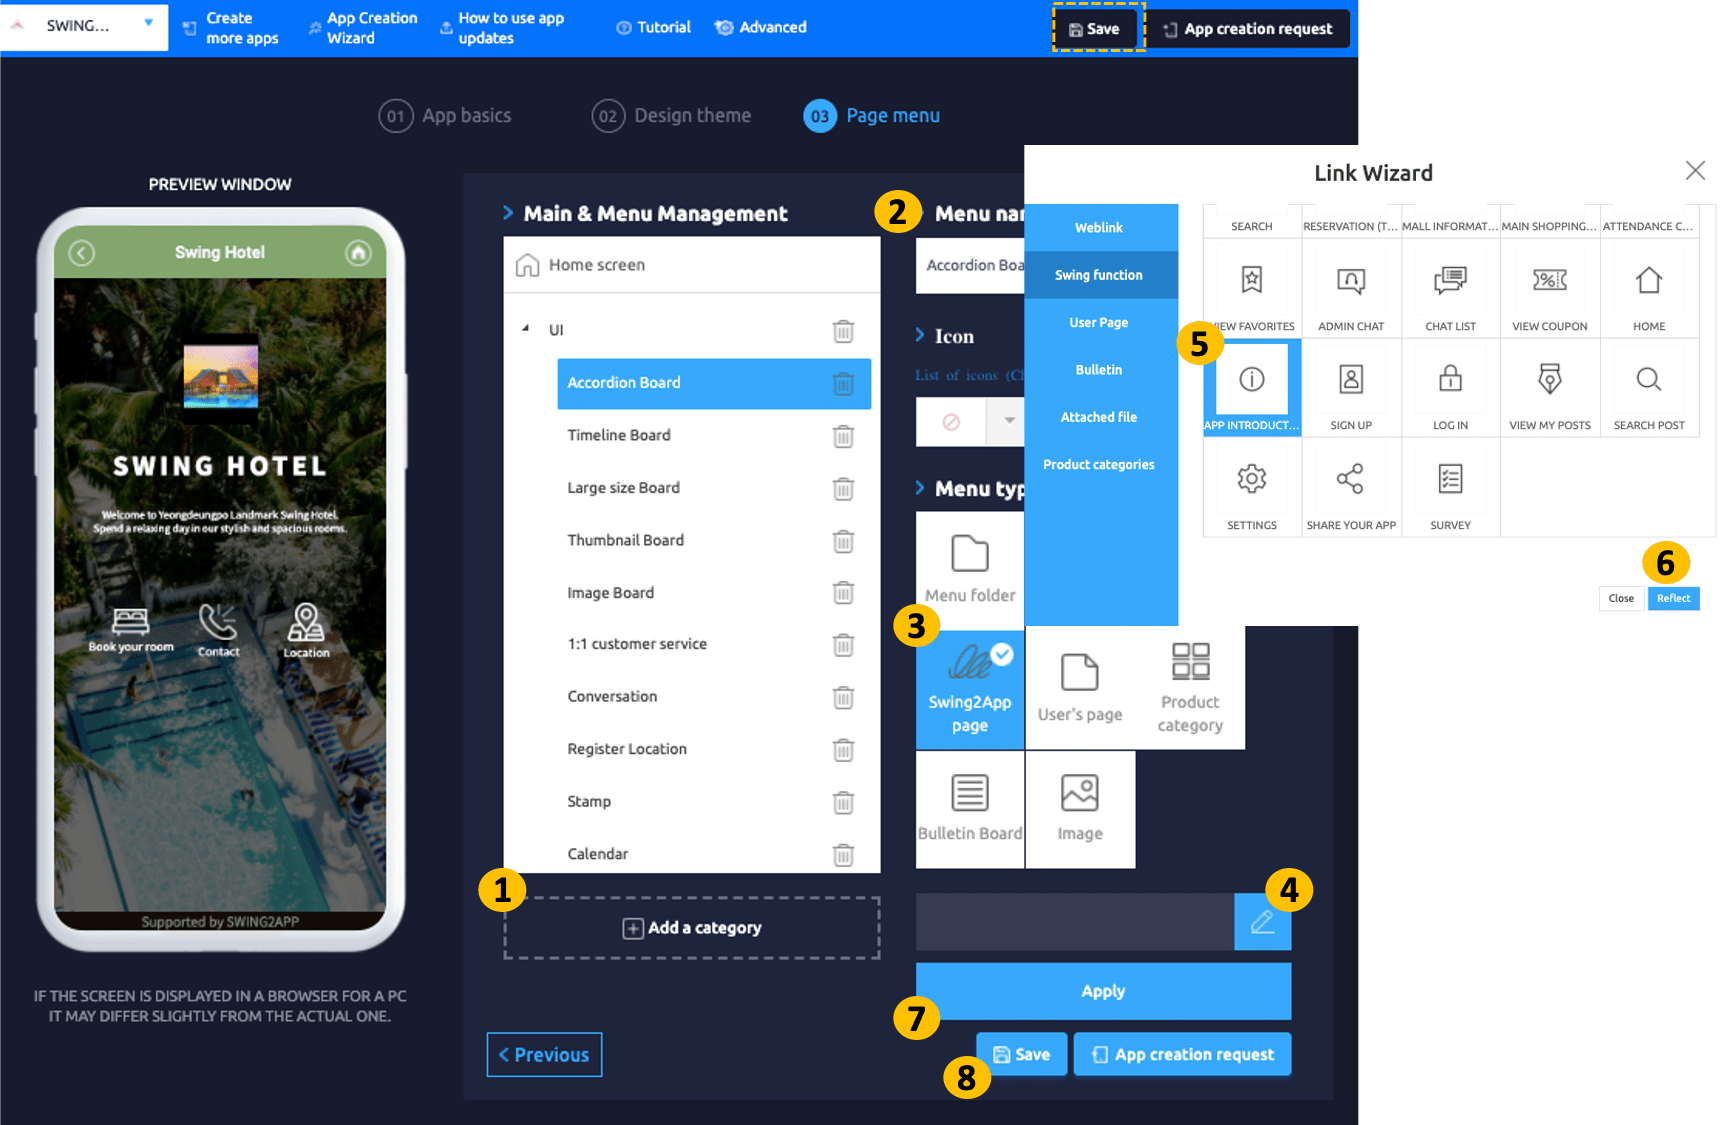
Go to **Maker(V2)** and click **Page Menu.**
1. Click **Home Screen** with a mouse and a menu setting page will appear on the right side.
2. You can rename the menu at the top of the home screen. (If you do not change the name, it will be displayed as the app name.)
3. Select the **Web Link** menu in the **menu type**.
4. Click on the **Link Wizard** icon and the link wizard window will pop-up. Enter the web link in the link wizard window.
5. Click **Apply.**
6. Press **Save** to finish.
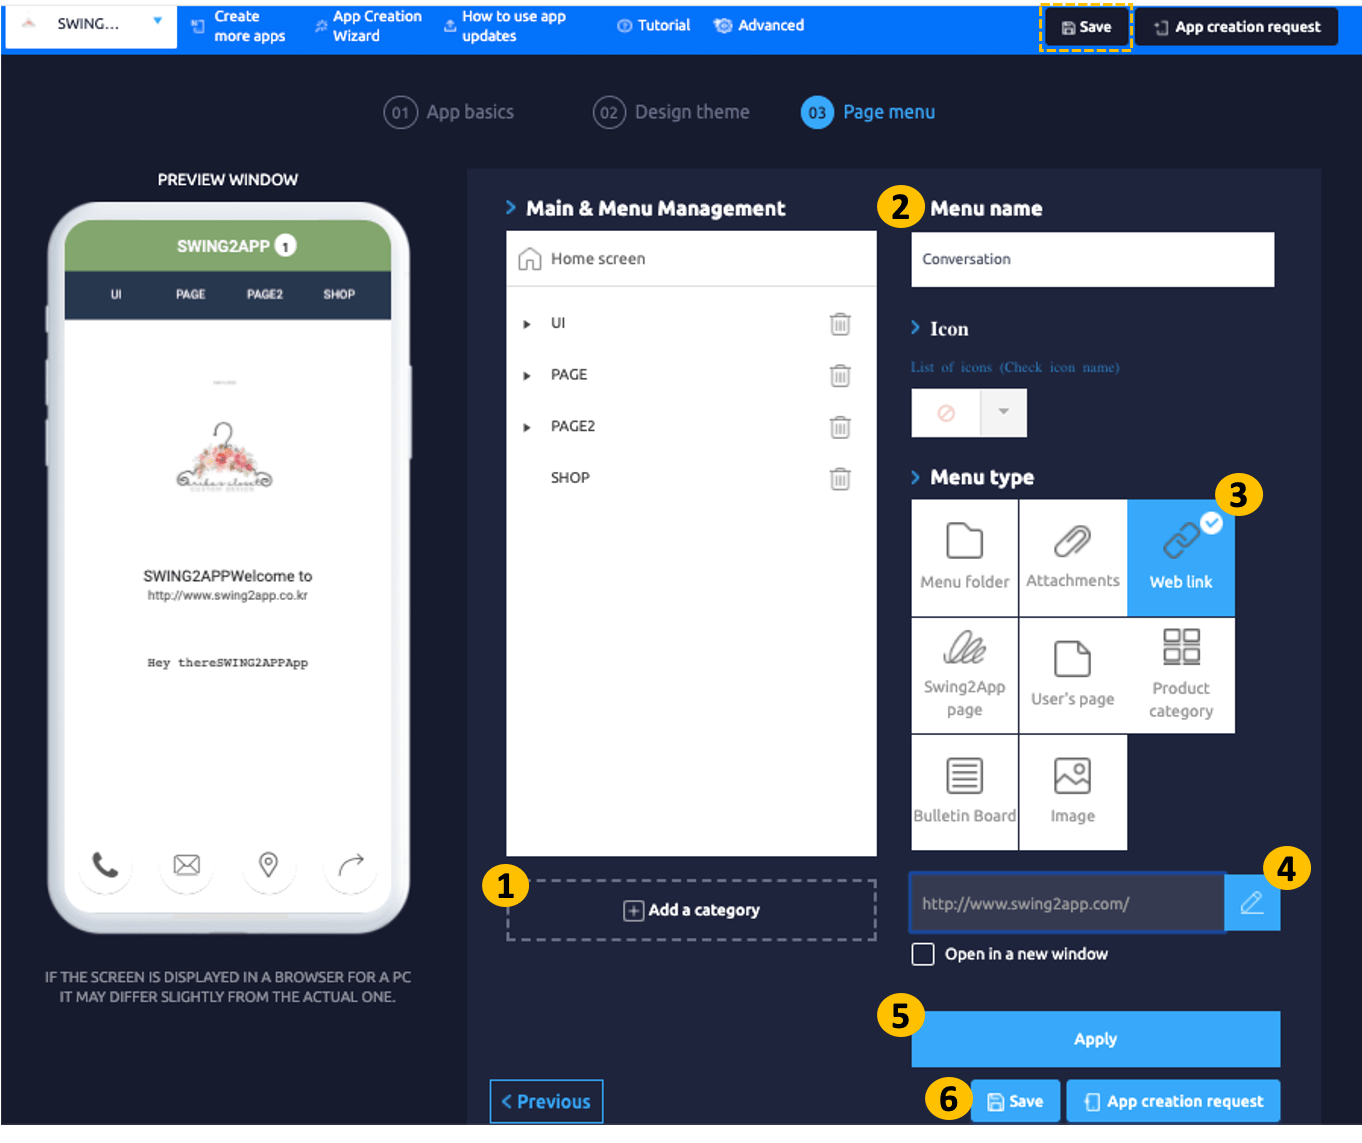
**▶ It is easier to understand if you look at it**
**If you look at the mobile phone virtual machine on the right, you can see the swing2app homepage has been applied to the home screen.**
### **2. Apply Image**
**The second step is to apply an image menu to register the image on the home screen.**
**Production Method**
Go to **Maker(V2)** and click **Page Menu.**
1. Click the **Home Screen** with a mouse and a menu setting page will appear on the right side.
2. You can change the menu name at the top of the home screen (unless you change the name, it will be displayed as the app name.)
3. Select the **Image** menu in the **menu type.**
4. Click on the **Link Wizard** icon and the link wizard window will pop-up.
5. Attache the image you want to display.
6. Click **Reflect.**
7. Press the **Apply** button at the bottom of the page.
8. Press **Save** to complete.
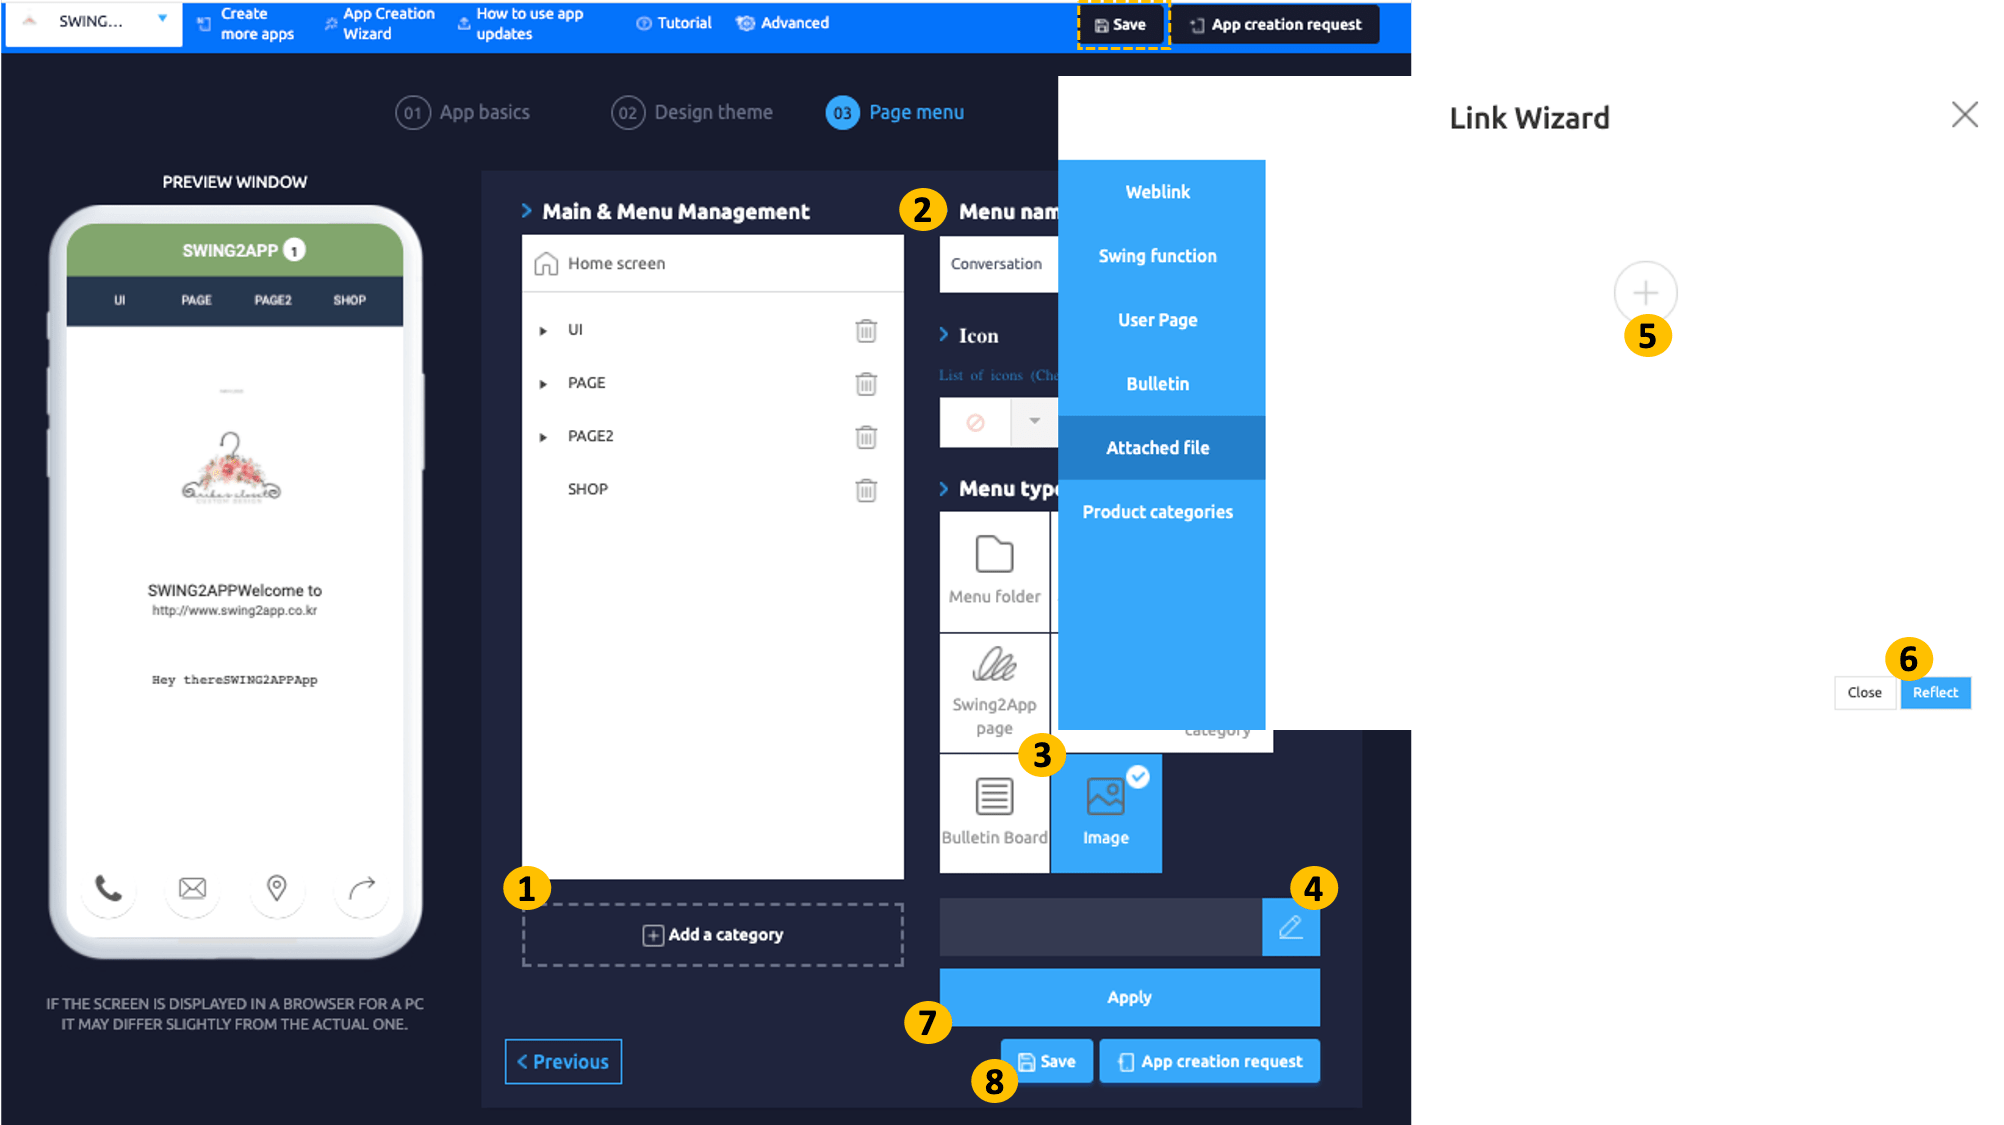
▶ **It will be easier to understand if you look at it**

**If you look at the mobile phone virtual machine on the right, you can see that the image has been applied to the home screen.**
\*Because it is an image, if you touch the image in the app, you will see the image detailed view like you see in a virtual machine.
If you are uncomfortable with this part of the app, we recommend that you create a separate image page.
### **3.** **Applying the bulletin board**
The third step is to apply the bulletin board to the home screen.
**Production Method**
Go to **Maker(V2)** and click **Page Menu.**
1. Click the **Home Screen** with a mouse and a menu setting page will appear on the right side.
2. You can change the menu name at the top of the home screen (unless you change the name, it will be displayed as the app name.)
3. Select the **Bulletin Board** menu in the **menu type.**
4. Click the **Link Wizard.**
5. When the bulletin board list window appears, select the bulletin board to be applied to the home screen.\
\*The bulletin board must create all the necessary bulletin boards from the Manager page → Services → Bulletin Board management menu in advance.
6. Click on **Reflect.**
7. Press the **Apply** button.
8. Click on **Save.**
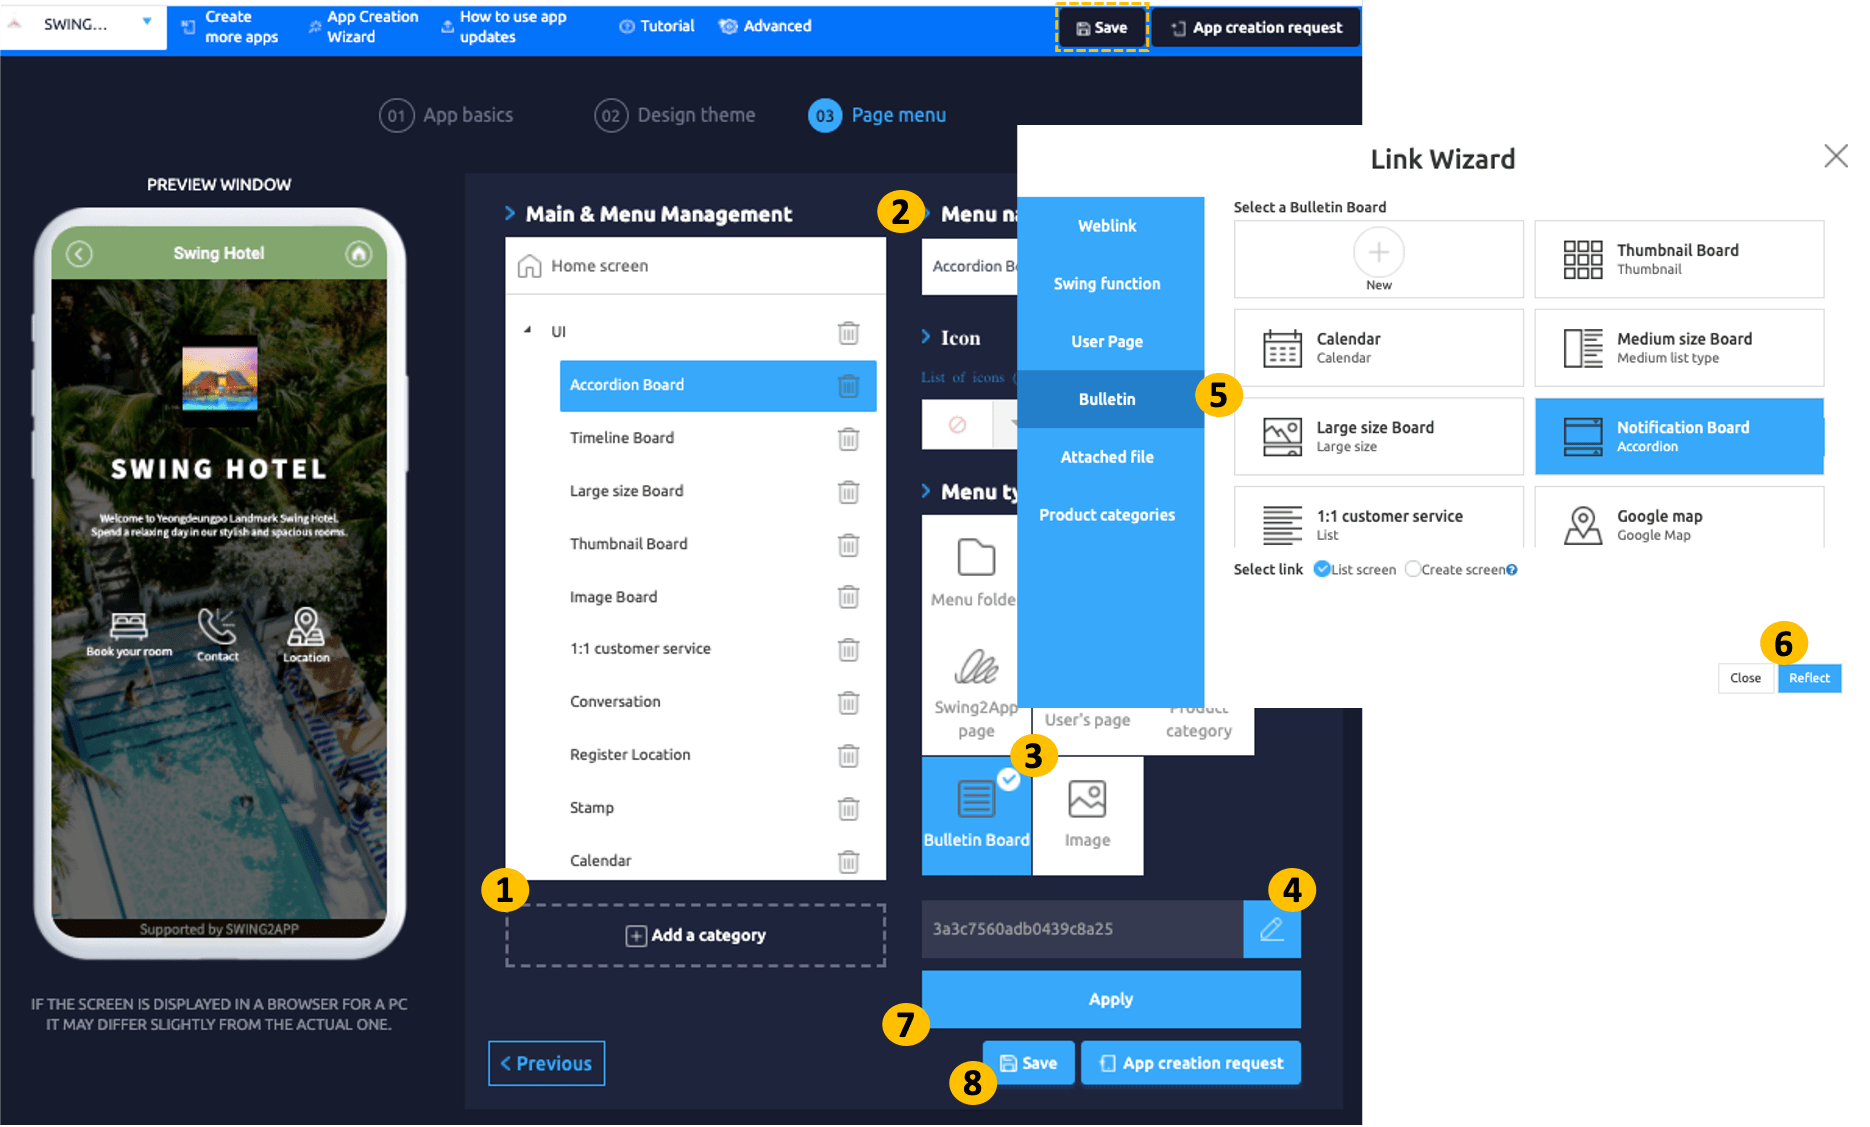
**▶ It will be easier to understand if you look at it**

**If you look at the virtual machine on the right, you can see the bulletin board is applied to the home screen.**
### **4. Apply image page**
**The fourth step is to create an image page and apply it to the home screen.**
**Production Method**
Go to **Maker(V2)** and click **Page Menu.**
1. Click the **Home Screen** with a mouse and a menu setting page will appear on the right side.
2. You can change the menu name at the top of the home screen (unless you change the name, it will be displayed as the app name.)
3. Select the **User Page** menu in the **menu type.**
4. Click the **Link Wizard.**
5. When the Link Wizard window appears, select the **Image Map** to be applied to the home screen.\ \*You must create an image page in advance.\ If you haven’t created any pages, click \[Add Image-Based Page] to create a new one.\ \*The image page is applied with the ‘page name’ entered in the page creator as the home screen name.
6. Click on **Reflect.**
7. Press the **Apply** button.
8. Click on **Save.**
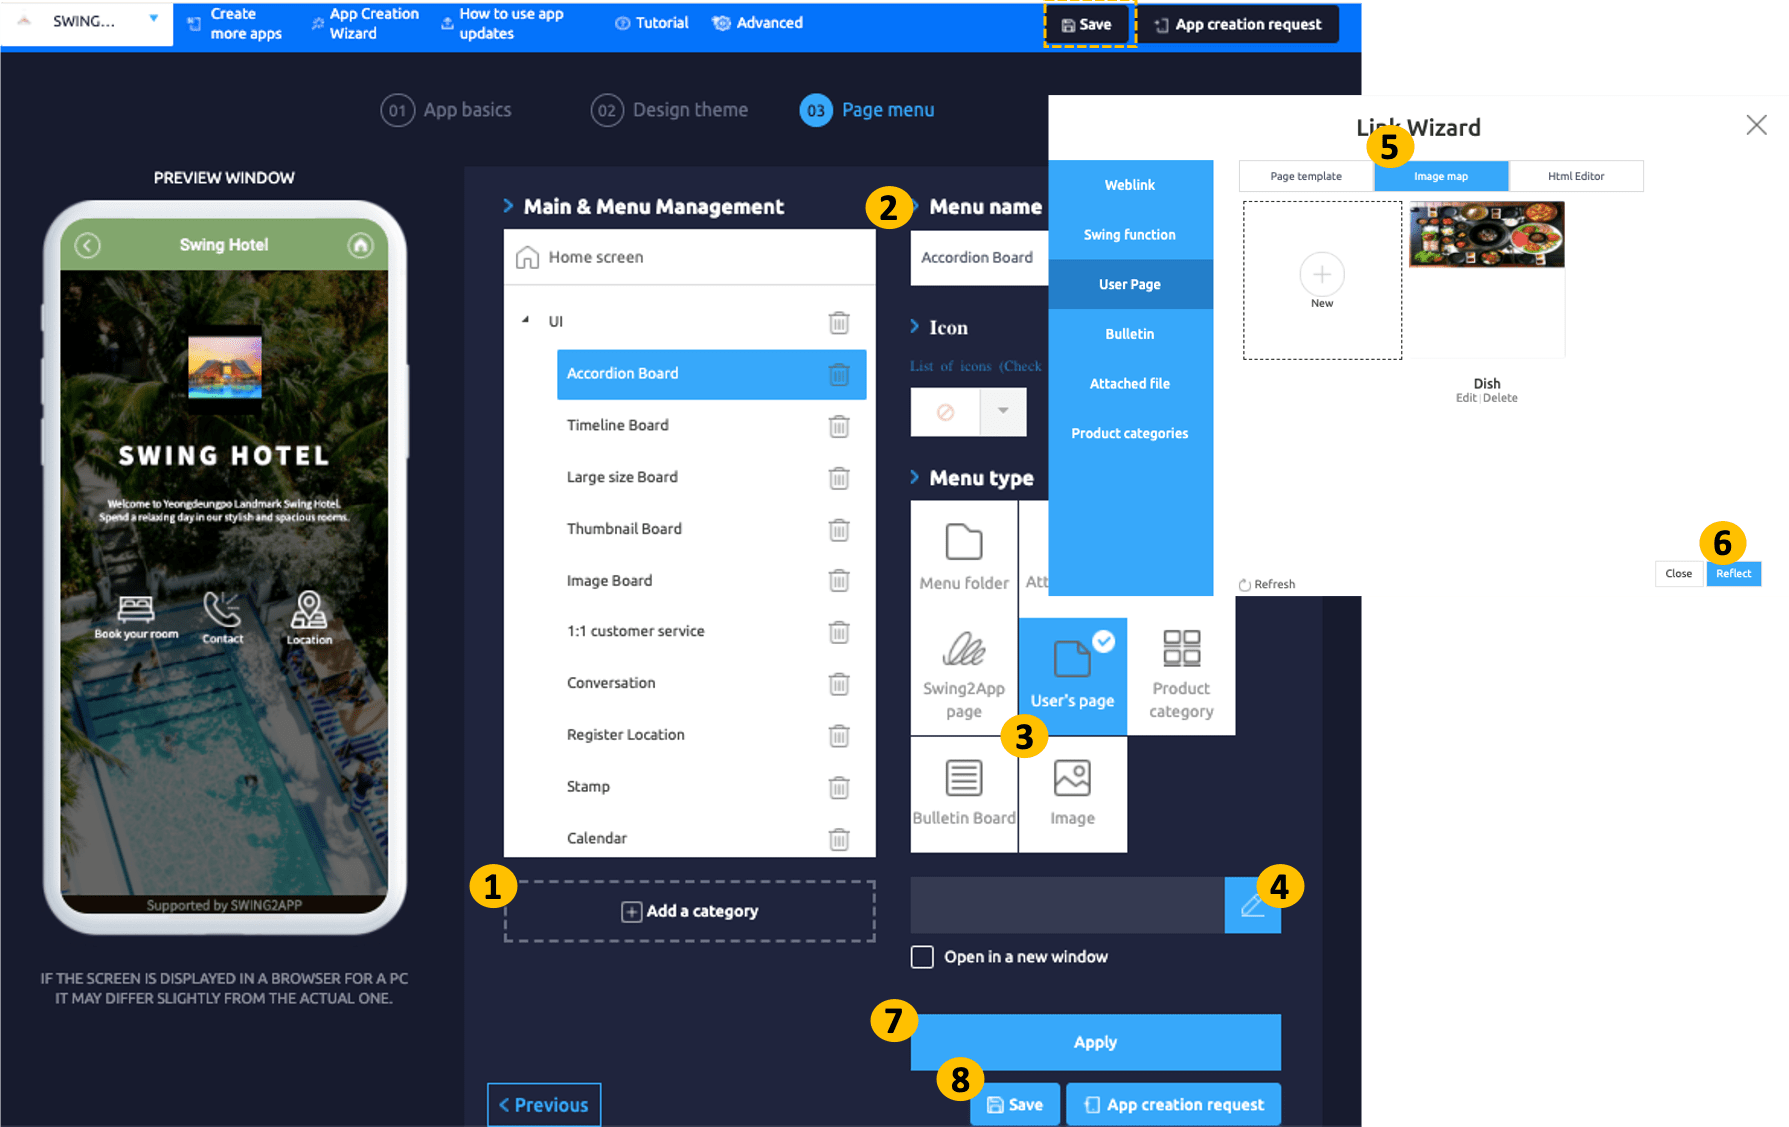
★ Please refer to the post below on how to create an image-based page.
**☞**[ **\[View how to create an image page\]**](/manual/maual/pagemenu/image-page.md)
**▶ It will be easier to understand if you look at it**
****

**If you look at the virtual phone on the right, you can see that the image page has been applied to the home screen.**
### **5. Apply web template page**
**The fifth step is to create and apply a user web template page.**
**Production Method**
Go to **Maker(V2)** and click **Page Menu.**
1. Click the **Home Screen** with a mouse and a menu setting page will appear on the right side.
2. You can change the menu name at the top of the home screen (unless you change the name, it will be displayed as the app name.)
3. Select the **User Page** menu in the **menu type.**
4. Click the **Link Wizard.**
5. When the Link Wizard list window appears, select the **Page Template** to be applied to the home screen.
6. Click on **Reflect.**
7. Press the **Apply** button.
8. Click on \*\*Save.\*\*
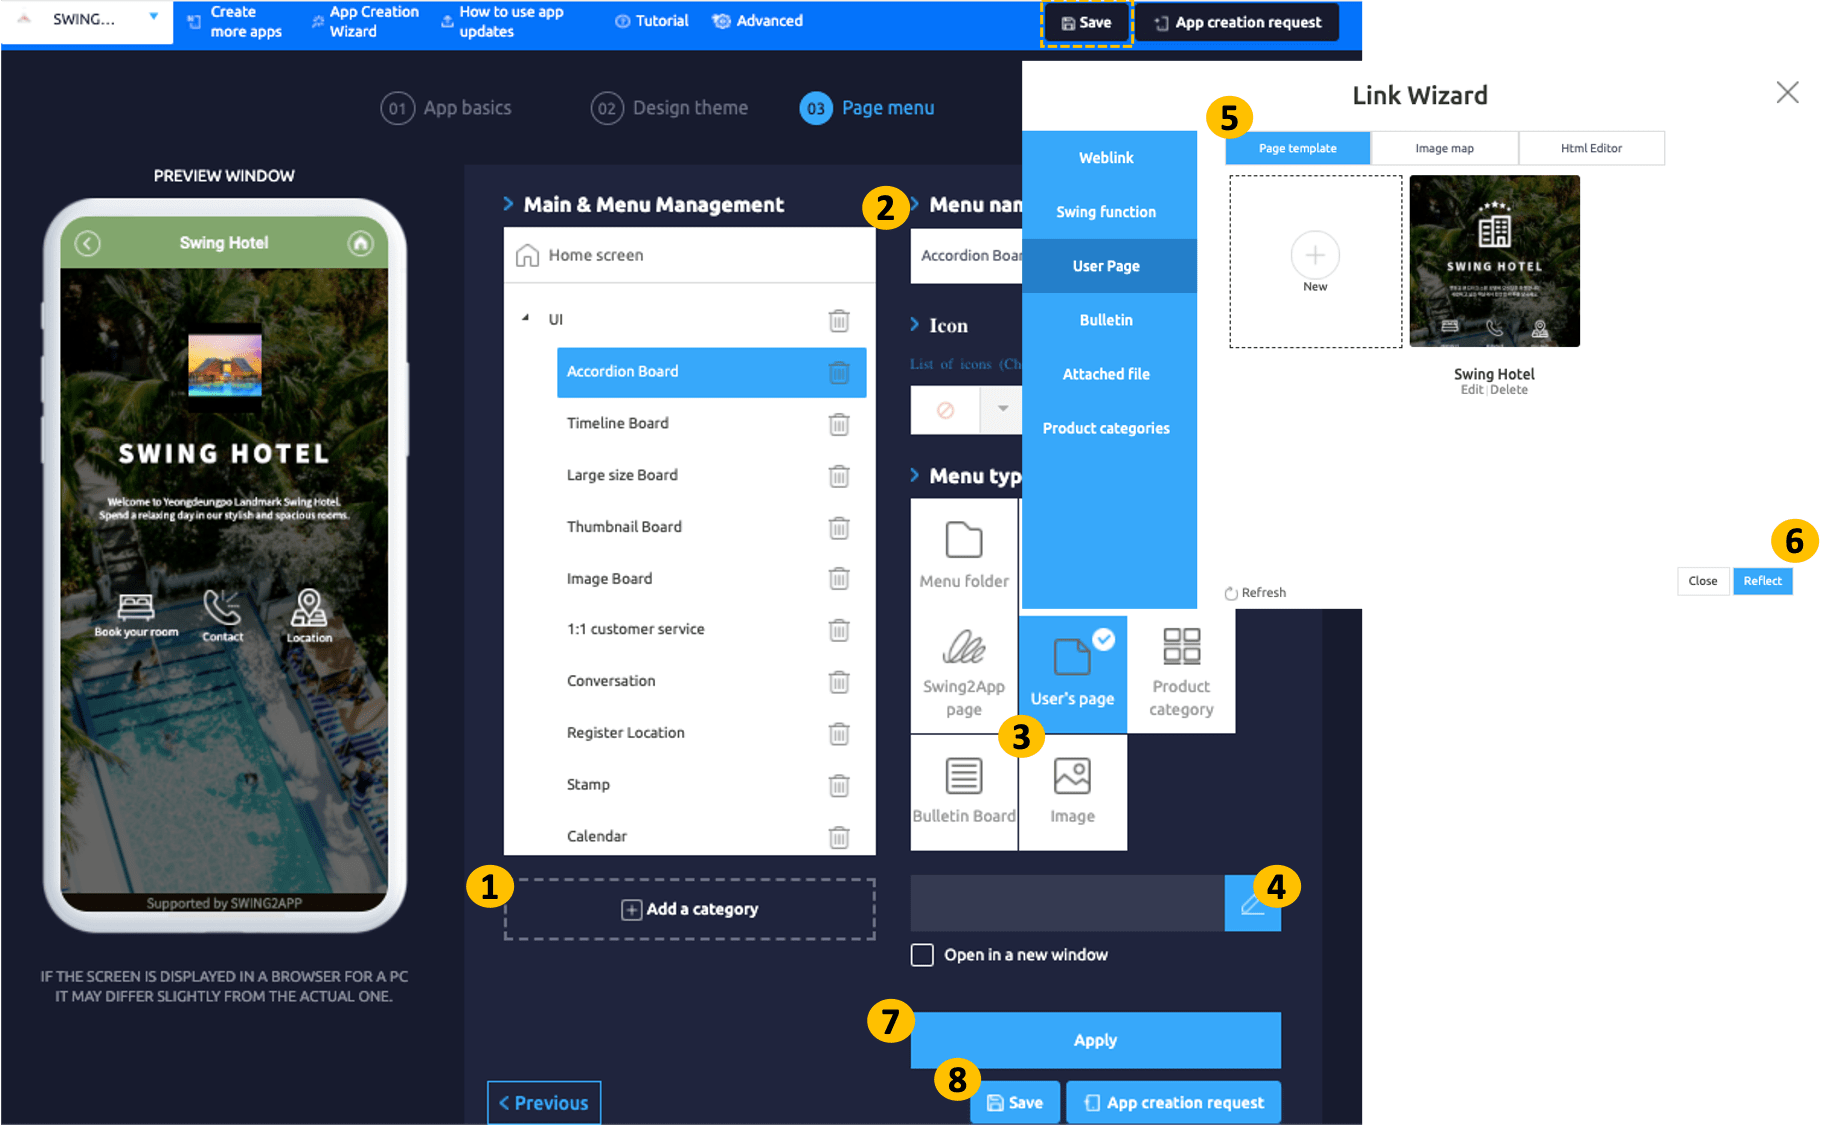
**★ Please refer to the post below for how to create a web template page!**
**☞** [**\[View on how to create a Web Template Page\]**](/manual/maual/pagemenu/template-page.md)
\ ▶ **How to apply a web template page to the home screen. GIF**

### **6. Apply Editor Page**
**The sixth step is to create and apply a custom page-editor page.**
**Production Method**
Go to **Maker(V2)** and click **Page Menu.**
1. Click the **Home Screen** with a mouse and a menu setting page will appear on the right side.
2. You can change the menu name at the top of the home screen (unless you change the name, it will be displayed as the app name.)
3. Select the **User Page** menu in the **menu type.**
4. Click the **Link Wizard.**
5. When the Link Wizard window appears, select the **HTML Editor** to be applied to the home screen.\ **\*At this time, the editor page must be created in advance.**\ **If you haven’t created a page yet, click \[Add / Manage HTML Editor Page] to create one.**
6. Click on **Reflect.**
7. Press the **Apply** button.
8. Click on **Save.**
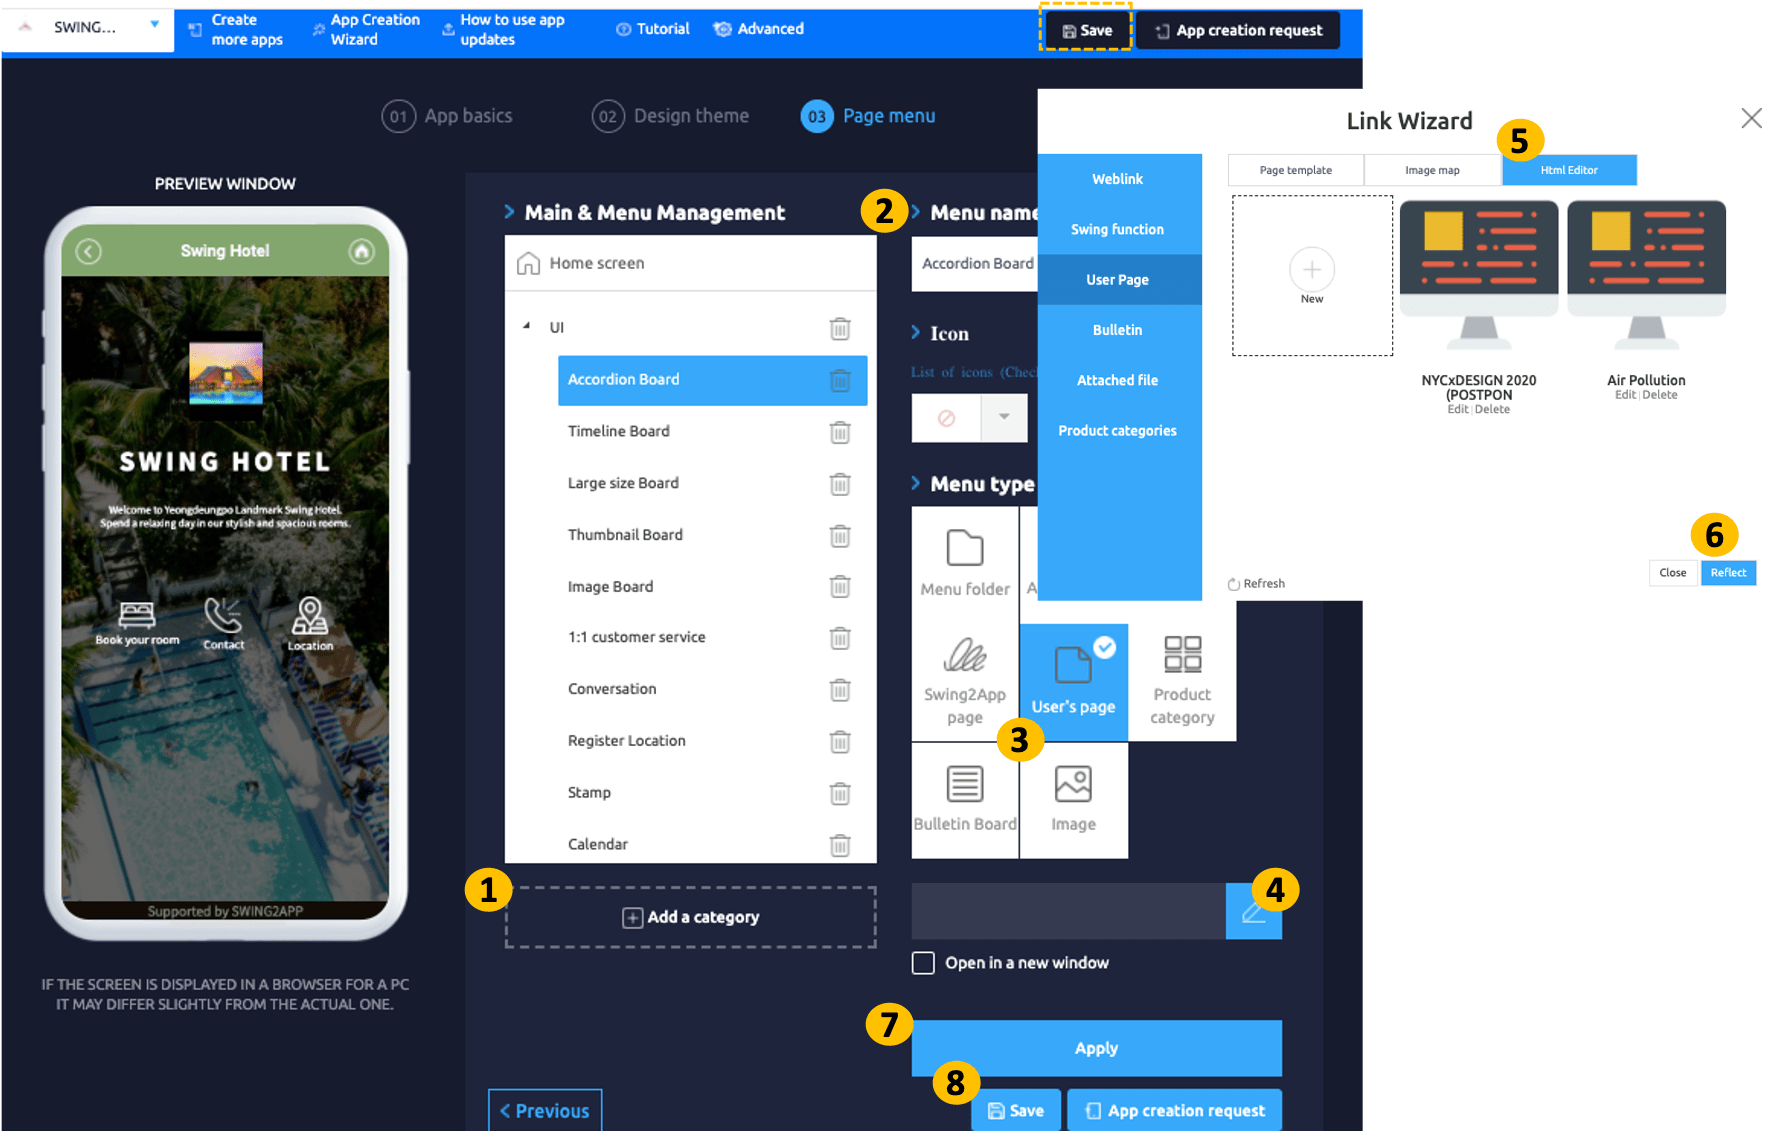
**★ Please refer to the post below on how to create an editor page.**
**☞** [**\[View how to create an editor’s page\]**](/manual/maual/pagemenu/editor-page.md)
**▶ How to apply an editor page to the home screen. gif**

### **7. App Introduction Page**
The app introduction page is the home screen that is set to the home screen when you create the app in the first swing2app.
As a result, users can use the app introduction page as it is, and you can change the home screen in a variety of styles as described above.
If you use the home screen in a different style and apply the home screen to the app introduction page again, apply it in the following way.
**The seventh step is to create and apply a custom-editor page.**
**Production Method**
Go to **Maker(V2)** and click **Page Menu.**
1. Click the **Home Screen** with a mouse and a menu setting page will appear on the right side.
2. You can change the menu name at the top of the home screen (unless you change the name, it will be displayed as the app name.)
3. Select the **Swing2App Page** menu in the **menu type.**
4. Click the **Link Wizard.**
5. When the Link wizard window appears, select the **App Introduction** to be applied to the home screen.
6. Click on **Reflect.**
7. Press the **Apply** button.
8. Click on **Save.**
\*When the app introduction page is applied to the home screen, the home name is displayed as ‘App name’.
**▶ How to apply the app introduction page on the home screen. gif**

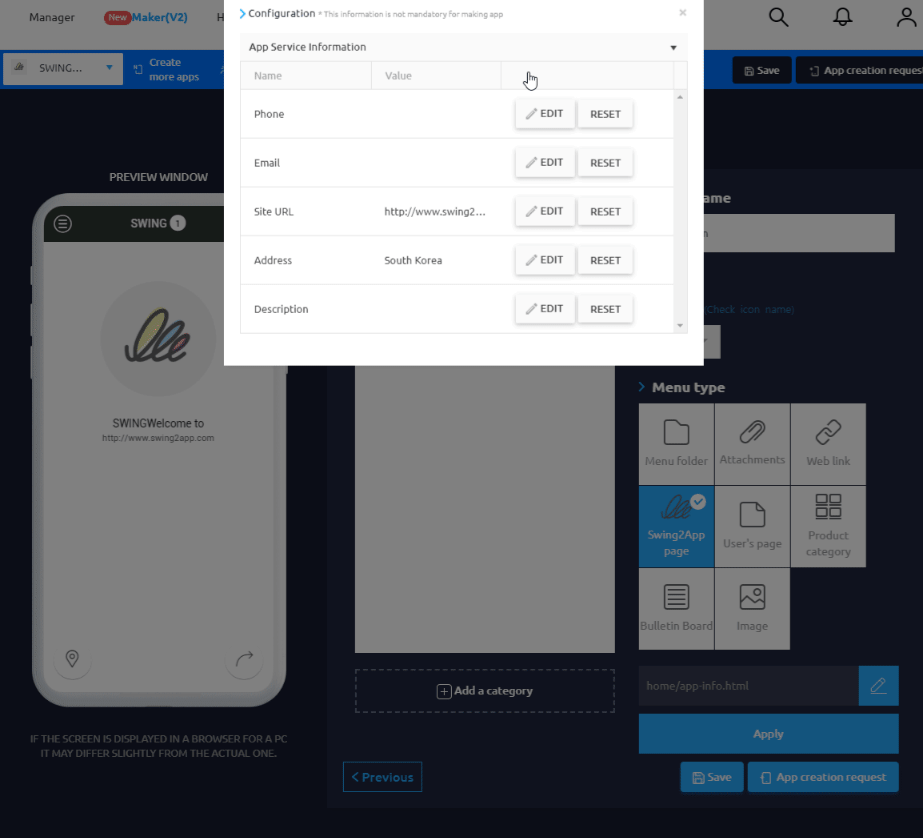
**▶The description, address, email address, phone number, website address, etc. on the app introduction page can be modified in the advanced settings.**
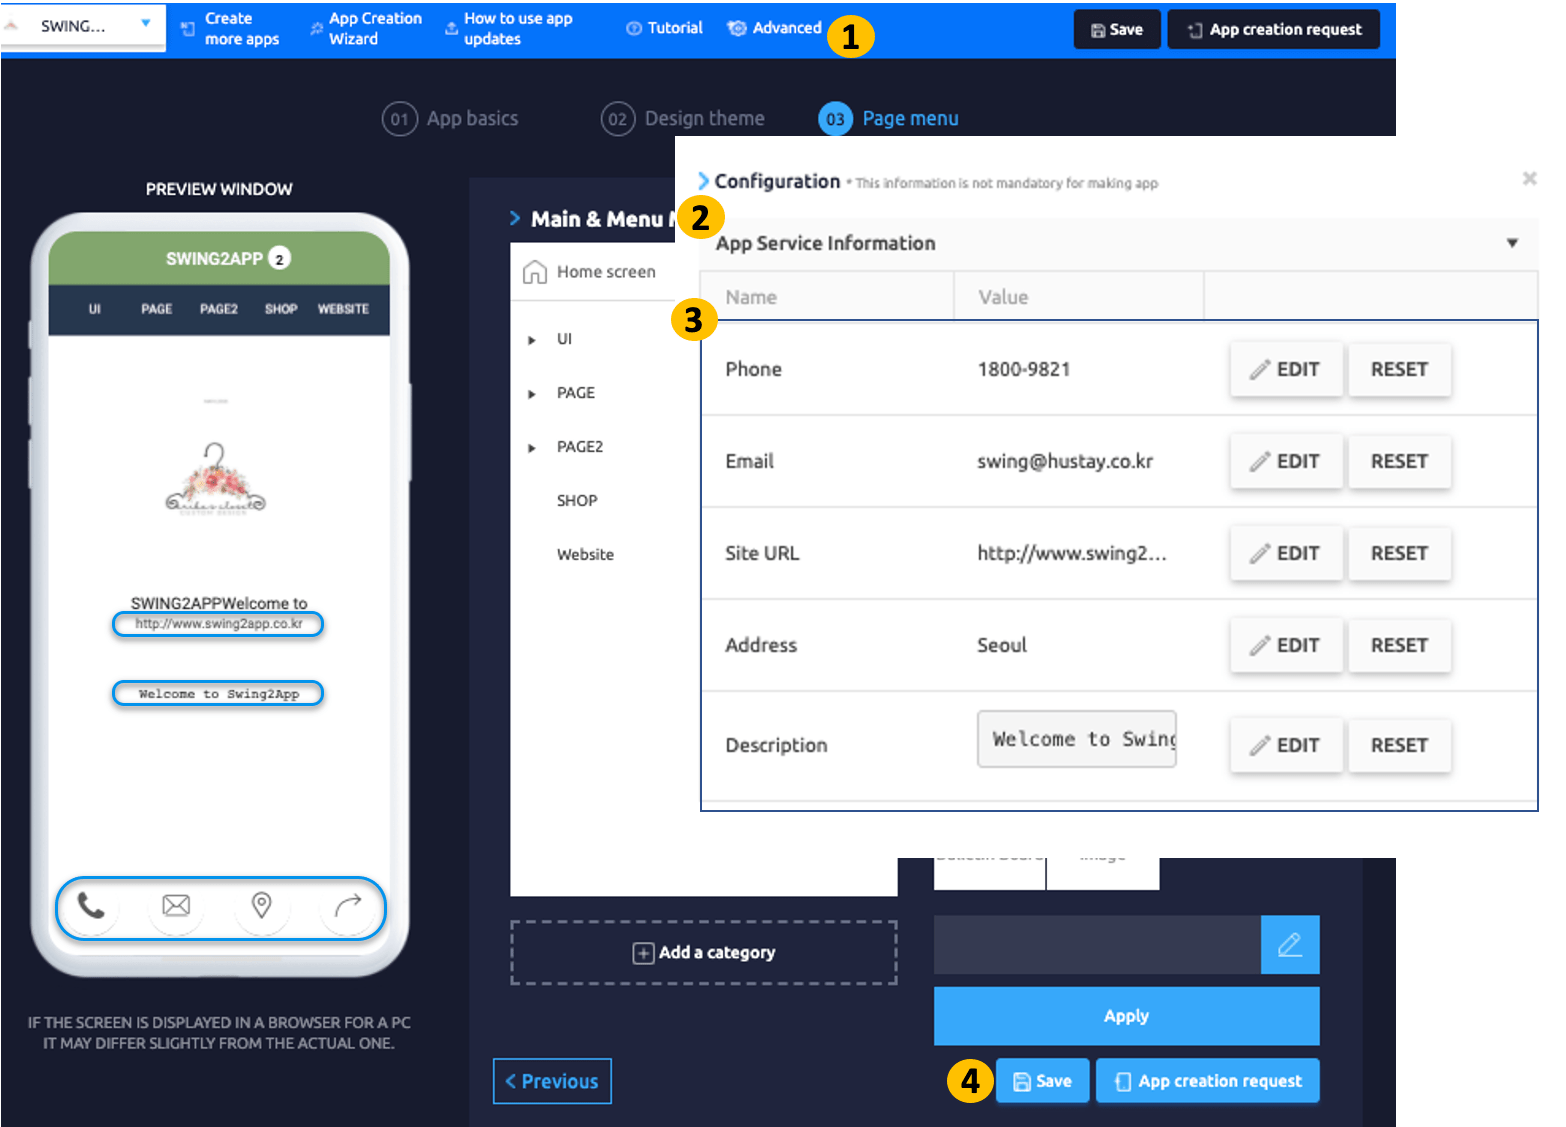
**\[Advanced Settings] Steps on the app Maker(V2) page**
**Settings – Select App Service Info to edit your phone, email, address, app description, website address, and more.**
**This is how you create a home screen.**
**Many different menus create the home screen, so decorate your home screen in a variety of styles.**
**We recommend that you modify the menus other than the default app introduction menu.**
**\*Push and web view style users do not need to create a home screen because they are created by applying the website link to the app.**