Swing2App Manual
Help CenterFAQContact UsBuild an app
  • Swing2App
  • Swing2App Update
  • FAQ
    • FAQ(Frequently Asked Questions)
      • Frequently Asked Questions (FAQ)
      • App Creation FAQ
      • App Operations & Features FAQ
      • App installation and download FAQ
      • Registration and Login FAQ
      • App Preview FAQ
      • Swing Shop FAQ
      • Billing FAQs
      • Paid App Passes & Tickets FAQ
      • Paid usage and uploading FAQ
      • Unlimited Usage and Package FAQ
      • Push sending FAQs
      • PlayStore FAQ
      • App Store FAQ
      • AdMob FAQ
      • Affiliate Program FAQ
      • Customization FAQ
  • Manual
    • App production manual (V3)
      • Start App Creation With MakerV3 Screen
      • Manual on How to Create an App In MakerV3 Screen
      • STEP1 Basic Information
      • STEP2 Prototype
      • STEP3 Page
        • How to Create a Home Screen For an App
        • Registering a menu icon image
        • How to use: Menu Exposure Settings
        • Set menu settings: Access permissions
        • Page Design - UI KIT
        • Page Design - eStore Page
        • Page Design - eStore Deals
        • Page Design - Product Category
        • Page Design- Page Templates
        • Page Design - Image Page
        • Page Design - HTML Editor
        • Page Design - Sign Up, login & Settings Page.
        • Page Design - Search Posts Page
        • Page Design - View Favorite Page
        • Page Design - View Coupons Page
        • Page Design - Share Your App Function
        • Page Design - App Introduction Page
        • Page Design - Admin Chat Page
        • Page Design - Chat List Page
        • Page Design - Surveys Page
        • Page Design - View My Posts Page
        • Page Design - Attendance Check Page
        • Page Design- Web Link
      • STEP4 Complete App Creation
        • How to create an additional app
        • How to update an app
        • App launch screen by update type
    • App production manual(V2)
      • App basics
        • Guide to create an app
        • App Update Type And Method
        • App Launch Screen Update Type
        • Push or WebView version creation method (super simple app creation)
        • WebView App Manual(production and operation)
        • Push App Manual(production and operation)
        • Remove Push App Toolbar
        • App Production
        • Guide to create App Icon Image
        • Guide to Create an Idle Screen Image
        • Image Editing Tool
      • Design Theme
        • Prototype UI Design
        • App Main Design Style
        • App Navigation Styles
        • Applying Slide Prototype
      • Page Menu
        • Page Menu – Main Menu Management
        • Creating an App Home Screen
        • How to use Web Link
        • Home screen: Applying App Introduction Page
        • How to use file attachment
        • How to use the image attachment
        • How to use Product category
        • How to use Weblink-linkeditor
        • How to use User Page
        • How to create an Image Page
        • How to create a web template page
        • How to create HTML editor page
        • Swing2App Page – Signup, Login, Settings
        • Swing2App Page – Search Post
        • Swing2App Page – View Favorites
        • Swing2App Page – View Coupon
        • Swing2App Page – Share App
        • Swing2App Page – App Introduction
        • Swing2App Page – Admin Chat
        • Swing2App Page – How to read my article
        • Swing2App Page - Survey
    • App Production Application TIP
      • Sending a push using the push API
      • Insert GIF image
      • Create a Flash style home screen
      • Change App Loading Icon
      • Set device mode (switch app screens)
      • How to use the app review button
    • App operation manual
      • Bulletin board management
        • Create a bulletin board
        • Bulletin board type, design style
        • Bulletin Board – How to Enter Posts
        • Bulletin Board – Post Schedule Settings
        • Set post detail options
        • Bulletin Board – How to Attach Files
        • Register video post(how to register a video)
        • Bulletin Board – How to Attach Music Files
        • How to enter post comments and comments
        • How to set up Bulletin Board Permission
        • Bulletin board authority setting
        • How to create a Form in Bulletin Board
        • How to write a bulletin board
        • How to use the list screen and creation screen
        • How to set up a bulletin board post alarm
        • Set Up a Board Administrator
        • Google Map Bulletin Board
        • Google Map Bulletin Board Advanced setting
        • HTML Editor Writing
        • Report and manage posts
        • Block posts
        • Create bulletin board by membership level
        • Bulletin board thumbnail image registration
        • Search Post Functions
        • Post Management Options
        • How to use the bulk registration bulletin board
        • Copy Bulletin Board
        • Copy Post
        • Move a post
        • How to delete bulk posts
        • Group Chat
        • Create a Secret Bulletin Board (1:1 Customer Service)
        • Create a link for a post
        • How to Use Calendar
        • Calendar Application - How To Use
        • How to create and register a stamp
        • Stamp application: Issue coupons upon completion of stamps
        • How to use the bulletin board header
        • Using 2 hash-tags Options
        • How to use hashtag search option
        • Download Posts
      • Service management
        • How to use Pop-up
        • Check-ins
        • Surveys
        • Resource Management – Capacity Management
        • Coupon Management: Create and Issue Coupon
        • How to use Admin Chat [1:1 Chat]
        • Chat Administrator Page – Chat List
        • Chat Administrator page – Chat settings
        • How to use chat list
        • Unified Notification Settings
        • App Policy Management – App Subscription Policy
        • App Terms of Use And Privacy Policy
        • App Policy Management-Membership Form
        • App policy management – How to set up a membership completion message
        • Membership Form-ID Setting
        • App Terms and Conditions, Privacy Policy
        • Create a Private App
        • App string management
        • Link Wizard
      • Push & Member Menu
        • Send push
        • Send Push from Push Version App
        • Push Posts
        • Display messages after getting push notifications
        • Delete or Mark as Read Push Notifications
        • Push history
        • Member Inquiry - Check Member Information
        • Member Inquiry - Setting up an Associate Administrator
        • Member Inquiry - Create User Account
        • Setting up an App Administrator
        • Permission Group Settings-Membership Rating
        • Admin Screen: Change App member's name
        • How to use Push device management
      • Analytics
      • Version control
        • Version management-App production and market registration history
        • How to apply for App Store Upload
        • How to apply for Google Play Store Upload
        • How to apply for a mobile web upload
      • Payment
        • Introduction of paid products and payment methods
        • Payment-How to use my payment status
        • How to Use 1000 SMS Tickets
        • WebView Lifetime Paid App
        • PushOnly Lifetime Paid App
        • How to use mobile web registration
        • Budget package
        • AdMob Power Package
        • Large Storage Packages
        • Online Stores – Coupon
      • Full Search Function
    • SwingShop
      • Apply for Swing Store
      • Swing Store Product Type
      • Introduction of pages provided by Swing Shop
      • How to Apply a Swing Store Menu to your App
      • Swing Shop - Shopping Mall Main Page How to Use
      • Shopping Mall Main Page Slide Image
      • Store Management - Basic Information Settings
      • Store Management - Shipping Management
      • Product Management - Set how to receive goods
      • Product Management - Product Category Registration
      • Store Management-Policy Settings
      • Product Management - Physical Product Registration
      • Product Management - Digital Products: PDF File Registration
      • Product Management - Digital Products: Video Files Registration
      • Product Management-Digital Products: Authorized Sales
      • Product Management-Digital Products: Coupon Registration
      • Product Management-Reservation system product registration
      • Product management - Reservation system, Time reservation product registration
      • Product management-Reservation System Operation TIP
      • Product Management - Product Post Management
      • Product Management- Product Inquiry, Reservation Product Inquiry
      • Product Management - Product Exposure Management
      • Order Management
      • Reservation Order Management
      • Store Statistics
      • Swing2App Page-shopinfo
      • Swing2App Page-Search
      • Swing2App Page - Category List
      • Swing2App Page-mypage
      • Swing2App Page - Cart
      • Swing2App Page-digital products
      • Product Modification - Modify a registered product
    • Affiliate program
      • How to apply for affiliate program
  • Web App - Webview, Push
    • Web App - Webview, Push
      • Swing2App WebView App
      • Swing2App Push App
      • webview app manual
      • Pushapp manual
      • How to create a push app or webview app easily
      • Push-app toolbar
      • How to use the first run address in webview and push app
      • WebviewApp basic settings and advanced setting options
      • Push App Toolbar - Introduction: How to Use and Functions
      • Registering a Push Notification Icon Image
      • Progress Bar Color Settings
      • Remove progress bar (not in use)
  • App Guide
    • How to use Swing2App Preview
    • Application operation
      • How to convert and use paid apps.
      • How to install APK file on your phone
      • How to install apps by sharing
      • Free app conversion method after Paid period ends/expires
      • Download the app after accessing the mobile Swing2App site
      • Download the app using the app installation link address
      • If you can not install the free version of the app (APK file), please check!
      • If you can not install the paid version app (APK file), please check!
      • Find App Password
      • Registering and changing your app profile picture
      • How to re-register with the same ID after leaving the app
      • Share app
      • App – Share your Bulletin Board Posts
      • How to use the App Administrator menu
      • App Administrator menu: Chat
      • App Administrator Menu: Registering Stamp
      • App Administrator Menu: Use Coupon
  • STORE
    • Play Store
      • How to create a Google Developer Account
      • Create a Google Developer - Business Account
      • Google Developer Account Identity Verification
      • Launching Play Store App
      • Setting up Play Store app auto-updates
      • Transfer your app to another developer account on the Play Store
      • How to change the name of Play Store Developer
      • Delete Play Store app
      • How to use Google Help Center
      • Issuing Google Maps API Key
      • Invite a Play Store Developer Account
      • How to get app updates released on the Play Store
      • Launch the Play Store Private App (Alpha release)
      • Check Play Store App Installs
      • Reply to Play Store app reviews
      • Play Store Developer Page
      • Play Store prior notice
      • Linking Play Store Privacy Links
      • Play Store App Search TIP
      • How to restore Play Store app
      • Update the Play Store App
    • App Store
      • App Store Apple Developer Account Registration
      • Check app store app downloads
      • How to use the App Store Customer Center
      • Delete apps from the App Store
      • AppStore App Rejection Cases
      • App Store TestFlight
      • How to invite Swing2App account on App Store Connect and share information on App Store Upload form
    • AdMob (Google AdMob Ads)
      • Admob Banner Ad Frequency Settings
      • Admob Operation Precautions
      • How to apply AdMob plug-in
      • AdMob Plug-in check
      • What is AdMob plugin setting?
      • How to join AdMobs, create an Ad Unit ID
  • Developer Document
    • Server Side API Specifications
      • Sending a push notification By API
    • Webview (Webview, Push only) Development tool
      • Implementing Google and Facebook Login in WebView
      • Website Member Integration Guide
        • Wix Website User Integration Guide
        • WordPress Website Member Integration Guide
      • Javascript API Documentation
  • Policy
    • Store Policy
    • Limit on the Number of Devices for Free User
    • Swing Store Terms and Conditions
Powered by GitBook
On this page
  • 1. Apply [Share App] to your app
  • 2. App launch screen: Share the app
  • 3. Settings menu: Share the app
  • [App sharing instructions - including app sharing, bulletin boards, and post sharing]
Edit on GitHub
  1. Manual
  2. App production manual (V3)
  3. STEP3 Page

Page Design - Share Your App Function

Last updated 1 year ago

What is app sharing?

App sharing is a feature that allows you to share apps created with Swing2App to a variety of applications.

You can use your app to share it with other users.

You can share apps through various application paths installed on your phone, such as KakaoTalk, messages, email, etc.

*Precautions

-The free version of the app can only be shared on Android phones! (iPhone Free VersionApp Sharing X)

-iPhone can't share the free version of the app, only apps released on the App Store.

-When sharing an app, if the app is released to the App Store, or Play Store, go to the corresponding Store launch link (URL).

For more information on how to download the app to share, please refer to the manual below!

☞[Go to the manual on how to download the app to share]


1. Apply [Share App] to your app

On the MakerV3 screen.

1)Go to STEP3 Page

2)Select Menu or Create a new menu. Click on the [+] button to add a new menu.

3) Enter the menu name

4) Select [Basic Feature] from under the page design.

5) Click on the [Function] option-> Select [Share App] function. Click on the [Apply] button. (Hover the mouse cursor over the page and the Apply button opens)

6) Press the [Save] button at the top of the screen to apply it to the app.

*If you select the Preview button, you can check how the page will look with a web preview (virtual machine).

*Even after applying, you can still see how the page is applied to the app through the virtual machine.

*Menu icon during the production phase, menu settings are not required.

In the manual, we proceeded without any additional settings, so please apply then as per your requirement.

2. App launch screen: Share the app

If you select [Share App] that you applied to the menu, the list of apps that can be shared will open.

*The app list does not look the same on all phones but will be displayed differently depending on the user's mobile phone device and model.

*The first window that opens displays the selective application, and if you select [Share Other], you can see and select other applications.
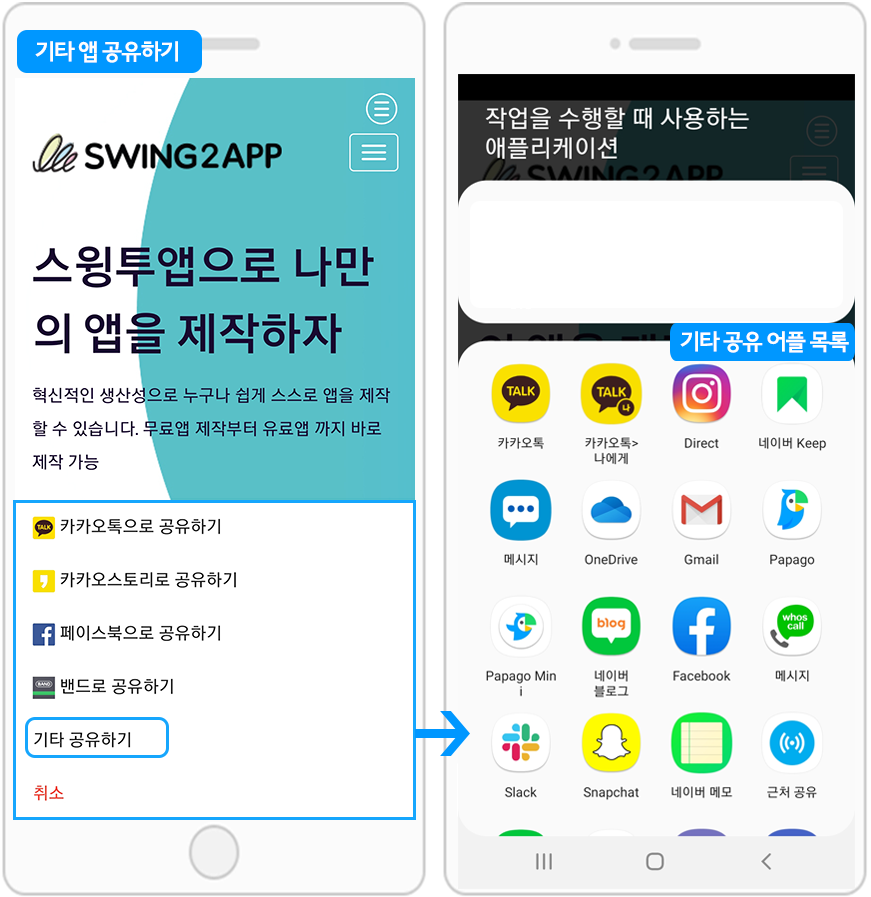
If you select [Share Other], you can see a list of various applications.

1)Share apps with KakaoTalk – Install shared apps

When sharing the app with KakaoTalk, please select the [Read More] button in the chat window.

A new window will pop up and you will be asked to select Run App.

If the app is already installed on your phone, press the [Launch App] button to go directly to the app.

*If you share with a user who has not installed the app, the user can download and install the app by pressing the [Download App (APK)] button.

*If the app is released on the Play Store, please press the [Install and launch the app] button. Go to the PlayStore launch link.

2) Email app sharing

In addition to sharing Katok, you can also share it by email.

When you access the recipient's email, you'll receive an app-sharing email in your inbox.

If you select the link, you will be taken to the app installation window as shown in the image above.

The method of launching the app and installing the app is the same as the KakaoTalk sharing method described above, and you can launch the app and download the app according to the user's presence or absence of the app installation.

3. Settings menu: Share the app

App sharing is also available in the settings menu which is set by default within the app without having to add the app sharing function separately on the swing page.

After launching the app, you can use the Share App function in the → Settings menu.

The setting is a page where you can set app basics, set notifications, and sign up, and the settings menu is created as the default settings when you create an app.

Therefore, you can also use the app sharing function as a basic function in the settings menu.

And in addition to sharing apps, you can also share bulletin boards, posts, and images.

[App sharing instructions - including app sharing, bulletin boards, and post sharing]

â–¶Android Phones

The app you created in the free version can only be shared on Android phones. (Android Phone Android ↔ Phone)

-If you share with a user who has not installed the app, you can download the app and install it by pressing the download button of the app (APK).

-When you share with a user who has installed the app, simply press the button to launch the app and you will immediately go to the app.

-If the app is released on the Play Store, you can go to the Play Store to download the app.

â–¶iPhone

Apps created in the free version don't support sharing on iPhones.

If your app is released on the App Store, iPhone users can also share it. (When sharing, you can go to the App Store and download the app)

★ Share apps, share bulletin boards, and posts For the full process manual, please check out the manual below~!

☞ [Go to the manual on how to download the app to share]

☞ [Go to the bulletin board and post sharing manual on how to use it]