> For the complete documentation index, see [llms.txt](https://documentation.swing2app.com/llms.txt). Markdown versions of documentation pages are available by appending `.md` to page URLs; this page is available as [Markdown](https://documentation.swing2app.com/manual/swingshop/swingstore-menu.md).
# How to Apply a Swing Store Menu to your App
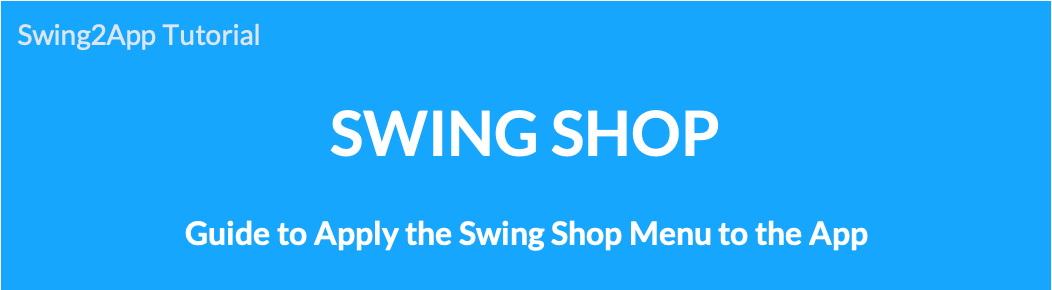
**Swing store app production – Various styles that make up the shopping mall screen**
After applying the swing store – Please register the product on the Manager page.
We will tell you how to apply the menu (swing store mall menu) that you have created to your app.
**★ First Maker(V2) page-Please check the page available in the swing store.**
If you apply for a swing store, you basically use it.
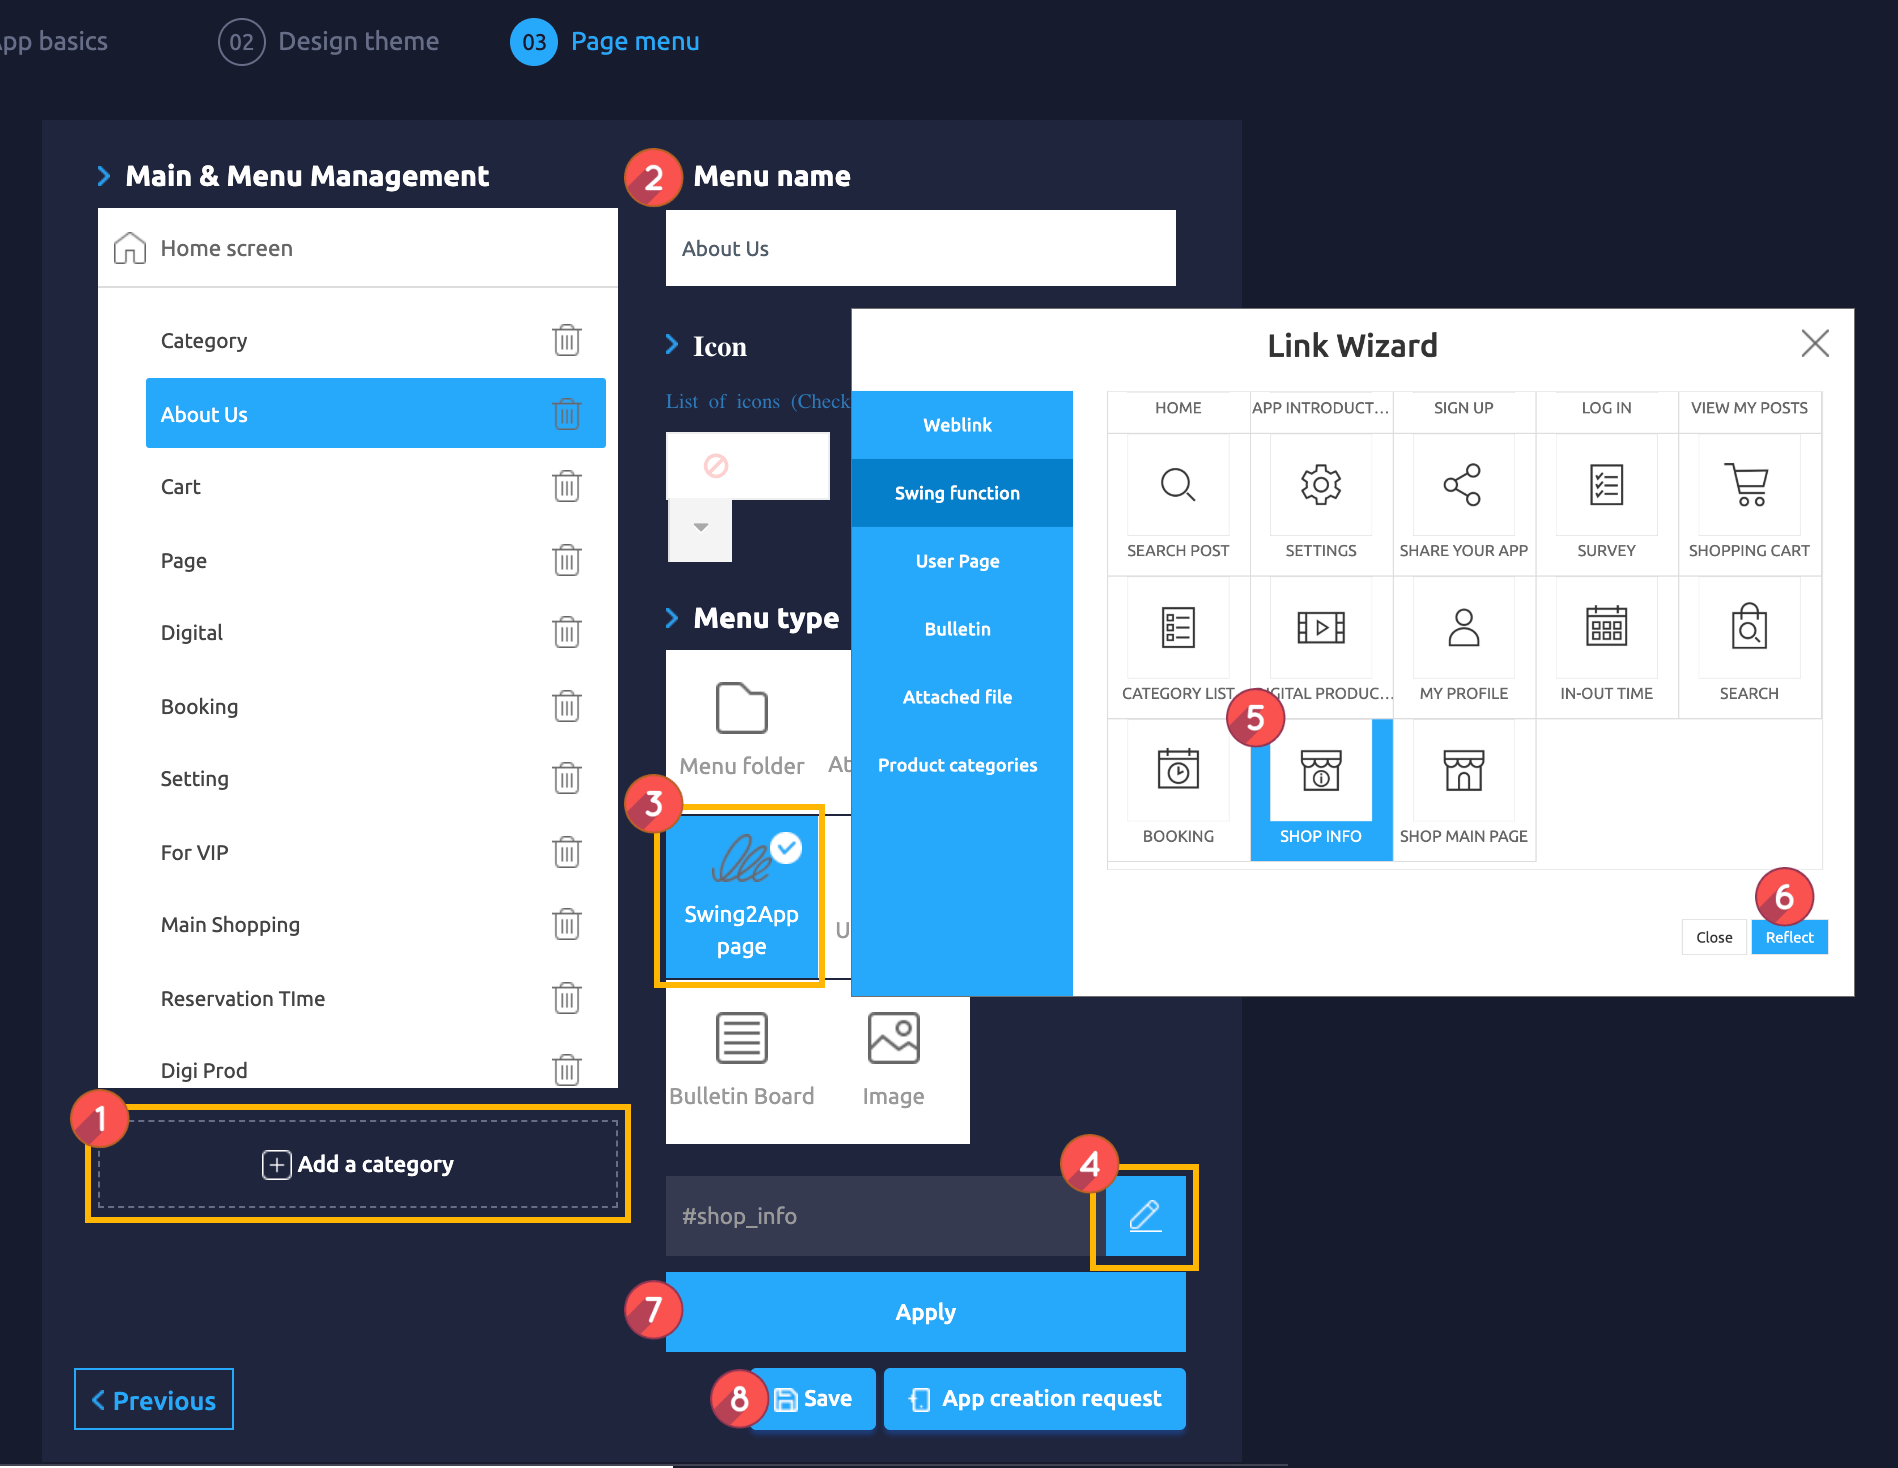
**\*Maker(V2) page – In the page menu step-Select the menu type: If you select \[Swing2App Page] and select to load, the swing store (the page required to run the mall) will automatically create related pages.**
> -Customer (User) Page: Shopping Cart, My Page
>
> -Mall main, shopping mall information
>
> -Category list
>
> -Digital product purchase complete page, reservation product reservation (period setting, time + period setting)
>
> -Booking a date-booking product, booking a date-and-time-booking product
>
> -Search for products
Therefore, if you are using the swing store, you can select the swing2app page on the Maker(V2) page and you will be able to see all the menus related to the swing store.
You can apply the required menus to the app.
You can apply each page to the menu, and if you look at the virtual machine on the right, you can see in real time how the page looks like in the app.
When creating an app, please apply various pages to the menu and check it through a virtual machine.
When creating the Swing Store app, please check the manual below, as it provides a variety of style-specific applications that make up the shopping mall screen.
### **STEP 1. \[Shopping Mall Main] page applied**

**\*The shopping mall main page is the most basic shopping mall design UI, and many users are using it when making swing store apps.**
**We’ll show you the mall main page style and how to apply it to the app home screen.**
This is the swing store app main home screen that applied the main page of the shopping mall.
It is provided as a basic shopping mall UI.
\*\* Swing Store – Basic information registered in the shop management, products registered in the product management consists of the main page.
Therefore, the main page can be fully visible only if you register basic information in store management and register the product.

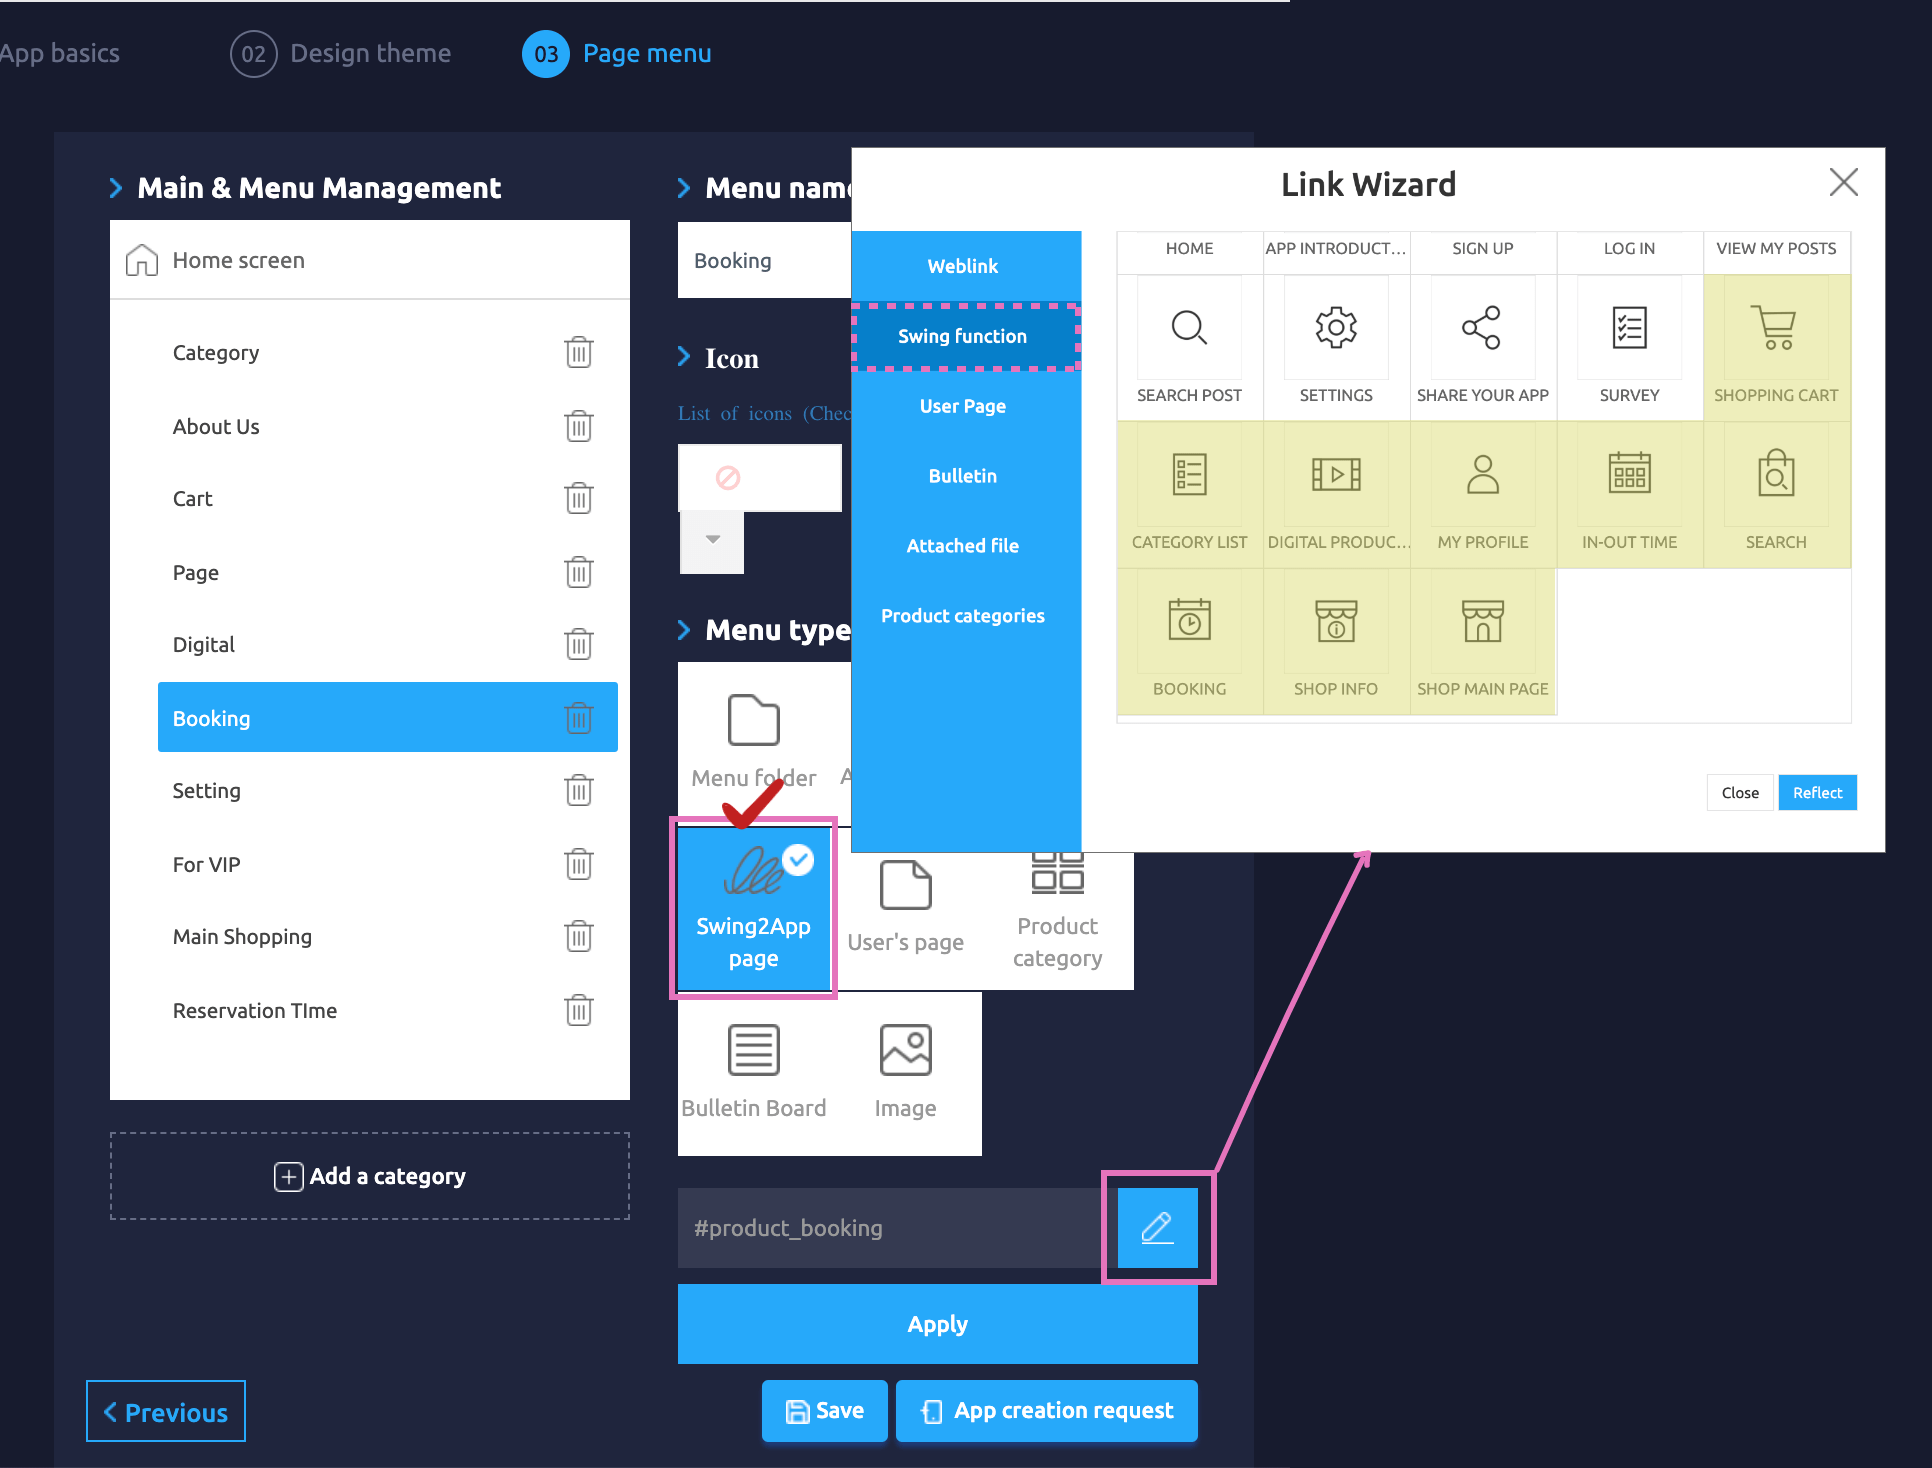
**▶Shopping Mall Main Page – How to Apply to App Home Screen**
Maker(V2) Page → Move to Step 3 Page Menu
1. Select Home screen and click **Add a Category.** A new menu item will appear.
2. Select the new menu item and change the name in **Menu Name.**
3. Select **Swing2App Page.**
4. Click on the **Link Wizard** icon. The **Link Wizard** pop-up window will open.
5. Select a **Shop Main Page** from the list.
6. Click on **Reflect**
7. Click on **Apply.**
8. Click on **Save.**
### **STEP 2. Apply \[Shopping Mall Information] page**

**\*Shopping mall information page is a page that shows icon banner of store information: opening hours, store introduction, icon image, share/call.**
**We’ll show you the style of the shopping mall information page and how to apply it to the app home screen.**
Swing store app is the main home screen applied to the shopping mall information page.
\*\*Shopping mall information page will be shown the basic information registered in the swing store-store management.
Therefore, you can register the basic information in the store management, you can also edit later in the menu.

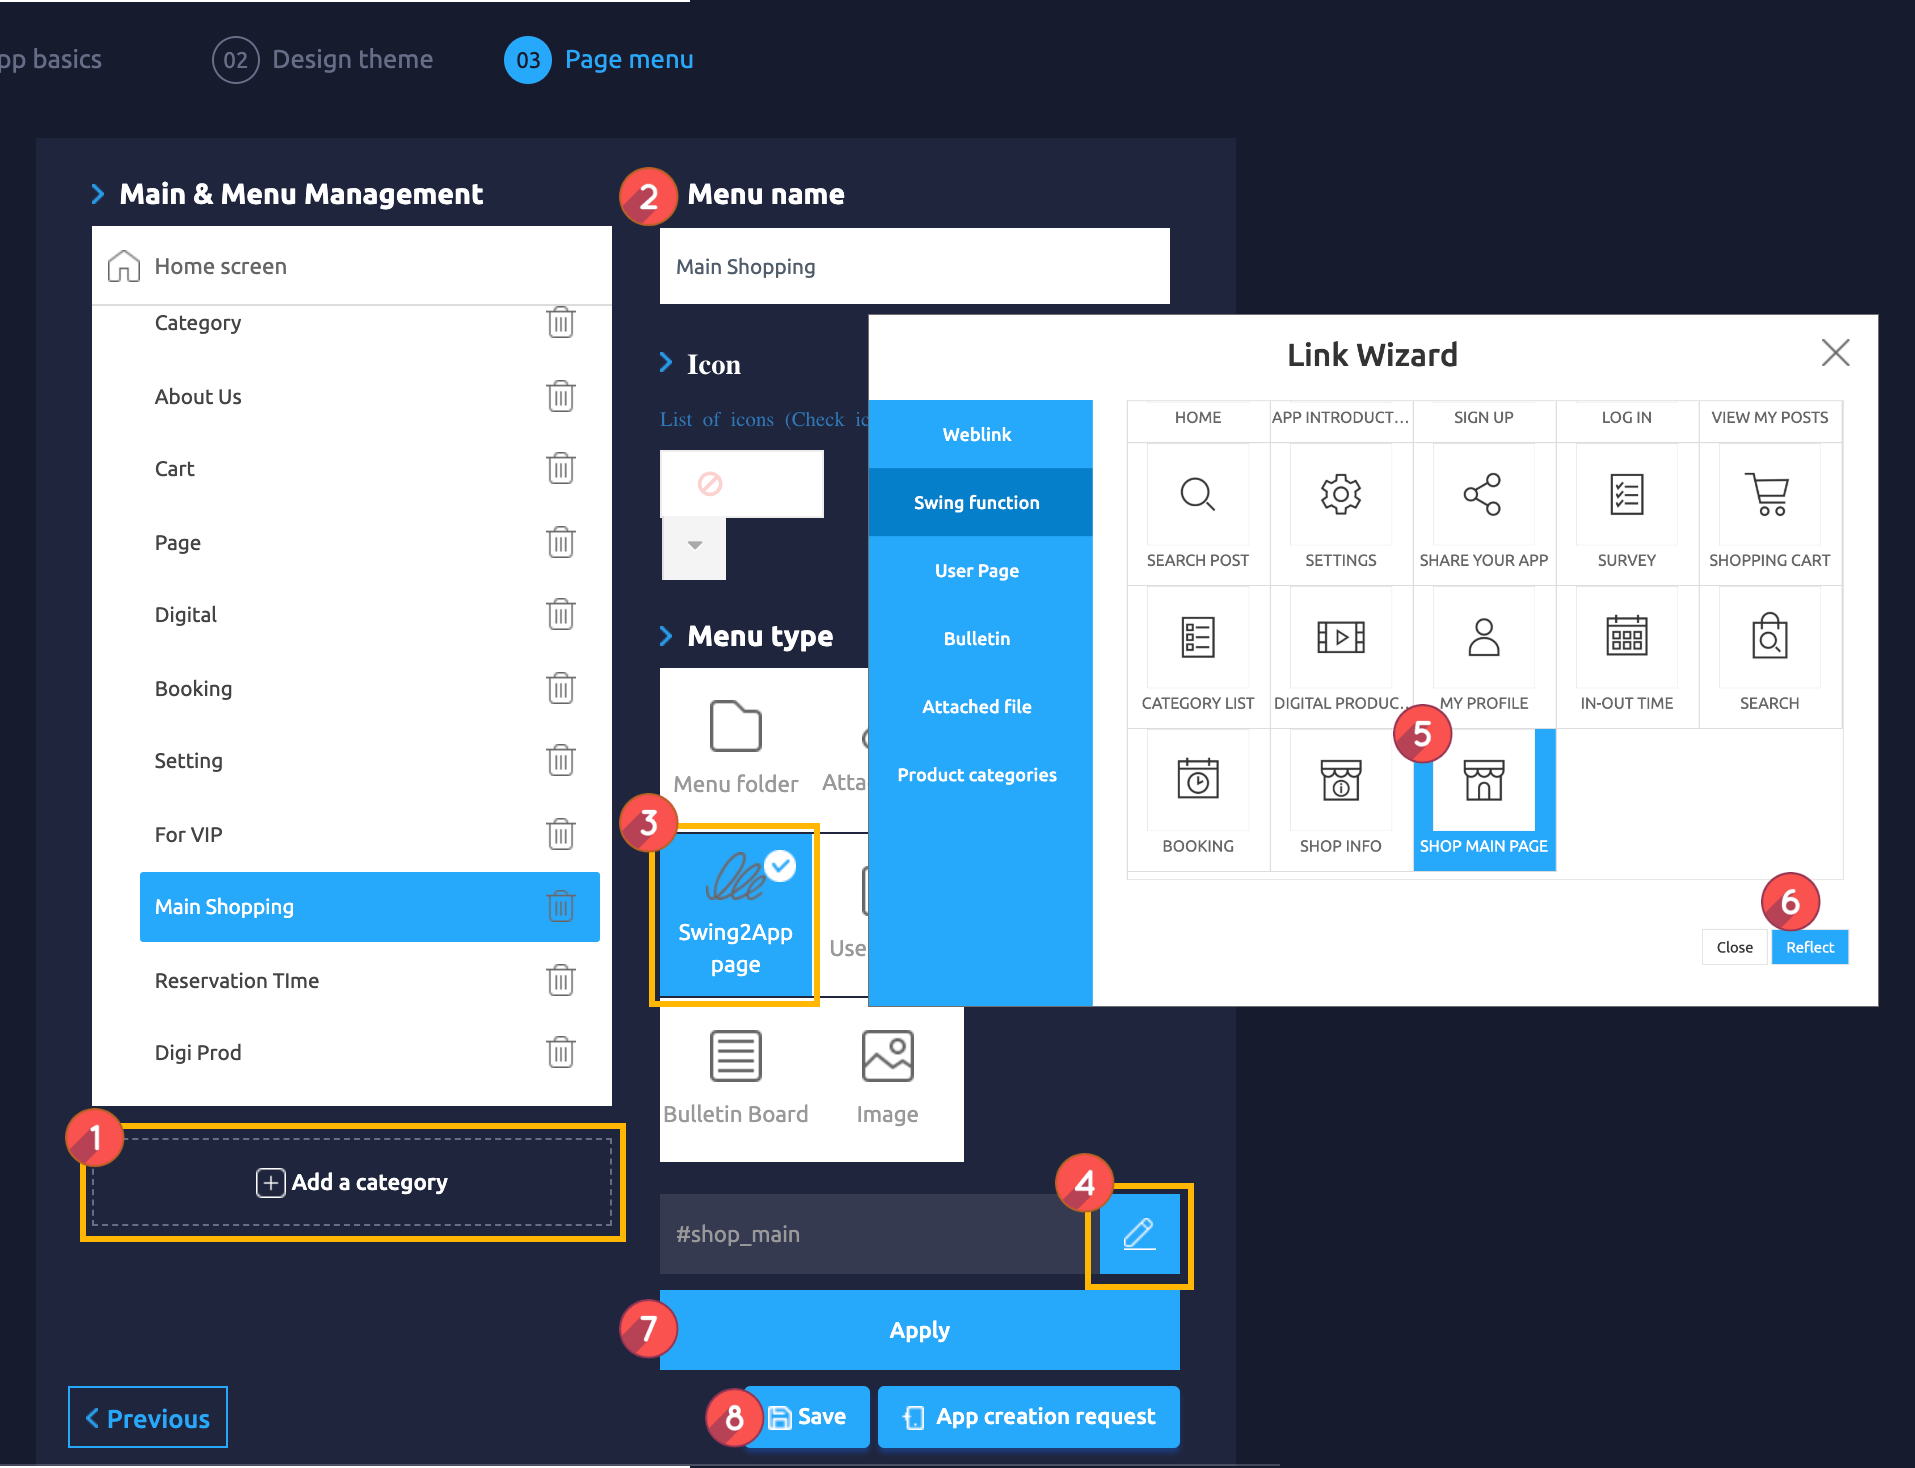
**▶Shopping Mall Information Page – How to Apply to App Home Screen**
Maker(V2) Page → Move to Step 3 Page Menu
1. Select Home screen and click **Add a Category.** A new menu item will appear.
2. Select the new menu item and change the name in **Menu Name.**
3. Select **Swing2App Page.**
4. Click on the **Link Wizard** icon. The **Link Wizard** pop-up window will open.
5. Select a **Shop Info** from the list.
6. Click on **Reflect**
7. Click on **Apply.**
8. Click on **Save.**
### **STEP 3. Using the User Page**

**Do you not like the swing store page – the main page of the shopping mall and the shopping mall information page??**
**Of course! Home screen can be created by applying it to other pages.**
If you use the custom page creation tool provided by Swing2App, you can work according to your desired style.
The user page provides the link wizard function (web link, app menu link, etc.), so you can link to the menu created in the swing store.
We’ll show you how to create it through the sample app.
**1. Using Web Template Pages**
First of all, we will show you how to link the registered products to each banner (button) using the web template page.
Web template is a user page provided by Swing2App and provides a variety of industry-specific design templates.
Since the design is fully provided, users can only change the text, images, and links.
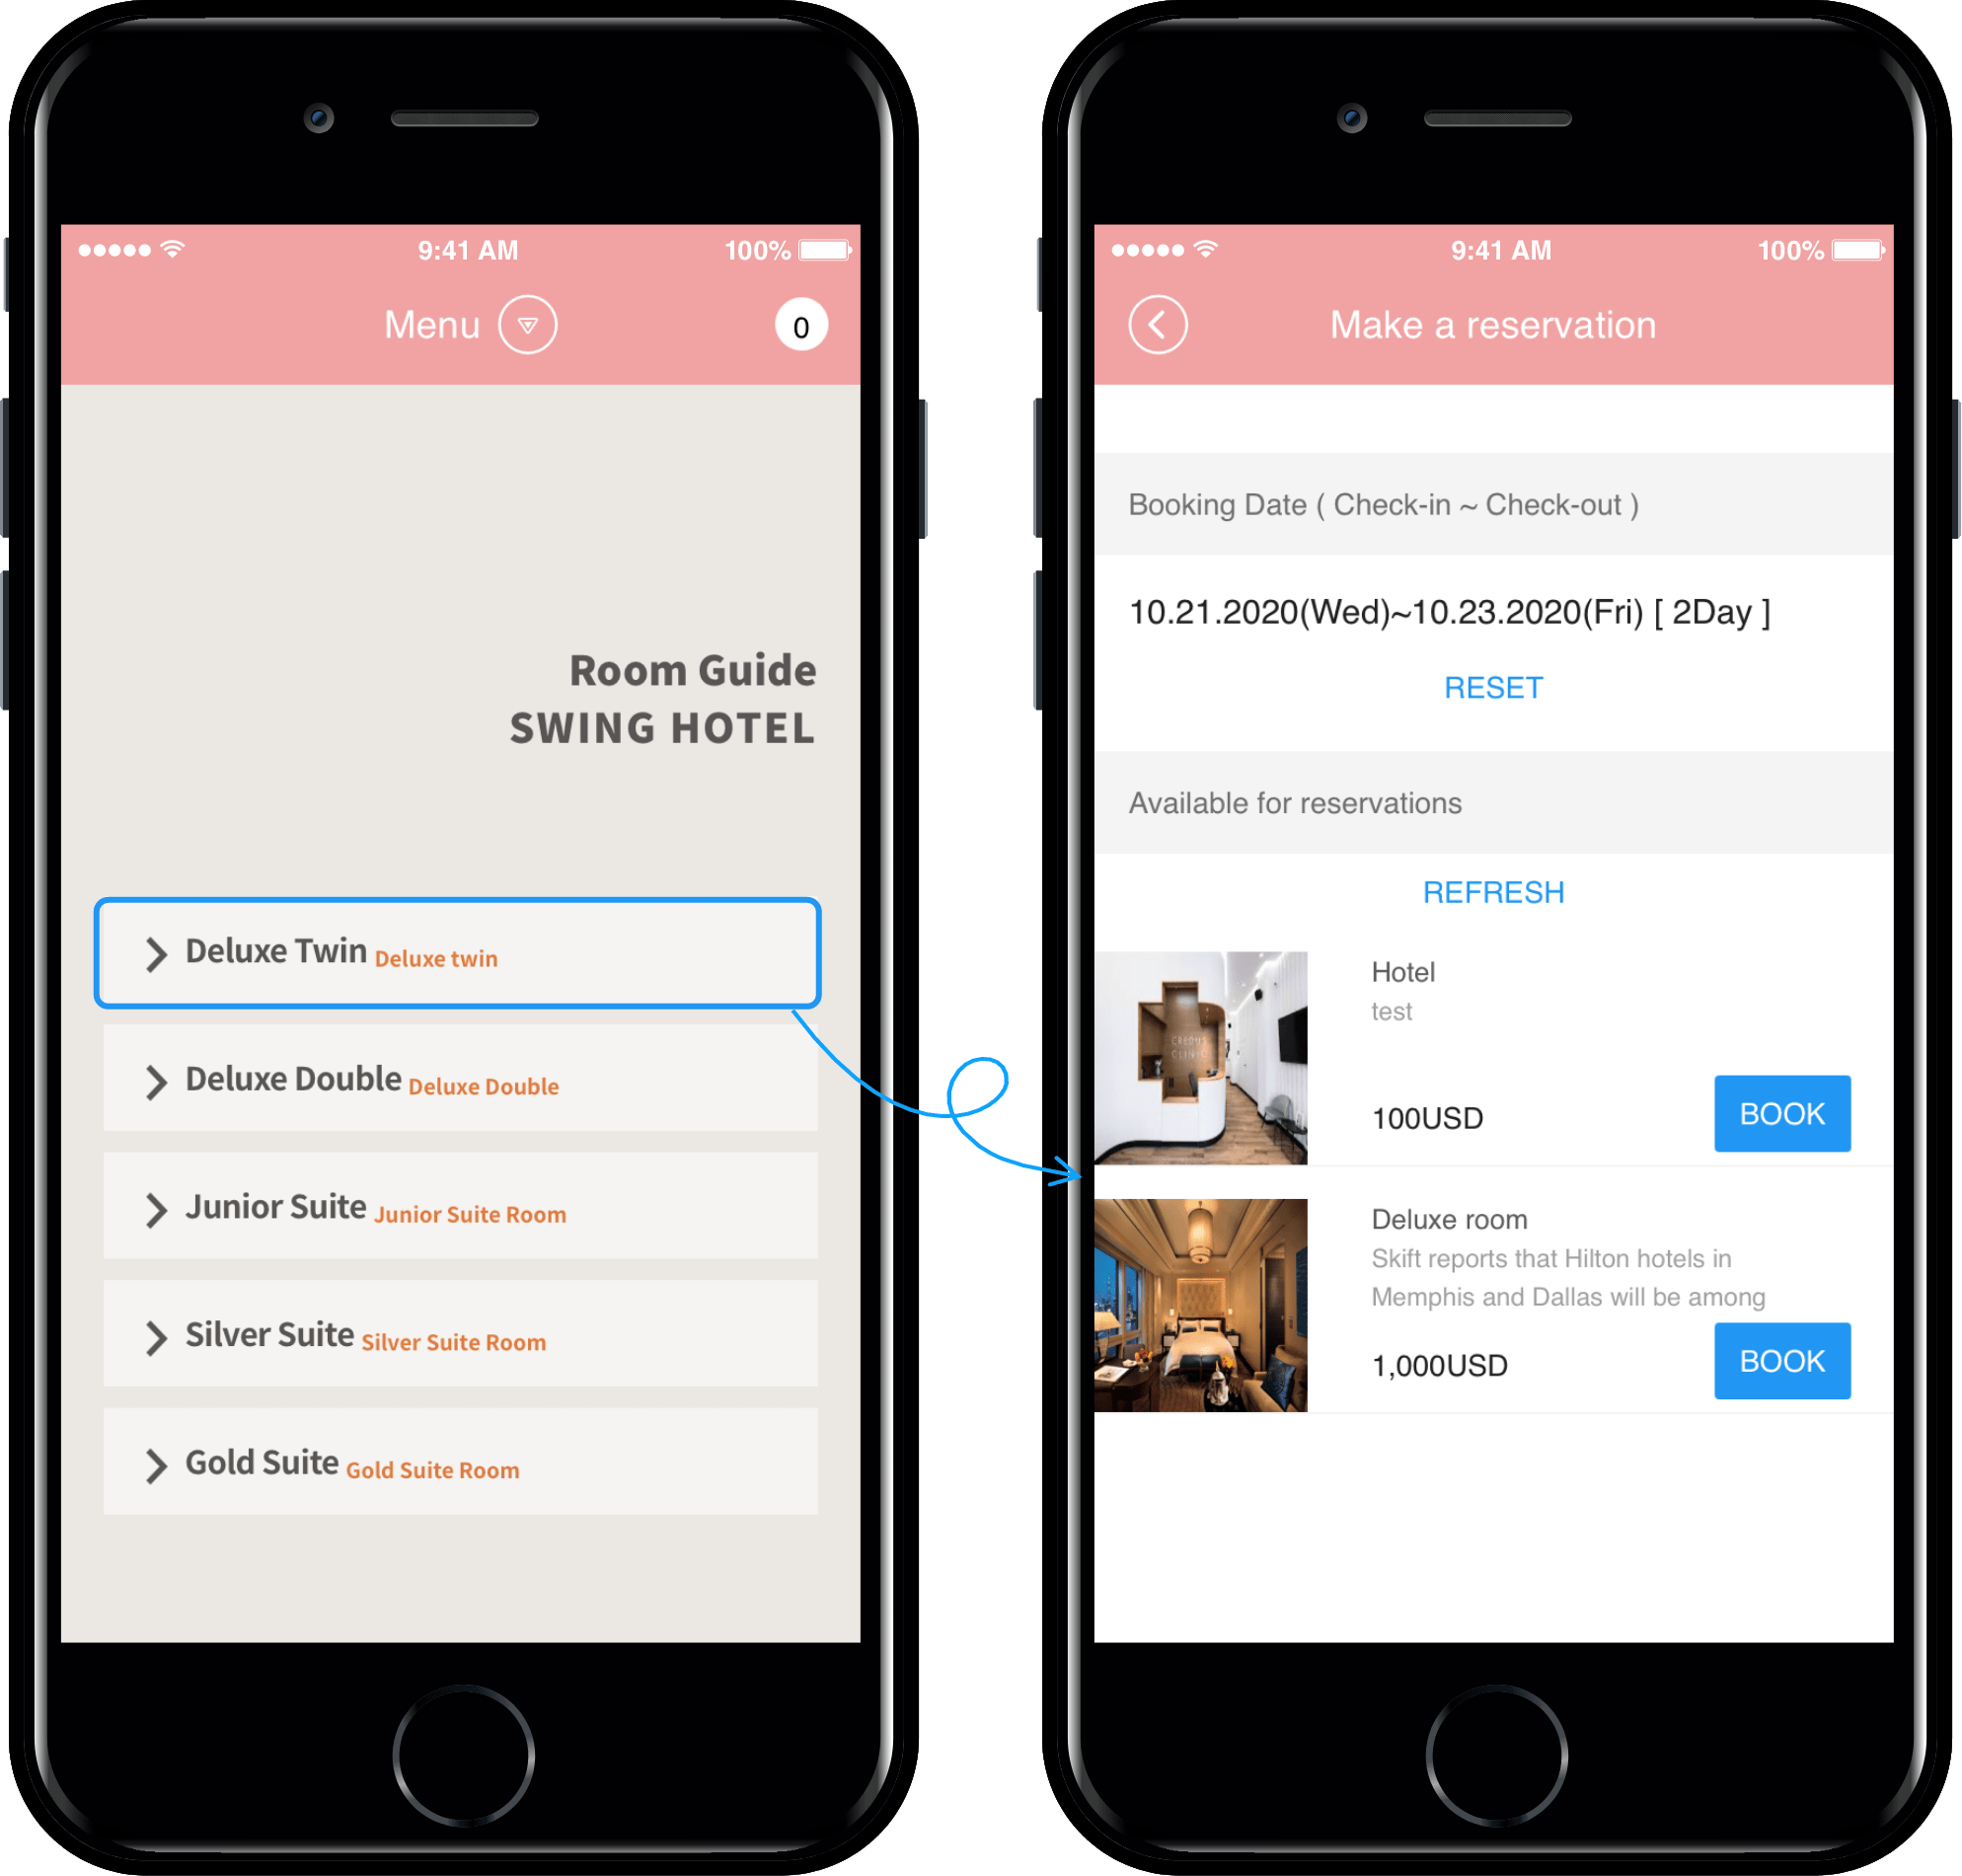
**In the hotel sample app, the web template is placed on the home screen, and the reservation link is applied to each button to purchase the reservation.**

**▶Web template page – How to create a swing store product**
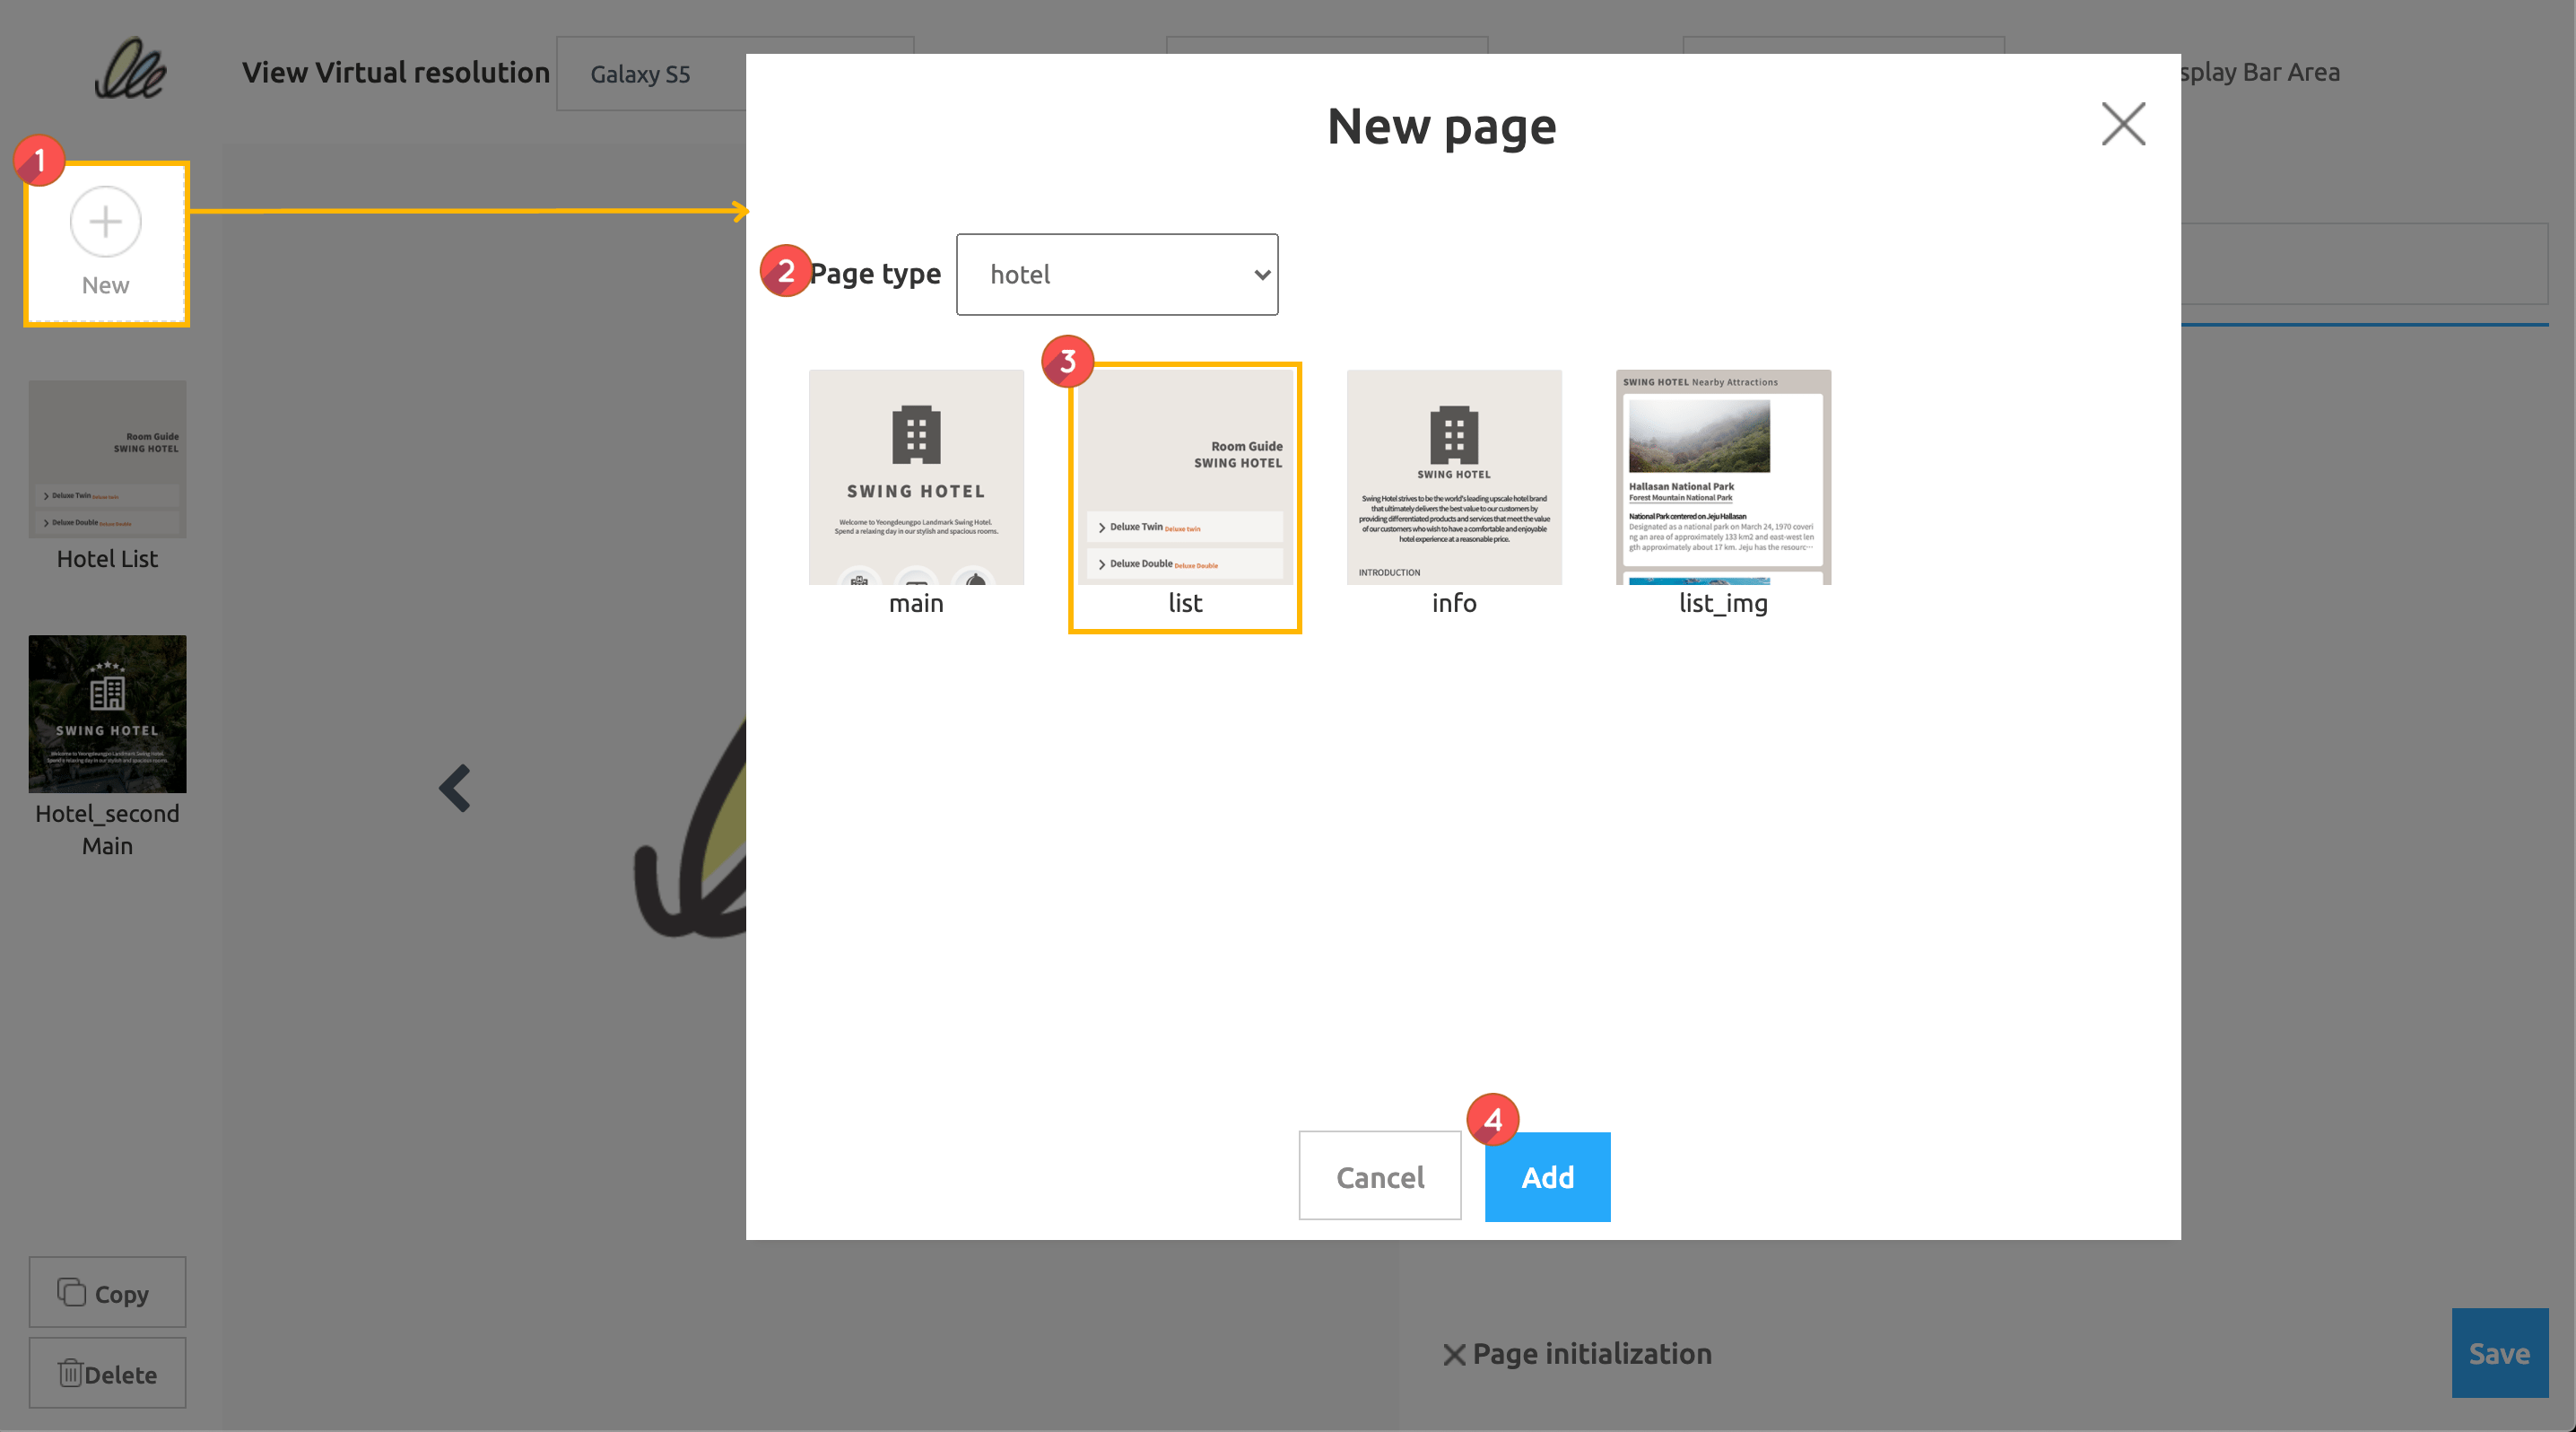
**On the Maker(V2) page – select step 3 Page menu – select ‘User Page’ in Menu Type, click Link Wizard and click ‘New’ in ‘Page Template’.**
**When the web template page builder window opens, follow the steps below.**
1\)Click the **\[New]** button.
2\) Select Page Type: Hotel. (We offer a variety of industry templates, please choose the style of your choice.)
3\) From the different pages select the page as per requirement.
4\) Press the **Add** button.
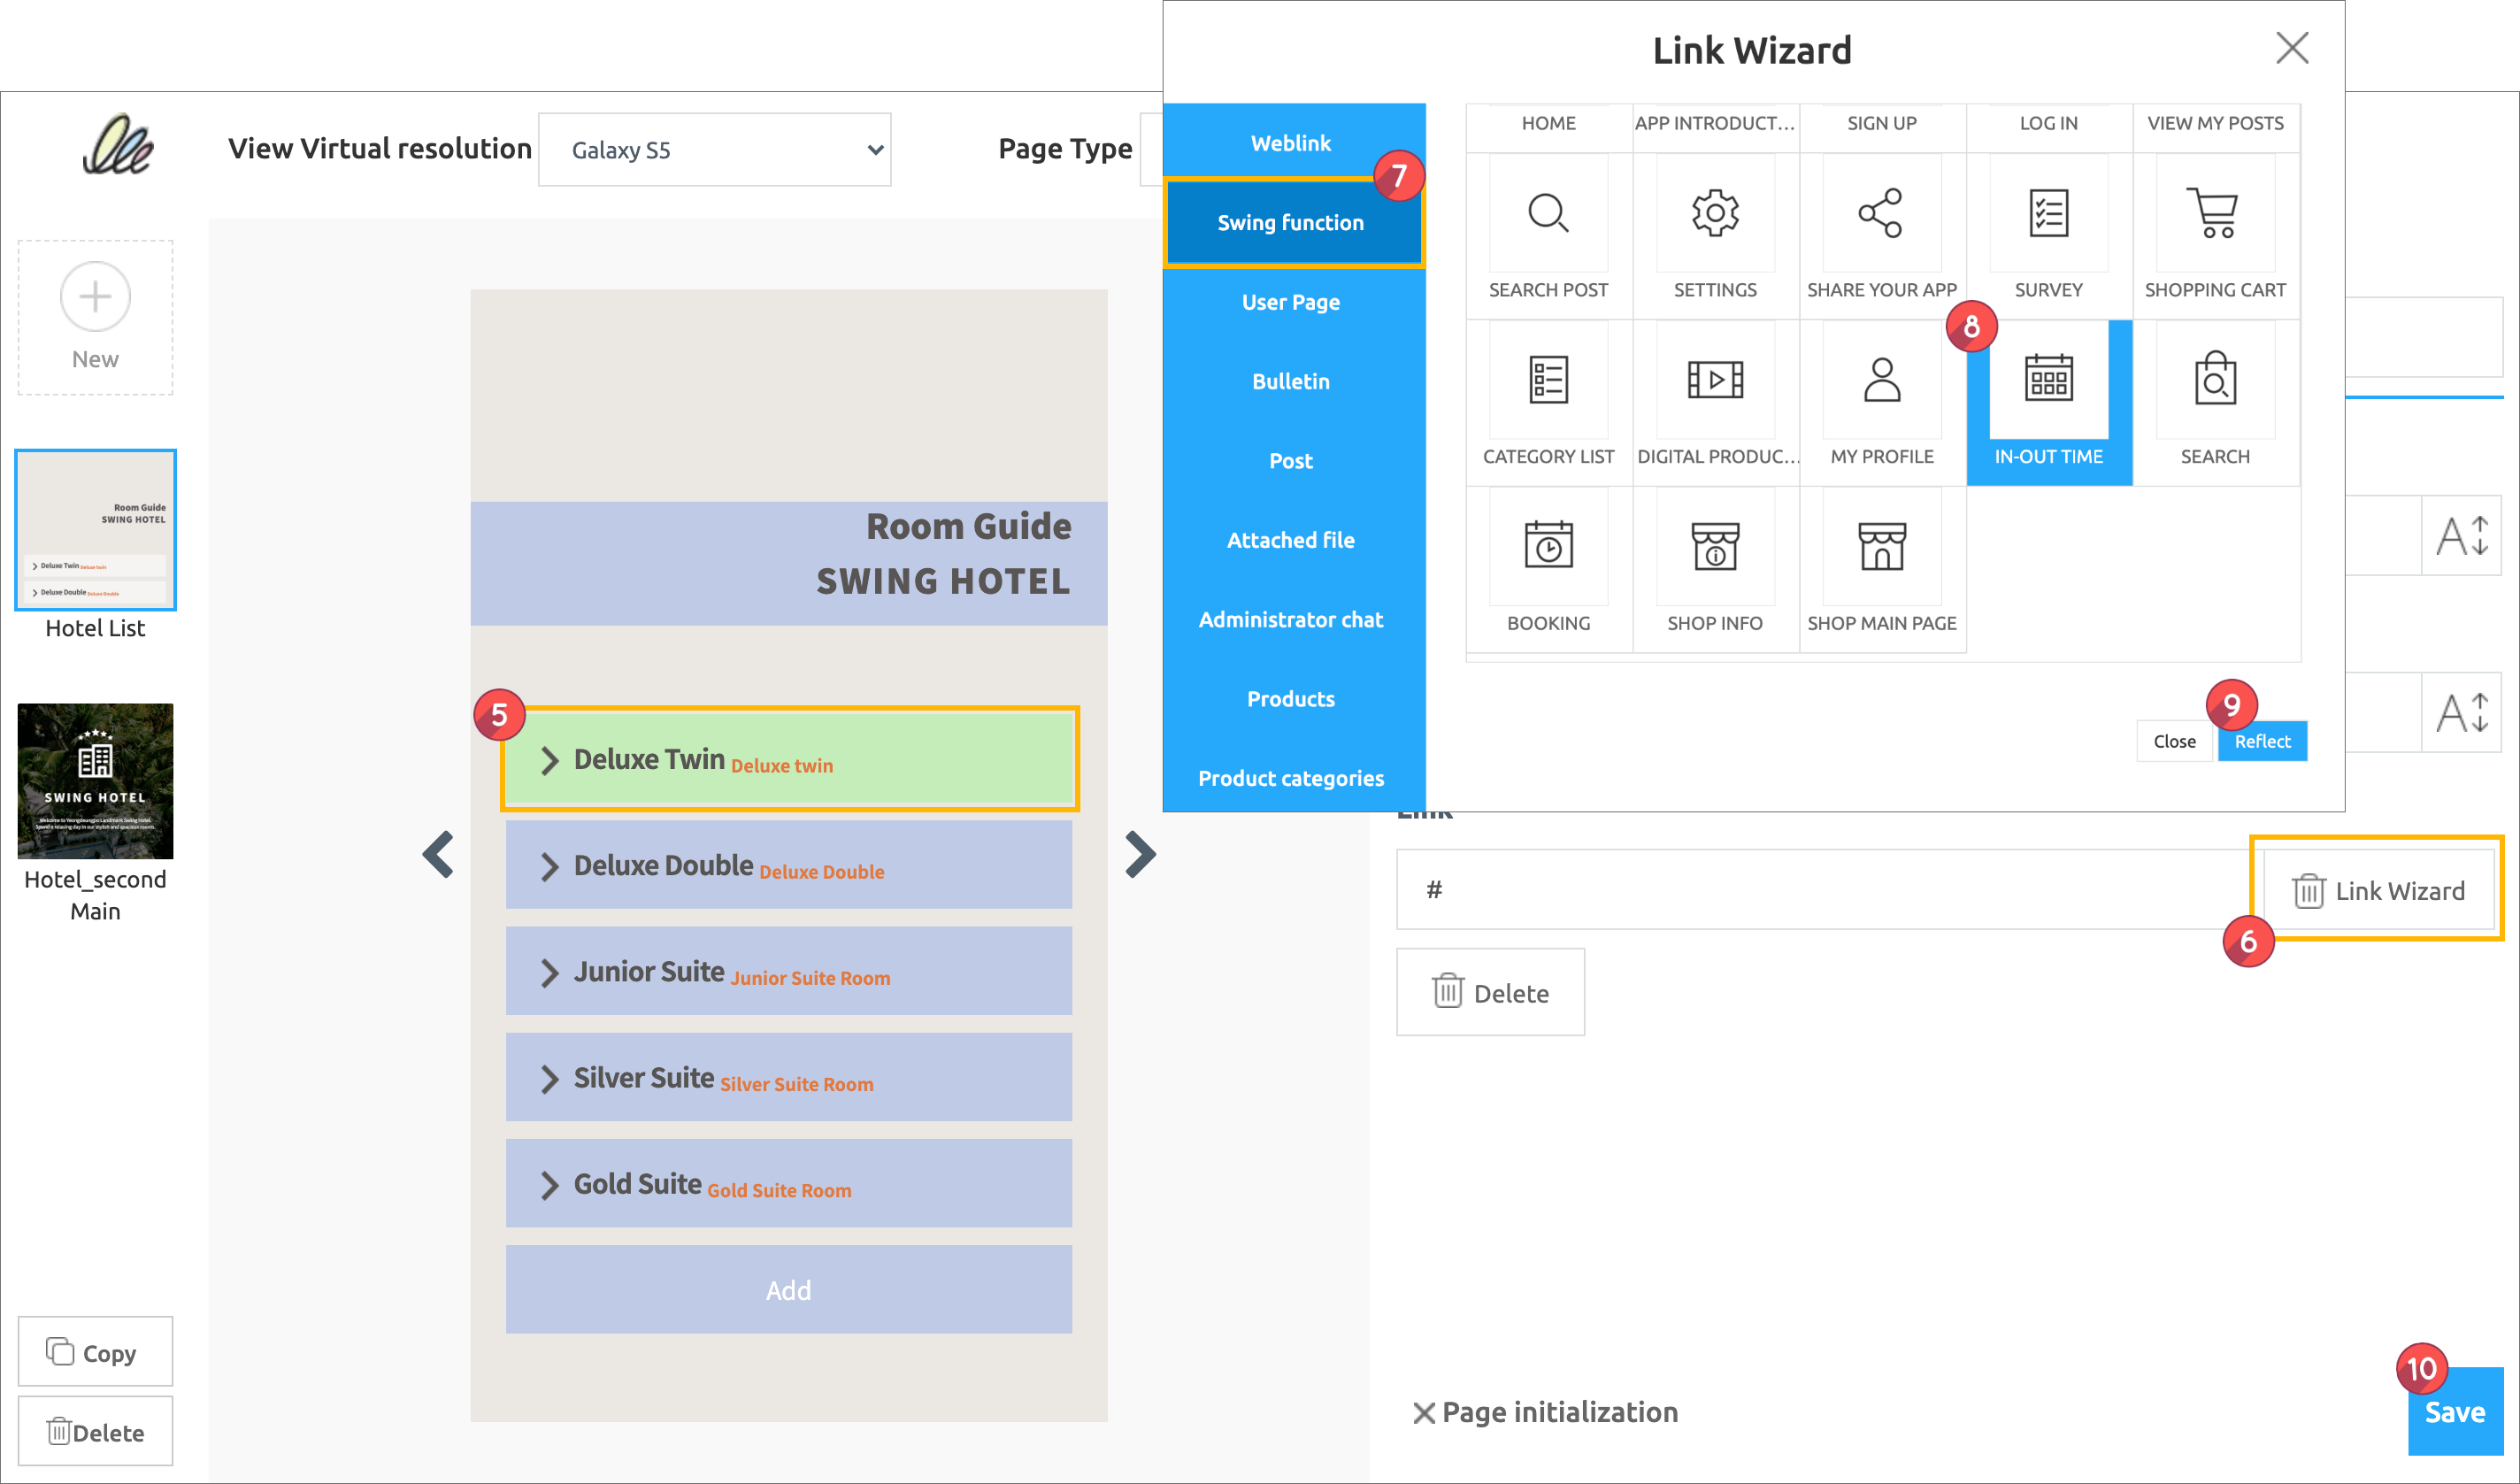
5\) In the template, select the button to which you want to apply the link.
6\) Click the **Link Wizard** button.
7\) Select **Swing Function** in the link wizard window.
**\*If you connect the product you are selling directly – select the product, search for the product name and apply the link.**
**\*You can also select a product category to link the category itself.**
8\) Select **In-Out Time** from the list.
**\*The app shown in the sample is a shopping mall that sells reservations with hotel apps, so I chose to reserve a reservation.**
**Depending on the Swing Store product type, you can choose to buy digital goods and connect directly to the products that are sold.**
9\) If you press the **Reflect** button, the link is applied to the button.
10\) Click **Save.**
\*If you select the \[Link Wizard] button provided in the user page, you can apply all menus related to the swing store operation.
Once you have applied the swing2app feature, product and product category, press the button in the app to go to the link.
**▶Template page – how to apply to app home screen**
Now that you have a template, can you apply it to your app?
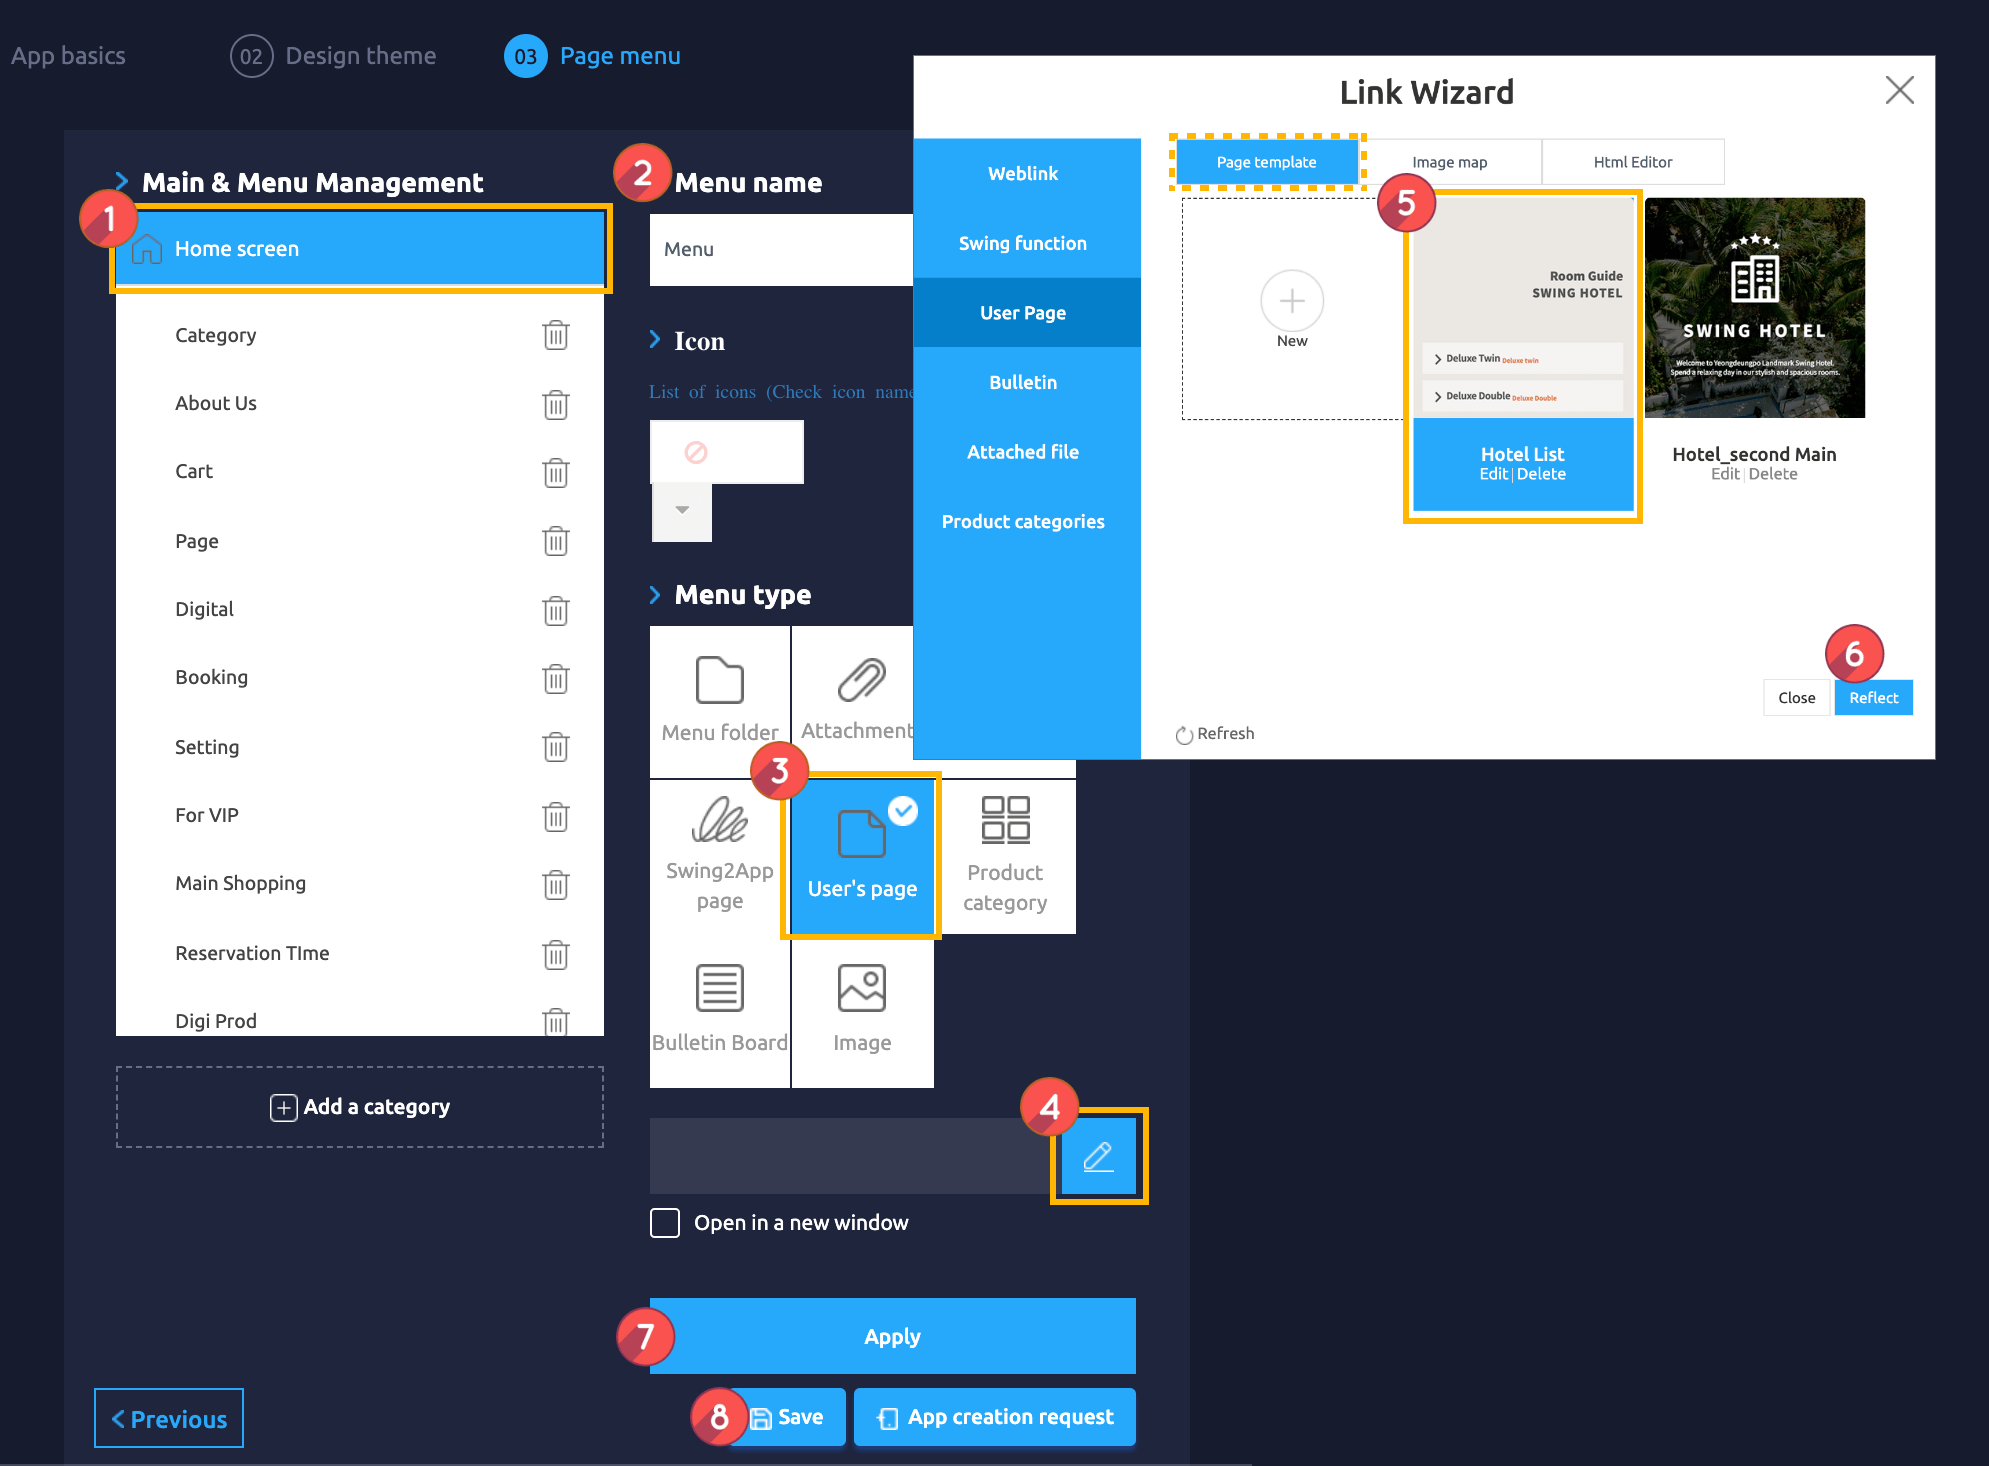
Maker(V2) Page → Move to Step 3 Page Menu
1. Select Home screen.
2. Change the name in **Menu Name.**
3. Select **User’s Page.**
4. Click on the **Link Wizard** icon. The **Link Wizard** pop-up window will open.
5. Select a page created from the templates in Page templates.
6. Click on **Reflect**
7. Click on **Apply.**
8. Click on **Save.**
**★Application TIP**
You can also organize your reservation product page with other style web templates.
I used the Information page for other industry templates.
After editing the image and text, create a – schedule link on the bottom button and select the button to go to the schedule link.
You can compose a shopping mall screen using various web template designs.
**2. Using Image Pages**
The second is an image page, which will show you how to link the items registered in the swing store to each banner (button).
The image page is also a user page provided by the swing2app, which allows you to link by setting a banner on top of the image.
If you are uncomfortable using only tools because you create your own images, you can freely configure them.
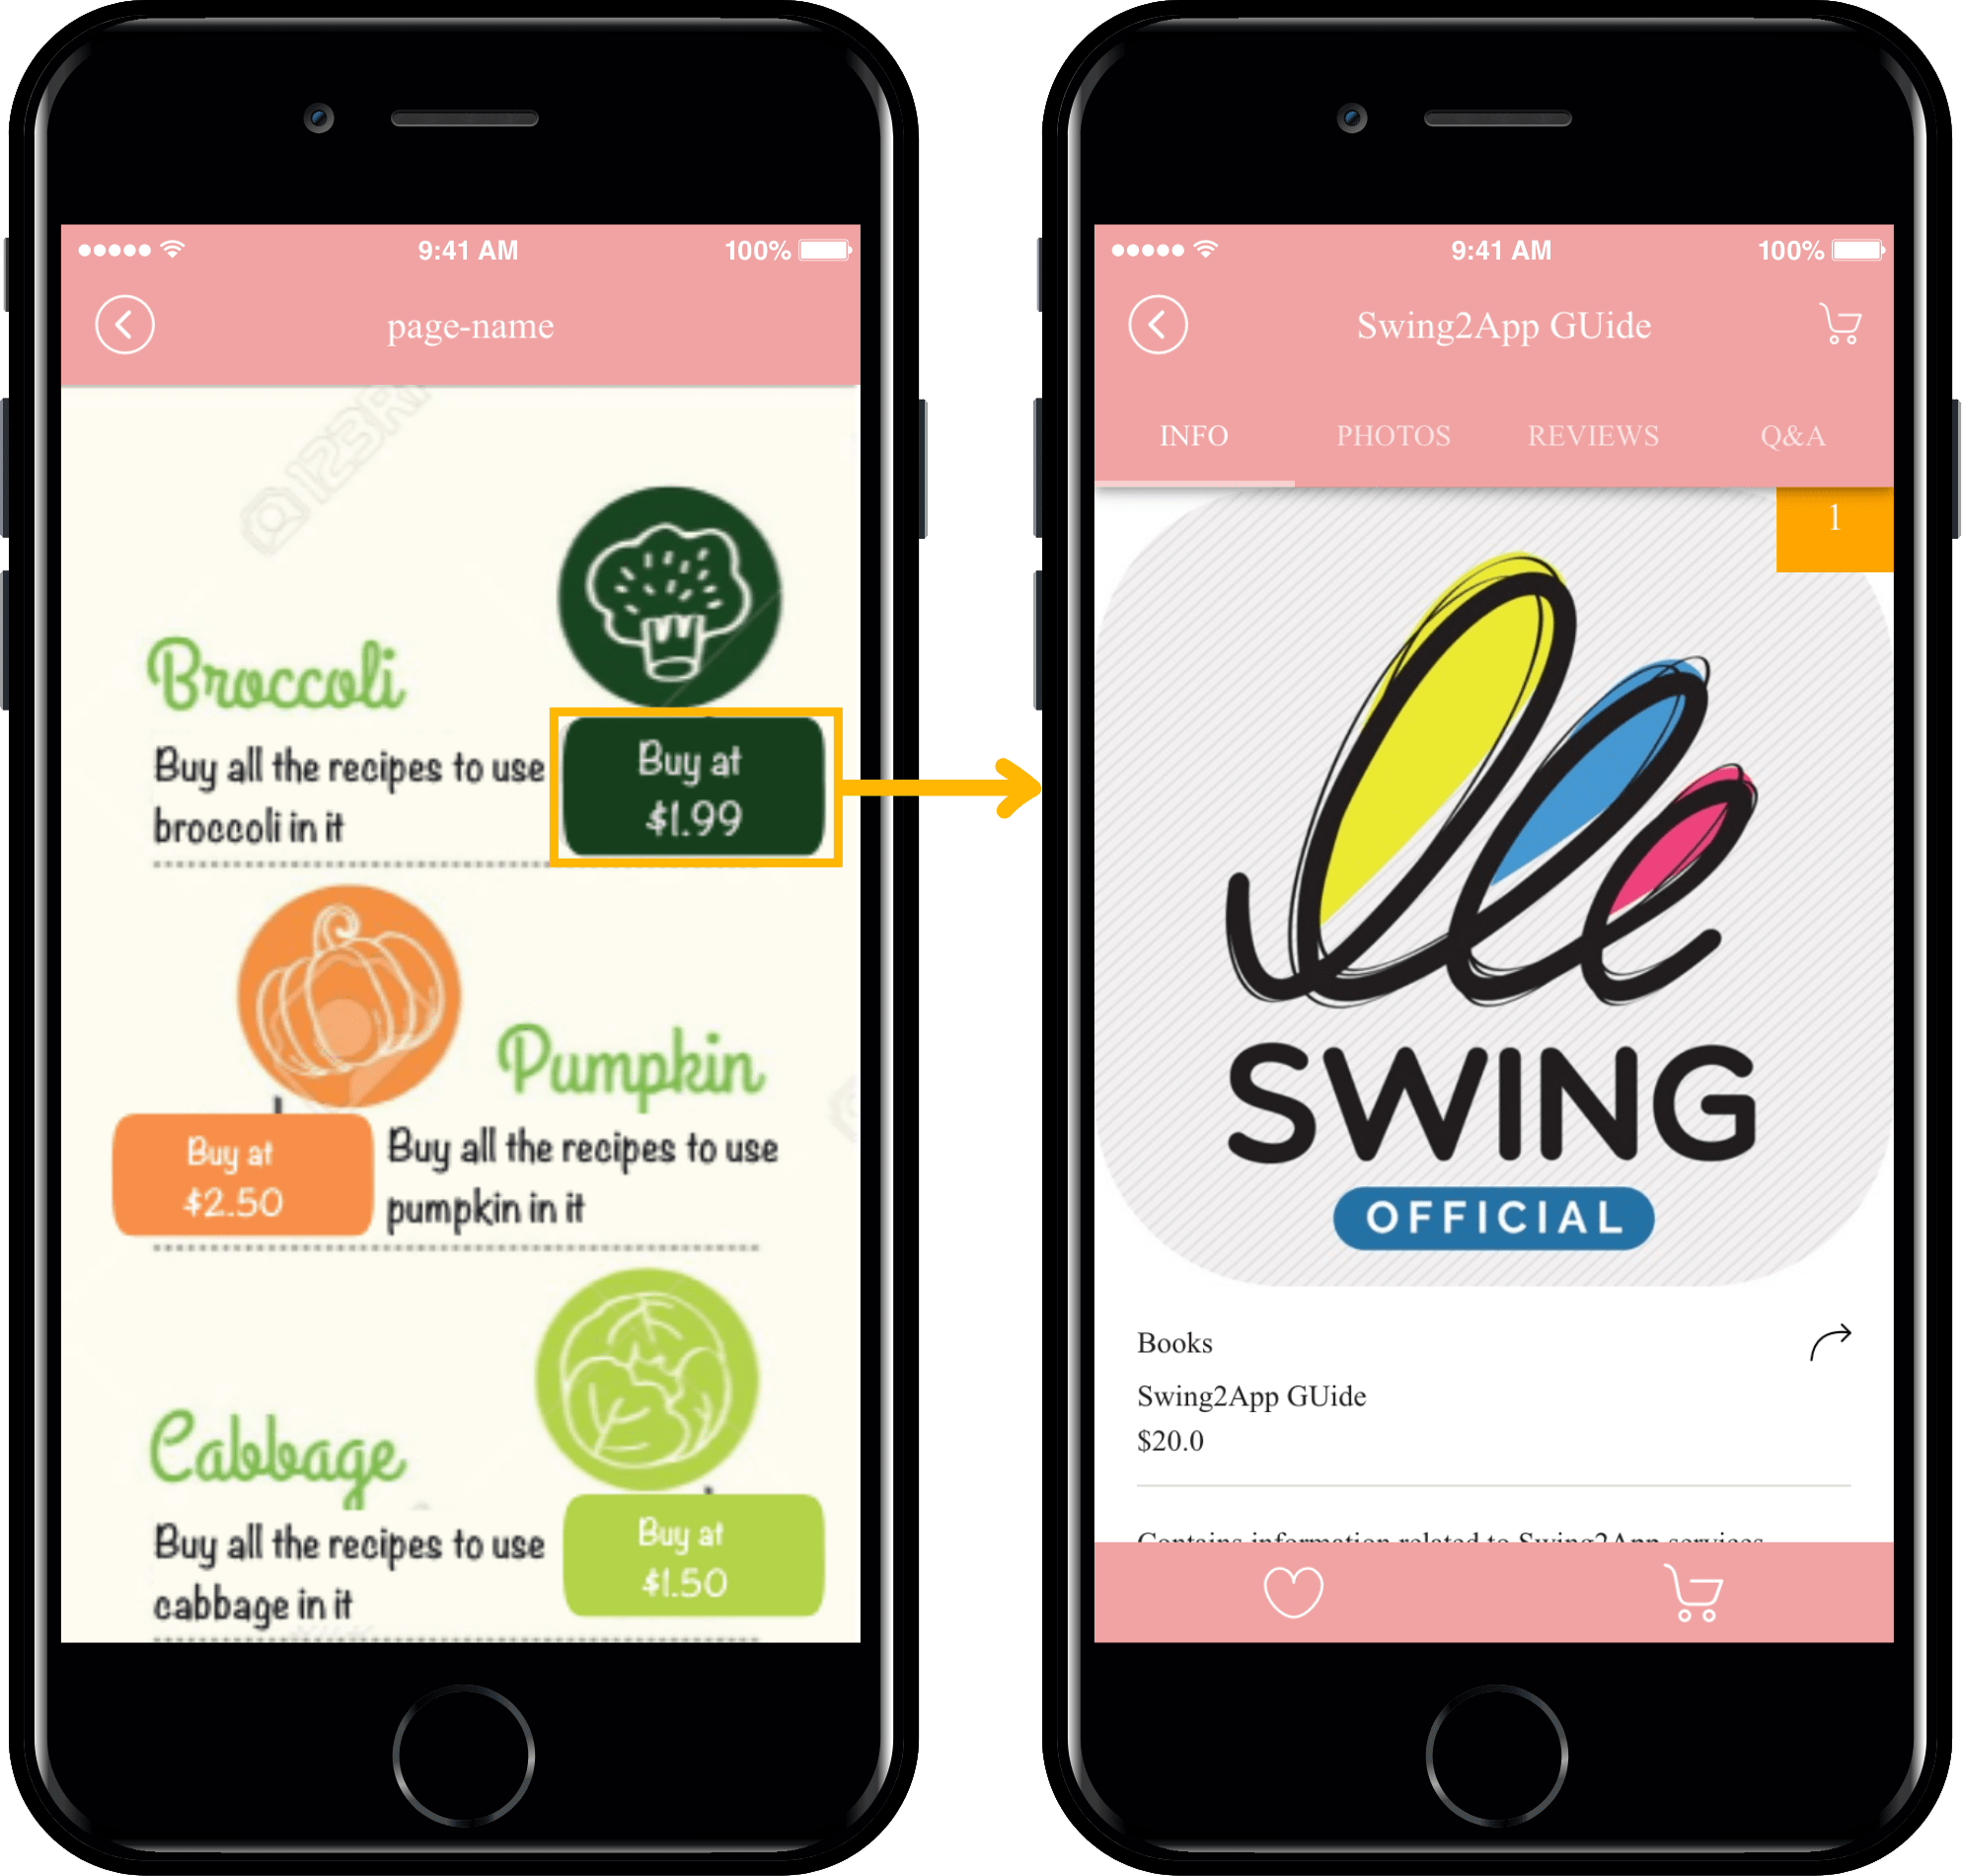
**In the school sample app, the image page is placed on the home screen, and the product can be purchased for each banner.**

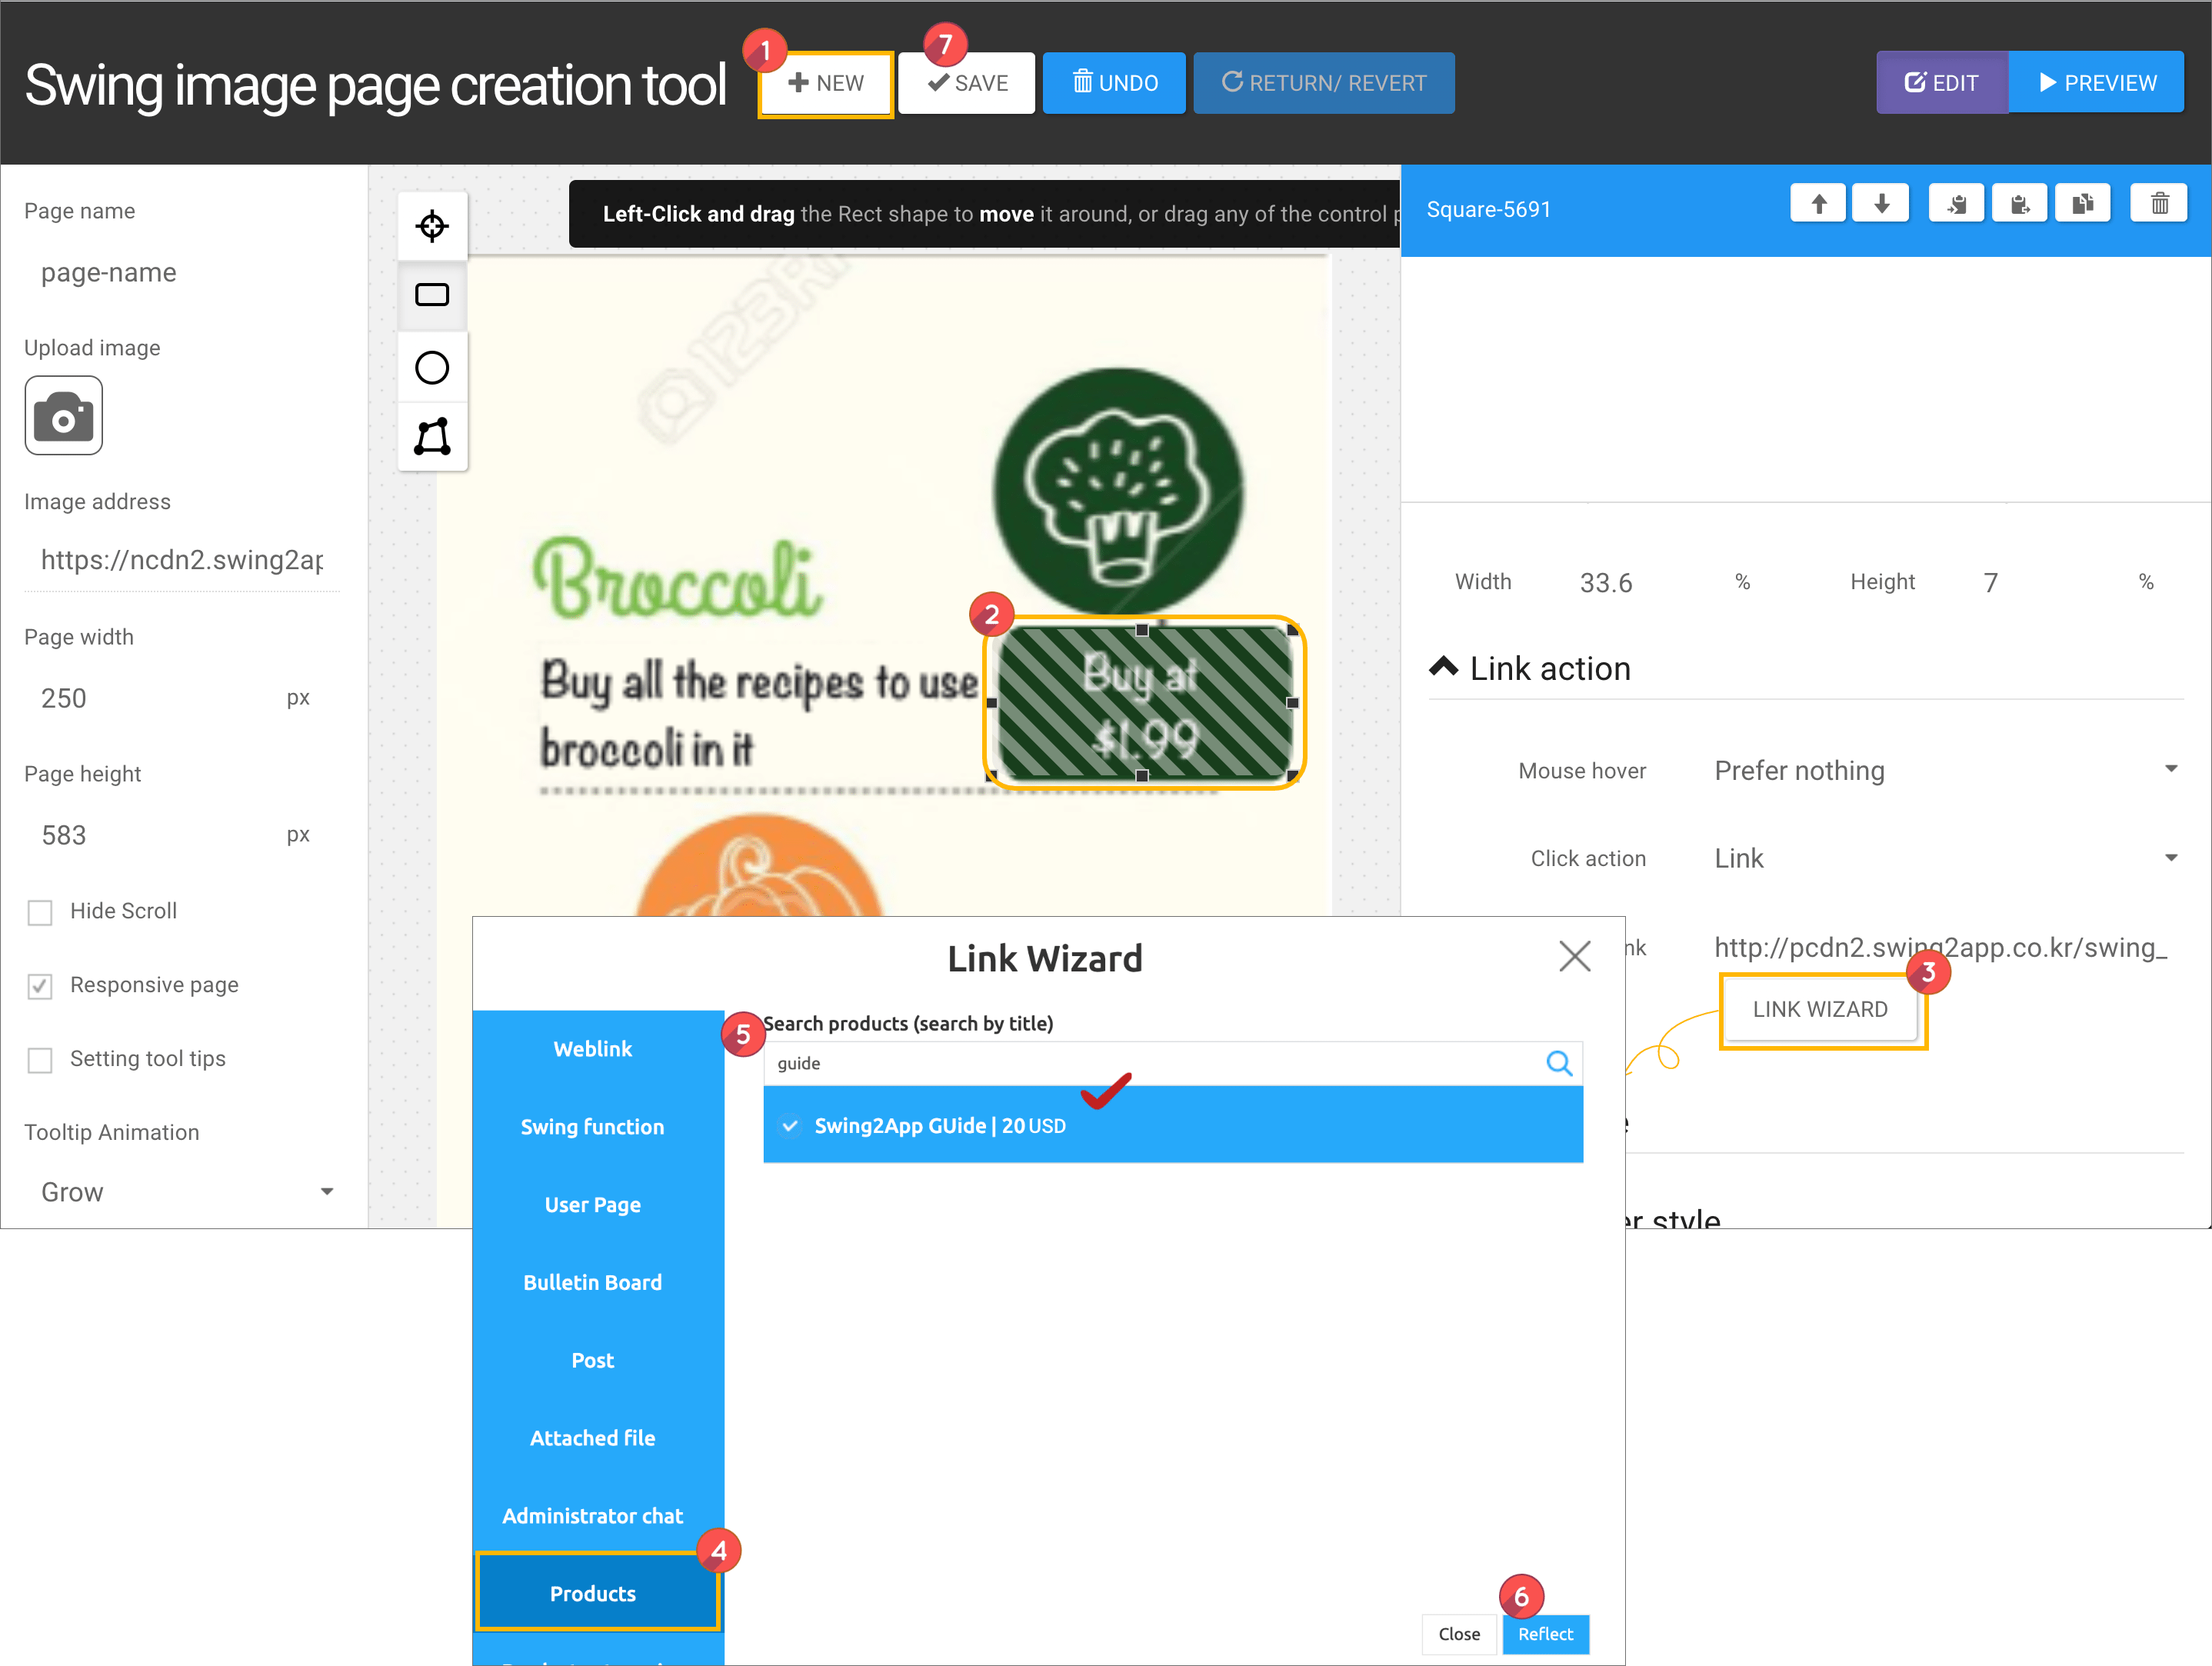
**▶ Image Page-How to create a swing store**
**On the Maker(V2) page-select the Page menu-Load User Page and select ‘Add Image Based Page’.**
**When the Image Page Maker window opens, follow the steps below.**
1. Press the **\[New]** button on the top. \* Please attach your own image.
2. Using the tool button on the left, create an area where you want to apply the banner\
\*When I click Buy, I only block those areas so I can go to the product purchase page.
3. Select the **\[Link Wizard]** button in the right link action.
4. Select **\[Product]** in the link wizard window.
5. For product search, please enter the product name to be displayed on the page.\
\*Products must be registered in the swing store product registration, and the product will be searched from the appropriate menu.\
Therefore, please apply after the product registration is completed in Swing Store-Product Management.
6. Press the **\[Reflect]** button.
7. If you press the **\[Save]** button on the top, image page production is completed.
**▶ Image Pages – How to Apply to App Home Screen**
Now that you’ve created an image page, can you apply the page you created to your app?
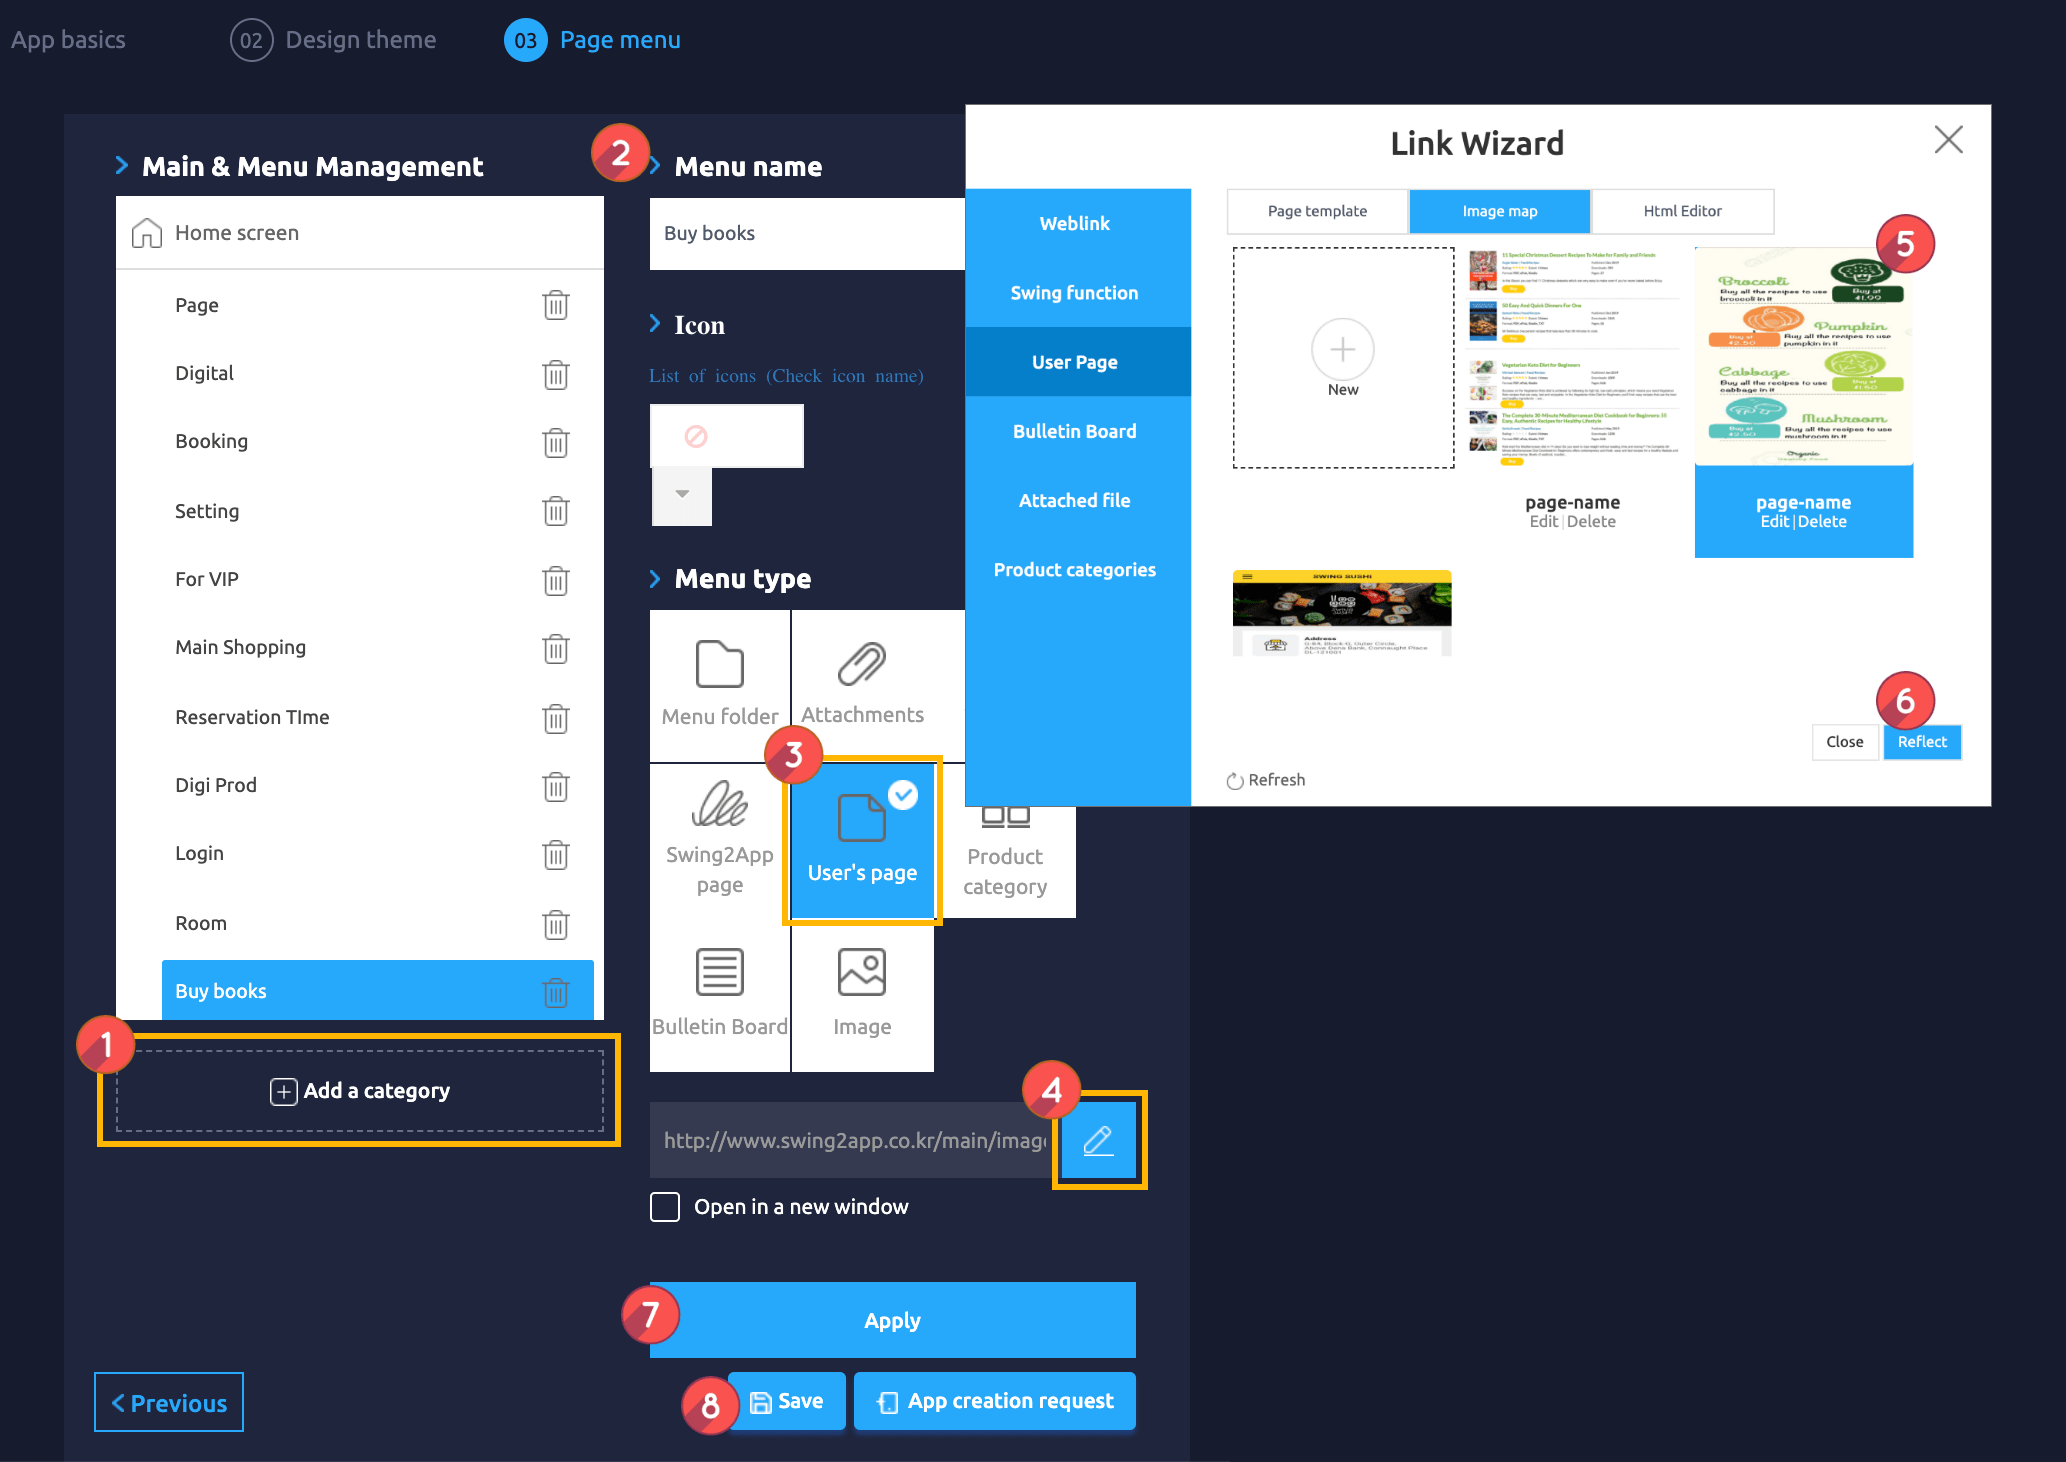
Go to **Maker(V2)** and click **Page Menu.**
1. Click **Add a category**.
2. You can change the menu name at the top of the home screen (unless you change the name, it will be displayed as the app name.)
3. Select the **User’s Page** menu in the **menu type.**
4. Click the **Link Wizard.**
5. When the Link wizard window appears, select the **Image Map** and select the image\*\*.\*\*
6. Click on **Reflect.**
7. Press the **Apply** button.
8. Click on **Save.**
**This is the app home screen style that can be configured in the swing store mall app.**
**If you use Swing Store, please refer to the manual above to configure the app screen.**
**You can also apply it to the built-in shopping mall page.**
**You can use the user page in a variety of ways.**