> For the complete documentation index, see [llms.txt](https://documentation.swing2app.com/llms.txt). Markdown versions of documentation pages are available by appending `.md` to page URLs; this page is available as [Markdown](https://documentation.swing2app.com/manual/appmanage/board/groupchat.md).
# Group Chat
Within the app, multiple users can chat at the same time, and chat with administrators and multiple users.
You can also set chat room permissions for each member group, and you can also set up a secret chat room where you can enter a password to enter.
Please check the manual on how to use the group chat room.
***
**\[Group chat room usage policy by swing2app]**
> **\* Free swing2app user: open a chat room, up to 5 users can chat**
>
> **\* Basic paid app voucher: 5 chat rooms, up to 20 users can chat**
>
> **\* Expandable paid app voucher: 10 chat rooms, up to 100 users can chat**
>
> **\* Premium paid app voucher: Unlimited chat room available, users unlimited chat available**
## STEP1. Create a group chat room
**Create a group chat room – Basic Settings**
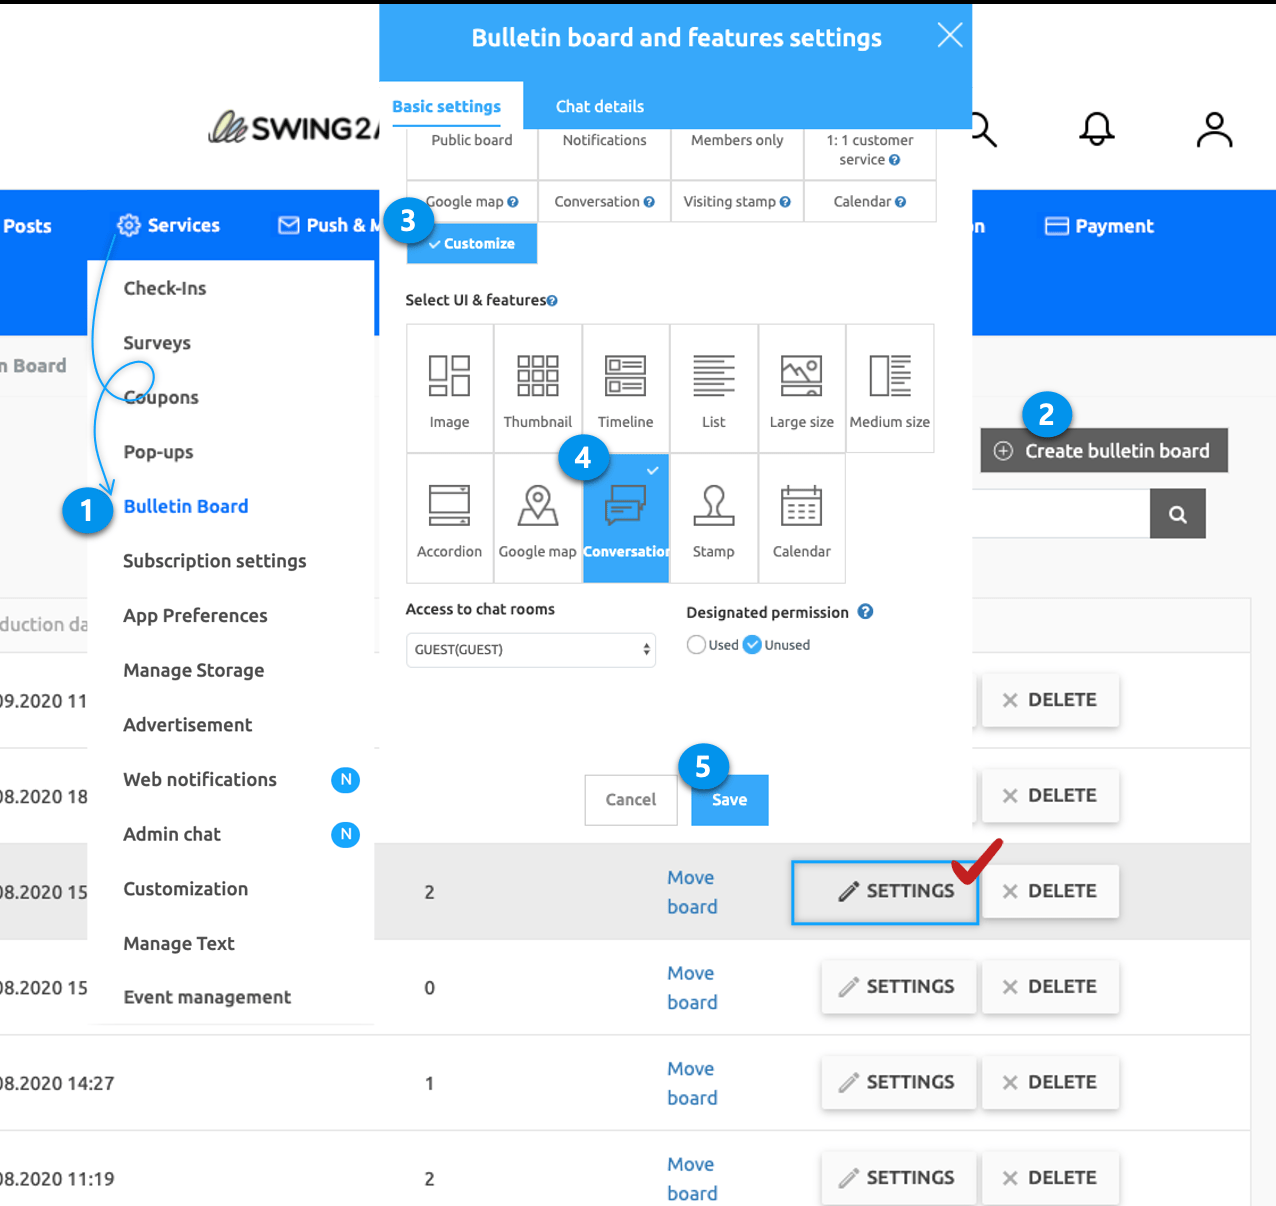
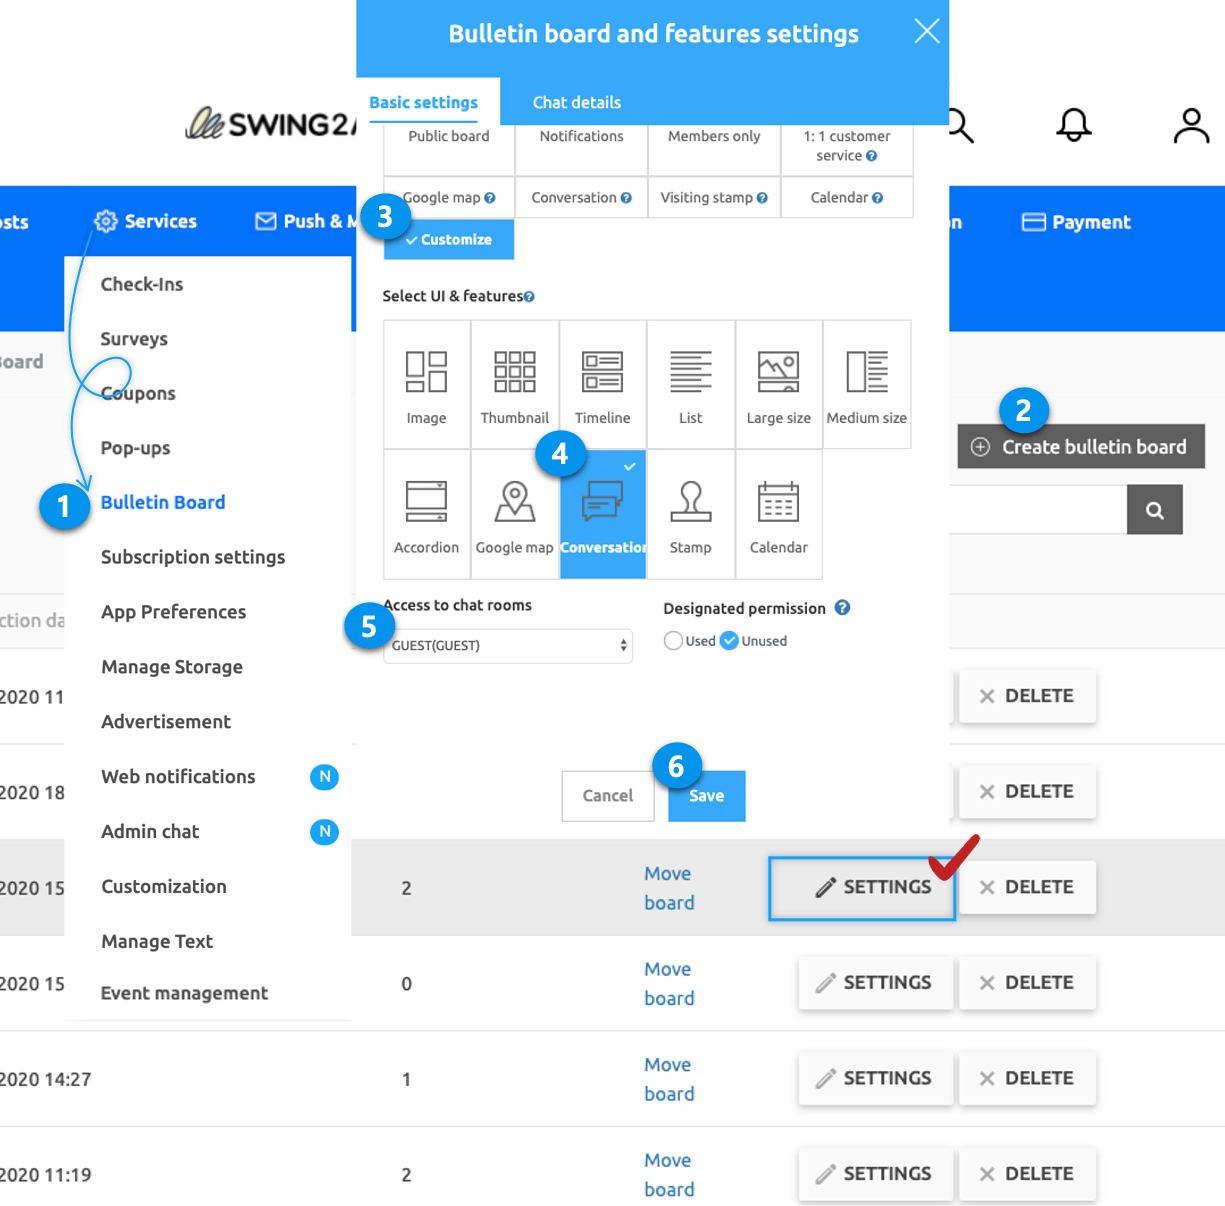
1. Go to **Manager,** select **Services** and click on **Bulletin Board** from the drop-down list
2. Select **Create bulletin board** button on the bulletin board management page to open the bulletin board and function setting window.
3. Enter the board name and select **Customize.**
4. Please select the **Conversation.**
5. Press **Save** to finish.
\*You do not need to enter the bulletin board and function settings. (Even if you write it, it won’t be seen in the app)
\*The right to\*You do not need to enter the bulletin board and function settings. (Even if you write it, it won’t be seen in the app) enter the chat room is set to ‘Guest’ by default.
If you want to edit the permissions, select ‘Custom’ for the service purpose and the fixed grey area will be solved and you can edit the permissions.
**▶ Edit chat room access**
1. Go to **Manager,** select **Services** and click on **Bulletin Board** from the drop-down list
2. Select **Create bulletin board** button on the bulletin board management page to open the bulletin board and function setting window.
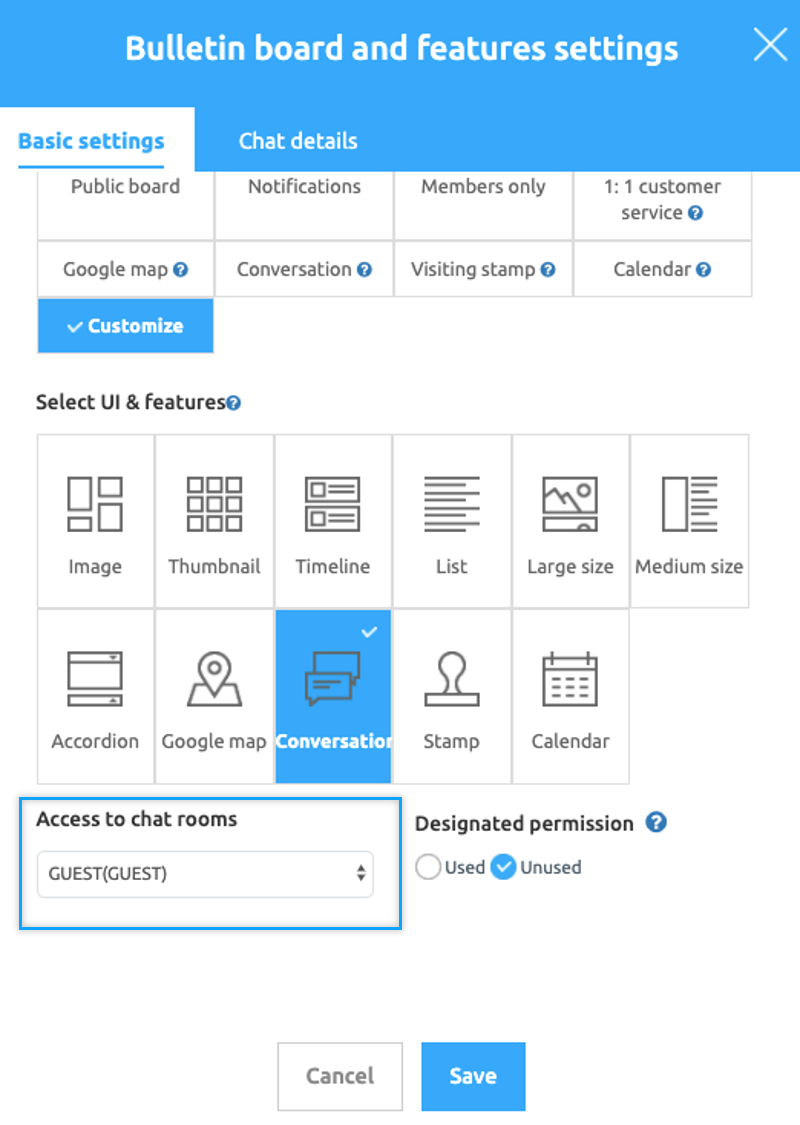
3. Enter the board name and select **Customize,** so that fixed grey area is released.
4. Please select the **Conversation** from the UI & features.
5. You can set the admission permission in the following chat permission settings.
6. Press **Save** to finish.
If you only want to use the chat room among the app members, select ‘User’.
If you want to use all the members of the app, select ‘Guest’ if you want to use only administrators, select ‘Administrator’.
**\*Permissions can be set to your liking according to the groups of members granted to your app.**
***
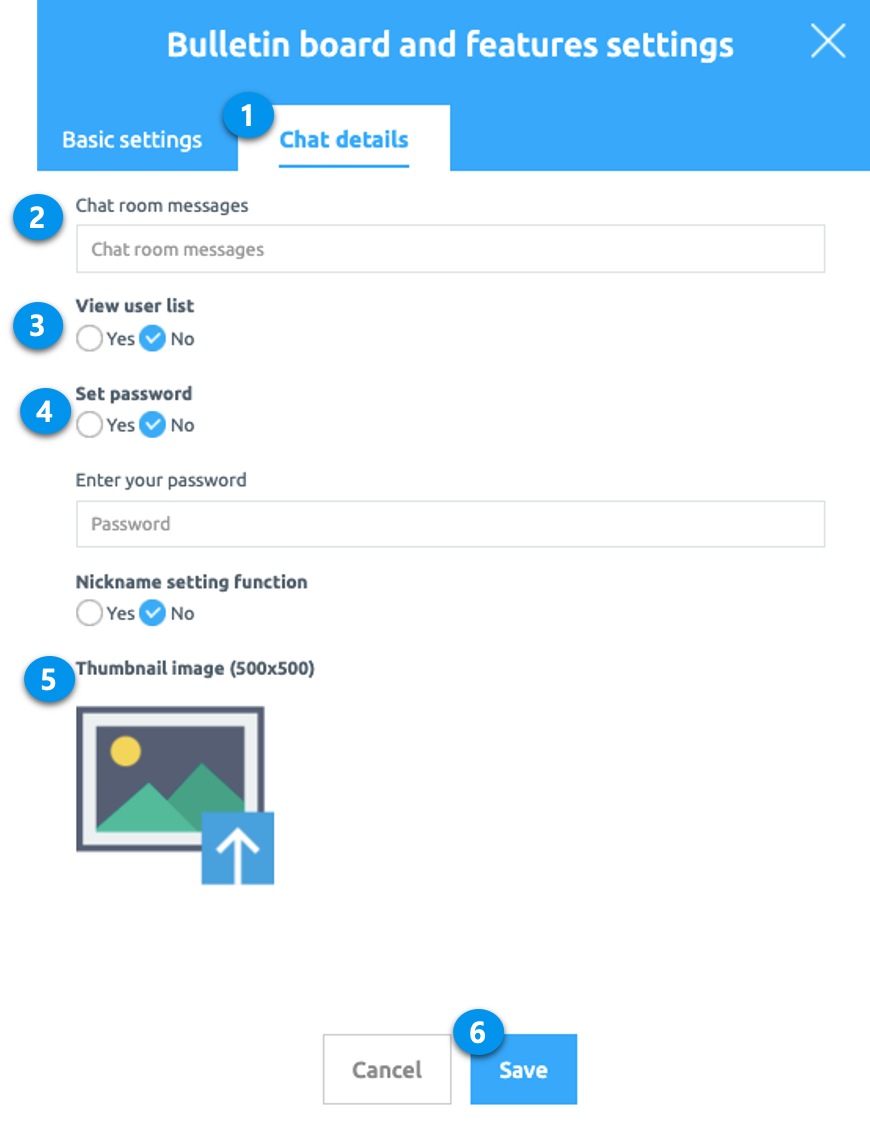
**2. Create a group chat room – Chat detailed settings**
**When the basic setting is completed, go to the next page \[Chat detail setting].**
1. Chat Notification Message: Enter a message to display in the chat room.
2. User list view function: You can view the list of users entered in the chat room.
3. Password setting: Set a password in the chat room, only the user who entered the password can enter.
4. Nickname Setting Function: You can set a nickname in addition to the user name.
5. After saving the details, click Save.
**Chat details are ‘optional’ not required.**
**Therefore, you do not need to use detailed settings. If you use it, please set the option.**
## STEP2. Apply a Group Chat Rooms to the Apps
If you created a group chat board, you should apply a chat room to the app. Let’s go to the app production page and apply a chat room to the app.
### **1.**When using app production V3 version
1\)Select the app production screen STEP3 page
2\)Select Menu.
\*If you haven't created a menu, please create a new one. (Select the + shape button to add menu)
3\)Enter a menu name.
4\)Select \[UI KIT] from the page design.
5\)Select \[Chat].
6\)Check the created chat room, and then select the \[Apply] button. (Hover over the mouse cursor on the page to open the Apply button)
\*Please create a group chat board first. If there is no group chat board created, it will not appear on the screen and cannot be applied to the app.
\*You can select the \[New] button on the UI KIT screen, or create a board in App Operation-Service Management-Board Management.
7\)Press the \[Save] button at the top of the screen to apply it to the app.
### **2.** When using the app production V2 version
**Move to the Maker(V2) → Page menu.**
1. Click on **Add a category** button to add the menu where you want.
2. Please enter the menu name (Please note that group chat will be displayed under the main menu name “Group Chat” even if you edit the menu name)
3. Select **Bulletin Board** in **Menu type.**
4. Click ok the **Link Wizard** button.
5. Select the Conversation board created in the board list window.
6. Click the **Reflect** button.
7. Select the **Apply** button at the bottom.
8. Select the **Save** button.
You can see that the group chat room is applied to the app through the right virtual machine (preview) screen.
***
## STEP3. App Launch screen
**Let’s run the app and see how the chat room looks like in the app.**
**1. Enter group chat rooms**
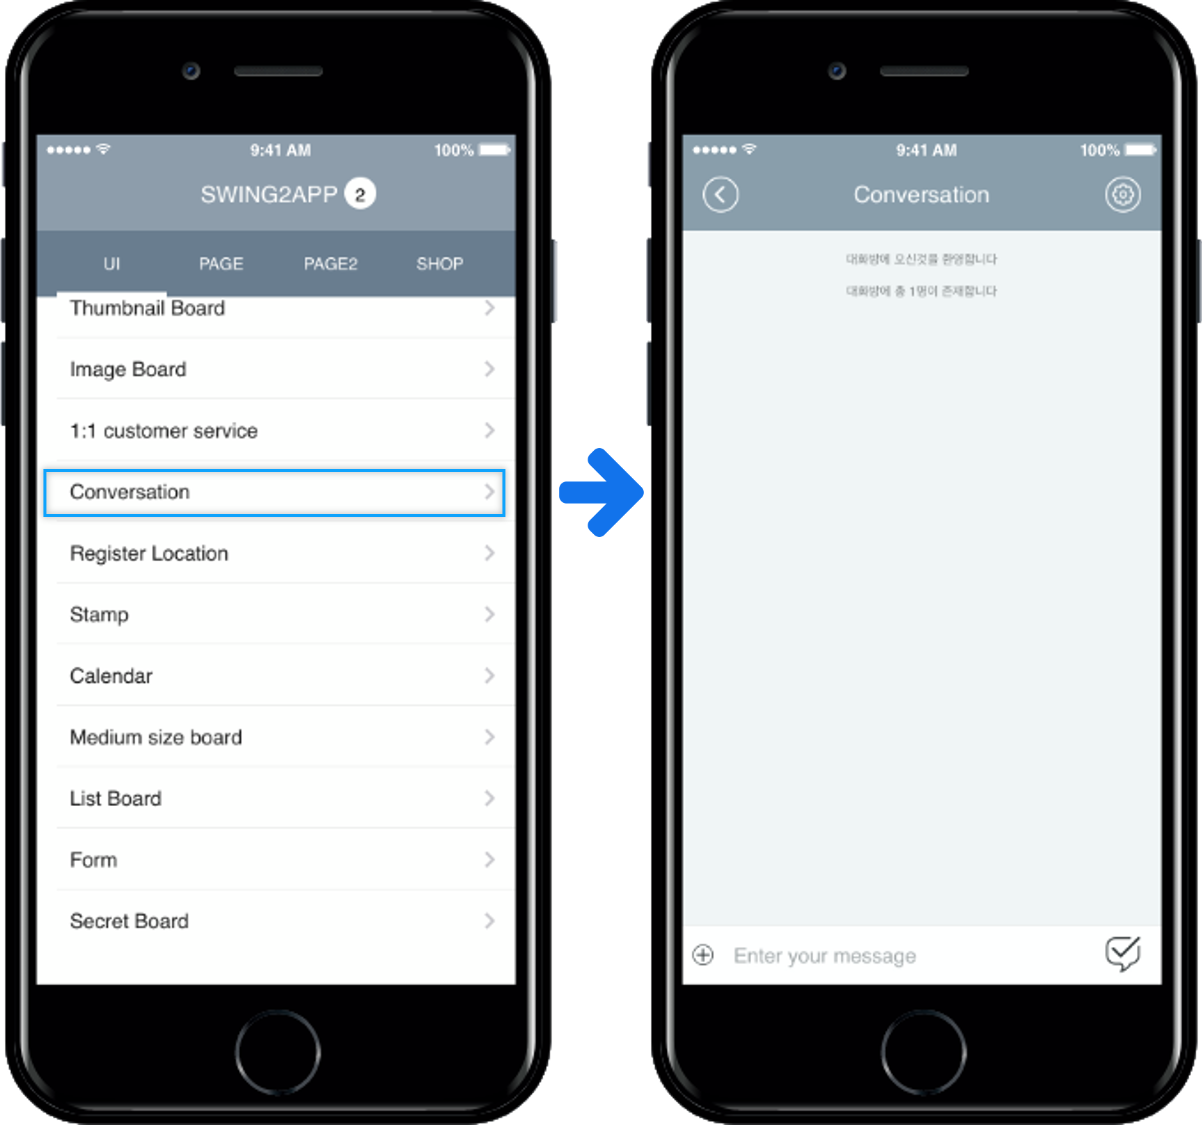
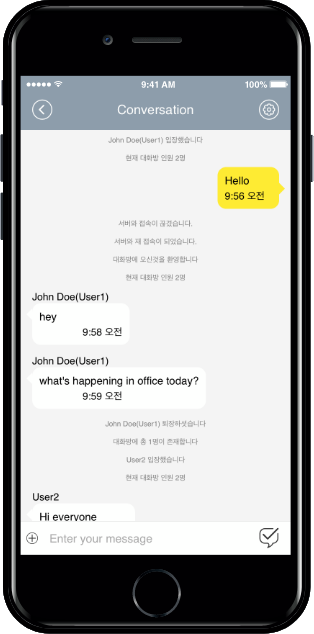
**If you select a user chat room, you can enter the created chat room.**
In the chat room, you can see other people besides you, as well as the number of people and posts.
You can chat with multiple users in real-time.
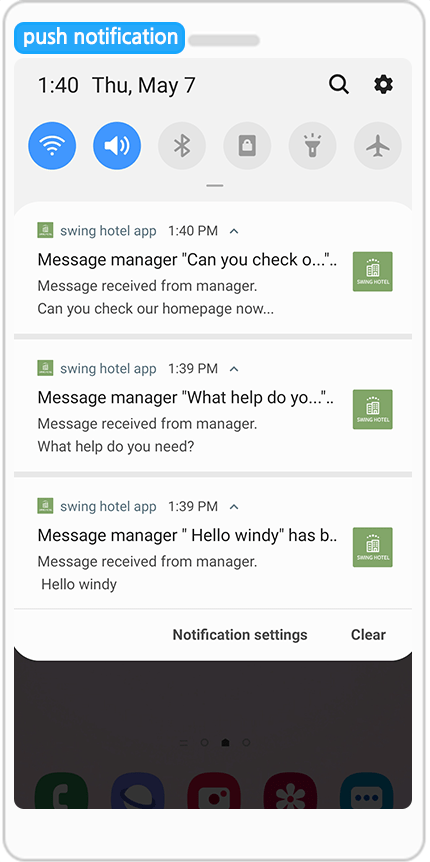
**★Chat room message push notification**
If you enter a message in the group chat room, a push notification is sent to the other party.
However, it will only be sent to users who have used the chat room at least once.
**★Chat room permissions**
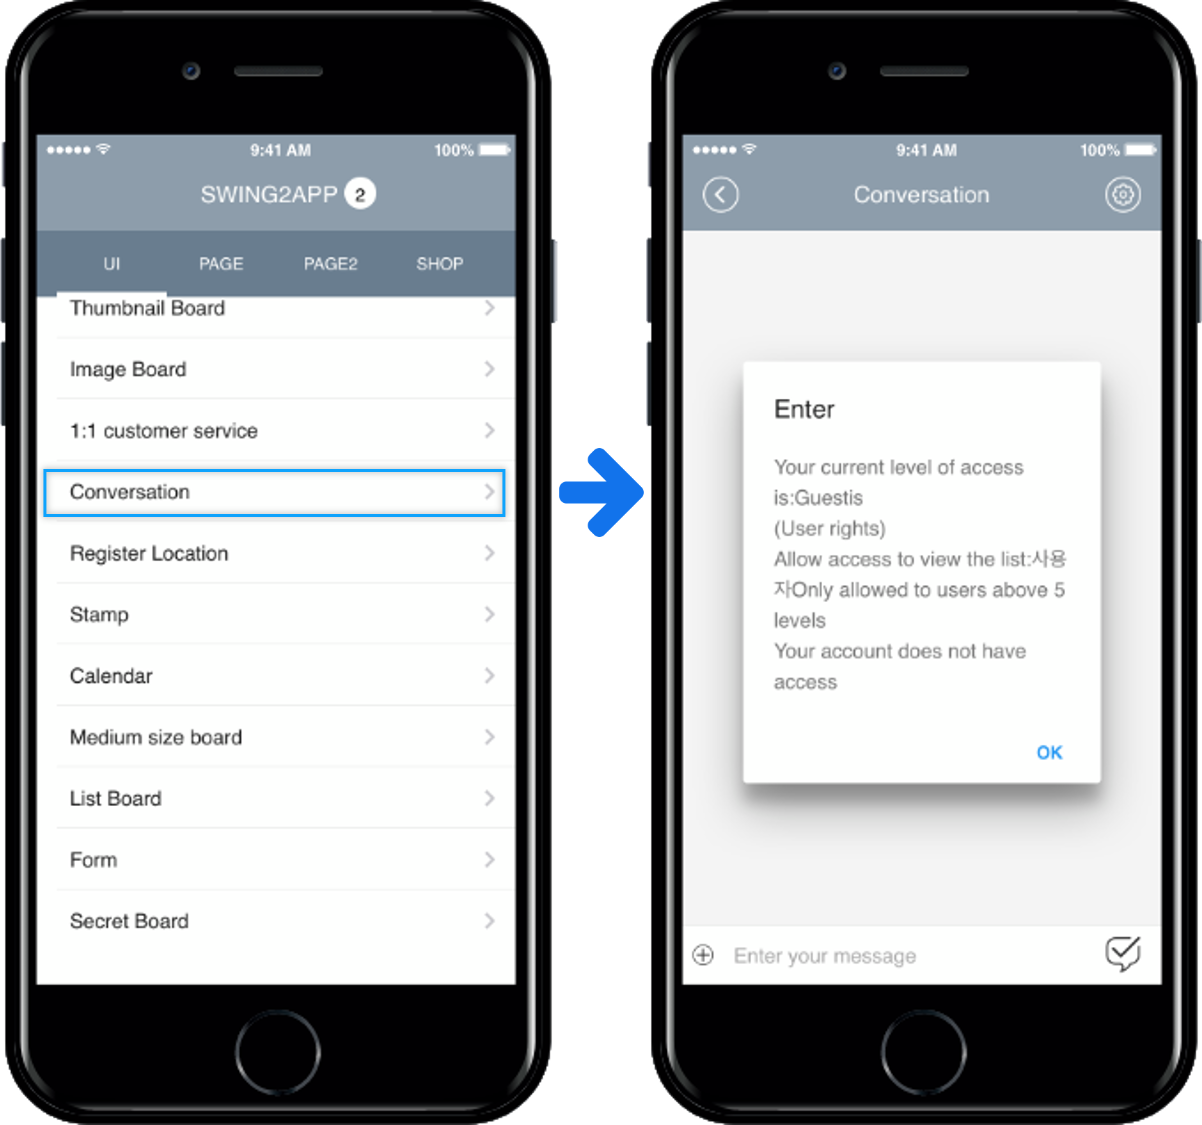
When a user tries to enter an administrator’s chat room, they are restricted from entering the chat room because they are not authorized.
**2. Chat details**
* **If you’ve set up chat details, let’s see how it looks like in the app.**
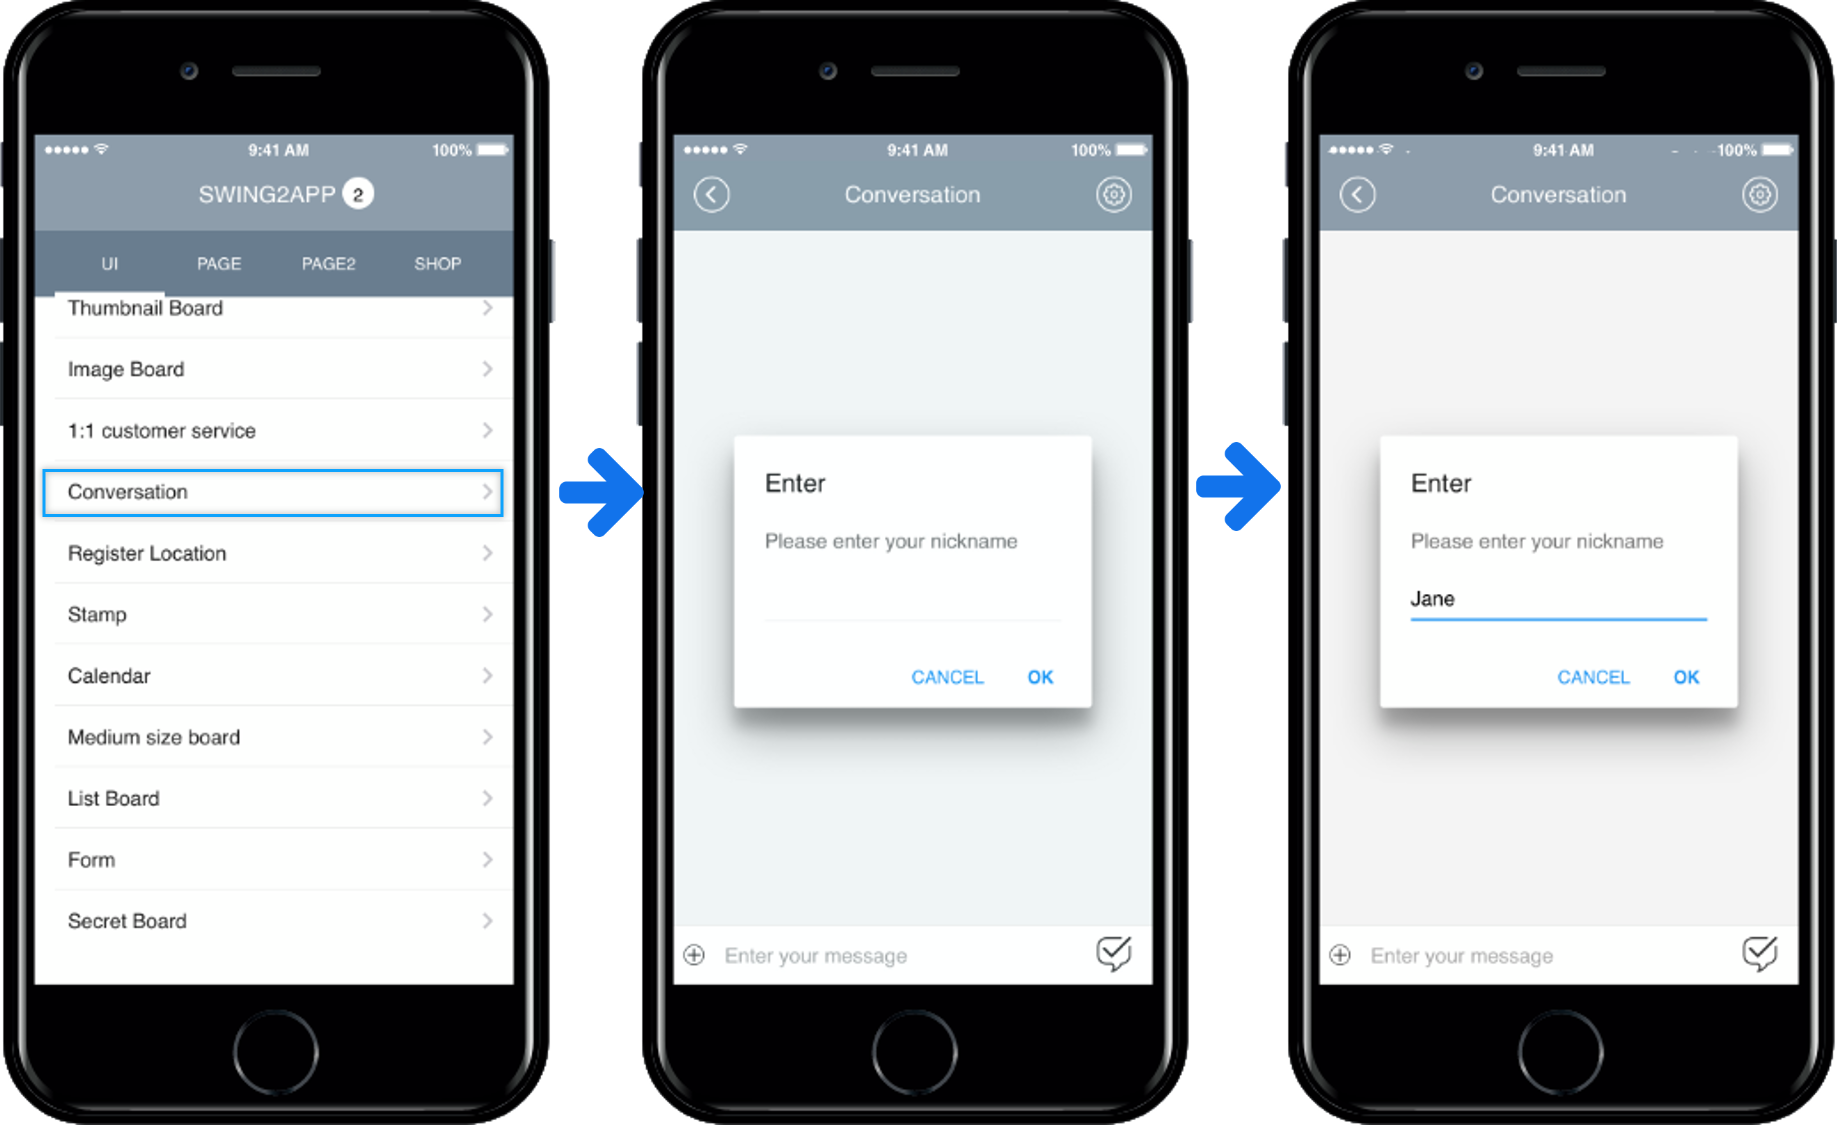
1. Nickname Setting: When you enter the chat room, you will see a window to enter the nickname.
2. Password setting: When entering a chat room, a chat room password input window appears.
(Password is assigned as the number entered in the chat room detailed settings, and can be shared with users through announcements or other routes.)
3\) Chat Notification Message: You can check the notification message entered in the detail setting page in the chat room.
4\) View user list: You can check the list of users who entered the chat room by pressing the upper right button of the chat room.
## STEP4. Group Chat Q\&A
**Q. Can users select other users to chat within the app?**
Selecting users or inviting them to a room is not supported.
**Q. How do app users know if I have a conversation in a group chat room?**
Users who have accessed (entered) a group chat room even once will receive a conversation push notification from the app.
If you select push notifications, you can enter the chat room.
However, users who have not logged in will not receive push notifications, so they will not be able to check their conversation history.
**Q. So how can I notify users of group chats? Or can I announce that I can join a group chat room?**
Allows the administrator to send pushes.
Please use the function provided by the Swing2App app operation → push delivery, not chat push.
If you select the Link Wizard when sending a push, you can set the link as a group chat room.
When you select a push that users receive from your app, they are taken directly to the group chat room, so you can engage them in that way.
However, as mentioned above, the number of people accessing is determined according to the product, so only the number of people listed in the applied product can access it.
**Q. Does the group chat room always require an administrator to be in order to operate?**
Since it is not an admin chat, only users can enter to use it.
In addition to the administrator, users can chat in groups.
**Q. How do I delete a chat room conversation?**
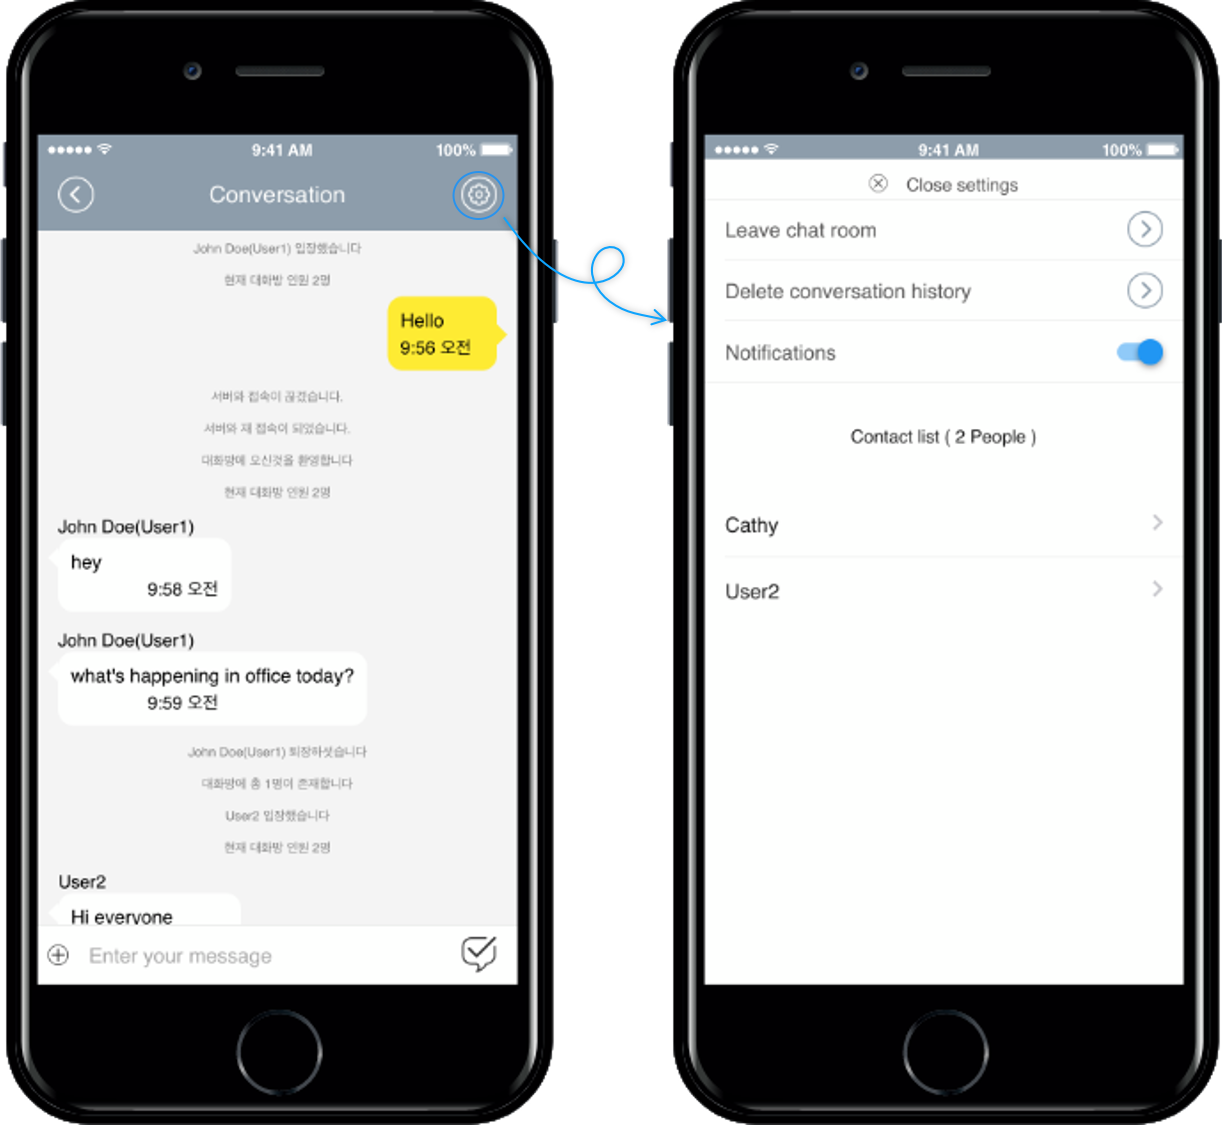
If you press the \[Settings] button at the top right of the chat window, there is a menu to delete chat history.
If you select the menu, you can delete the conversation history.
If you leave and enter again after deletion, the conversation history is deleted.
**Q. What if I don't want to receive push conversations?**
If you press the \[Settings] button in the upper right corner of the chat window, there is a push notification on/off button.
You can select the menu to turn off the notification setting.