> For the complete documentation index, see [llms.txt](https://documentation.swing2app.com/llms.txt). Markdown versions of documentation pages are available by appending `.md` to page URLs; this page is available as [Markdown](https://documentation.swing2app.com/manual/appmanage/board/googlemap.md).
# Google Map Bulletin Board
**How to use Google Map Board**
In addition to the general location registration board that works with the following map, we will show you how to use the location registration board using Google Maps.
**\*For Google Maps, you will need to apply on a separate Google Map platform and use it.**
> 1. Google Maps is not a free service, but a service provided by Google’s own platform for a fee.
> 2. In order to integrate Google Maps into your own apps, you need to sign up at the Google Maps platform site and get a key value called API. (Enter the API key value into the Swing2App Google Map board to link it). Only then can users use Google Maps normally.
> 3. Because Google Maps is a paid service, you must pay a fee to the Google Maps platform.
>
> \*It is a pay-as-you-go plan, and you are only billed for what you use.
**Please check the post on how to get a Google Map API key.**
**☞** [**\[Go to Google Map API key issuing method\]**](https://support.swing2app.com/knowledgebase/googlemaps-api/)
**App execution screen-map board**
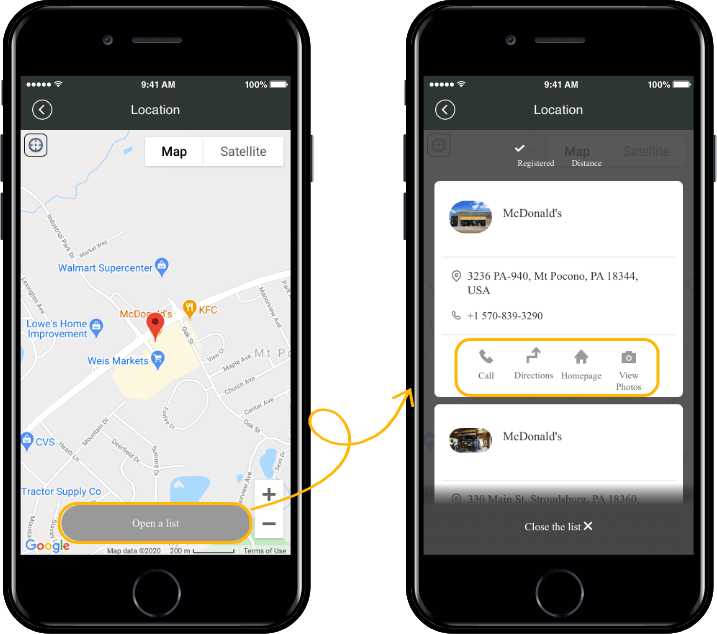
Please check how the map bulletin board looks through the app execution screen.
Below, we will tell you all about the process of creating a map board and applying it to the app!
## STEP1. Create Google Map Board
**Google Maps is a function provided by the bulletin board.**
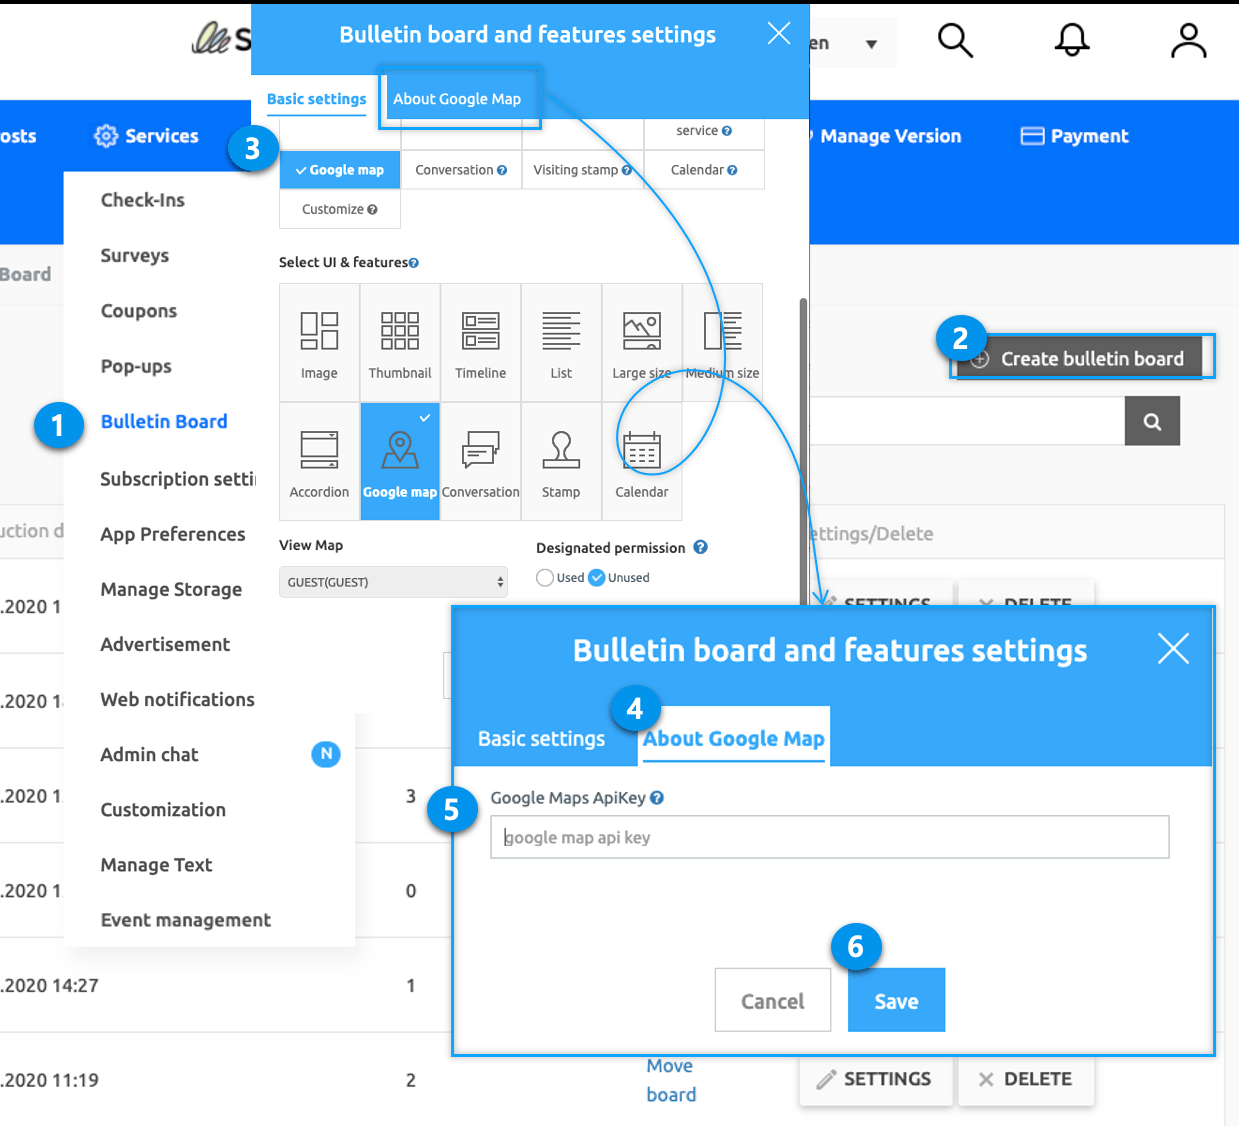
1. Go to **Manager.** Select **Services.** Click on **Bulletin Board** from the drop-down list.
2. If you need to create a new board on the board management page, click on **Create Bulletin Board** button. If a bulletin board is created, click the **Settings** button on the bulletin board.
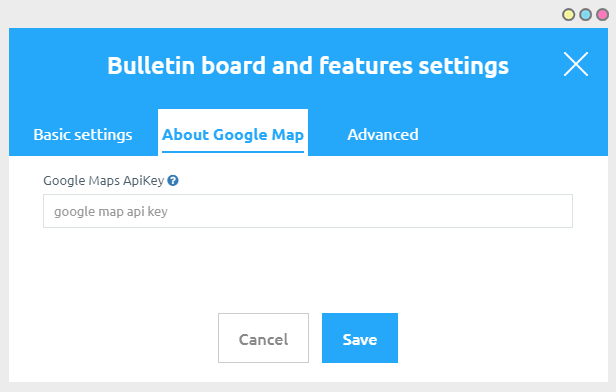
3. Select **Google map** in **Bulletin Board and Features settings.**
4. Click on **About Google Map** tab.
5. Fill **Google Map API Key.**
6. Click on **Save.**
### **1. Board function setting – Basic setting**
**If you select the \[Create Board] button, the bulletin board and function setting window will appear.**
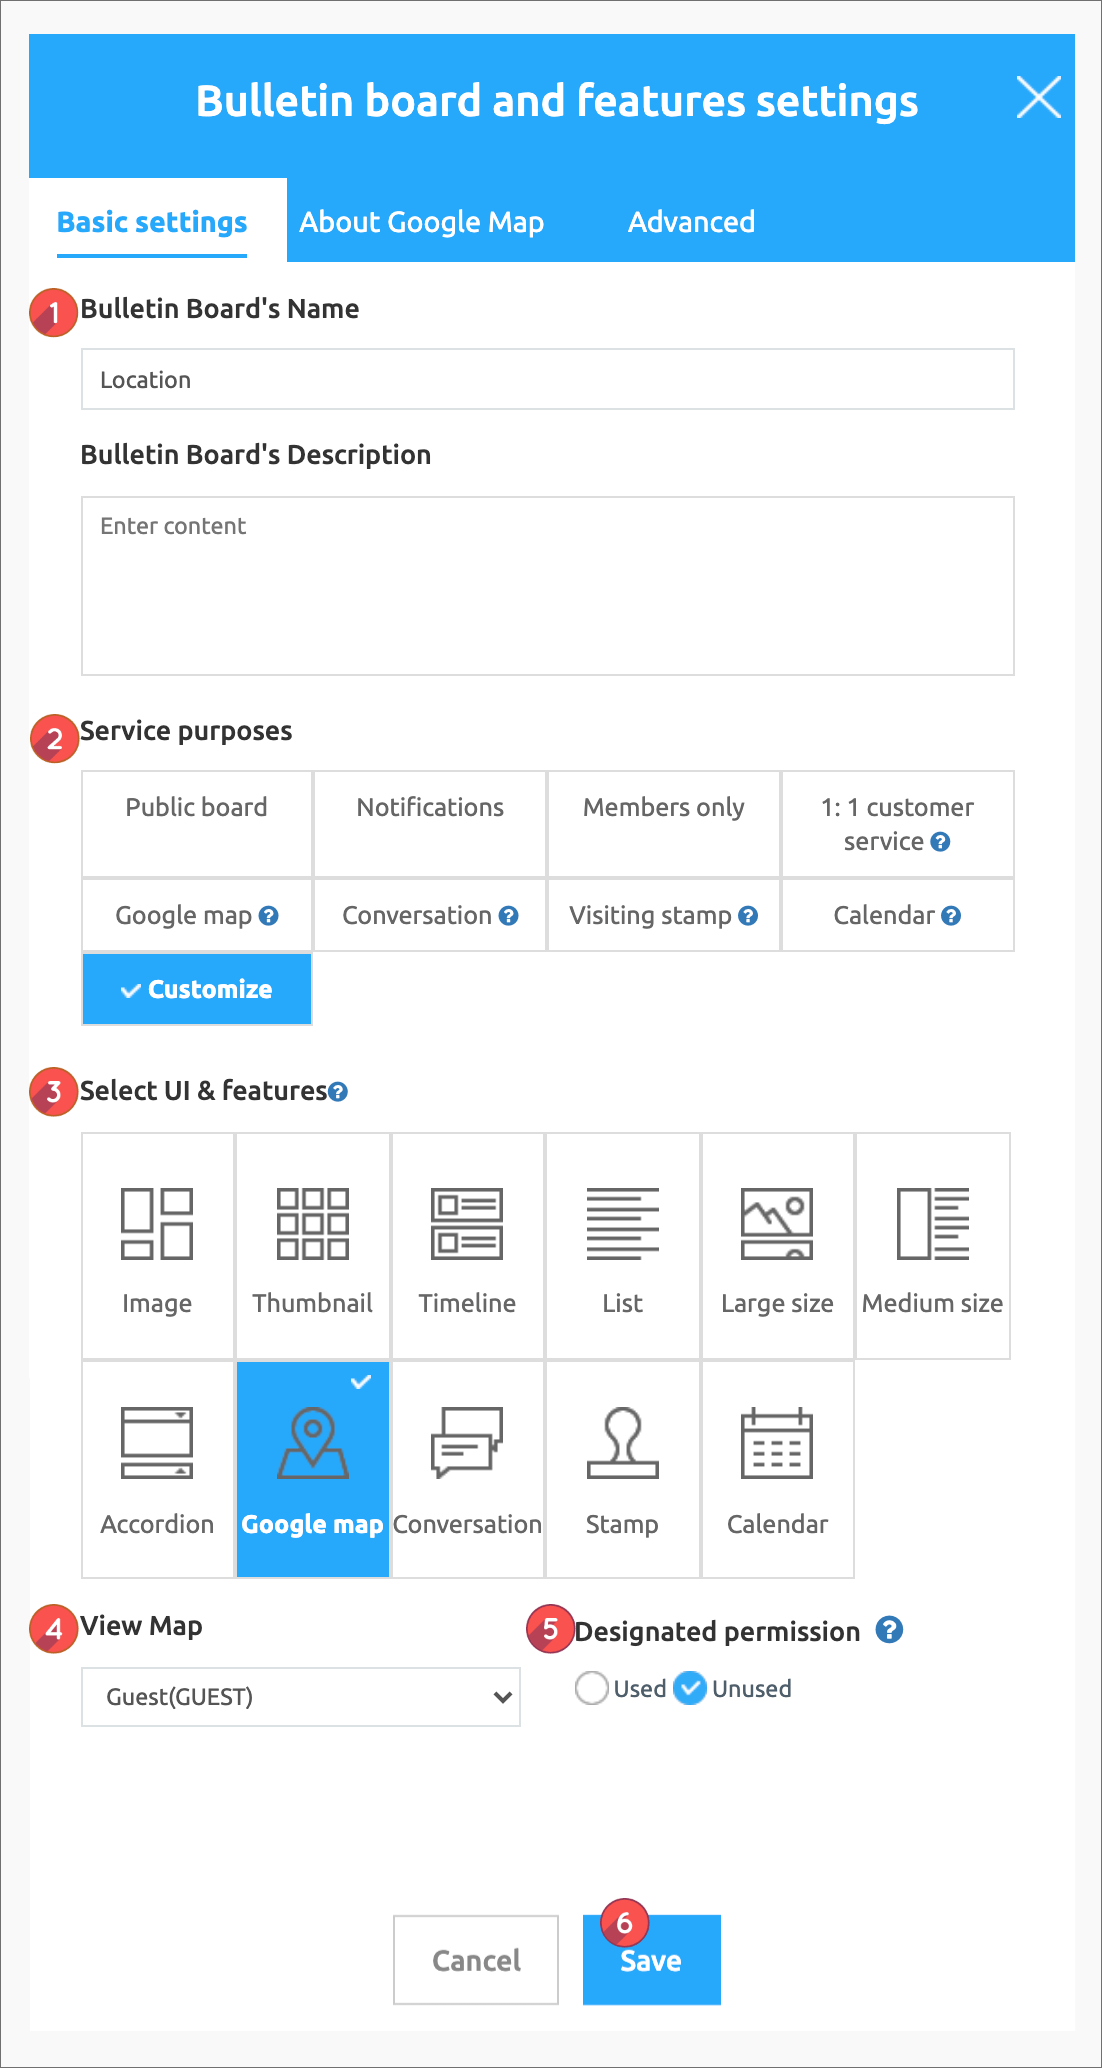
1\) Bulletin board and function name: Write the bulletin board name.
2\) Service purpose: Please select Custom.
3\) UI and function selection: Select \[Register location].
4\) Select permission to view map: Select permission to show the map board to whom.
If you want to show it to all app users, set it as ‘Guest’.
5\) Allow the use of designated privileges: This is an optional feature that allows only users of a certain level to use. If you do not use the option, check’Off’.
\*Please select the manual link below for details on the authority to designate the bulletin board.
[ **\[Check the detailed manual on how to use the bulletin board designated authority\]**](https://github.com/kgitae7/swing2app_doc_en/blob/main/manual/appmanage/board/broken-reference/README.md)
6\) When all contents are entered, click the \[Save] button.
> * Map board does not enter the function description text.\\
> * If you need to set the permission to view the map (add option), select ‘Custom’ in the service purpose and the fixed grey area will be released.\\
> * After selecting ‘Location registration (Google Map)’ in + UI and function selection, you can use the options such as permission setting and permission to specify. \\
> * If you want to use the existing map board, select \[Register location]. (Next map)

### **2. About Google Map**
Unlike the existing map board, **Google Map bulletin board should go to \[Google Map Information] and put the Google Map API key value.**
**Please check the post on how to get a Google Map API key.**\
\&#xNAN;**☞**[**\[Go to Google Map API key issuing method\]**](https://support.swing2app.com/knowledgebase/googlemaps-api/)
Paste the copied API key and select Save.
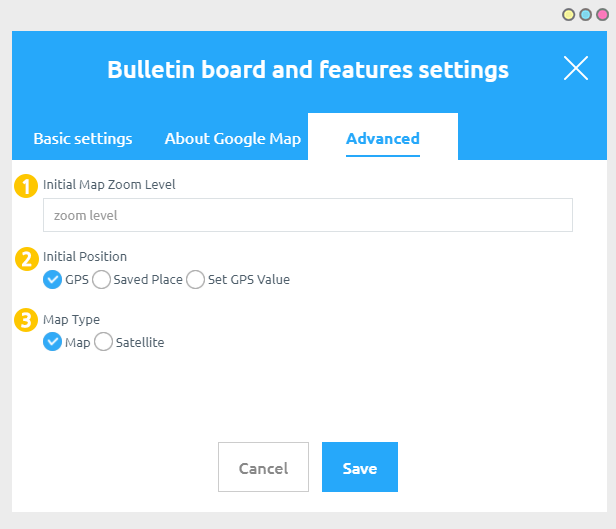
### **3. Advanced**
You can set additional items by selecting the 3rd menu, Advanced Settings.
Advanced settings are not required.
You can just enter the Google Map API key and save it, and you can edit several items in the advanced settings.
1\) Zoom level designation: You can set the map screen size by entering a number, such as zooming in on the map screen or reducing it to small.
\* The smaller the number, the larger the screen, the larger the number, the smaller the screen.
2\) Initial location setting: This is a function to determine which location to show on the first map screen when the map board is opened.
(1) Current location: The current location pin of the user using the app is set and the map screen is displayed (default setting).
(2) Priority: The map screen of the location is displayed according to the registered priority.
(3) Location setting: Enter a specific location by entering latitude and longitude.
3\) Initial display format: When you open the map board, you can select whether to show the screen as a map or as a satellite screen.
Then, we will register the location on the Google Map bulletin board!
## STEP2. Register your location on Google Maps
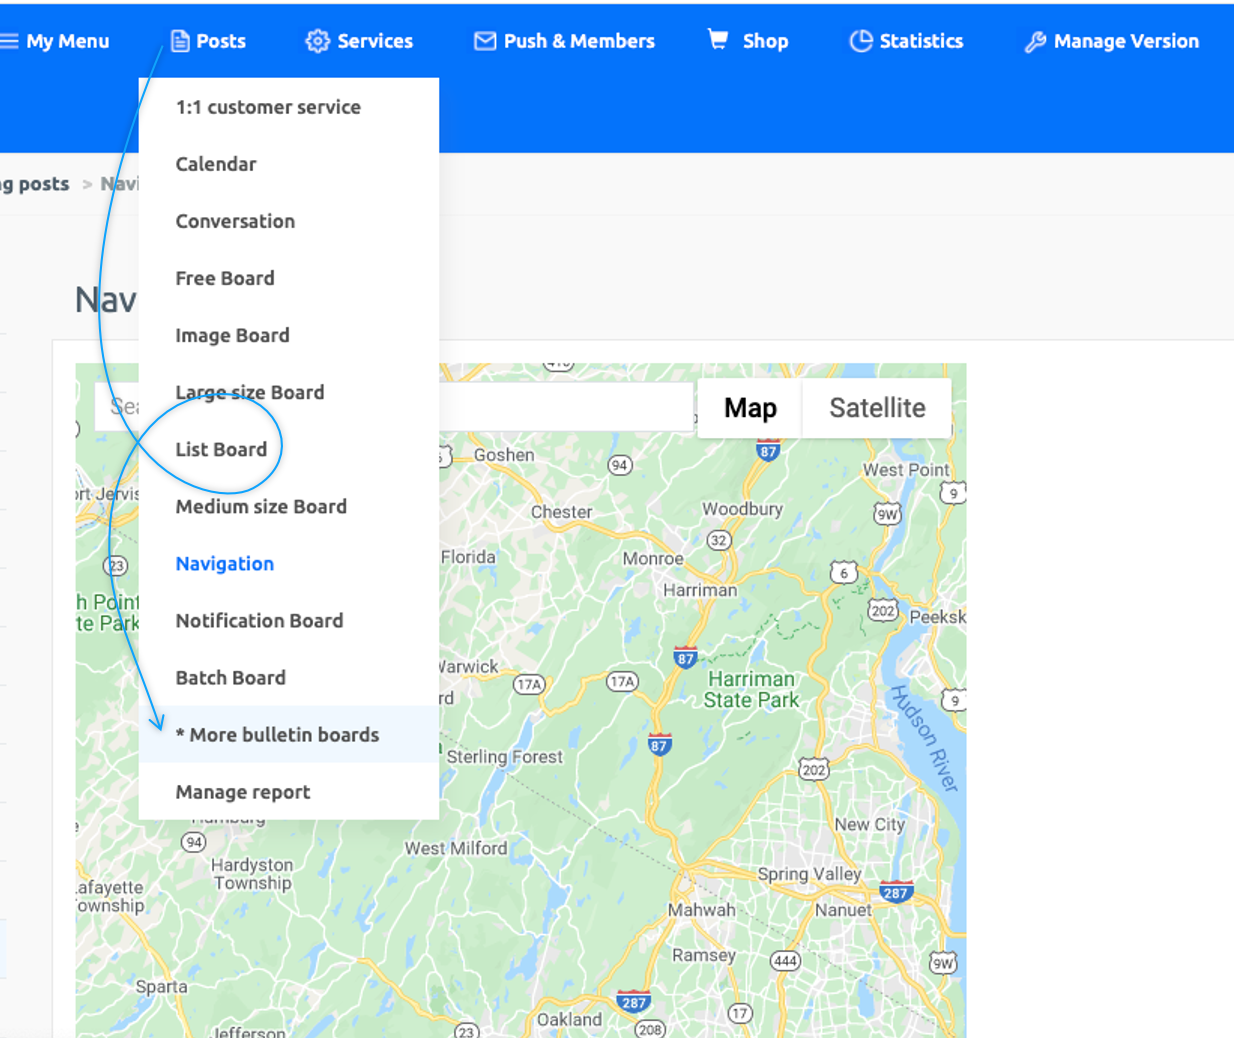
1. Go to **Manager.**
2. Select **Posts.**
3. Click on the Google maps bulletin board created.\\
To register a location, use the search toolbar above to enter an address or search by business name (keyword).
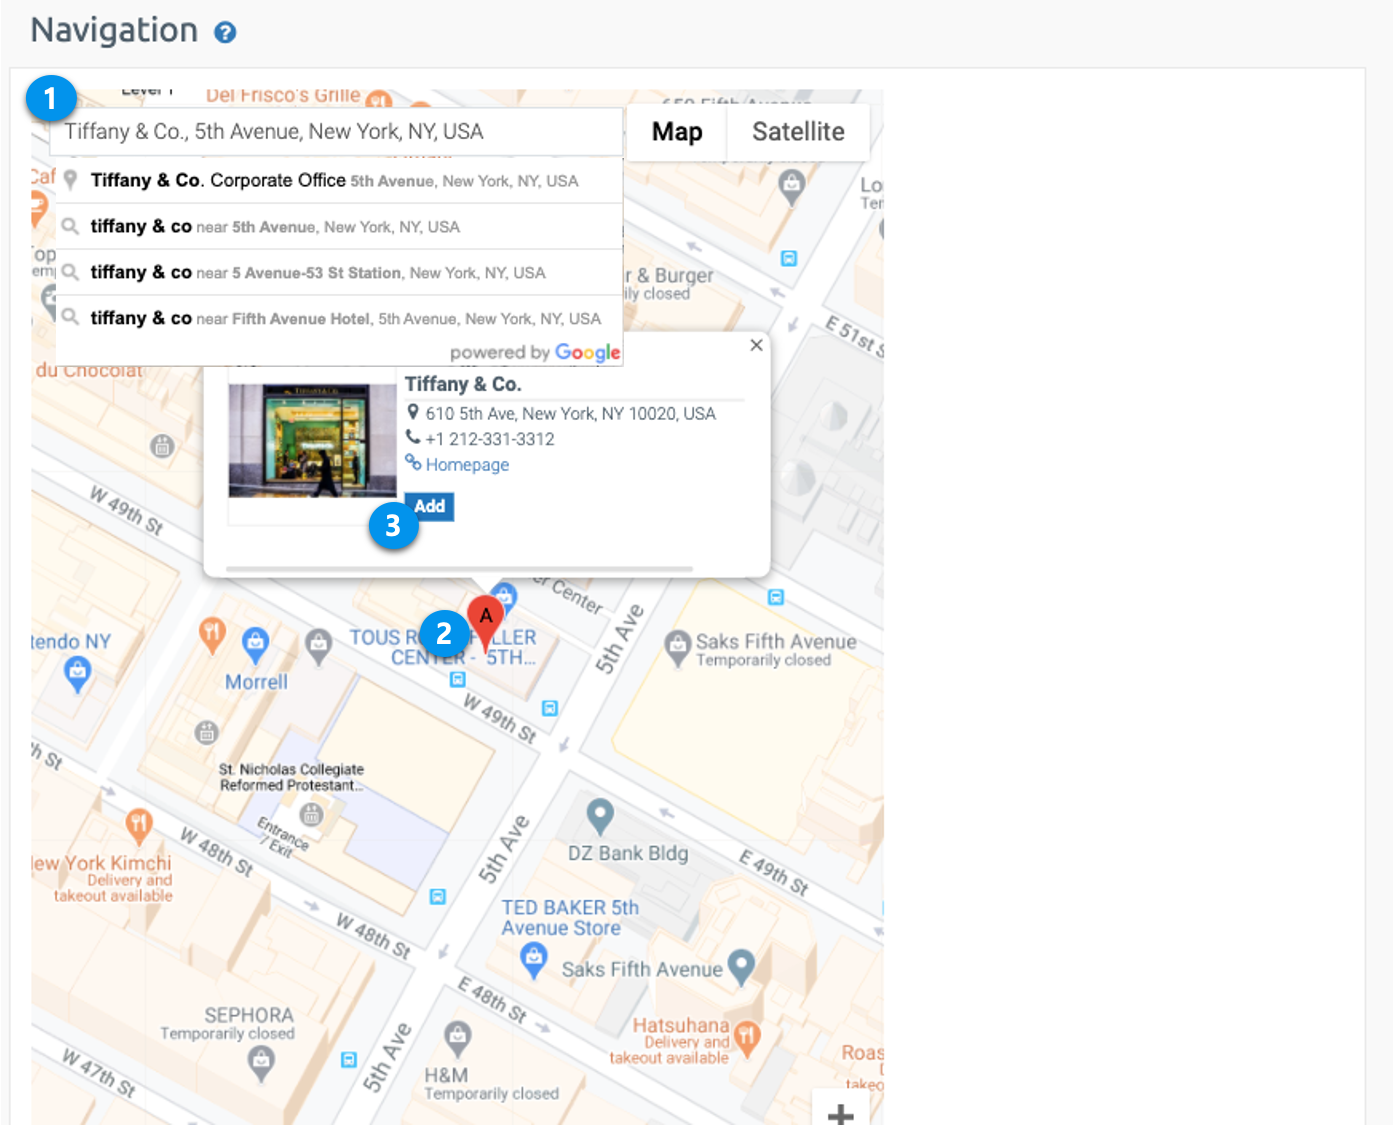
### **1. Location registration**
1. Enter the address or search by company name (keyword) in the search box at the top of Google Maps.
2. When the location is created from the address. Click on the Red Tag marked on Map.
3. Click on the **Add** button and enter the information and details about the location.
\*Search for Tiffany & Co. and add them to my location so you can show them in Google Maps.
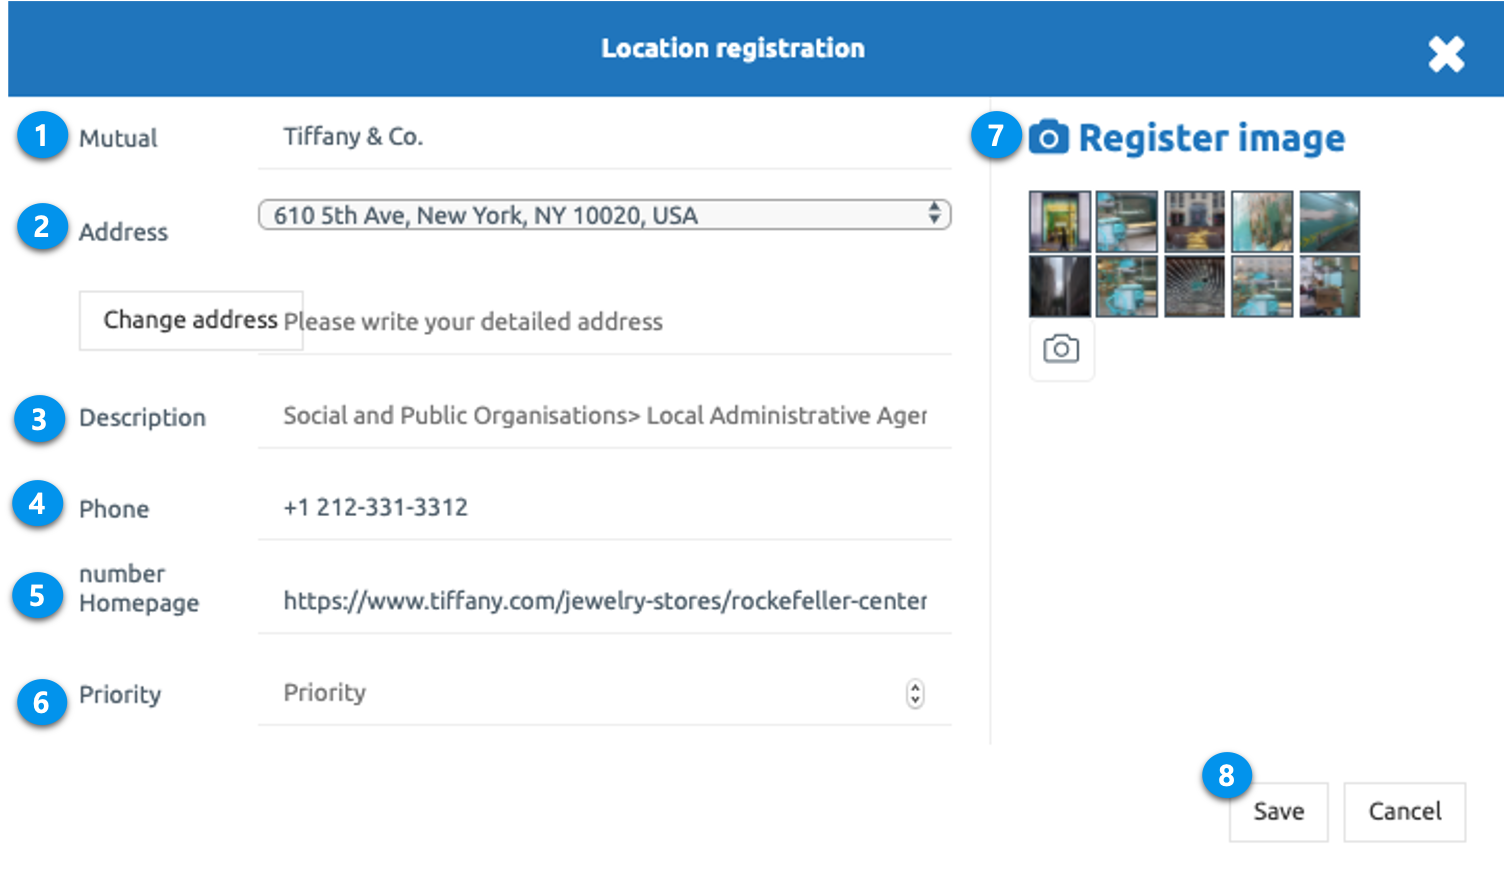
### **2. Location Registration – Enter Details**
**In the Location Registration window, you can enter a detailed description.**
1. **Mutual:** Enter the business name.\
\*You can enter the actual company name or write a phrase to introduce to users.
2. **Address:** Enter all the detailed addresses in addition to the previously searched addresses.
3. **Description:** Write an introduction that describes your business.
4. **Phone Number:** Enter the phone number.
5. **Homepage:** Enter a link to your homepage, blog, or cafe URL.
6. **Priority:** Priority can determine the order in which the app is displayed when there are several registered locations.\
\*The smaller the number is placed above.
7. **Register Image:** Image registration is available. Please register if you have the company’s internal photo and company promotional photos (attachments up to 10)
8. Select the **Save** button when you finish entering all information.
★ If you do not have a homepage, phone number, photos you do not need to enter. Only the items entered are displayed on the bulletin board.
★ If you register only one location, you do not need to enter a priority.\\
**Location registration is complete.**
\
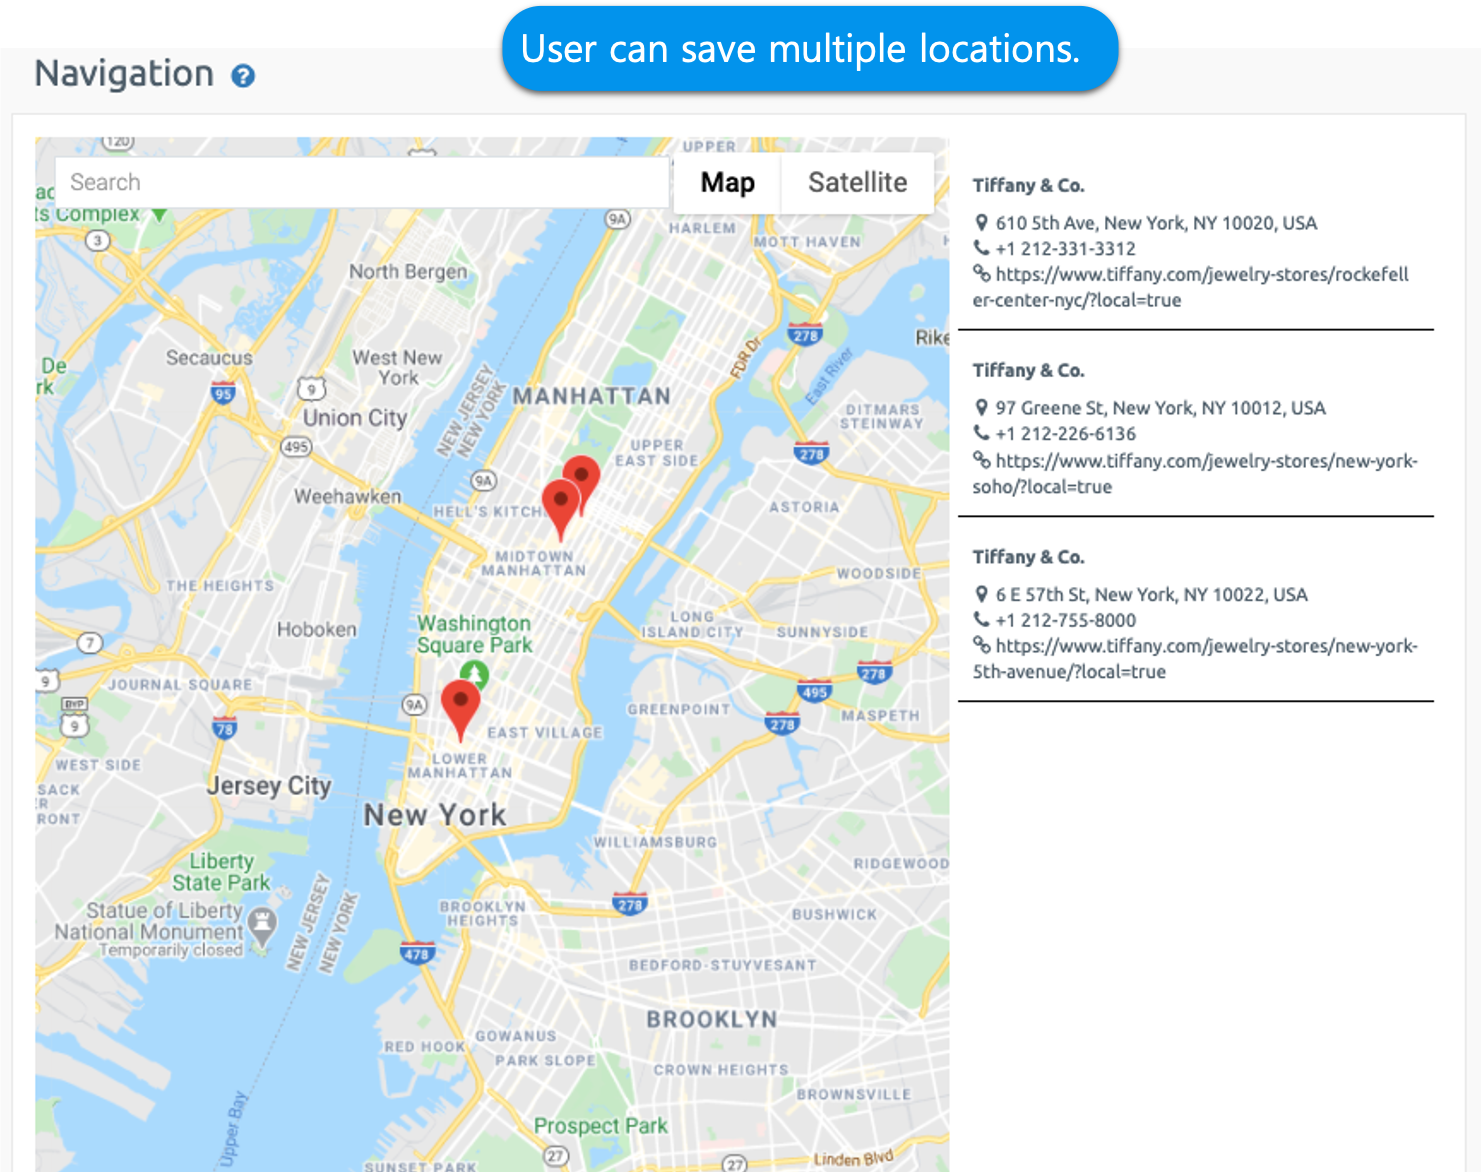
Google Map board can add location by address and a keyword like this.
You can edit and delete the location, and if you have an app that manages multiple businesses, you can register by adding addresses from multiple businesses.
## STEP3. Apply the Map Board to the App
### **1.** When using app production V3 version
1\)App Creation – Select STEP3 Page
2\)Select Menu.
\*If you haven't created a menu, please create a new one. (Select the + shape button to add menu)
3\)Enter a menu name.
4\)Select \[UI KIT] from the page design.
5\)Select \[Location Registration].
6\)Check the location registration board you created, and then select the \[Apply] button. (Hover over the mouse cursor on the page to open the Apply button)
\*Please create a location registration board first. If there is no location registration board created, it will not appear on the screen and cannot be applied to the app.
\*You can select the \[New] button on the UI KIT screen, or create a board in App Operation-Service Management-Board Management.
7\)Press the \[Save] button at the top of the screen to apply it to the app.
\*During the production stage, the menu icon and menu settings are not required items.
In this manual, it was done without input, and please apply it additionally if necessary when creating the app.
### **2.** When using app production V2 version
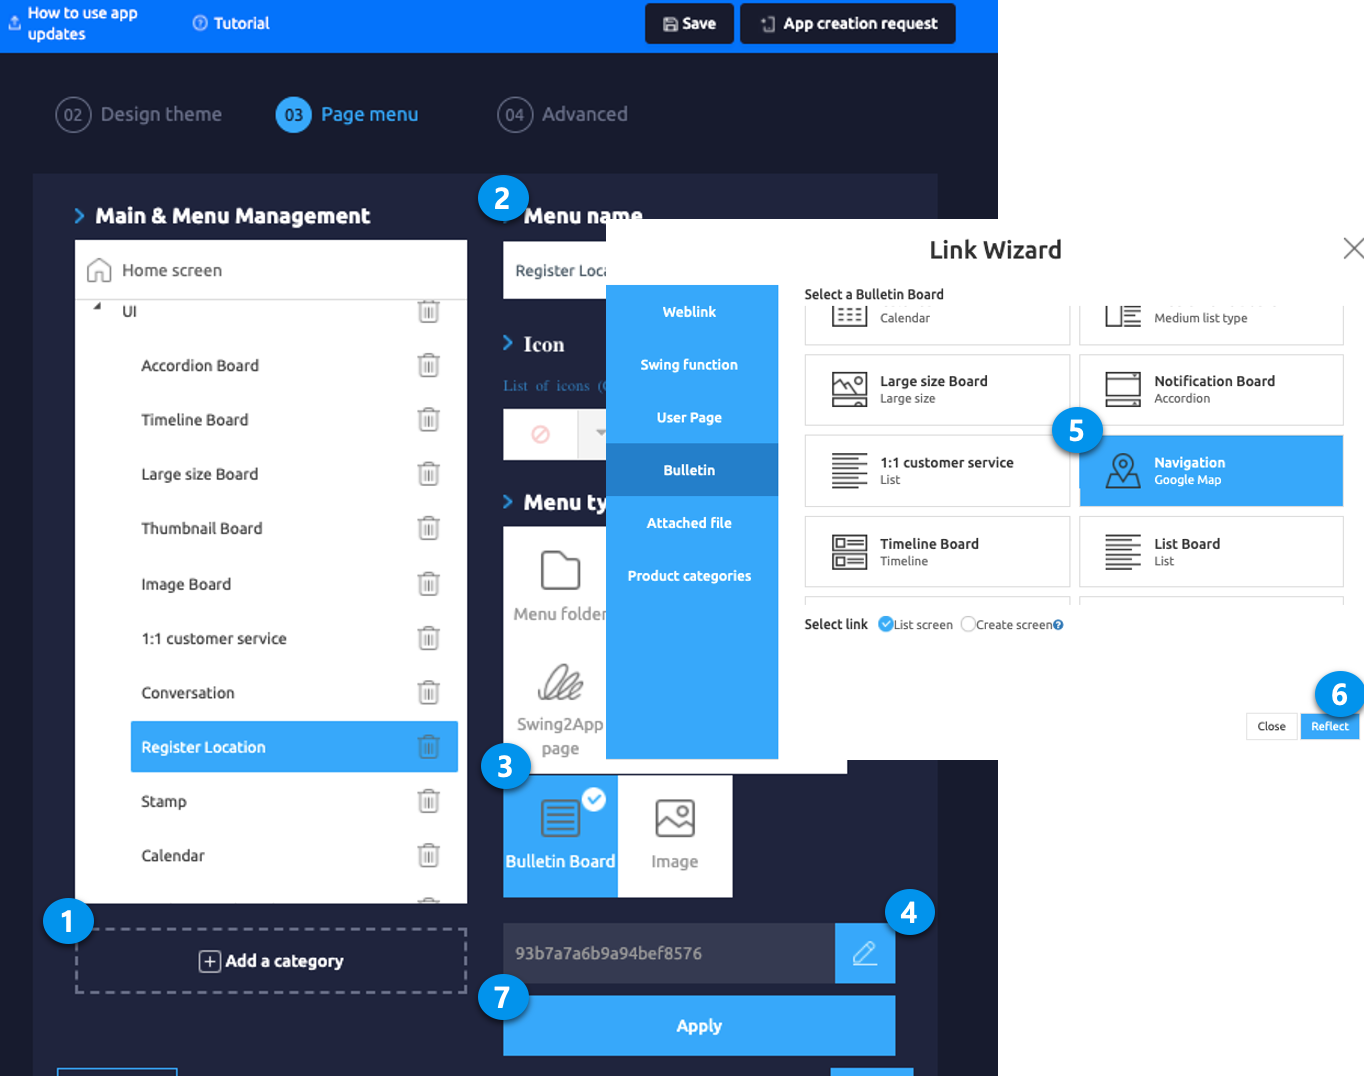
Go to **Maker(V2)** and select the **Page Menu.**
1. From the menu set by default, click the **Add a category** to add a new menu.
2. Edit the name of the added item in **Menu Name.**
3. Select **Bulletin Board** in the **Menu Type.**
4. Click on **Link Wizard**(pencil icon).
5. Select the board from the list of Bulletin Boards in the Link Wizard window.
6. Click on **Reflect.**
7. Click on **Apply** and then **Save.**
## STEP4. App Launch screen
Let’s open the app and see how the Google Maps bulletin board looks like.
**If** you select **\[Open List]**, the locations registered on the bulletin board are shown in a list.
Select the ‘Tiffany and Co.’ from saved locations.
Click on the **Directions** button, it will take you to the Google Maps page and guides you through the directions.
 [ **\[Check the detailed manual on how to use the bulletin board designated authority\]**](https://github.com/kgitae7/swing2app_doc_en/blob/main/manual/appmanage/board/broken-reference/README.md)
6\) When all contents are entered, click the \[Save] button.
> * Map board does not enter the function description text.\\
> * If you need to set the permission to view the map (add option), select ‘Custom’ in the service purpose and the fixed grey area will be released.\\
> * After selecting ‘Location registration (Google Map)’ in + UI and function selection, you can use the options such as permission setting and permission to specify. \\
> * If you want to use the existing map board, select \[Register location]. (Next map)

### **2. About Google Map**
[ **\[Check the detailed manual on how to use the bulletin board designated authority\]**](https://github.com/kgitae7/swing2app_doc_en/blob/main/manual/appmanage/board/broken-reference/README.md)
6\) When all contents are entered, click the \[Save] button.
> * Map board does not enter the function description text.\\
> * If you need to set the permission to view the map (add option), select ‘Custom’ in the service purpose and the fixed grey area will be released.\\
> * After selecting ‘Location registration (Google Map)’ in + UI and function selection, you can use the options such as permission setting and permission to specify. \\
> * If you want to use the existing map board, select \[Register location]. (Next map)

### **2. About Google Map**