> For the complete documentation index, see [llms.txt](https://documentation.swing2app.com/llms.txt). Markdown versions of documentation pages are available by appending `.md` to page URLs; this page is available as [Markdown](https://documentation.swing2app.com/store/admob/admob-plugin-apply.md).
# How to apply AdMob plug-in
***
You can create an ad-profit app by applying Google AdMob advertisement to an app produced by Swing2App.
After purchasing Google’s AdMob plug-in product provided by Swing2App, you can connect the advertisement directly to the app by entering the information needed to set up the ad mob.
We will guide you through the AdMob setting to the store launch process, so if you want to set up AdMob advertising, please refer to the manual before proceeding.
{% hint style="info" %}
**\[AdMob ad setting order arrangement]**
1\) Completed the production of the app\
2\) Payment of plug-in products with AdMob ($220) or AdMob package products ($420)\
3\) Subscribe to the official AdMob site → Create ad unit ID, copy app ID by platform\
4\) Setting up ads in AdMob plug-in settings\
Manager →Services→ Go to AdMob Plug-in settings\
Enter Set ad unit ID, Set ad exposure pattern, and save\
5\) After setting up the ad, \[App Creation Request] : Update the app with the advertised version\
6\) Ad setting is complete. Download the app on your Android phone and test it to see if it’s working well\
7\) Register store: Upload stores you wish to launch, such as Play Store, App Store, etc.
{% endhint %}
***
## **1. App Production Completed**
Please complete the application before applying the ad-mob advertisement.
\*You don’t have to create 100% complete apps!
If you want to test the advertisement setting first, you can proceed after making some.
The app can be modified and updated continuously in the future, so even if you apply the advertisement, it can be used continuously.
***
## **2. Purchase AdMob plug-in products or package products**
### 1) Purchase plug-in products with Google AdMob (single product)
\*[Manager → Online Stores → Swing2App Plug-in](https://www.swing2app.com/view/new_product_list_by_plugin) Please pay $220 on the Swing Plug-in purchase page.
AdMob plug-in products are also available in the free version of the app.
You can purchase a paid app coupon after setting up the advertisement.
\* Plug-in with AdMob is a single product, and after purchasing the product, you must purchase a swing paid app ticket and store upload ticket separately.
or
### **2) AdMob Power Package**
You can also purchase the **\[AdMob Power Package]** package.
\*[Manager → Online Stores → Swing Package Product ](https://www.swing2app.com/view/new_product_list_by_package)Please pay $420 for **\[AdMob Power Package]**.
The AdMob Power Package is a cheaper package product that combines ad-mob and voucher.
\[Plug-ins with add-mob + Swing Basic Access (1 years/12 months)+ Upload Ticket 1 time each (App Store Upload Ticket, Play Store Upload Ticket)] It’s all included.
So if you’re going to use the app for a long time, it’s much cheaper to buy a package.
\* It is offered at a discount of $120, which is less than the individual item purchased. ~~$540~~ → $420
***
## **3. Create the ID required to subscribe to AdMob sites and set up ads**
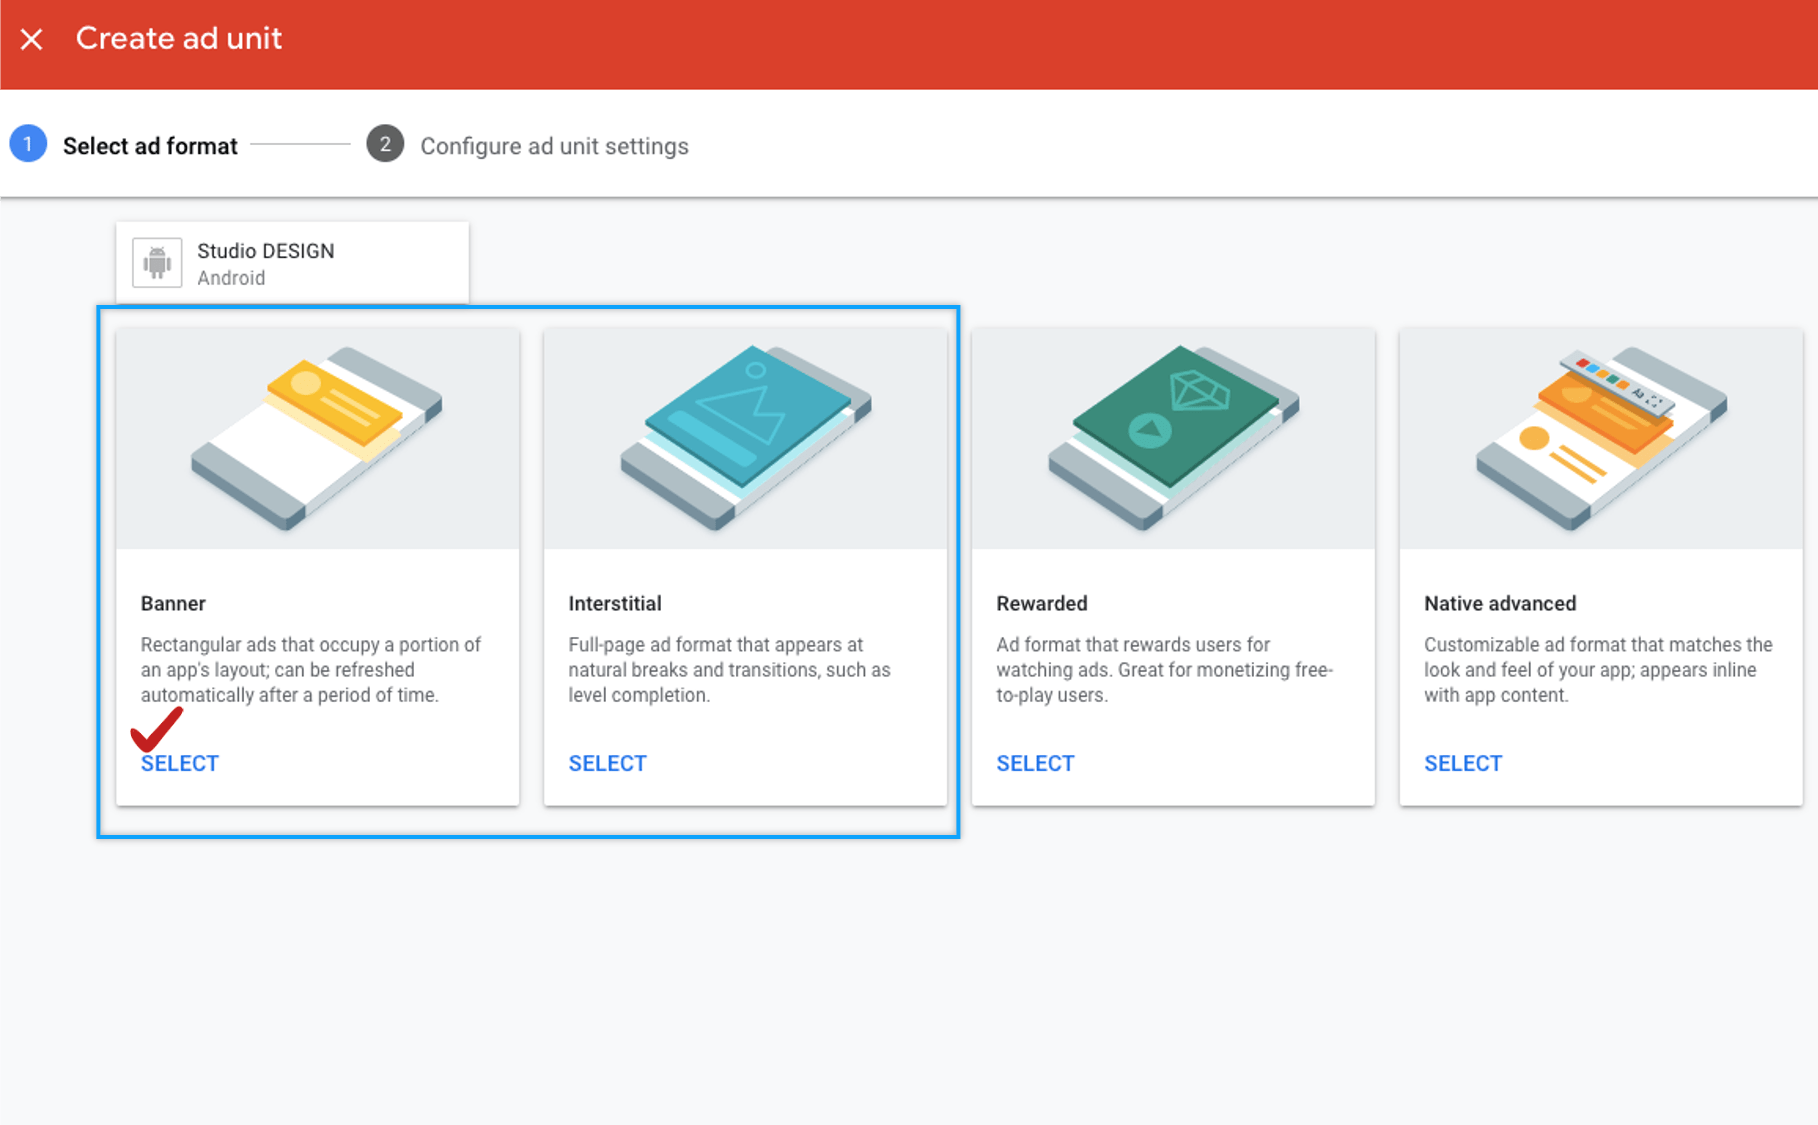
1\)Please sign up for Google ad mob or log in if you have an account.
2\)Add apps to create advertising unit IDs and check app IDs.
3\) Please add all payment information so that it is not omitted.
To set ad-mob ads on the app, you need the information below.
(1) Full-page advertising unit ID (Android, iPhone)
(2) Banner ad advertising unit ID (Android, iPhone)
(3) Android App ID , iOS App ID
Please check the manual below for how to sign up for ad mobs, create advertising units, and check the app ID.
☞[**Go to see how to sign up for Google ad mobs and how to create advertising unit IDs**](/store/admob/admob-register.md)
***
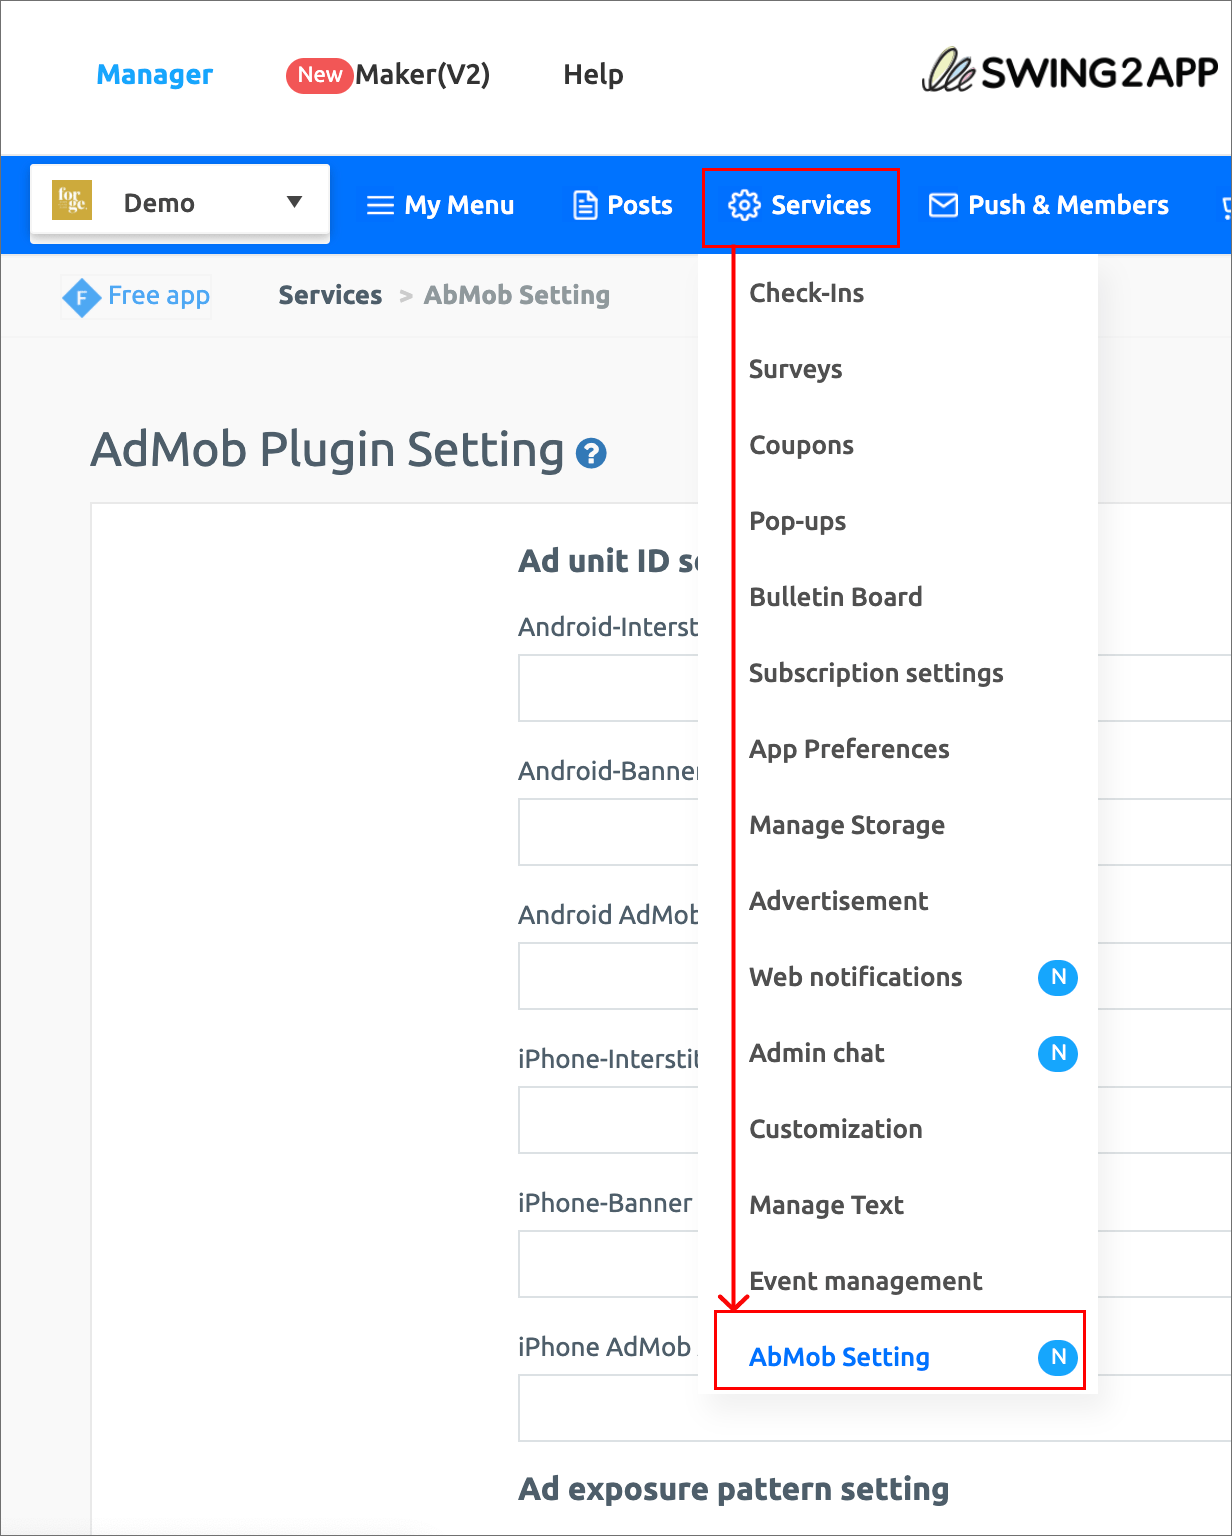
## **4. Set up ads in AdMob plug-in settings**
After signing up for an ad-mob, if you’ve made all the advertising unit IDs, now I’m going to use the app! Let’s set up the ad.
**Manager → Services → AdMob Plug-in Settings**
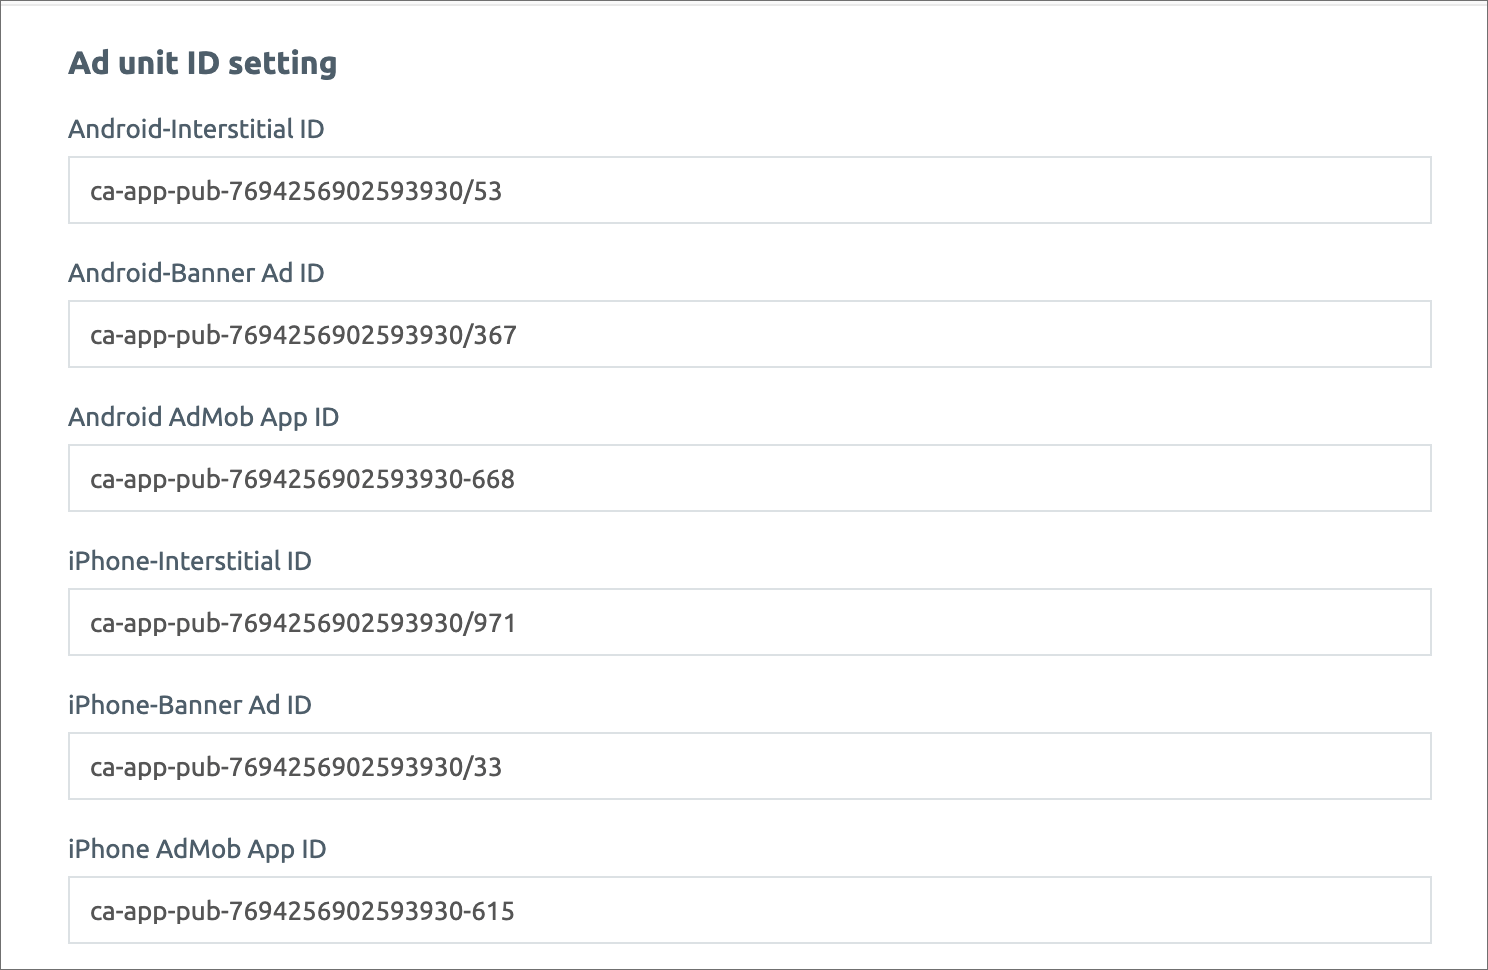
### **1) Ad unit ID setting**
-Enter Android Full Ad, Banner Ad ID
-Enter iPhone full-page ad, banner ad ID
-Android, enter iPhone app ID
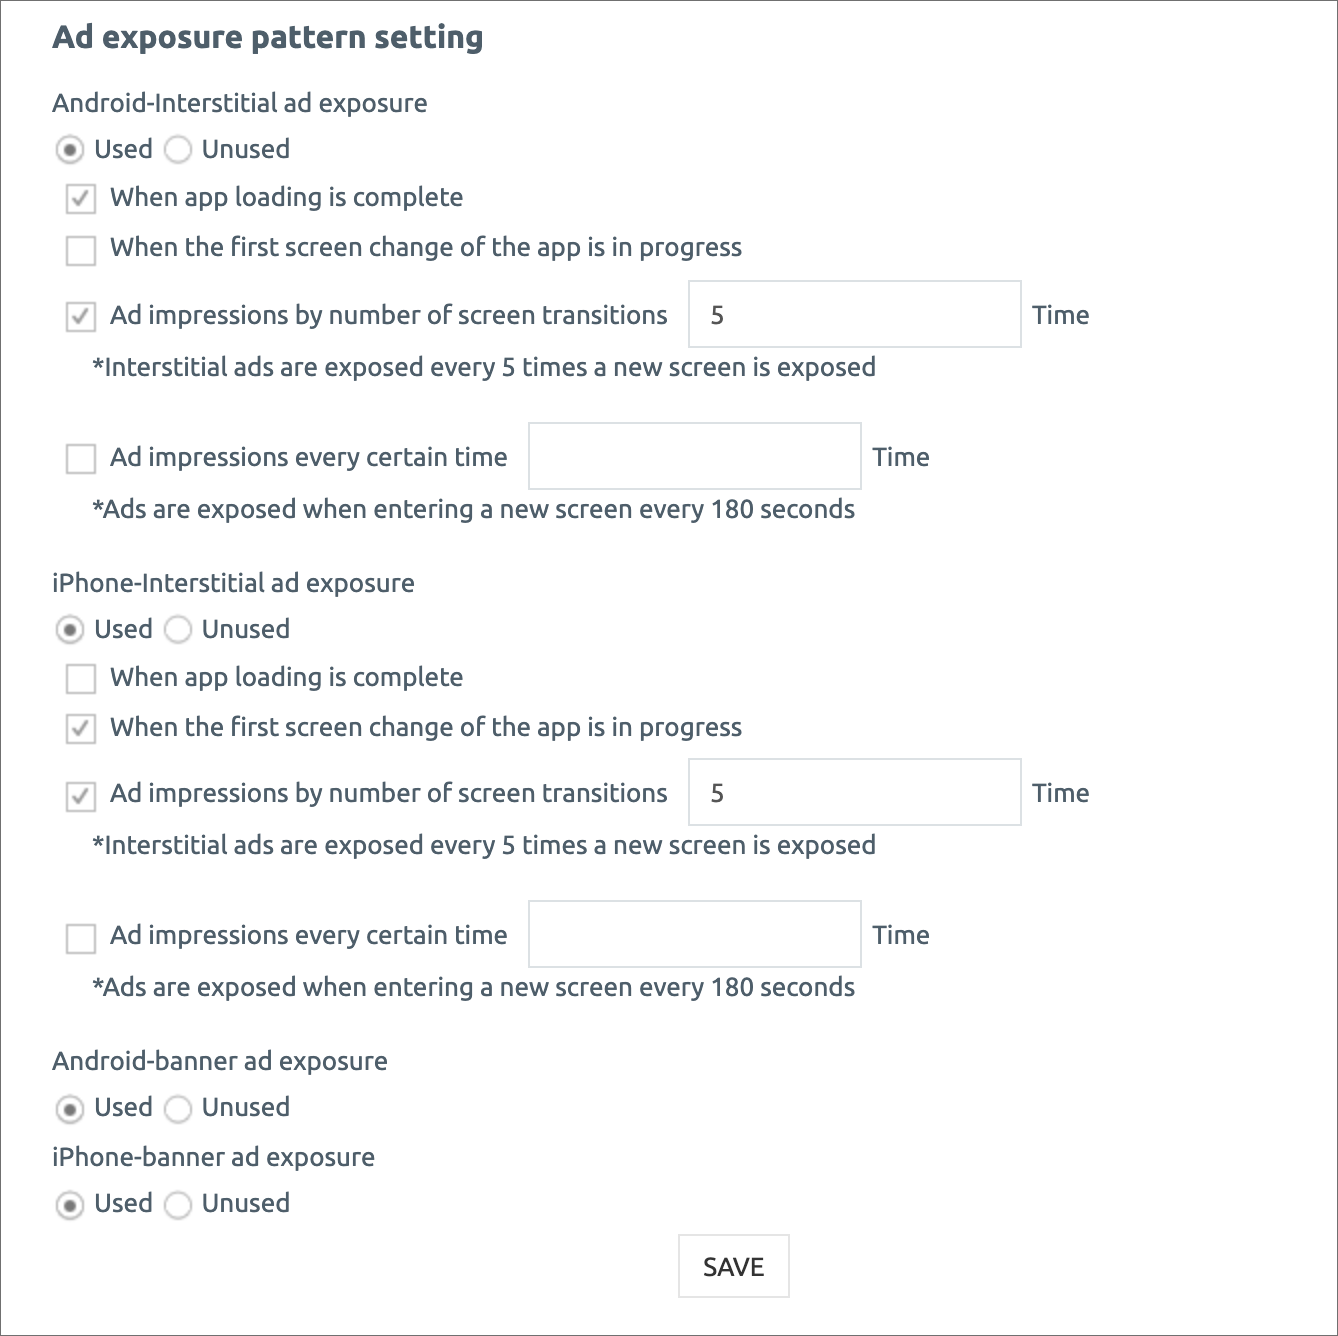
### **2) Setting up a pattern of ad exposure**
Please check both front and banner ads with ‘Use’ exposure.
\*Front and banner ads are optional. You don’t have to expose both.
You can selectively apply it by exposing only the banner or just the front.
Banner ads can be completed by checking for ‘use’ exposure.
You can choose an exposure pattern for a full-page advertisement.
{% hint style="success" %} **Front ad exposure settings**
1\)Exposure of advertisements when launching the app for the first time
->Full advertisements are exposed when the app is first launched.
2\) When switching to the app for the first time is in progress.
->After launching the app, a pop-up advertisement will appear once the screen is switched by selecting the first menu or page.
3\)Exposure of advertisements by number of screen transitions
->You can set the number of ad exposures that appear as the screen transitions.
When setting to ‘Example’5’, full-page advertisements are exposed when the screen is switched 5 times.
4\) Expose advertisements every scheduled time
->If you set a schedule time, the full-page advertisement will be exposed after that time.
Example) If you set it up for 60 seconds, the advertisement will be exposed 60 seconds after the app is launched. (Expose ad every 60 seconds)
{% endhint %}
{% hint style="danger" %}
#### **Important**
Please be careful when setting up a full-page advertisement!
Too many ads can increase the inconvenience of app users, leading to ad-spam reporting.
If you receive a report, you can block the app ad from Google or delete the AdMob account itself if it is too much.
Therefore, please manage the advertisement exposure properly so that there are no policy problems.
**It’s better not to set up advertisement exposure by screen number of times and advertisement exposure by schedule time.**
**If you set it up together, please set the number of times or exposure time for a long.**
\*Please note that Swing to App will not solve the problem if the advertisement is suspended due to a violation of advertising policy.
You can check the full-page advertisement pattern setting and set it in the form you want.
You’re free to modify it at any time! Please re-produce the app only during the first setting.
After that, you just need to modify it and save it. If you exit and re-run the app, it will be reflected in the changed advertising settings.
{% endhint %}
***
## **5. App Creation Request (App Update)**
\*You have to update the app to apply the advertisement setting.
After completing the ad-mob plug-in setup, please re-produce the app in a new version by clicking the \[App Update] button on the app production page.
**Please check ‘No update Message’ for the update display option.**
**→ Displaying updates is meaningless because you need to install a new app.**
Or, for apps that have existing apps on the Play Store and so on, if you show updates, they’ll be available to users before testing.
Therefore, it is not allowed to produce ‘Do not display updates’ so that only the administrator can use them.
If you make any further modifications, just save it and it will be reflected in the app. (If you re-run after the app is closed, it will be reflected in the changed advertising settings.)
***
## **6. Set ad app production completed (app test)**
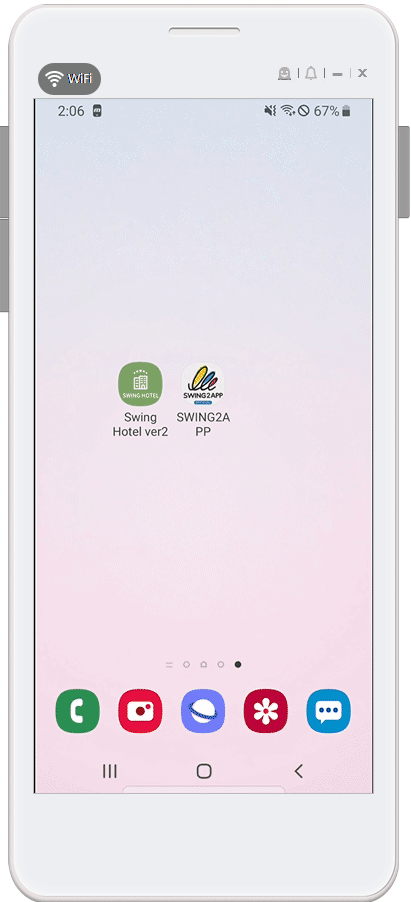
Please install the new version of the app on your Android phone to see if the advertisement is working properly. (Test only on Android phones)
Download and check the app you created on Swing to App Official App – \[App Preview].

**Check GIFs) See how to download apps**
**Check if the advertisement is working well after launching the app!**
We used banner ad exposure to the app’s advertisement setting.
Front advertisement is set to -> App on initial launch + App on screen 1 times.
So, as you can see, when you launch the app for the first time, you can see a full-page advertisement.
The full-page advertisement pops up when the screen changes 1 times by selecting the post.
It’s so easy to download the app and see if the set ad works well\~!
{% hint style="danger" %} **\*Important\***
After I finished setting up the ad, I made the app again and downloaded the app! The ad may not appear on the app right away.
There is a screening period because Google sends ads after checking ad mob accounts and apps.
In some cases, it may take up to a week to send an AdMob ad.
So if you can’t see the commercial right away, please wait a little bit.
{% endhint %}
{% hint style="info" %}
**Please check**
(1) Enter payment information on the ad-mob site and (2) Check all advertisement management.
If the payment profile is not registered, the advertisement will not be approved. If there is an unsupervised advertisement due to the lack of advertisement management, the advertisement will not appear on the app does not appear on the app.
All of these must be checked directly by the operator on the ad-mob site and managed continuously afterwards.
If you can’t proceed with the content, the actual app advertisement can be delayed even if you complete the ad-mob advertisement.
{% endhint %}
***
## 7. Registering the Store
You can download the app from above, test it, and then launch the app officially in the store if the ad pops up well.
– If you purchased an ad-mob power package, you can upload it right away because both your pass and upload ticket have already been applied.
– If you have purchased only AdMob plug-in products, please purchase a paid app pass and upload ticket together.
(App Store Upload Ticket $20 / Play Store Upload Ticket $10)
\*If you can register the Play Store yourself, you don’t have to purchase upload tickets, please upload them yourself.
\*App Store is only available on behalf of you, so if you want to upload the app store, please purchase a ticket and apply for upload.
Please refer to the below for instructions on how to apply for upload.
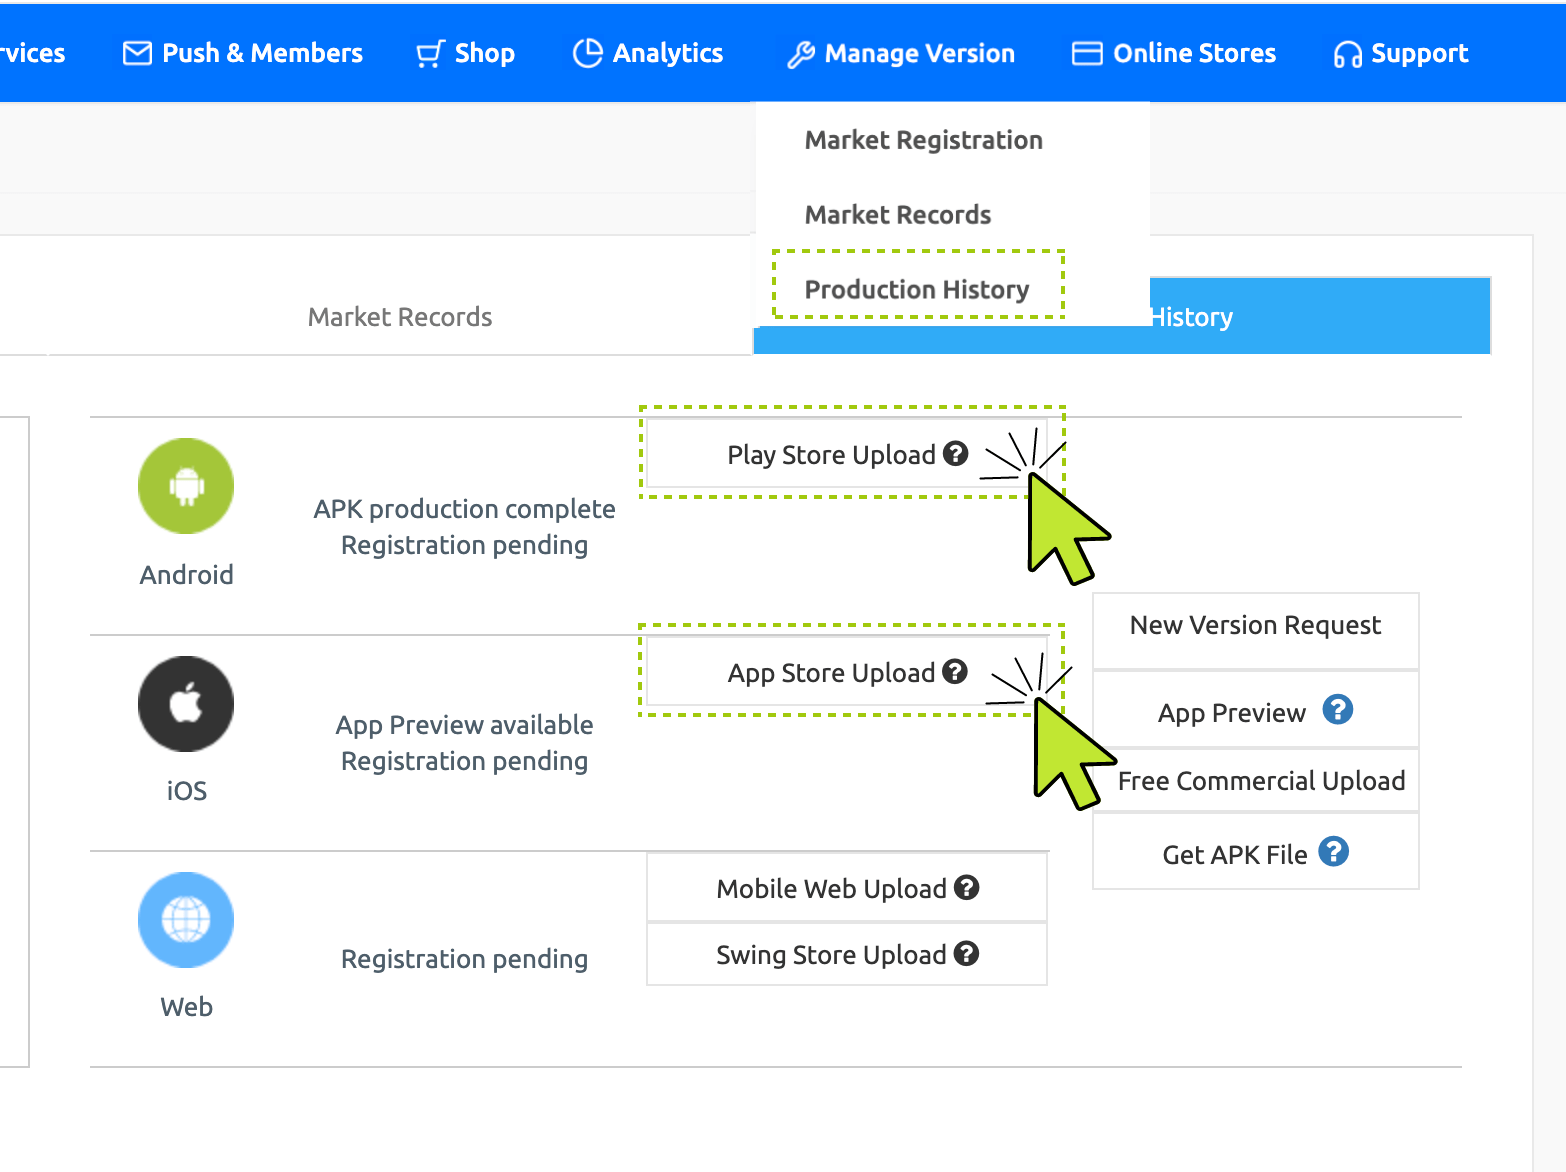
\*[Manager → Manage Version → Go to Production History](https://www.swing2app.com/view/app_work_history) menu and select the Play Store Upload or App Store Upload button in the market registration box.
The application pop-up will be displayed, and you will need to fill out the application form and apply for the upload to be delivered to Swing2App.
\*Please apply for upload after payment.
**☞**[**\[How to apply for a Play Store upload\]**](/manual/appmanage/version/playstore-upload.md)
**☞**[**\[How to apply for a App Store upload\]**](/manual/appmanage/version/appstore-upload.md)
If you apply for upload of Play Store and App Store, we will upload your app on your behalf.
You must check the policies for each store.
\*Store registration policy:
***
## **8. Advice on operation of AdMob (user confirmation)**
**1) Only one ad-mob account per person can be used.**
The same person cannot run multiple accounts, and **if there is a duplicate account, the account created will be suspended.**\
So please make sure you have a previous account before joining the ad-mob.\
If you accidentally created a duplicate account, you should request the account to be closed.\
**If you have a duplicate account, the advertisement will not be posted, and even if you request the cancellation of the duplicate account, it may take a long time for the account to be restored.**
**2) AdMob ads must be checked and managed by the operator.**
If you created an advertising unit ID by adding an app for the first time, you should check if there are any unsupervised or blocked ads in the advertising management.\
You need to check it from time to time, not just from the beginning.\
If there is an unreviewed advertisement, the advertisement does not appear on the user’s phone, so the operator should always check it and change it to a review advertisement.\
**If you don’t manage your ads properly, the ads can suddenly go down or stop posting even if the ads are posted well at first.**
**3) Please be aware of invalid traffic and negative clicks!**
Invalid traffic and negative clicks are when a user continues to artificially click an ad.\
Advertisements run from the moment they are set up in the app.\
If an ad touch is found on a particular model (phone), Google will drop the ad without notice.\
Not only the operator, but also the users of the app choose to advertise artificially.\
If there is any suspicious behavior, the advertisement may be suspended due to invalid traffic.\
\&#xNAN;**=The only way to wait for an ad to be re-published by Google is to wait for it to be re-published if the ad has gone down with invalid traffic.**
**4) App ad publishing may be interrupted if traffic is low.**
Just by setting up an ad mob on the app, you don’t get the advertising revenue right away.\
Google is sending out ads to see if the app is reliable.\
**If the operator’s app installation is poor or the users’ use of the app is poor, the app is judged to be unreliable and the advertisement is stopped.**\
Therefore, it’s not just about creating an app and setting up an ad mob, but it’s about time to continue marketing activities such as promoting the app so that more users can use it.\
\\
**5) Make sure to register the payment profile on the ad-mob.**
If the payment information is not registered in the ad mob, the advertisement will not be posted.\
Google opens the advertisement only when the payment profile is confirmed, so please complete the registration of payment information when you sign up.\
\= If you apply without entering payment information, the AdMob advertisement will be delayed that much.\
\*After setting up the ad mob, you have to manage all of the ads yourself, so you must check and check the operation parts.\\
***
## **9. Precautions**
**1) Information related to operation of ad mob, such as advertising revenue, operation methods, and policies related to ad mob, is not provided by Swing2App.**
Please check the content and precautions on the official website of Google’s ad mob before applying.
\*Swing to app only sets ad-mob ads on the app, so we don’t give advice on how to run an ad-mob.
2\) If you have any questions regarding the application of ad mob to the app, please contact the customer service center before proceeding.
3\) Once the ad-mob plug-in setting is completed after payment, we cannot refund the details of the ad-mob suspension or payment, so please consider it carefully before proceeding.
4\)Advertisements cannot be selected by the user and will be displayed randomly on Google.
5\)Advertisement setting – Full-page ad and banner ad, and full-page advertisement can be set up by the user.
6\)Advertisement setting will be carried out with Android+iPhone integration, but it can also be applied as an Android or iPhone platform.
(Applying only one platform, the price of the admob is the same.)
7\) The Swing to App does not sign up for an ad mob or create an advertising unit ID.
Please check the manual and register it yourself.
8\)Don’t push an ad with a person on an app with an ad mob. Google will advertise when the artificial number of times increases.
9\) Apps with ad mobs must be released in Play Store and App Store to generate app ad revenue.
Please make sure to launch the app on the store after applying the ad mob.
10\) Ad mobs do not immediately generate advertising revenue just because they are installed in the app.
There are many conditions, and we need to get publicity and users to install many apps.
**-A certain percentage of apps must be installed, and a certain amount of money must be earned to get a settlement.**
**-App ads can be lowered if the app is installed and used poorly, and Google can restrict the advertisement. (traffic low, etc.)**
**-So you should be familiar with the content on the official ad-mob site.**
***
## **10.Refund guidance**
1\) Refund is possible when applying within 3 days of purchase, but if the ad mob setting is completed, no refund is possible.
2\) You can apply the product before requesting a refund. If it is inevitable, please contact the customer service center.
3\) If the card is not automatically refunded, we will deposit the refund amount. Please let me know your account number, bank name, and deposit address.
4\) Please check the swing refund policy.
\[Use policy-Checking refund regulations]
 **Check GIFs) See how to download apps**