> For the complete documentation index, see [llms.txt](https://documentation.swing2app.com/llms.txt). Markdown versions of documentation pages are available by appending `.md` to page URLs; this page is available as [Markdown](https://documentation.swing2app.com/manual/maual/appbasic/app-manual.md).
# Guide to create an app
**Swing2App Step by Step App Production Manual**
After registering on the homepage, Swing2App will open a page where you can create an app. User can create their app using the **Maker(V2)** tools.
**Please check the step by step manual on how to create an app on the Maker(V2) page.**
\ **★ Before the app is created, please check the app production TIP!**
Swing2App provides app production tools, and as a service that requires users to build their apps, the production method manual is well built.\
If you look next to the **Manager** and **Maker(V2)**, you’ll see **Help.**\
Clicking on the **Help** will take you to the corresponding help manual site describing how to use or create an app.
Therefore, when you want to check the manual while creating an app, be sure to check the **Help,** to view the manual.
### **STEP.1 APP BASICS**
**App Basics** is a step to input basic information required for the app production like registering the app name, logo image, splash screen image, etc.
When you enter the app production page, the following page will open.
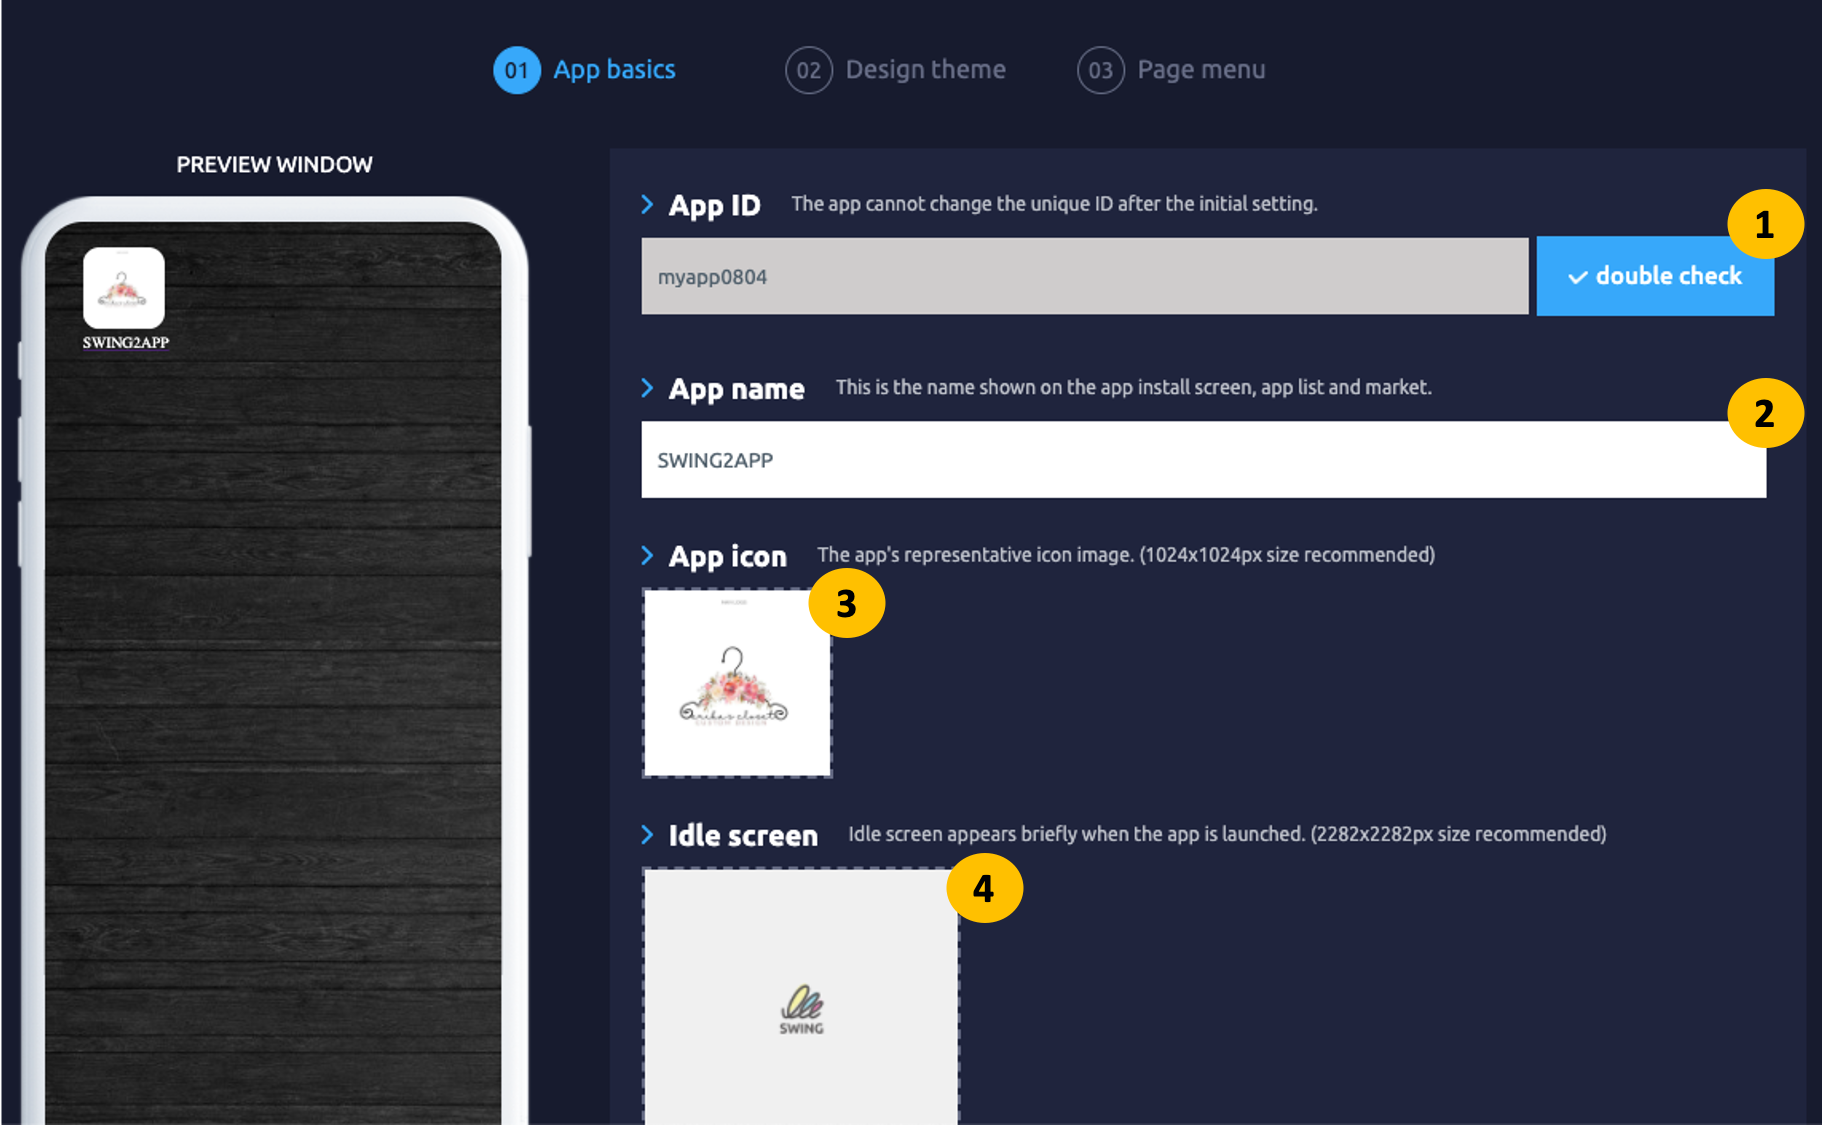
**How to create app basic information**
1. **App ID:** Apply your unique ID to the produced app. Check for duplicate after entering!
2. **App Name:** Enter the app name.
3. **App icon:** Register the app Logo image.
4. **Idle Screen:** Register the splash screen image that is displayed for 1-2 seconds when the app is launched.
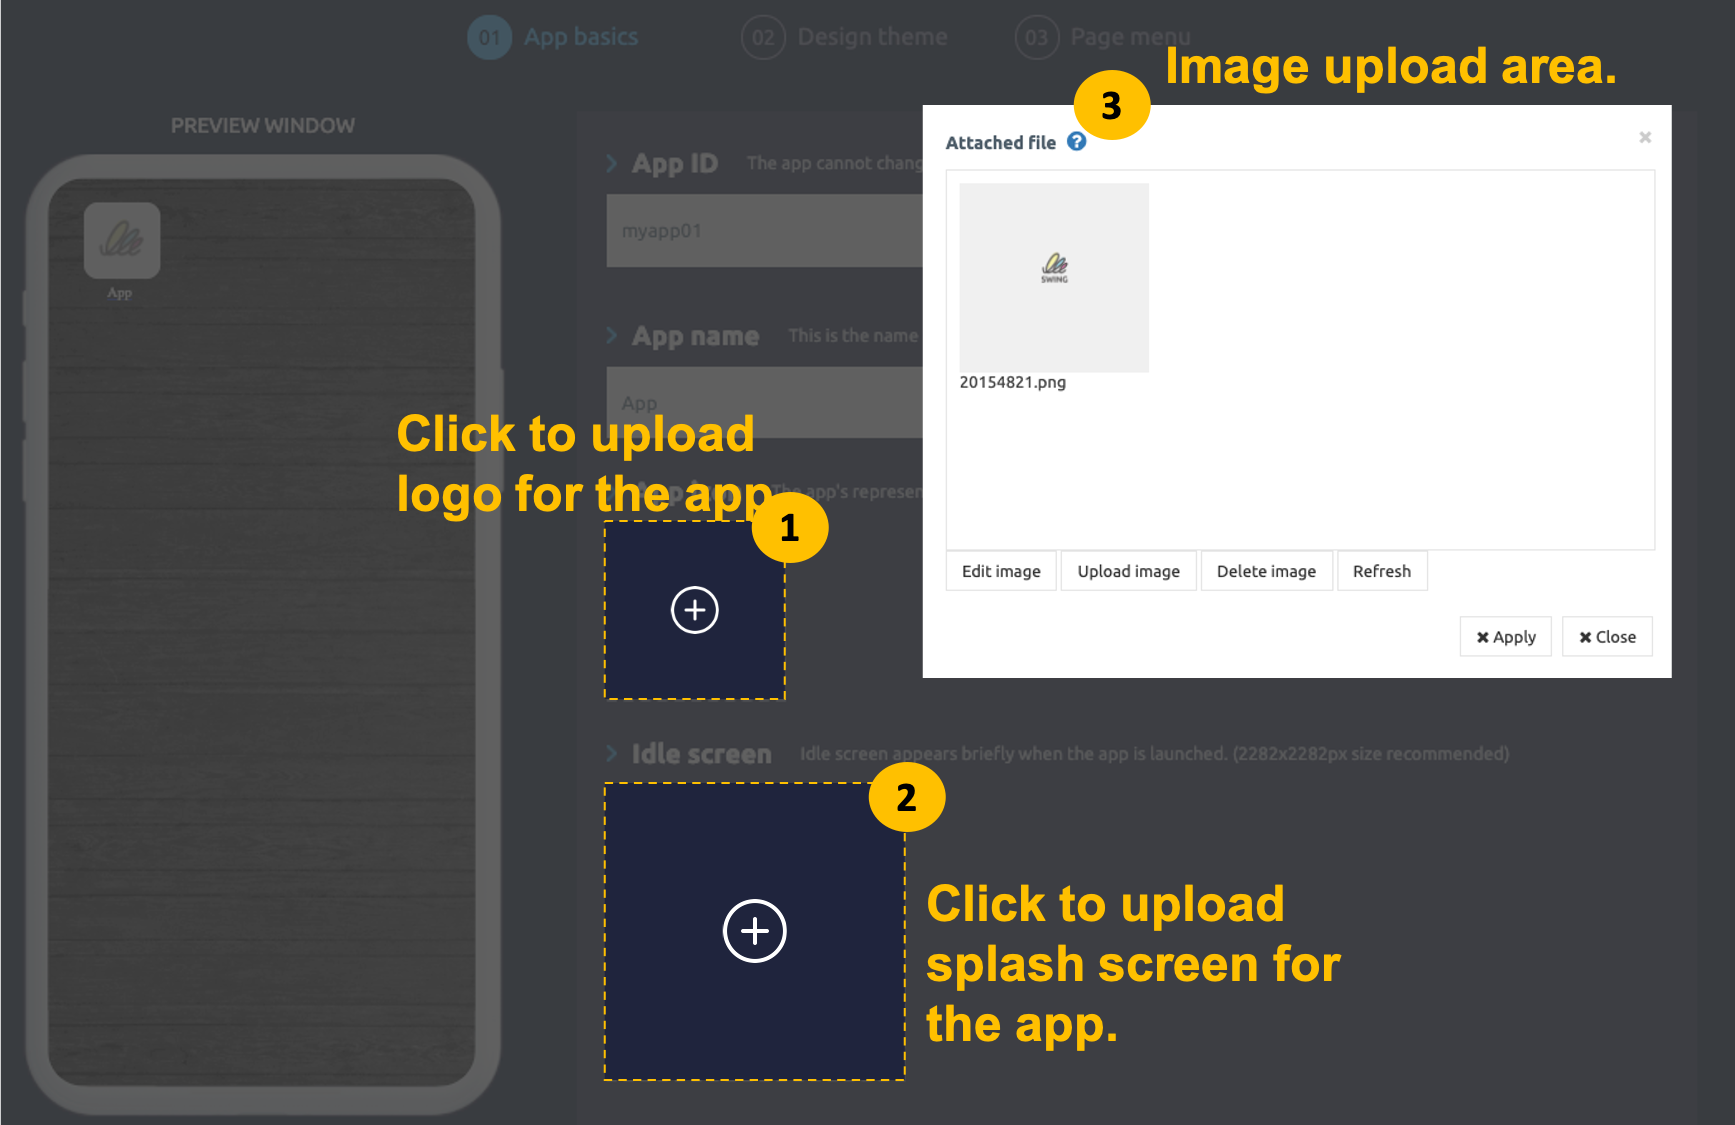
\*When you select the app logo and the splash screen image attachment button, the image editing tool window will pop up. You can modify the image to the desired size using the image editing tool provided by Swing2App.
**Image editing tools**
When you select the icon image button, you can upload the image in the Attached File window.
If the logo is uploaded and is of correct dimensions, you can complete it by pressing **Apply** immediately without modification.
**If you need to edit because of the different sizes, go to the image edit tool window.**
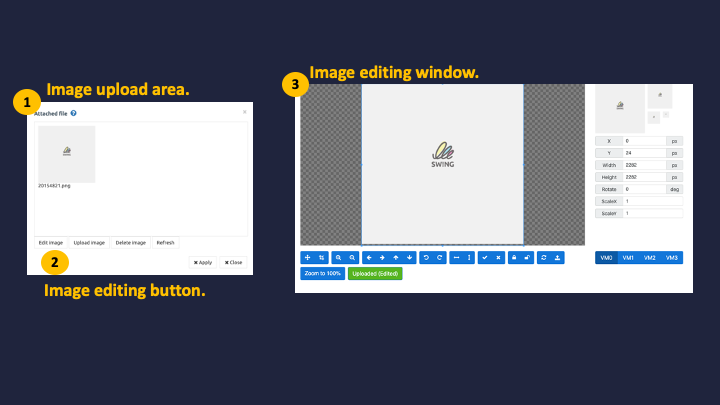
**The image above is the image editing tool window.**
The image editing tool is swing2app’s service, and if the user is unable to modify the image, the image editing tool makes it easier to modify the size.
Once you’ve applied the size, you can apply it by selecting the Upload (Edited) button.
\*Step 1 When all the basic information items are entered, press the \[Save] button and move to the next step design theme.
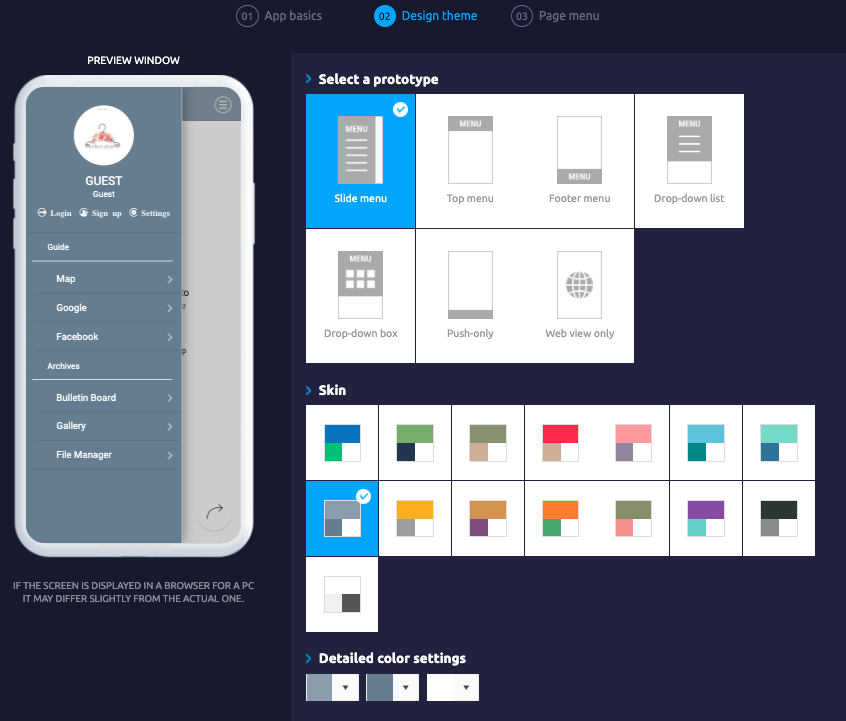
### **STEP.2 Design Theme**
**Stage 2 Design Theme, is the stage to determine the overall design and style of the UI design and color of the app.**
**\[Step 2 design theme production method]**
**1) Select a prototype: Select a prototype that determines the design of your app’s UI.**\\
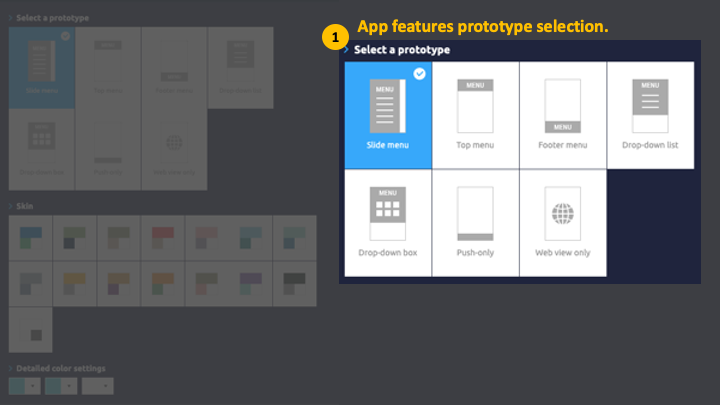
\*Swing2App offers a total of six prototype designs.
Select prototype If you press ‘?’ the question mark button, you can see all the styles that have been applied.
☞ [Check the Prototype design](https://support.swing2app.com/prototypeui/)\\
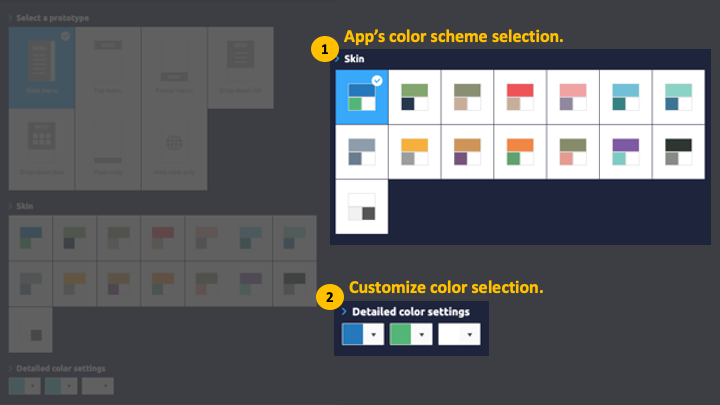
**2) Skin: Set the skin color of the UI design.**
Skin color provides 3 color combinations of app background, menu, and text.\\
Since the color that matched the trends are selected, you can see the UI that changes color instantly through the virtual machine by selecting the desired combination.
You can instantly see a UI that changes color.
**3. Save**
★But what if you don’t have a favorite among the color combinations?
If you don’t have the color you want, you can choose your color from Detail Color Settings.
In addition to a fixed color combination, detailed color settings are an option that allows you to select and apply your colors.
**\*If you’ve applied both prototypes and skin colors in the design theme, save them and go to the next level in the page menu.**
### **STEP.3 Page Menu**
**Step 3 Page Menu, is a step to organize the contents of the app by creating categories and menus in the overall app tool.**
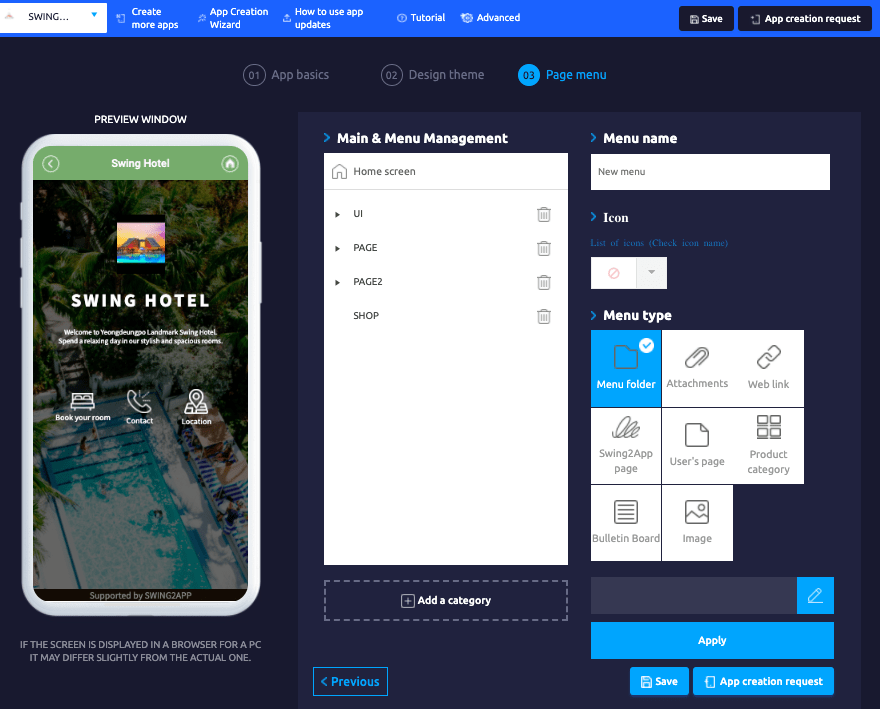
The page menu is a step that composes the home screen and menu.
We will show you how to apply both the home screen and menu.

**1. How to apply your home screen**
The home screen is the main screen that you see when you launch the app, and you can configure how you want the main screen to appear.
Menus provided by Swing2App – You can apply menus such as web links, swing2app pages, user pages, bulletin boards, and images.
**\* How to apply the Home Screen**
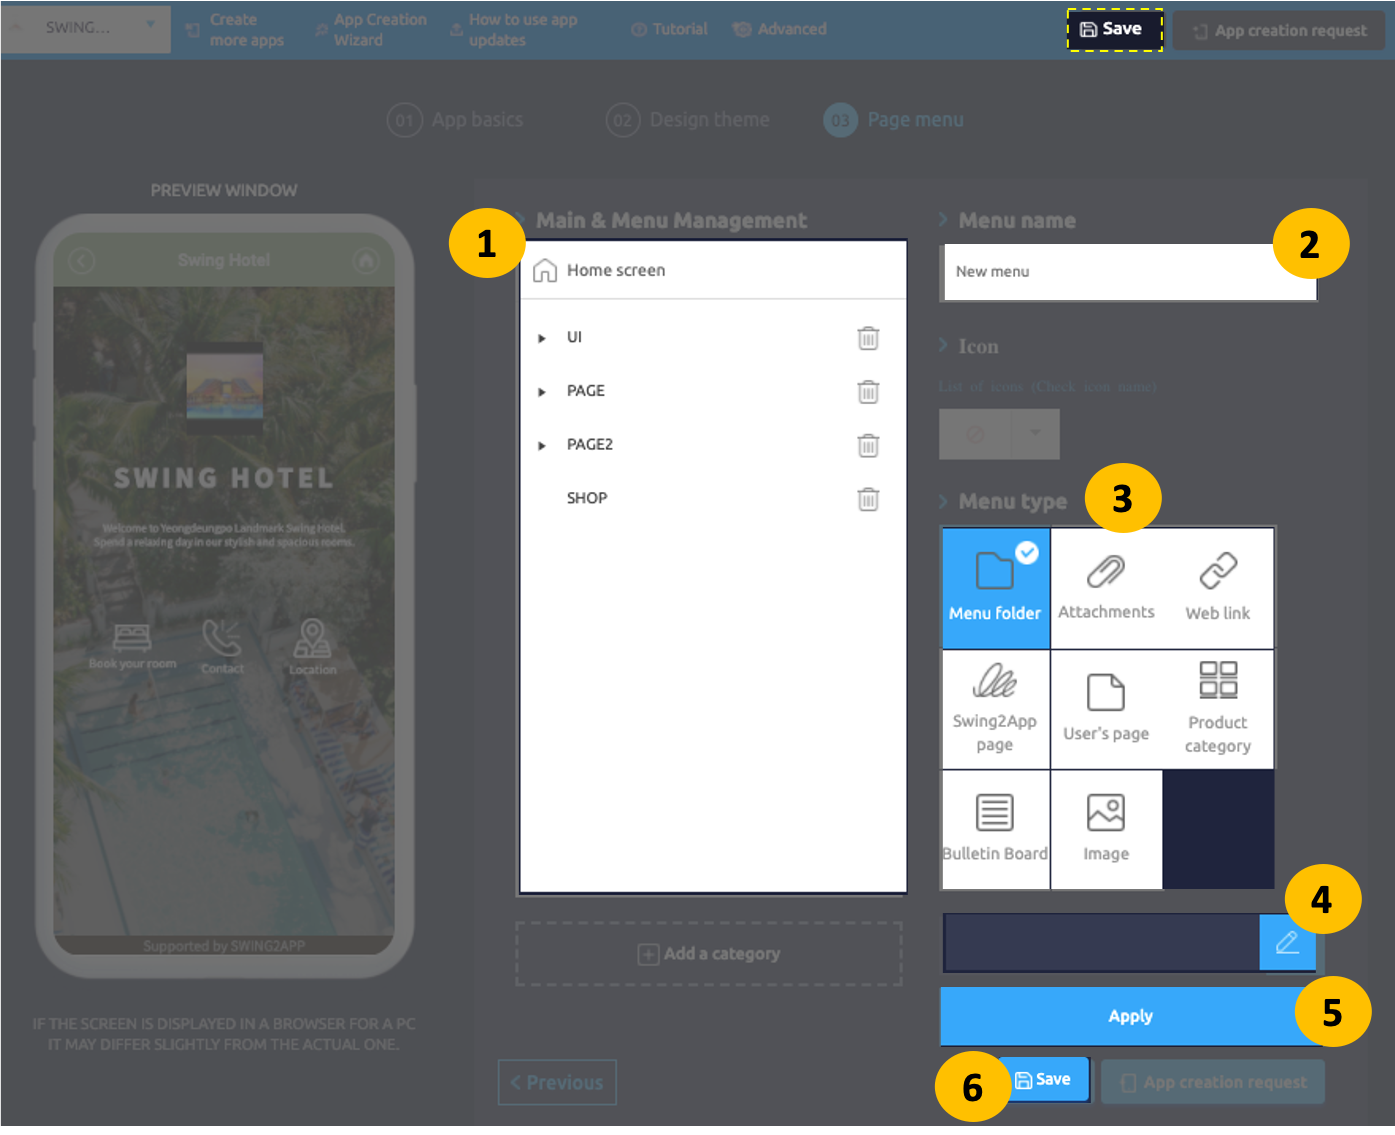
1. Select the home screen and open the menu settings window on the right.
2. Enter the name that will be shown at the top of the home screen in the Menu Name.
3. Select which menu to apply to your home screen.
**☞** [**Check the home screen production manual**](/manual/maual/pagemenu/apphomescreen.md)
\*\*▶ Weblink \*\***home screen applied**
**Let’s apply a web link to the home screen.**
**Production method**
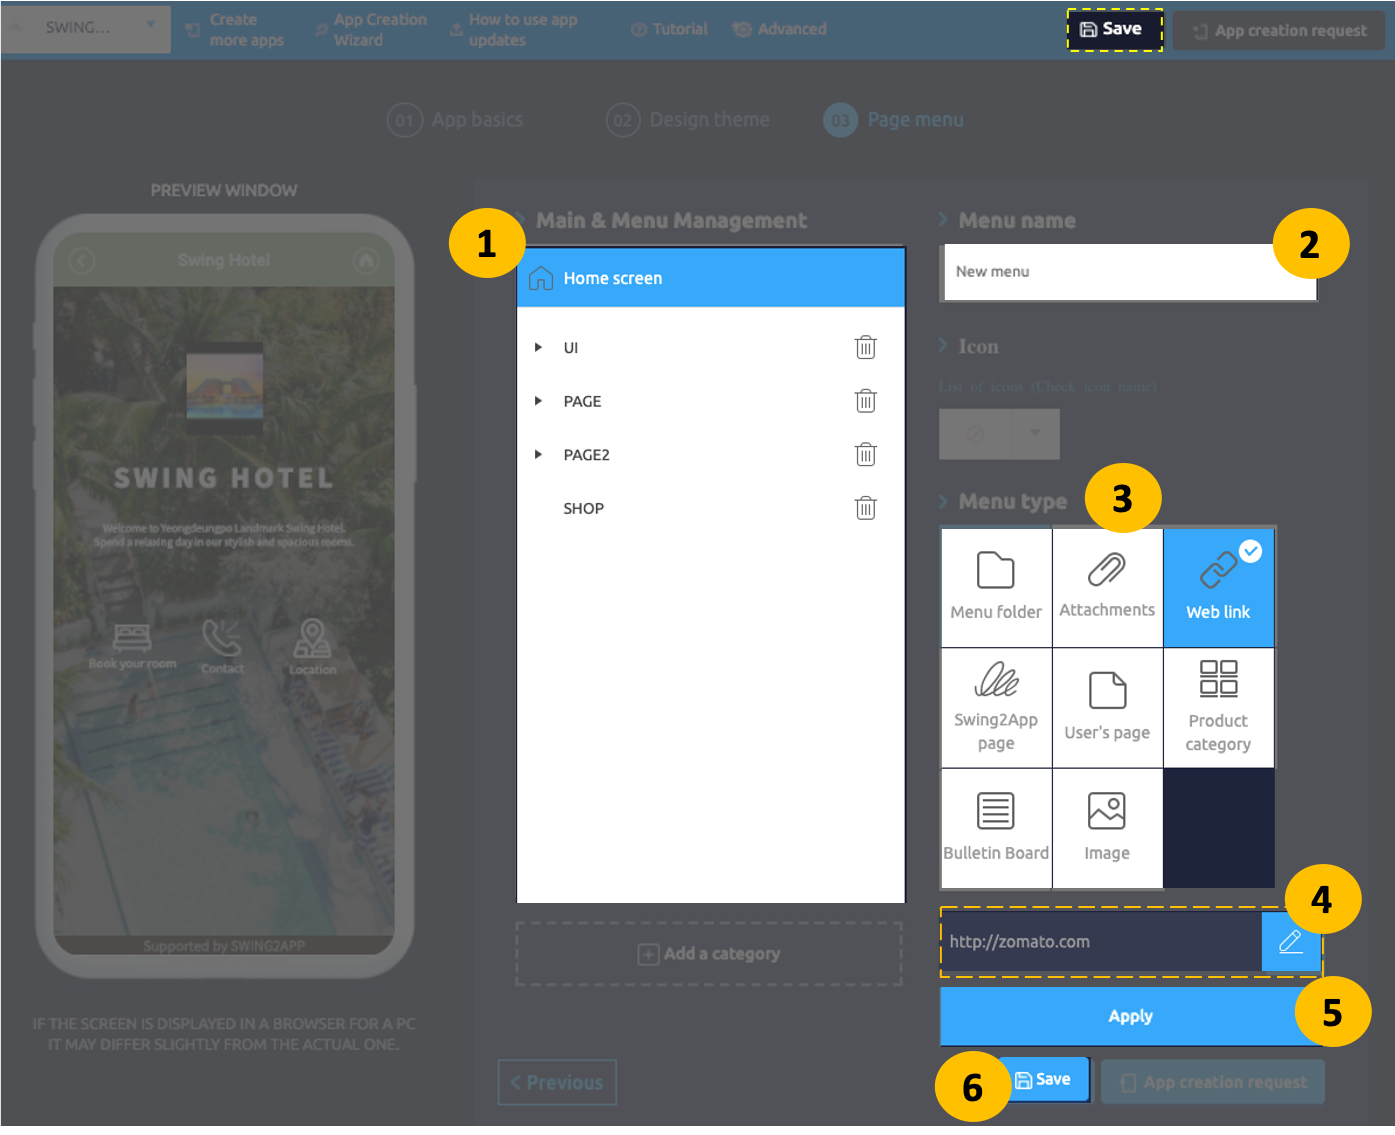
1. Click on the home screen and you will see a menu settings page on your right.
2. Rename the menu at the top of the home screen. (Unless you change the name, it will be displayed as the app name.)
3. Select the Web link menu in the menu settings. (Swing homepage URL: )
4. Enter the web link URL in the bottom area.
5. Click apply
6. Press Save to complete!
**\[Check it out with GIF]**
**★ Precautions**
Some sites sometimes prohibit embedding when applying web links.
\*Portal sites such as Naver, Daum, YouTube, social media sites (Instagram, KakaoTalk, Facebook) are some of the leading sites that have been prohibited from embedding!
In particular, blogs or Daum café that are operated by Naver are blocked, so it may not work properly on the home screen.
So on the app home screen weblink – avoid these portal sites and social media sites!
For more information on how to create your home screen, please check out this post!
☞ [\[View how to create an app home screen\]](/manual/maual/pagemenu/apphomescreen.md)
Once you’ve applied the home screen, then apply the menu.

**2. Delete menu**
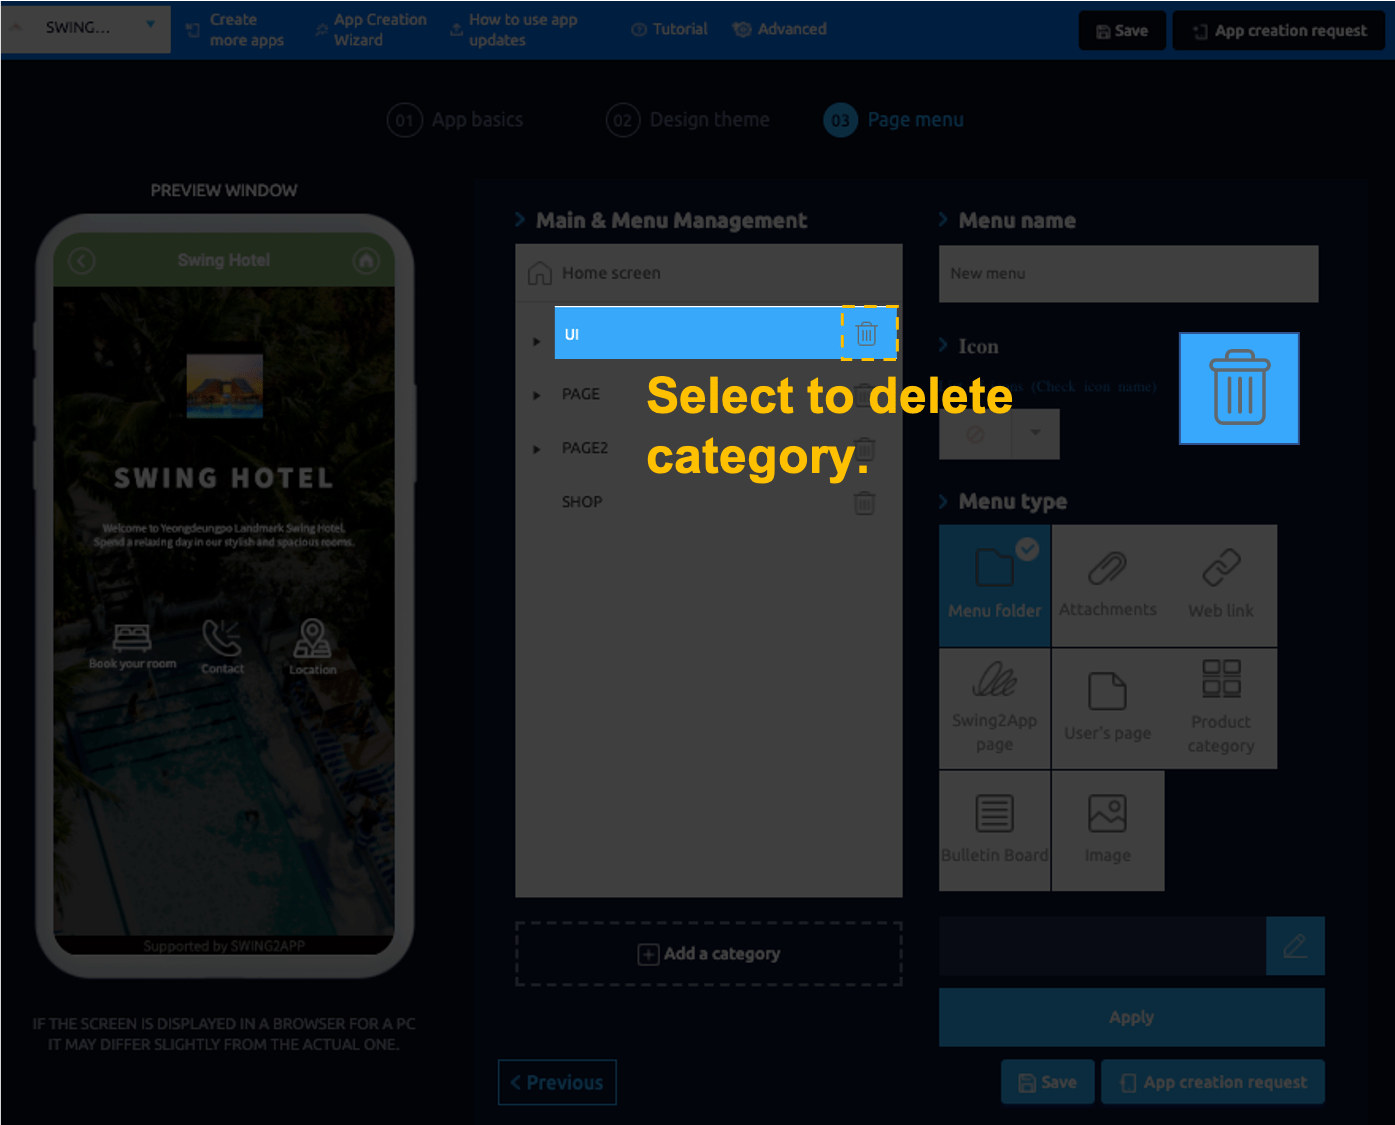
**\[How to delete the default menus]**
If you delete the menu named \[UI], select the \[UI] category and select the \[Delete] button above.
Menus can be deleted in this way.

**3. Add new menu**
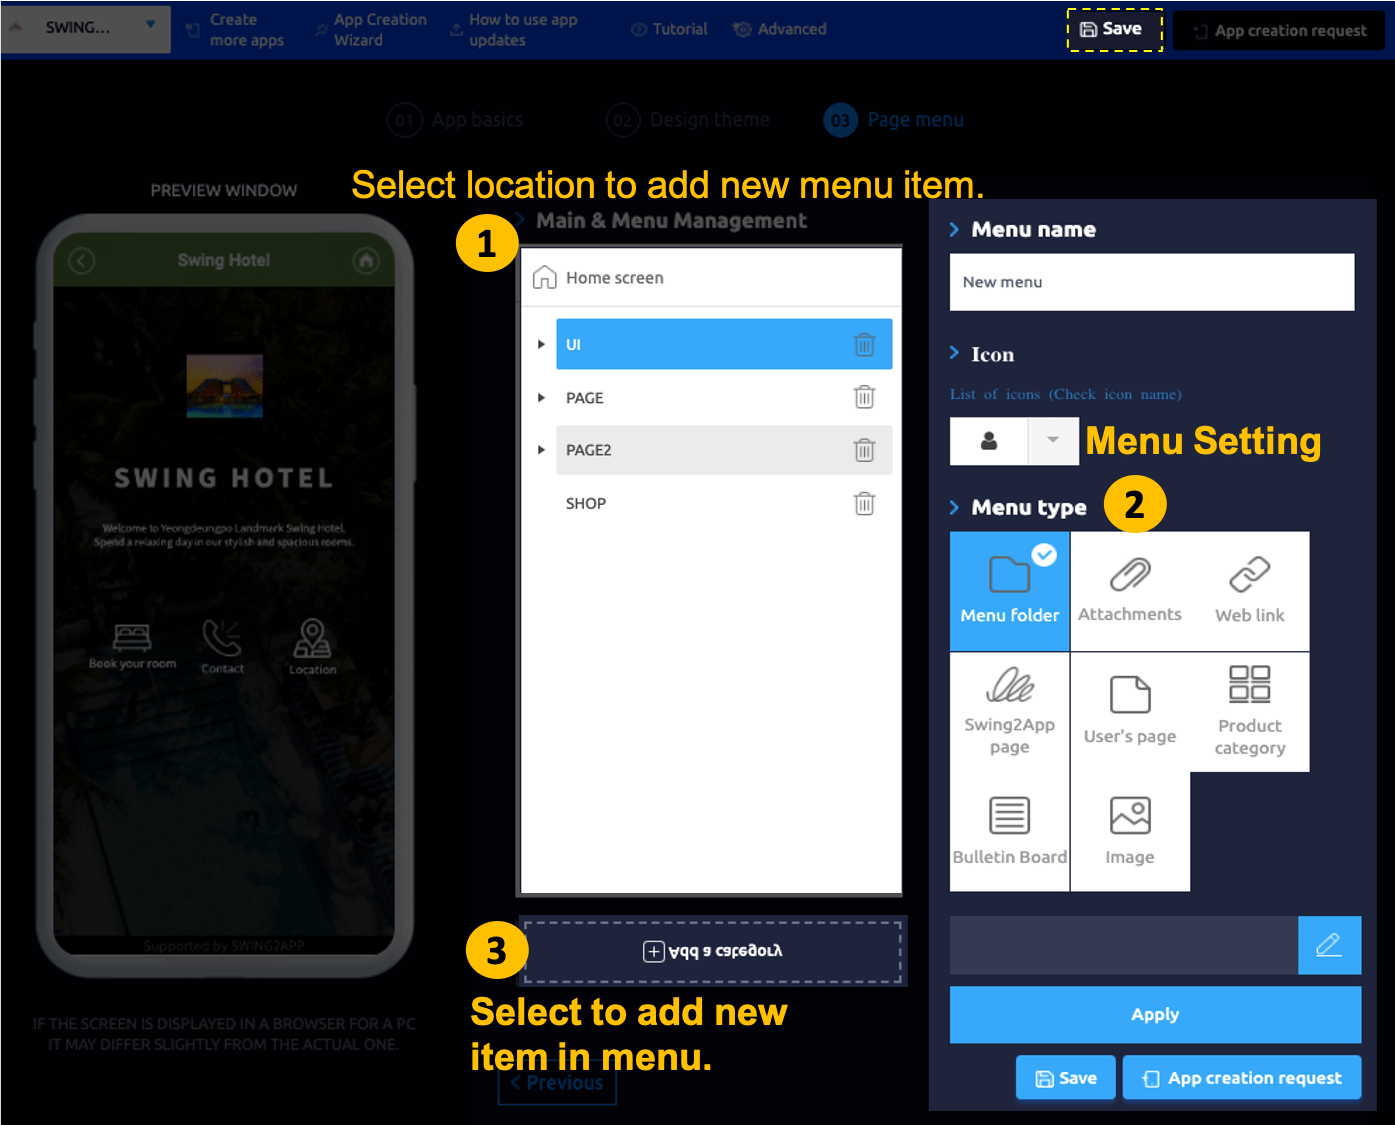
Instructions to delete existing menus and adding new ones.\\
1. Select the Add categories button.
2. Enter the name of the category.
3. Menu type: Select which menu to apply.
4. Apply
5. Save
**You can see the new menu has been created by viewing the virtual machine.**

**4. Add sub-menu**
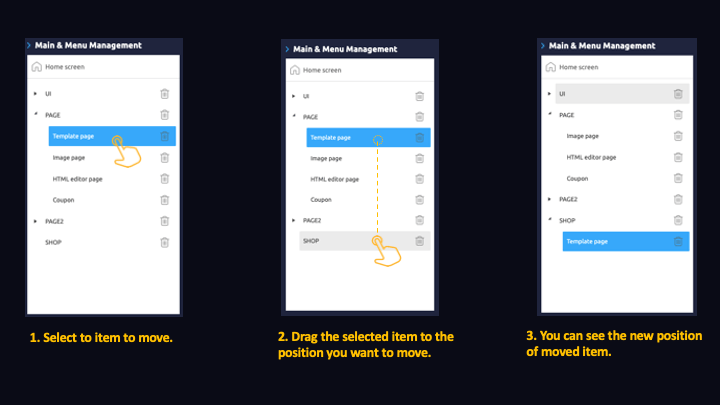
We will show you how to add a sub-menu below the menu you have created.
Select the menu to move and drag the mouse to where you want to move.
The menu is completed by the position you drag. – You can configure it as a lower or upper menu.
**If you look at the virtual machine, you can see that a menu called \[Swing2App Introduction] has been created as a sub-menu.**
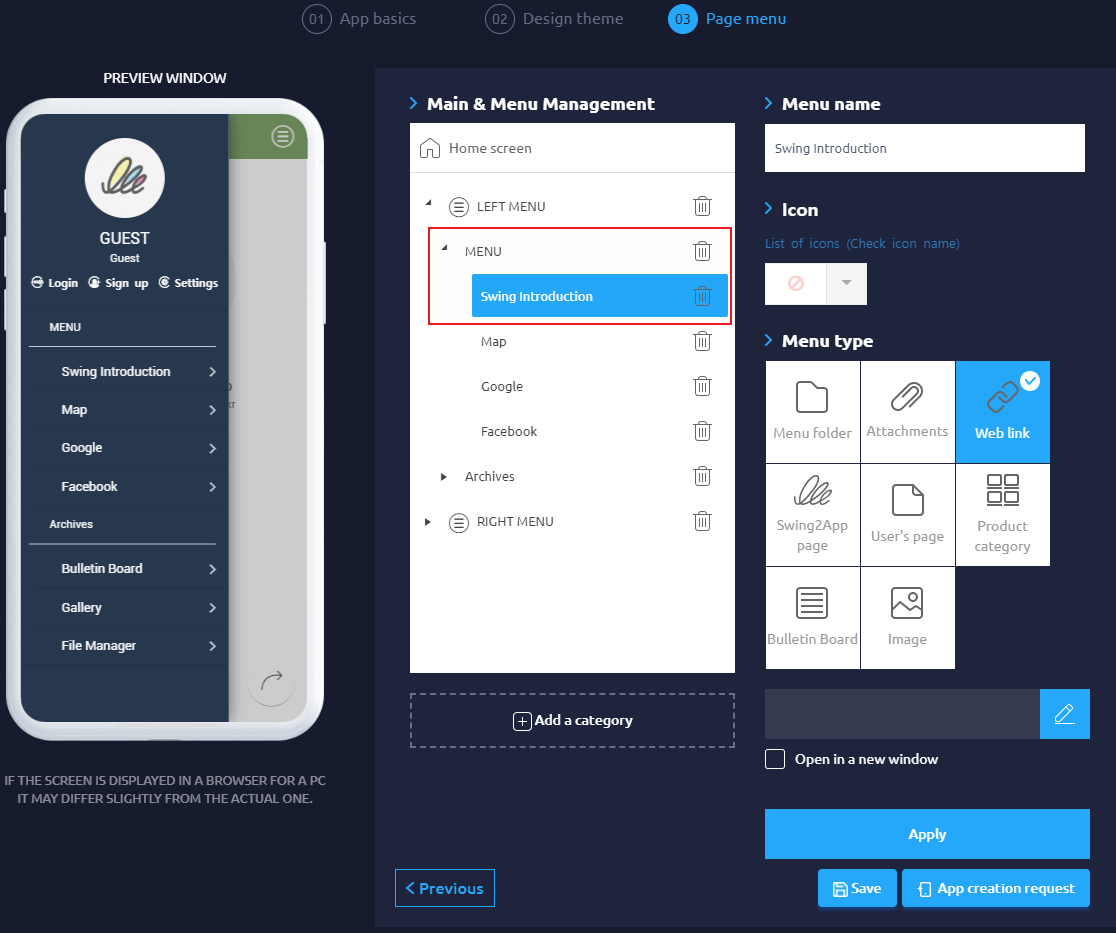
**Select the \[Swing2App Introduction]** menu to open the applied image.
In the page menu step, it is easier to create an app by first understanding how to use the menus.\
Therefore, please first check how to use each menu.
\* Advanced setting is not necessary for production, so please work only up to the 3-page menu.
When the production is completed with the page menu, press the app production request button to complete the app production.
### **STEP.4 App production Request**
**When the app production is completed, click the \[App Creation Request] button.**
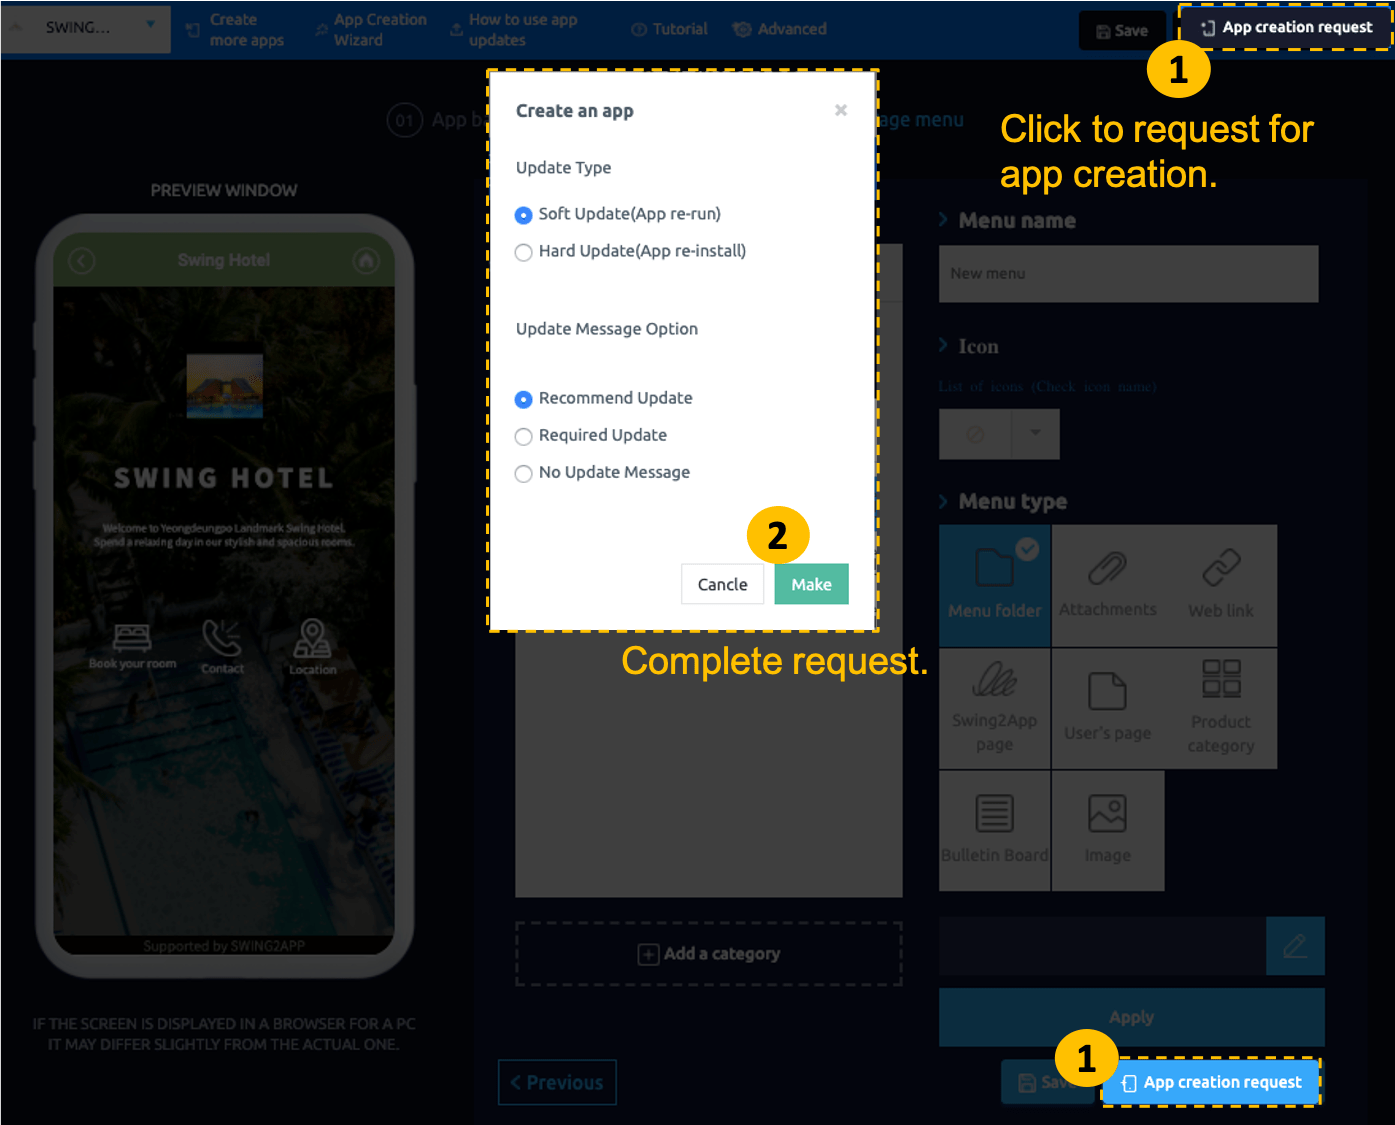
**Check the update display option as ‘Recommended’ and select \[Create].**
\*The update display option is optional, so it’s not required.
### **STEP.5 App Production completed**
**1. Check the app production progress**
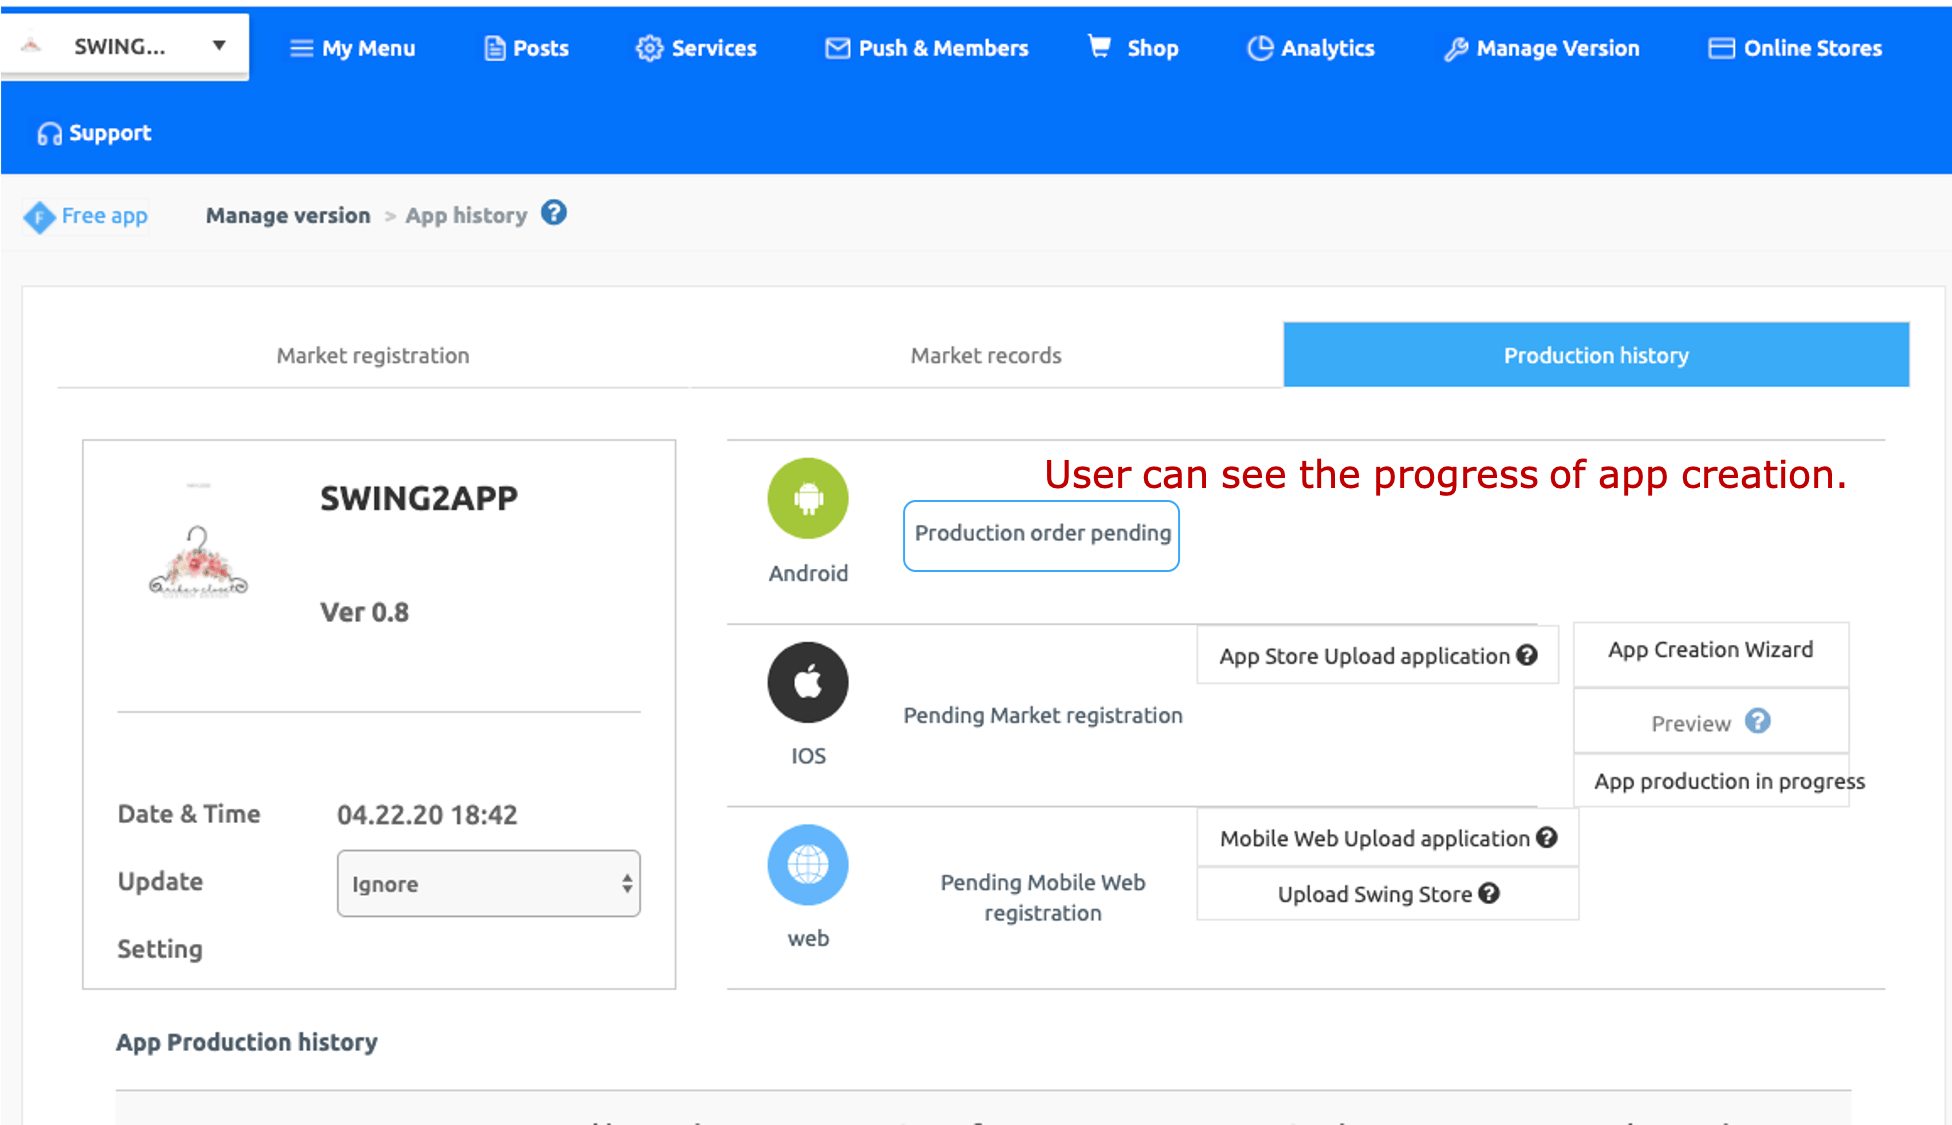
If you press the app creation request on the app production page, you will be directed to the app production history page on the app operation page.
When you check the status by platform, is it still marked as ‘Pending Production Order’?
You can check the progress of the app production on that screen.
Please wait a little while because it will be produced within 5 minutes after pressing the app production request!
**2. Swing2App preview (app preview)**
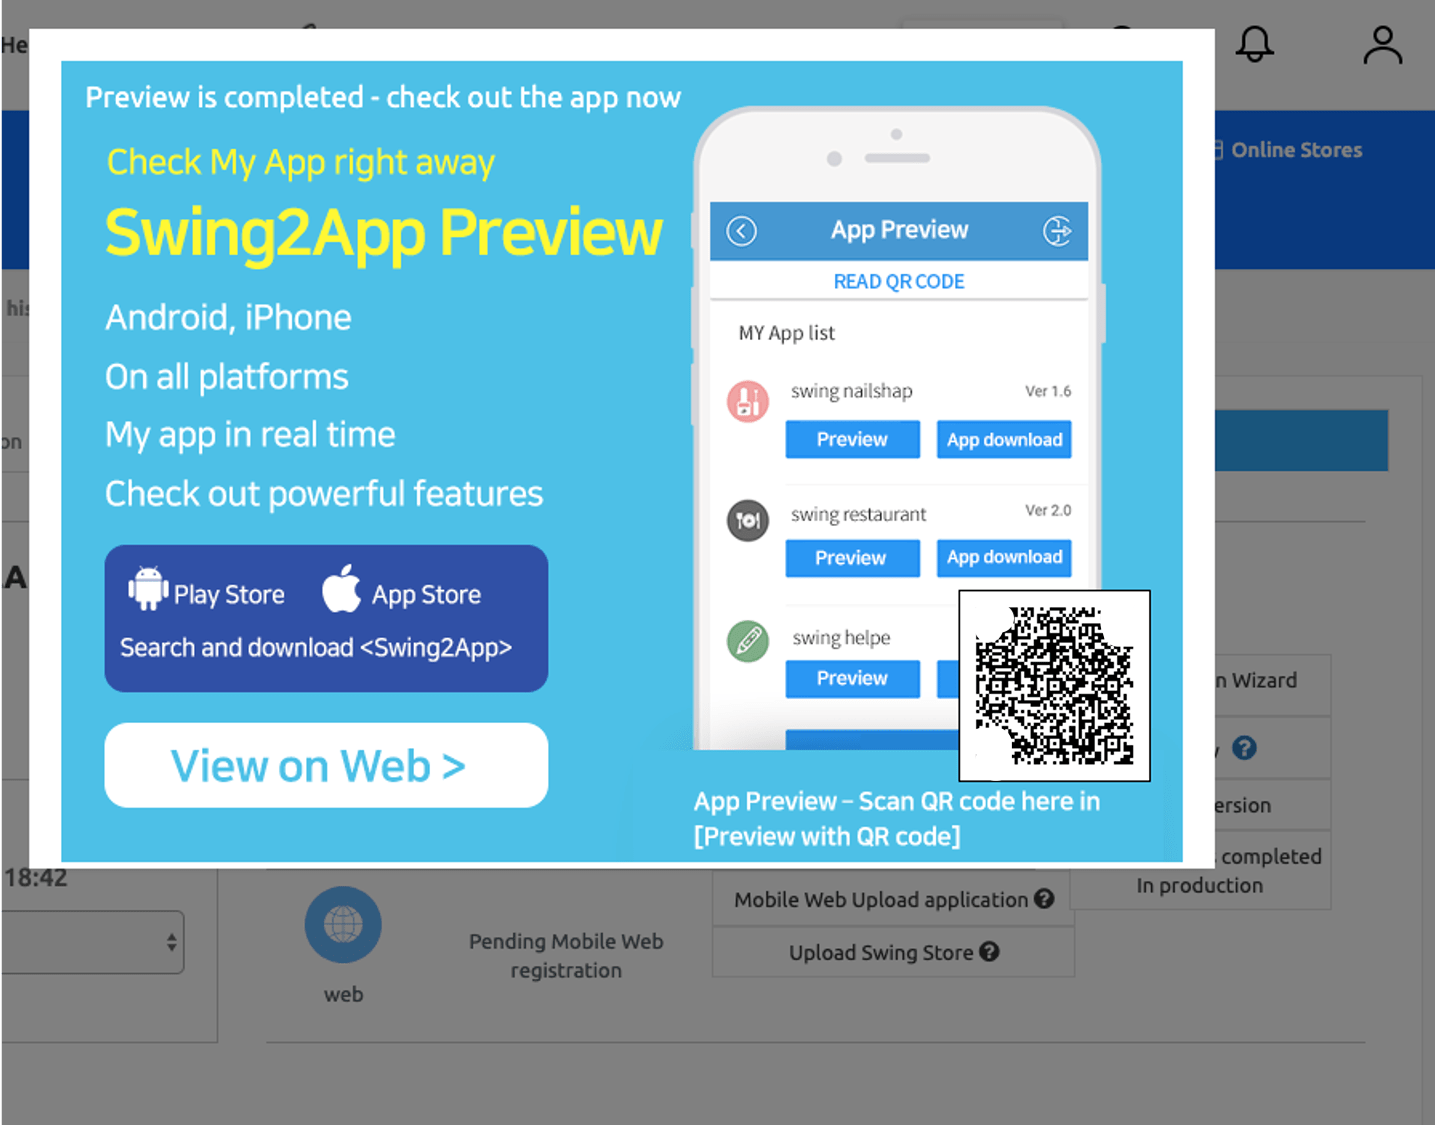
In less than a minute while waiting for production, the \[Swing2App Preview] pop-up window appears.
This is the ability to preview the app through swing2app preview before the app is produced.
\*View on the web: Select the \[View on Web] button to preview apps created by virtual machines on the web.
\*Preview on your phone: After downloading the official swing2app app – app preview menu – log in with your swing2app account or scan the QR code displayed in the pop-up window and you’ll be able to preview the app on your phone! (Only preview, no download)
\ **3. Complete App Production**

After a while, you can see the platform status has changed to ‘App production completed’.
**When the production is completed, the APK file (file to download the app) will be sent to your swing2app subscription email.**
**You can download the APK file directly by opening the mailbox on your phone.**
With the app preview described above, you can download the app from your Android phone.
\*APK files cannot be opened on your pc, so please check on your phone.
\*APK file installation can only be done on Android Phones. (iPhone not supported)
**★ App Preview**
Swing2App \[Preview App] allows iPhone users to check the app on their phone.
Android phone users can check it directly on their mobile phones without having to download the APK file.

* Please download the ‘Swing2App’ official app from the App Store and Play Store. \*If the app has already been installed, please update it to the latest version.
* After launching the app → Select the \[App Preview] menu at the top of the category, and log in to your swing2app website subscription account (ID, password).
* When you’re logged in, the app preview page opens, and you’ll see a list of apps you’ve created.
* On the iPhone, it can be checked by pressing the preview button.
* App preview, app download is available on Android phones.
\*Swing2App prototypes – Apps created with Push and Web View are not available for app preview. (App downloads only)
As a result, push and web view apps are not available on the iPhone and can be downloaded only on Android phones.
**★ How to edit the app?**
Even after app production, you’ll still be able to edit and update your app.
When you edit, you can go to the Maker(V2) page, modify the content, and then save it.
* **If you edit the page menu in step 3, press \[Save], write posts, etc. and then will be automatically reflected on the app!**
* **If you modify the 2-step design theme, press the \[App Creation Request] after \[Saving] and get updated with the new version! \*Soft update**
* **Step 1 If you modify the app basic information, \[Save] and press the \[App Creation Request] button to receive updates to the new version! \*Hard update**
*
**★ IMPORTANT CONTENT \*Please check the important content!!**
1. **If you modify the content of the ****Page Menu**** in step 3 of the app production phase, just press the \[Save] button and it will be automatically reflected in the app.**\
\*You don’t need to recreate the app!
2. **Step 2 ****Design Theme,**** When modifying the contents – Changing profile, changing design color, etc., please re-request the app production and select \[Soft Update].**\
If you select soft updates, it will be updated within your app without having to re-post your app, which has been released in the Play Store, App Store, etc.\
\[Soft Update] will be displayed at least 3 times in the app production. Only 1 to 3 times hard updates are possible.
3. **Step 1 ****App Basic,**** when you change the app name, idle screen image, icon image, etc., you must re-create the app.**\
Please **select Hard Update at this time!!** **The first-step item must be hard updated before it is reflected in the app.**\
If you modify the contents of the first step, please click “Request App Production” to create a new version of the APK file again.\
You’ll need to update the APK file by uploading it back to the Store.
**★What is the difference between soft and hard updates?**
1. Hard update: The APK file is reinstalled, and the app must be reinstalled to receive updates.\ \*If the app is available in the Play Store or App Store, you’ll need to update the new version of the app back to the Store.\ If you change the app name, icon, and idle screen, the new version of the APK file must be updated again to the Play Store/App Store after the app is recreated.
2. Soft Update: You can get updates by simply re-launching the app without reinstalling it. Apps must be released on the Play Store or App Store.\ \*You do not need to update the app on the store.