> For the complete documentation index, see [llms.txt](https://documentation.swing2app.com/llms.txt). Markdown versions of documentation pages are available by appending `.md` to page URLs; this page is available as [Markdown](https://documentation.swing2app.com/manual/swingshop/shoppingmall-mainpage.md).
# Swing Shop - Shopping Mall Main Page How to Use
**How to Use the Main Page of Swing Shop Shopping Mall**\
I’ll show you how to apply the main page that many people use when using Swing Shop.\
The main page is a swing page function that is provided when applying for a swing shop.\
Since the UI template is all set, it can be applied to the home screen and used as the main screen.
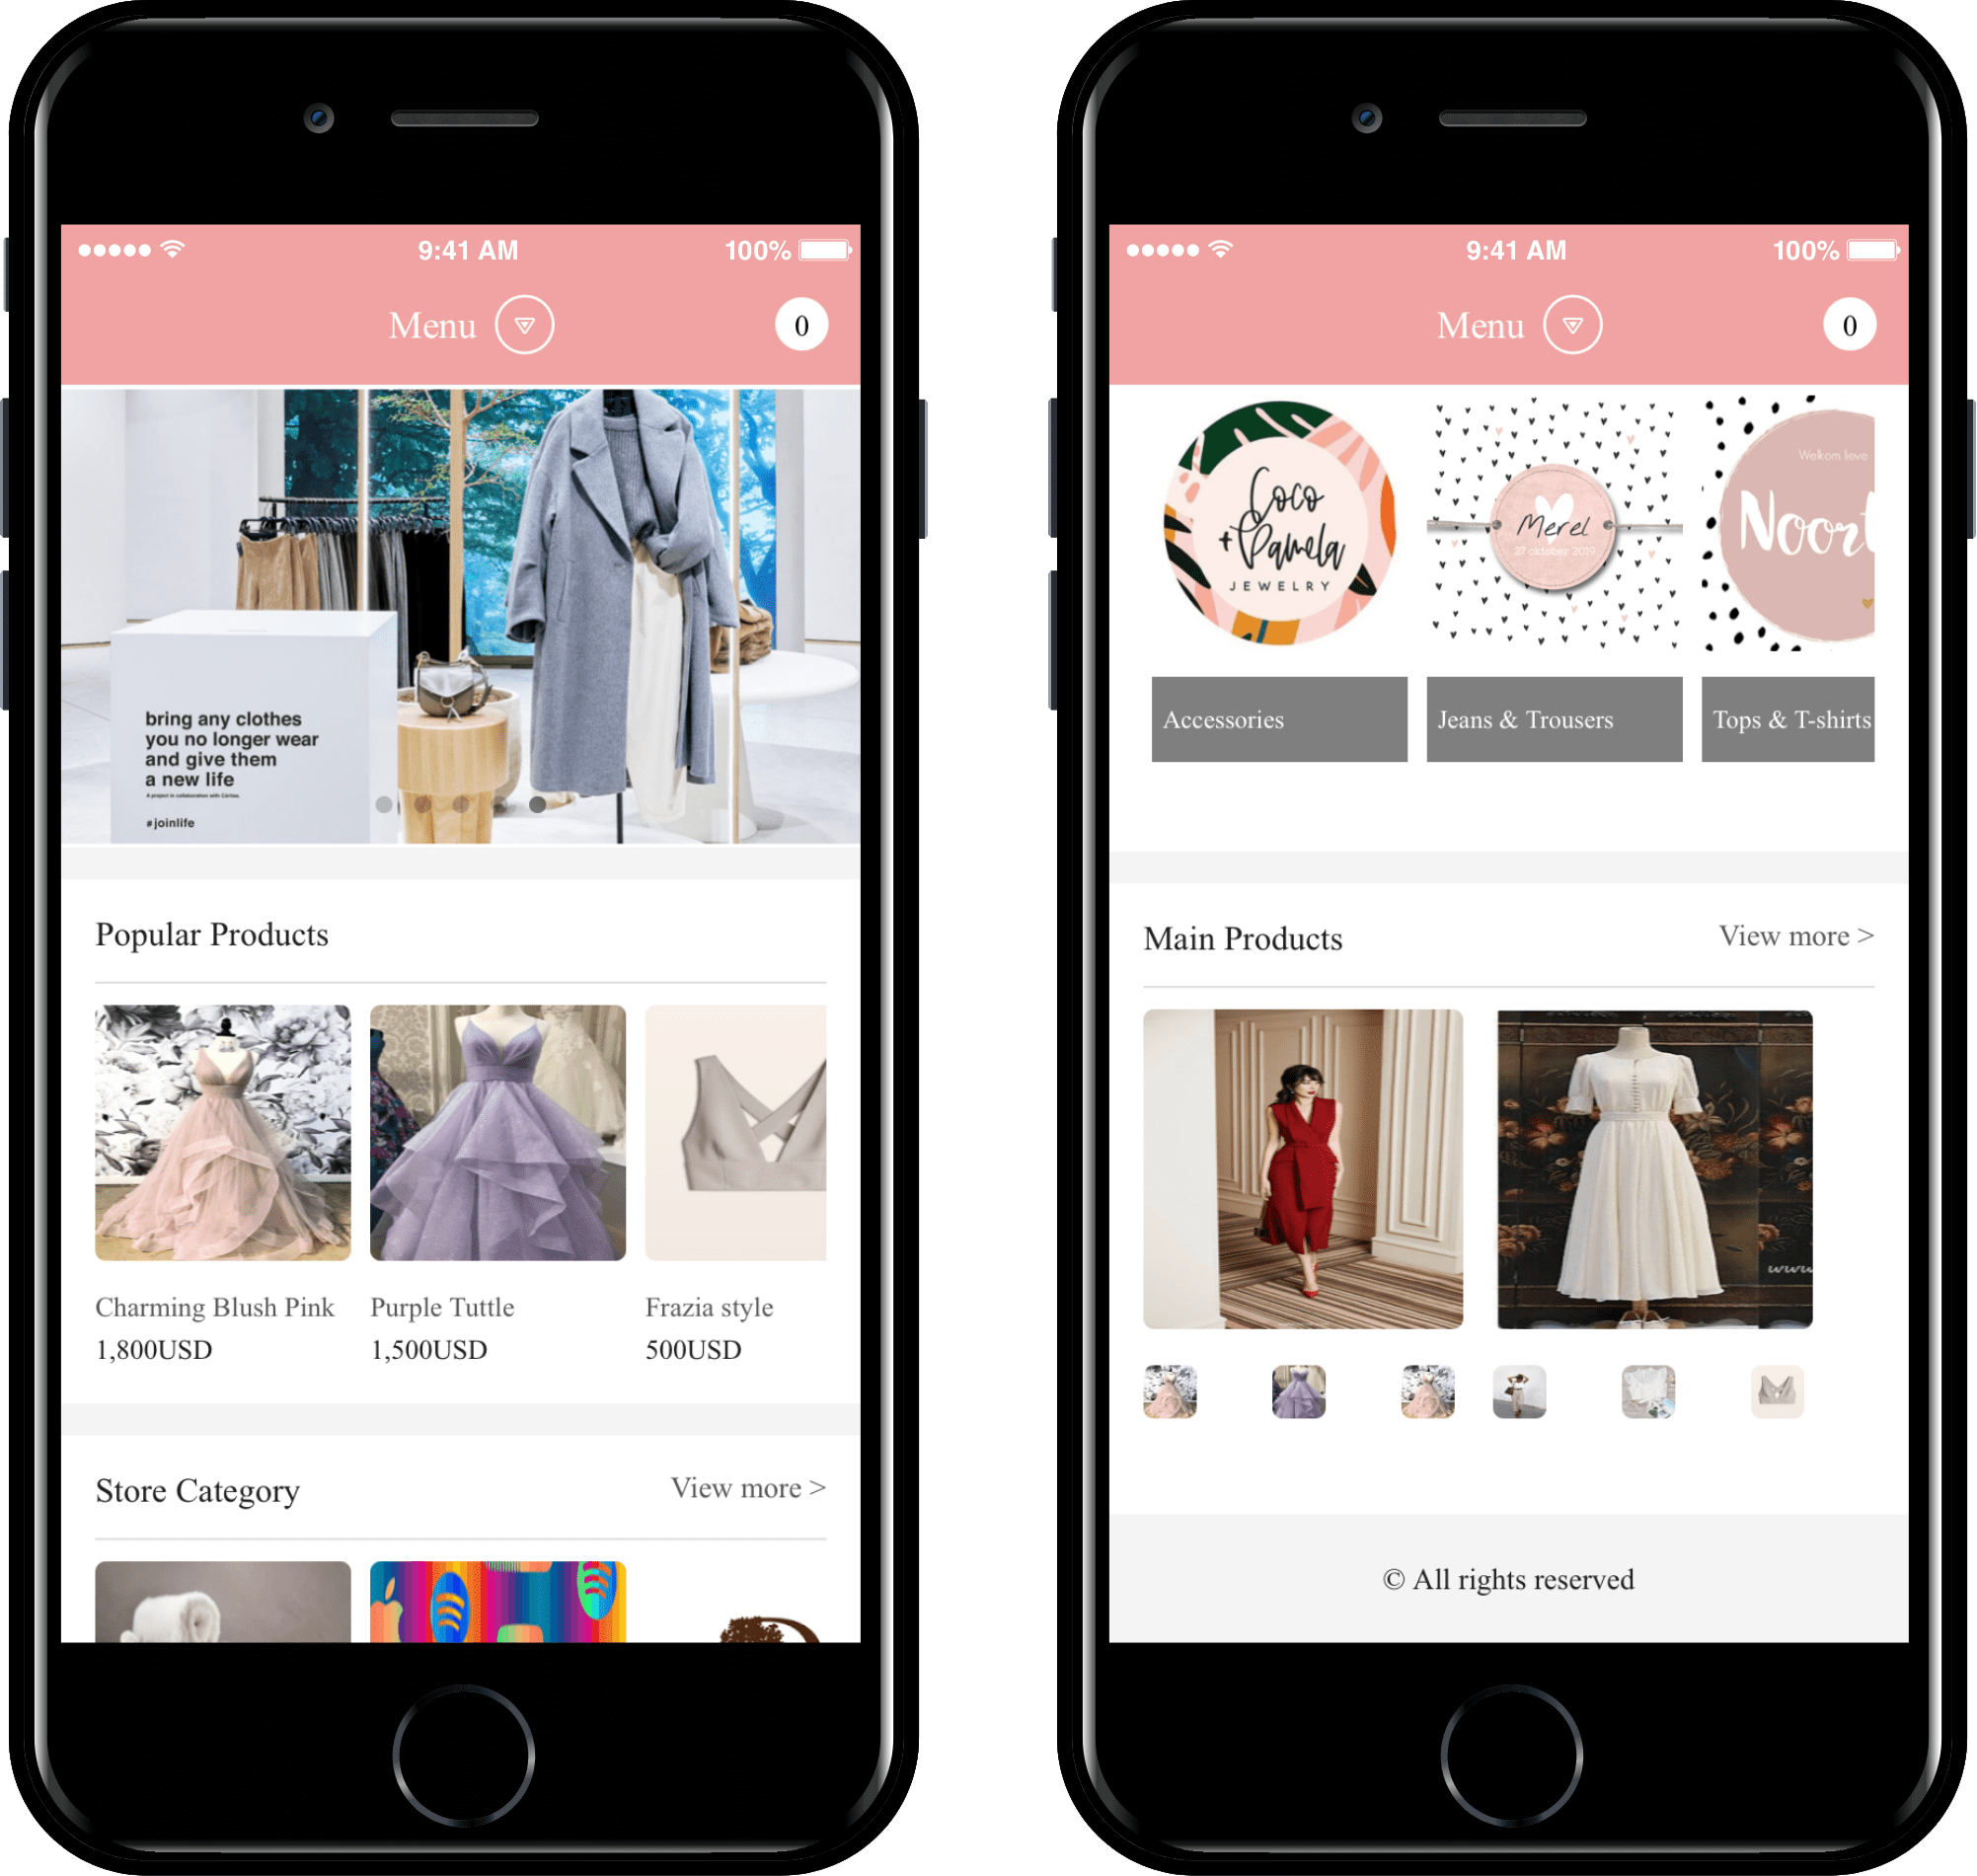
This is the app launch screen with the shopping mall main page applied.
Store main images and product thumbnail images are all placed on the screen when you register your store and register your product while using the Swing Shop menu.
Refer to the manual and when using Swing Shop) Please check how to use and apply the shopping mall main page ^^
**You need to apply for Swing Shop first to use Swing Shop Page, so if you haven’t applied, please apply before using it!**\
Next, I will apply the main page of the shopping mall to the home screen of the app.
**☞**[**Go to see how to apply Swing Shop**](/manual/aff-program/apply.md)
#### **STEP.1 Applying the app home screen shop main page**
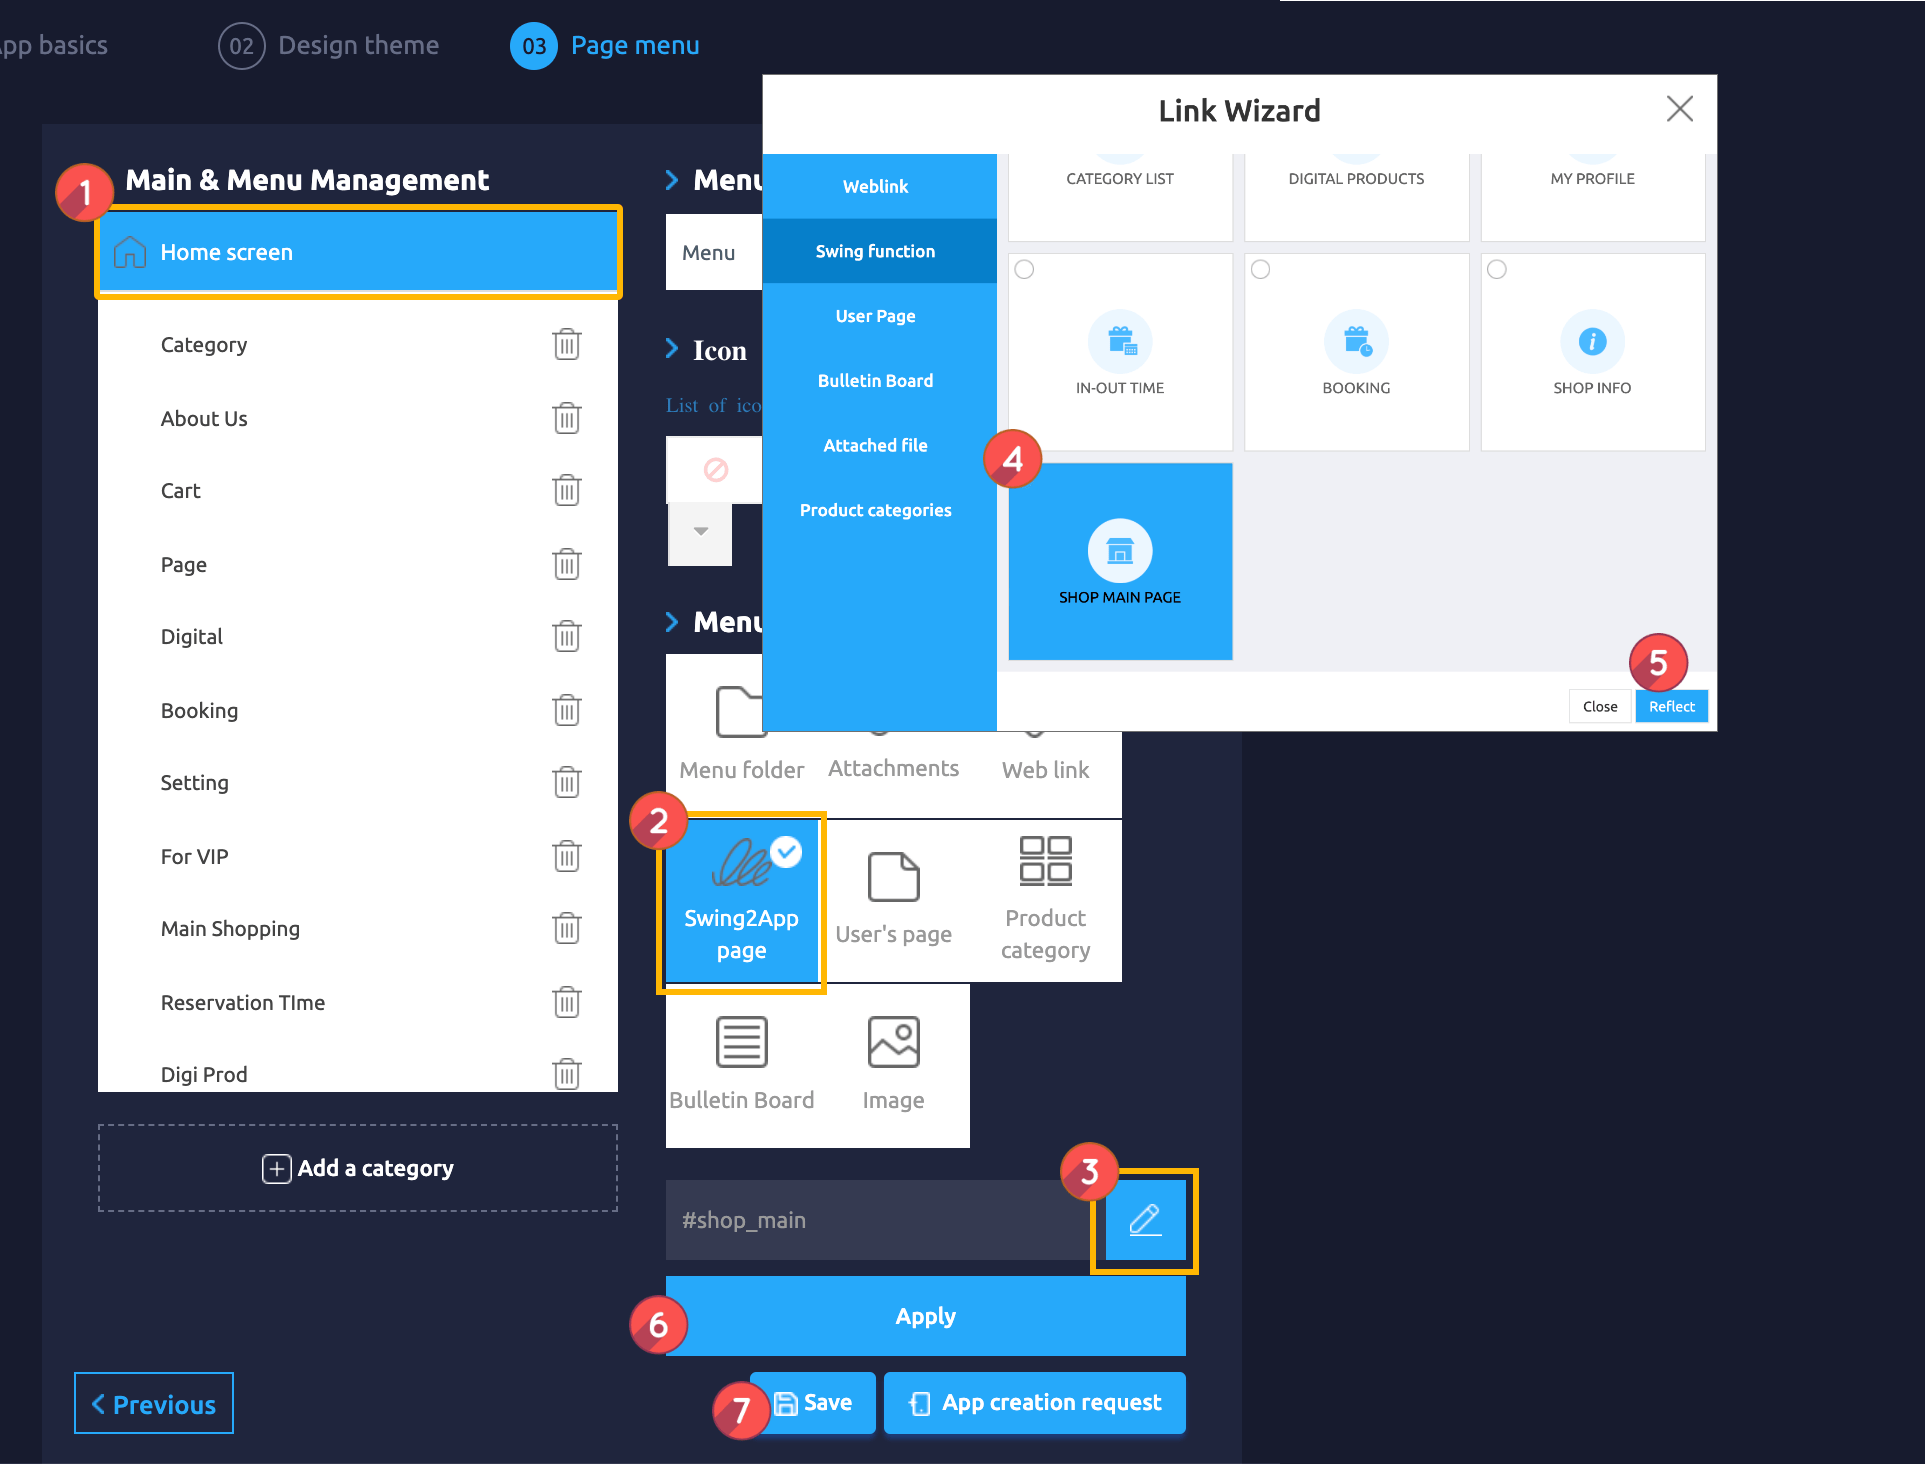
**Maker(V2) page → Go to page menu**
1. Select **Home Screen**
2. Assign **Swing2App Page** from Menu type.
3. Click on **Link wizard**(pencil icon).
4. Select **Shop Main Page** from the list in Link Wizard.
5. Click **Reflect.**
6. Click the **\[Apply]** button at the bottom of the page
7. Click the **\[Save]** button at the top to finish.

However, as you can see, there are some people who don’t see anything on the main page.
**App execution screen**
This is because there is no store information and product registration after applying for Swing Shop!
As you can see, the main page of the shopping mall is produced as a screen with nothing.
Therefore, please check the method below and fill in the main screen.
**1. Main image**
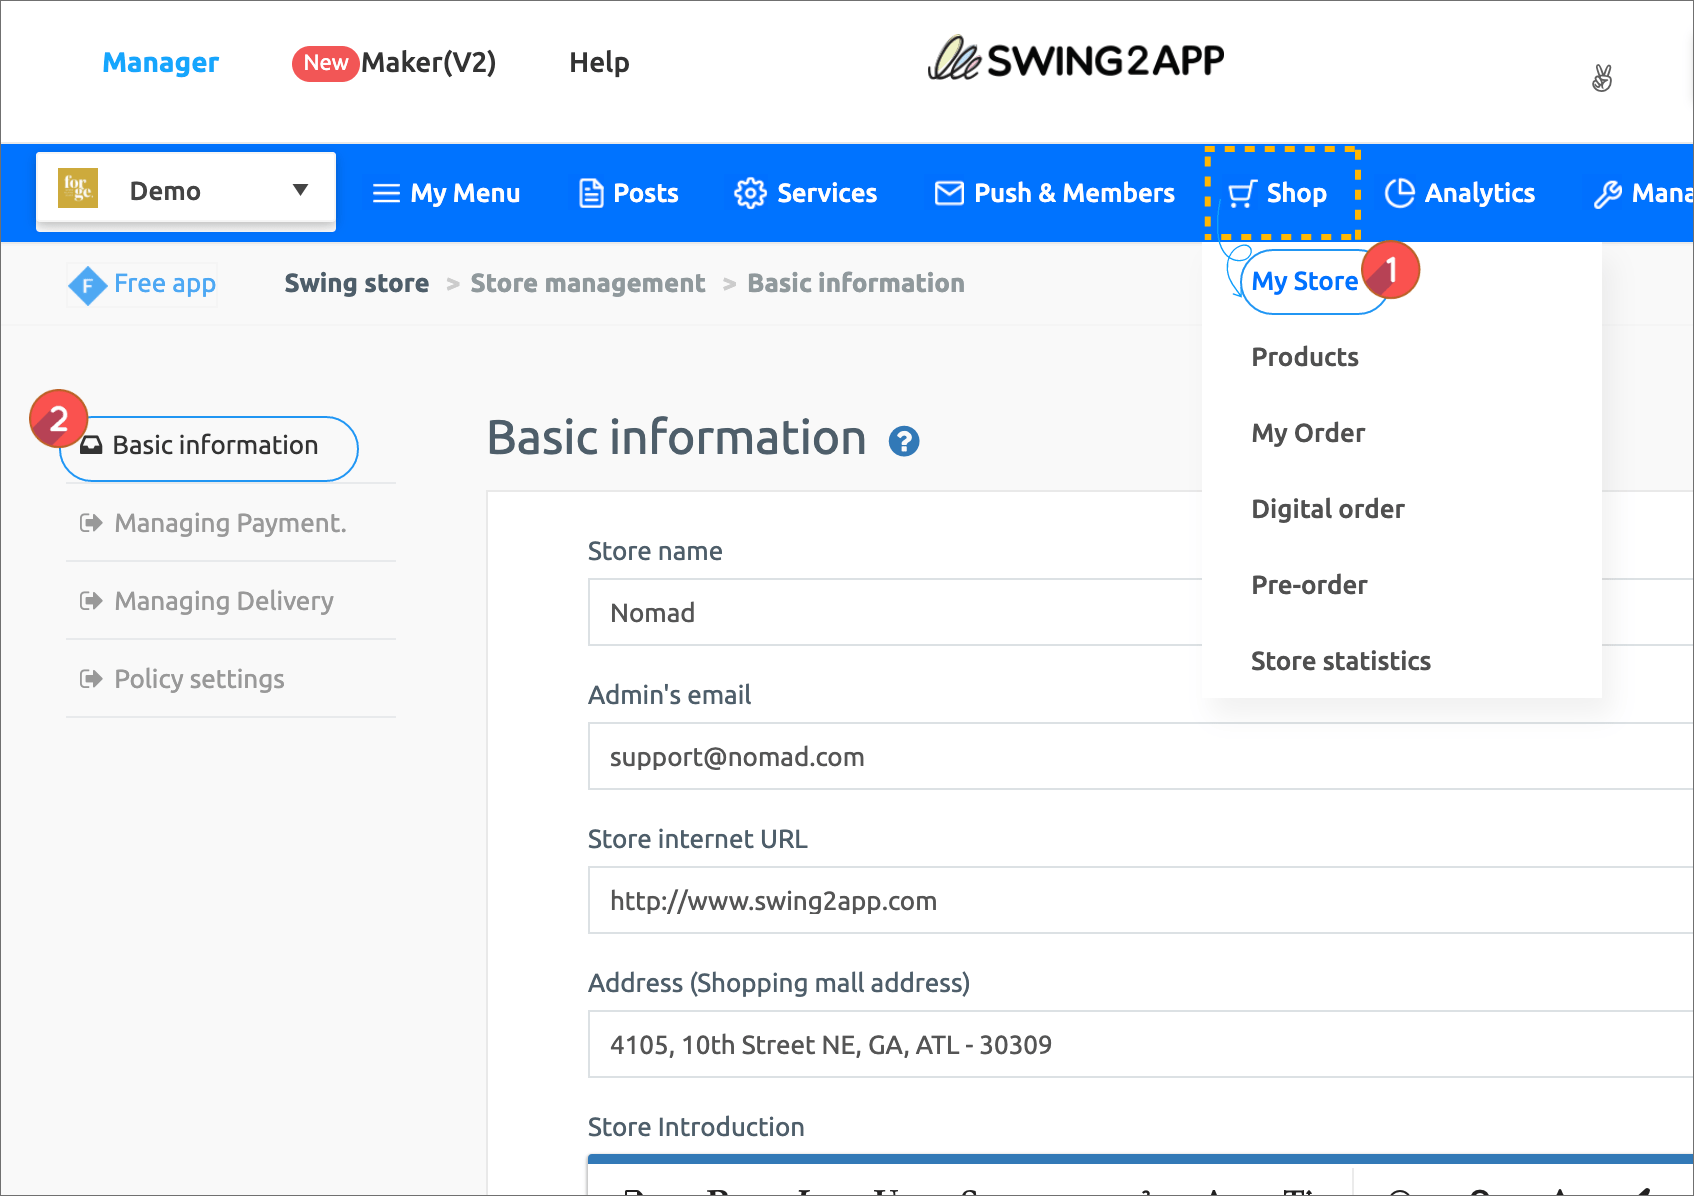
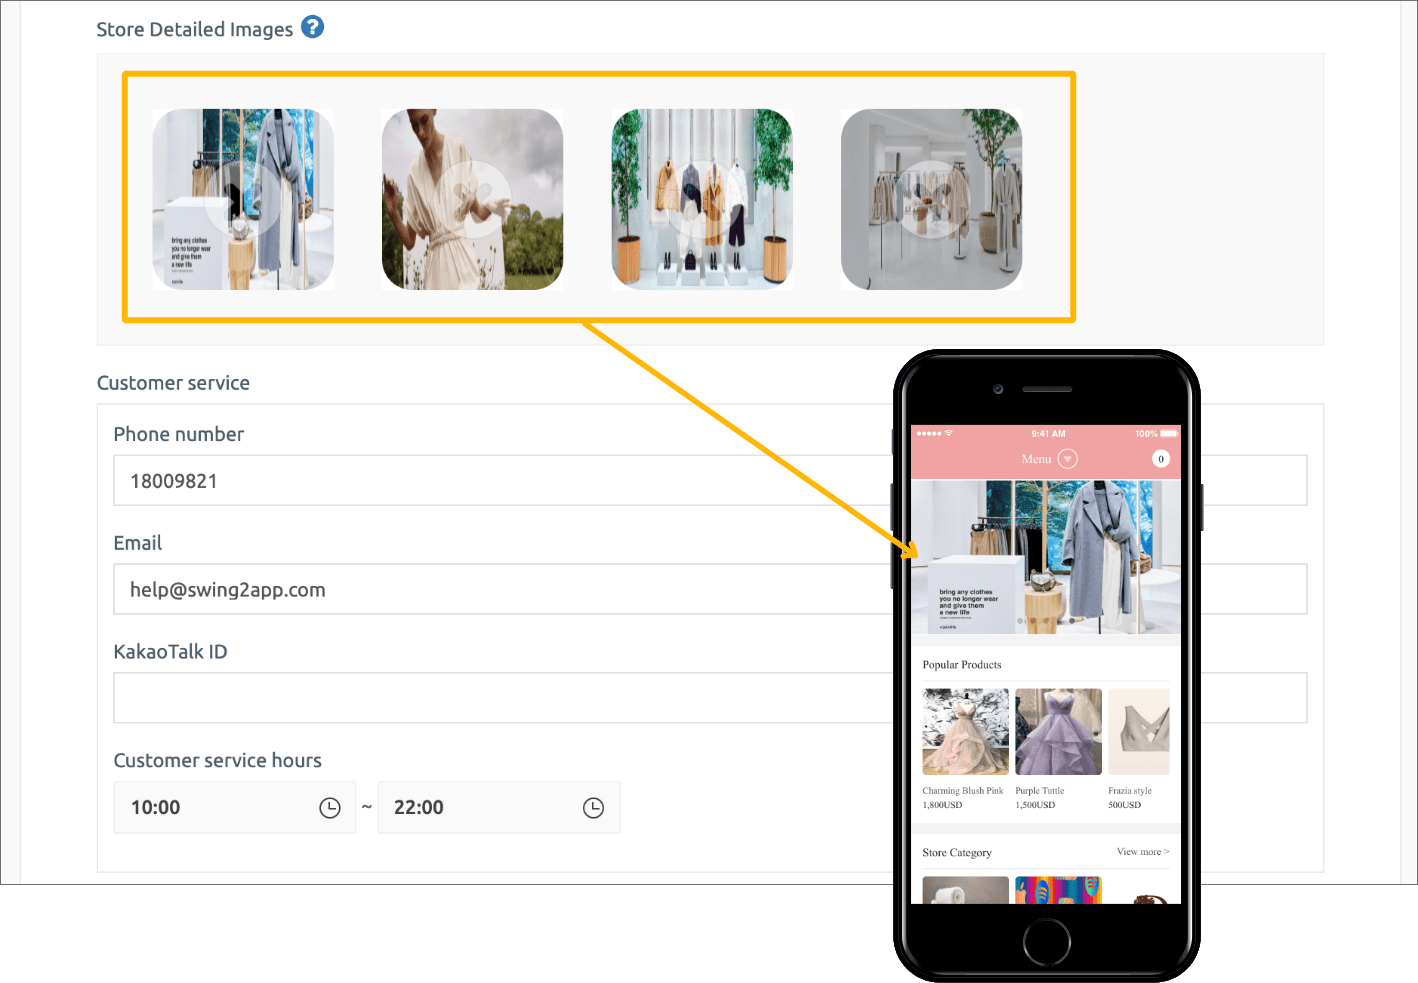
1\)Swingshop store management → 2)Go to the basic information setting page and you will find the **‘Store detail image’** menu.
**The image registered here is immediately exposed as the shopping mall main image.**
If two or more images are registered, they are automatically displayed by sliding.
For the main image, we recommend **1000px wide and 545px vertical.**
****
**\*If you put only one image in the store detail image, only one image will be displayed without a slide.**
**\* There is no limit to the number of images, so please attach all images to be displayed as slides.**

**App execution screen**
**After the store detailed image registration is complete, run the app and the main image at the top of the app will slide.**
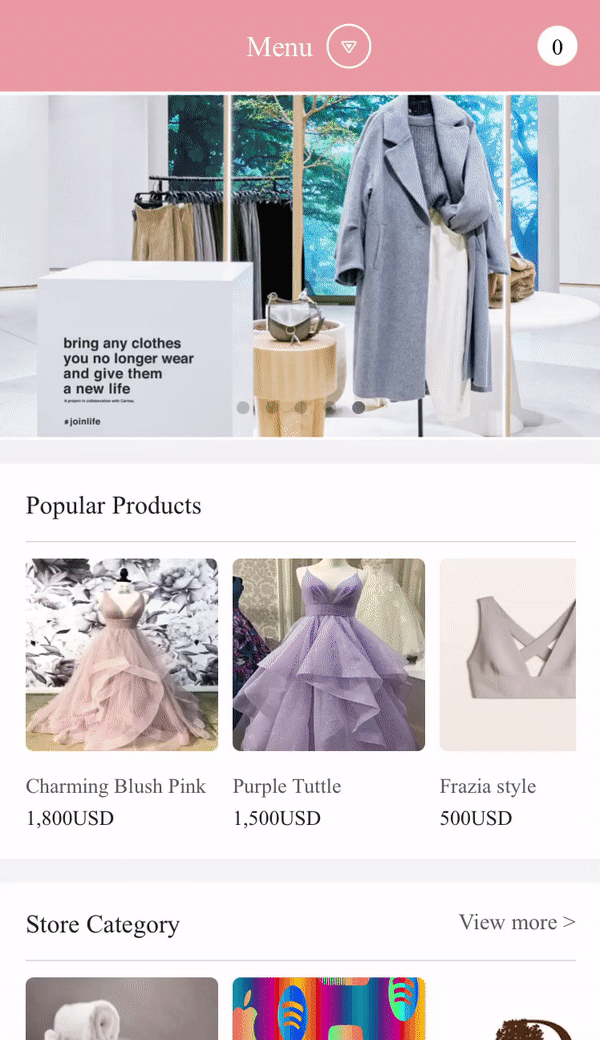
**2. Popular Product**
1\) Shop Products → 2) Go to the Product items registration screen page and register the product.
The product is exposed on the main screen only when the product is registered.
\*Important information\*
\[Popular Products] is automatically set and displayed in the order of the products with the most exposure among the products registered in the app.
So first of all! Products must be registered to be exposed, and then users will be exposed in the order of the most viewed products in the order of popular products.
The administrator can’t set the order\~!
**3. Category**
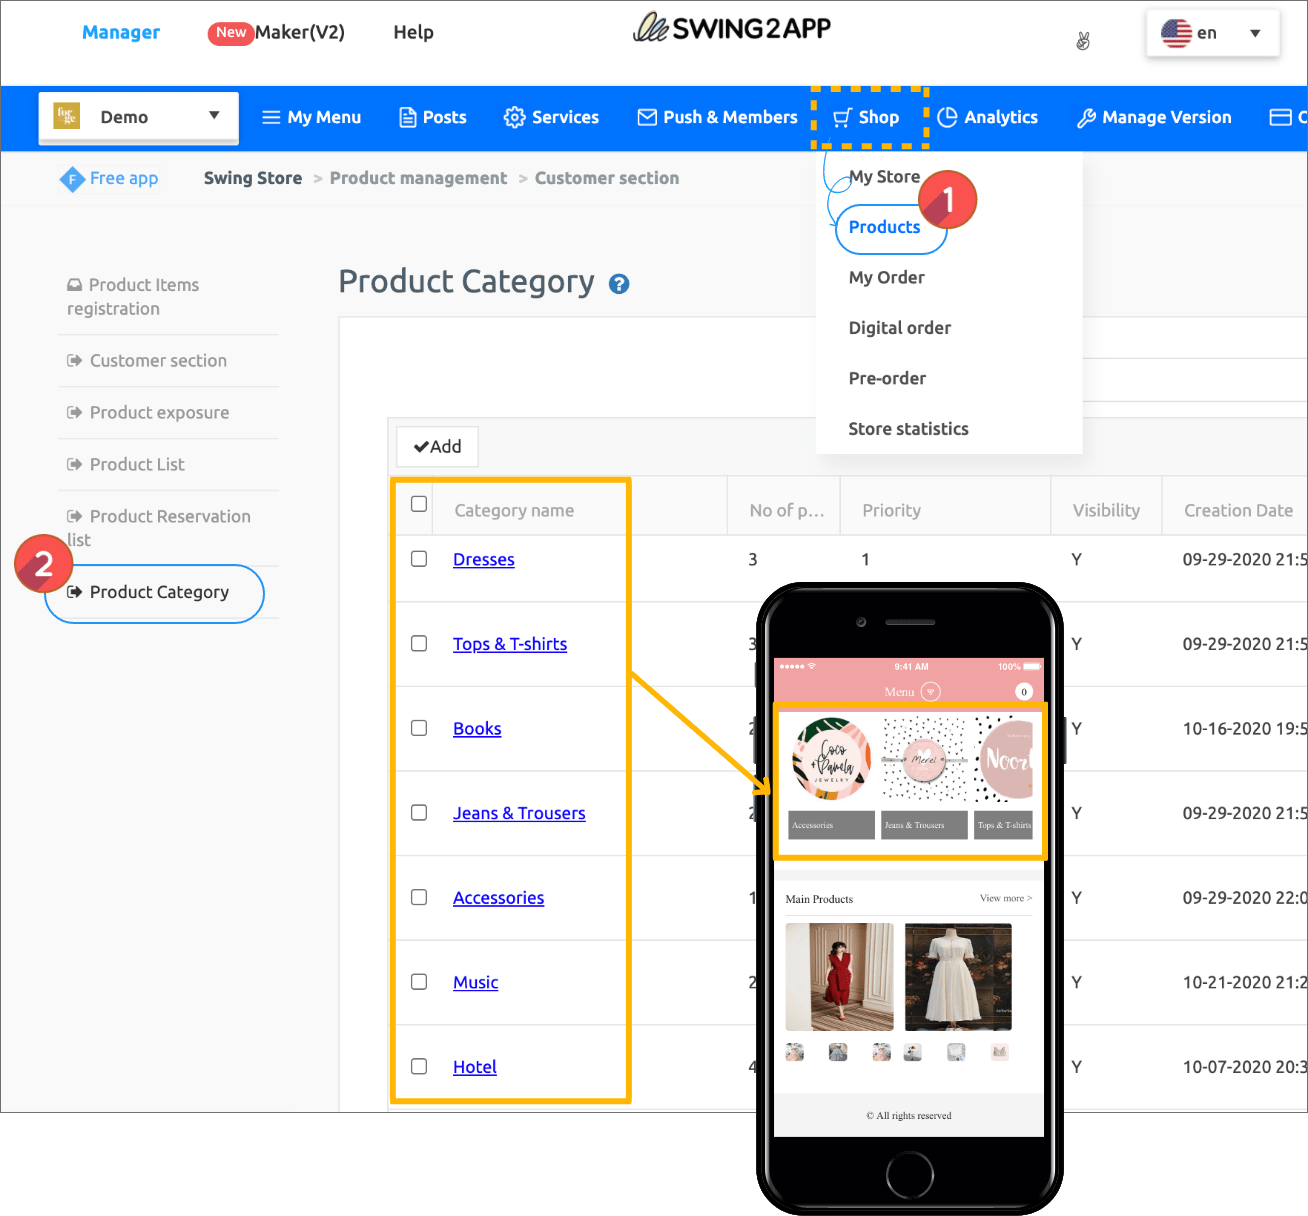
**1) Swing shop product management → 2) Product category registration management → 3) If you register a category, it is exposed as a category item on the main page of the shopping mall.**
\*Category is a large category required when registering a product.
Example) Category: If you create TOP, you can compose products with blouses, knits, tees, cardigans, jackets, etc. that belong to the category.
Therefore, after creating a category, you must register the product for sale in Product Registration to display the actual product in the app.
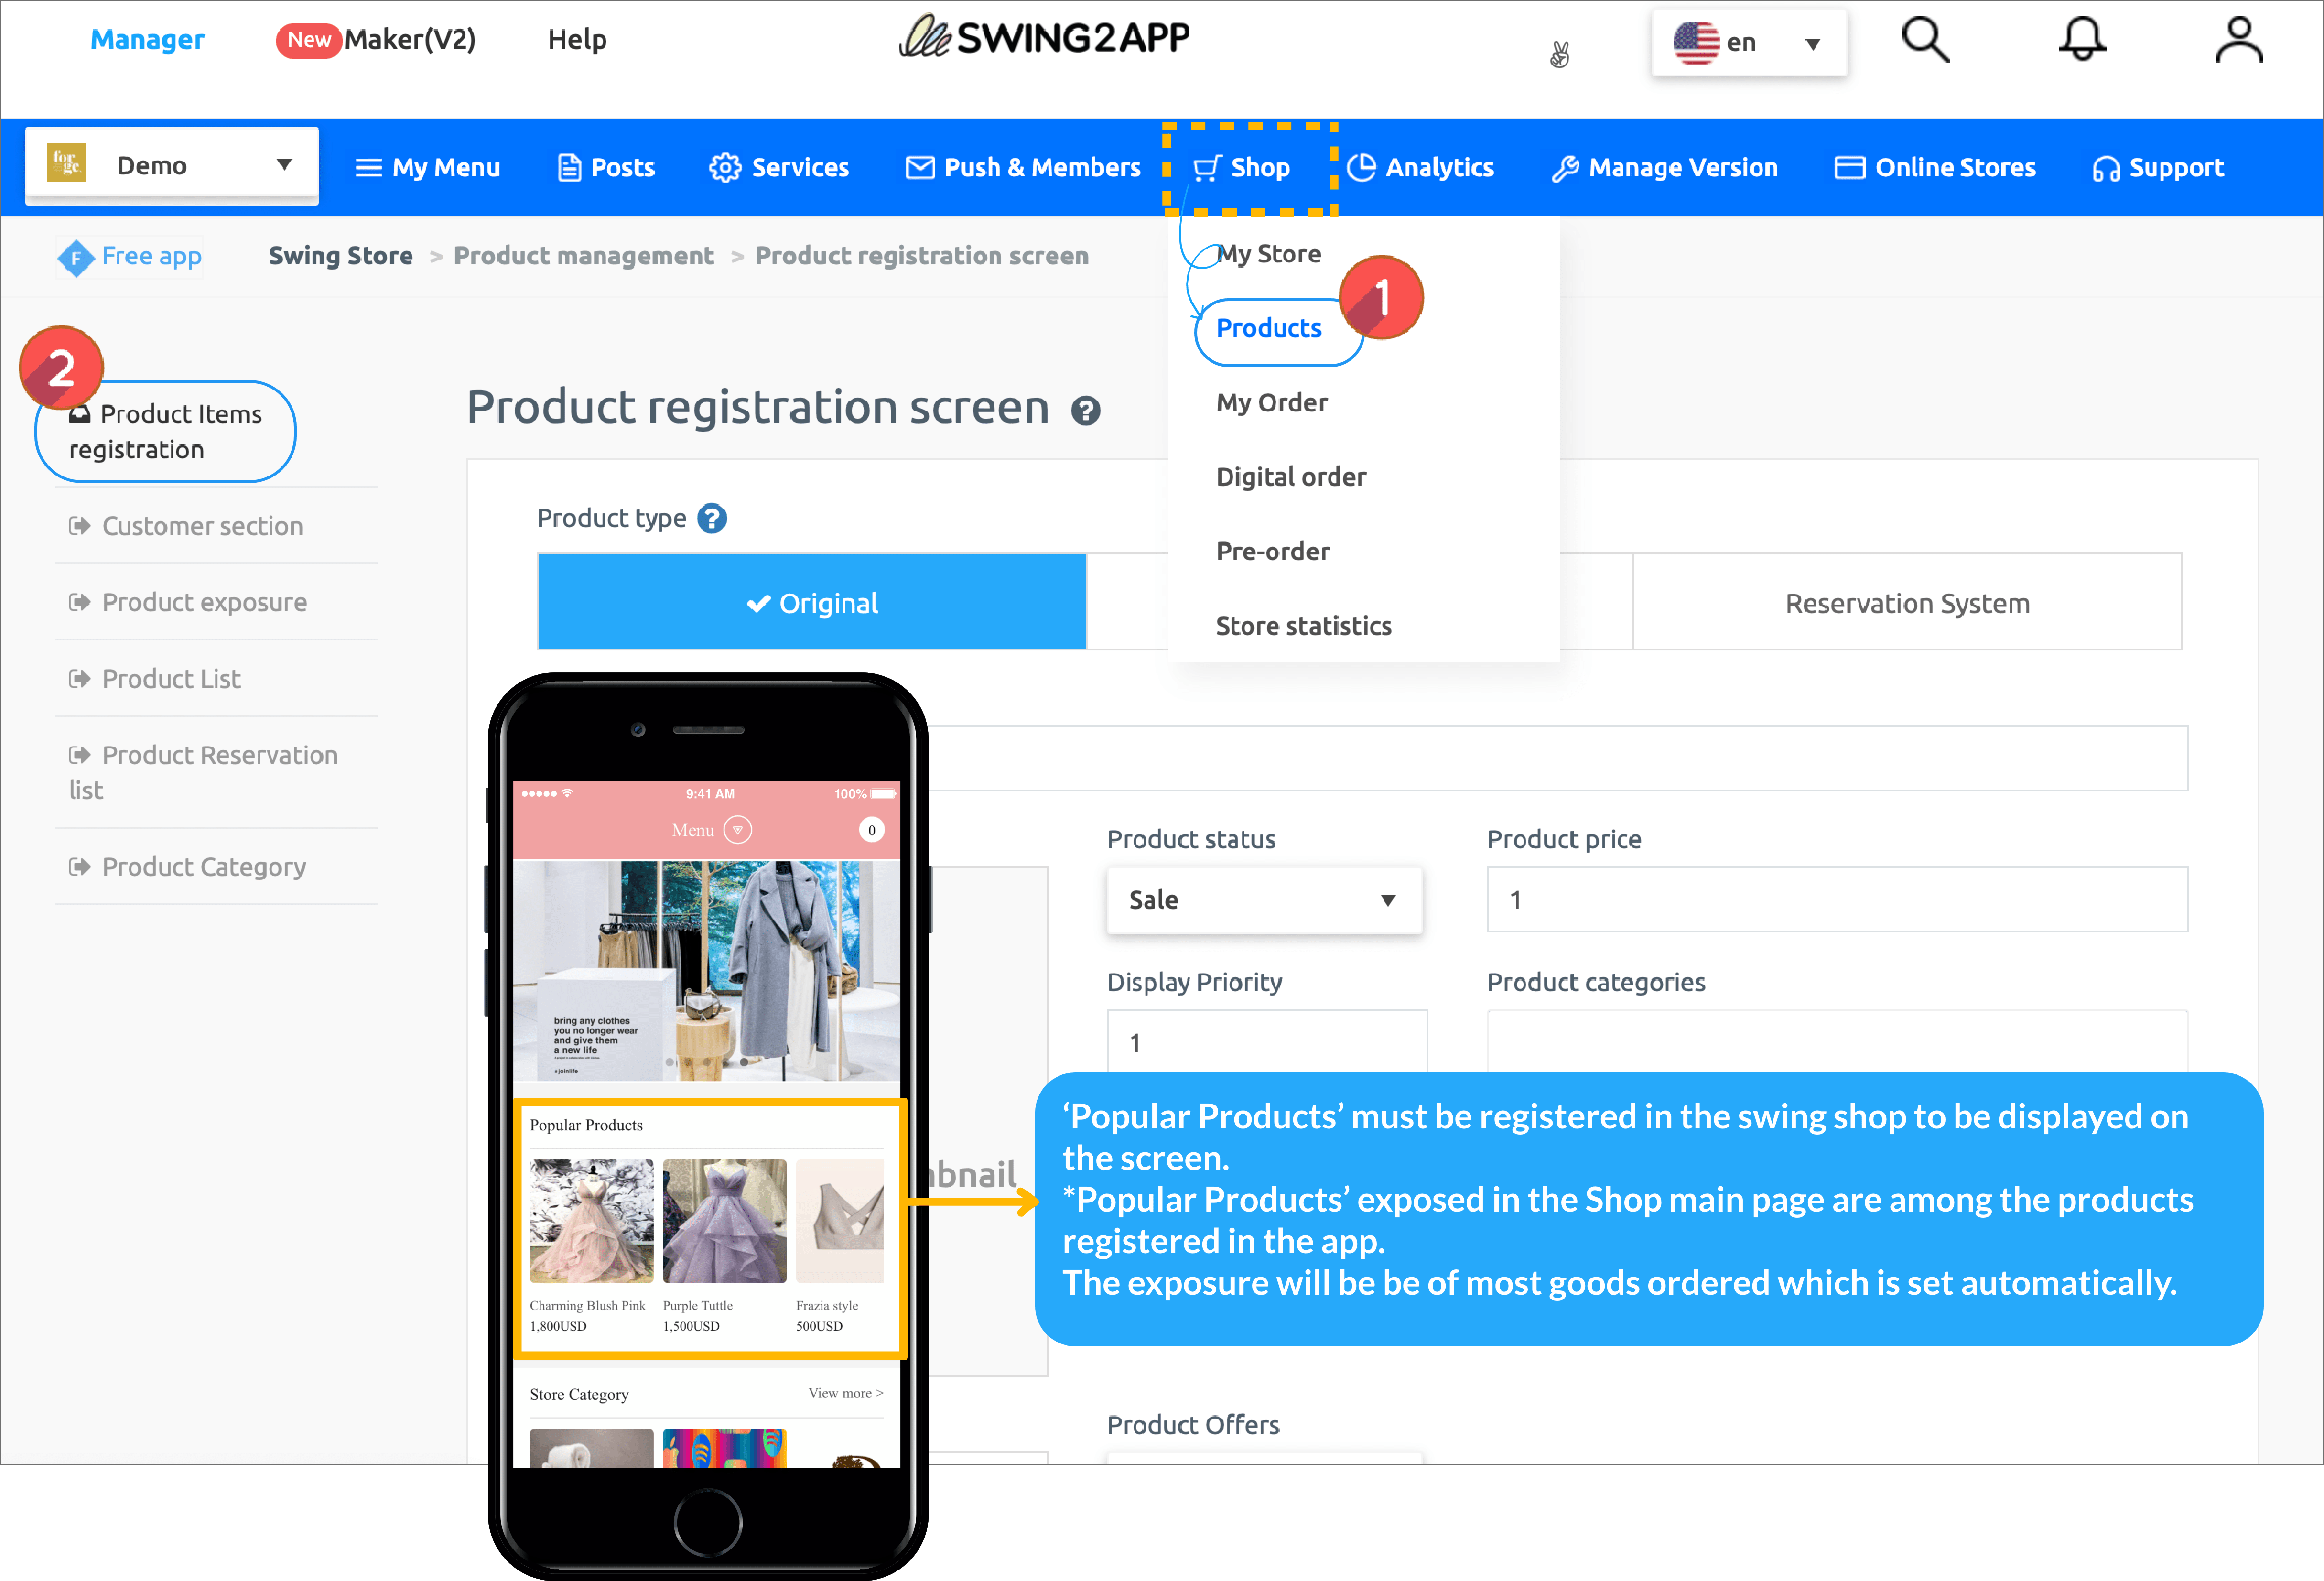
**4. Main Product**
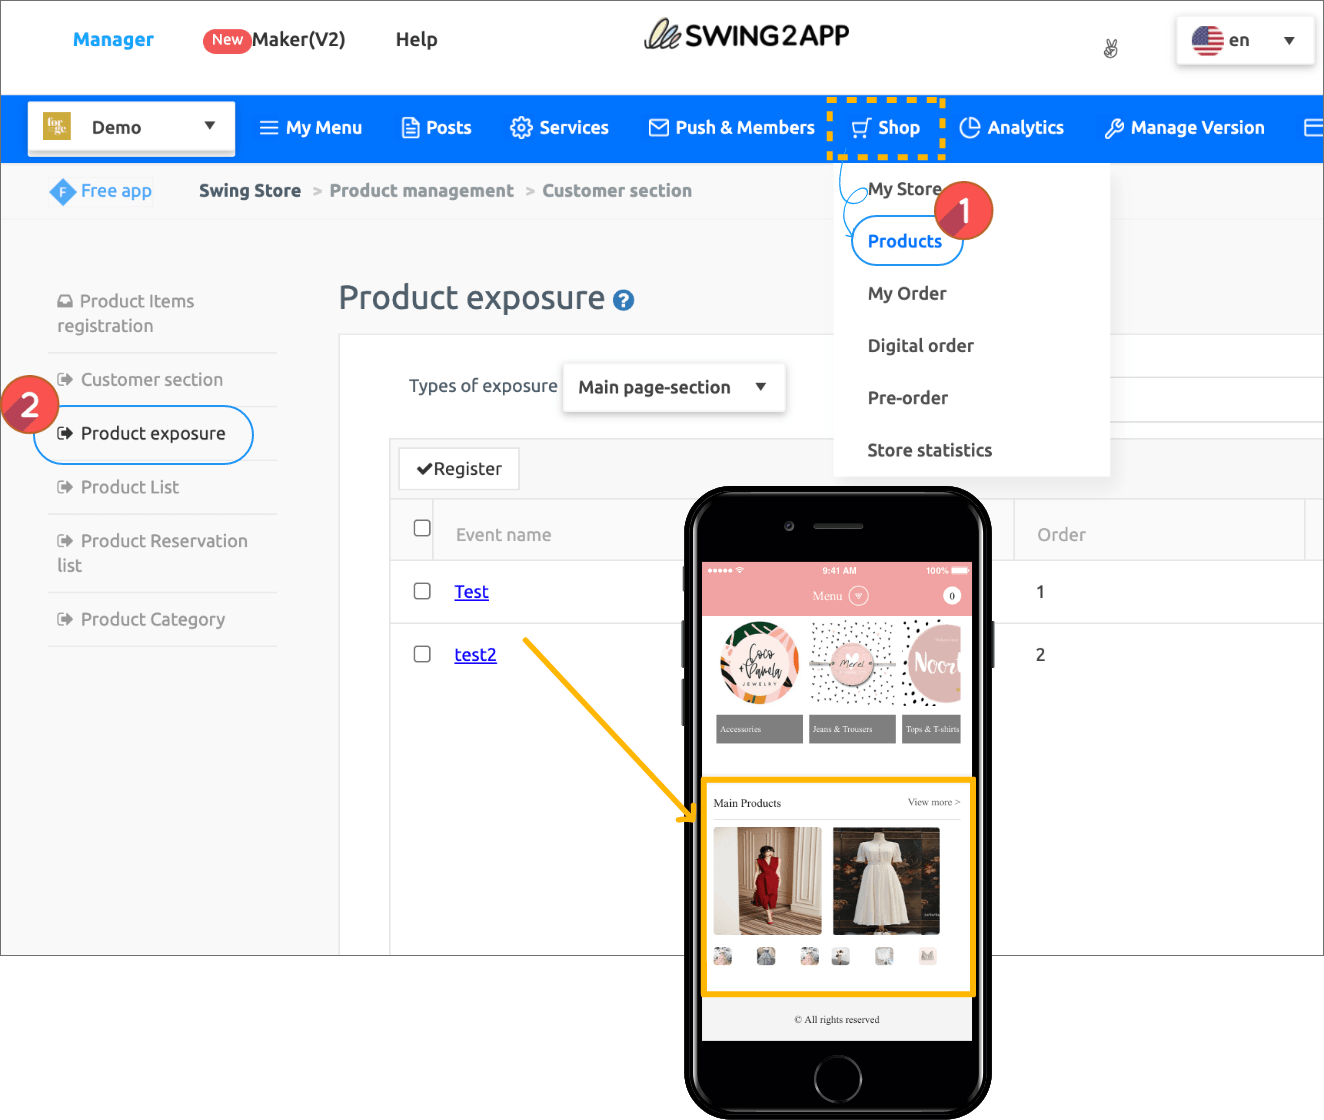
**1) Swing Shop Product Management → 2) Product Exposure Management → 3) Exposure Type: Main Page-Collection → 4) When you register for an event, it will be exposed as the ‘Main Product’ item on the main page of the shopping mall.**
The main product item is an event function, and if there is a product you want to expose more, you can show it in the corresponding section.
Clicking the small product image displayed below the thumbnail image will take you to the product page.
Please check the image below for how to register the event.

**To register an event:**
1\) Select the Register button
2\) Enter event name
3\) Category Setting: Register the category you want to expose.
4\) Priority: This is the order of exposure in major products. The smaller the number, the more it is exposed.
5\) Representative image: This is the image displayed on the thumbnails of major products. (There is no recommended size, please prepare the image in a square ratio)
6\) Event description: This is not required. (Does not appear in the app)
7\) Click the Save button to finish.
**4. Bottom – footer message**
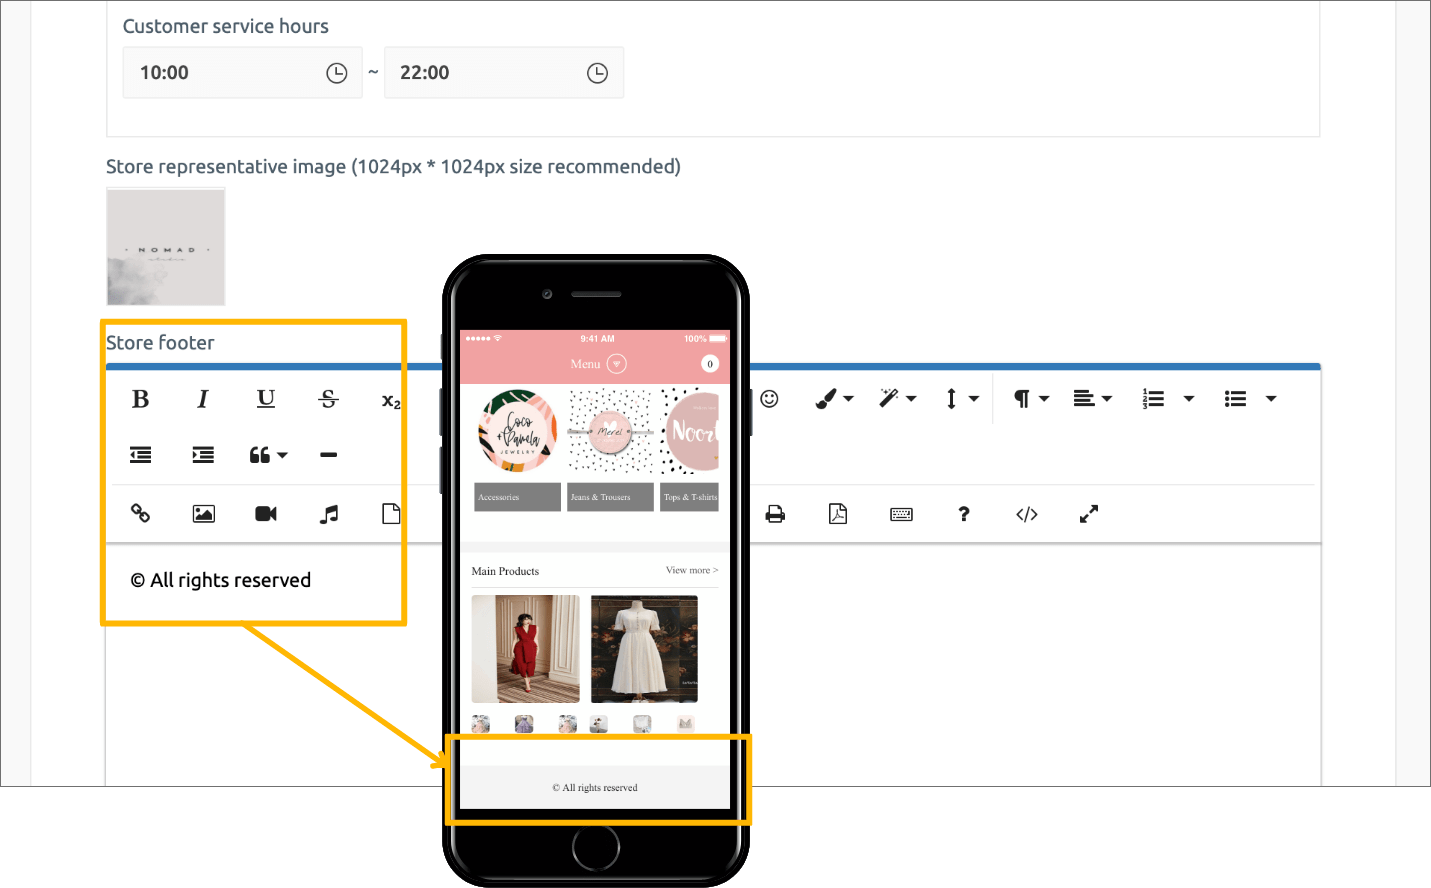
If you look at the bottom of the main page, there is a footer area and you can enter a message.
The message can be modified and registered at **1)Swing shop, My Store → 2) Basic information setting → 3)Store footer.**
**If you write your desired comment and save it, it will be displayed in the store footer text on the main page of the shopping mall.**
**STEP.2 App execution screen – shopping mall main page applied**
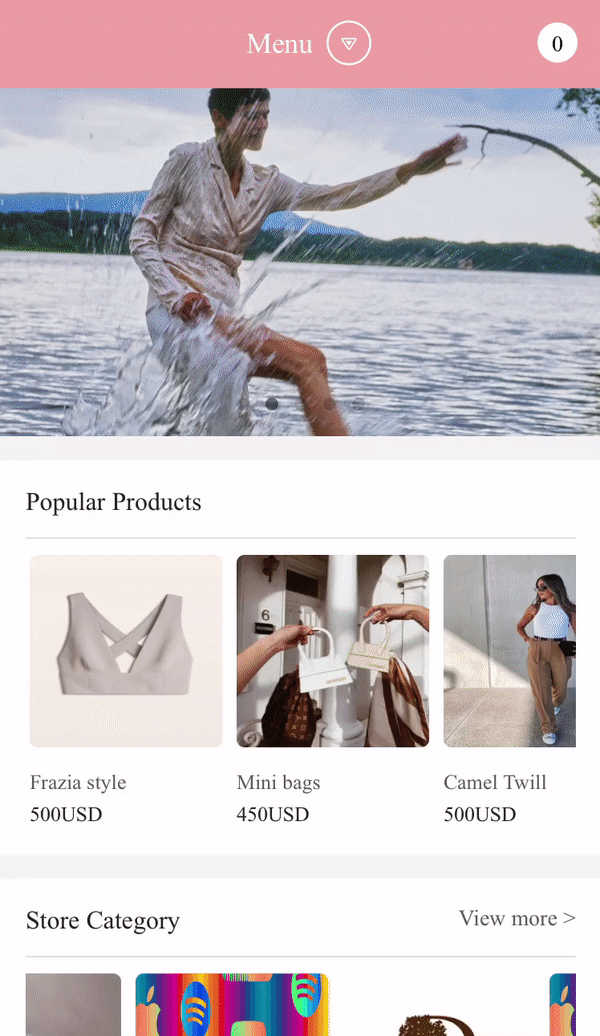
If you run the app again after completing the product registration, etc., you can see that all items on the main page are filled.
 **To register an event:**

1\) Select the Register button
2\) Enter event name
3\) Category Setting: Register the category you want to expose.
4\) Priority: This is the order of exposure in major products. The smaller the number, the more it is exposed.
5\) Representative image: This is the image displayed on the thumbnails of major products. (There is no recommended size, please prepare the image in a square ratio)
6\) Event description: This is not required. (Does not appear in the app)
7\) Click the Save button to finish.
**4. Bottom – footer message**

If you look at the bottom of the main page, there is a footer area and you can enter a message.
The message can be modified and registered at **1)Swing shop, My Store → 2) Basic information setting → 3)Store footer.**
**If you write your desired comment and save it, it will be displayed in the store footer text on the main page of the shopping mall.**
**STEP.2 App execution screen – shopping mall main page applied**

If you run the app again after completing the product registration, etc., you can see that all items on the main page are filled.
**To register an event:**

1\) Select the Register button
2\) Enter event name
3\) Category Setting: Register the category you want to expose.
4\) Priority: This is the order of exposure in major products. The smaller the number, the more it is exposed.
5\) Representative image: This is the image displayed on the thumbnails of major products. (There is no recommended size, please prepare the image in a square ratio)
6\) Event description: This is not required. (Does not appear in the app)
7\) Click the Save button to finish.
**4. Bottom – footer message**

If you look at the bottom of the main page, there is a footer area and you can enter a message.
The message can be modified and registered at **1)Swing shop, My Store → 2) Basic information setting → 3)Store footer.**
**If you write your desired comment and save it, it will be displayed in the store footer text on the main page of the shopping mall.**
**STEP.2 App execution screen – shopping mall main page applied**

If you run the app again after completing the product registration, etc., you can see that all items on the main page are filled.