Swing2App Manual
Help CenterFAQContact UsBuild an app
  • Swing2App
  • Swing2App Update
  • FAQ
    • FAQ(Frequently Asked Questions)
      • Frequently Asked Questions (FAQ)
      • App Creation FAQ
      • App Operations & Features FAQ
      • App installation and download FAQ
      • Registration and Login FAQ
      • App Preview FAQ
      • Swing Shop FAQ
      • Billing FAQs
      • Paid App Passes & Tickets FAQ
      • Paid usage and uploading FAQ
      • Unlimited Usage and Package FAQ
      • Push sending FAQs
      • PlayStore FAQ
      • App Store FAQ
      • AdMob FAQ
      • Affiliate Program FAQ
      • Customization FAQ
  • Manual
    • App production manual (V3)
      • Start App Creation With MakerV3 Screen
      • Manual on How to Create an App In MakerV3 Screen
      • STEP1 Basic Information
      • STEP2 Prototype
      • STEP3 Page
        • How to Create a Home Screen For an App
        • Registering a menu icon image
        • How to use: Menu Exposure Settings
        • Set menu settings: Access permissions
        • Page Design - UI KIT
        • Page Design - eStore Page
        • Page Design - eStore Deals
        • Page Design - Product Category
        • Page Design- Page Templates
        • Page Design - Image Page
        • Page Design - HTML Editor
        • Page Design - Sign Up, login & Settings Page.
        • Page Design - Search Posts Page
        • Page Design - View Favorite Page
        • Page Design - View Coupons Page
        • Page Design - Share Your App Function
        • Page Design - App Introduction Page
        • Page Design - Admin Chat Page
        • Page Design - Chat List Page
        • Page Design - Surveys Page
        • Page Design - View My Posts Page
        • Page Design - Attendance Check Page
        • Page Design- Web Link
      • STEP4 Complete App Creation
        • How to create an additional app
        • How to update an app
        • App launch screen by update type
    • App production manual(V2)
      • App basics
        • Guide to create an app
        • App Update Type And Method
        • App Launch Screen Update Type
        • Push or WebView version creation method (super simple app creation)
        • WebView App Manual(production and operation)
        • Push App Manual(production and operation)
        • Remove Push App Toolbar
        • App Production
        • Guide to create App Icon Image
        • Guide to Create an Idle Screen Image
        • Image Editing Tool
      • Design Theme
        • Prototype UI Design
        • App Main Design Style
        • App Navigation Styles
        • Applying Slide Prototype
      • Page Menu
        • Page Menu – Main Menu Management
        • Creating an App Home Screen
        • How to use Web Link
        • Home screen: Applying App Introduction Page
        • How to use file attachment
        • How to use the image attachment
        • How to use Product category
        • How to use Weblink-linkeditor
        • How to use User Page
        • How to create an Image Page
        • How to create a web template page
        • How to create HTML editor page
        • Swing2App Page – Signup, Login, Settings
        • Swing2App Page – Search Post
        • Swing2App Page – View Favorites
        • Swing2App Page – View Coupon
        • Swing2App Page – Share App
        • Swing2App Page – App Introduction
        • Swing2App Page – Admin Chat
        • Swing2App Page – How to read my article
        • Swing2App Page - Survey
    • App Production Application TIP
      • Sending a push using the push API
      • Insert GIF image
      • Create a Flash style home screen
      • Change App Loading Icon
      • Set device mode (switch app screens)
      • How to use the app review button
    • App operation manual
      • Bulletin board management
        • Create a bulletin board
        • Bulletin board type, design style
        • Bulletin Board – How to Enter Posts
        • Bulletin Board – Post Schedule Settings
        • Set post detail options
        • Bulletin Board – How to Attach Files
        • Register video post(how to register a video)
        • Bulletin Board – How to Attach Music Files
        • How to enter post comments and comments
        • How to set up Bulletin Board Permission
        • Bulletin board authority setting
        • How to create a Form in Bulletin Board
        • How to write a bulletin board
        • How to use the list screen and creation screen
        • How to set up a bulletin board post alarm
        • Set Up a Board Administrator
        • Google Map Bulletin Board
        • Google Map Bulletin Board Advanced setting
        • HTML Editor Writing
        • Report and manage posts
        • Block posts
        • Create bulletin board by membership level
        • Bulletin board thumbnail image registration
        • Search Post Functions
        • Post Management Options
        • How to use the bulk registration bulletin board
        • Copy Bulletin Board
        • Copy Post
        • Move a post
        • How to delete bulk posts
        • Group Chat
        • Create a Secret Bulletin Board (1:1 Customer Service)
        • Create a link for a post
        • How to Use Calendar
        • Calendar Application - How To Use
        • How to create and register a stamp
        • Stamp application: Issue coupons upon completion of stamps
        • How to use the bulletin board header
        • Using 2 hash-tags Options
        • How to use hashtag search option
        • Download Posts
      • Service management
        • How to use Pop-up
        • Check-ins
        • Surveys
        • Resource Management – Capacity Management
        • Coupon Management: Create and Issue Coupon
        • How to use Admin Chat [1:1 Chat]
        • Chat Administrator Page – Chat List
        • Chat Administrator page – Chat settings
        • How to use chat list
        • Unified Notification Settings
        • App Policy Management – App Subscription Policy
        • App Terms of Use And Privacy Policy
        • App Policy Management-Membership Form
        • App policy management – How to set up a membership completion message
        • Membership Form-ID Setting
        • App Terms and Conditions, Privacy Policy
        • Create a Private App
        • App string management
        • Link Wizard
      • Push & Member Menu
        • Send push
        • Send Push from Push Version App
        • Push Posts
        • Display messages after getting push notifications
        • Delete or Mark as Read Push Notifications
        • Push history
        • Member Inquiry - Check Member Information
        • Member Inquiry - Setting up an Associate Administrator
        • Member Inquiry - Create User Account
        • Setting up an App Administrator
        • Permission Group Settings-Membership Rating
        • Admin Screen: Change App member's name
        • How to use Push device management
      • Analytics
      • Version control
        • Version management-App production and market registration history
        • How to apply for App Store Upload
        • How to apply for Google Play Store Upload
        • How to apply for a mobile web upload
      • Payment
        • Introduction of paid products and payment methods
        • Payment-How to use my payment status
        • How to Use 1000 SMS Tickets
        • WebView Lifetime Paid App
        • PushOnly Lifetime Paid App
        • How to use mobile web registration
        • Budget package
        • AdMob Power Package
        • Large Storage Packages
        • Online Stores – Coupon
      • Full Search Function
    • SwingShop
      • Apply for Swing Store
      • Swing Store Product Type
      • Introduction of pages provided by Swing Shop
      • How to Apply a Swing Store Menu to your App
      • Swing Shop - Shopping Mall Main Page How to Use
      • Shopping Mall Main Page Slide Image
      • Store Management - Basic Information Settings
      • Store Management - Shipping Management
      • Product Management - Set how to receive goods
      • Product Management - Product Category Registration
      • Store Management-Policy Settings
      • Product Management - Physical Product Registration
      • Product Management - Digital Products: PDF File Registration
      • Product Management - Digital Products: Video Files Registration
      • Product Management-Digital Products: Authorized Sales
      • Product Management-Digital Products: Coupon Registration
      • Product Management-Reservation system product registration
      • Product management - Reservation system, Time reservation product registration
      • Product management-Reservation System Operation TIP
      • Product Management - Product Post Management
      • Product Management- Product Inquiry, Reservation Product Inquiry
      • Product Management - Product Exposure Management
      • Order Management
      • Reservation Order Management
      • Store Statistics
      • Swing2App Page-shopinfo
      • Swing2App Page-Search
      • Swing2App Page - Category List
      • Swing2App Page-mypage
      • Swing2App Page - Cart
      • Swing2App Page-digital products
      • Product Modification - Modify a registered product
    • Affiliate program
      • How to apply for affiliate program
  • Web App - Webview, Push
    • Web App - Webview, Push
      • Swing2App WebView App
      • Swing2App Push App
      • webview app manual
      • Pushapp manual
      • How to create a push app or webview app easily
      • Push-app toolbar
      • How to use the first run address in webview and push app
      • WebviewApp basic settings and advanced setting options
      • Push App Toolbar - Introduction: How to Use and Functions
      • Registering a Push Notification Icon Image
      • Progress Bar Color Settings
      • Remove progress bar (not in use)
  • App Guide
    • How to use Swing2App Preview
    • Application operation
      • How to convert and use paid apps.
      • How to install APK file on your phone
      • How to install apps by sharing
      • Free app conversion method after Paid period ends/expires
      • Download the app after accessing the mobile Swing2App site
      • Download the app using the app installation link address
      • If you can not install the free version of the app (APK file), please check!
      • If you can not install the paid version app (APK file), please check!
      • Find App Password
      • Registering and changing your app profile picture
      • How to re-register with the same ID after leaving the app
      • Share app
      • App – Share your Bulletin Board Posts
      • How to use the App Administrator menu
      • App Administrator menu: Chat
      • App Administrator Menu: Registering Stamp
      • App Administrator Menu: Use Coupon
  • STORE
    • Play Store
      • How to create a Google Developer Account
      • Create a Google Developer - Business Account
      • Google Developer Account Identity Verification
      • Launching Play Store App
      • Setting up Play Store app auto-updates
      • Transfer your app to another developer account on the Play Store
      • How to change the name of Play Store Developer
      • Delete Play Store app
      • How to use Google Help Center
      • Issuing Google Maps API Key
      • Invite a Play Store Developer Account
      • How to get app updates released on the Play Store
      • Launch the Play Store Private App (Alpha release)
      • Check Play Store App Installs
      • Reply to Play Store app reviews
      • Play Store Developer Page
      • Play Store prior notice
      • Linking Play Store Privacy Links
      • Play Store App Search TIP
      • How to restore Play Store app
      • Update the Play Store App
    • App Store
      • App Store Apple Developer Account Registration
      • Check app store app downloads
      • How to use the App Store Customer Center
      • Delete apps from the App Store
      • AppStore App Rejection Cases
      • App Store TestFlight
      • How to invite Swing2App account on App Store Connect and share information on App Store Upload form
    • AdMob (Google AdMob Ads)
      • Admob Banner Ad Frequency Settings
      • Admob Operation Precautions
      • How to apply AdMob plug-in
      • AdMob Plug-in check
      • What is AdMob plugin setting?
      • How to join AdMobs, create an Ad Unit ID
  • Developer Document
    • Server Side API Specifications
      • Sending a push notification By API
    • Webview (Webview, Push only) Development tool
      • Implementing Google and Facebook Login in WebView
      • Website Member Integration Guide
        • Wix Website User Integration Guide
        • WordPress Website Member Integration Guide
      • Javascript API Documentation
  • Policy
    • Store Policy
    • Limit on the Number of Devices for Free User
    • Swing Store Terms and Conditions
Powered by GitBook
On this page
  • STEP.1 Create Coupon
  • STEP.2 Register Swing Store Product Category Registration
  • STEP.3 Select Digital Product [Coupon]
  • STEP.4 Apply Product Categories to your App
  • STEP.5 Swing Cafe Sample App) Check your purchase of coupons
Edit on GitHub
  1. Manual
  2. SwingShop

Product Management-Digital Products: Coupon Registration

Last updated 2 years ago

How to register a coupon for a swing store digital products.

Swing Store is a shopping mall service provided by the app-maker Swing2App.

Swing Store can be registered by selecting a variety of product types – Original Products, reservations products, digital products, etc.

Digital products are the type of product that sells intangible content. You can register [Change permissions, view PDF, Videos and files sales, coupons].

You can sell coupons to users of the swing store digital products by registering the coupon.

★You can use the coupon shipping function and swing store payment service provided by Swing2App.

For example, 1 month pt of gym, nail shop gel nail coupon, haircut 30% discount coupon, etc.

You can create these coupons, apply them to the Swing Store feature app, and purchase the coupons you want.

*Existing swing2app coupon issuing service and + swing store coupons made by combining the way to the actual purchase.

We’ll show you how to register your offer in the swing store and apply it to the app.

Please check the digital product – How to register a coupon and how to apply the app through the manual.

STEP.1 Create Coupon

Unlike other swing store products registration, when you sell a coupon, you’ll need to register it on the coupon management page.

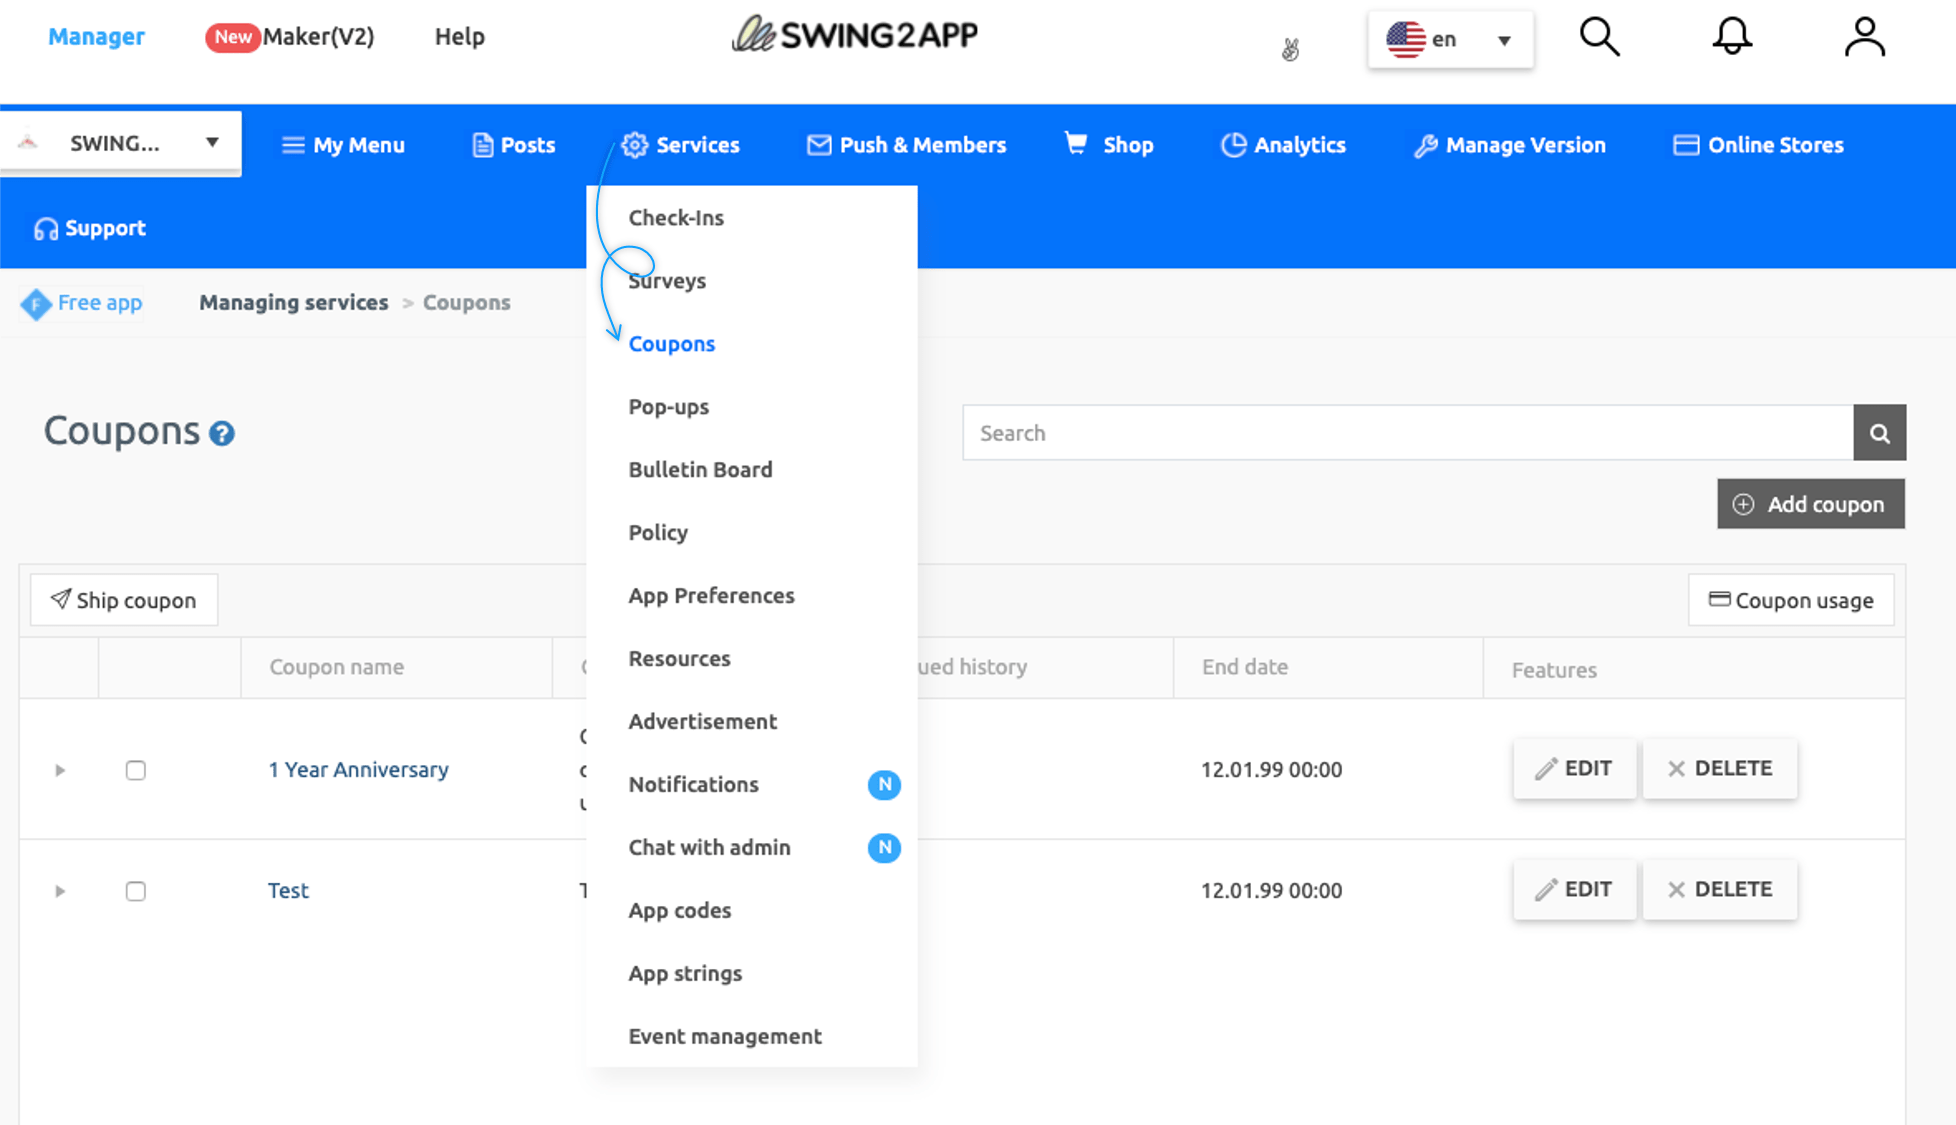
Move to Swing2App Manager Page → Services → Coupons menu.
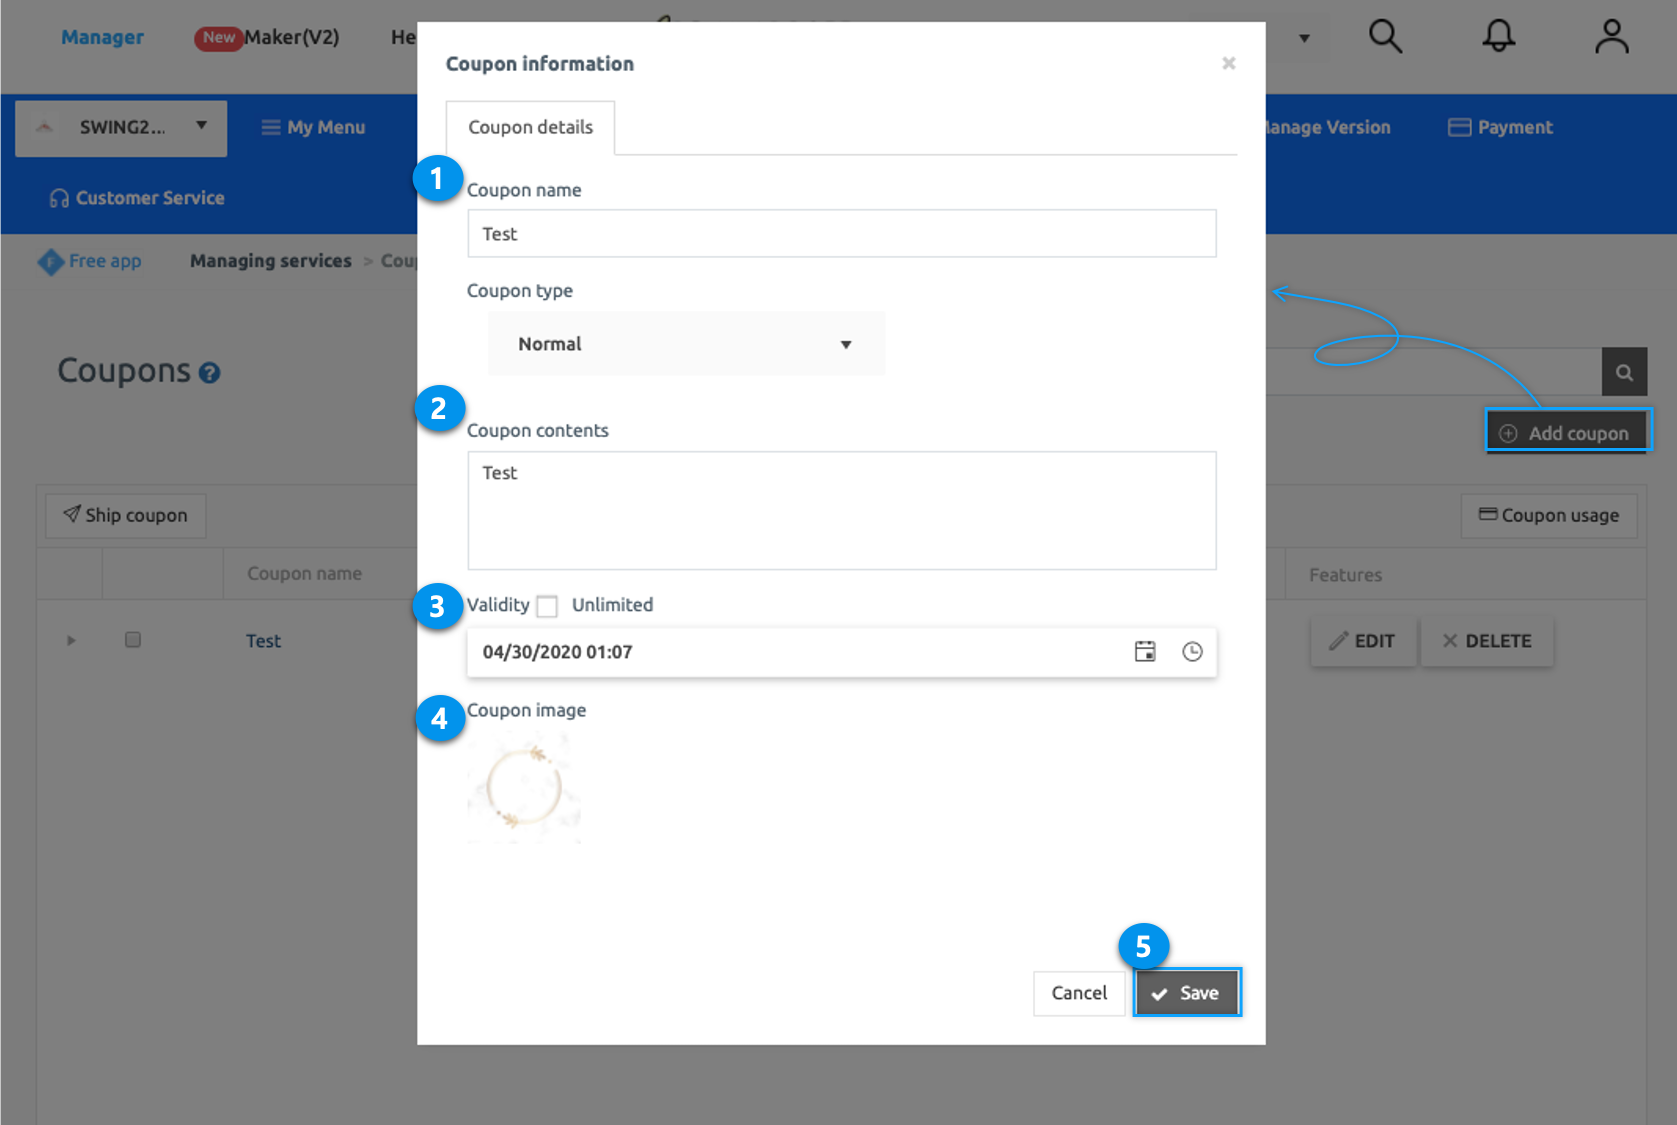
On Coupons screen, click Add Coupons. A Coupon information window will open and enter the information.

  1. Enter Coupon name.

  2. Enter Coupon content.

  3. Select the validity of the coupon either by selecting the date and time or checking Unlimited.

  4. Upload image for the coupon.

  5. Select Save.

**Coupons can be added by pressing the [Add Coupons] button. You can see the coupons created in the list.

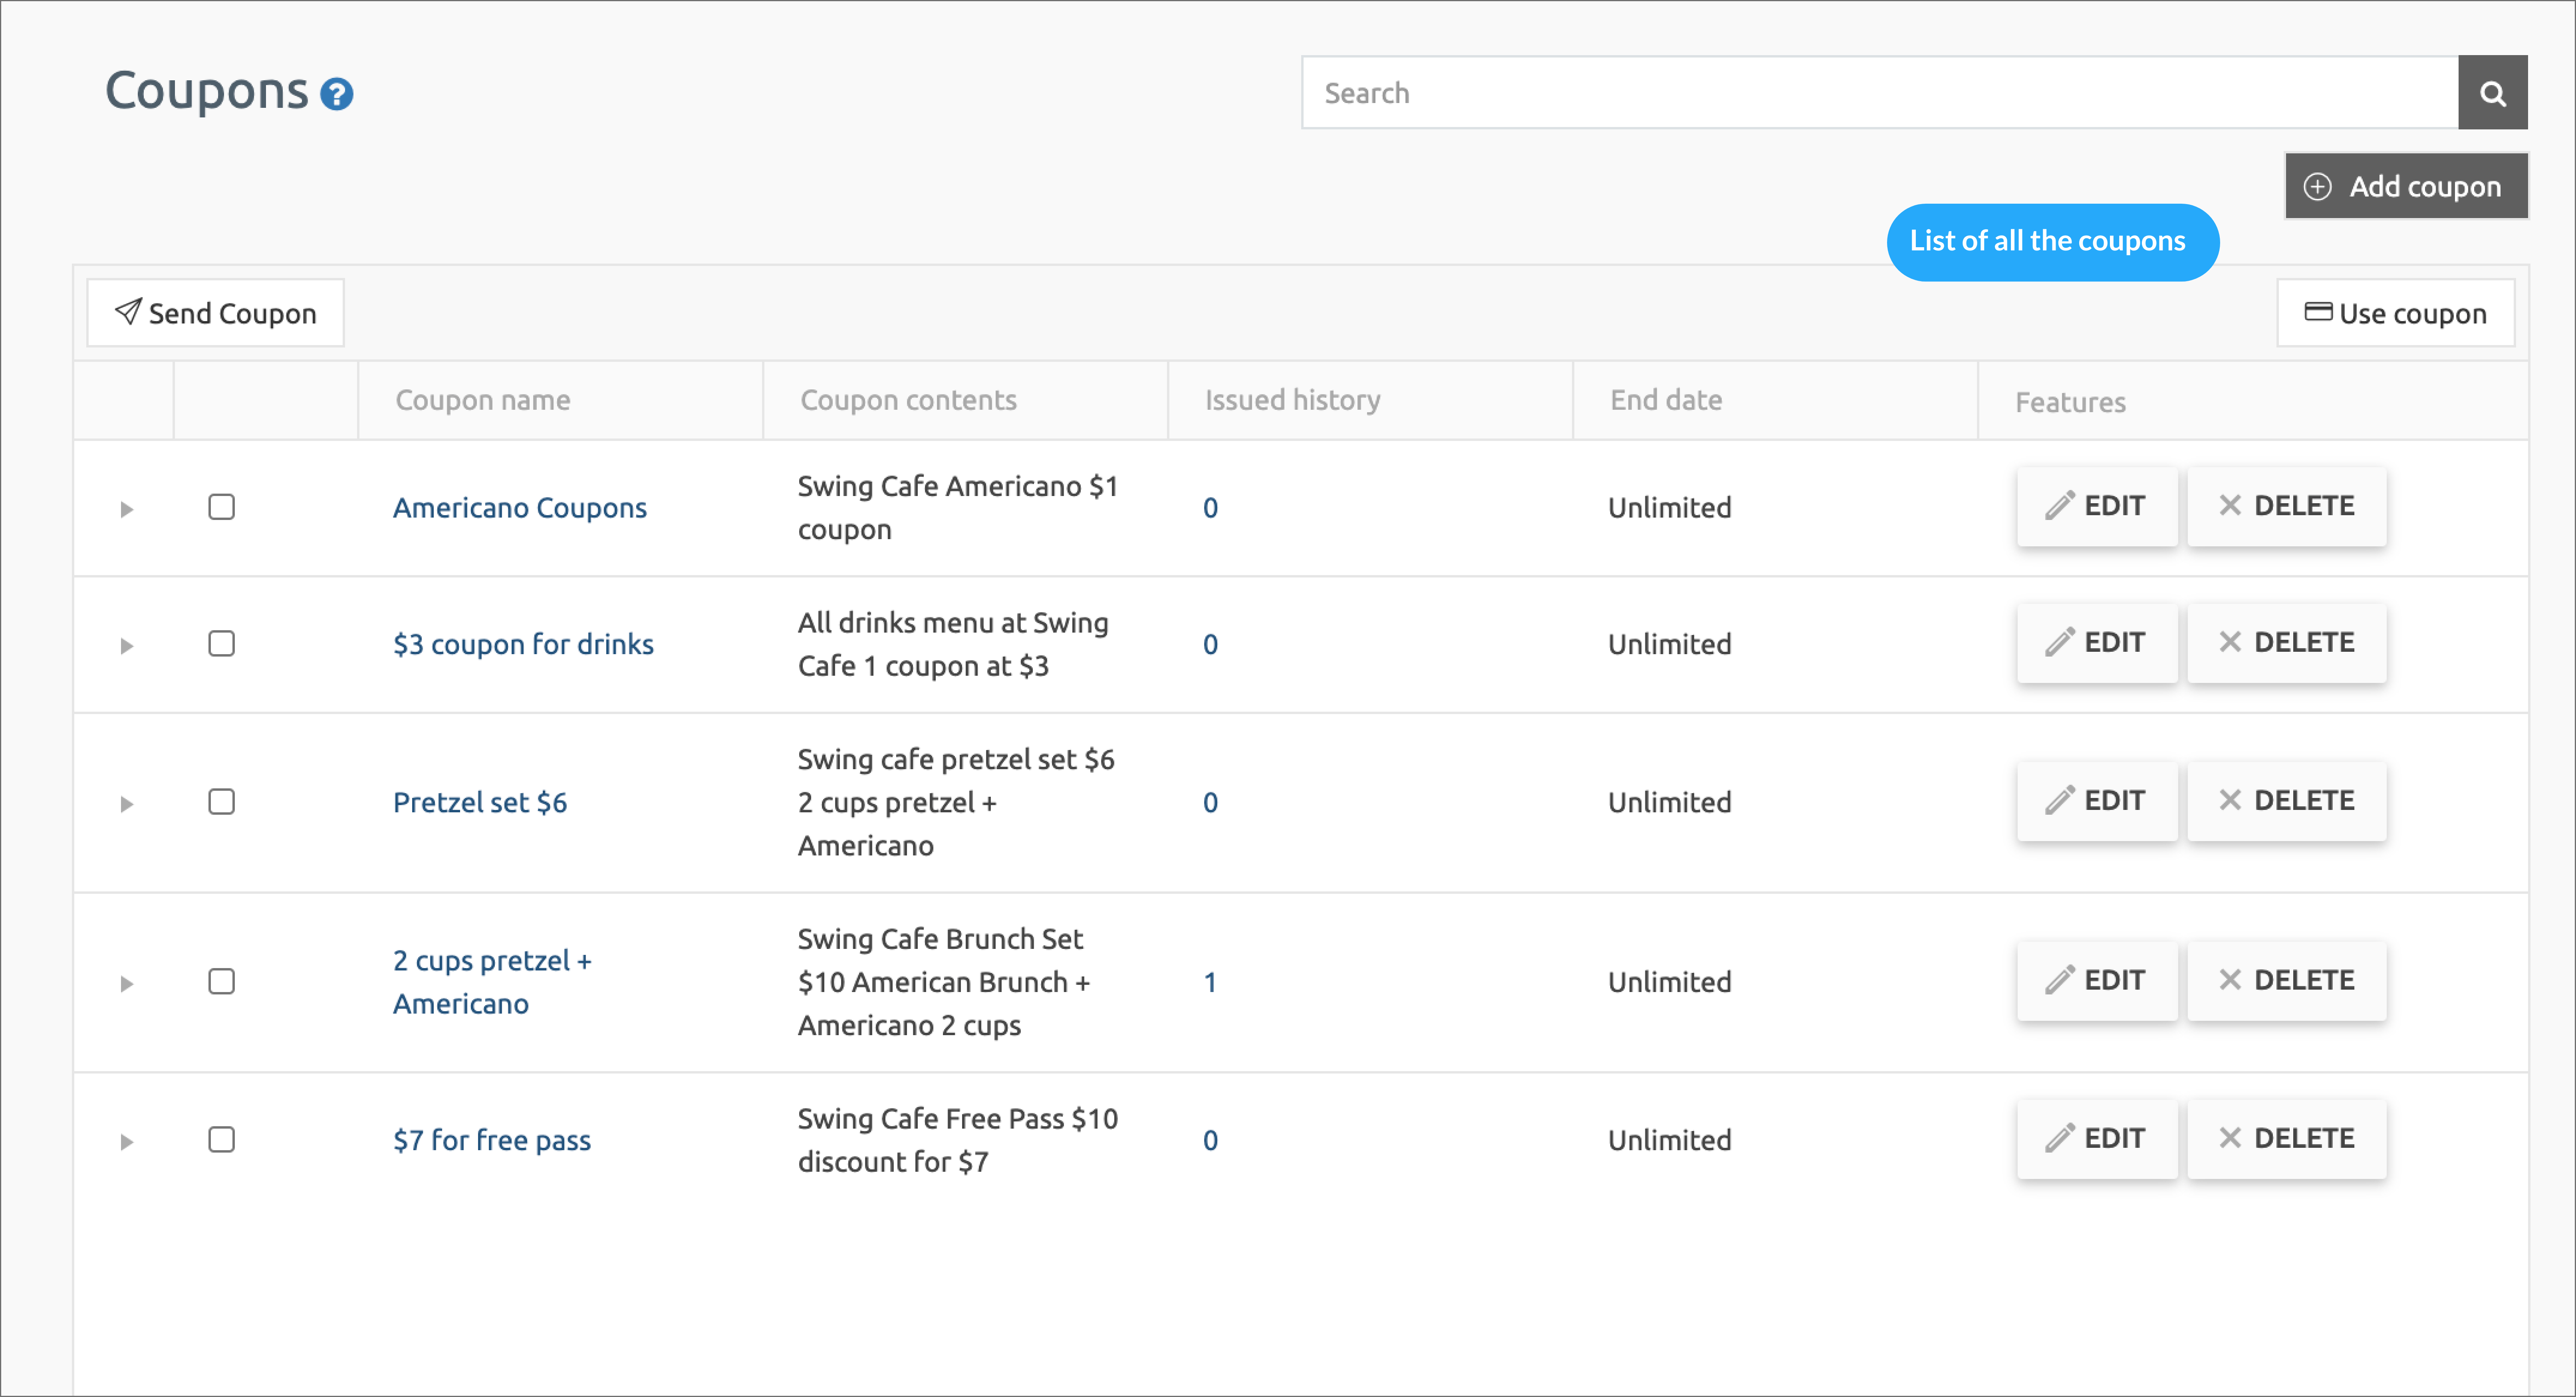
Coupon registration is complete!!

On the right side of the coupon created there is a management function, so you can edit or delete the coupon..

After the coupons are made, go to the Swing Store menu and register a coupon to sell!

STEP.2 Register Swing Store Product Category Registration

Please apply for a swing store first. The swing store must be requested before the menu is available!

You must apply for a swing store to create a [Swing Store] menu at the top of the app operation page.

If you created a [Swing Store], you must first register your product category.

*Rather than registering a product, you must first create a category that contains the top menu which includes the product!!

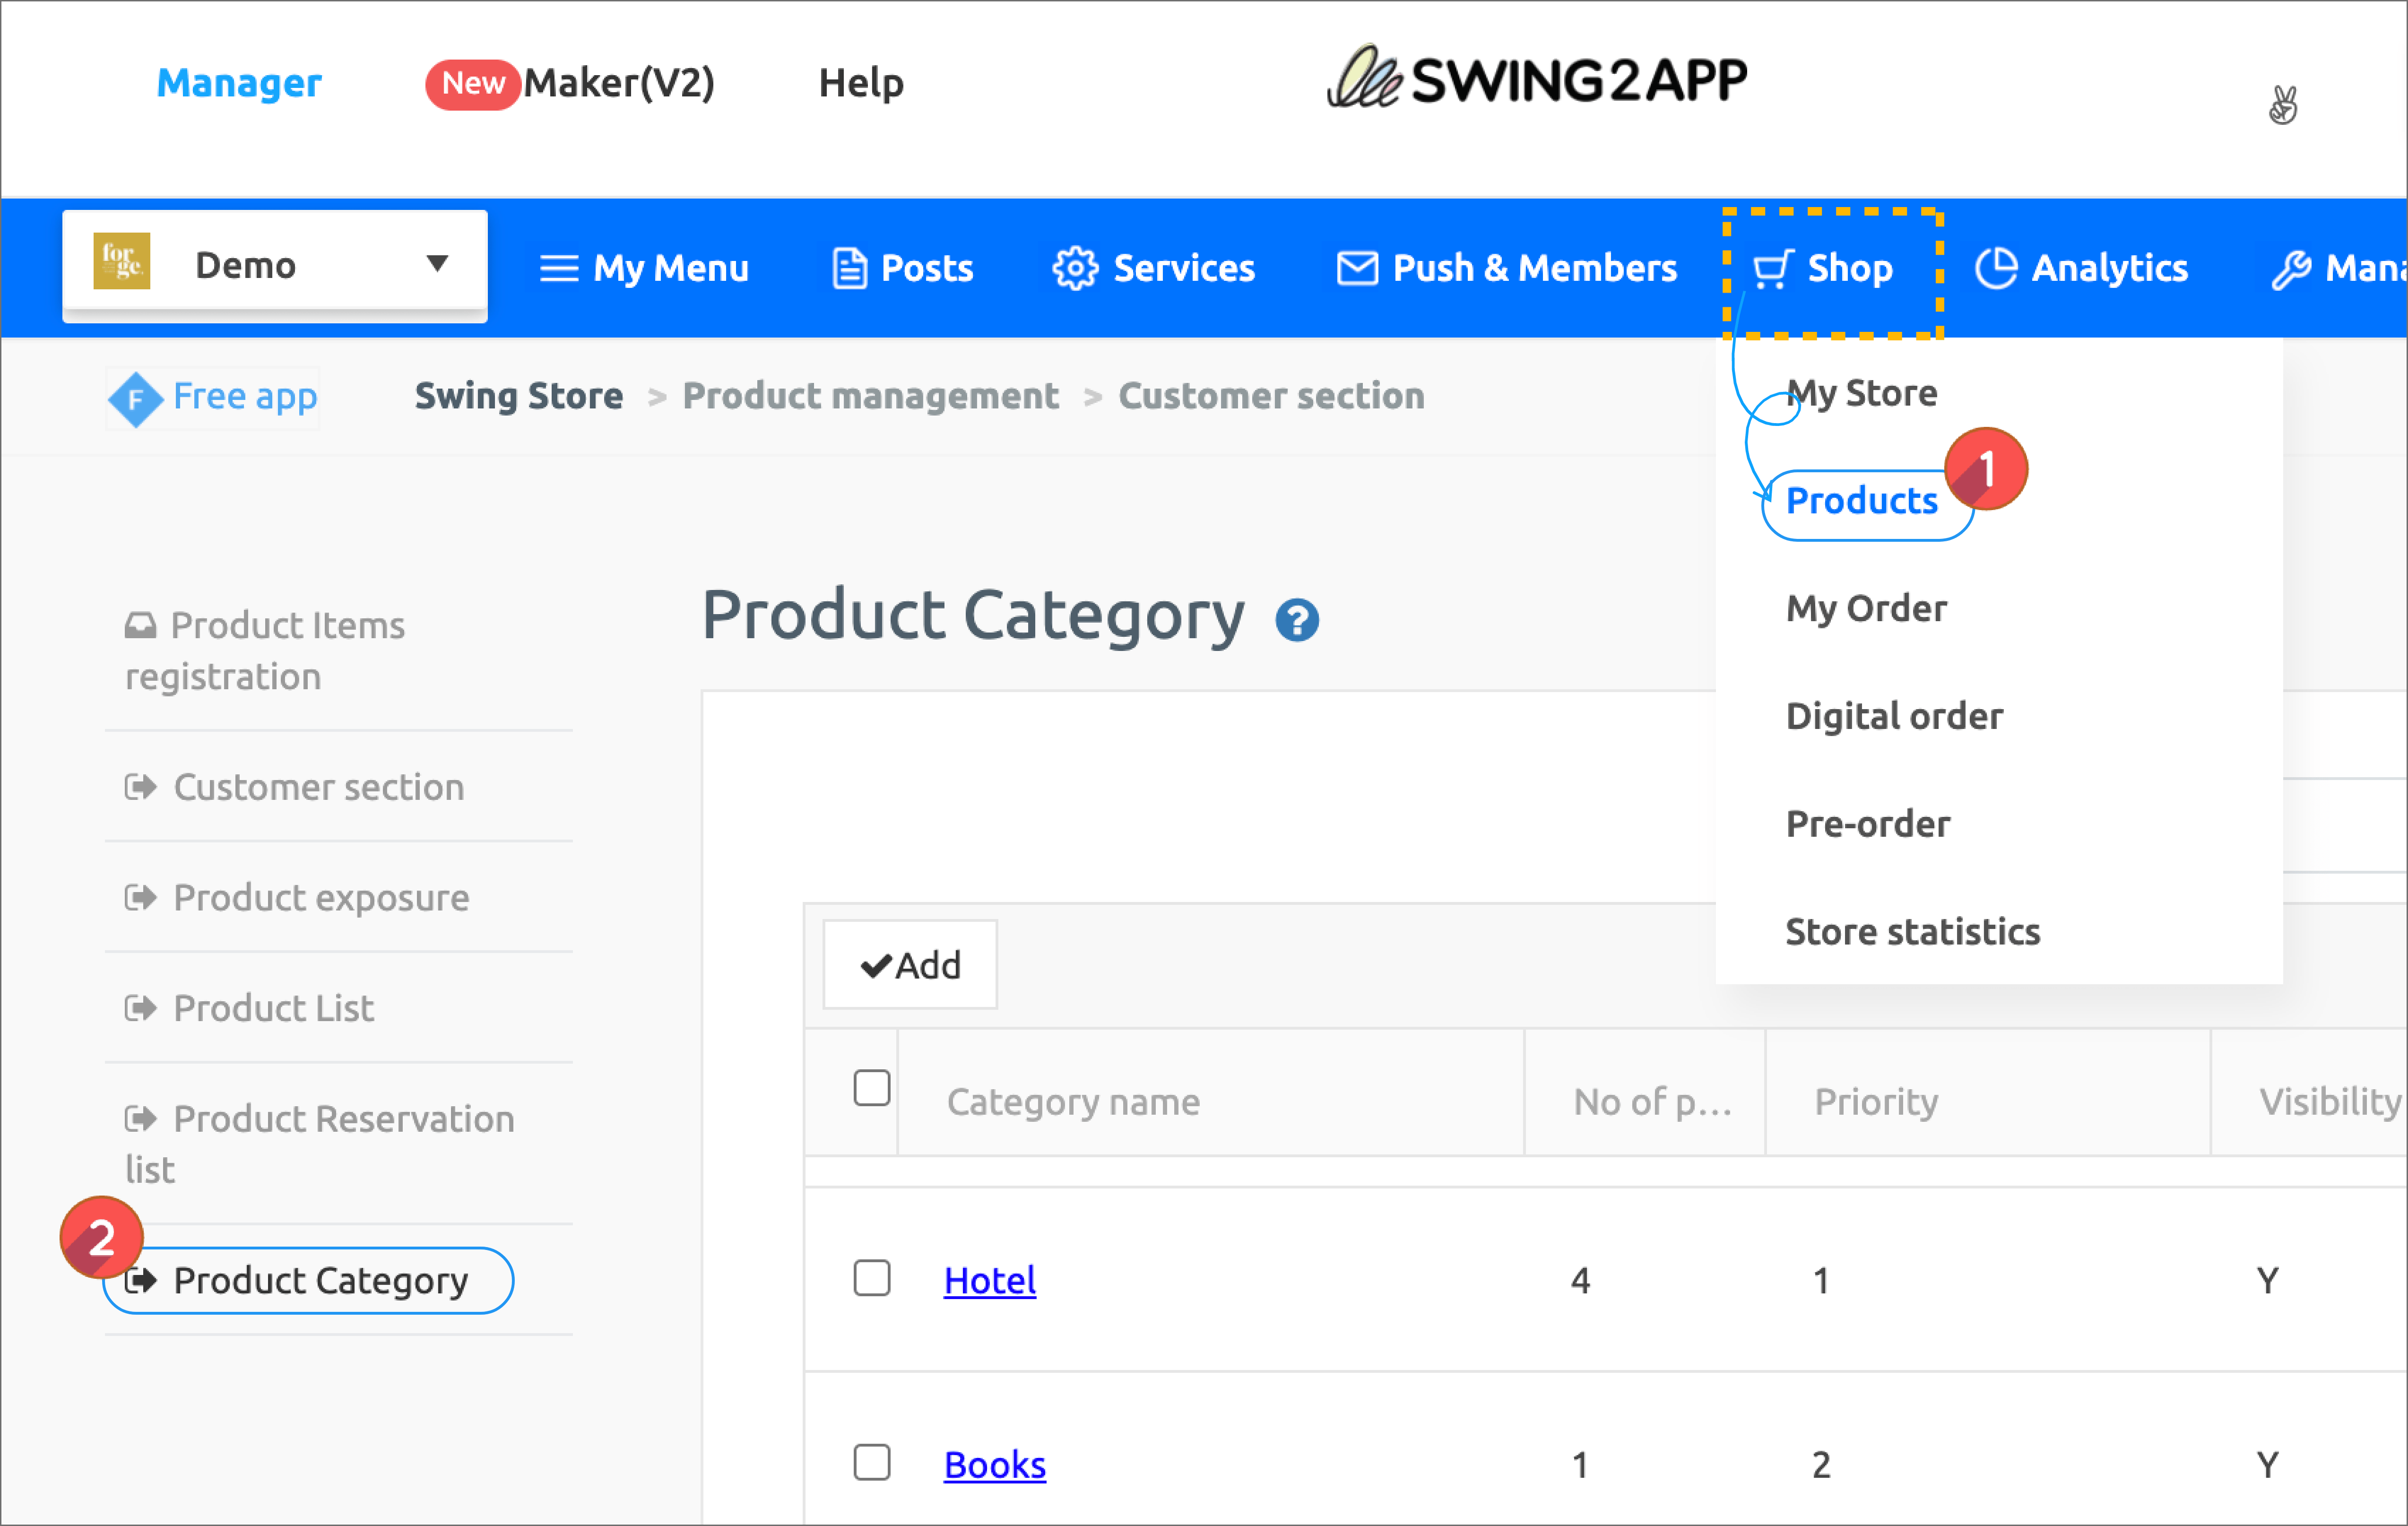
Move to Swing Store → Product Management → Product Category Registration Management menu.
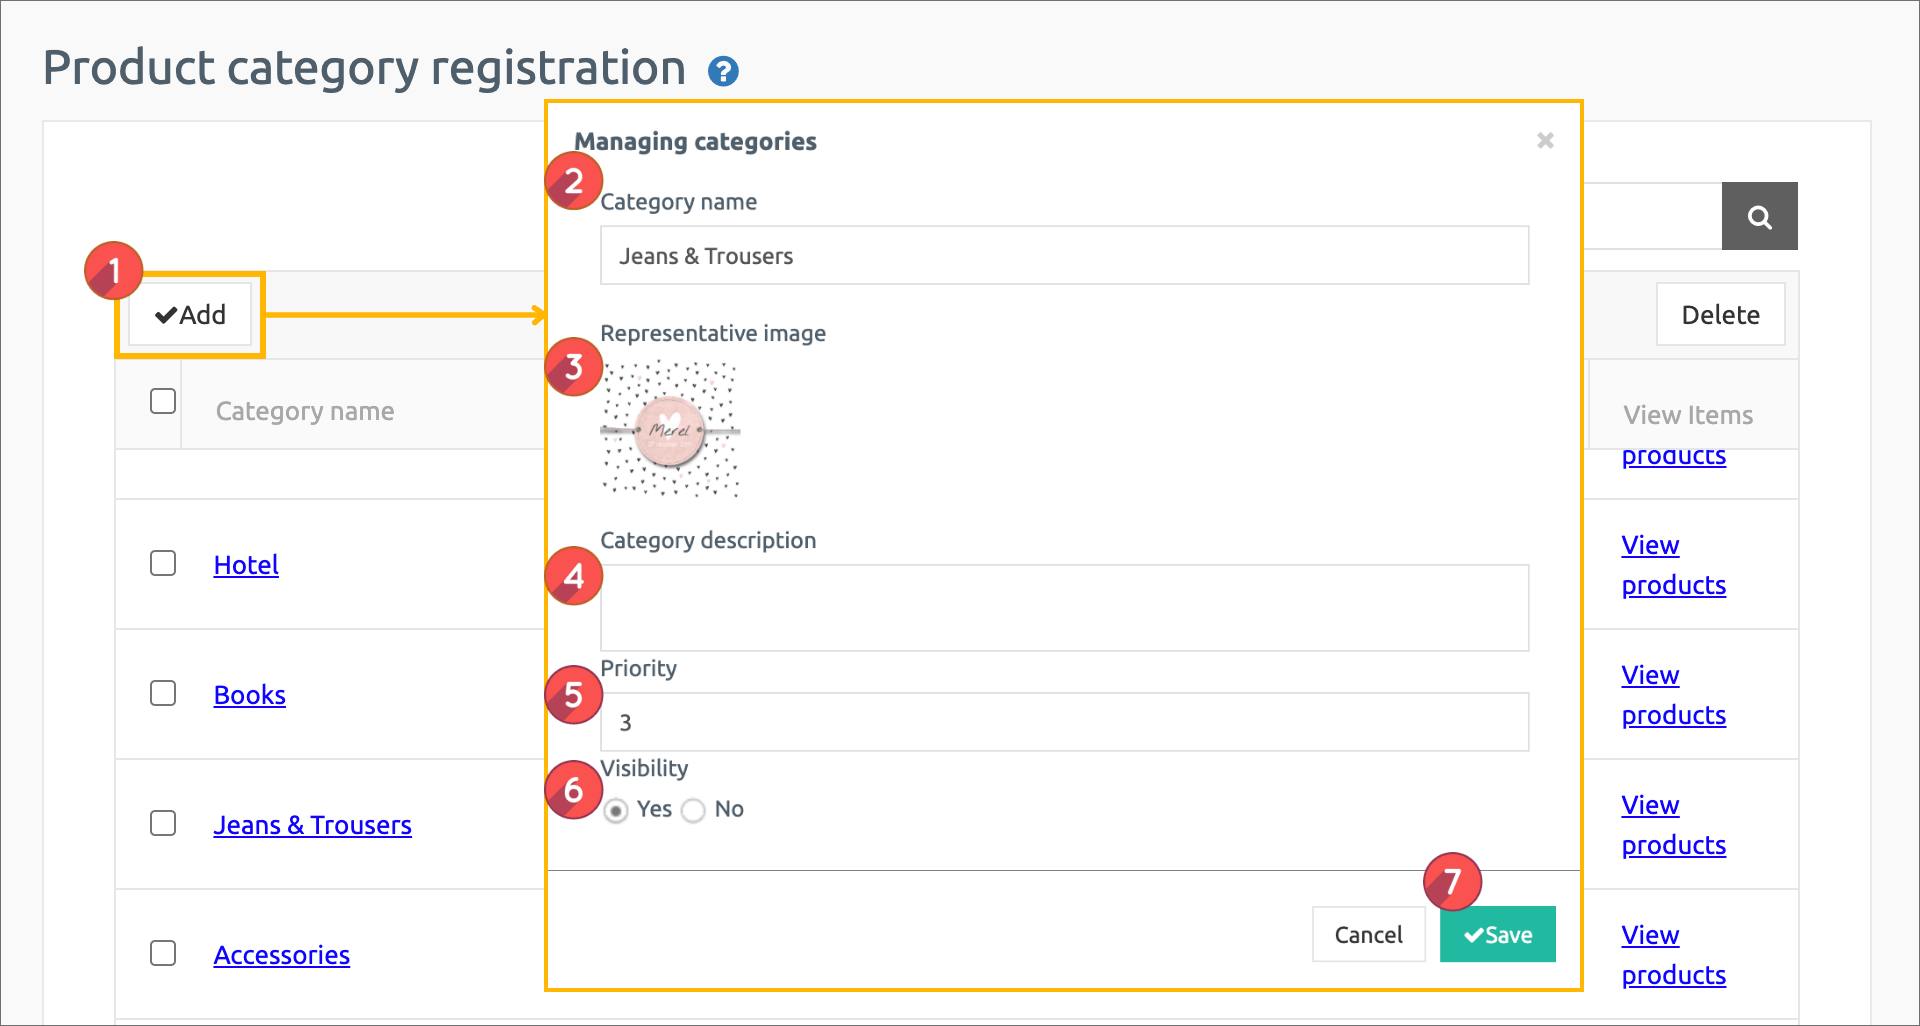
Select 1) [Register] button on the product category registration management screen.

In the category management window, 2) Category name 2) Representative image 3) Category description 5) Priority 6) Check display status 7) Select save button.

*Priority is placed at the top as the number is higher, and if the priority is the same, the first registered category will be placed at the top, depending on the item registration date.

*Categories must include a name that includes the product. Example) top, bottoms, accessories… Like this.

Category registration is complete.

Category registration is complete.

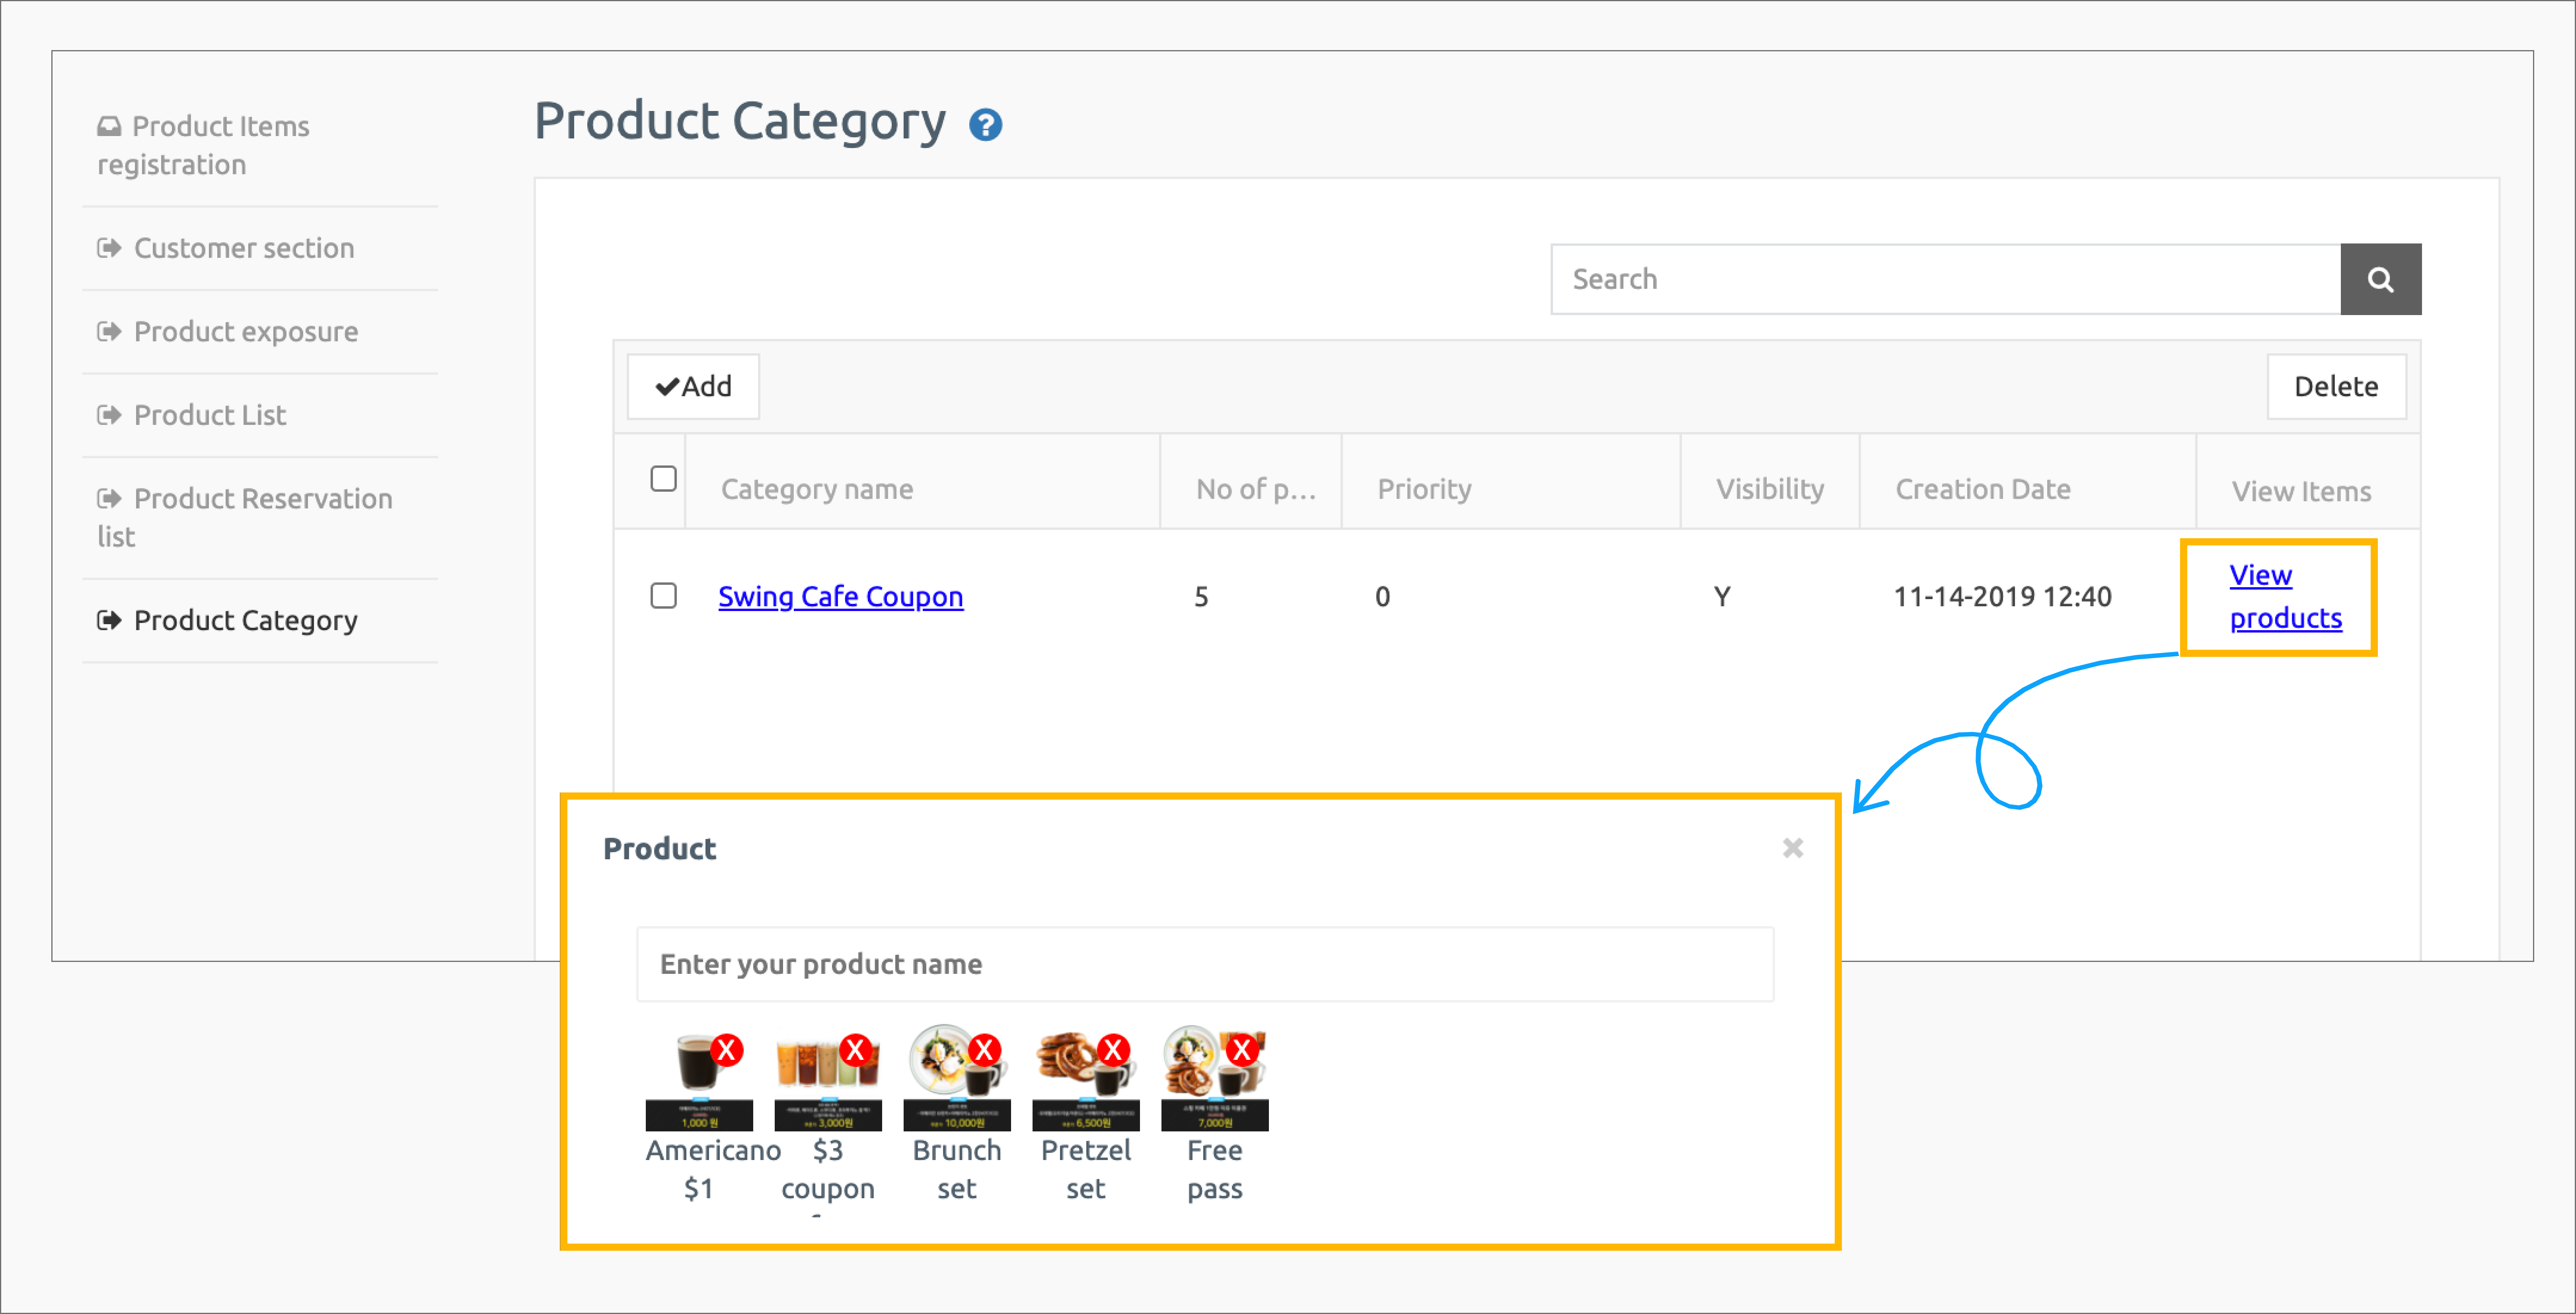
Categories can still be added from that menu without limiting the number of categories.

You can edit the content by selecting the category, and delete the category with the [Delete] button.

STEP.3 Select Digital Product [Coupon]

Once the category has been created, we’ll register and apply the coupon among digital products.

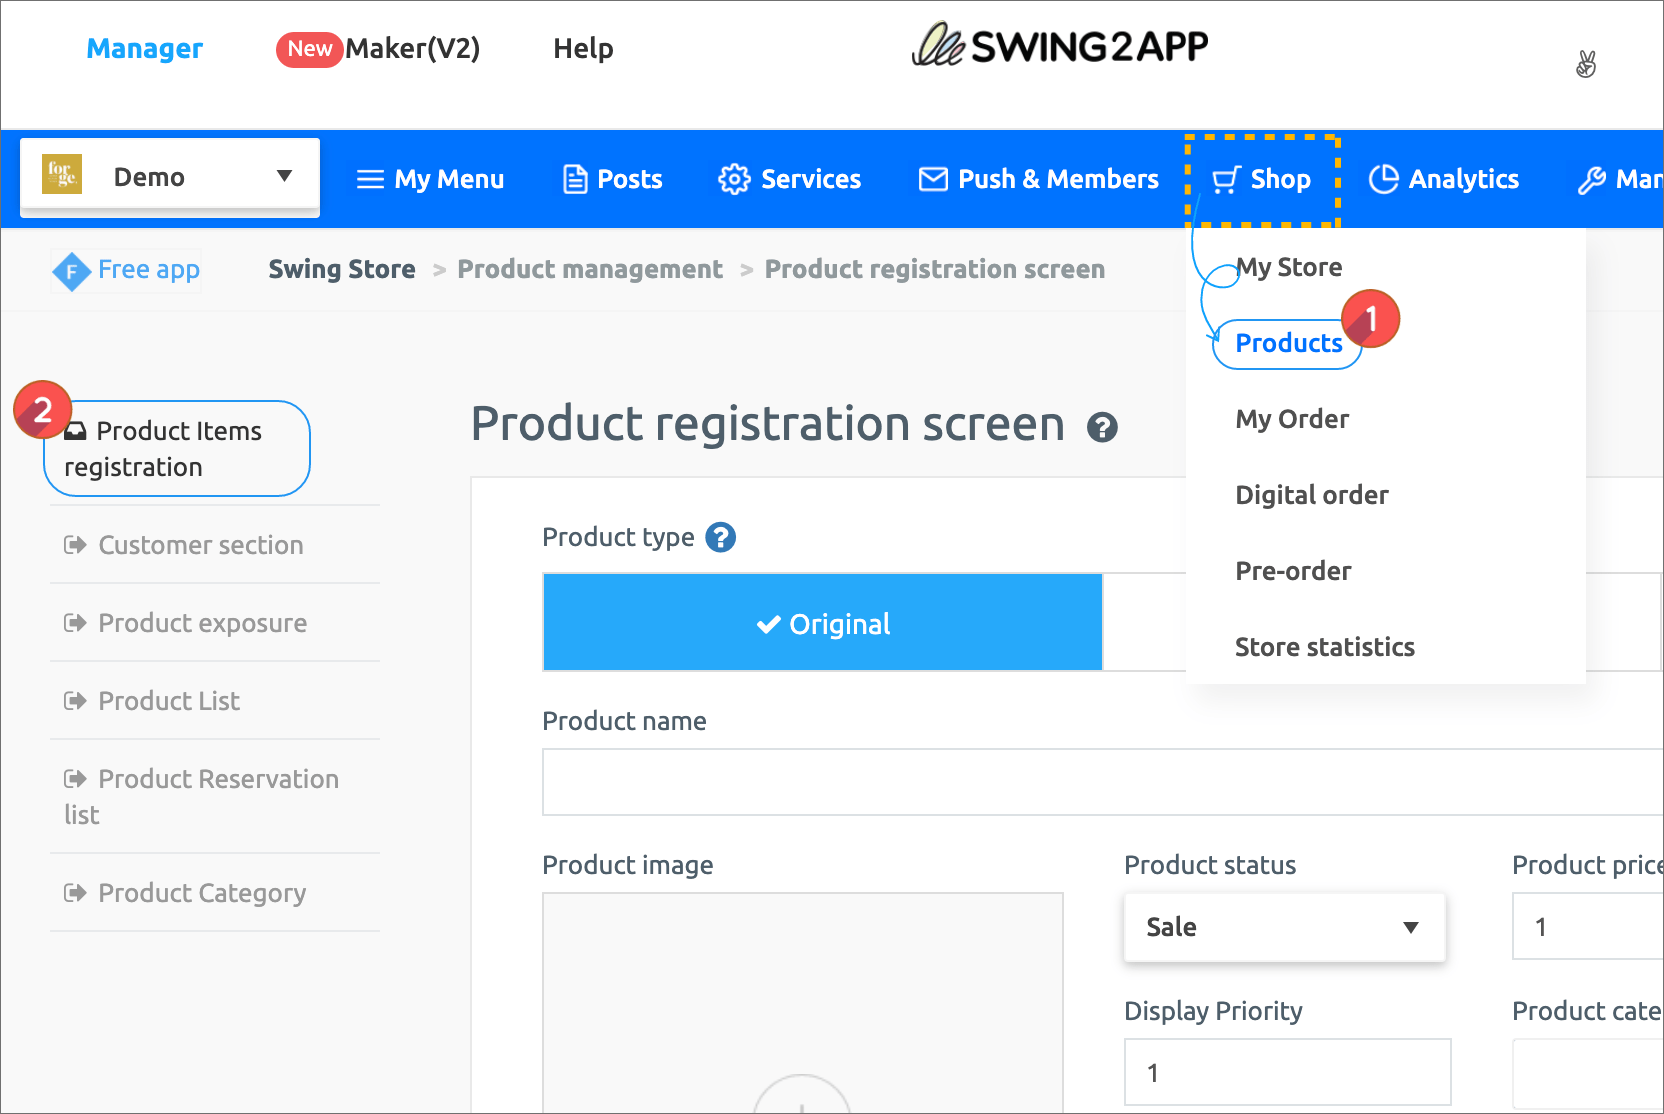
Go to Swing Store → Product Management → Product Registration screen.
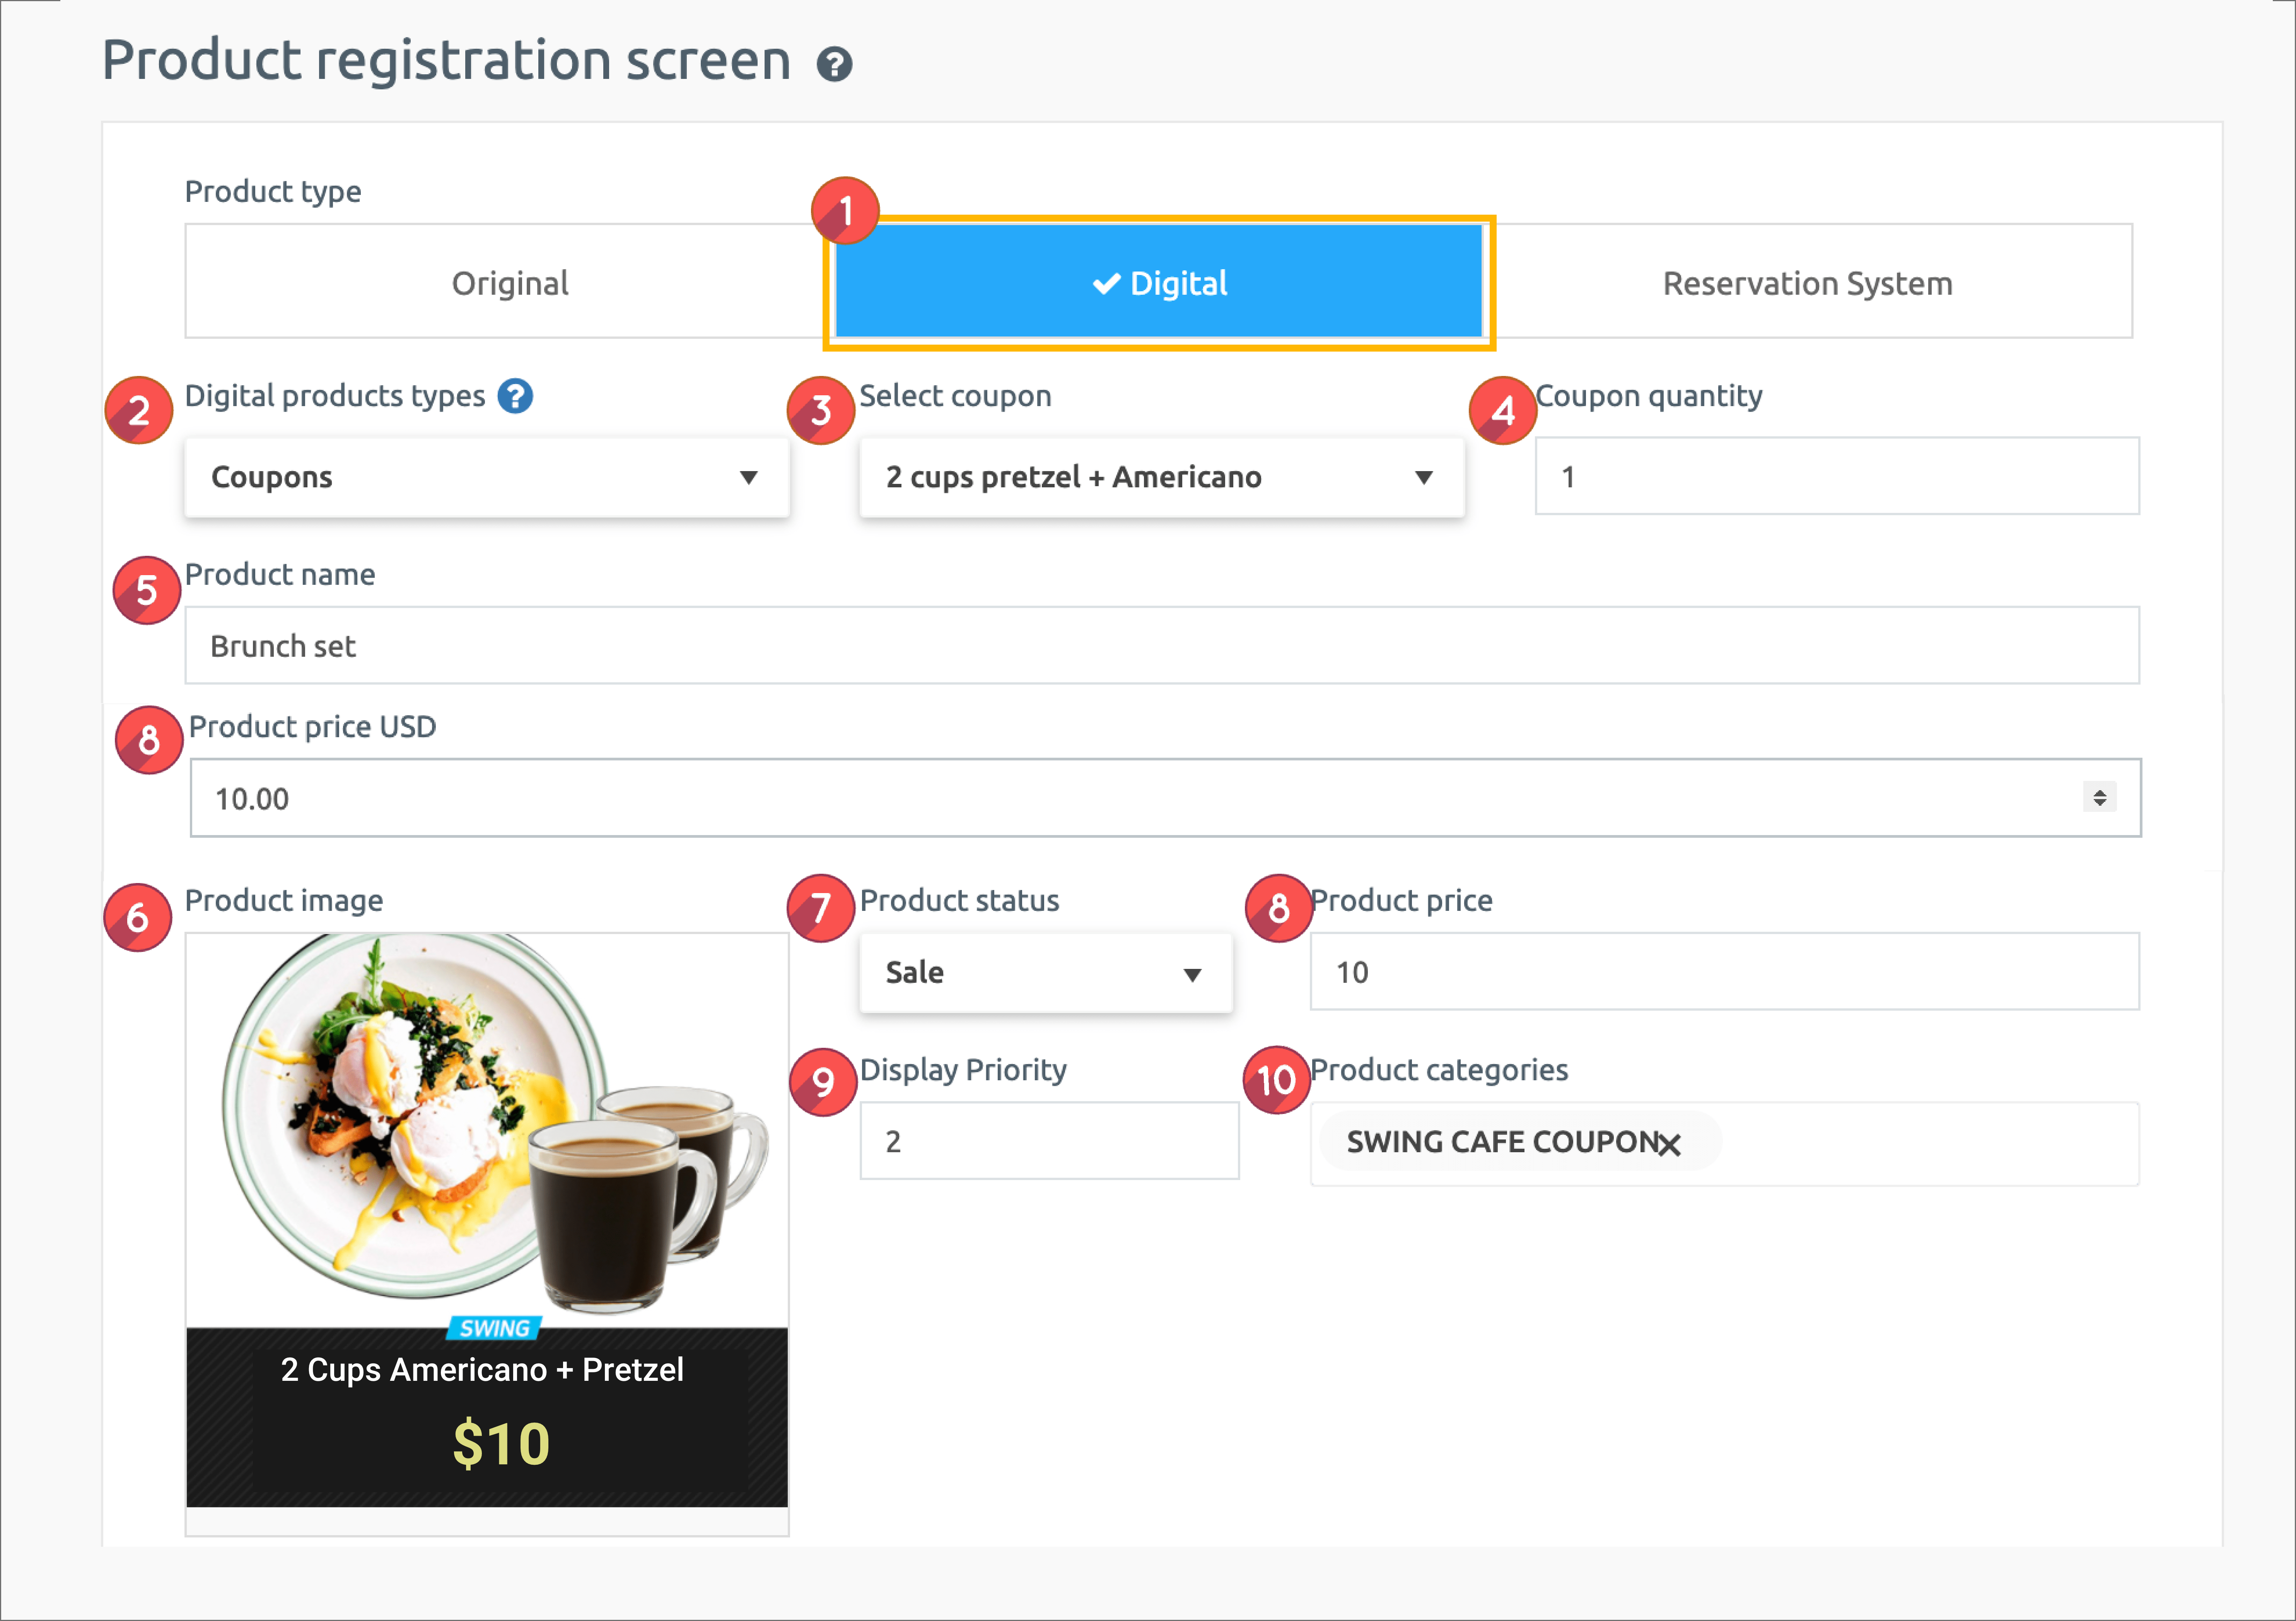
1. Product Type: Select ‘Digital’.

2. Digital Product Type: Select from [Change permissions, PDF view, video and file sales, coupon]. \

In this manual, you will select and register a ‘coupon’!

3. Select Coupon : Select the coupon you want have created.

4. Coupon quantity: Enter the quantity sold.\

– The default quantity is 1. *One coupon is issued at the time of payment.

-If you need to issue multiple coupons at the time of purchase, you can enter the desired number in quantity.

Example) 3 unlimited drink coupons for $10! => Can be used for these events.

5. Product Name: Enter the product name.\

6. Product Representative Image: Register the representative image shown on the product purchase page.

7. Registration status: Select Available for sale, out of stock, suspension of sale, temporary registration status.

8. Product Price: Enter the coupon price.\

9. Batch order: List the order in which the products are displayed in the category. *The higher the order, the lower it is placed on it, and the lower it goes down.\

10. Product Category: Please select the product category.\

*As mentioned above, you must create a product category first so that you can select a category in the product registration! Don’t forget to create a category first.
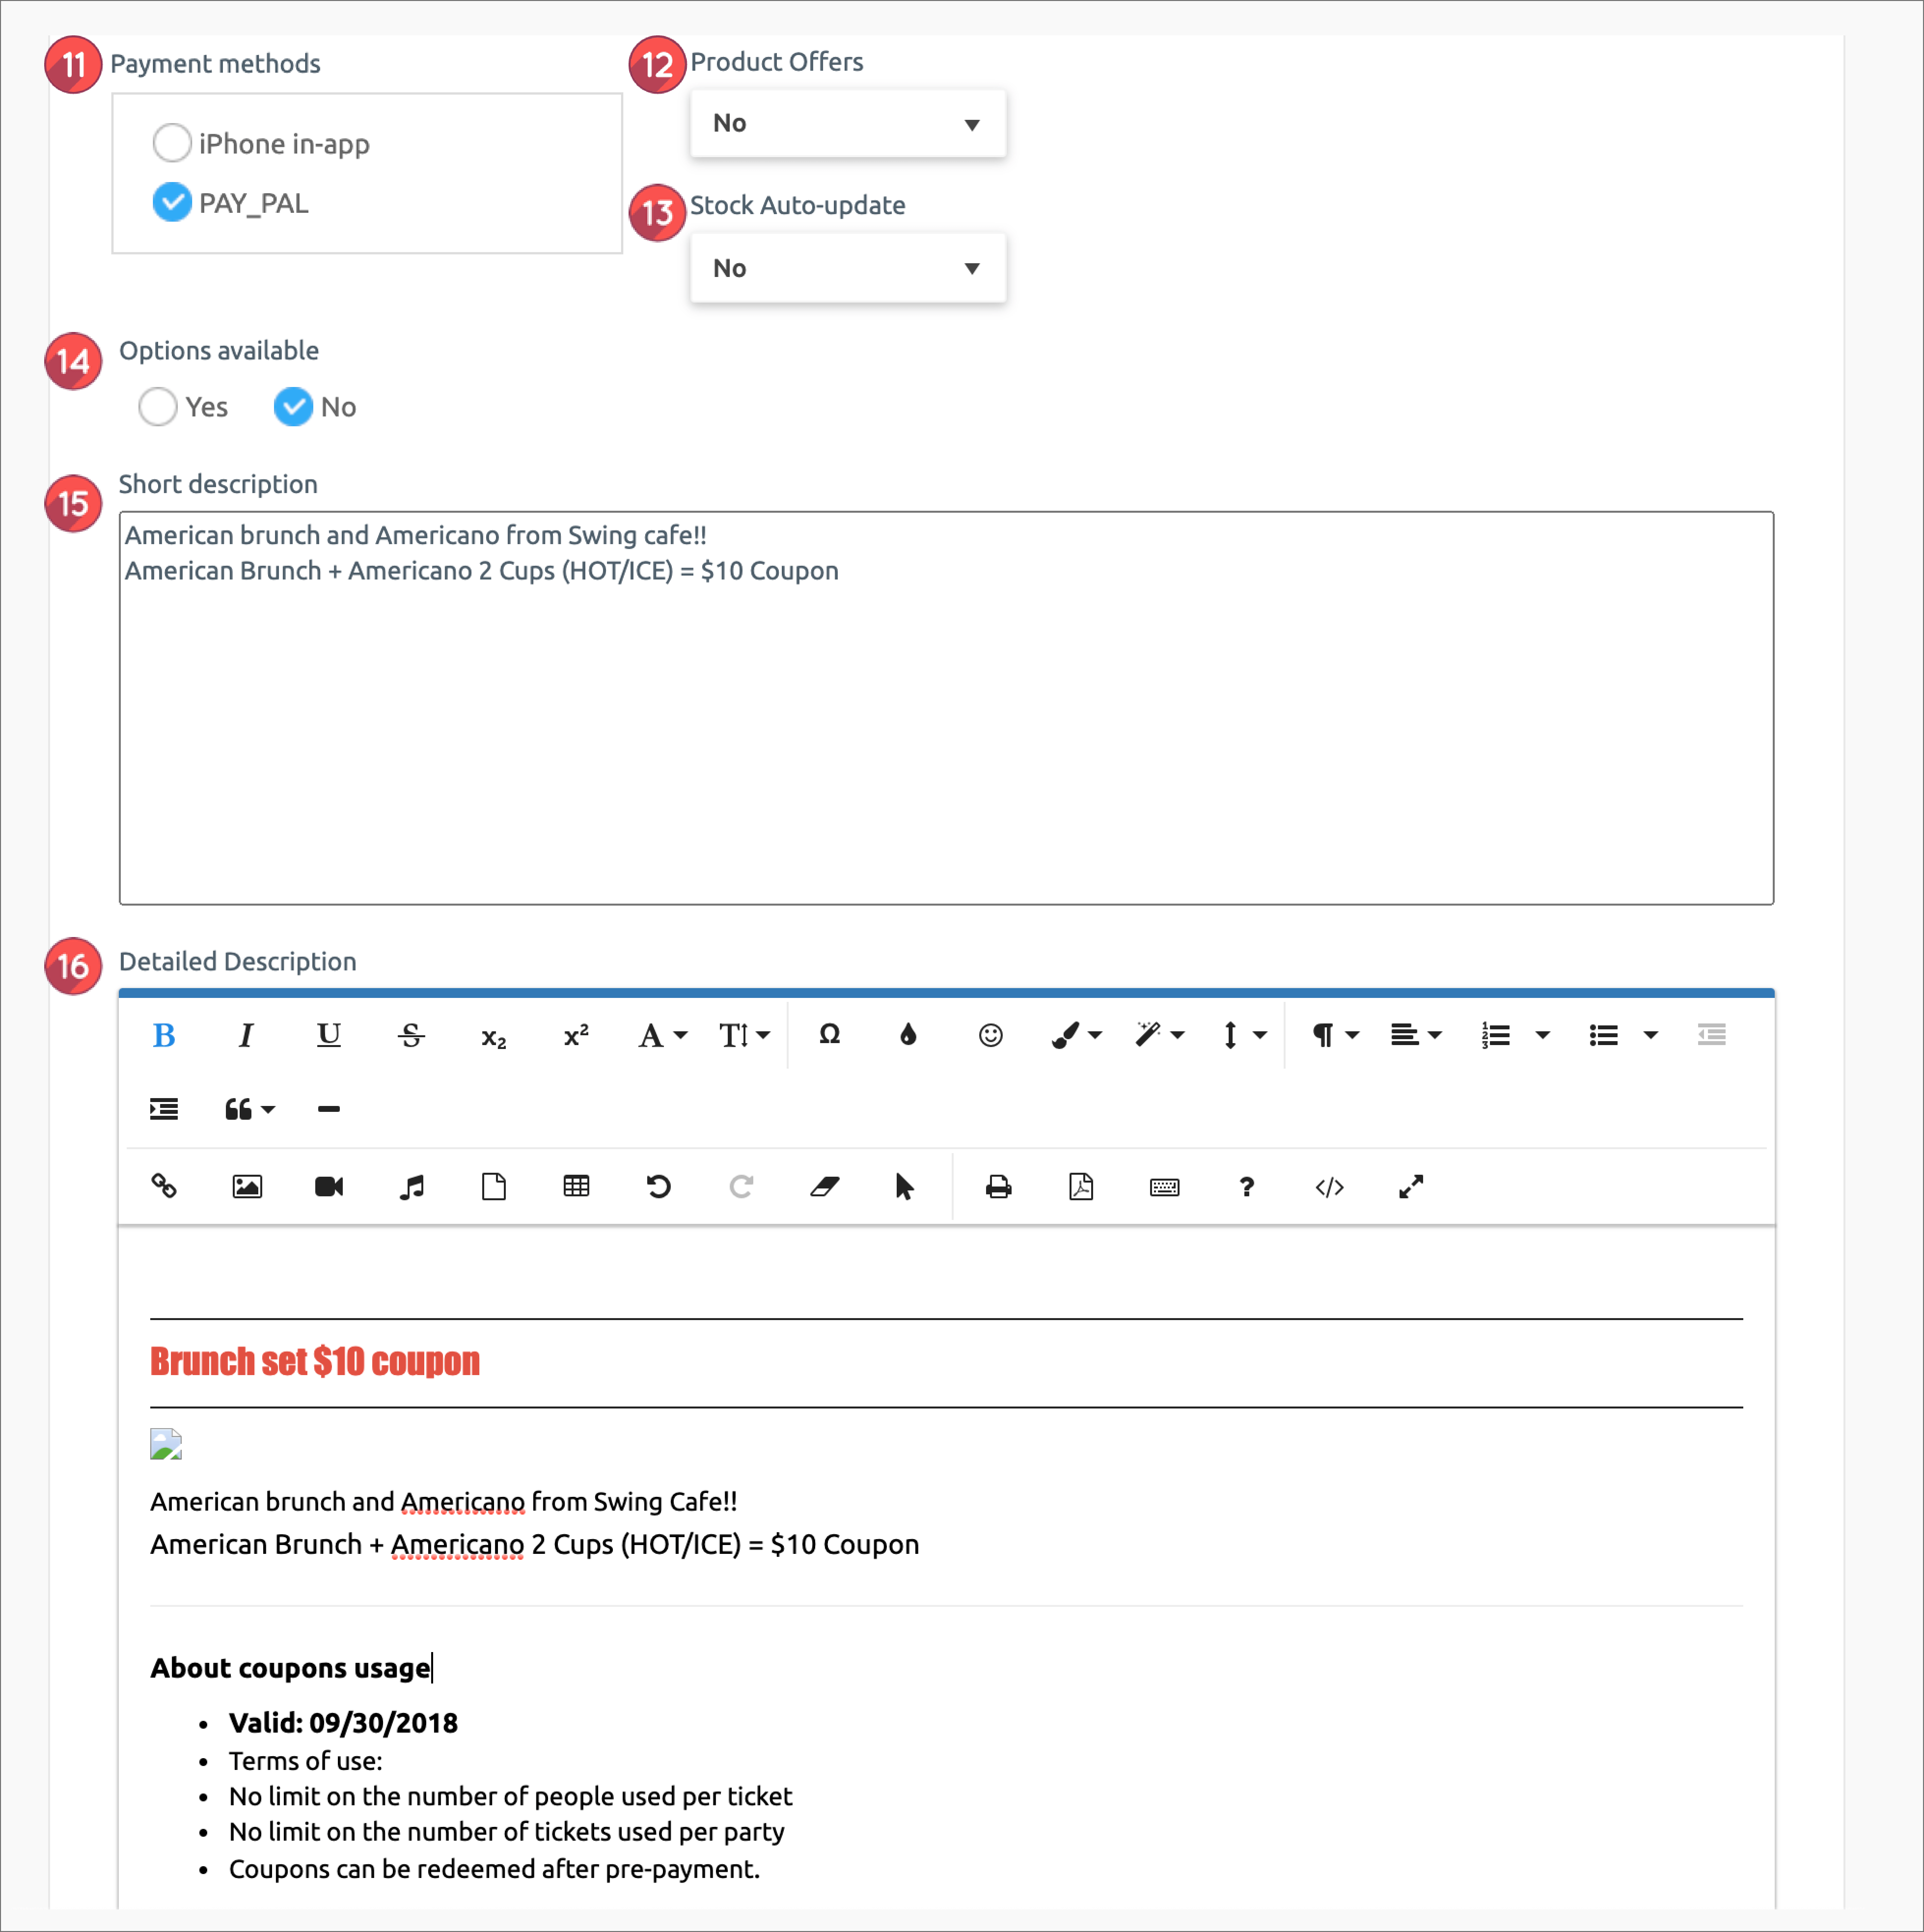
11. Payment method by product: Please check PAY APP (pay app) card payment.

*Digital products cannot be used as non-bank accounts and electronic payment modules must be applied.

12: Offer a discount: Select whether you want the product to appear at its original price or you want to apply a discount.

*If you check the discount as “Yes”, you will see an option window that sets the discount amount and period.

*The discount amount must be entered in the final discounted amount.

13. Use inventory management: Check whether you want to use product inventory management. / If you check the quantity, please enter the quantity to sell.
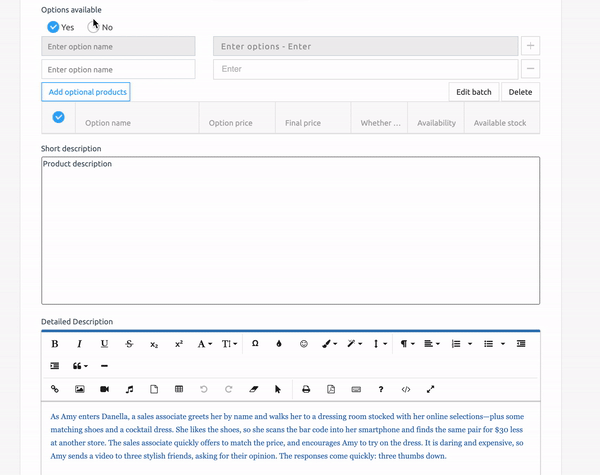
14. Availability: You can use it if you add an optional item to your product.

Digital product did not set options separately. If you have an option, please check the gif image below!!

Examples: You can set options and the amount of options by adding sizes, adding colors, and more.

**▶ **For more options, check out the image below!

15. Product Brief Description: Enter a simple one-line description to introduce the product.

16. Product Description: Please write details such as product image, description, product information, refund and exchange using the editor program.
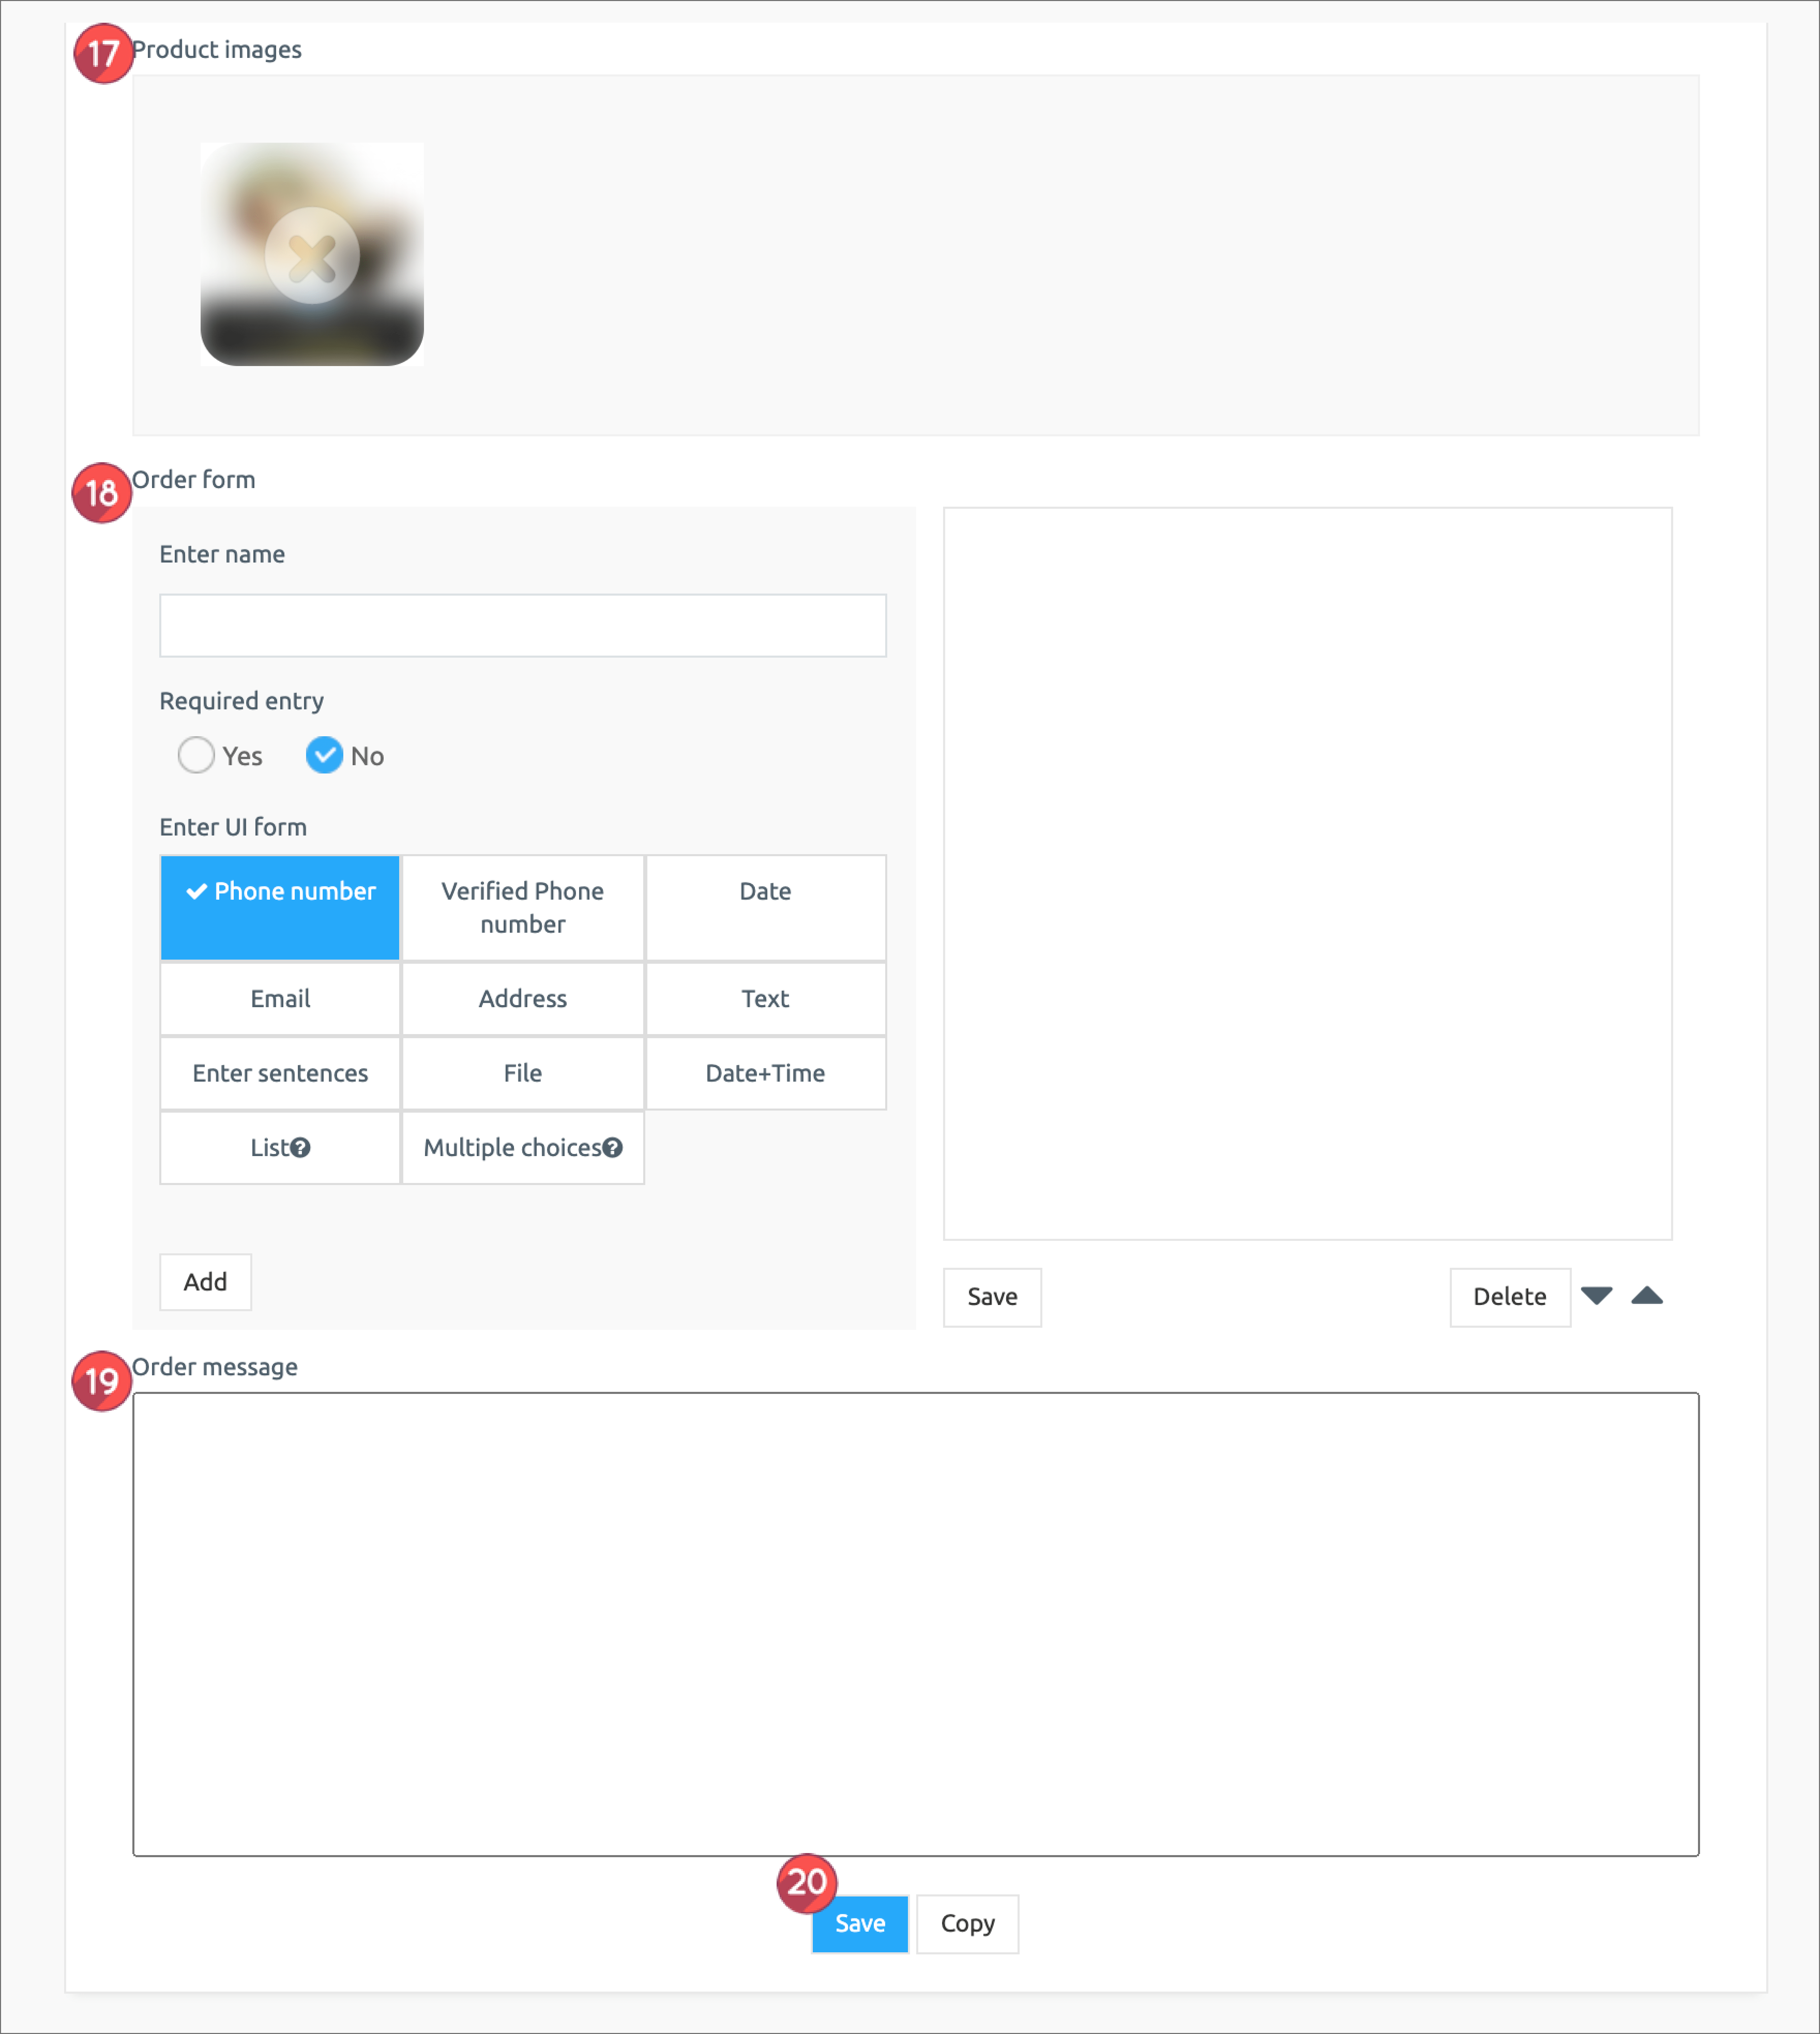
17. Product detailed image: Register the product image. Multiple images can be registered and can be reordered.

18. Order form items: If you have any information you need to receive, please fill out the order form.

19. Ordered Message: If you don’t have a specific message, you can skip.

20. Click the [Save] button to complete the product registration.

—Product has been registered. Registered products can be found in the Product List.—

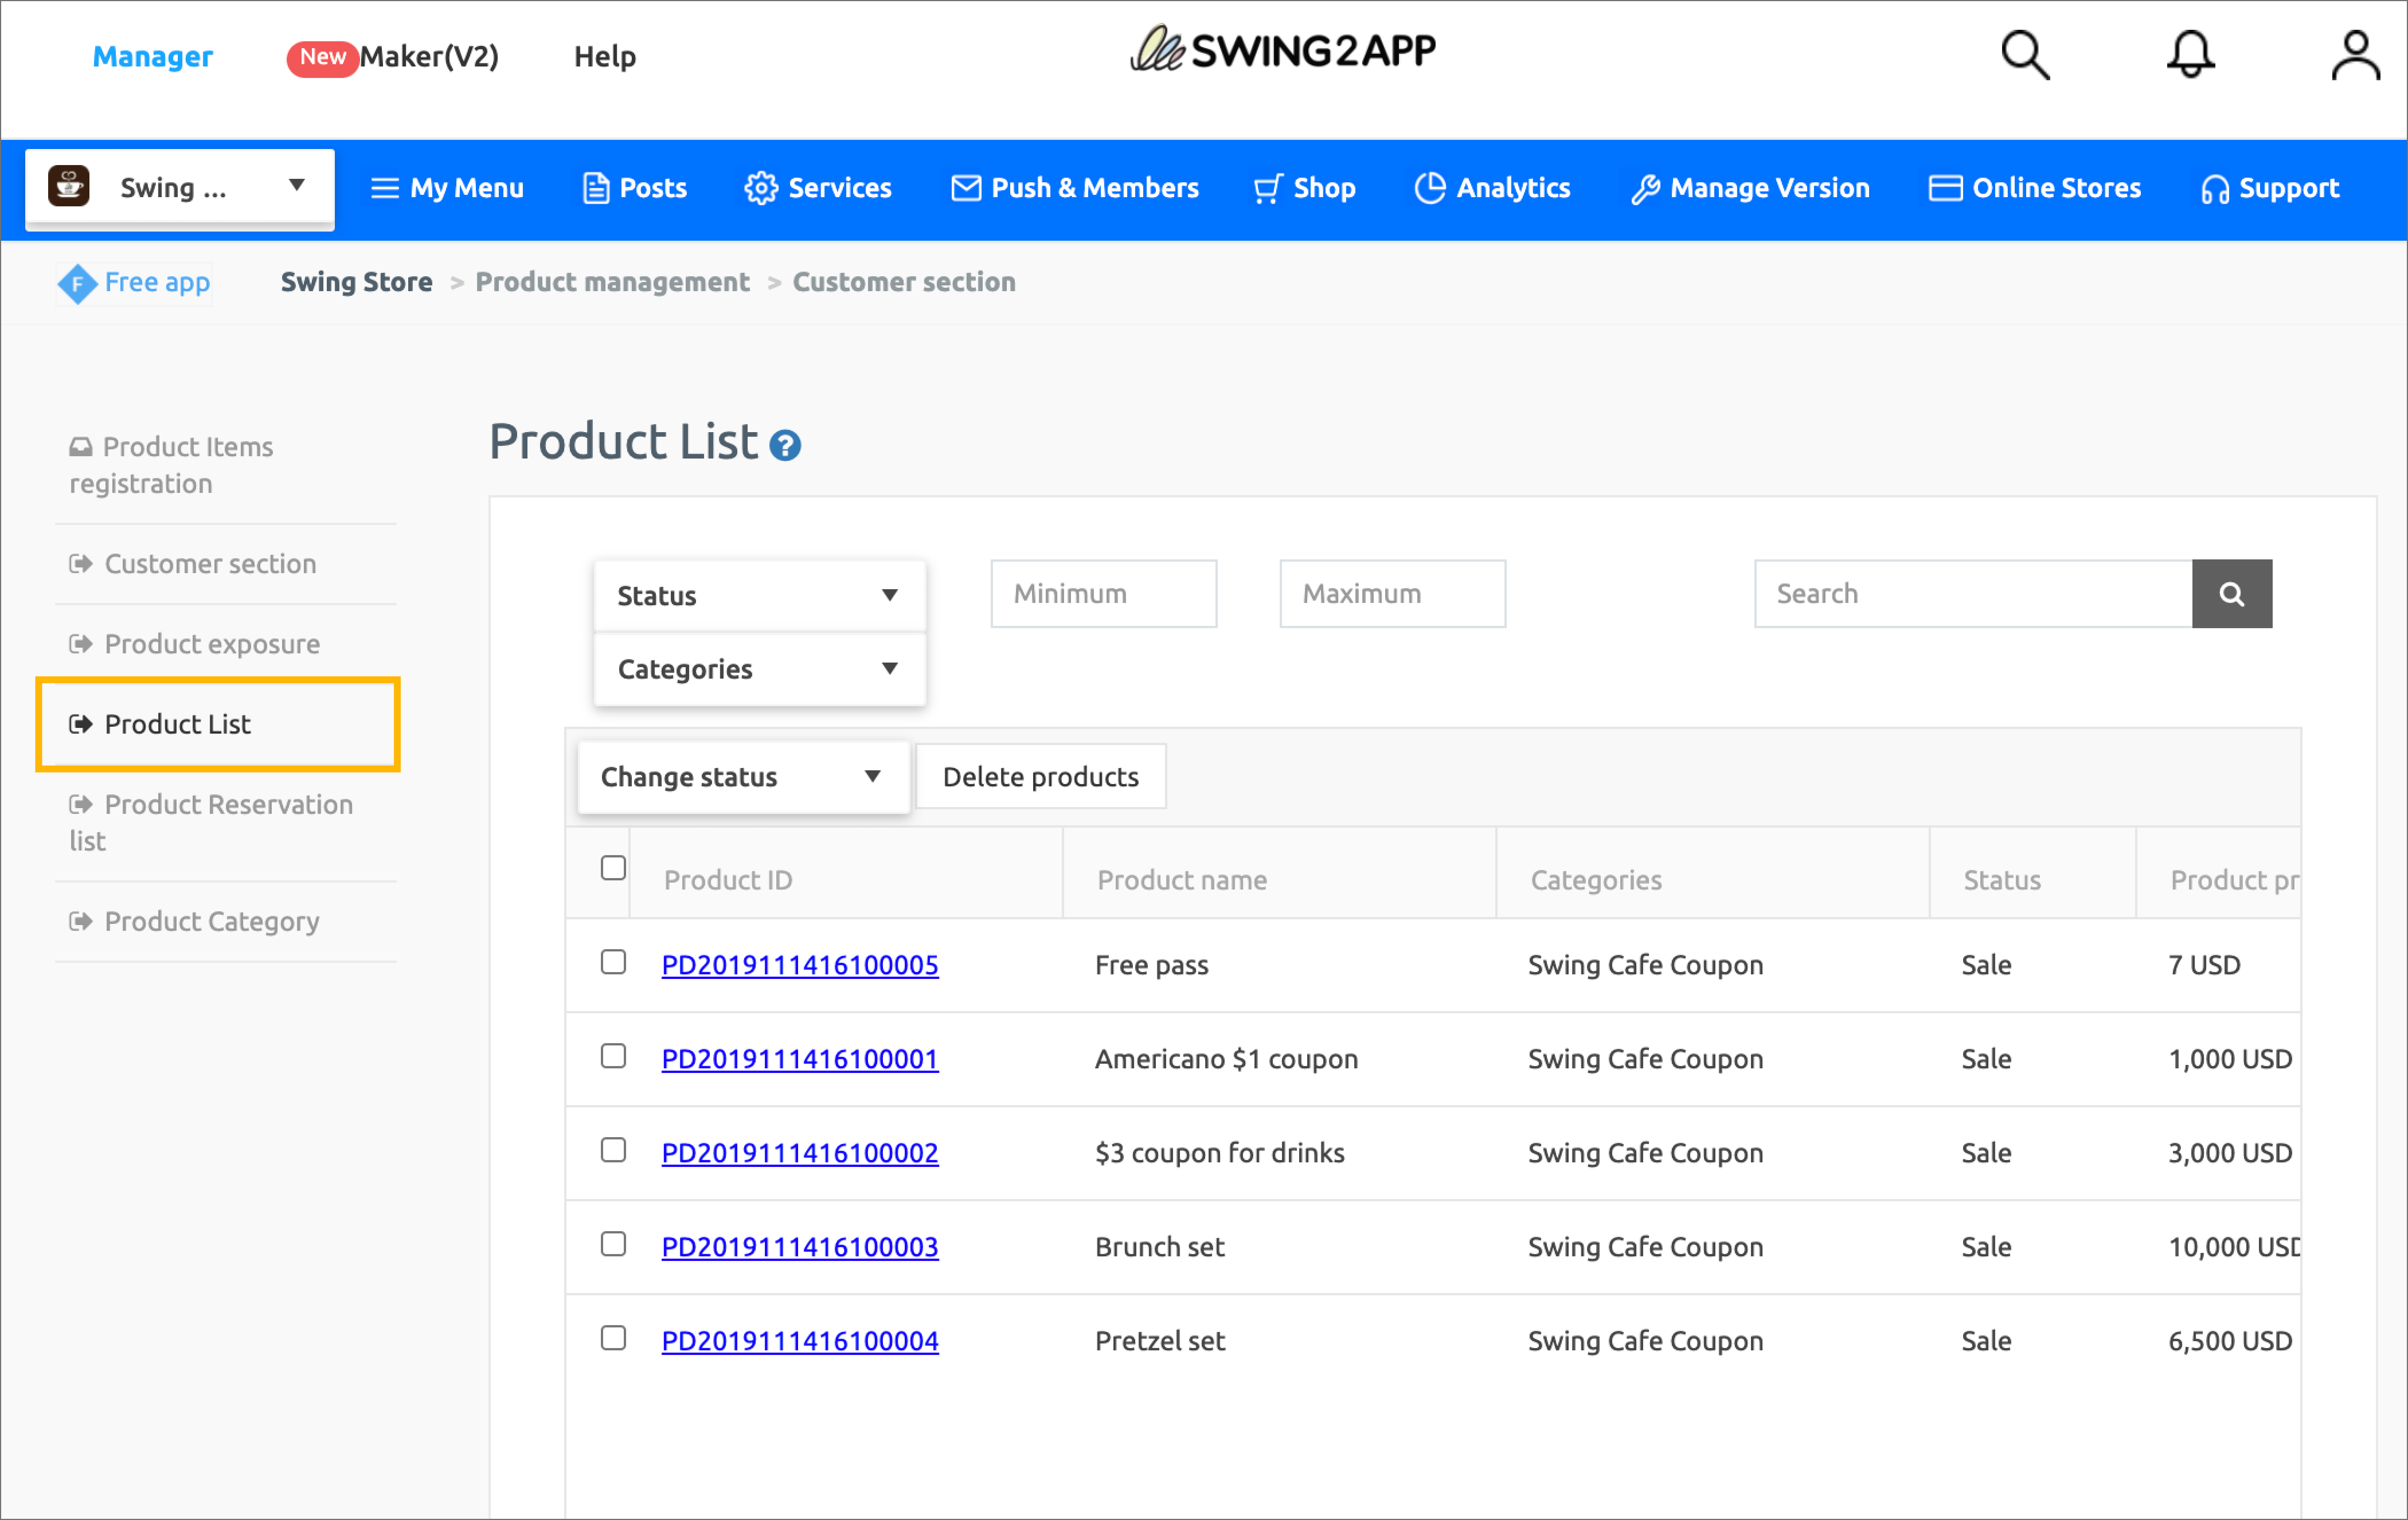
You can find a list of all the registered products in the Product Search menu.

If you need to modify the content of the registered product, please select the product you want to modify with your mouse.

Go to the product registration modification screen.

STEP.4 Apply Product Categories to your App

Once you’ve registered your digital product above, we’ll apply a page in the app where you can purchase the actual products.

01. Applying product categories

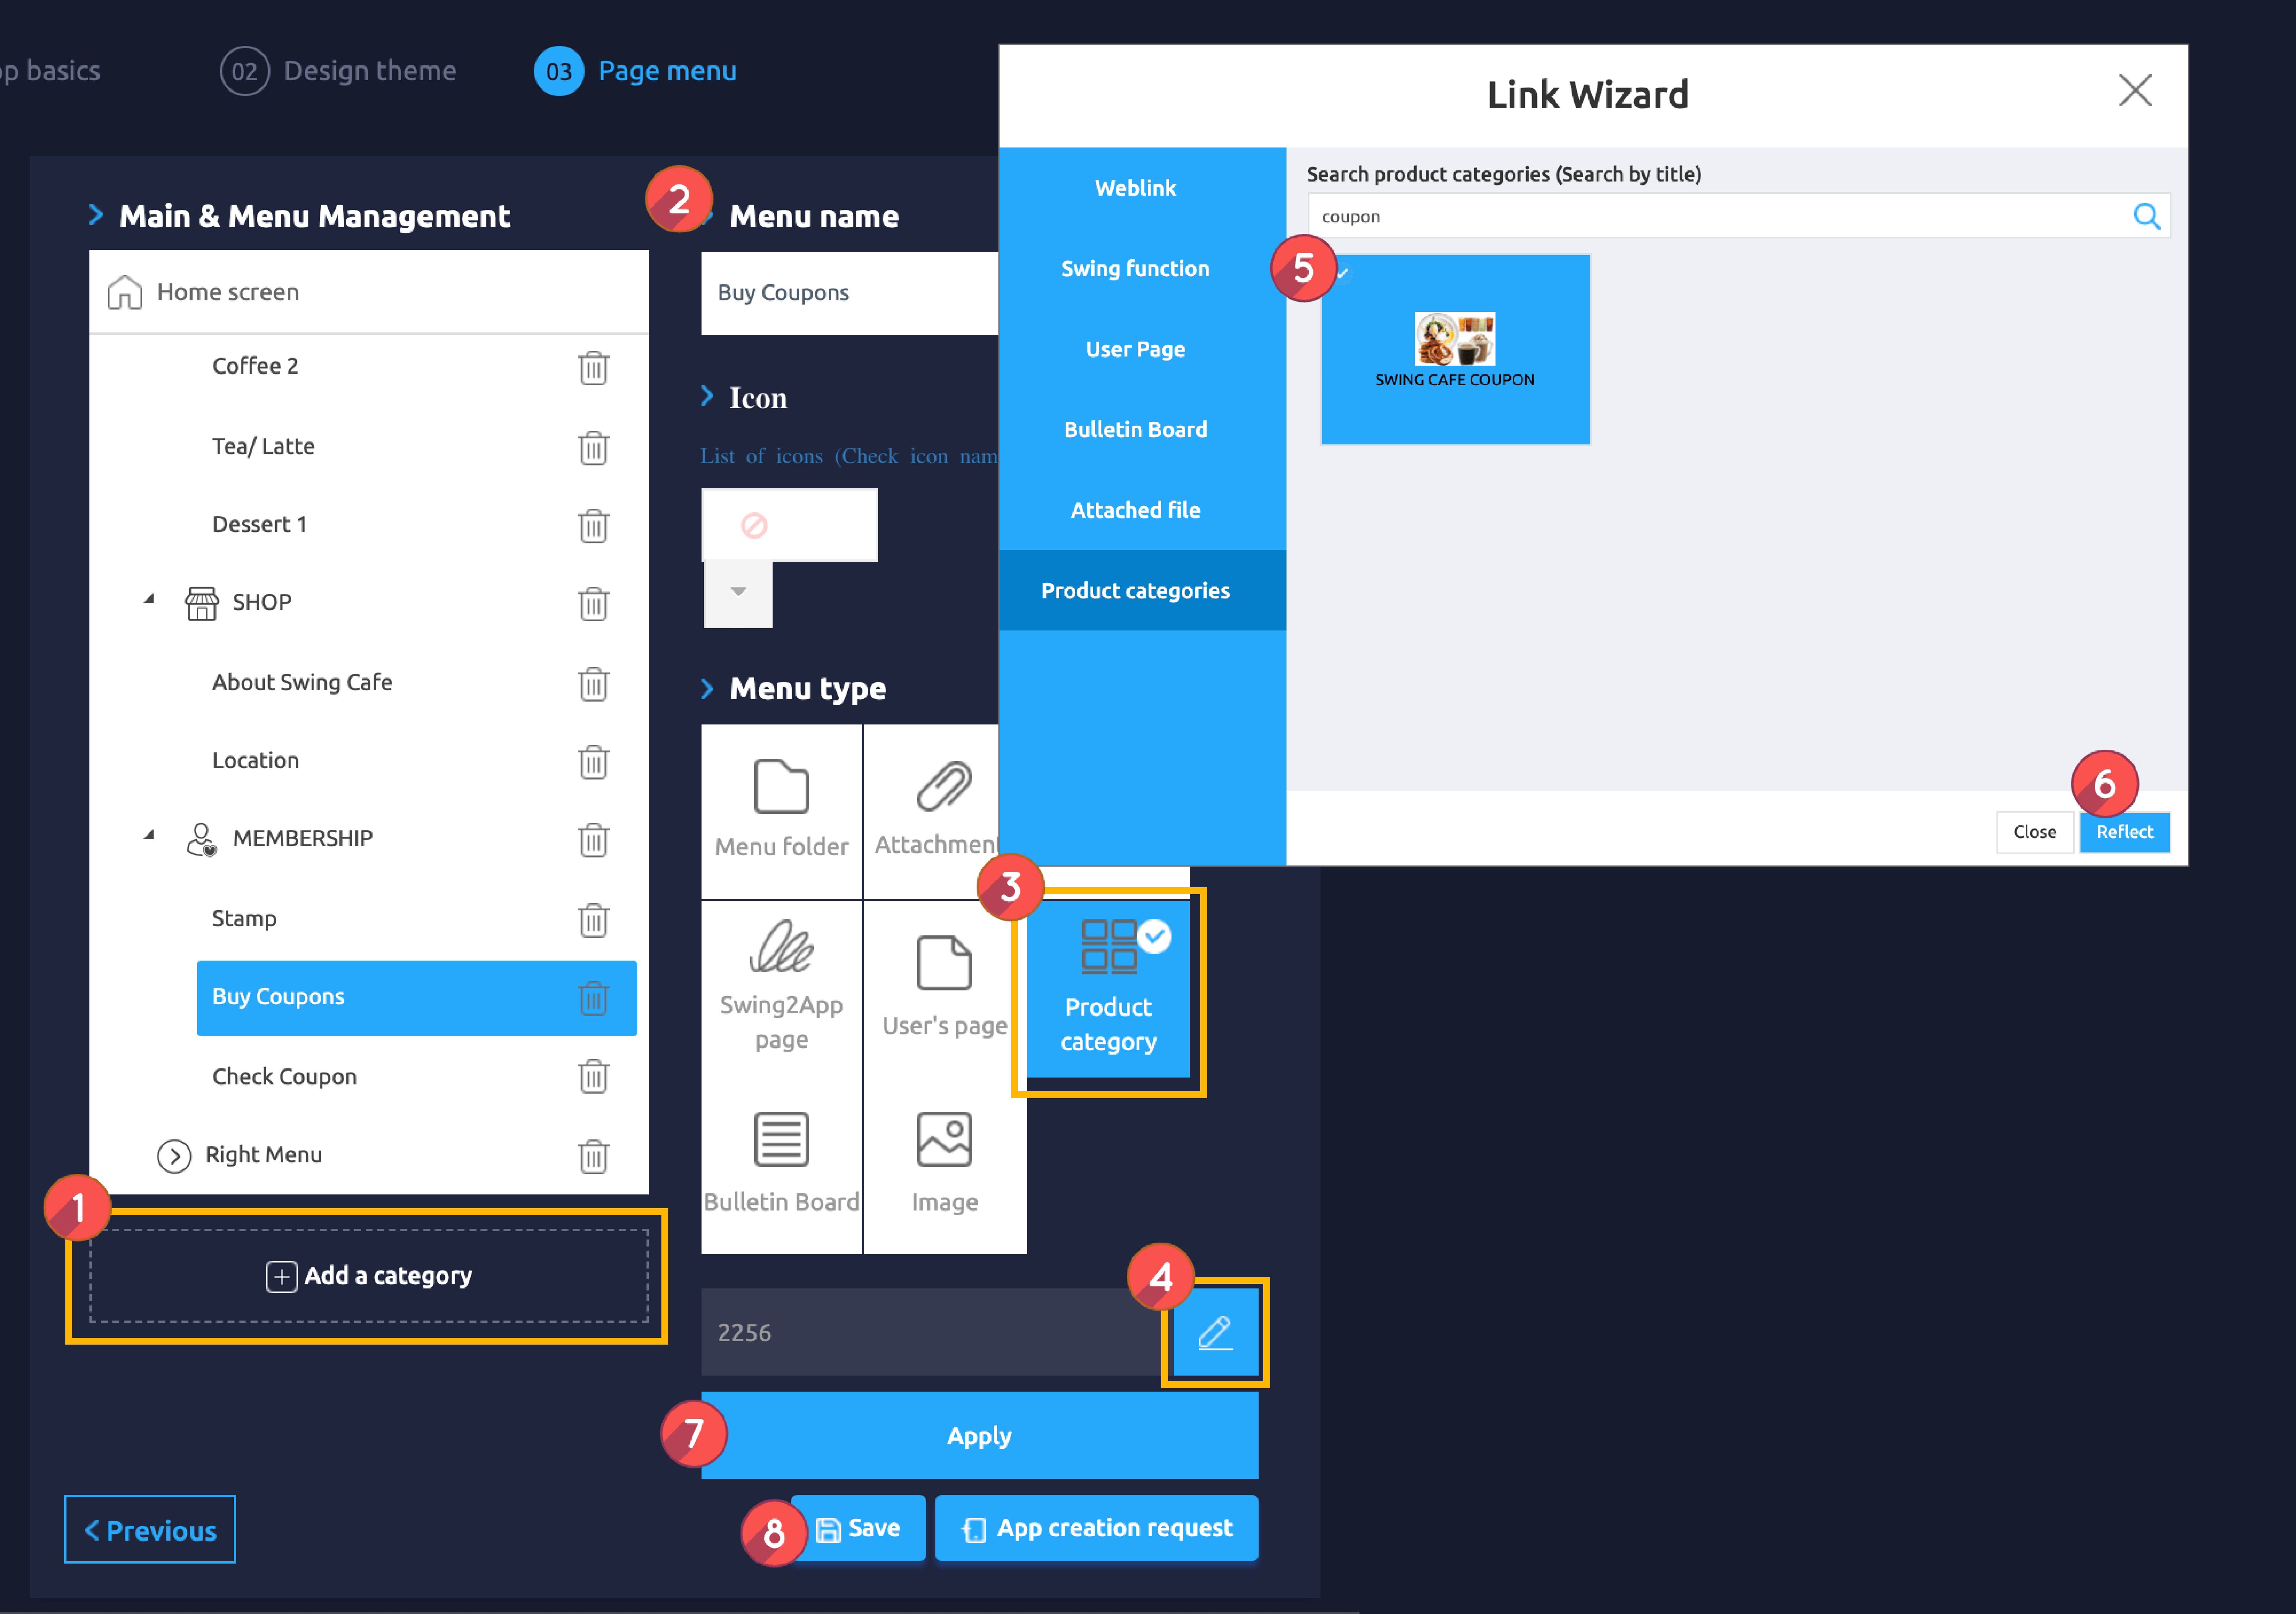
Please go to the Maker(V2) page.

  1. Move to the page menu step of the app production step. Click the Add New Category button on the Main Menu to add the menu.

  2. Enter a name in the menu you created.

  3. Select the Product Category in the menu type.

  4. Click on Link Wizard and add enter the web link address (URL).

  5. Search for the product category you want to assign.

  6. Select Reflect.

  7. Select the Apply button.

  8. Press the Save button.

[App Launch Screen]

Product category is the style in which the category is configured in the menu.

When applying the “Swing Cafe Coupons” category to the app, a list of categories will be displayed and you can see the products listed in that category.

So it can be applied when you want to show your products by category.

When you select a product, go to the purchase page.

02. Apply as a template page
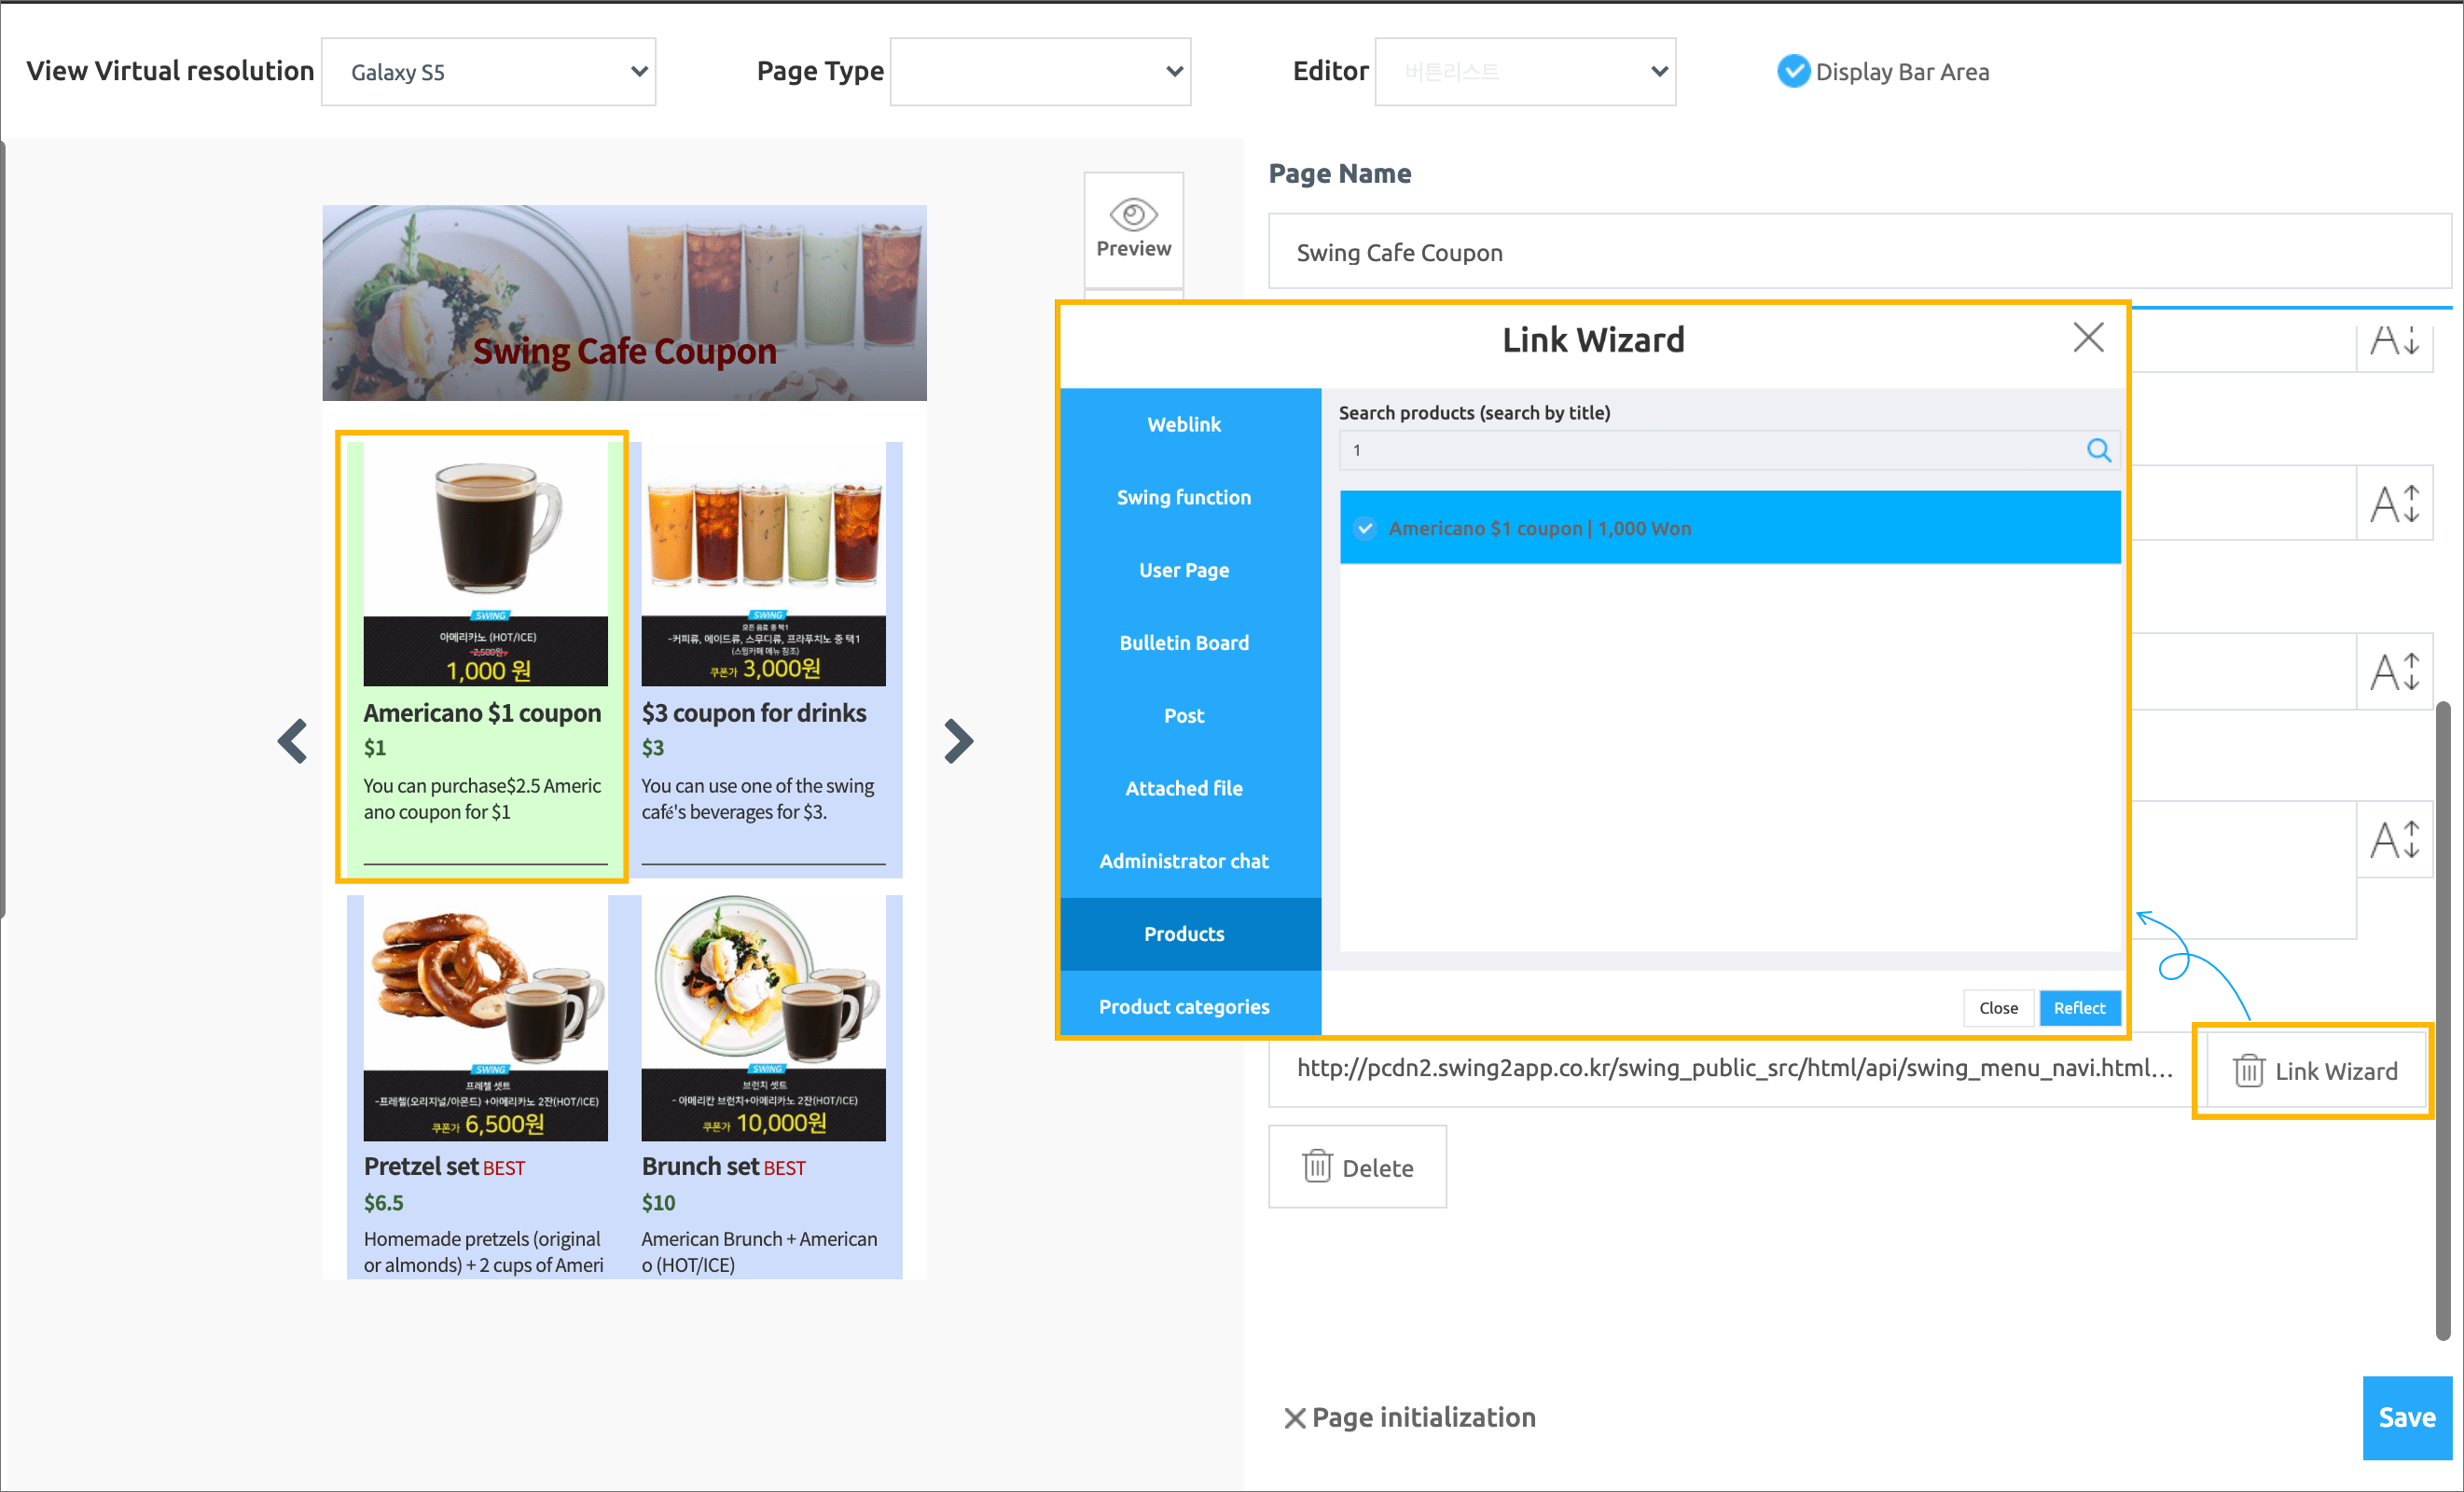
[App Launch Screen]

Swing Cafe Sample App created a coupon purchase page by applying the [Web Template Page].

I’ve entered coupon images, prices, and contents in the template.

When you touch each list, it was applied using the link wizard to go to the product purchase page.

STEP.5 Swing Cafe Sample App) Check your purchase of coupons

Please check how the coupon digital product is registered in the app through the Swing Cafe sample app.

You can also find out how to purchase and redeem coupons through the sample app.

Purchased coupons can be found through coupon confirmation menu.

*Coupon confirmation menu can be applied on the app production page – page menu – swing2app page!

Available coupons and used coupons are shown.

★ How to use coupons

How can I process user coupons? You can apply the use of the coupon through the serial number listed on the coupon.

*Please check the manual link below to see how the administrator can process the user’s coupon usage!!

☞

\

▶

How to apply for Swing Shop
View how the coupons are issued and used