Swing2App Manual
Help CenterFAQContact UsBuild an app
  • Swing2App
  • Swing2App Update
  • FAQ
    • FAQ(Frequently Asked Questions)
      • Frequently Asked Questions (FAQ)
      • App Creation FAQ
      • App Operations & Features FAQ
      • App installation and download FAQ
      • Registration and Login FAQ
      • App Preview FAQ
      • Swing Shop FAQ
      • Billing FAQs
      • Paid App Passes & Tickets FAQ
      • Paid usage and uploading FAQ
      • Unlimited Usage and Package FAQ
      • Push sending FAQs
      • PlayStore FAQ
      • App Store FAQ
      • AdMob FAQ
      • Affiliate Program FAQ
      • Customization FAQ
  • Manual
    • App production manual (V3)
      • Start App Creation With MakerV3 Screen
      • Manual on How to Create an App In MakerV3 Screen
      • STEP1 Basic Information
      • STEP2 Prototype
      • STEP3 Page
        • How to Create a Home Screen For an App
        • Registering a menu icon image
        • How to use: Menu Exposure Settings
        • Set menu settings: Access permissions
        • Page Design - UI KIT
        • Page Design - eStore Page
        • Page Design - eStore Deals
        • Page Design - Product Category
        • Page Design- Page Templates
        • Page Design - Image Page
        • Page Design - HTML Editor
        • Page Design - Sign Up, login & Settings Page.
        • Page Design - Search Posts Page
        • Page Design - View Favorite Page
        • Page Design - View Coupons Page
        • Page Design - Share Your App Function
        • Page Design - App Introduction Page
        • Page Design - Admin Chat Page
        • Page Design - Chat List Page
        • Page Design - Surveys Page
        • Page Design - View My Posts Page
        • Page Design - Attendance Check Page
        • Page Design- Web Link
      • STEP4 Complete App Creation
        • How to create an additional app
        • How to update an app
        • App launch screen by update type
    • App production manual(V2)
      • App basics
        • Guide to create an app
        • App Update Type And Method
        • App Launch Screen Update Type
        • Push or WebView version creation method (super simple app creation)
        • WebView App Manual(production and operation)
        • Push App Manual(production and operation)
        • Remove Push App Toolbar
        • App Production
        • Guide to create App Icon Image
        • Guide to Create an Idle Screen Image
        • Image Editing Tool
      • Design Theme
        • Prototype UI Design
        • App Main Design Style
        • App Navigation Styles
        • Applying Slide Prototype
      • Page Menu
        • Page Menu – Main Menu Management
        • Creating an App Home Screen
        • How to use Web Link
        • Home screen: Applying App Introduction Page
        • How to use file attachment
        • How to use the image attachment
        • How to use Product category
        • How to use Weblink-linkeditor
        • How to use User Page
        • How to create an Image Page
        • How to create a web template page
        • How to create HTML editor page
        • Swing2App Page – Signup, Login, Settings
        • Swing2App Page – Search Post
        • Swing2App Page – View Favorites
        • Swing2App Page – View Coupon
        • Swing2App Page – Share App
        • Swing2App Page – App Introduction
        • Swing2App Page – Admin Chat
        • Swing2App Page – How to read my article
        • Swing2App Page - Survey
    • App Production Application TIP
      • Sending a push using the push API
      • Insert GIF image
      • Create a Flash style home screen
      • Change App Loading Icon
      • Set device mode (switch app screens)
      • How to use the app review button
    • App operation manual
      • Bulletin board management
        • Create a bulletin board
        • Bulletin board type, design style
        • Bulletin Board – How to Enter Posts
        • Bulletin Board – Post Schedule Settings
        • Set post detail options
        • Bulletin Board – How to Attach Files
        • Register video post(how to register a video)
        • Bulletin Board – How to Attach Music Files
        • How to enter post comments and comments
        • How to set up Bulletin Board Permission
        • Bulletin board authority setting
        • How to create a Form in Bulletin Board
        • How to write a bulletin board
        • How to use the list screen and creation screen
        • How to set up a bulletin board post alarm
        • Set Up a Board Administrator
        • Google Map Bulletin Board
        • Google Map Bulletin Board Advanced setting
        • HTML Editor Writing
        • Report and manage posts
        • Block posts
        • Create bulletin board by membership level
        • Bulletin board thumbnail image registration
        • Search Post Functions
        • Post Management Options
        • How to use the bulk registration bulletin board
        • Copy Bulletin Board
        • Copy Post
        • Move a post
        • How to delete bulk posts
        • Group Chat
        • Create a Secret Bulletin Board (1:1 Customer Service)
        • Create a link for a post
        • How to Use Calendar
        • Calendar Application - How To Use
        • How to create and register a stamp
        • Stamp application: Issue coupons upon completion of stamps
        • How to use the bulletin board header
        • Using 2 hash-tags Options
        • How to use hashtag search option
        • Download Posts
      • Service management
        • How to use Pop-up
        • Check-ins
        • Surveys
        • Resource Management – Capacity Management
        • Coupon Management: Create and Issue Coupon
        • How to use Admin Chat [1:1 Chat]
        • Chat Administrator Page – Chat List
        • Chat Administrator page – Chat settings
        • How to use chat list
        • Unified Notification Settings
        • App Policy Management – App Subscription Policy
        • App Terms of Use And Privacy Policy
        • App Policy Management-Membership Form
        • App policy management – How to set up a membership completion message
        • Membership Form-ID Setting
        • App Terms and Conditions, Privacy Policy
        • Create a Private App
        • App string management
        • Link Wizard
      • Push & Member Menu
        • Send push
        • Send Push from Push Version App
        • Push Posts
        • Display messages after getting push notifications
        • Delete or Mark as Read Push Notifications
        • Push history
        • Member Inquiry - Check Member Information
        • Member Inquiry - Setting up an Associate Administrator
        • Member Inquiry - Create User Account
        • Setting up an App Administrator
        • Permission Group Settings-Membership Rating
        • Admin Screen: Change App member's name
        • How to use Push device management
      • Analytics
      • Version control
        • Version management-App production and market registration history
        • How to apply for App Store Upload
        • How to apply for Google Play Store Upload
        • How to apply for a mobile web upload
      • Payment
        • Introduction of paid products and payment methods
        • Payment-How to use my payment status
        • How to Use 1000 SMS Tickets
        • WebView Lifetime Paid App
        • PushOnly Lifetime Paid App
        • How to use mobile web registration
        • Budget package
        • AdMob Power Package
        • Large Storage Packages
        • Online Stores – Coupon
      • Full Search Function
    • SwingShop
      • Apply for Swing Store
      • Swing Store Product Type
      • Introduction of pages provided by Swing Shop
      • How to Apply a Swing Store Menu to your App
      • Swing Shop - Shopping Mall Main Page How to Use
      • Shopping Mall Main Page Slide Image
      • Store Management - Basic Information Settings
      • Store Management - Shipping Management
      • Product Management - Set how to receive goods
      • Product Management - Product Category Registration
      • Store Management-Policy Settings
      • Product Management - Physical Product Registration
      • Product Management - Digital Products: PDF File Registration
      • Product Management - Digital Products: Video Files Registration
      • Product Management-Digital Products: Authorized Sales
      • Product Management-Digital Products: Coupon Registration
      • Product Management-Reservation system product registration
      • Product management - Reservation system, Time reservation product registration
      • Product management-Reservation System Operation TIP
      • Product Management - Product Post Management
      • Product Management- Product Inquiry, Reservation Product Inquiry
      • Product Management - Product Exposure Management
      • Order Management
      • Reservation Order Management
      • Store Statistics
      • Swing2App Page-shopinfo
      • Swing2App Page-Search
      • Swing2App Page - Category List
      • Swing2App Page-mypage
      • Swing2App Page - Cart
      • Swing2App Page-digital products
      • Product Modification - Modify a registered product
    • Affiliate program
      • How to apply for affiliate program
  • Web App - Webview, Push
    • Web App - Webview, Push
      • Swing2App WebView App
      • Swing2App Push App
      • webview app manual
      • Pushapp manual
      • How to create a push app or webview app easily
      • Push-app toolbar
      • How to use the first run address in webview and push app
      • WebviewApp basic settings and advanced setting options
      • Push App Toolbar - Introduction: How to Use and Functions
      • Registering a Push Notification Icon Image
      • Progress Bar Color Settings
      • Remove progress bar (not in use)
  • App Guide
    • How to use Swing2App Preview
    • Application operation
      • How to convert and use paid apps.
      • How to install APK file on your phone
      • How to install apps by sharing
      • Free app conversion method after Paid period ends/expires
      • Download the app after accessing the mobile Swing2App site
      • Download the app using the app installation link address
      • If you can not install the free version of the app (APK file), please check!
      • If you can not install the paid version app (APK file), please check!
      • Find App Password
      • Registering and changing your app profile picture
      • How to re-register with the same ID after leaving the app
      • Share app
      • App – Share your Bulletin Board Posts
      • How to use the App Administrator menu
      • App Administrator menu: Chat
      • App Administrator Menu: Registering Stamp
      • App Administrator Menu: Use Coupon
  • STORE
    • Play Store
      • How to create a Google Developer Account
      • Create a Google Developer - Business Account
      • Google Developer Account Identity Verification
      • Launching Play Store App
      • Setting up Play Store app auto-updates
      • Transfer your app to another developer account on the Play Store
      • How to change the name of Play Store Developer
      • Delete Play Store app
      • How to use Google Help Center
      • Issuing Google Maps API Key
      • Invite a Play Store Developer Account
      • How to get app updates released on the Play Store
      • Launch the Play Store Private App (Alpha release)
      • Check Play Store App Installs
      • Reply to Play Store app reviews
      • Play Store Developer Page
      • Play Store prior notice
      • Linking Play Store Privacy Links
      • Play Store App Search TIP
      • How to restore Play Store app
      • Update the Play Store App
    • App Store
      • App Store Apple Developer Account Registration
      • Check app store app downloads
      • How to use the App Store Customer Center
      • Delete apps from the App Store
      • AppStore App Rejection Cases
      • App Store TestFlight
      • How to invite Swing2App account on App Store Connect
    • AdMob (Google AdMob Ads)
      • Admob Banner Ad Frequency Settings
      • Admob Operation Precautions
      • How to apply AdMob plug-in
      • AdMob Plug-in check
      • What is AdMob plugin setting?
      • How to join AdMobs, create an Ad Unit ID
  • Developer Document
    • Server Side API Specifications
      • Sending a push notification By API
    • Webview (Webview, Push only) Development tool
      • Implementing Google and Facebook Login in WebView
      • Website Member Integration Guide
        • Wix Website User Integration Guide
        • WordPress Website Member Integration Guide
      • Javascript API Documentation
  • Policy
    • Store Policy
    • Limit on the Number of Devices for Free User
    • Swing Store Terms and Conditions
Powered by GitBook
On this page
  • 1. What is AdMob plugin settings?
  • 2. Advantages of the AdMob plugin setting function!
  • 3. How to Use the AdMob Plug-in Settings
Edit on GitHub
  1. STORE
  2. AdMob (Google AdMob Ads)

What is AdMob plugin setting?

Last updated 2 years ago

How to Use the AdMob Plug-in Settings

1. What is AdMob plugin settings?

After purchasing an AdMob plug-in product, you can set the ad-mob advertisement directly in the user’s app. Previously, it was done by applying to Swing2App. Users can now insert their own ad IDs and freely set up and use their ad exposure patterns.

2. Advantages of the AdMob plugin setting function!

1) You can expose/display front ads in any form at any time.

Exposing the first time you run the app? Expose when switching app screens? Expose at a set time? => The administrator can easily modify it any time. You can also expect advertising revenue accordingly.

2) If you need to change your ad ID, you can change it easily anytime.

3) If the advertisement needs to be stopped for a while, it will be reflected directly in the app if the exposure is only ‘not used’.

4) Users who run multiple advertised apps can manage them more easily from the AdMob plug-in settings page.

For each app, it is easier to check how the ad ID is and how the exposure pattern is set within the swing-to-app site without having to go into the official ad-mob site.

3. How to Use the AdMob Plug-in Settings

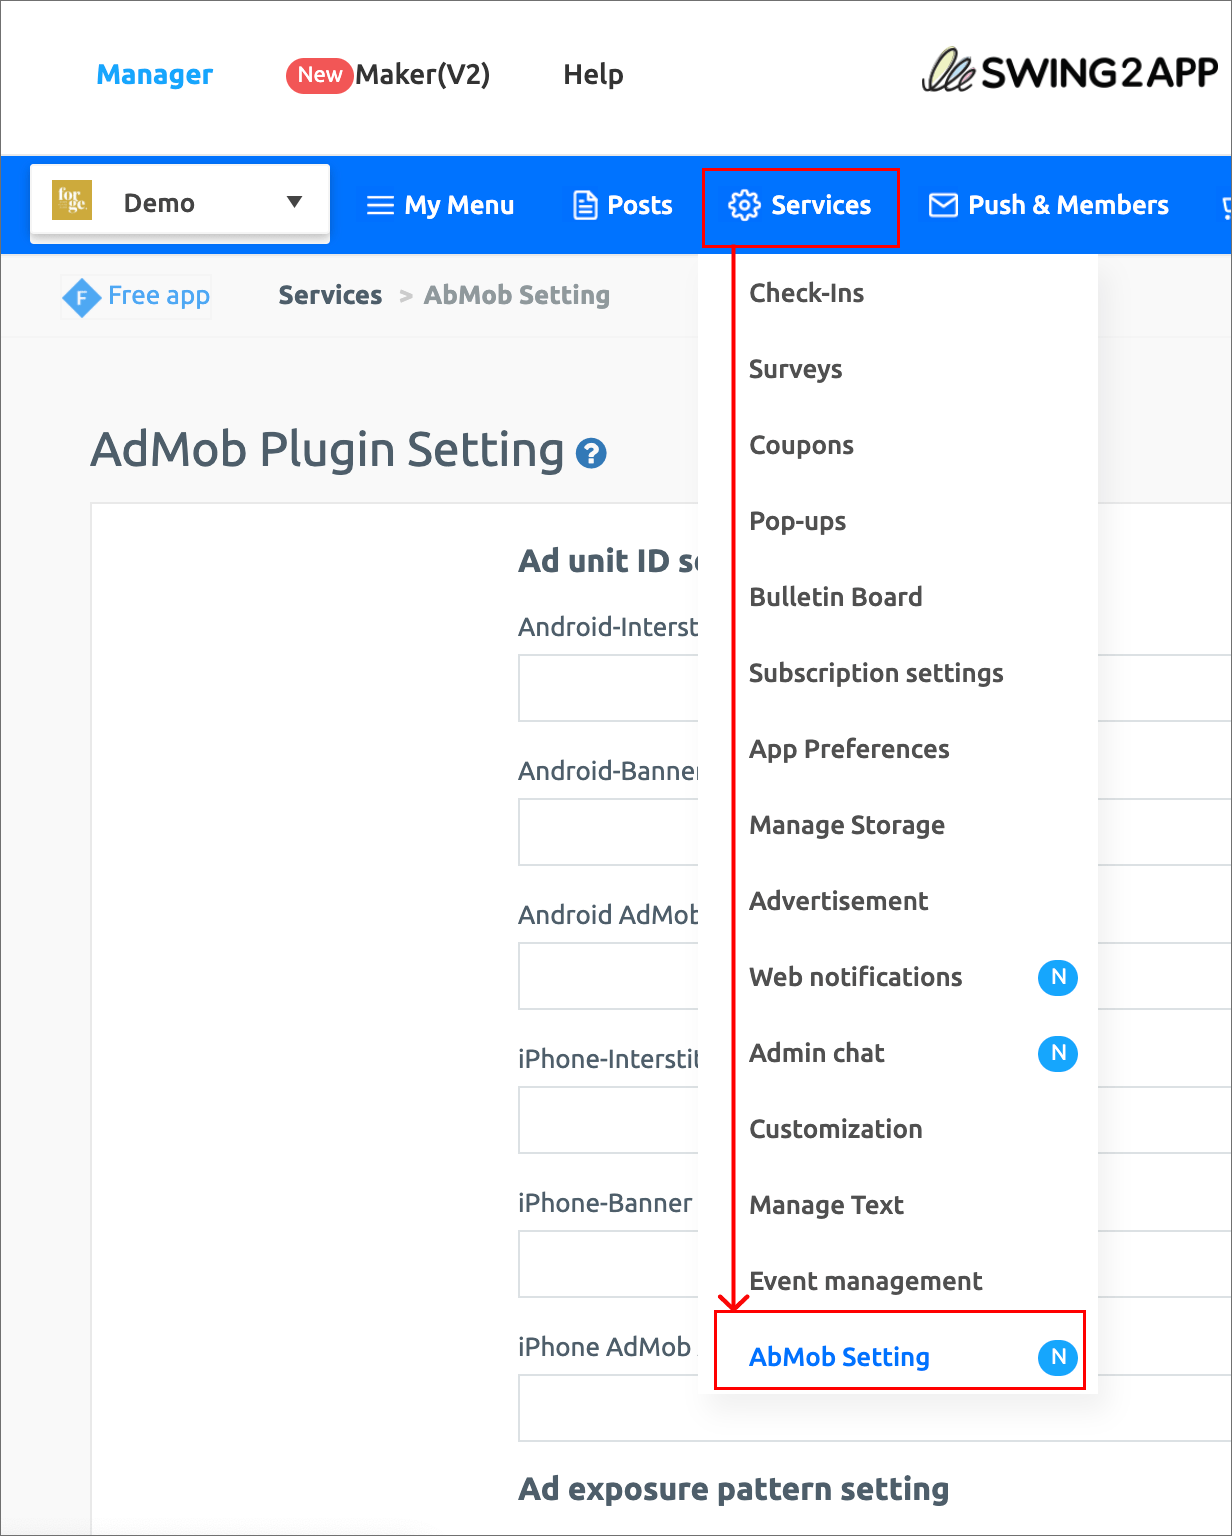
Go to Manager → Services → AdMob Plugin Settings.

*Only available to users who are using the AdMob service. You must purchase an AdMob plug-in to open that page!

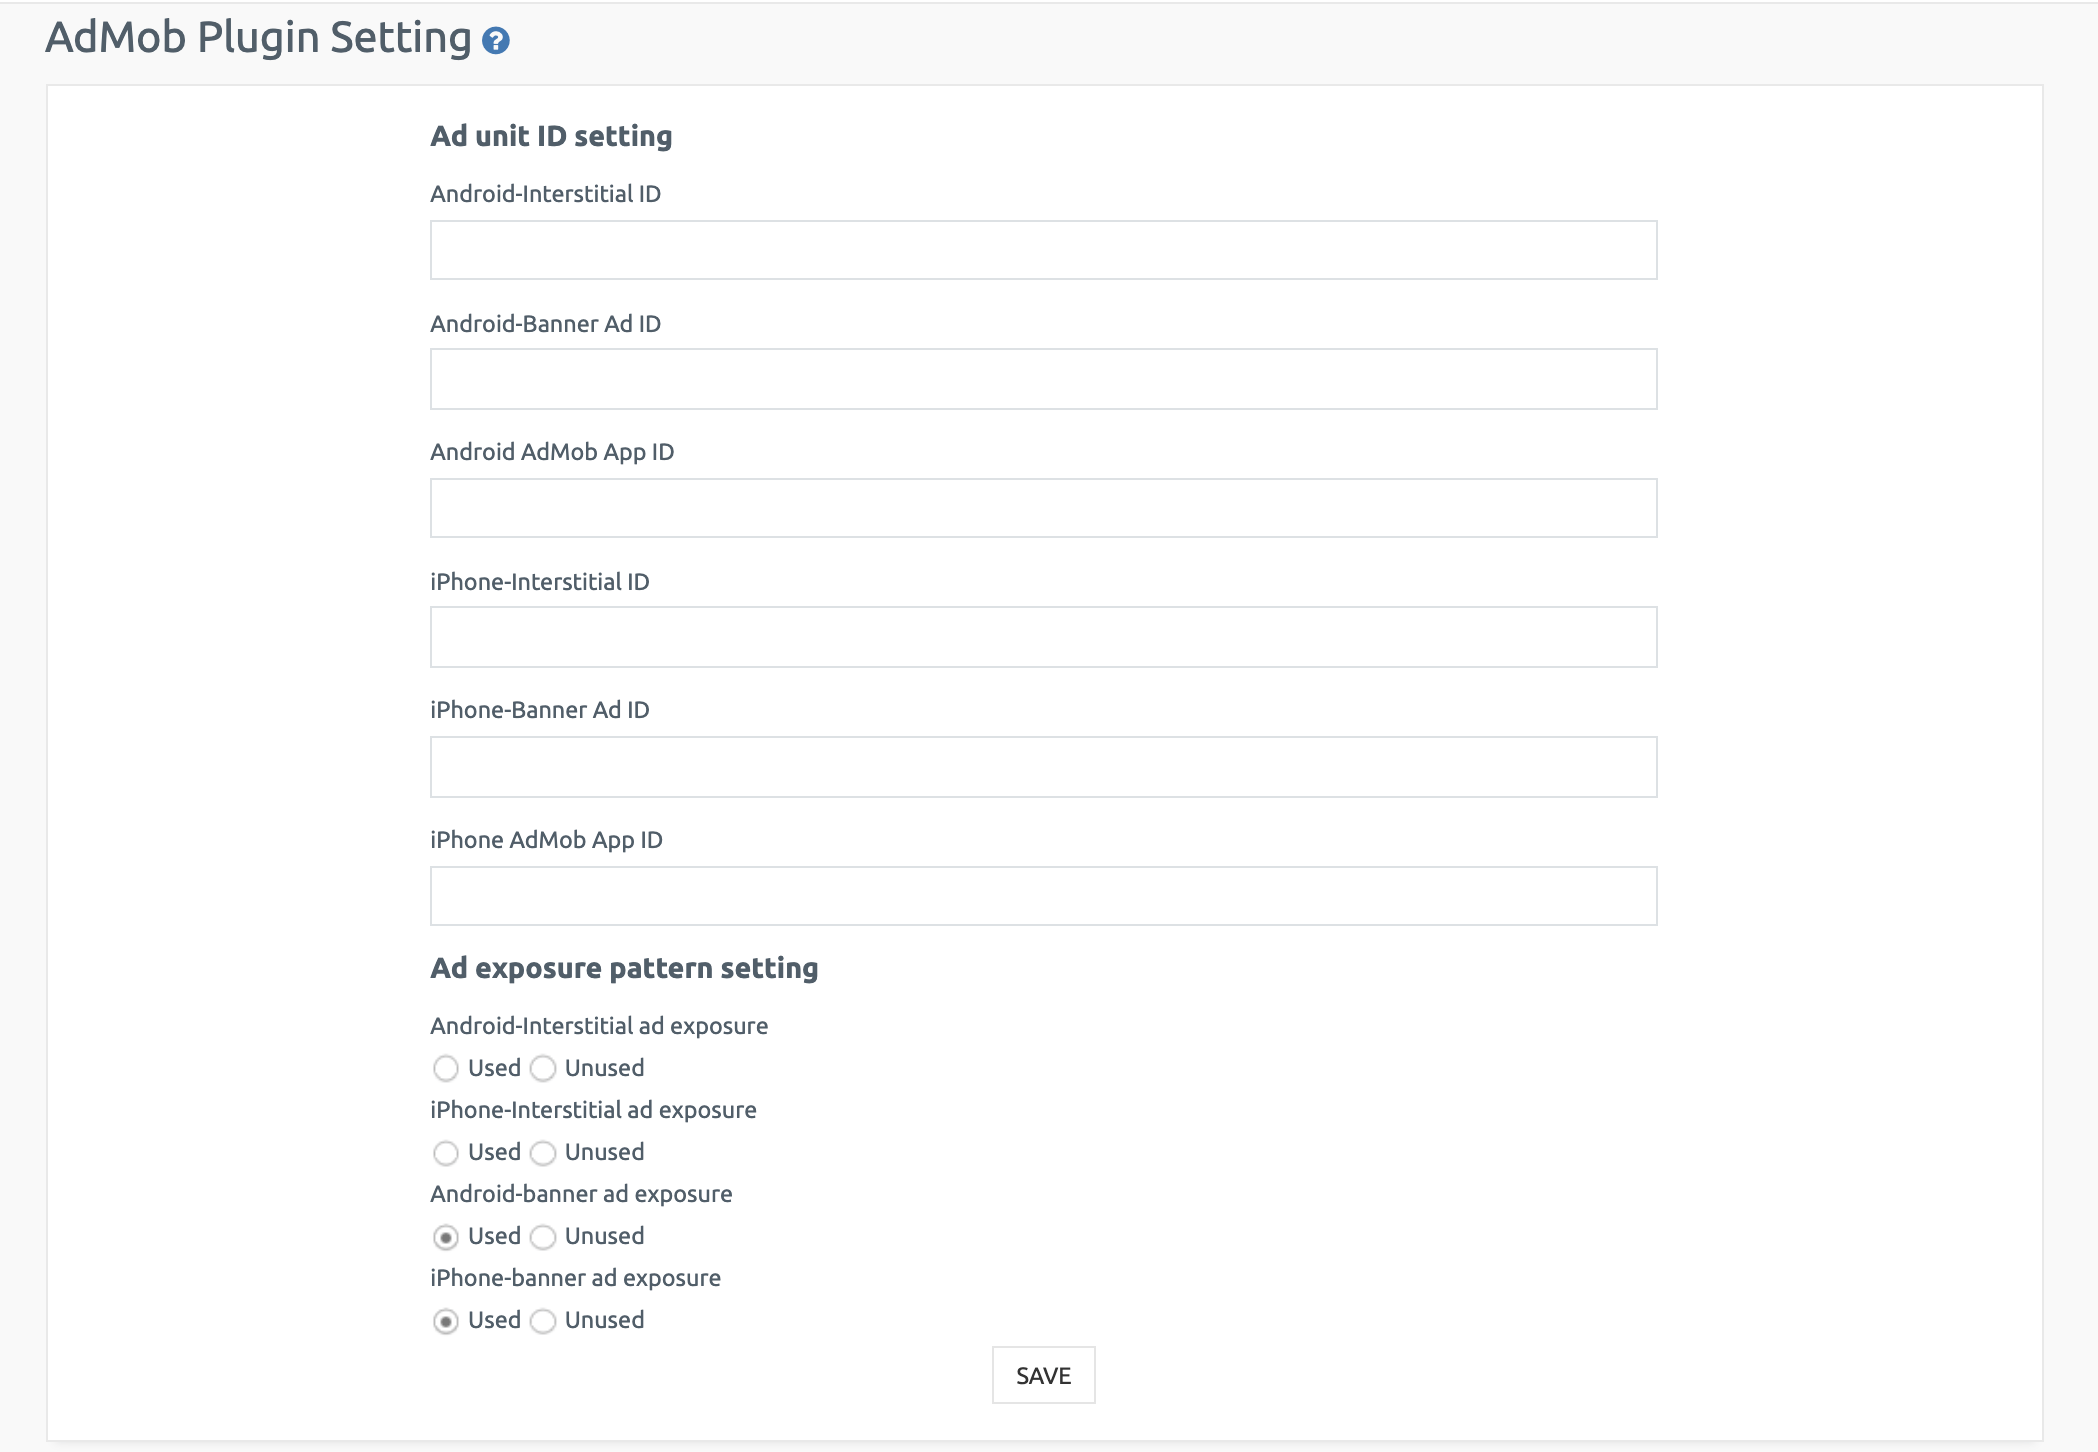
1) Ad unit ID setting

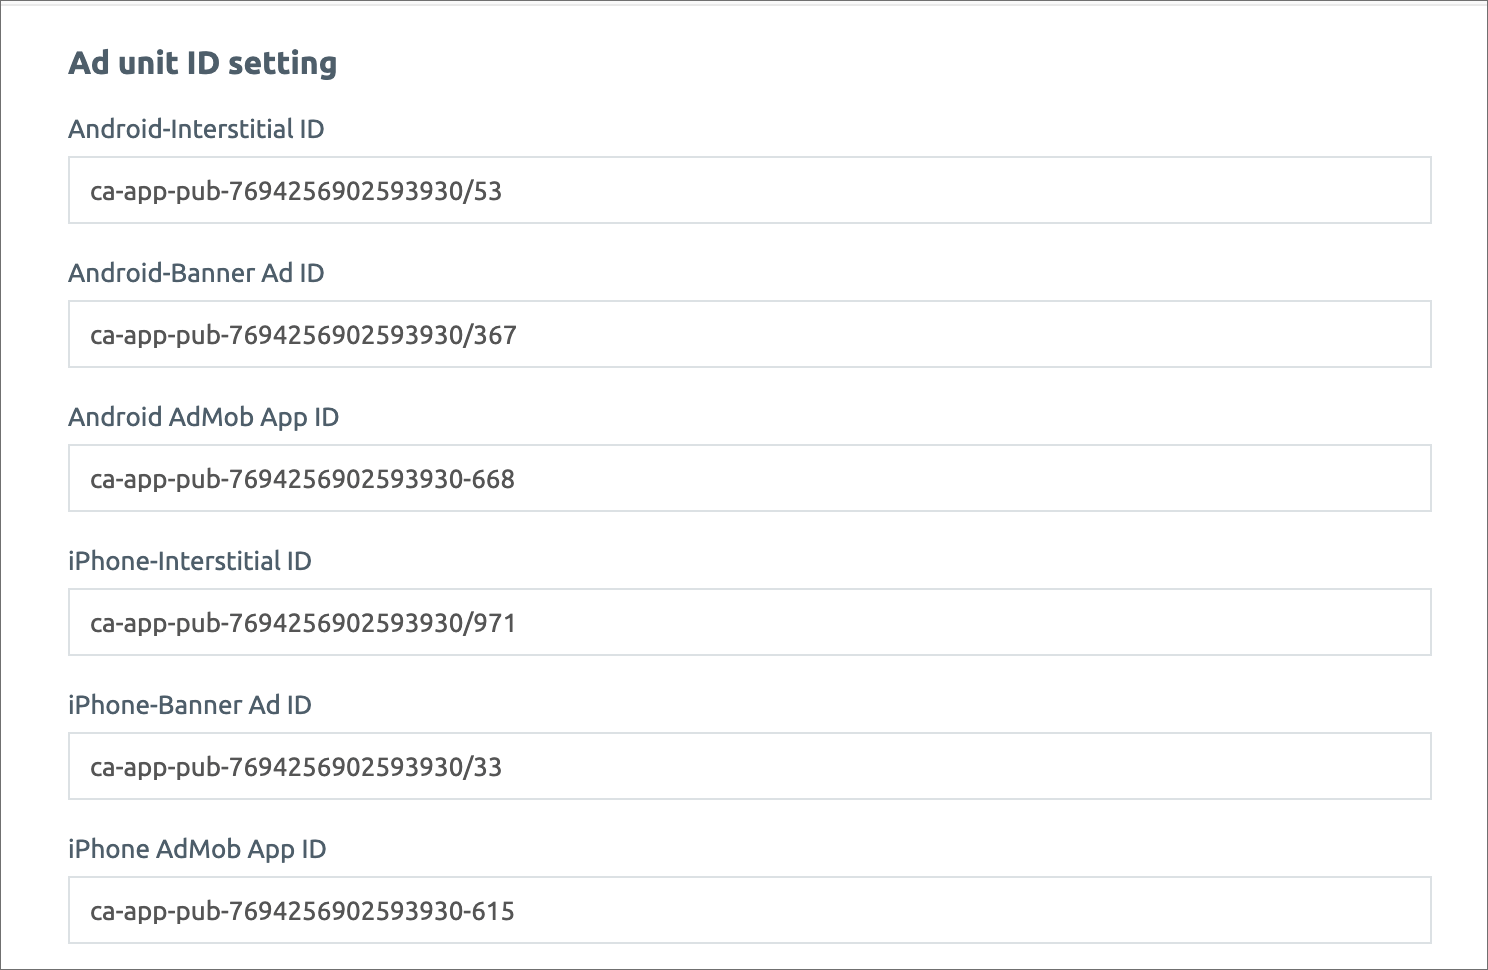
–Android interstitial advertisement, banner advertisement ID input

–iPhone interstitial advertisement, banner advertisement ID input

-Android, iPhone app ID input

Please check the posting below to make AdMob sign-up, make ad unit, and check the app ID.

☞Go to see how to sign up for Google AdMob and how to create an ad unit ID.

2) Ad exposure pattern setting

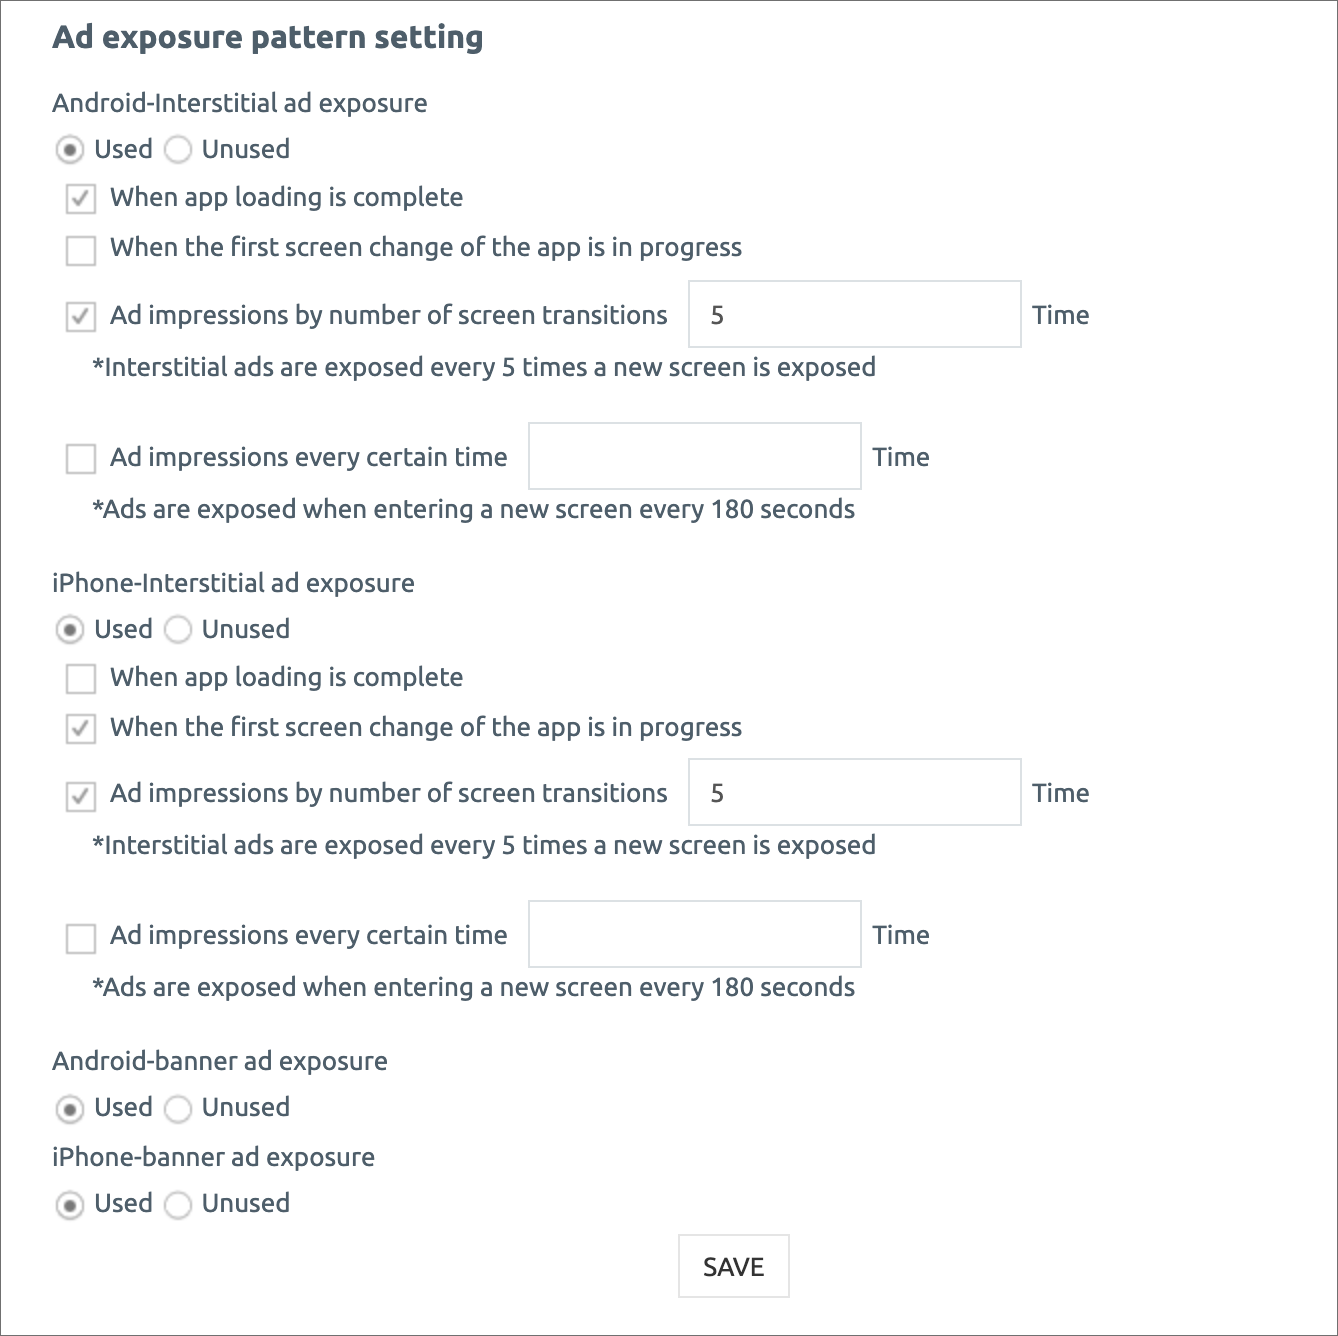
Please check both front and banner ads with ‘Used’ exposure.

*Front and banner ads are optional. You don’t have to expose both.\ You can selectively apply it by exposing only the banner or just the front.

Banner ads can be completed by checking for ‘used’ exposure. You can choose an exposure pattern for a full-page advertisement.

​

*Front ad exposure settings

1) Exposure of advertisements when launching the app for the first time ->Full advertisements are exposed when the app is first launched.

2) When switching to the app for the first time is in progress. ->After launching the app, a pop-up advertisement will appear once the screen is switched by selecting the first menu or page.

3)Exposure of advertisements by number of screen transitions ->You can set the number of ad exposures that appear as the screen transitions. When setting to ‘Example’5’, full-page advertisements are exposed when the screen is switched 5 times. 4) Expose advertisements every scheduled time ->If you set a schedule time, the full-page advertisement will be exposed after that time. Example) If you set it up for 60 seconds, the advertisement will be exposed 60 seconds after the app is launched. (Expose ad every 60 seconds)

​

*Can’t banner ads be exposed like full-page ads?

Banner ads are attached to the bottom of the app screen, so they are constantly exposed. Therefore, you do not need to set the exposure.

*Important*

Please be careful when setting up a full-page advertisement! Too many ads can increase the inconvenience of app users, leading to ad-spam reporting. If you receive a report, you can block the app ad from Google or delete the AdMob account itself if it is too much. Therefore, please manage the advertisement exposure properly so that there are no policy problems. Ad exposure by screen number of times + advertisement exposure every certain time is not recommended. If you set it up together, please set the number of times or exposure time for a long. *Please note that Swing to App will not solve the problem if the advertisement is suspended due to a violation of advertising policy.

How to set advertisements can be checked in detail by viewing the manual below.

☞ Go to see how to set up AdMob plugin advertisement

▶ Check the GIF) Let’s check if the advertisement is well displayed!

We used banner ad exposure to the app’s advertisement setting. Front advertisement is set to -> App on initial launch + App on screen 1 times. So, as you can see, when you launch the app for the first time, you can see a full-page advertisement. The full-page advertisement pops up when the screen changes 1 times by selecting the post. It’s so easy to download the app and see if the set ad works well~!^^

4. Guidelines

1) Only those who use the ad mob service after purchasing the AdMob plug-in will see the page. Existing ad mob users are also available.

2) Those who register for the first time and modify the advertisement for the first time should update the app to a new version after saving it.

3) Please check the existing users of the AdMob. If you modified the ad exposure pattern in the AdMob plug-in settings, please re-create the app. **First! Please re-create the app only in edit. After the first modification, you only need to save the next modification. -> If it’s on the Play Store or App Store, you need to update it to the newly created app with the modified ad settings.

4) Please check with new users who are planning to use it after the update New users don’t have to leave their applications on Swing2App after purchasing an ad-mob plug-in product. You can use the ad-mob plug-in setting screen after setting up the advertisement. *After applying ad-mob advertisement, click [App Creation Request] on the app production page and update it to the new version. You need to create a new app for the ad to take effect, and you can check the ad and release it in the App Store and Play Store. You just need to save it when you edit the advertisement later.

5)You can check the front advertisement pattern setting and set it in the form you want. You’re free to modify it at any time! Please re-produce the app only during the first setting. After that, you just need to modify it and save it. If you exit and re-run the app, it will be reflected in the changed advertising settings.

6)Please take care of it so that it doesn’t become a problem. You can edit your own exposure, so you can be greedy and expose too much. But if the ads appear too often, the app user can report them to Google. If you receive a report, you can block the app ad from Google or delete the AdMob account itself if it is too much. Therefore, please manage the advertisement exposure properly so that there are no policy problems.

*Please note that Swing2App will not solve the problem if the advertisement is suspended due to a violation of advertising policy.​