> For the complete documentation index, see [llms.txt](https://documentation.swing2app.com/llms.txt). Markdown versions of documentation pages are available by appending `.md` to page URLs; this page is available as [Markdown](https://documentation.swing2app.com/manual/appmanage/board/create-bulletinboard.md).
# Create a bulletin board
## STEP1. Create Bulletin board
### **1.** Create a board
To create a Bulletin board, follow the below step:

1. Go to **Manager.**
2. Select **Services.**
3. From the drop-down list, select **Bulletin Board.** A list of default Bulletin boards will open.
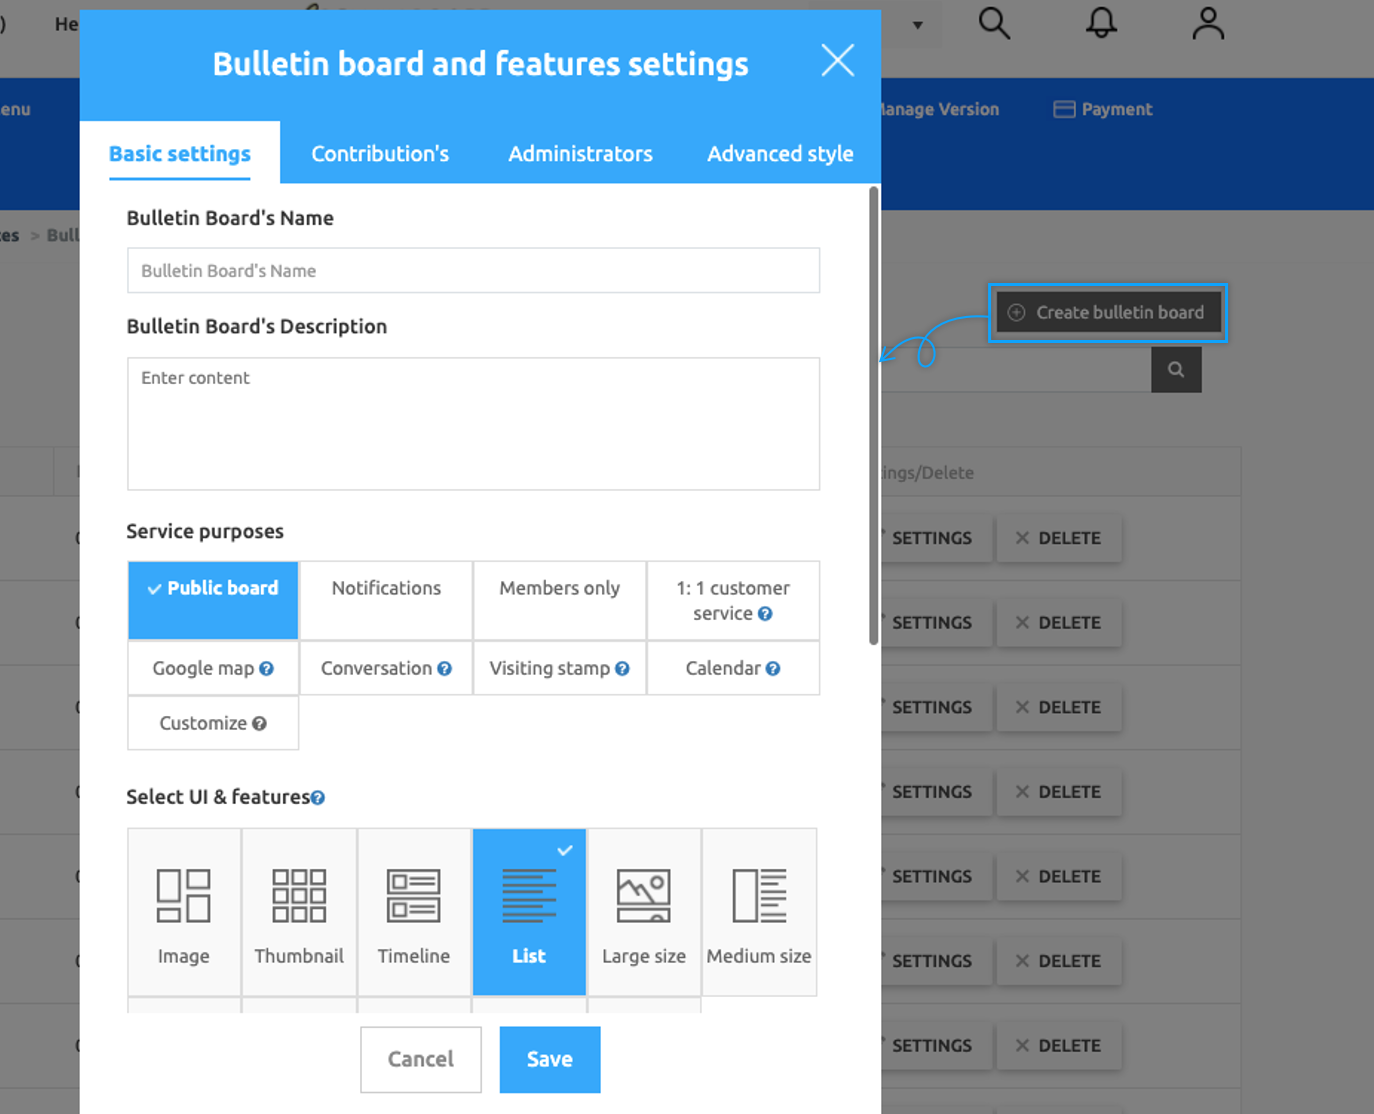
4. Click **Create Bulletin Board** on the top right corner of the Bulletin Board page.
5. **Bulletin Board and Feature Settings** window will open
> \*User list of bulletin board already present in the system. These are default bulletin boards provided by Swing2App. User may use these boards or can delete them.
>
> \*User can create bulletin board by either creating a new board from **Create Bulletin Board** or by clicking on **Settings** of default bulletin board.
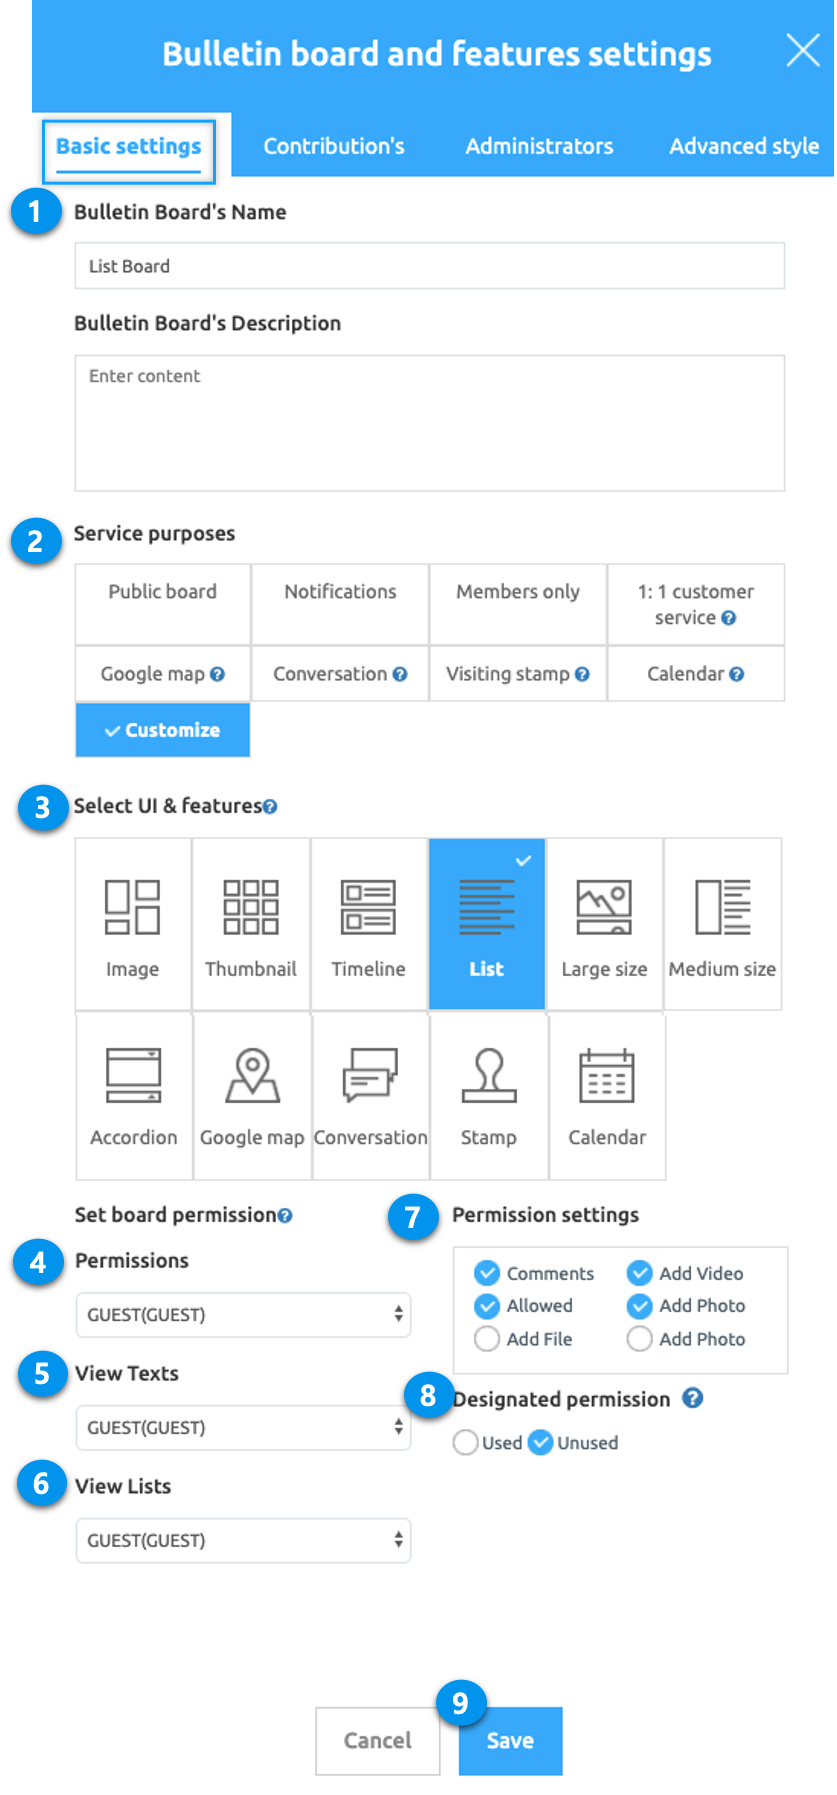
### **2. Bulletin Board and feature setting: Basic Setting**
Please follow the below steps:
1. Enter Bulletin Board’s name.
2. Select the purpose from Service purposes. (Some purpose options have predefined settings so you may customize it by selecting **Customize**)
3. Select the option from UI and Features options.
4. Set the permissions to write from Set Board Permissions.
5. Set the permission to View Text.
6. Set permission to View list.
7. Set the Permission Settings for uploading an image, video, adding the file, etc.
8. Select Designated permission(This option is to select whether to use the bulletin board only for a specific member group designated by the administrator).
9. Click **Save.**
**NOTE:**
* If the user selects Customize for service purposes, then the grey fixed area will be released. The user needs to edit the detailed settings further to create a board.
* If a separate group is not creating then the Set Board Permission(the 3 items are set to write, view detail, and view list) will only have options in the drop-down list as Administrator, User, and Guest.
* Set Tolerance: There are options such as comments, likes, photo attachments, video attachments, file attachments, and photo attachments. Please check the required option according to the app operation method.\ **\*Comments, likes, attach photos, attach photos -> Items available to users in the app**\ **\*Image attachment, file attachment -> item is registered and operated by the administrator only on the web, and cannot be used in the app.**
* This option is to select whether to use the bulletin board only for a specific member group designated by the administrator.
**☞** [**Go to the Board UI Style**](/manual/appmanage/board/bulletinboard-ui.md)
**☞** [**Go to Board Setting Permission**](/manual/appmanage/board/board-permission.md)
**☞** [**Use Board Authority**](https://github.com/kgitae7/swing2app_doc_en/blob/main/manual/appmanage/board/broken-reference/README.md)
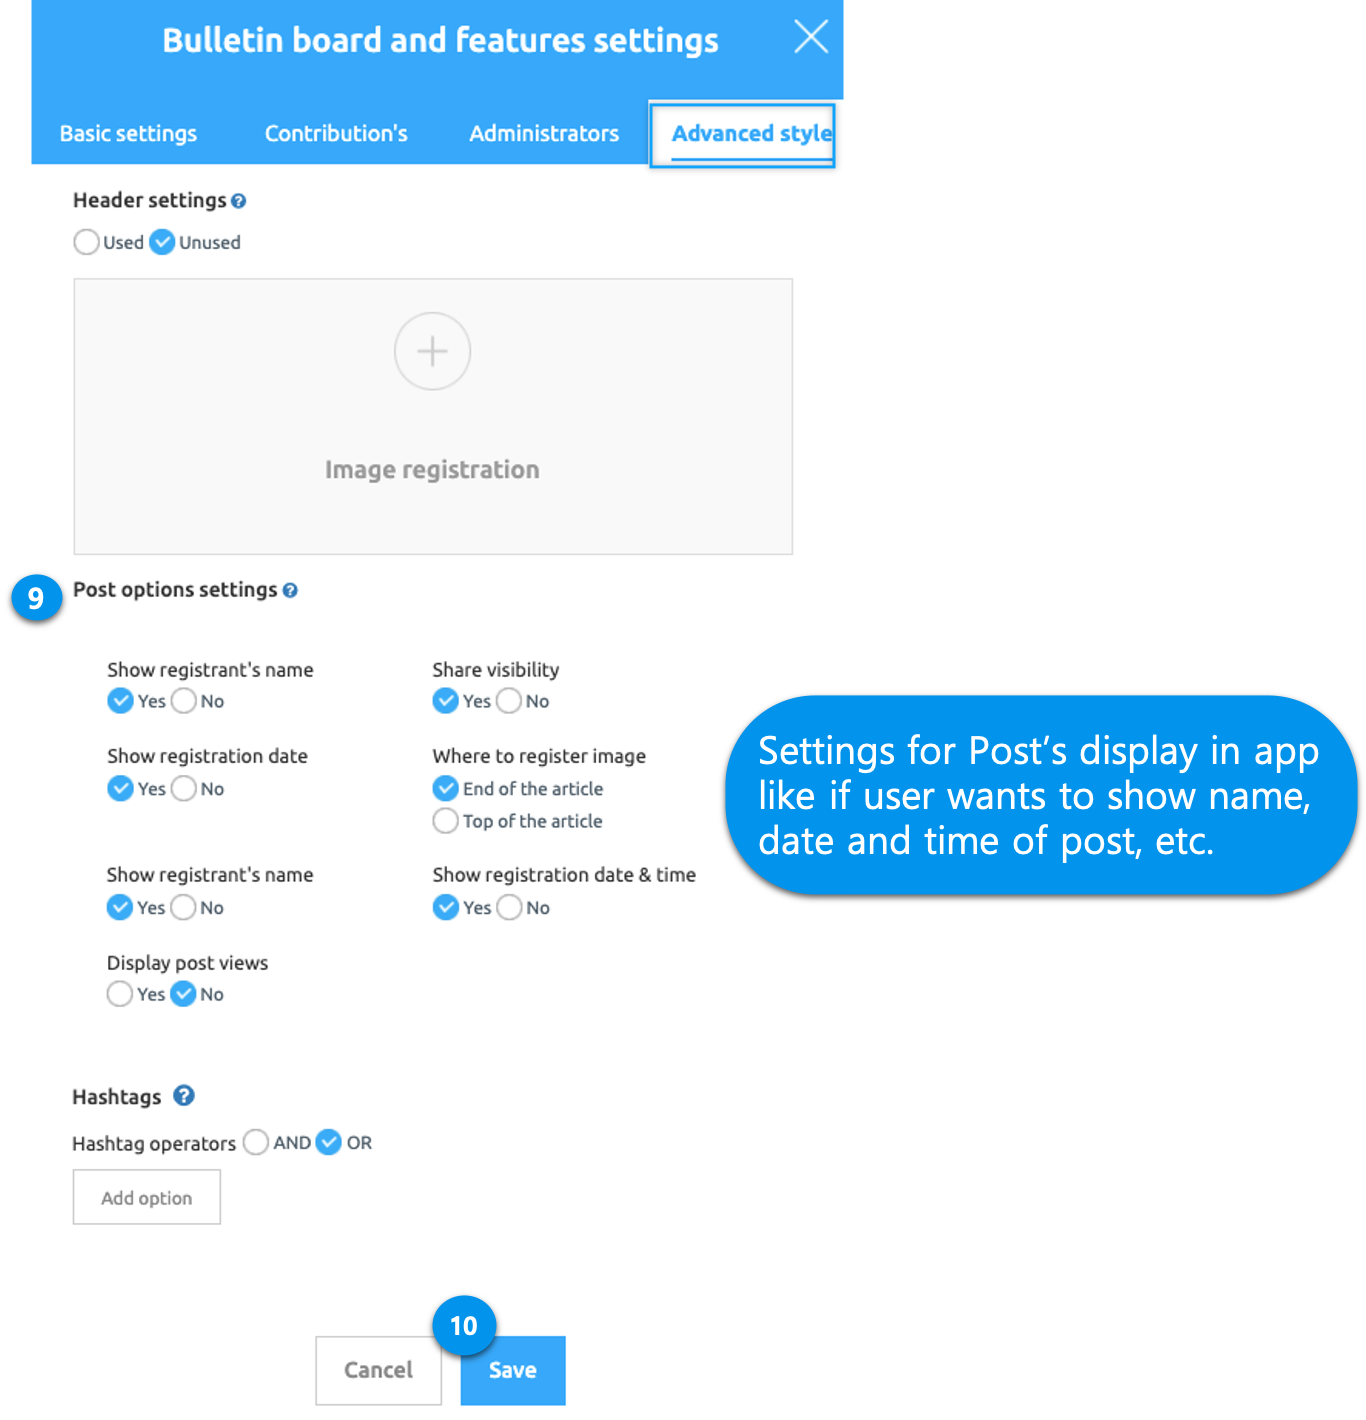
### **3. Board and function setting: Advanced style**
**★Bulletin board basic items are all entered. Please enter and save the last one.**
**Go to the Advanced Style item at the top.**
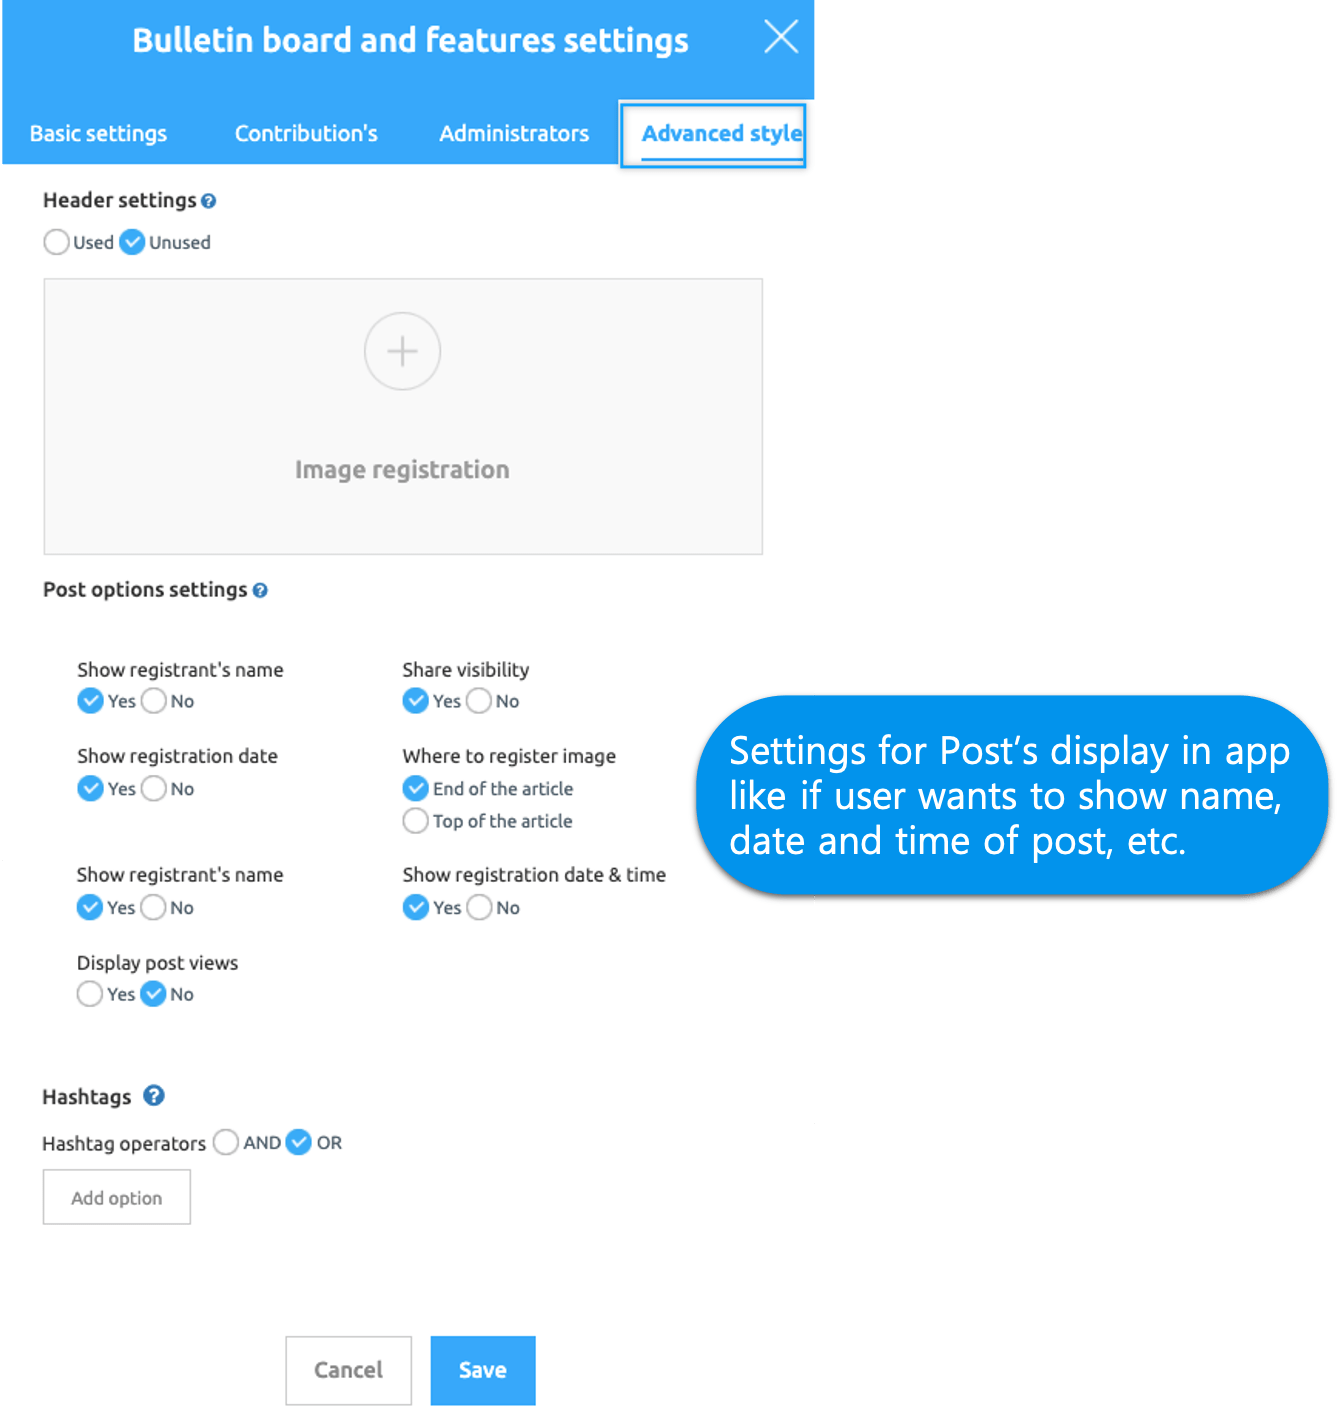
9\) **Advanced Style** Options Posts Settings
Advanced style post option setting is a menu for setting post options such as displaying the name of the registrant who created the post, the date and time of registration, and the number of views.
If you create it as it is, you can leave it as it is and save it.
Please check and edit the necessary items according to the app operation.
\*Please check the manual below on how to operate post options!
**☞** [**\[View detailed manual for setting post options\]**](/manual/appmanage/board/post-options.md)
10\) Click the **Save** button to complete the board creation.
**\[Created board]**
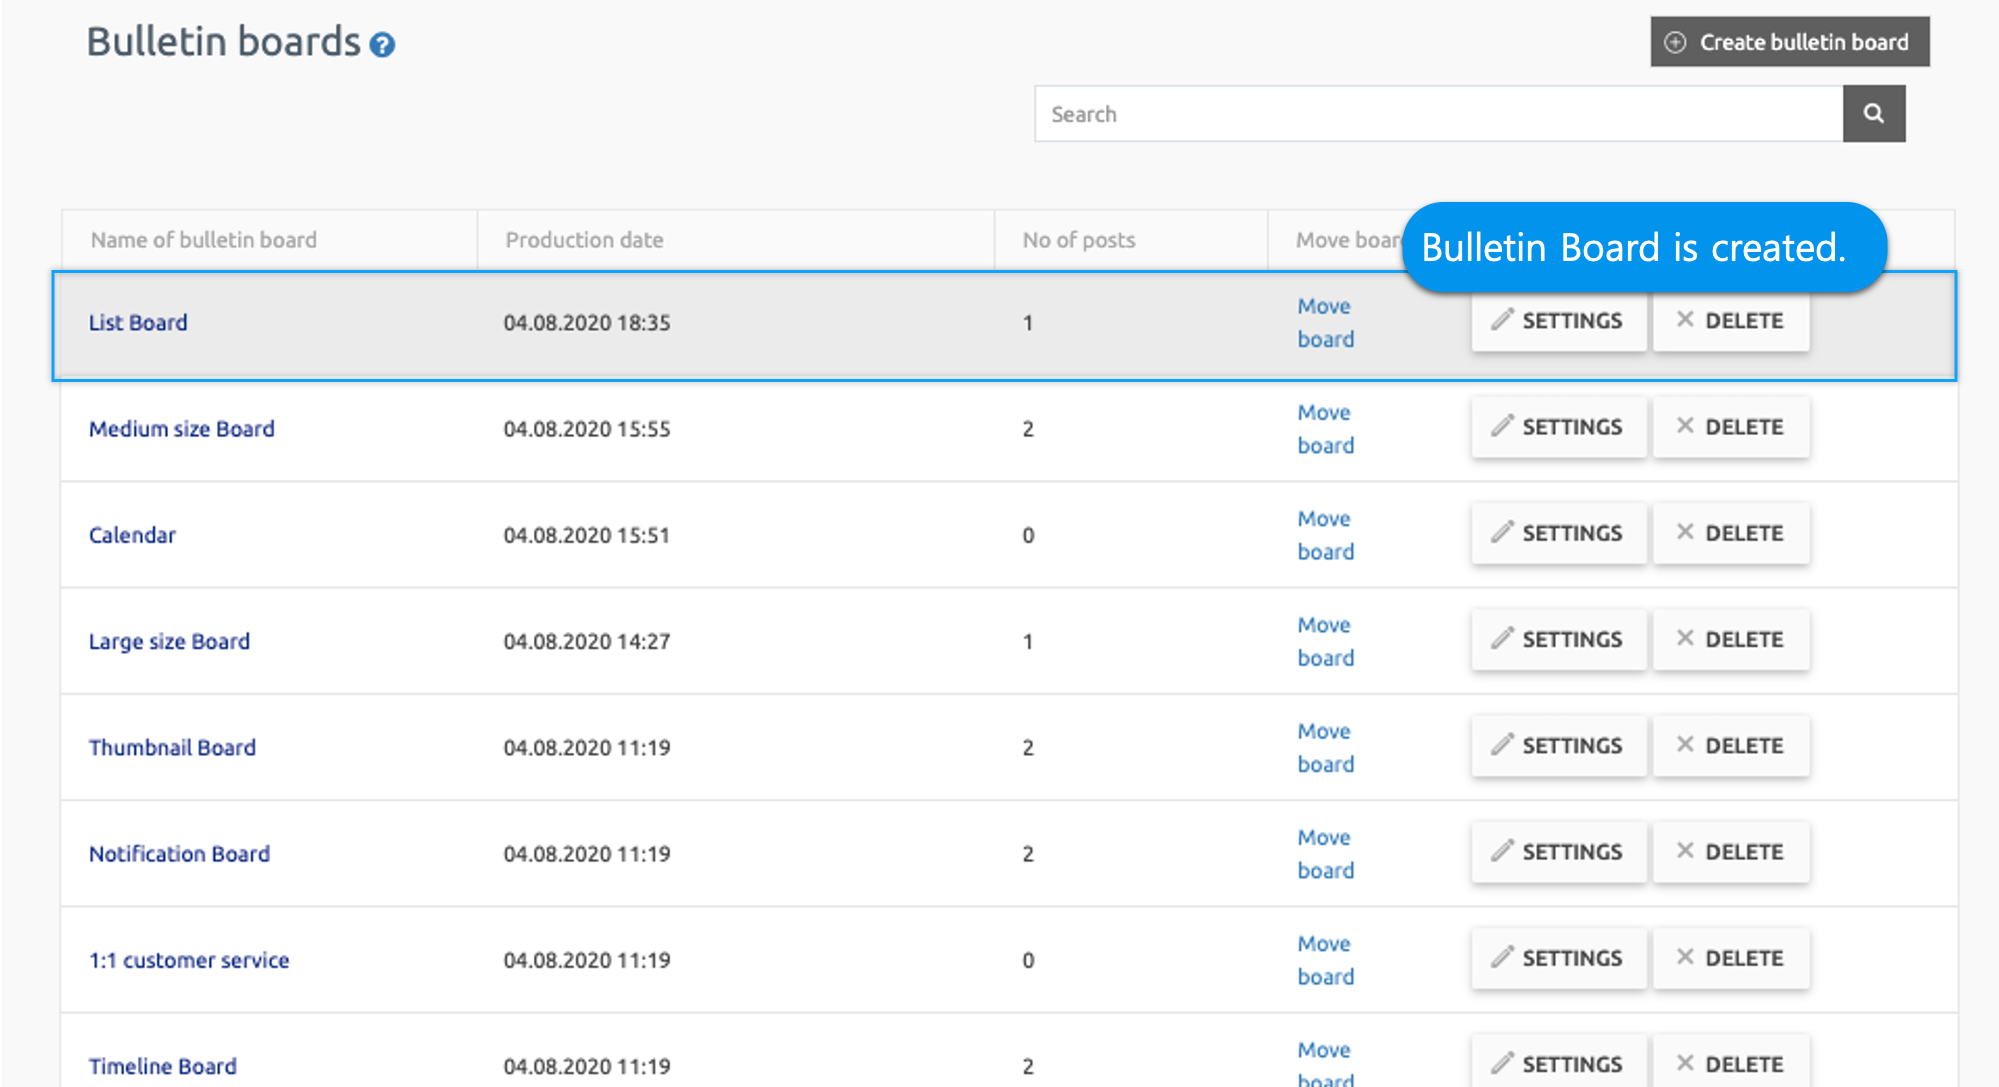
When saving is completed, you can check the created board in the board management list.
In this way, you can continue to add as many boards as you need.
**-The number of free, paid version app bulletin board production-**
\*Free version app: Can produce up to 30
\*Paid version app: Basic) 100, Expandable) 300, Premium) Unlimited production available
Create a bulletin board, and do not worry because you can freely edit it for your desired style and use.
You can just create it your way.
See how it looks in your app and edit it to your desired style.
A lot of the various functions used to generate a regular bulletin board in addition.
All of these functions are provided in a manual, so please check them together when operating.
**\*TIP:** Next to each menu is Blue **?** icon(question mark) icons are listed. If you press the button, you will be taken to the manual.
### 4. Learn about other bulletin board features
In addition to creating general bulletin boards, there are many functions of bulletin boards. All of these functions are provided in the manual, so please check them together when operating!
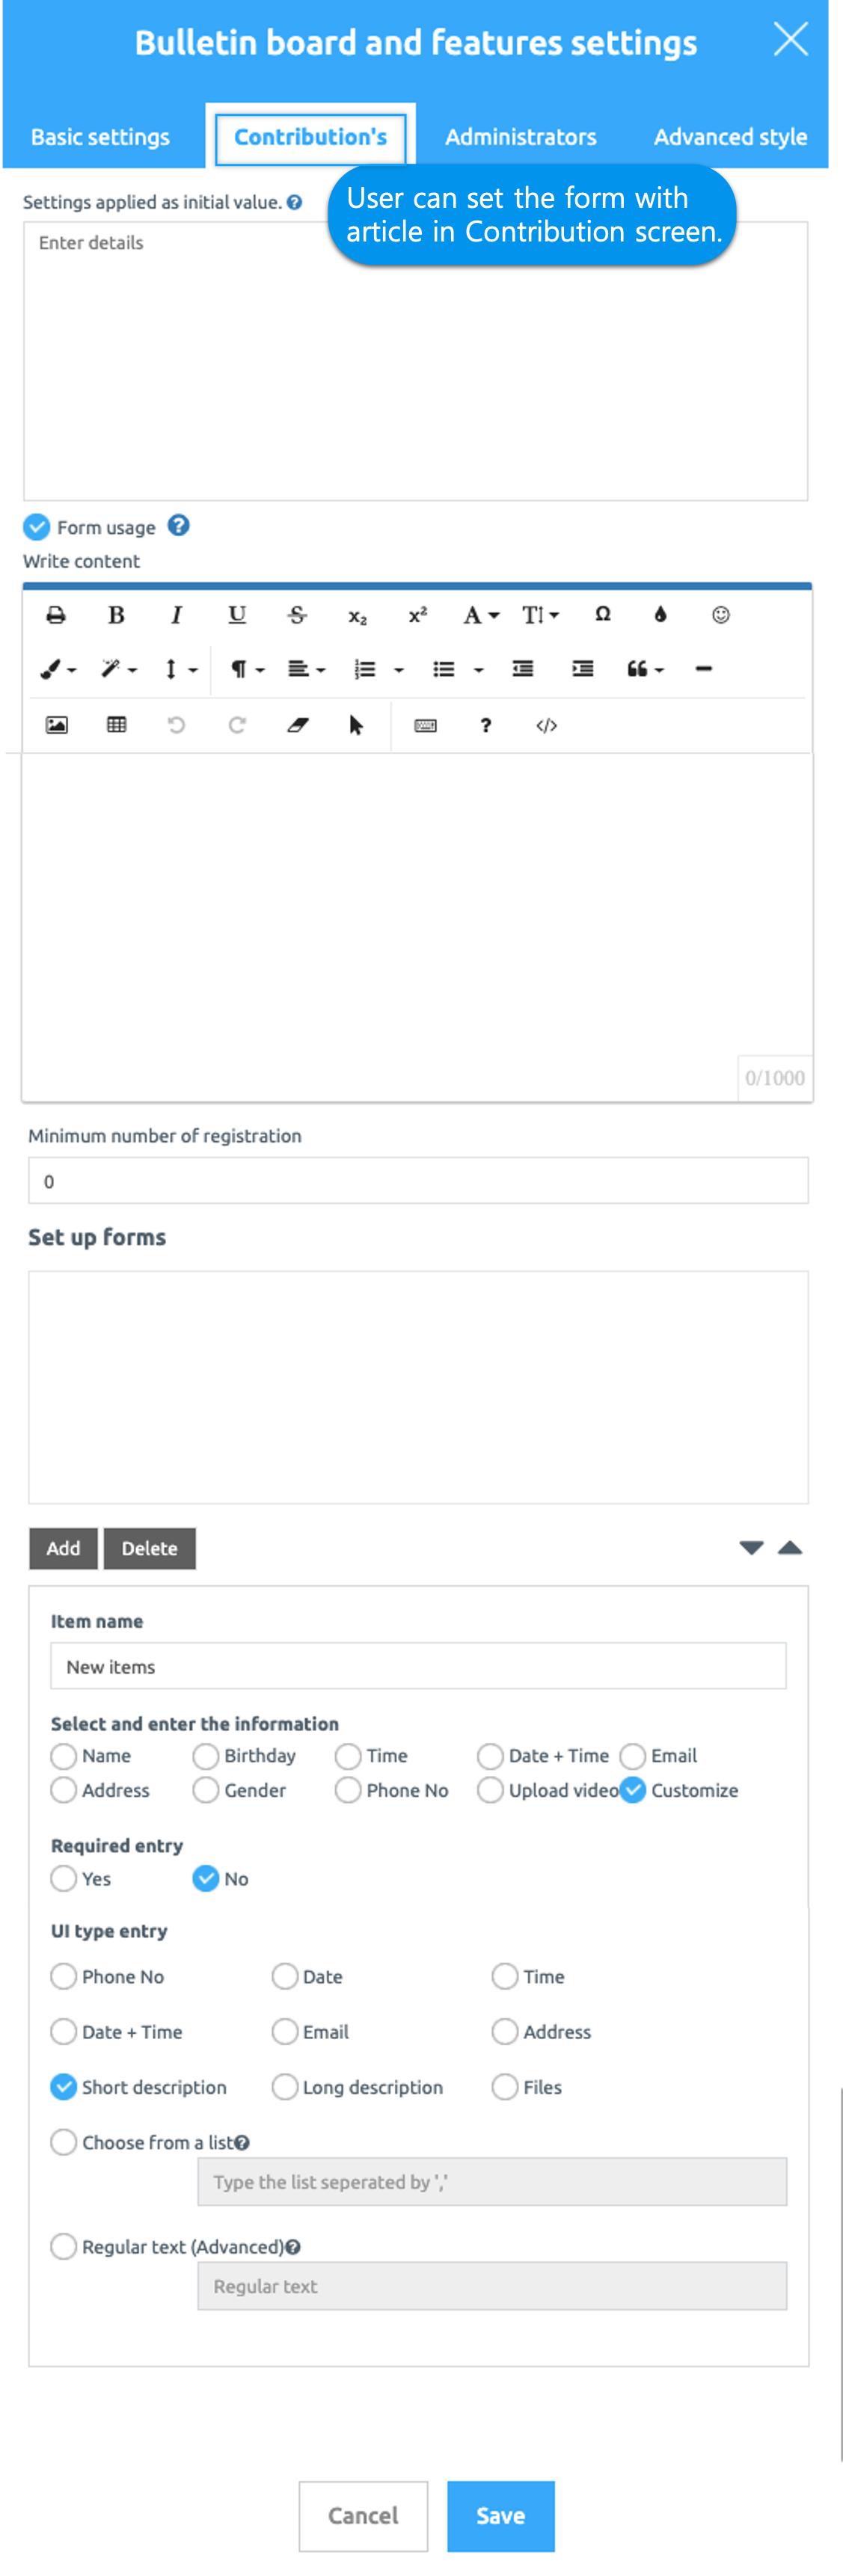
**1. Set Post**
**1)Writing**
If there is a list of answers that all users should receive the same, the administrator can provide the users with the questionnaire on the bulletin board in advance.
**▶** [**How to write a bulletin board**](/manual/appmanage/board/bulletinboard-form.md)
**2)Filling form**
**Since the bulletin board form is provided, a tool is created in the bulletin board and you can use it by adding an image or adding a calendar (date setting).**
**▶**[**How to create a bulletin board**](/manual/appmanage/board/filling-form.md)
**2. Admin Settings**
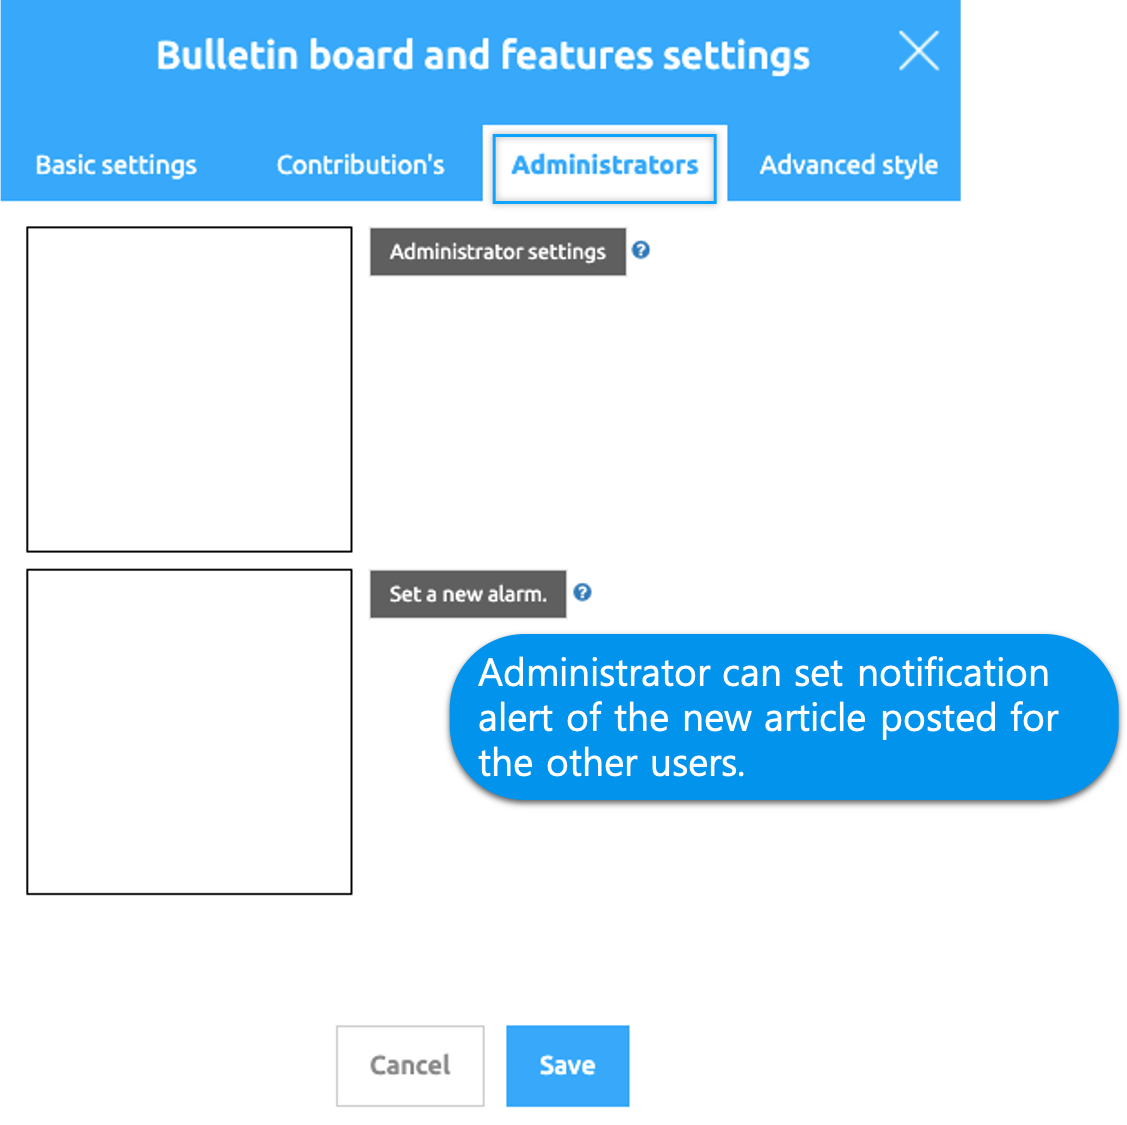
**1)Administrator Setting**
Rather than operating the app as a whole, **it allows you to manage a specific bulletin board, so you can select a specific member on the bulletin board and set it as an administrator.**
If you are set as a board administrator, you have the right to delete or post a post written by another user.
**▶** [**\[View how to use the administrator settings\]**](/manual/appmanage/board/administrator.md)
**2)Set new alarm**
When a new post is registered on the bulletin board, it is a function to notify in the real-time push that the new post has been registered.
If you select a member who wants to receive an alarm in \[Bulletin administrator page], a push alarm will be sent to the member.
**▶**[**\[View how to use the new alarm setting\]**](/manual/appmanage/board/post-alarm.md)
**3. Advanced style**
**1) Board Header Setting**
**The bulletin board header is a pin function that pins a post to the top.**
Post thumbnails are displayed at the top of the bulletin board, you can see the list of posts only with thumbnails without looking at the list.
You can sort the post thumbnails in order by ranking the registered posts.
**▶**[**\[Details on how to use the bulletin board header\]**](/manual/appmanage/board/header.md)
**2) Set Post Options**
\*Please check the manual below on how to operate post options.
**☞** [**\[View detailed post options setting manual\]**](/manual/appmanage/board/post-options.md)
**3) Hashtag management**
**Like Instagram, it’s a tag search feature that finds all the search terms you’ve entered with hashtags (#).**
The hashtag search option provided by Swing2App is available on the bulletin board.
You can set different search options for each app.
**▶** [**\[Details on how to use hash tags\]**](/manual/appmanage/board/hashtag-search.md)
***
## **STEP2. Apply the bulletin board created in the app**
**If you create a bulletin board, should you apply the bulletin board to the app?**
1\. When using the App MakerV3 version
1\. App MakerV3 screen - Select the STEP3 page
2\. Select Menu. \*If you haven't created a menu, please create a new one. (Select the + shape button to add the menu)
3\. Enter a menu name.
4\. Select \[UI KIT] from the page design.
5\. Select \[Bulletin Board].
6\. Check the board to register, and then select the \[Apply] button. (Hover over the mouse cursor on the page to open the Apply button)
\*I didn't create a bulletin board, but I can see that there is a bulletin board. This is a board that is provided as a sample in the Swing2App. Therefore, before using the board, please create only the board to be used in \*App Operation-Service Management-Board Management, and delete the board that you do not use. After cleaning up the operation of the board, please register the board to be applied to the app.
7\. Press the \[Save] button at the top of the screen to apply it to the app.
### 2.When using the app production V2 Version
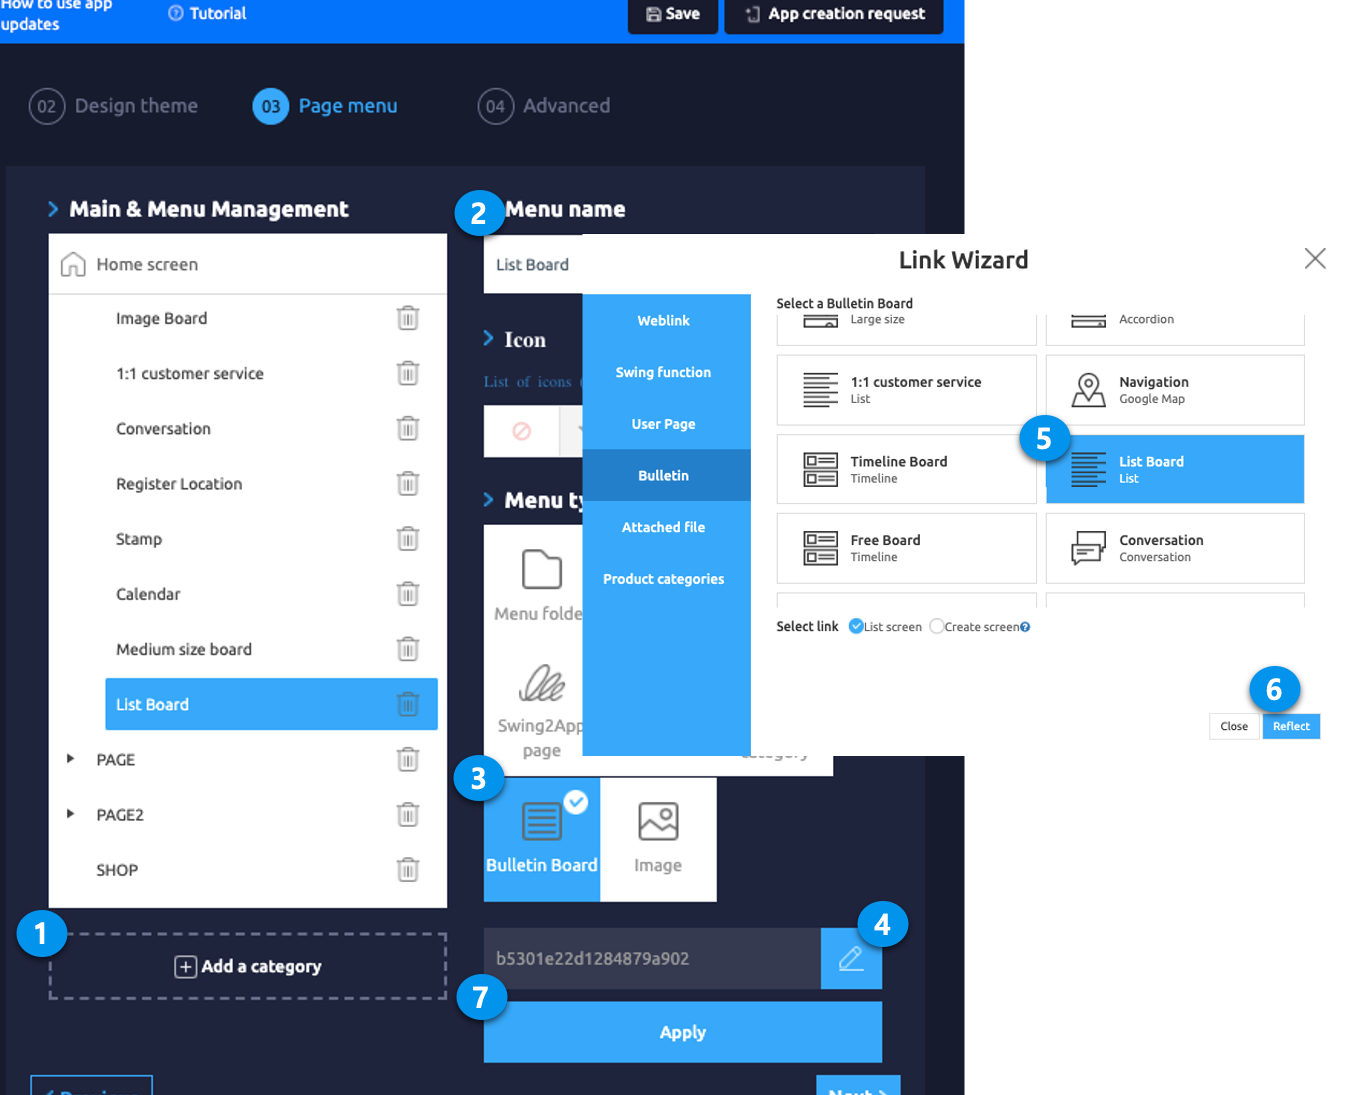
On the Swing2App Maker(V2), go to the Page menu.
1. From the menu set by default, click the **Add a category** to add a new menu.
2. Edit the name of the added item in **Menu Name.**
3. Select **Bulletin Board** in the **Menu Type.**
4. Click on **Link Wizard**(pencil icon).
5. Select the board from the list of Bulletin Boards in the Link Wizard window.
6. Click on **Reflect.**
7. Click on **Apply** and then **Save.**
The bulletin board you have created must be applied to the app menus on the app production page so that it is reflected in the app.
Don’t forget to apply your bulletin board to the app
For more information on how to enter a post please refer to the relevant post.
**☞**[**Go to the post-input method**](/manual/appmanage/board/post-write.md)
## STEP3.App launch screen- Bulletin board application screen
Since bulletin boards provide various UI styles, each board is displayed in the app in a different style.
When you select a board linked to the menu, the \[List View] screen is displayed, and tapping the post title or image moves the → to \[Post Details View].
## STEP4. Notice Board
1\) If you are new on Swing2App, you do not have to create a bulletin board.
You have been provided with default boards which you can edit and use as per the need.
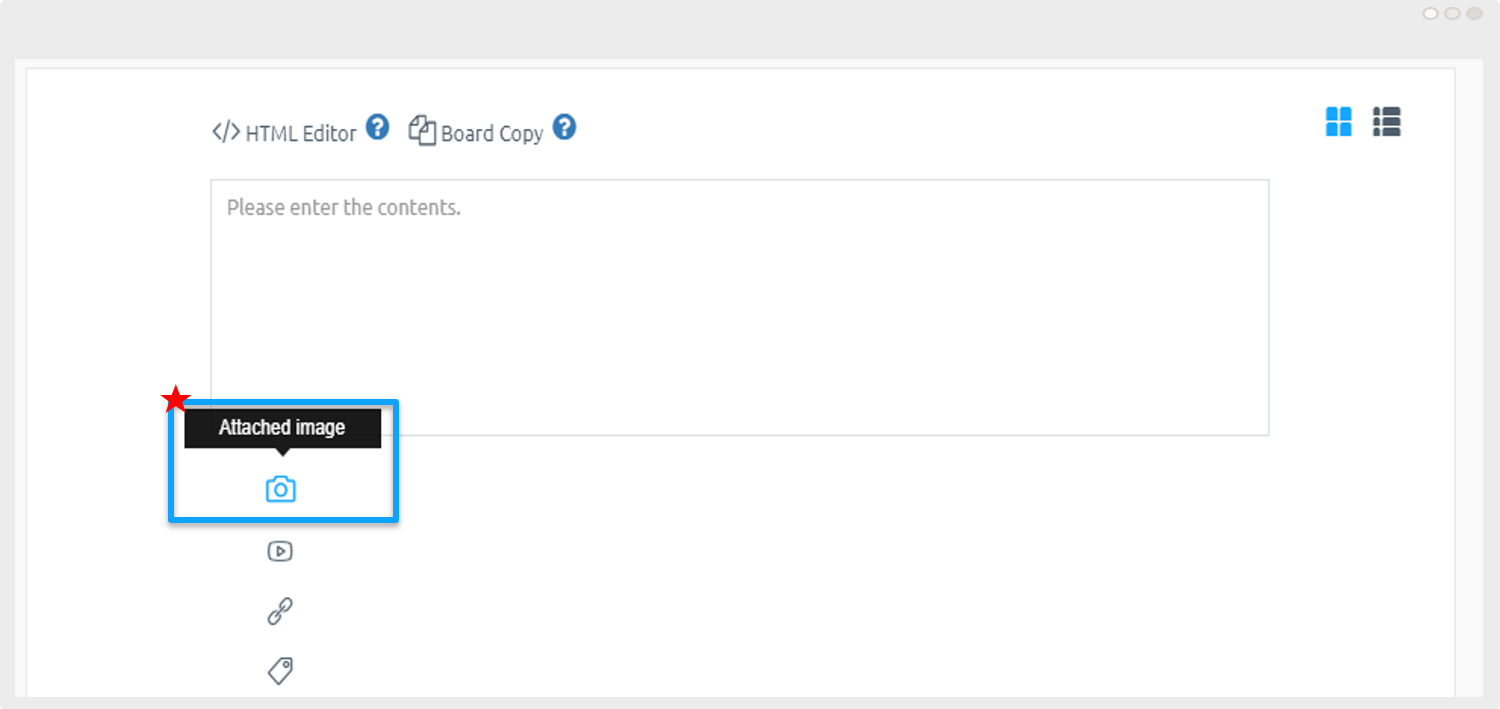
2\)When using the bulletin board, you must attach an image to set the representative thumbnail image.
When using the bulletin board, there is an inquiry that thumbnail images are not displayed on the bulletin board list page and are displayed as app icons.
The invisible image is because there is no attached image.
When specifying a thumbnail image for a post, be sure to select \[Attach photo] to attach an image file.
If you attached an image into the text (body), the image is recognized as text and cannot be specified as a thumbnail.
**Therefore, when you specify a thumbnail image in the post, please register as an attached image.**
3\)Free users can create up to **30 bulletin boards.**
\*There is no limit to the number of posts.
4)Paid users can create **100 items when using basic products, 300 expandable products, and unlimited premium products**.
\*There is no limit to the number of posts!
5)Image and video files attached to the bulletin board are counted in the app capacity.
If you upload a large number of images, the capacity will be counted accordingly.
\*You can check the usage of the app on the **Manager → Services → Resources**