> For the complete documentation index, see [llms.txt](https://documentation.swing2app.com/llms.txt). Markdown versions of documentation pages are available by appending `.md` to page URLs; this page is available as [Markdown](https://documentation.swing2app.com/store/playstore/create-a-google-developer-business-account.md).
# Create a Google Developer - Business Account
A Google Developer Business Account is an account that can be created by an organization (company).
You can link your company's email address to your Google developer account.
See how to create a Google Business developer account.
{% hint style="info" %}
**★What is a Google developer account?**
-This is a developer account that must be created to release an app on the Play Store, which can be created by paying a registration fee to Google.
-Account registration fee: $25 (lifetime use with one payment, about 33,000\~36,000 won in Korean won)
**\*Google Play Developer Console site** ****
\*Just because you have a regular Gmail account, doesn't make it a Google developer account!
The account that paid the $25 registration fee on the Google console becomes a developer account\~!
{% endhint %}
{% hint style="warning" %} **Please check before registering for a Google developer account.**
\*\*\*\*
1. To create a Google Play developer account, you must be at least 18 years old.
2. When you register for a Google developer account, you will be verified several times. Since the process of verifying your email address and verifying your mobile phone number is carried out several times, you must use an email address and contact information that is actually available.
3. You must be able to verify your identity. In some cases, Google may require both a valid national ID and a credit card issued in your legal name.
4. There is a $25 Google developer registration fee. You will only be charged once, and you can pay with any of the credit or debit cards listed below. (Payment by card only)
5. If you cannot verify your identity or provide incorrect information, the registration fee will not be refunded.
6. You can pay with any of the credit or debit cards listed below.
7. Mastercard
8. Visa
9. American Express
10. Discover (US only)
11. Visa Electron (outside the United States only)
**Note:** Prepaid cards are not accepted. Card types may vary by region.
{% endhint %}
**\*For Google individual developer account registration, please check the manual guide below.**
{% embed url="" %}
## 1. Go to Google Login
\*Create Gmail account:
Select Create an account – Select a business manager account and click on the \[Next] button.
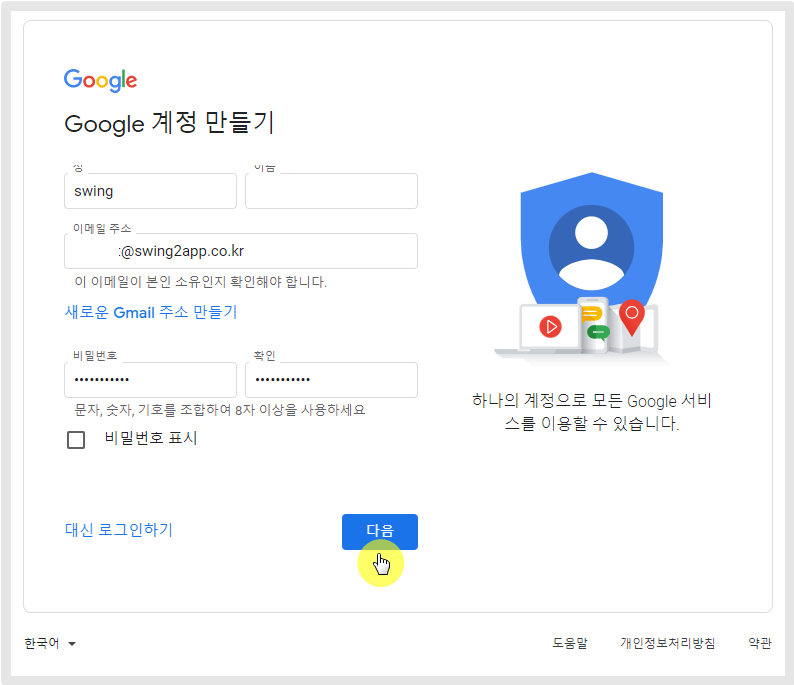
### STEP1.Enter account information
1\) Enter your first and last name to be used for your account (You can enter either your last name or first name.)
2\) Enter your email address \* Enter the actual email address used by your company
3\. Enter your password.
4\. Click on the Next button.
If you don't have a work email address, you can create one by selecting "Create a new Gmail address."
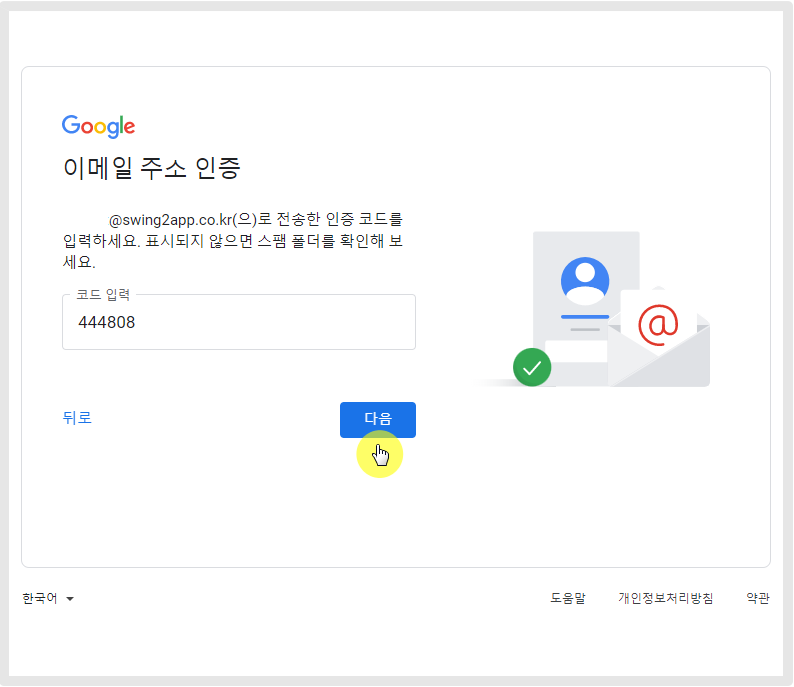
### STEP2.Verify your email address
A verification code will be sent to the email address you entered above.
Enter the code number, and then click on the \[Next] button.
### STEP3.Enter basic information such as phone number
1\) Enter your mobile phone number \*Here, the country code is already set, so please enter the number without the country code.
2\) Select your date of birth
3\) Select the gender
4\. Click on the \[Next] button.
Some information is optional, but you'll need to enter everything to move on to the next.
For the phone number, you need to get a verification code, so please enter the mobile phone number of the actual account manager.
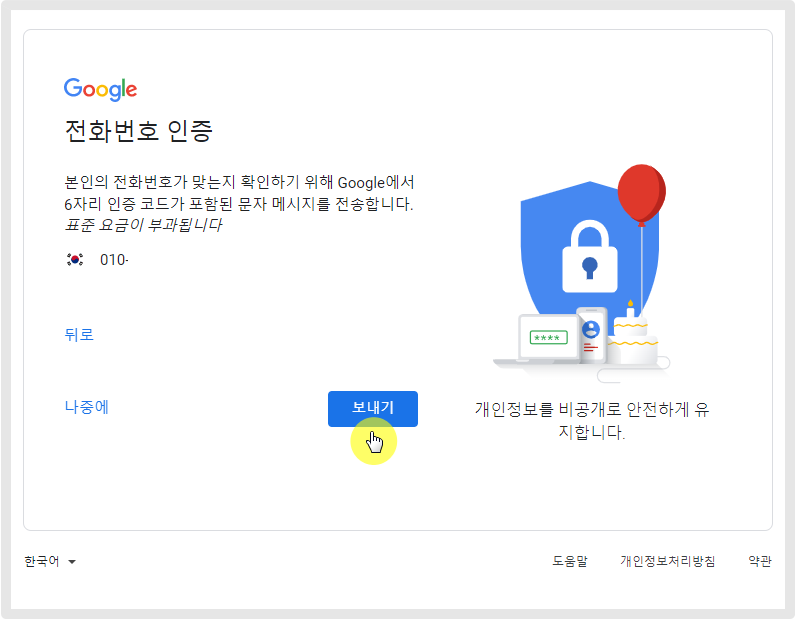
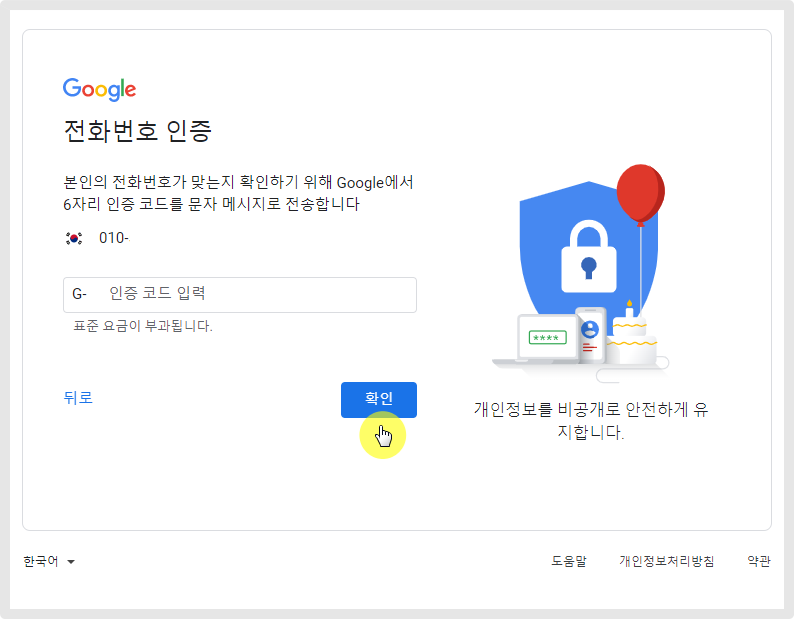
### STEP4.Verify your phone number
Click on the \[Send] verification code to the phone number you entered.
Enter the verification code (code) that came to your phone, and then click the \[OK] button.
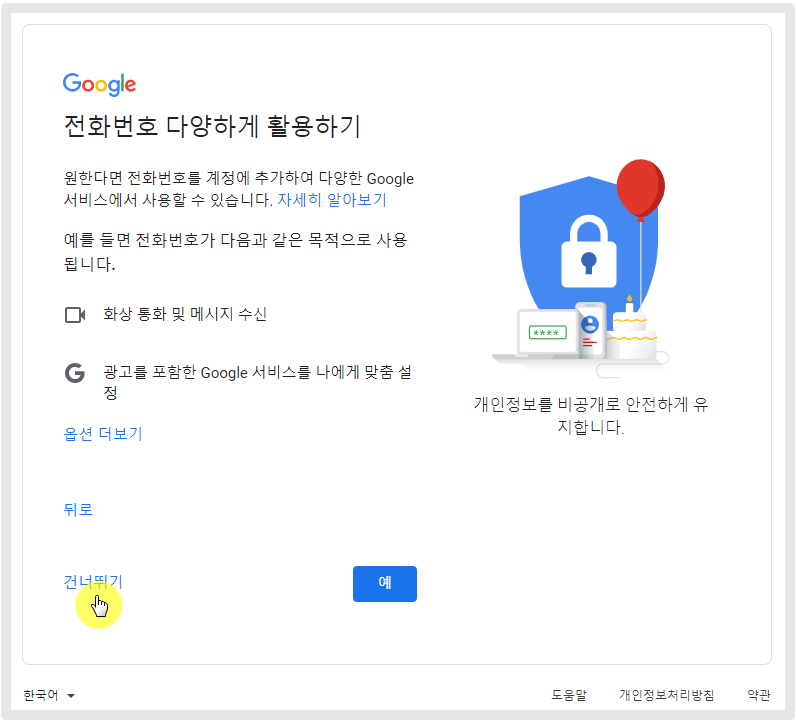
Click Skip
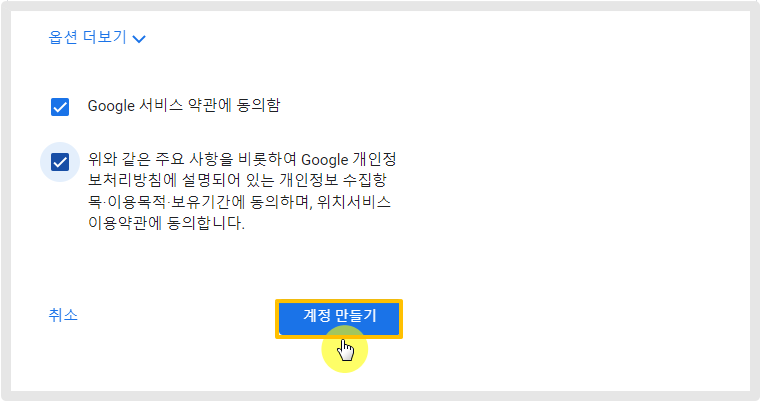
### STEP5.Select Create Account
Please check all agree to Google's Terms of Service.
Please click on the \[Create Account].
## 2. Create a Play Console developer account
You have entered your account's basic information,
Now is the step to enter the organization (institution/organization) information.
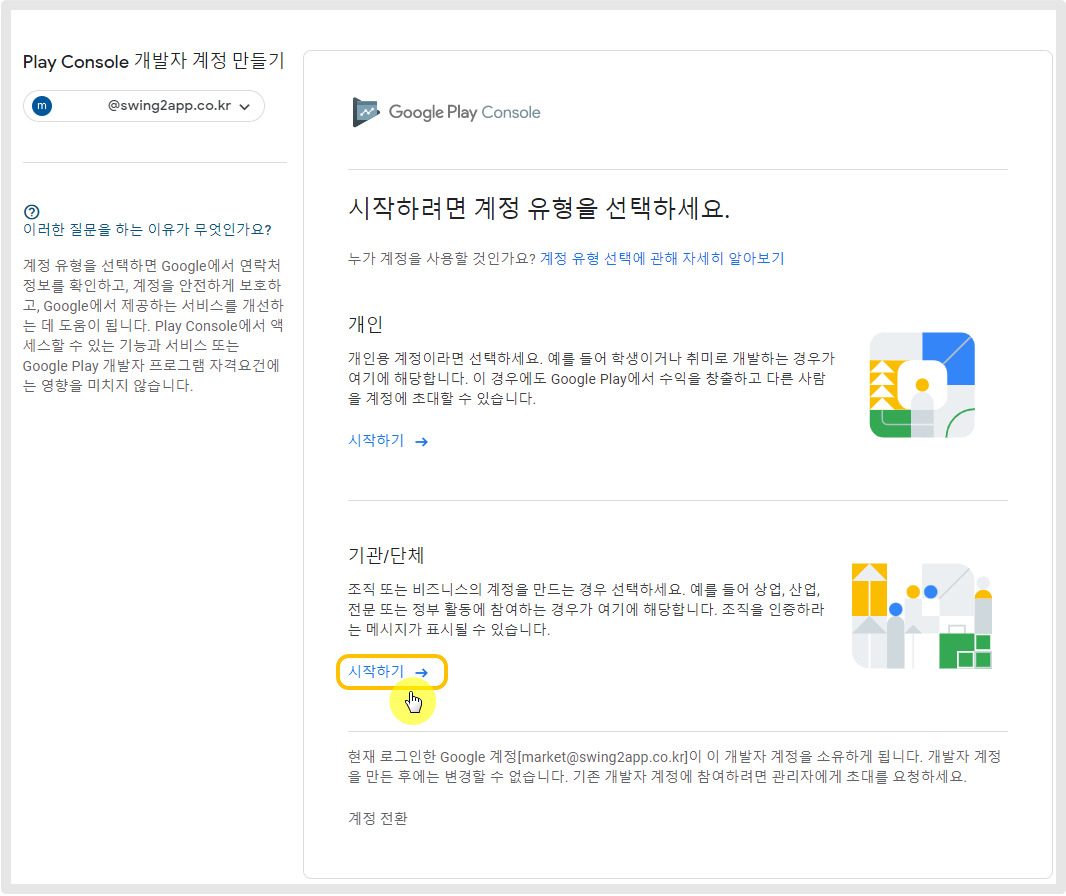
### STEP1.Account Type
Click on the Organization/Organization \[Get Started] button.
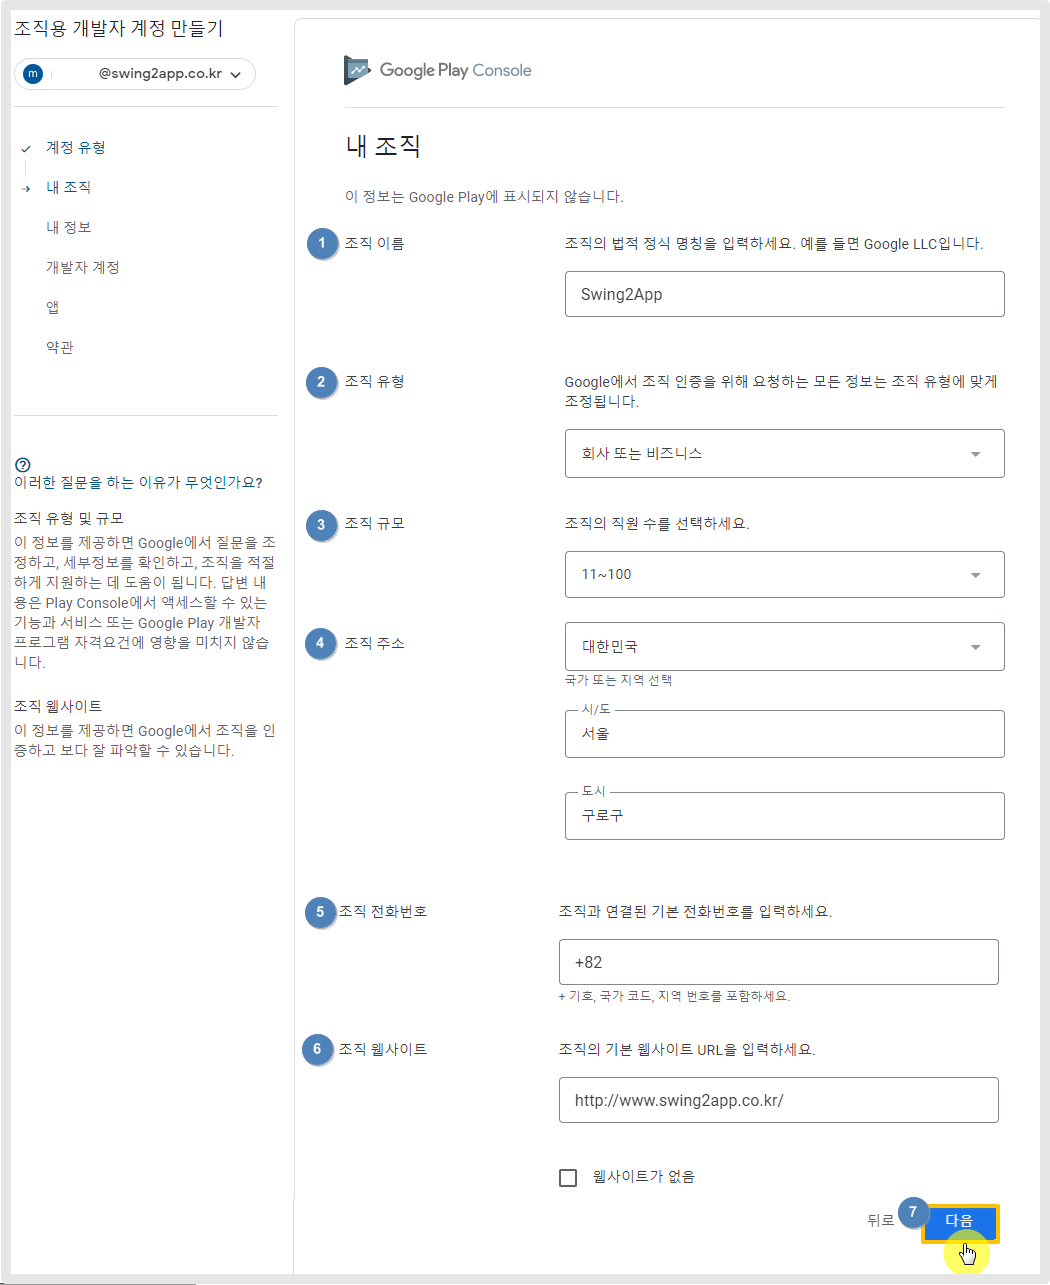
### STEP2.My Organization
1\)Organization name: Please enter the actual company name and legal official name.
2\) Select Organization Type: Click on the drop-down arrow to select the correct type.
3\) Organization size: Click on the drop-down arrow to select the correct type.
4\) Organization address: Enter the country, state/province, and city name according to the item
5\) Organization phone number: Please enter the company's primary contact information.\*Enter including country code Example)+821012345678
(If you don't have a customer center number, you can enter the operator's personal mobile phone number)
6\) Organization website: Enter the URL of the website operated by the company. If you don't have a site, check 'No website'.
**Precautions)**
This information does not affect your eligibility for the Developer Program.
This means that if your organization is small or you don't have a website, it won't affect your ability to create a developer account.
These are just the details that Google collects.
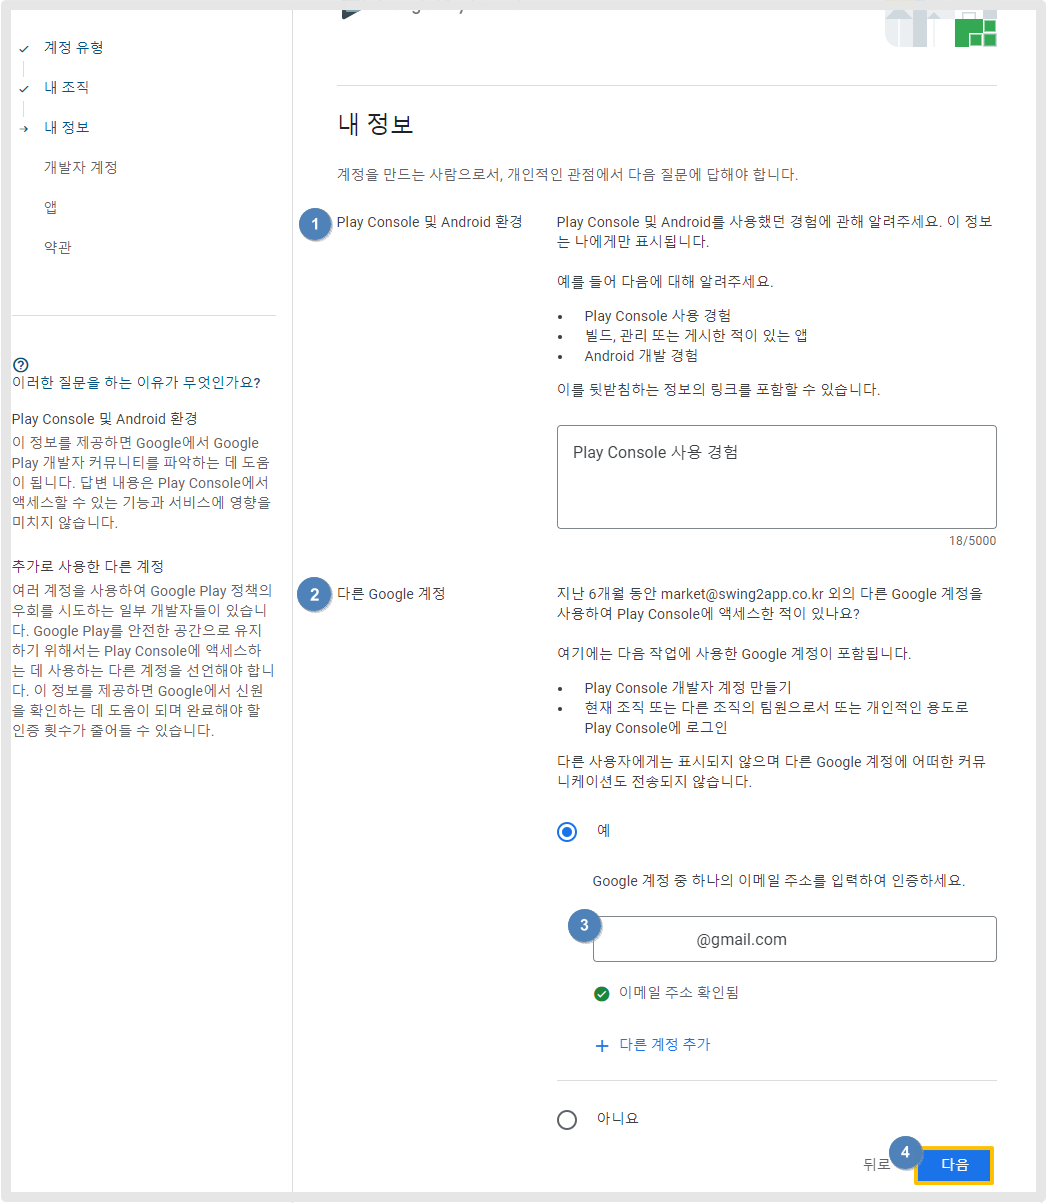
### STEP3.My Information
1\)Play Console and Android environment: Enter your experience using Play Console and Android.
2\) Another Google Account: If you have used Play Console with a Google account other than the one you are registering.
-Check 'No' if there is none.
\- If there is, check "Yes"
3\) If there is, please enter a different Google email address and authenticate. Once your email address is verified, you will be moved on.
4\. Click on the Next button.
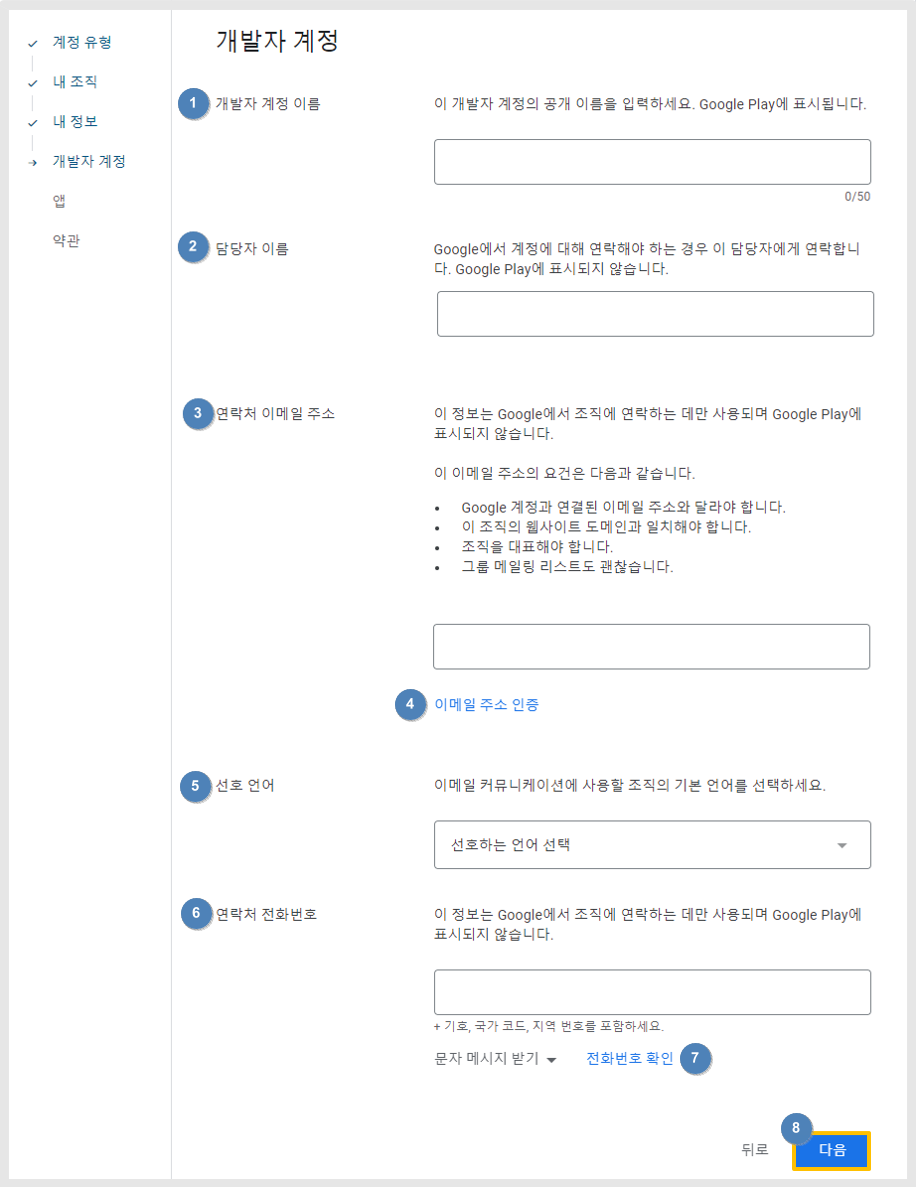
### STEP4.DEVELOPER ACCOUNT
1\)Developer account name: The developer name that will actually appear on Google Play.
2\) Contact name: Enter the name of the person in charge who runs the account, Google Play is not displayed.
3\)Contact email address: Enter the same email address as the company domain, which must differ from the email address you are registering now. e.g. Swing2App domain: swing2app.co.kr / Email address:
4\. Click on the Verify email address.
5\. Select your preferred language.
6\) Contact phone number: Enter the country code and contact information. Example)+821012345678
7\. Click on Confirm phone number.
8\) Click on the \[Next] button.
Your email address and phone number must be verified before you can move on to the next one.
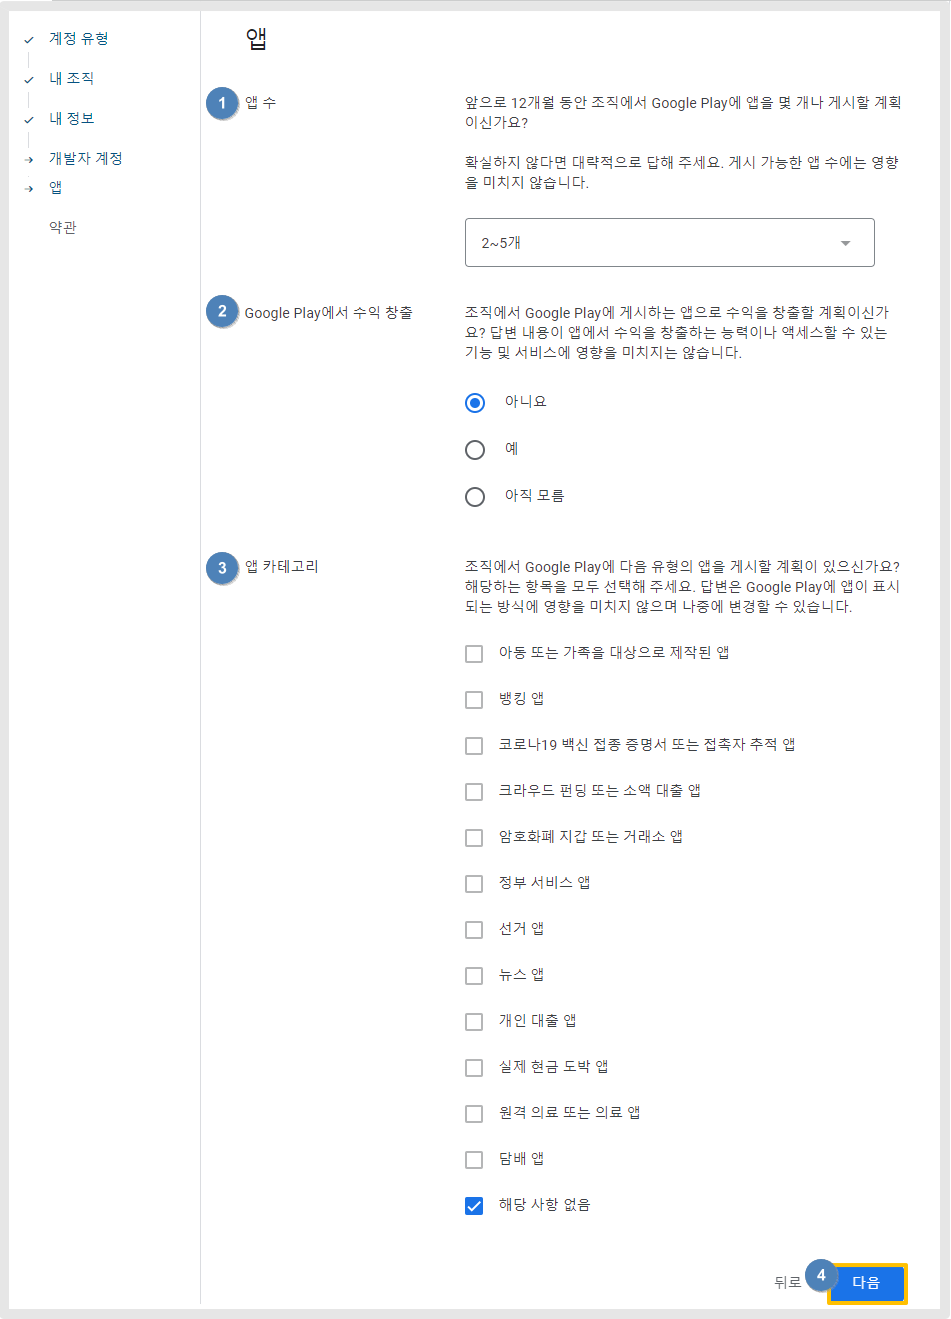
### STEP5.APP
1\) Check the number of apps: This question asks how many apps you will publish on Google Play in the future.
2\)Monetize on Google Play: This question asks if you plan to monetize your app.
3\) App category: A question asking if you plan to submit the following types of apps: \*Unless it is a special case, please check 'Not applicable'.
4\. Click on the \[Next] button.
### STEP 6.Terms
Please check the terms and conditions.
Please select \[Account creation and payment].
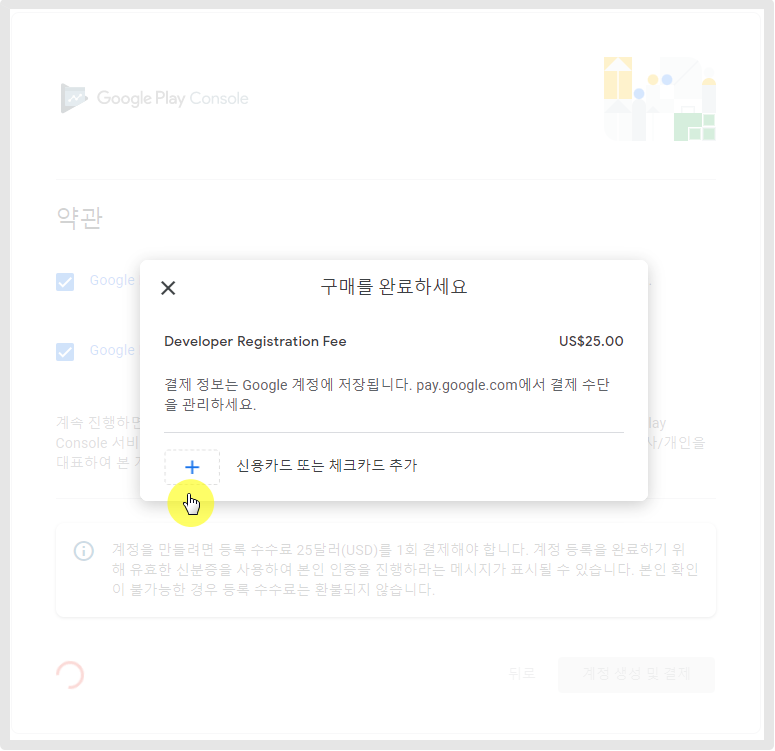
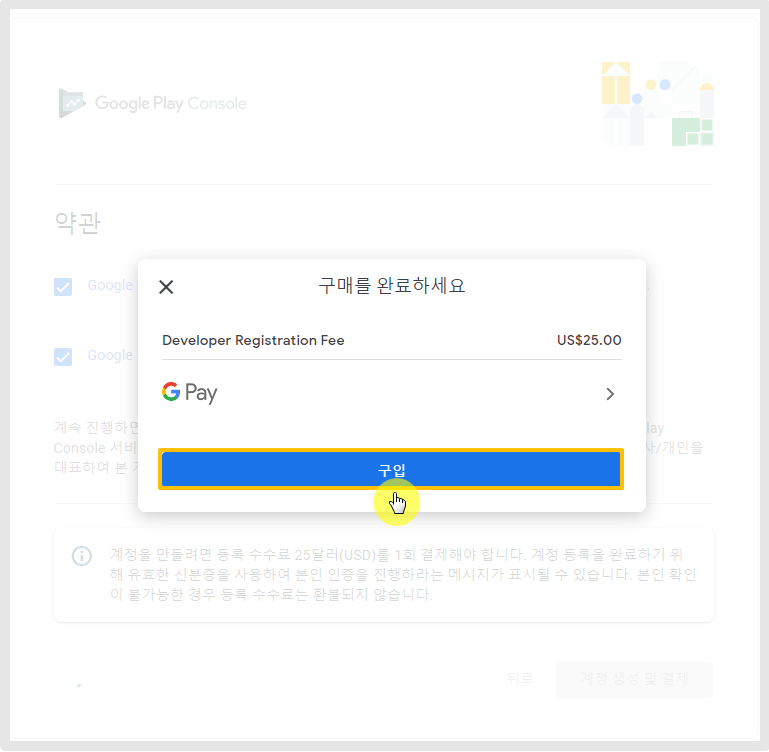
## 3. Make a payment (account registration fee)
**You have entered all the information required to register your organization. The final step is to pay the developer account registration fee.**
**Please select** \[Add Credit Card or Debit Card ].
-Google developer registration fee $25 (KRW 33,000\~36,000 depending on KRW)
-Only credit cards are accepted.
-It doesn't matter if the person who registered the account and the cardholder who wants to pay is different when paying with the card
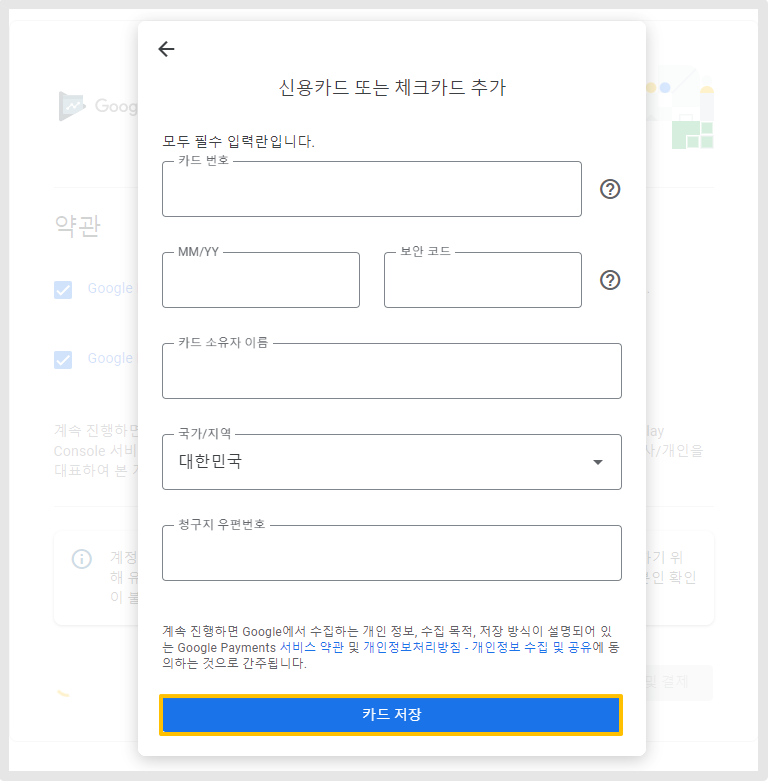
1\) Enter your card number
2\) Expiration date, security code (CVC number)
3\) Cardholder name
4\) Select Country/Region
5\) Enter the postal code of the billing address
6\) Select the \[Save Card] button.
{% hint style="danger" %} **\*\*Caution**
The country/region must be the same as the country you entered earlier when registering your account.
The cardholder's name can be different from the person running the developer account, but the country must be the same.
Example) When registering an account, you enter the organization address as 'Korea', but if you select 'United States' when registering the card, you will not be able to use the account because your identity cannot be verified.
If it's the 'Republic of Korea', it should all be entered uniformly.
Even if the developer account registration fee is paid, you cannot verify your identity, so you will not be able to use it and you will not be refunded.
{% endhint %}
The card registration is complete. Select the \[Purchase] button.
Your purchase is complete and your developer account has been created.
By the way! It's important to note that your organization's (business) account doesn't end there, it needs to be verified once more.
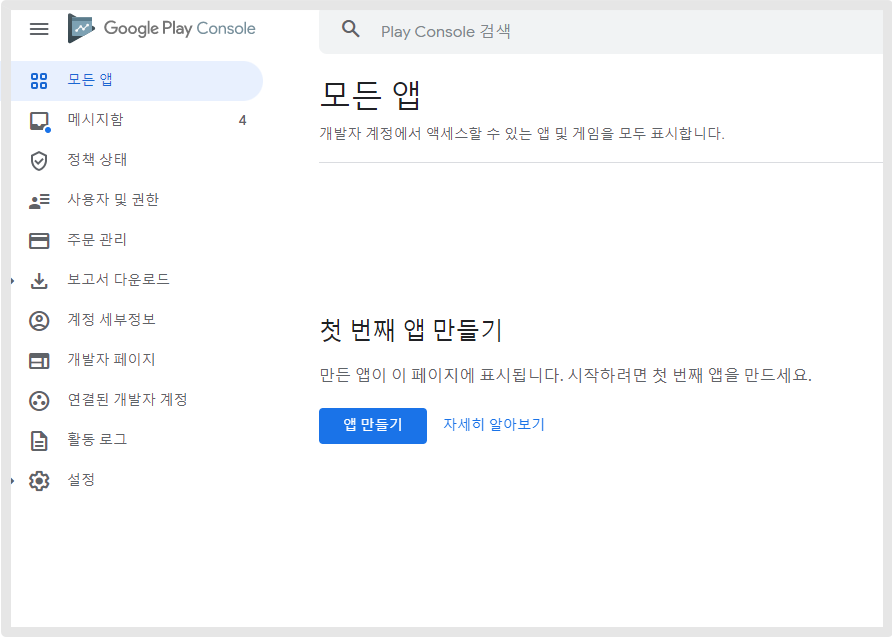
Select **\[Go to Play Console ]**
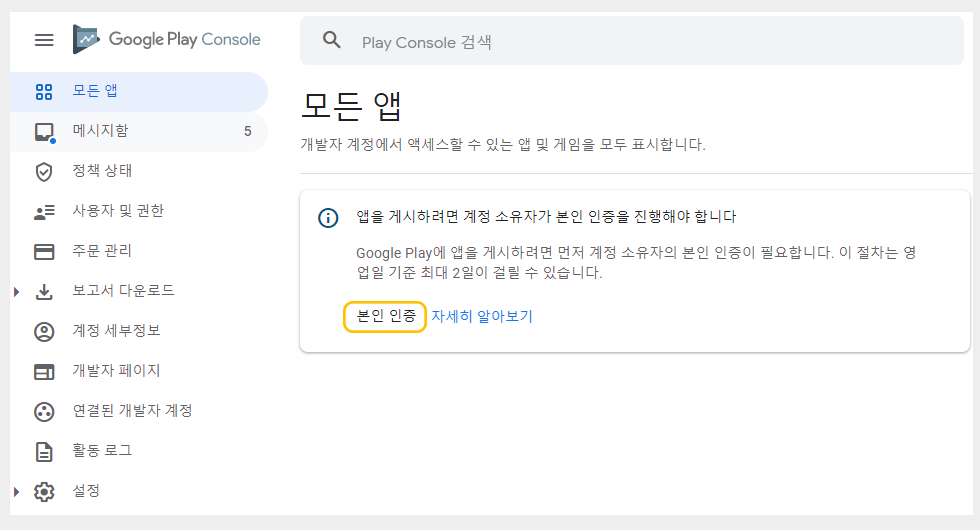
## 4. Identity verification
### STEP1.Select Identity Authentication
When the button is selected,
You will be taken to the Google Play console page, and you will see a message that says you need to verify your identity, as shown in the image above.
Click on the \[Verify Identity] option.
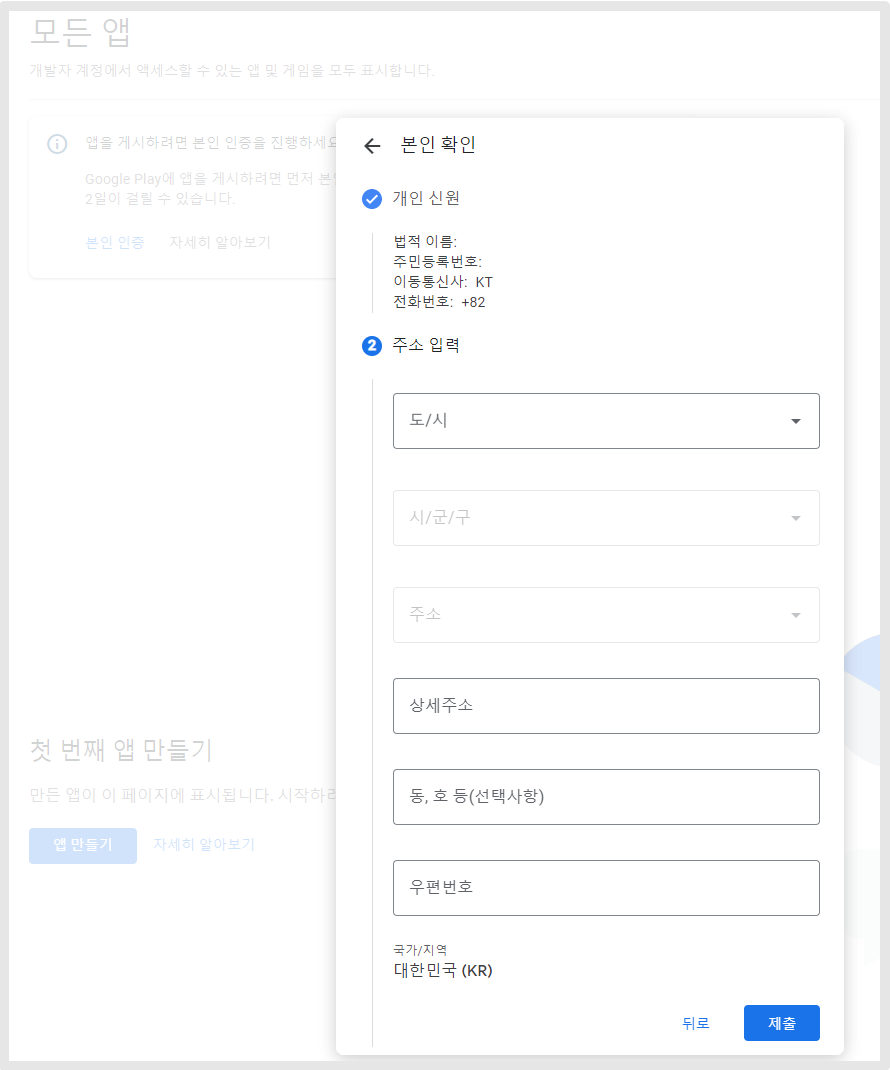
### STEP2.Identity verification procedure
The first thing you will do is verify your identity.
1.Enter your name, resident registration number, select a carrier, and register your contact number (mobile phone number) to be authenticated.
2.Enter the address.
Enter your residential address, and select South Korea for Country/Region.
3\. Click on the Submit button.
{% hint style="danger" %} \*Caution\*
It is important to note here that if you enter an address different from the address entered in your Google developer account, authentication may not be performed.
For example, in the developer account input, you enter the country as "United States", but enter the identity verification address as "South Korea".
If the countries entered are different, Google will not process identity verification. \_This policy is to prevent illegal copying of accounts such as ghost accounts.
Therefore, please enter the same country and address.
{% endhint %}
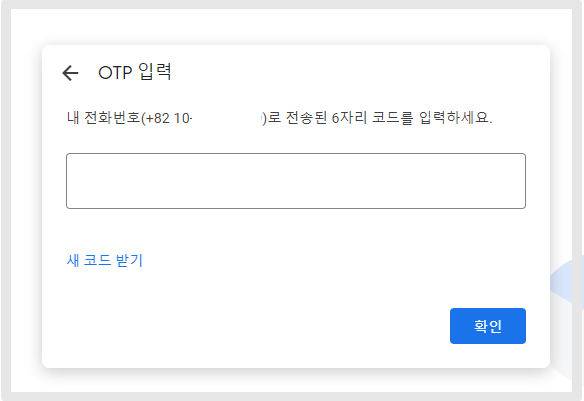
### STEP3. Enter your Verification Code Number (OTP)
As the last authentication, a verification code (code) is sent to the mobile phone number entered by the user.
Enter the 6-digit code sent to you and press the \[Confirm] button.
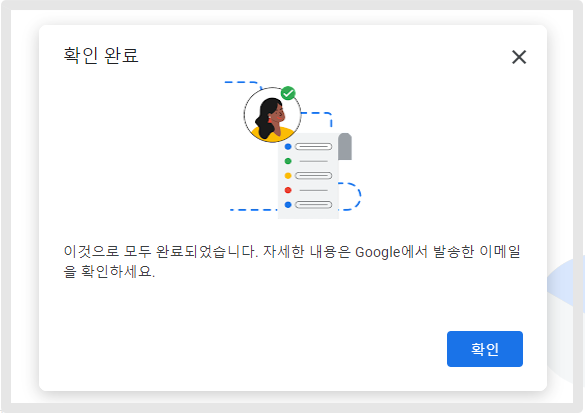
### STEP4.VERIFICATION COMPLETE
Once the OTP code registration is completed, all identity verification is completed.
### STEP5.Done – console available
Play console access is now available.
You must complete identity verification before you can register for the app.
If identity verification is not completed, you will not be able to register the app even if the console is created.
Therefore, after confirming the message that the developer account registration is complete, be sure to go to the Play Console and check if all the tasks you need to do are completed.
In some cases, you may not be prompted to verify your identity.
In this case, you can register the app immediately.
{% hint style="danger" %}
the Important Instructions
1\)In order to register and launch the Play Store app, the user must have a Google developer account, and it is required, not optional.
2\)The developer registration fee is $25, which is a fee payable to Google. Once you pay, you can use it for life.
3\) The Google developer registration fee is not related to the Swing2App service. (Please contact Google customer service for all refunds.)
4\)Google developer accounts are not created in Swing2App. (We cannot make it because we need to enter personal information and verify your identity)
5\)When you want to release an app made with Swing2App on the Play Store, you can only release a paid app.
The free version of the app is a version that cannot be commercialized, so if you want to release it in the store, please purchase a paid app subscription.
6\) When registering an app created by Swing2App on the Play Store, if you find it difficult to do it yourself, the Swing2App team can upload your app on your behalf.
For related information, please check the manual on how to apply for Play Store upload.
**☞ \[See how to apply for Play Store upload]**
7\) The developer account you created can register the app without any restrictions.
However, if you violate the policy, the Play store may delete your app and developer account, so please be sure to check the Google Play policy.
{% endhint %}
\*\*\*\*