Swing2App Manual
Help CenterFAQContact UsBuild an app
  • Swing2App
  • Swing2App Update
  • FAQ
    • FAQ(Frequently Asked Questions)
      • Frequently Asked Questions (FAQ)
      • App Creation FAQ
      • App Operations & Features FAQ
      • App installation and download FAQ
      • Registration and Login FAQ
      • App Preview FAQ
      • Swing Shop FAQ
      • Billing FAQs
      • Paid App Passes & Tickets FAQ
      • Paid usage and uploading FAQ
      • Unlimited Usage and Package FAQ
      • Push sending FAQs
      • PlayStore FAQ
      • App Store FAQ
      • AdMob FAQ
      • Affiliate Program FAQ
      • Customization FAQ
  • Manual
    • App production manual (V3)
      • Start App Creation With MakerV3 Screen
      • Manual on How to Create an App In MakerV3 Screen
      • STEP1 Basic Information
      • STEP2 Prototype
      • STEP3 Page
        • How to Create a Home Screen For an App
        • Registering a menu icon image
        • How to use: Menu Exposure Settings
        • Set menu settings: Access permissions
        • Page Design - UI KIT
        • Page Design - eStore Page
        • Page Design - eStore Deals
        • Page Design - Product Category
        • Page Design- Page Templates
        • Page Design - Image Page
        • Page Design - HTML Editor
        • Page Design - Sign Up, login & Settings Page.
        • Page Design - Search Posts Page
        • Page Design - View Favorite Page
        • Page Design - View Coupons Page
        • Page Design - Share Your App Function
        • Page Design - App Introduction Page
        • Page Design - Admin Chat Page
        • Page Design - Chat List Page
        • Page Design - Surveys Page
        • Page Design - View My Posts Page
        • Page Design - Attendance Check Page
        • Page Design- Web Link
      • STEP4 Complete App Creation
        • How to create an additional app
        • How to update an app
        • App launch screen by update type
    • App production manual(V2)
      • App basics
        • Guide to create an app
        • App Update Type And Method
        • App Launch Screen Update Type
        • Push or WebView version creation method (super simple app creation)
        • WebView App Manual(production and operation)
        • Push App Manual(production and operation)
        • Remove Push App Toolbar
        • App Production
        • Guide to create App Icon Image
        • Guide to Create an Idle Screen Image
        • Image Editing Tool
      • Design Theme
        • Prototype UI Design
        • App Main Design Style
        • App Navigation Styles
        • Applying Slide Prototype
      • Page Menu
        • Page Menu – Main Menu Management
        • Creating an App Home Screen
        • How to use Web Link
        • Home screen: Applying App Introduction Page
        • How to use file attachment
        • How to use the image attachment
        • How to use Product category
        • How to use Weblink-linkeditor
        • How to use User Page
        • How to create an Image Page
        • How to create a web template page
        • How to create HTML editor page
        • Swing2App Page – Signup, Login, Settings
        • Swing2App Page – Search Post
        • Swing2App Page – View Favorites
        • Swing2App Page – View Coupon
        • Swing2App Page – Share App
        • Swing2App Page – App Introduction
        • Swing2App Page – Admin Chat
        • Swing2App Page – How to read my article
        • Swing2App Page - Survey
    • App Production Application TIP
      • Sending a push using the push API
      • Insert GIF image
      • Create a Flash style home screen
      • Change App Loading Icon
      • Set device mode (switch app screens)
      • How to use the app review button
    • App operation manual
      • Bulletin board management
        • Create a bulletin board
        • Bulletin board type, design style
        • Bulletin Board – How to Enter Posts
        • Bulletin Board – Post Schedule Settings
        • Set post detail options
        • Bulletin Board – How to Attach Files
        • Register video post(how to register a video)
        • Bulletin Board – How to Attach Music Files
        • How to enter post comments and comments
        • How to set up Bulletin Board Permission
        • Bulletin board authority setting
        • How to create a Form in Bulletin Board
        • How to write a bulletin board
        • How to use the list screen and creation screen
        • How to set up a bulletin board post alarm
        • Set Up a Board Administrator
        • Google Map Bulletin Board
        • Google Map Bulletin Board Advanced setting
        • HTML Editor Writing
        • Report and manage posts
        • Block posts
        • Create bulletin board by membership level
        • Bulletin board thumbnail image registration
        • Search Post Functions
        • Post Management Options
        • How to use the bulk registration bulletin board
        • Copy Bulletin Board
        • Copy Post
        • Move a post
        • How to delete bulk posts
        • Group Chat
        • Create a Secret Bulletin Board (1:1 Customer Service)
        • Create a link for a post
        • How to Use Calendar
        • Calendar Application - How To Use
        • How to create and register a stamp
        • Stamp application: Issue coupons upon completion of stamps
        • How to use the bulletin board header
        • Using 2 hash-tags Options
        • How to use hashtag search option
        • Download Posts
      • Service management
        • How to use Pop-up
        • Check-ins
        • Surveys
        • Resource Management – Capacity Management
        • Coupon Management: Create and Issue Coupon
        • How to use Admin Chat [1:1 Chat]
        • Chat Administrator Page – Chat List
        • Chat Administrator page – Chat settings
        • How to use chat list
        • Unified Notification Settings
        • App Policy Management – App Subscription Policy
        • App Terms of Use And Privacy Policy
        • App Policy Management-Membership Form
        • App policy management – How to set up a membership completion message
        • Membership Form-ID Setting
        • App Terms and Conditions, Privacy Policy
        • Create a Private App
        • App string management
        • Link Wizard
      • Push & Member Menu
        • Send push
        • Send Push from Push Version App
        • Push Posts
        • Display messages after getting push notifications
        • Delete or Mark as Read Push Notifications
        • Push history
        • Member Inquiry - Check Member Information
        • Member Inquiry - Setting up an Associate Administrator
        • Member Inquiry - Create User Account
        • Setting up an App Administrator
        • Permission Group Settings-Membership Rating
        • Admin Screen: Change App member's name
        • How to use Push device management
      • Analytics
      • Version control
        • Version management-App production and market registration history
        • How to apply for App Store Upload
        • How to apply for Google Play Store Upload
        • How to apply for a mobile web upload
      • Payment
        • Introduction of paid products and payment methods
        • Payment-How to use my payment status
        • How to Use 1000 SMS Tickets
        • WebView Lifetime Paid App
        • PushOnly Lifetime Paid App
        • How to use mobile web registration
        • Budget package
        • AdMob Power Package
        • Large Storage Packages
        • Online Stores – Coupon
      • Full Search Function
    • SwingShop
      • Apply for Swing Store
      • Swing Store Product Type
      • Introduction of pages provided by Swing Shop
      • How to Apply a Swing Store Menu to your App
      • Swing Shop - Shopping Mall Main Page How to Use
      • Shopping Mall Main Page Slide Image
      • Store Management - Basic Information Settings
      • Store Management - Shipping Management
      • Product Management - Set how to receive goods
      • Product Management - Product Category Registration
      • Store Management-Policy Settings
      • Product Management - Physical Product Registration
      • Product Management - Digital Products: PDF File Registration
      • Product Management - Digital Products: Video Files Registration
      • Product Management-Digital Products: Authorized Sales
      • Product Management-Digital Products: Coupon Registration
      • Product Management-Reservation system product registration
      • Product management - Reservation system, Time reservation product registration
      • Product management-Reservation System Operation TIP
      • Product Management - Product Post Management
      • Product Management- Product Inquiry, Reservation Product Inquiry
      • Product Management - Product Exposure Management
      • Order Management
      • Reservation Order Management
      • Store Statistics
      • Swing2App Page-shopinfo
      • Swing2App Page-Search
      • Swing2App Page - Category List
      • Swing2App Page-mypage
      • Swing2App Page - Cart
      • Swing2App Page-digital products
      • Product Modification - Modify a registered product
    • Affiliate program
      • How to apply for affiliate program
  • Web App - Webview, Push
    • Web App - Webview, Push
      • Swing2App WebView App
      • Swing2App Push App
      • webview app manual
      • Pushapp manual
      • How to create a push app or webview app easily
      • Push-app toolbar
      • How to use the first run address in webview and push app
      • WebviewApp basic settings and advanced setting options
      • Push App Toolbar - Introduction: How to Use and Functions
      • Registering a Push Notification Icon Image
      • Progress Bar Color Settings
      • Remove progress bar (not in use)
  • App Guide
    • How to use Swing2App Preview
    • Application operation
      • How to convert and use paid apps.
      • How to install APK file on your phone
      • How to install apps by sharing
      • Free app conversion method after Paid period ends/expires
      • Download the app after accessing the mobile Swing2App site
      • Download the app using the app installation link address
      • If you can not install the free version of the app (APK file), please check!
      • If you can not install the paid version app (APK file), please check!
      • Find App Password
      • Registering and changing your app profile picture
      • How to re-register with the same ID after leaving the app
      • Share app
      • App – Share your Bulletin Board Posts
      • How to use the App Administrator menu
      • App Administrator menu: Chat
      • App Administrator Menu: Registering Stamp
      • App Administrator Menu: Use Coupon
  • STORE
    • Play Store
      • How to create a Google Developer Account
      • Create a Google Developer - Business Account
      • Google Developer Account Identity Verification
      • Launching Play Store App
      • Setting up Play Store app auto-updates
      • Transfer your app to another developer account on the Play Store
      • How to change the name of Play Store Developer
      • Delete Play Store app
      • How to use Google Help Center
      • Issuing Google Maps API Key
      • Invite a Play Store Developer Account
      • How to get app updates released on the Play Store
      • Launch the Play Store Private App (Alpha release)
      • Check Play Store App Installs
      • Reply to Play Store app reviews
      • Play Store Developer Page
      • Play Store prior notice
      • Linking Play Store Privacy Links
      • Play Store App Search TIP
      • How to restore Play Store app
      • Update the Play Store App
    • App Store
      • App Store Apple Developer Account Registration
      • Check app store app downloads
      • How to use the App Store Customer Center
      • Delete apps from the App Store
      • AppStore App Rejection Cases
      • App Store TestFlight
      • How to invite Swing2App account on App Store Connect and share information on App Store Upload form
    • AdMob (Google AdMob Ads)
      • Admob Banner Ad Frequency Settings
      • Admob Operation Precautions
      • How to apply AdMob plug-in
      • AdMob Plug-in check
      • What is AdMob plugin setting?
      • How to join AdMobs, create an Ad Unit ID
  • Developer Document
    • Server Side API Specifications
      • Sending a push notification By API
    • Webview (Webview, Push only) Development tool
      • Implementing Google and Facebook Login in WebView
      • Website Member Integration Guide
        • Wix Website User Integration Guide
        • WordPress Website Member Integration Guide
      • Javascript API Documentation
  • Policy
    • Store Policy
    • Limit on the Number of Devices for Free User
    • Swing Store Terms and Conditions
Powered by GitBook
On this page
  • 01. Reservation System – Set Reservation Date
  • 02. Apply the reservation system menu to the app: Only the reservation date is displayed
  • 03. App Launch Screen
  • 01. Reservation System – Set the Reservation Date, Reservation Time
  • 02. Apply reservation system menu to app: Display Reservation date, reservation time
  • 03. App Launch Screen
Edit on GitHub
  1. Manual
  2. SwingShop

Product management-Reservation System Operation TIP

Last updated 2 years ago

Swing Store-The booking system is not only a reservation product, but also a method to set the date of the reservation to be purchased on a mere date. You can also register products that can be purchased at the same time as the reservation date.

So depending on what kind of product you sell –

-Do you want to let the consumer purchase the reservation product only on the date of the reservation?

-After selecting the reservation date, you can set the time together to purchase the reservation product.

We’ll tell you about the sales method of the reservation system through the manual.

1. (Reservation date) select In-Out time

First, let’s check how to register a reservation product that selects only the reservation date, how to apply the app, and how to run the app.

01. Reservation System – Set Reservation Date

Reservation products must be registered when the menu is applied, you can see the reservation products in the app.

Therefore, please add your reservation at Swing Store-Product Registration.

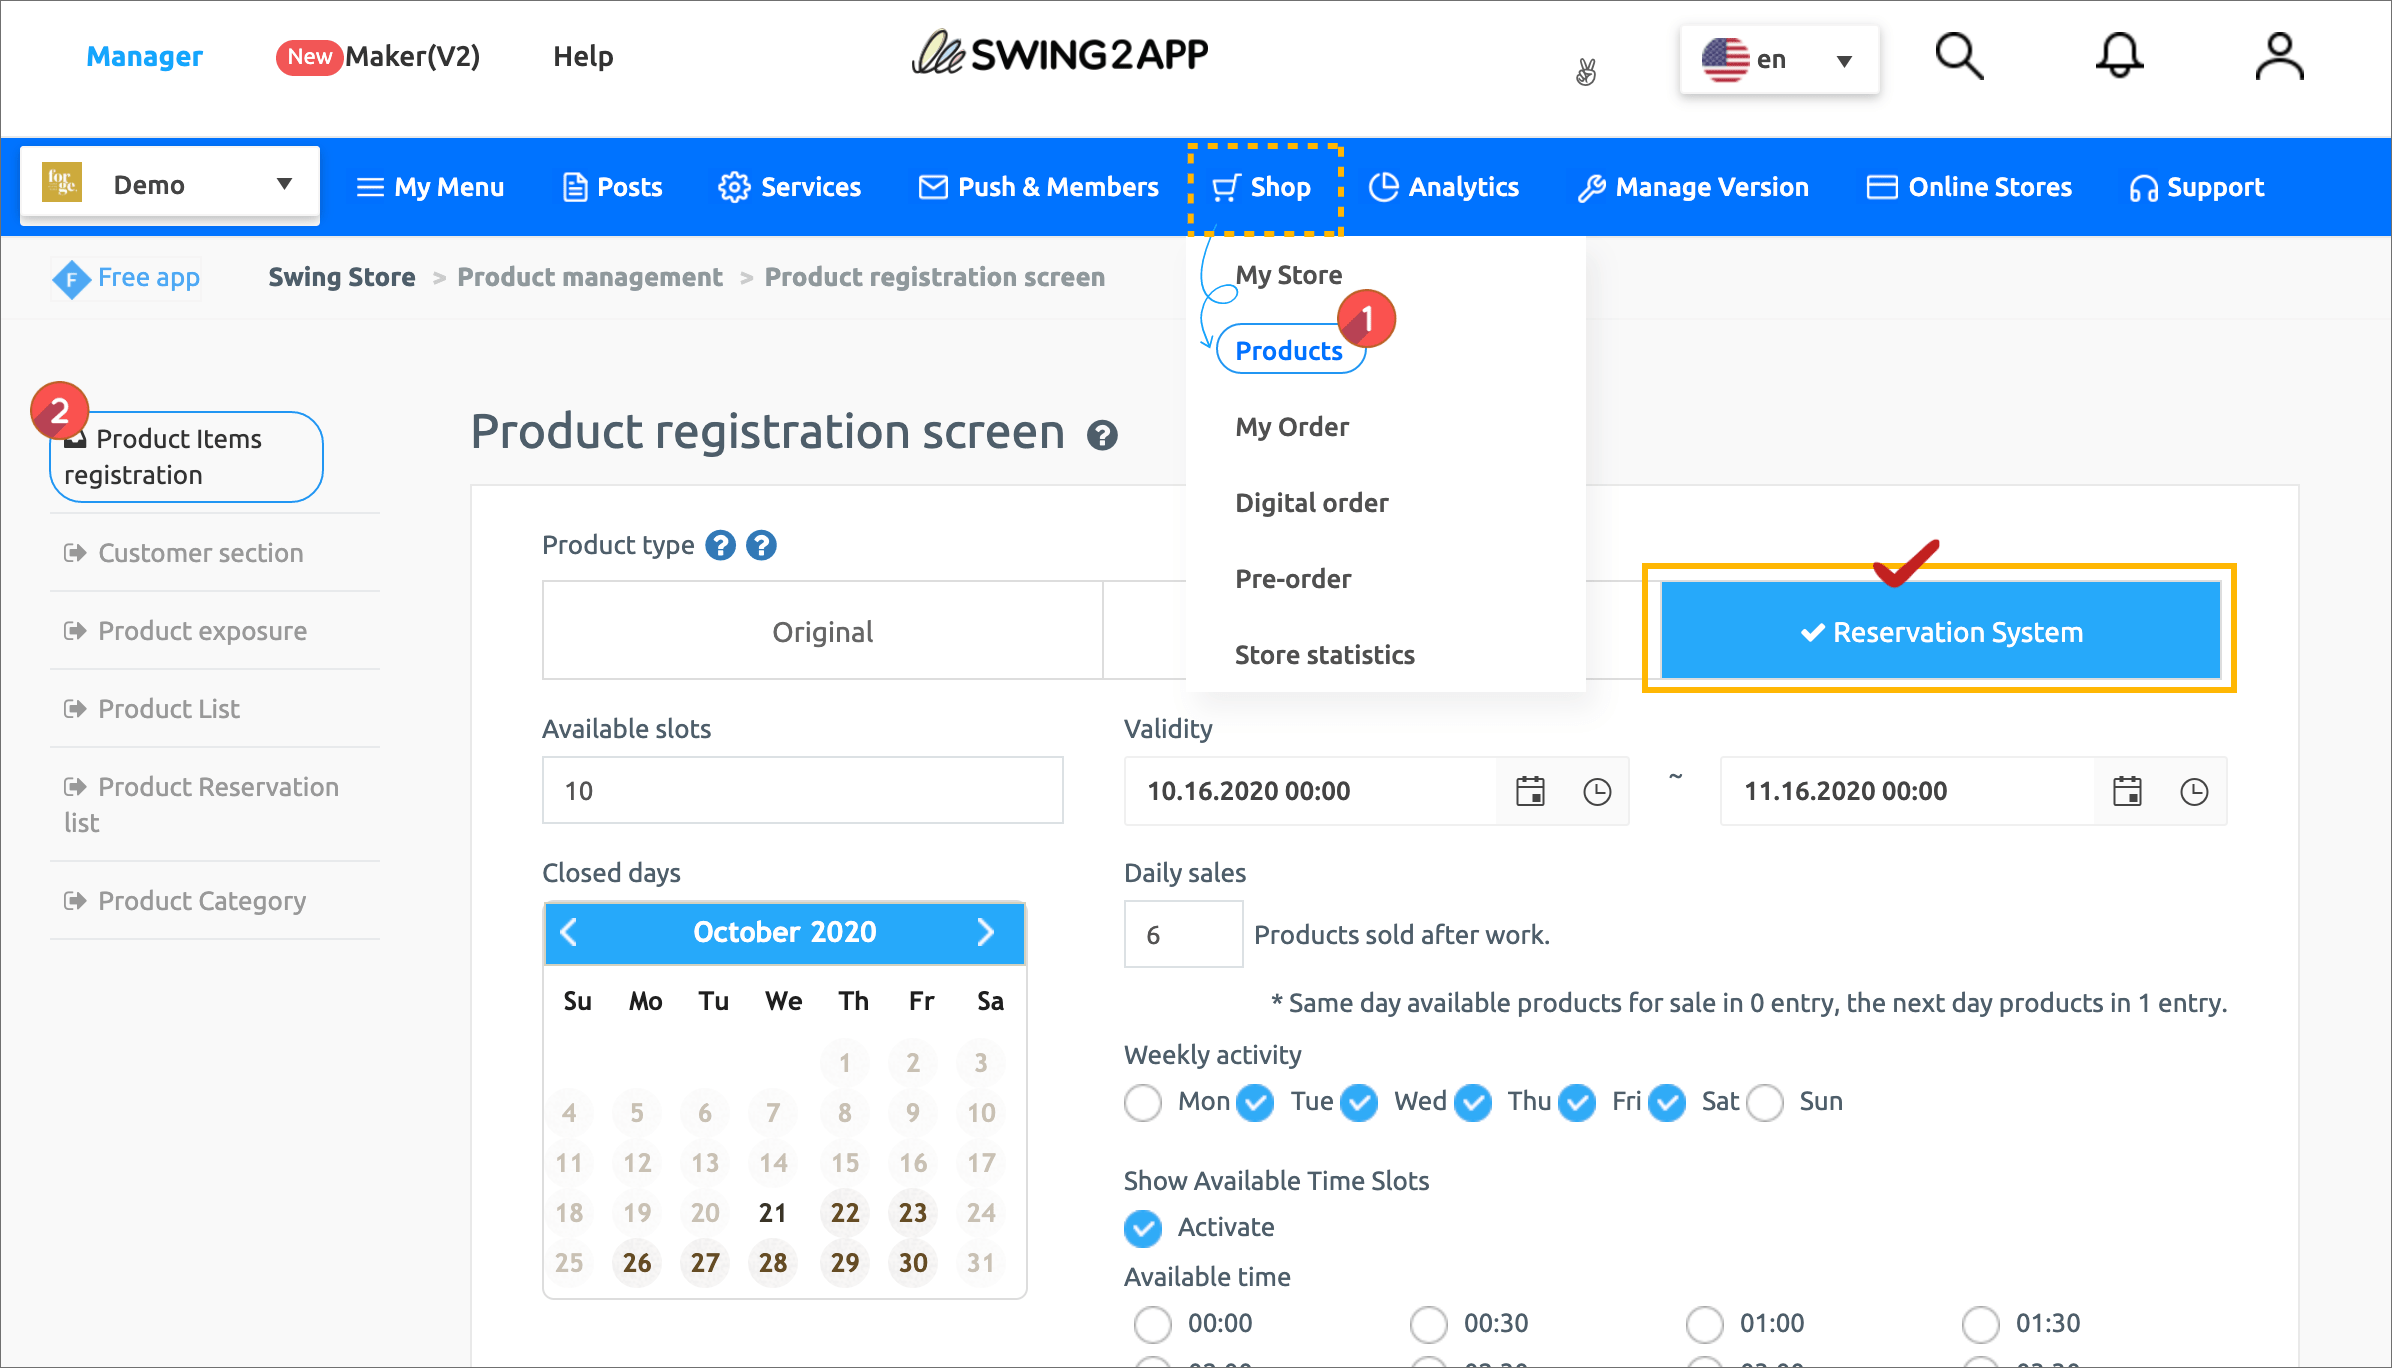
Manager → Shop → Reservation System

On the product registration page, select the product type: reservation system, and select the sales period and the available date.

*At this time, if you sell a reservation that shows only the reservation date, time reservation activation is not checked.

02. Apply the reservation system menu to the app: Only the reservation date is displayed

Maker(V2) Page → Move to Step 3 Page Menu

  1. Select Home screen and click Add a Category. A new menu item will appear.

  2. Select the new menu item and change the name in Menu Name.

  3. Select Swing2App Page.

  4. Click on the Link Wizard icon. The Link Wizard pop-up window will open.

  5. Select a In-Out Time from the list.

  6. Click on Reflect

  7. Click on Apply.

  8. Click on Save.

03. App Launch Screen

If you look at the app launch screen with the reservation product (reservation system) applied with the reservation date, you can select the reservation date (date) and select the desired product from the list.

Users can select and purchase a desired product on that day after selecting the reservation date.

Utilization TIP

Time-setting reservation products can be useful in industries that make reservations on a daily basis.

Example business type) It can be applied to hotels, pensions, motels, Airbnb hotels, water parks, travel products, etc.

2. Select date, time and reservation

Let’s check how to register a reservation product to select the date of booking, the time of the reservation, how to apply the app, and the app launch screen.

01. Reservation System – Set the Reservation Date, Reservation Time

Next, let’s register the reservation product that shows the reservation date and the reservation time together.

Manager → Shop → Product

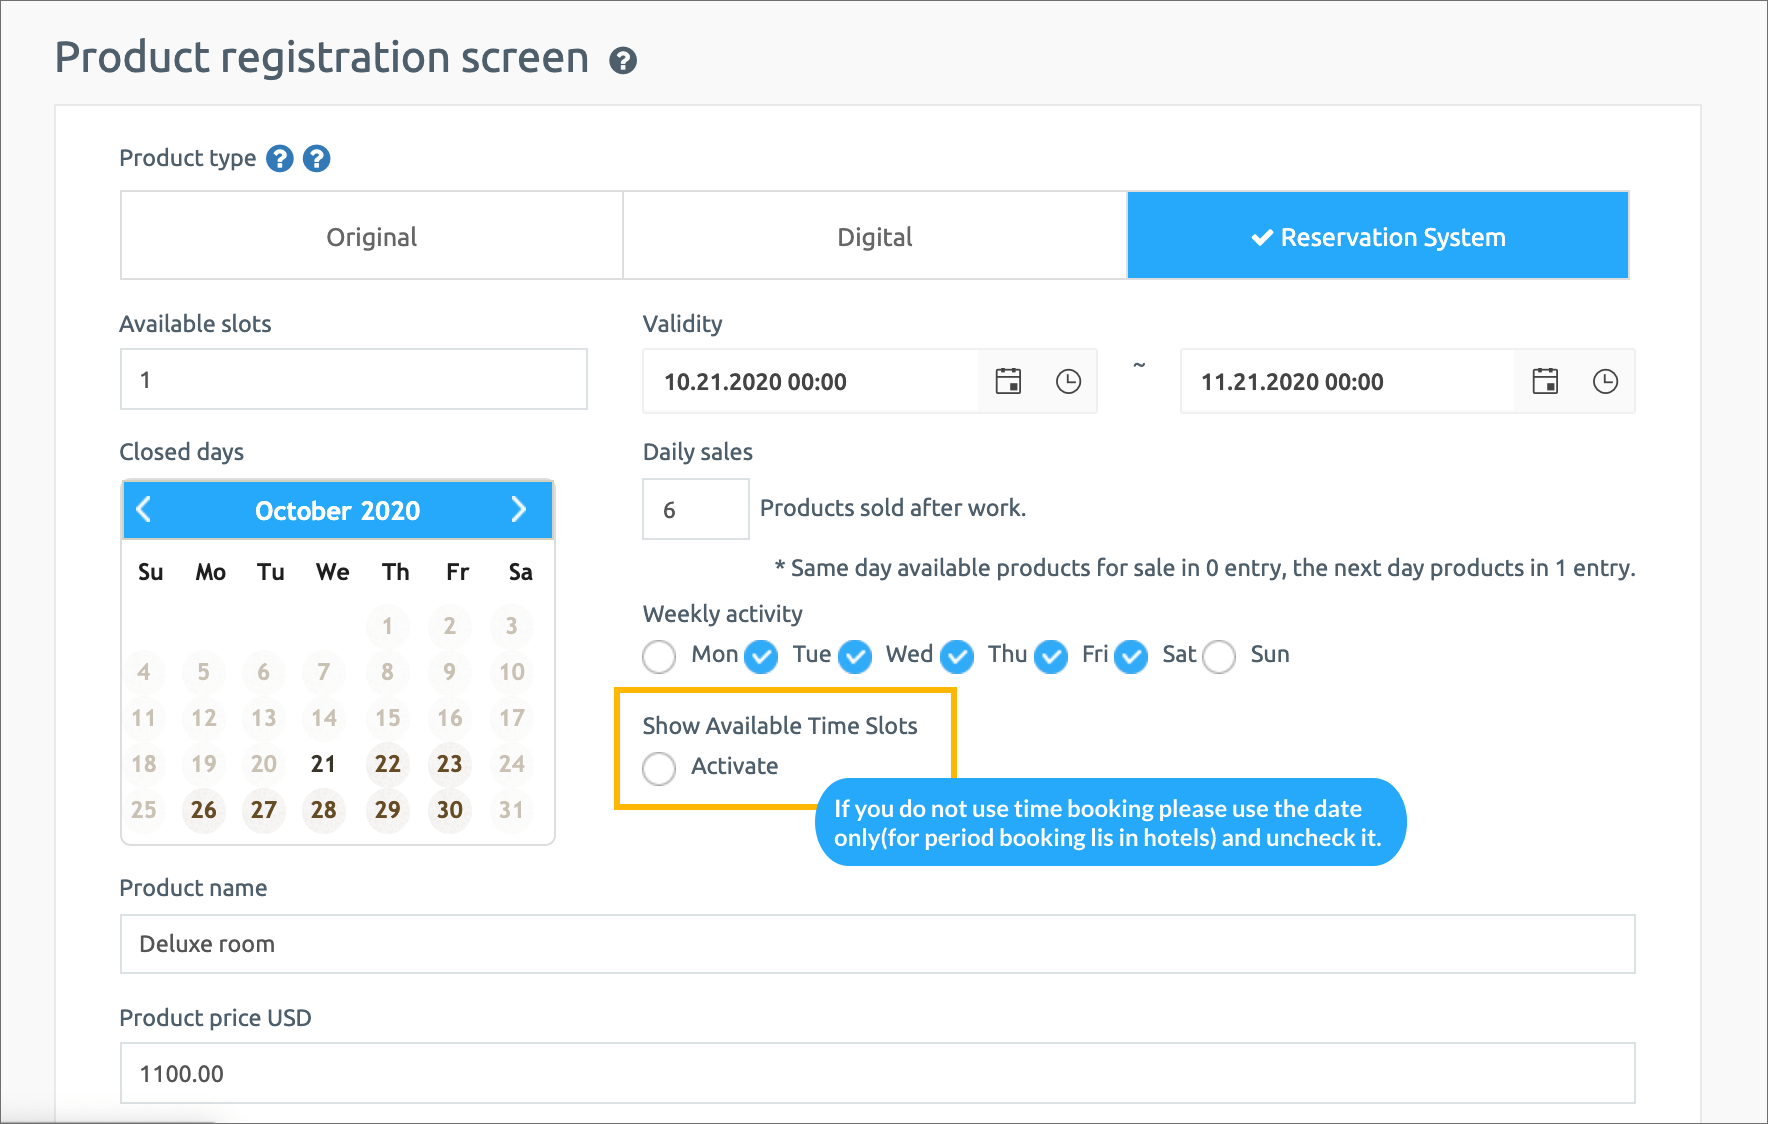
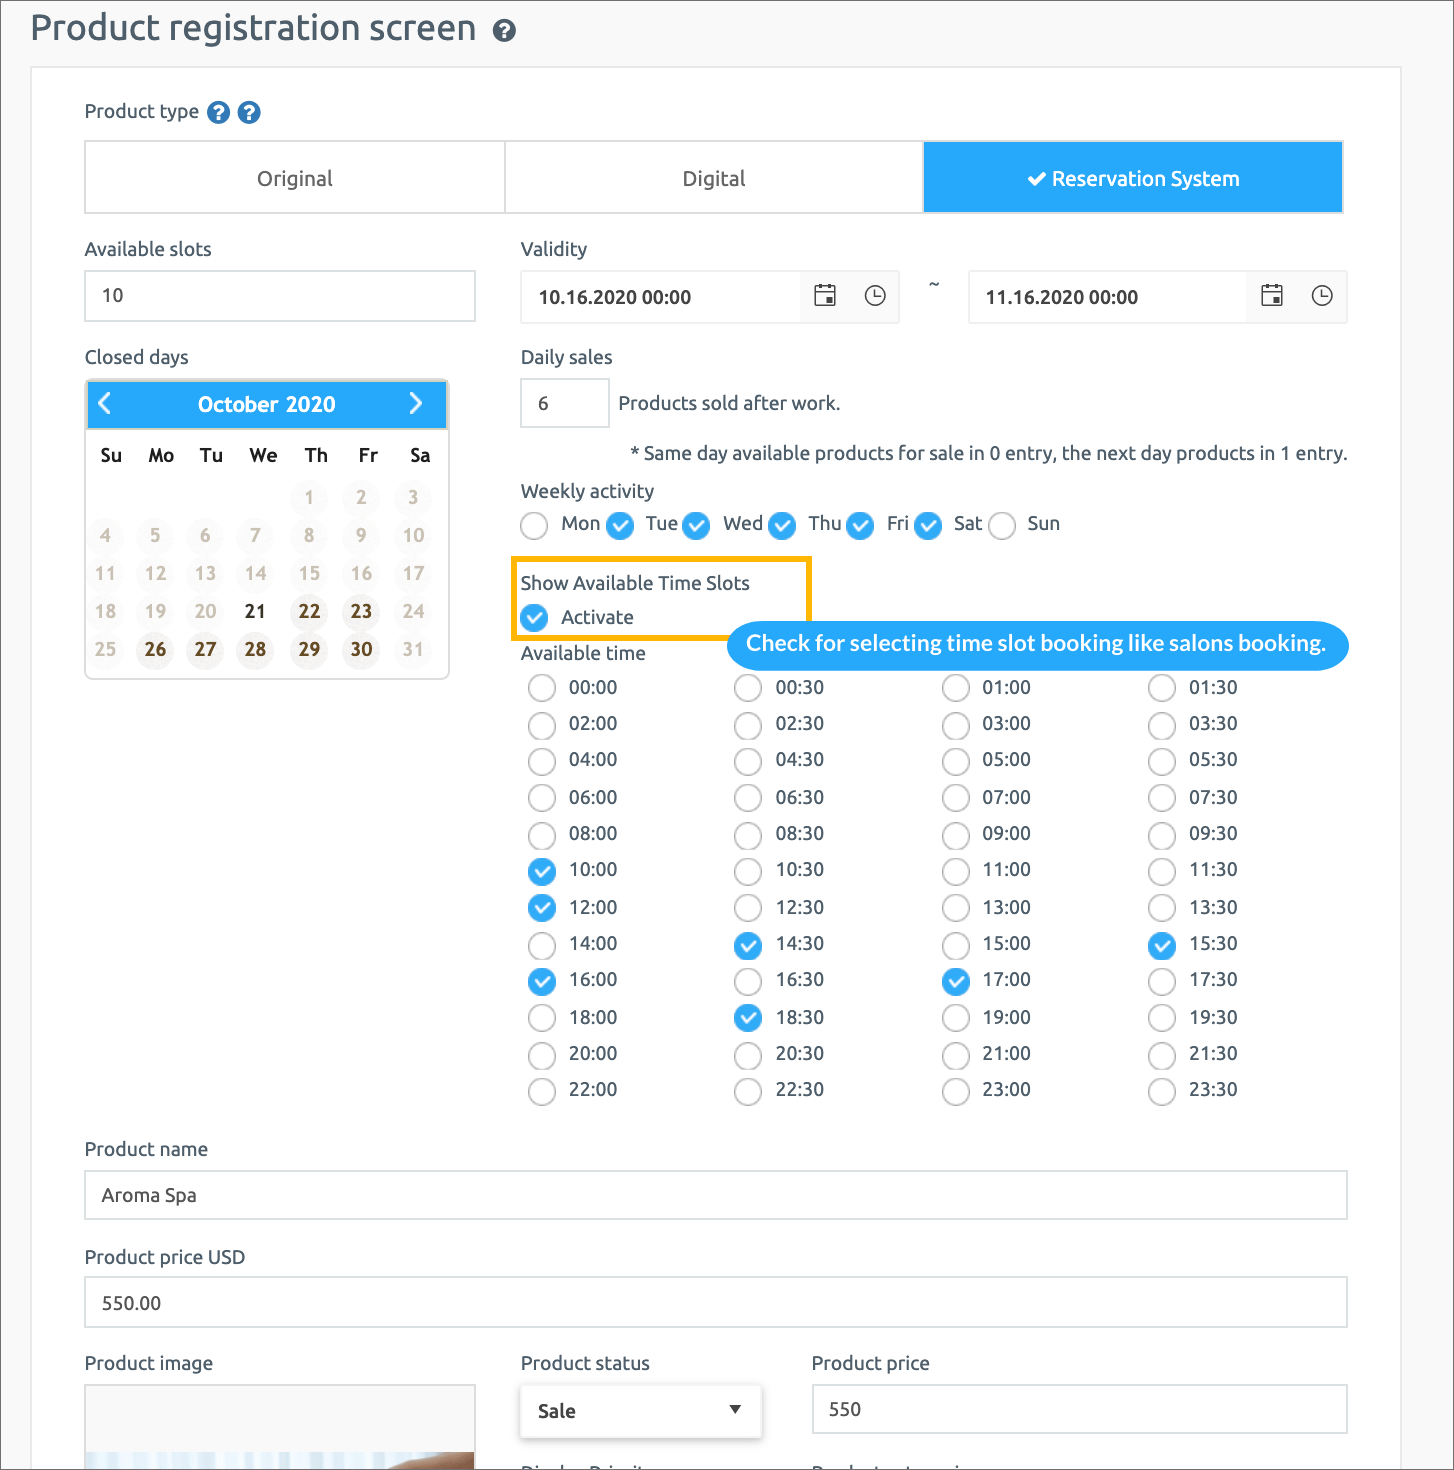
On the product registration page, please select the product type: Reservation system, the sales period and the date on which it is available for sale.

* At this time, if you check [Enable time reservation], the available time will be listed at that time.

The administrator can check and save only the reservation time for sale.

If you check and save the reservation date and time together, you can select the time is also displayed in the App-Booking list.

02. Apply reservation system menu to app: Display Reservation date, reservation time

Maker(V2) Page → Move to Step 3 Page Menu

  1. Select Home screen and click Add a Category. A new menu item will appear.

  2. Select the new menu item and change the name in Menu Name.

  3. Select Swing2App Page.

  4. Click on the Link Wizard icon. The Link Wizard pop-up window will open.

  5. Select a Booking from the list.

  6. Click on Reflect

  7. Click on Apply.

  8. Click on Save.

03. App Launch Screen

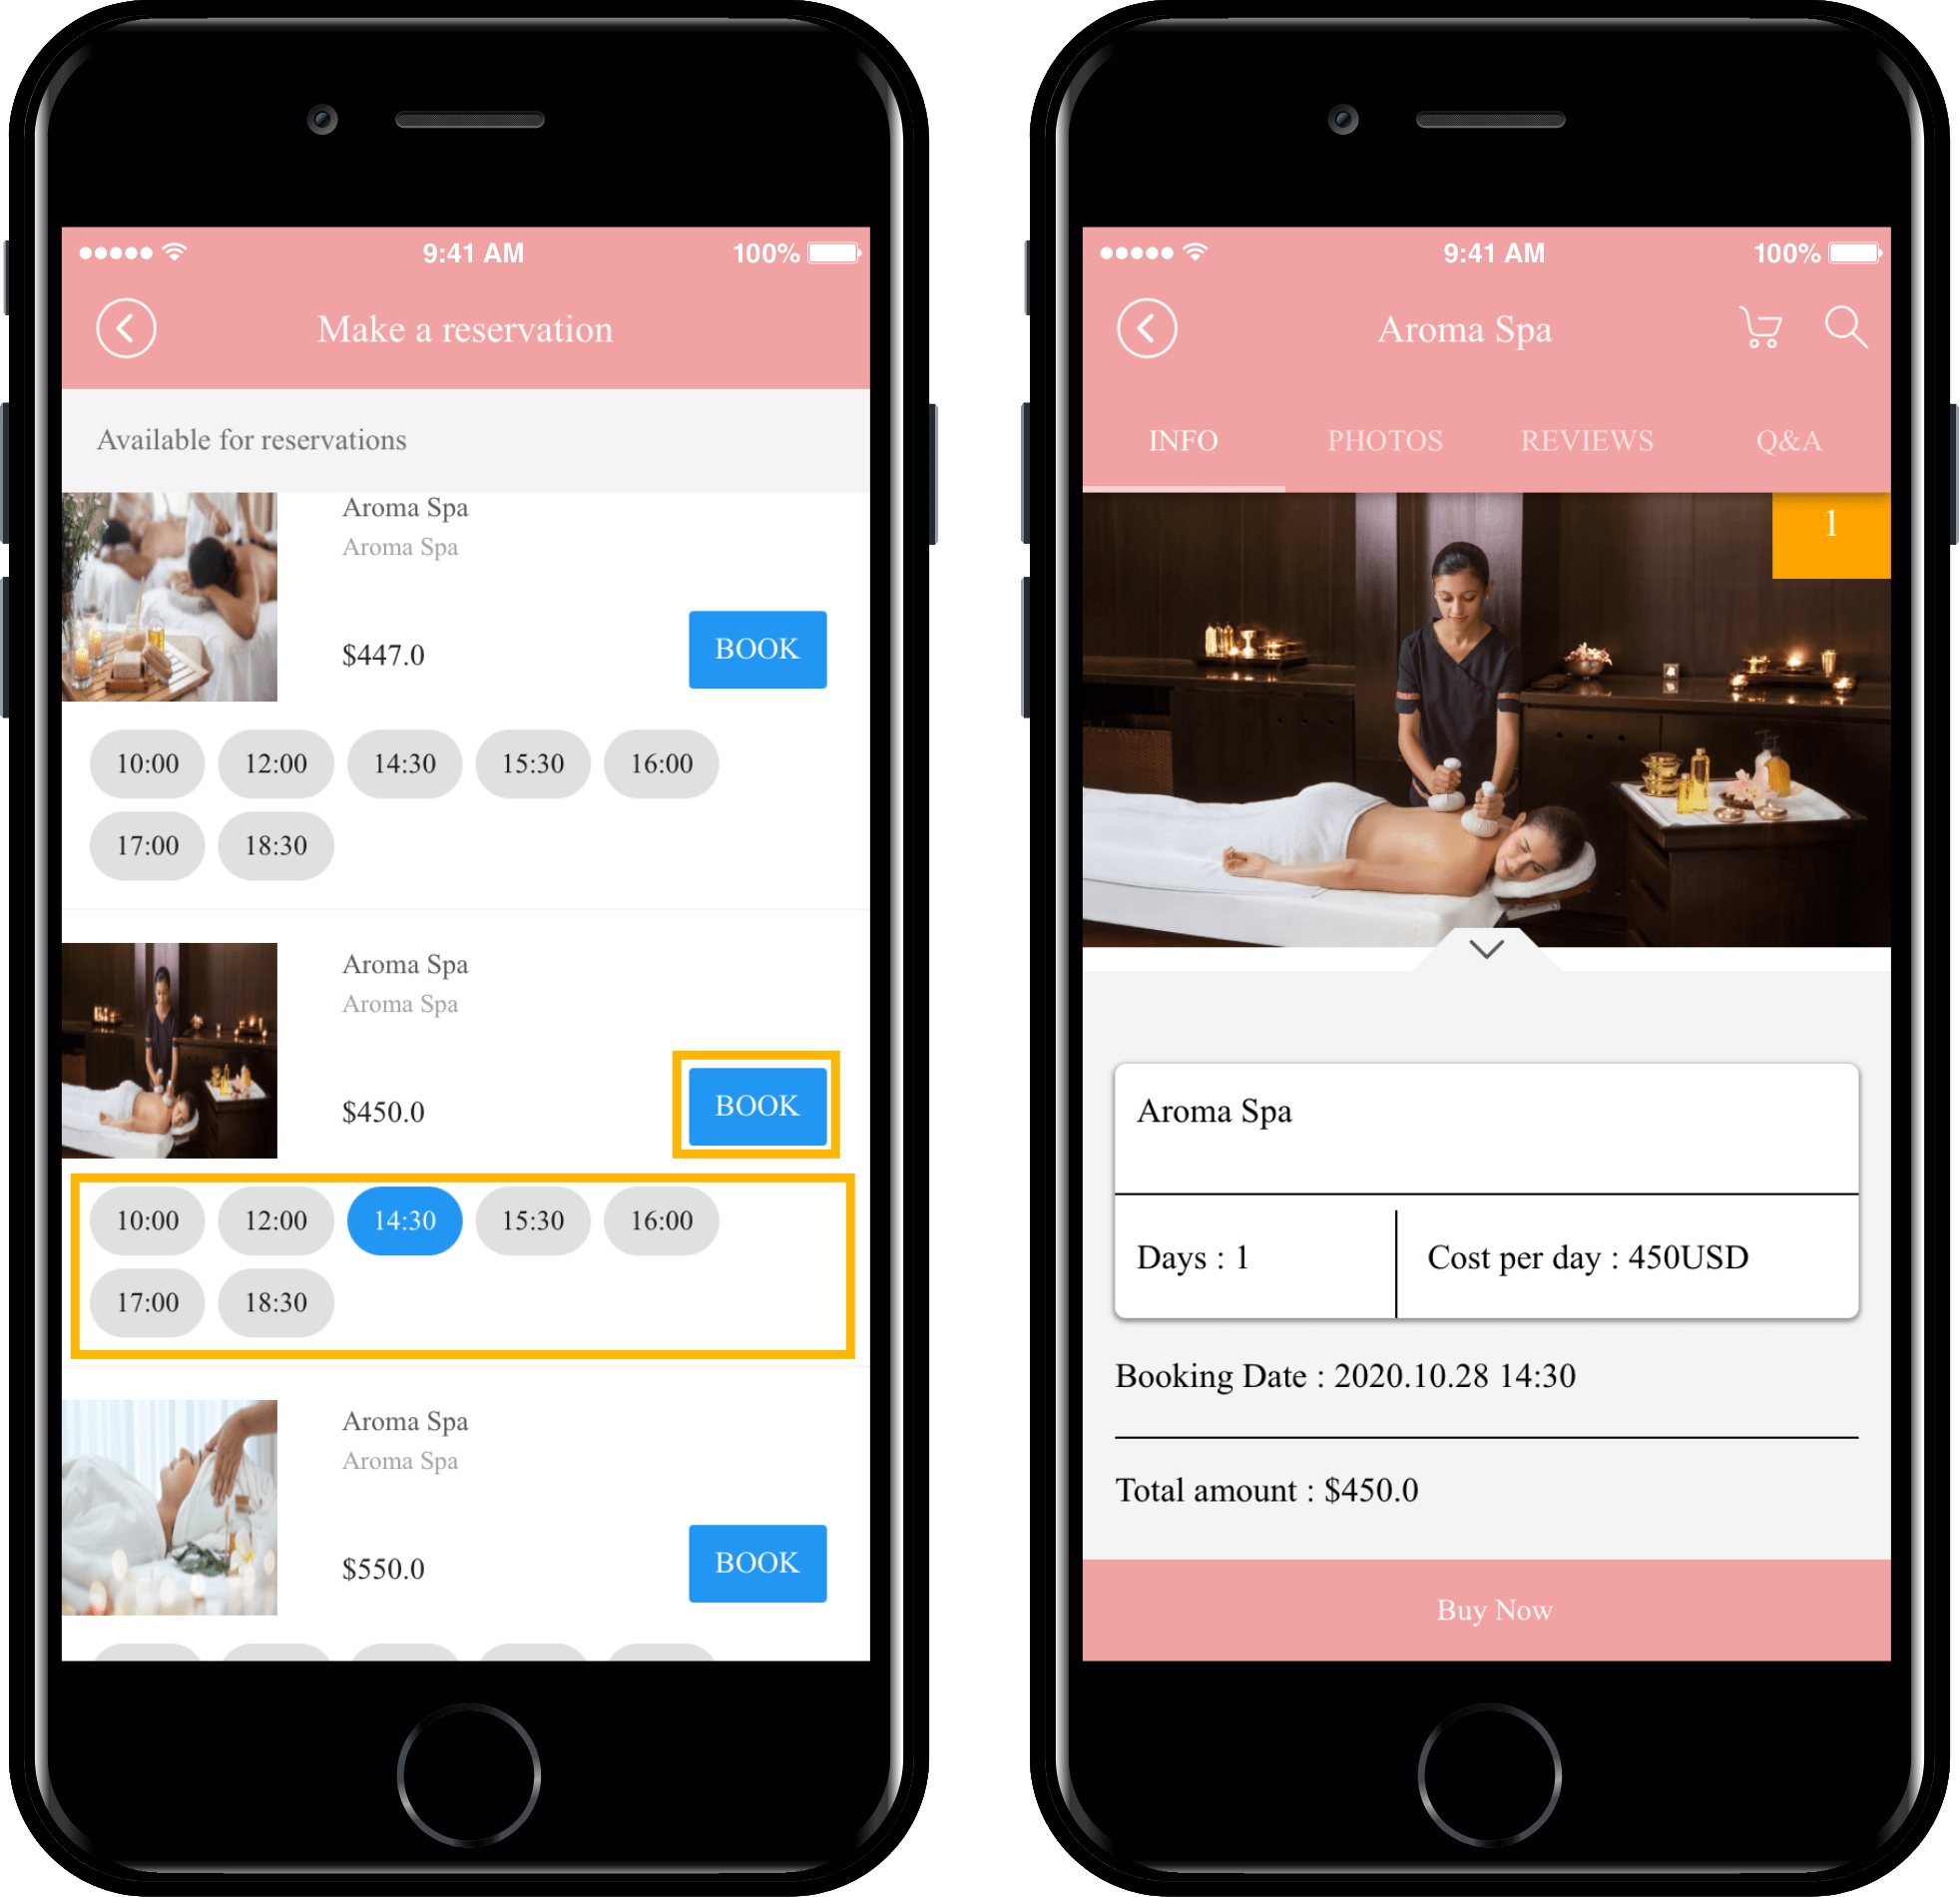
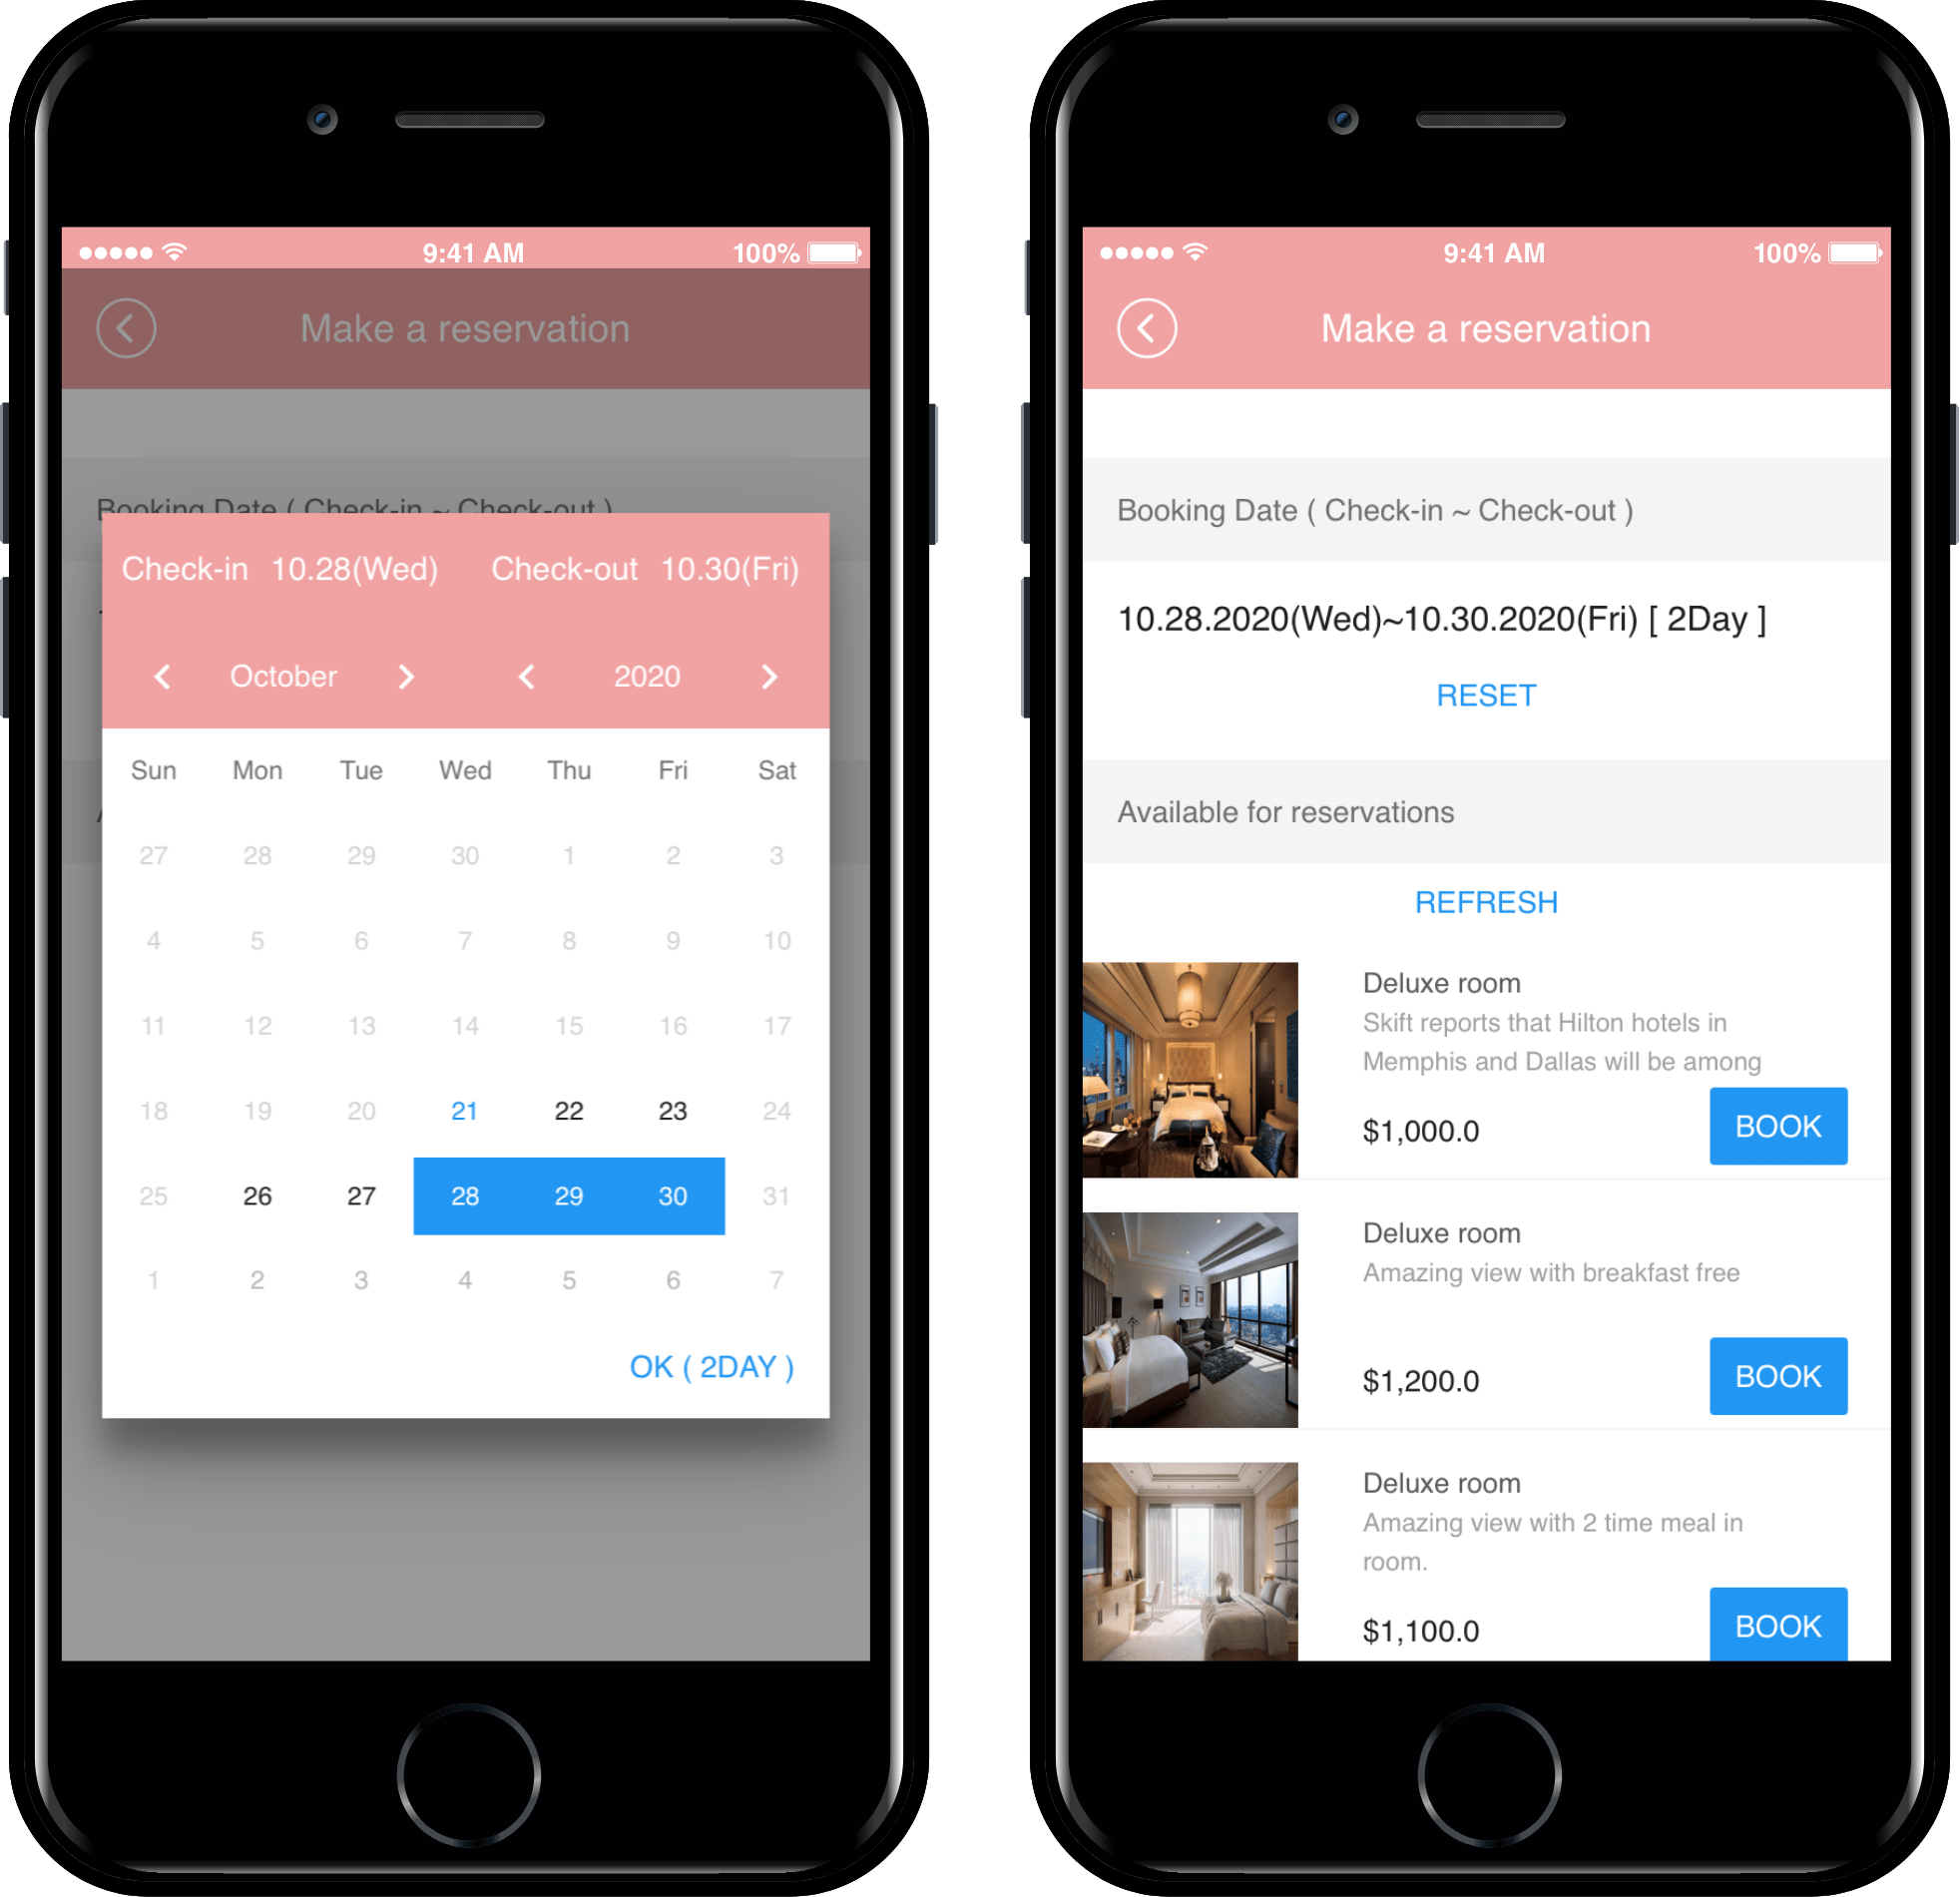
If you look at the app launch screen with the reservation product (reservation system) which applies the reservation date and time together, you can select the reservation date (date) and see that the reservation time is displayed together in the list.

Users can select a reservation date and then select a desired time to purchase a reservation.

Utilization TIP

Period and time-setting pre-sale products – this can be useful in industries where you book by hour, rather than renting a day.

Example industry) You can use it at the nail salon, hair salon, hospital facilities such as dermatology, spa & massage shop, restaurant meal reservation, theater/movie and more.

The reservation system is a menu provided by the swing store.

Therefore, it is not available in normal apps. You must apply for a swing store (swing2app shopping mall).

Please check below on how to apply and use the Shop.

★

★

Swing Store – Check out the manual for registration of reservation products
https://support.swing2app.com/documentation/swingshop/