> For the complete documentation index, see [llms.txt](https://documentation.swing2app.com/llms.txt). Markdown versions of documentation pages are available by appending `.md` to page URLs; this page is available as [Markdown](https://documentation.swing2app.com/store/playstore/playstore-privacylinks.md).
# Linking Play Store Privacy Links

When registering a Play Store app – you will learn how to enter the ‘Privacy Policy’ in the Store Listing menu.
**▶ What is the Privacy Policy?**
**The privacy policy provides information on what is required and how to use it.**
**You’ll probably see a lot of “privacy policies” when you look at the bottom of your homepage or shopping mall.\*There’s also a sign-up page.**
**You must also enter a link (URL) with this information in your Play Store upload.**
**In general, the app asks the user for basic information or uses a camera, contact, phone, etc., so the app should provide a reasonable usage policy for the user’s personal information.**
**-Therefore, those who have linked the homepage to the app can register the URL of the privacy policy on the homepage.**
**-If you do not have a policy, you can register the URL by modifying the Terms of Service on the swing2app homepage.**

**\*\*Precautions\*\***
The terms and conditions provided by Swing2App are services provided to users who create apps with Swing\~!
However, in some cases, people who do not create an app with Swing and use only the URL of the relevant terms and conditions and use it as a link to the privacy policy are receiving more reports.
You didn’t create an app with our service, but we use our own program!
It’s obviously stealing programs without permission.
Therefore, those who continuously filter and retrieve our unique usage policy URL will report it to Google and take action.
Please note that the app may be deleted once it is submitted to Google.
 **Where to enter the privacy policy URL when registering for the Play Store app?**
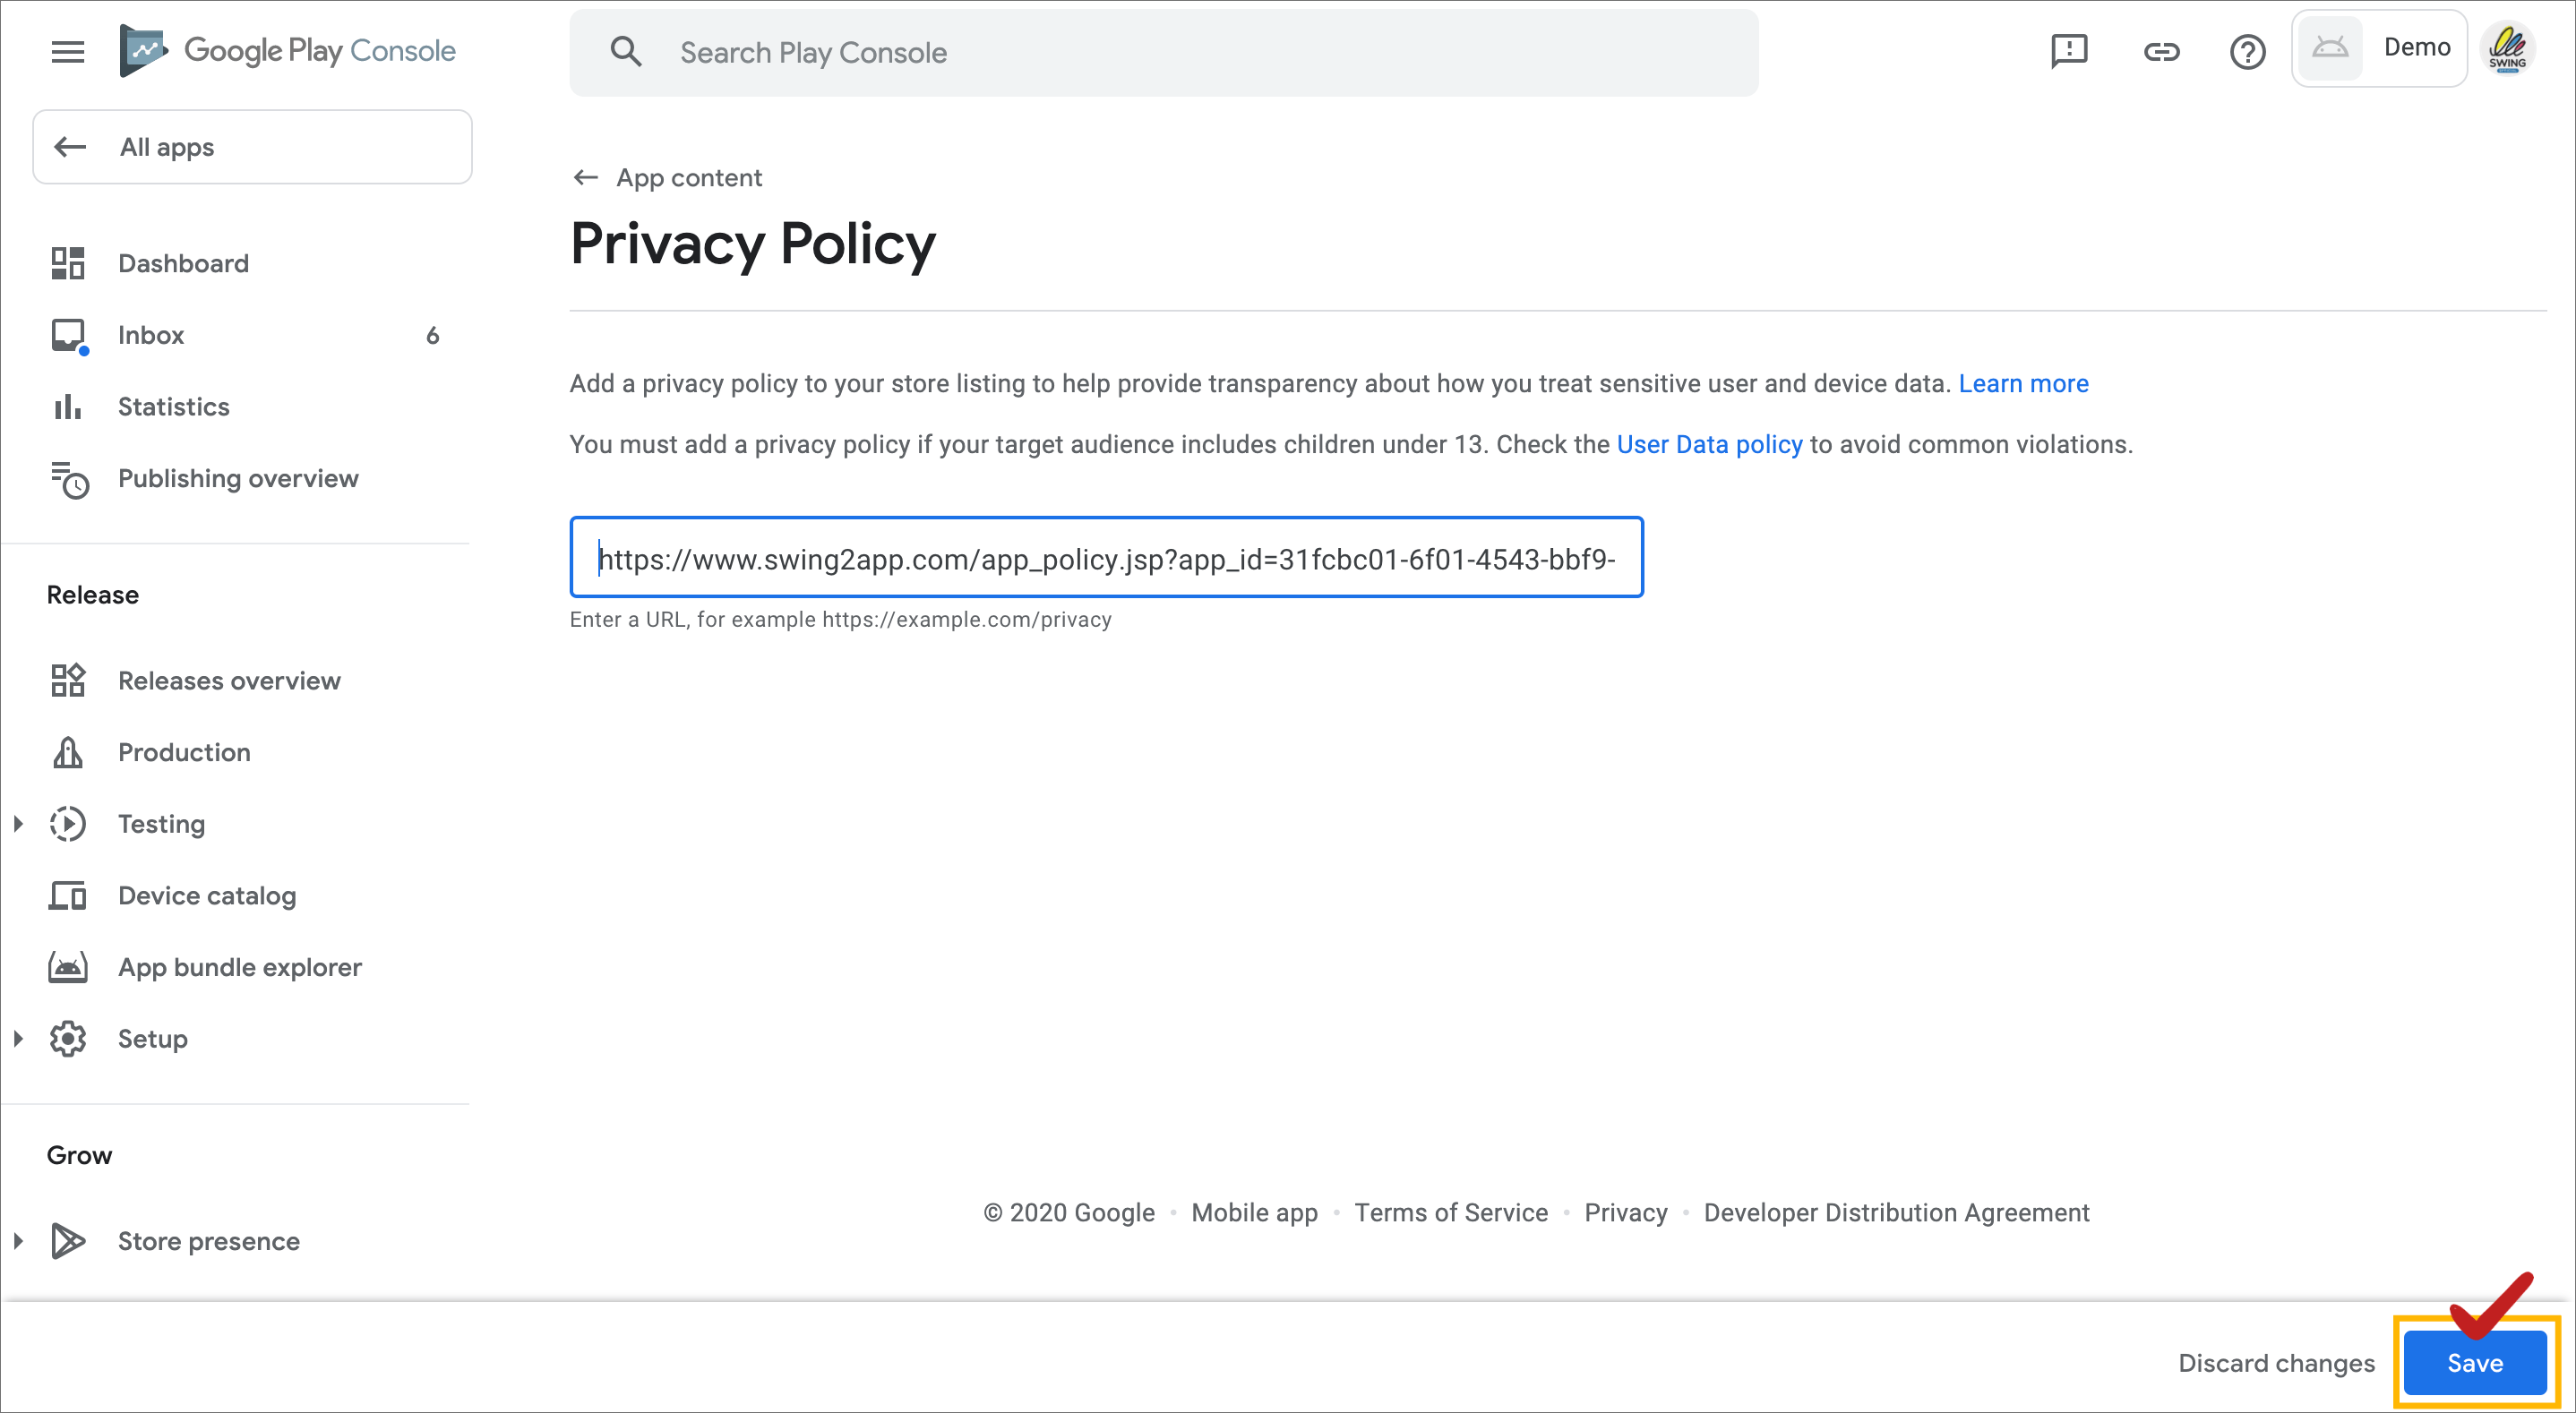
When you select an app on the Google Play console, the first step of initial setup comes out.
When you finish entering the content rating, you can check the **\[Privacy Policy]** section.
Enter the URL here.
**You just need to enter the link in the play store, so you won’t be very difficult in fact!**
**Instead, it would be most important to get the link that corresponds to the privacy policy, right**
**We will explain below.**
### **STEP.1 Copy the link after editing the personal information item in the app subscription policy**
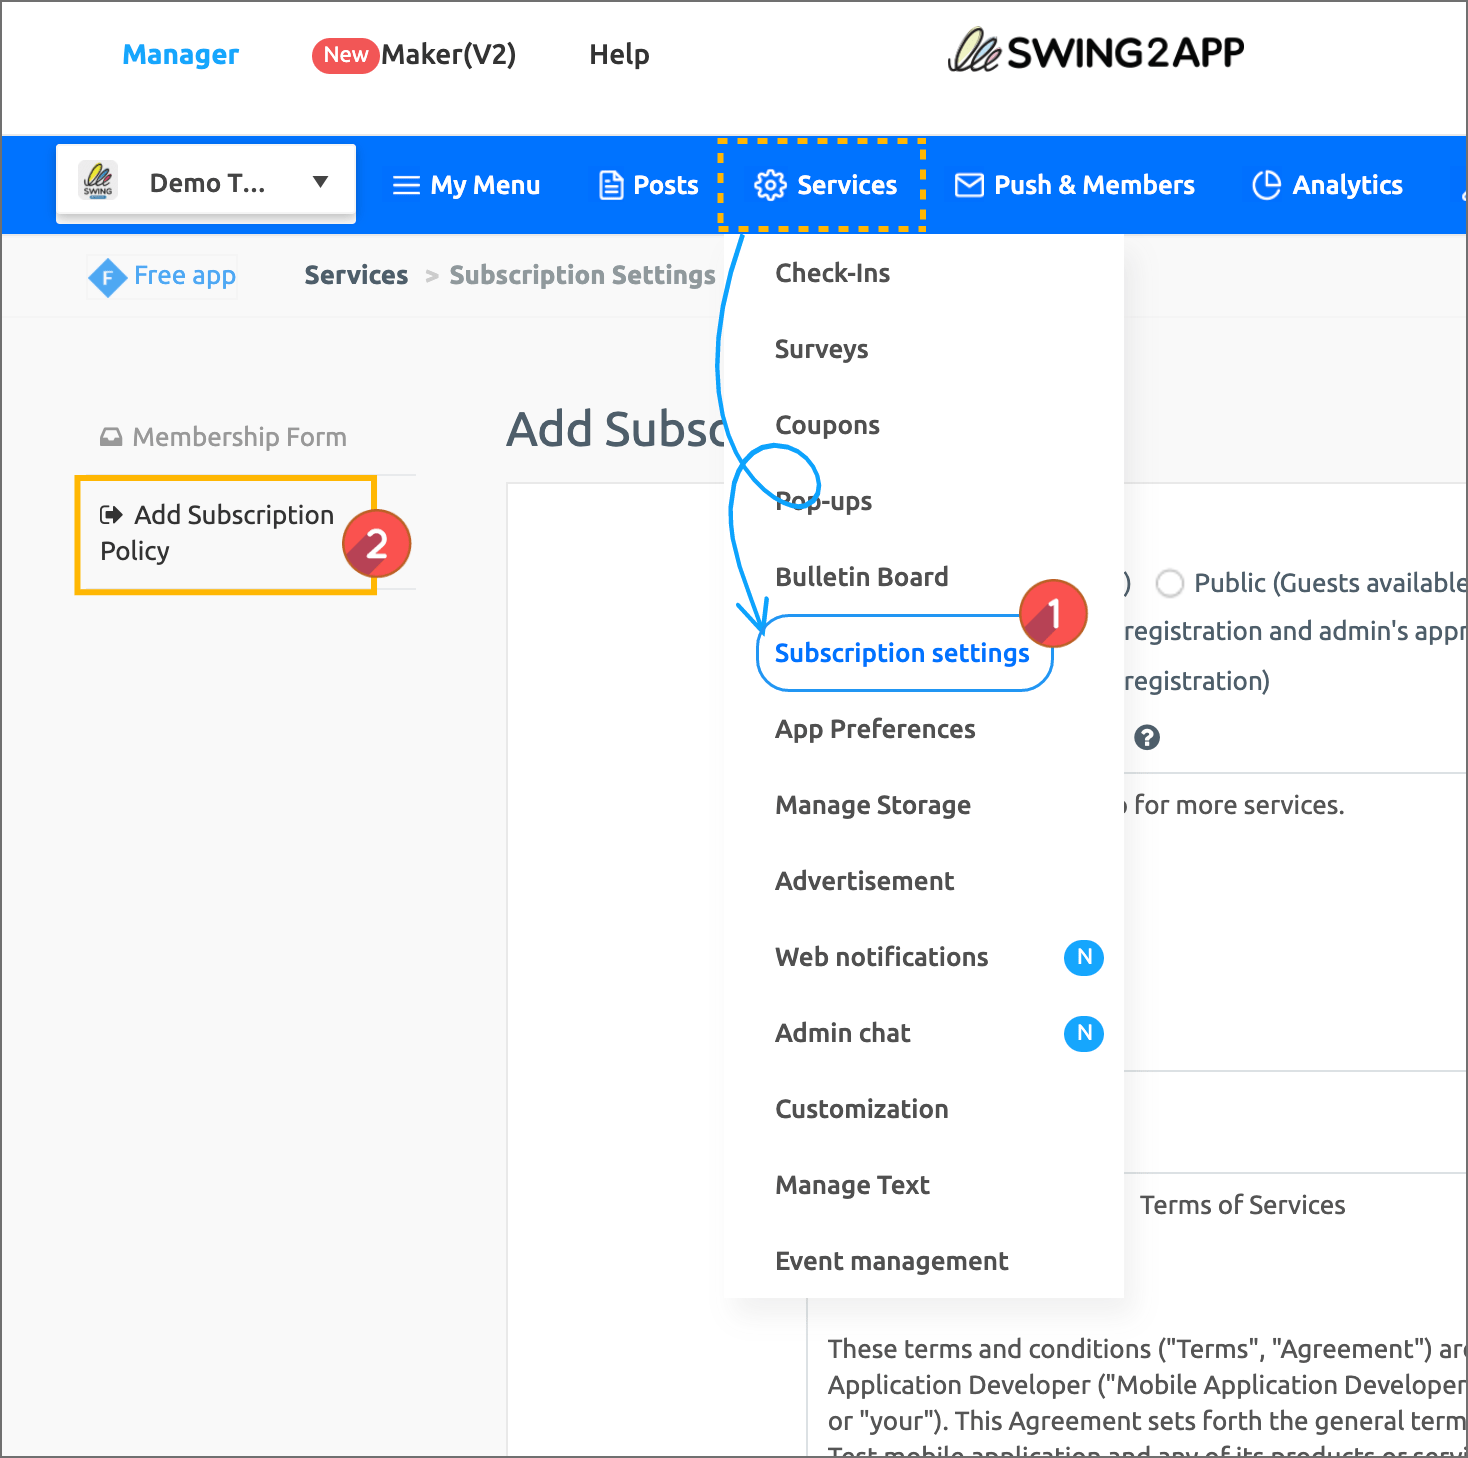
**Move to** [**Swing2app Manager page → Services → Subscription Settings → Add subscription policy page.**](https://www.swing2app.com/view/app_setting)
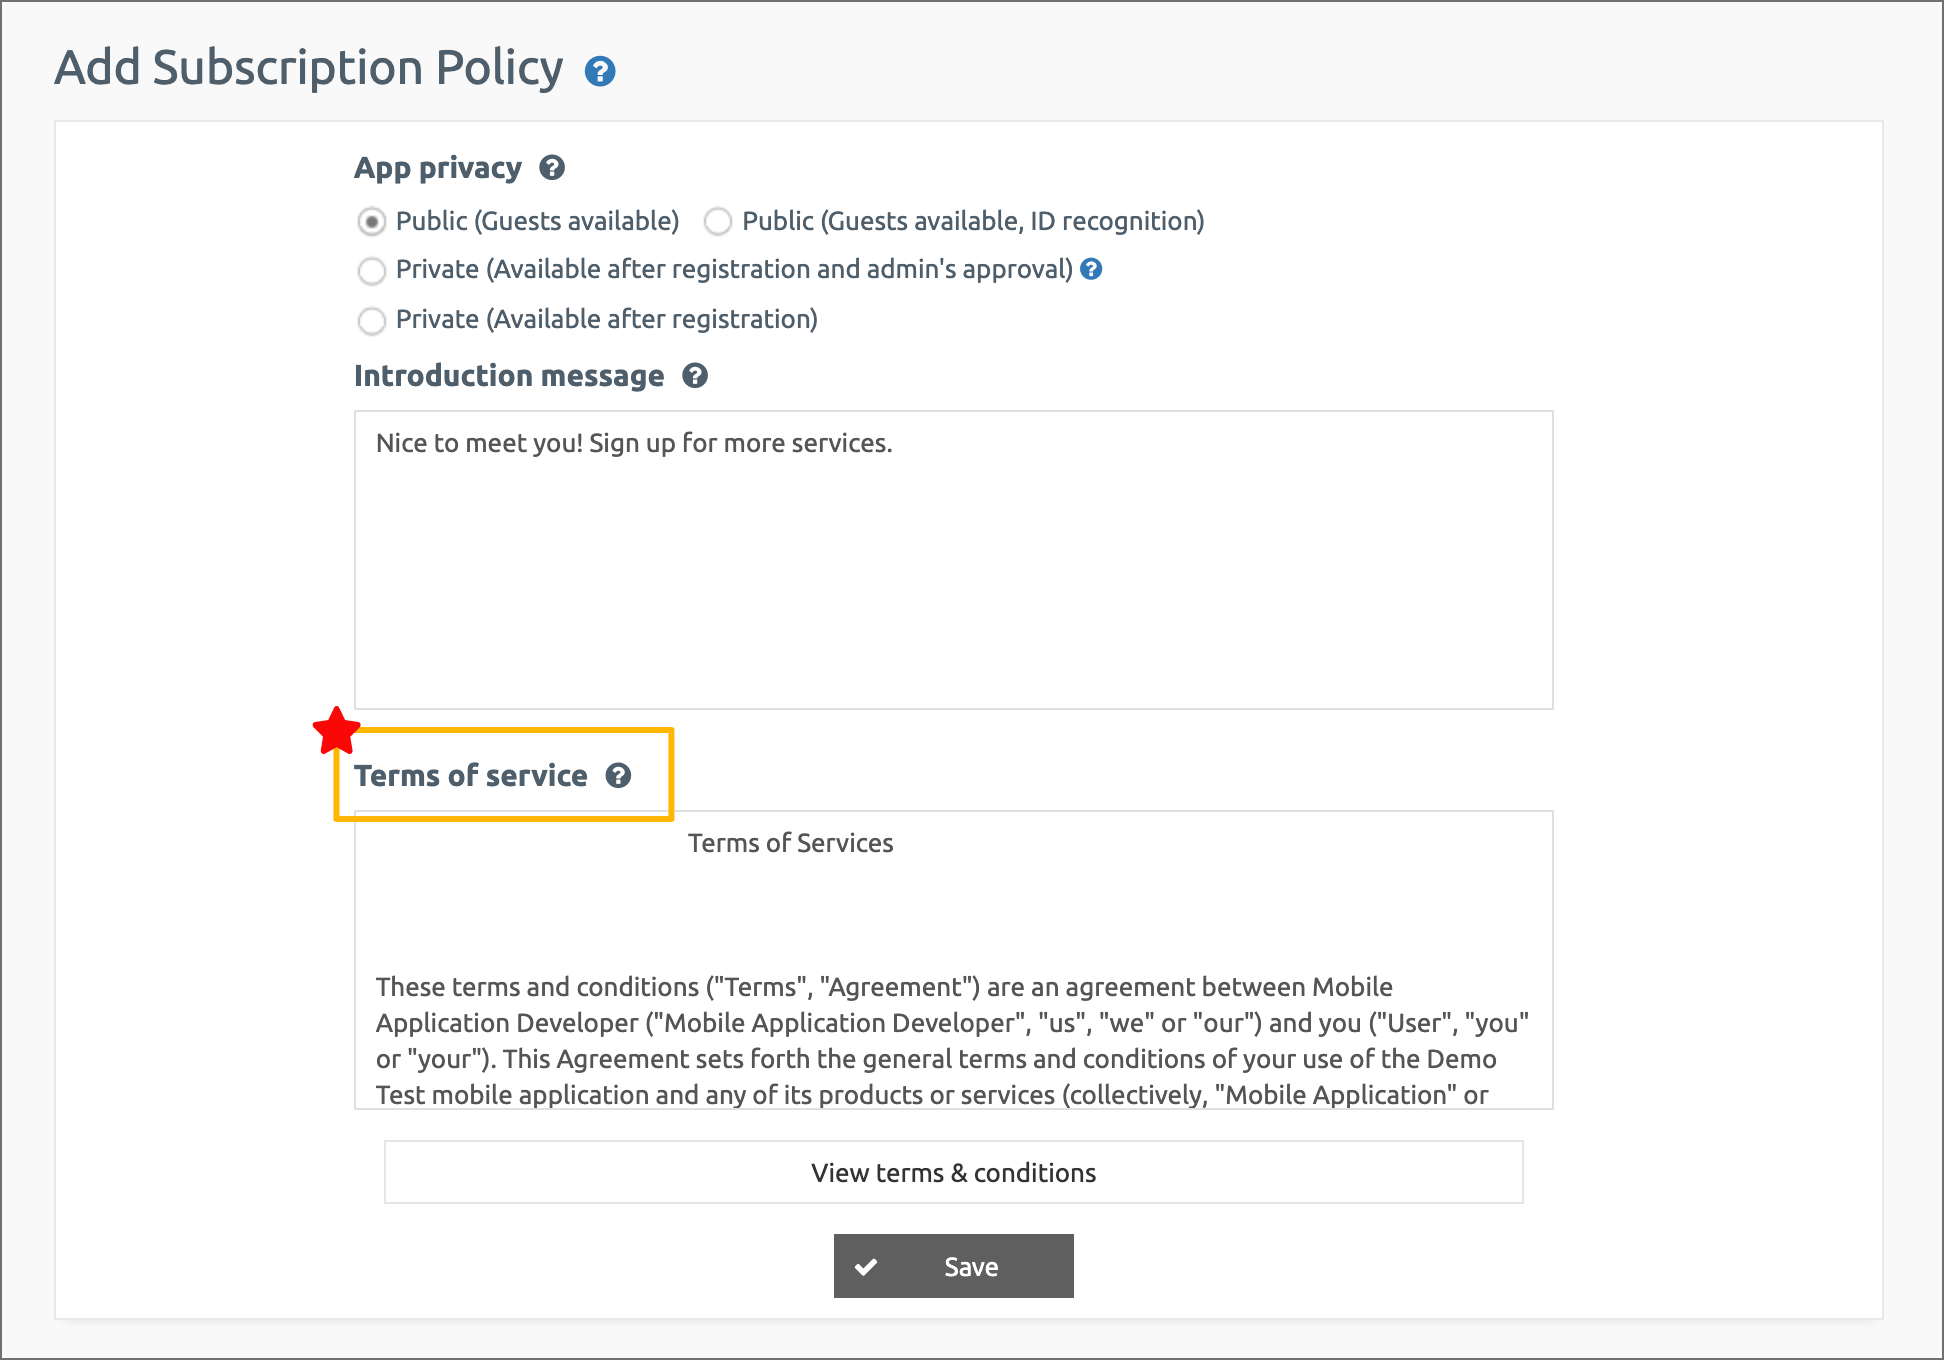
You can check the \[Terms of Service] and \[Privacy Policy] on the app subscription policy page.
**You can apply these terms to the privacy policy URL described above.**
**\*\* Please correct the terms and conditions.**
**Since the default setting with our company name and service name, users must directly use their service name and company name, you need to make corrections.**
The contents of the Terms and Conditions can be edited, so please change the company name and brand name.
**\*Once the terms and conditions, the contents of the personal information processing rules and modifications are completed, please select the \[Save]**\*\* button at the bottom to save it.\*\*
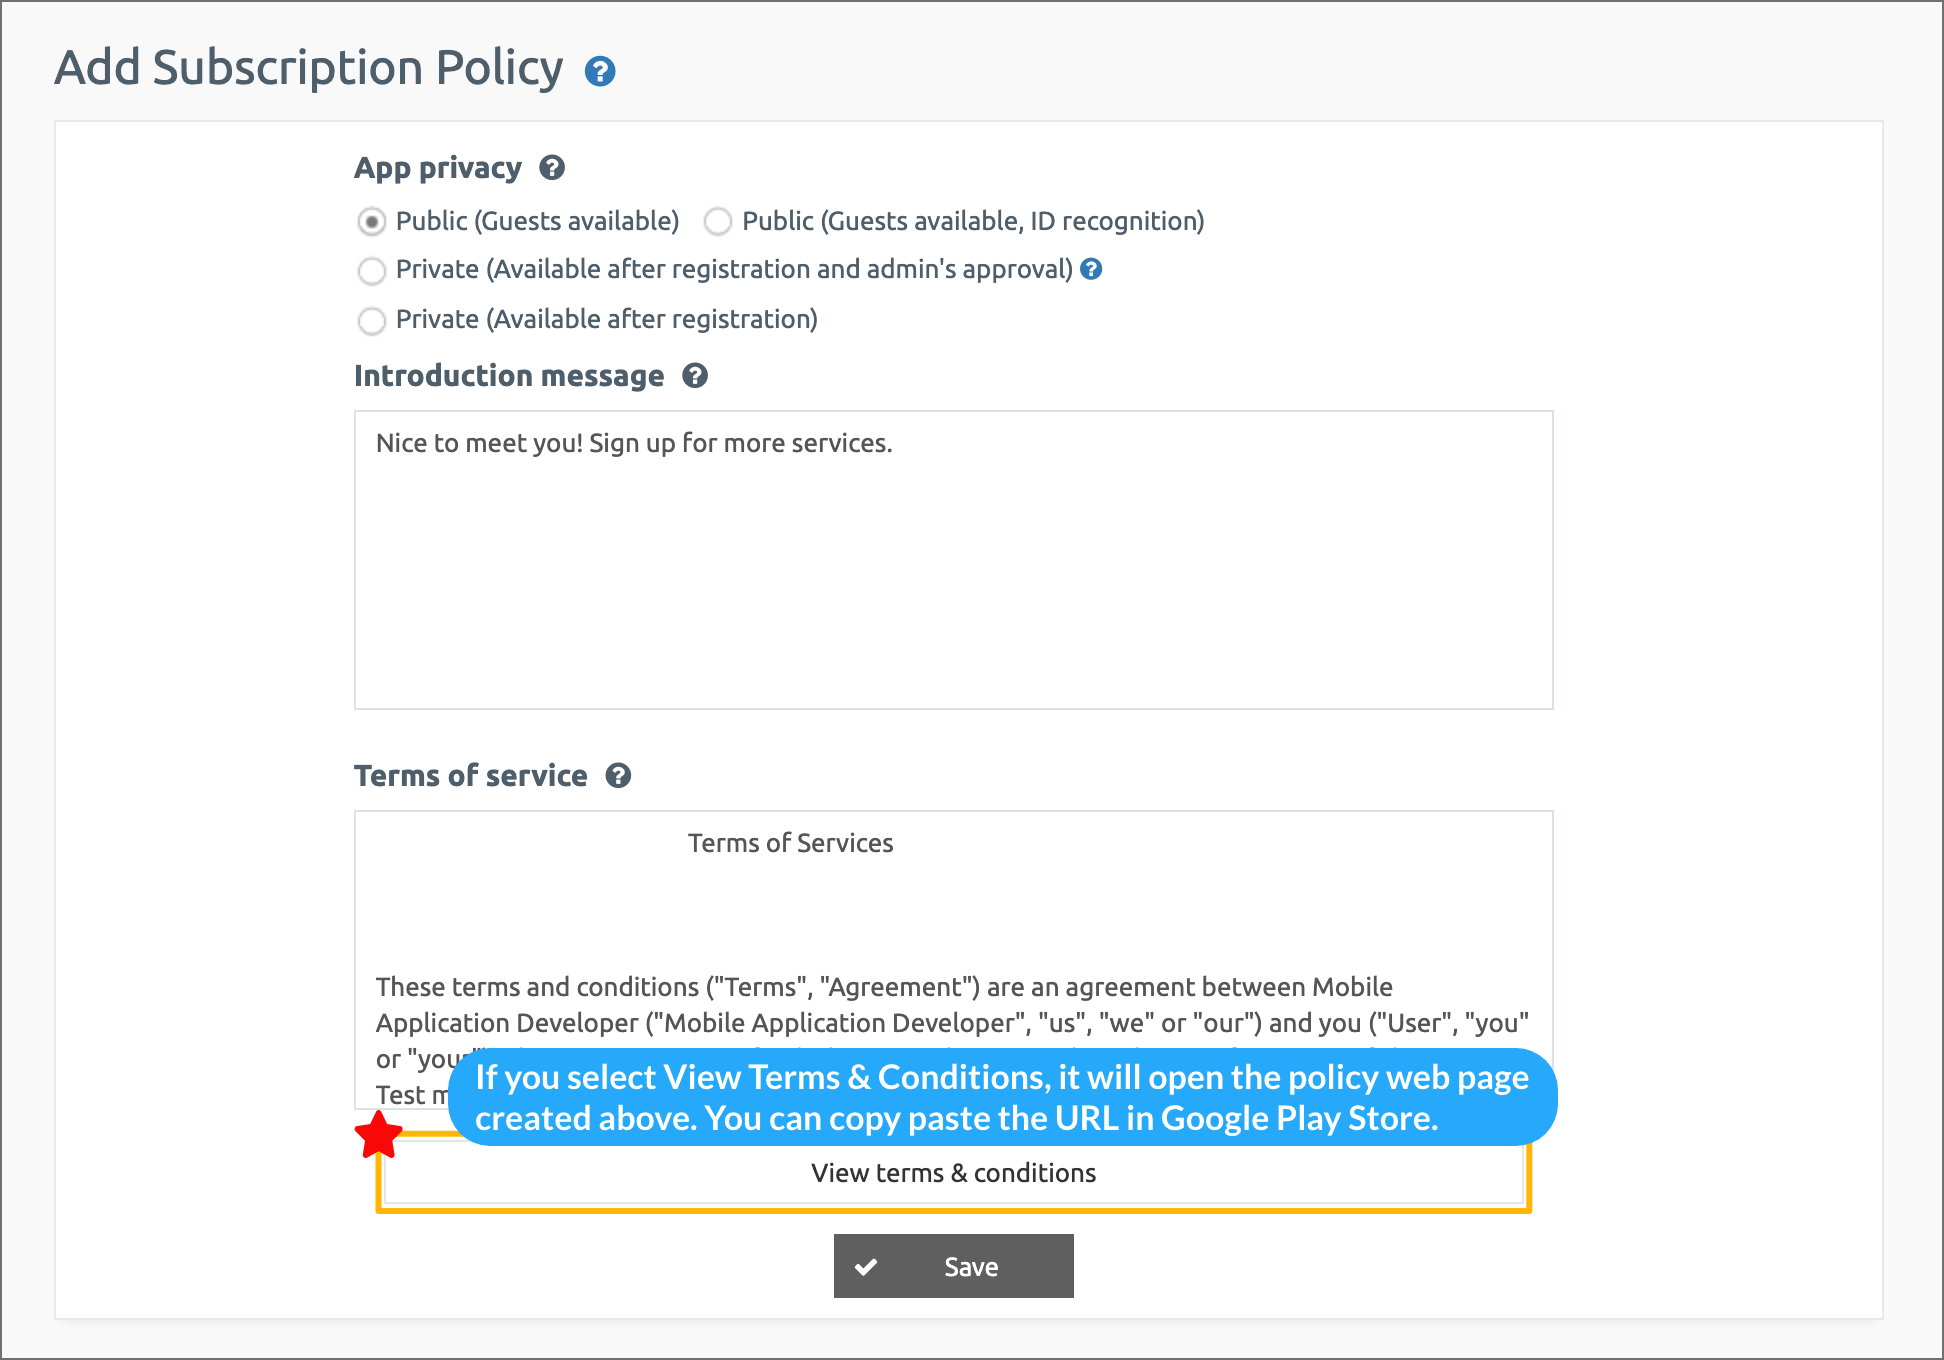
You can preview the full terms by clicking the \[View Terms of Service URL] button.
Then, copy the URL and paste it into the Privacy Policy URL.

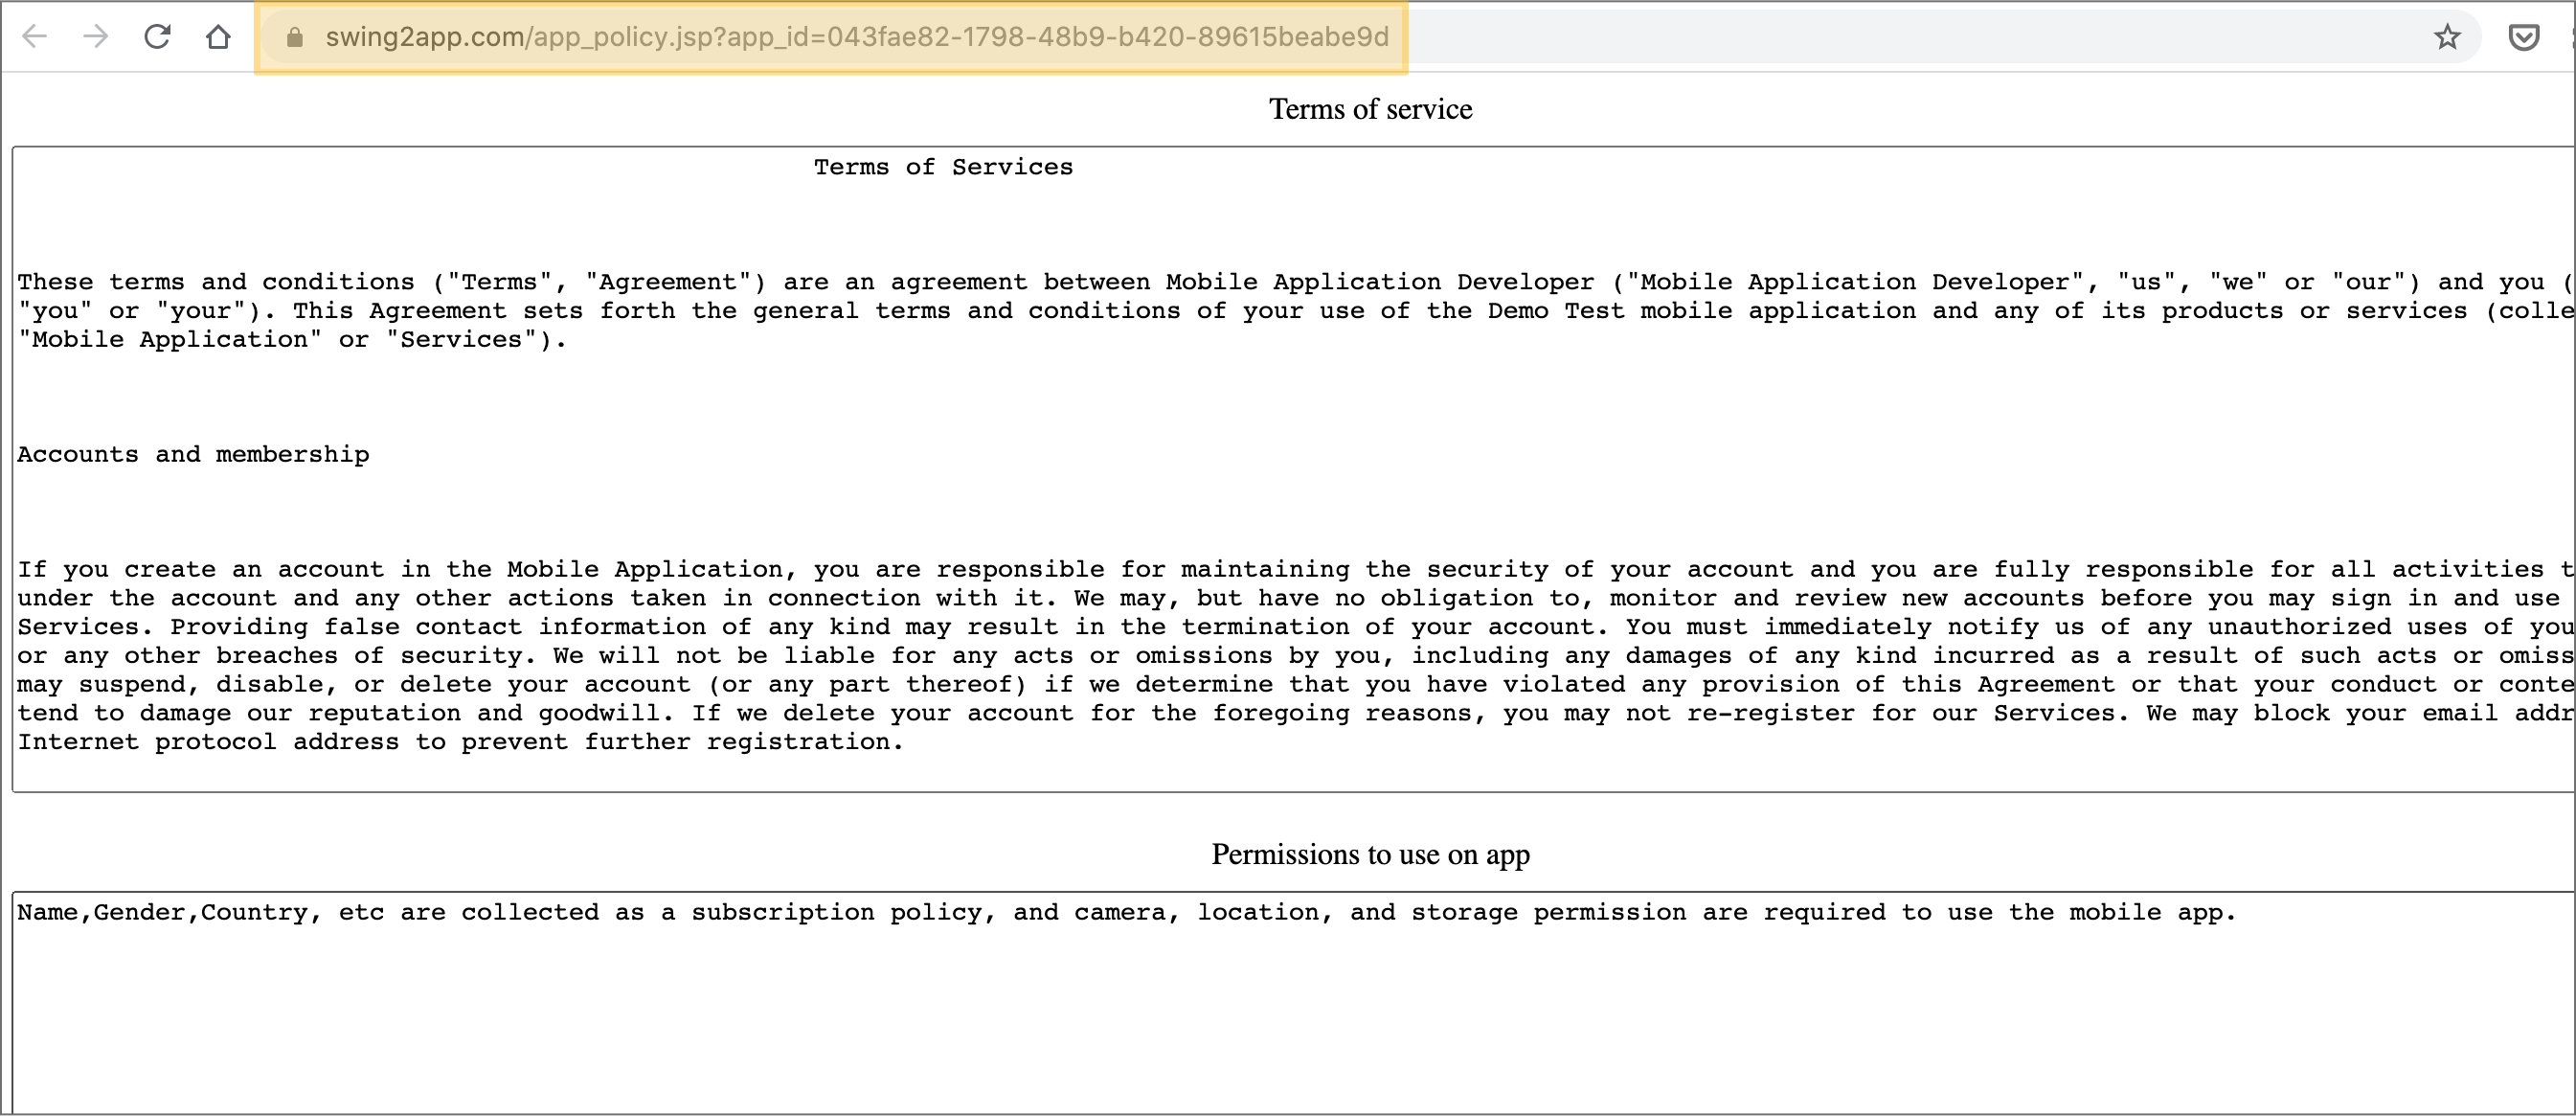
If you preview, you can check the terms of service.
You can copy the URL listed in the upper site address column and paste it into the Privacy Policy URL field.
### **STEP.2 For WebViews and Push apps, please provide the website privacy policy.**
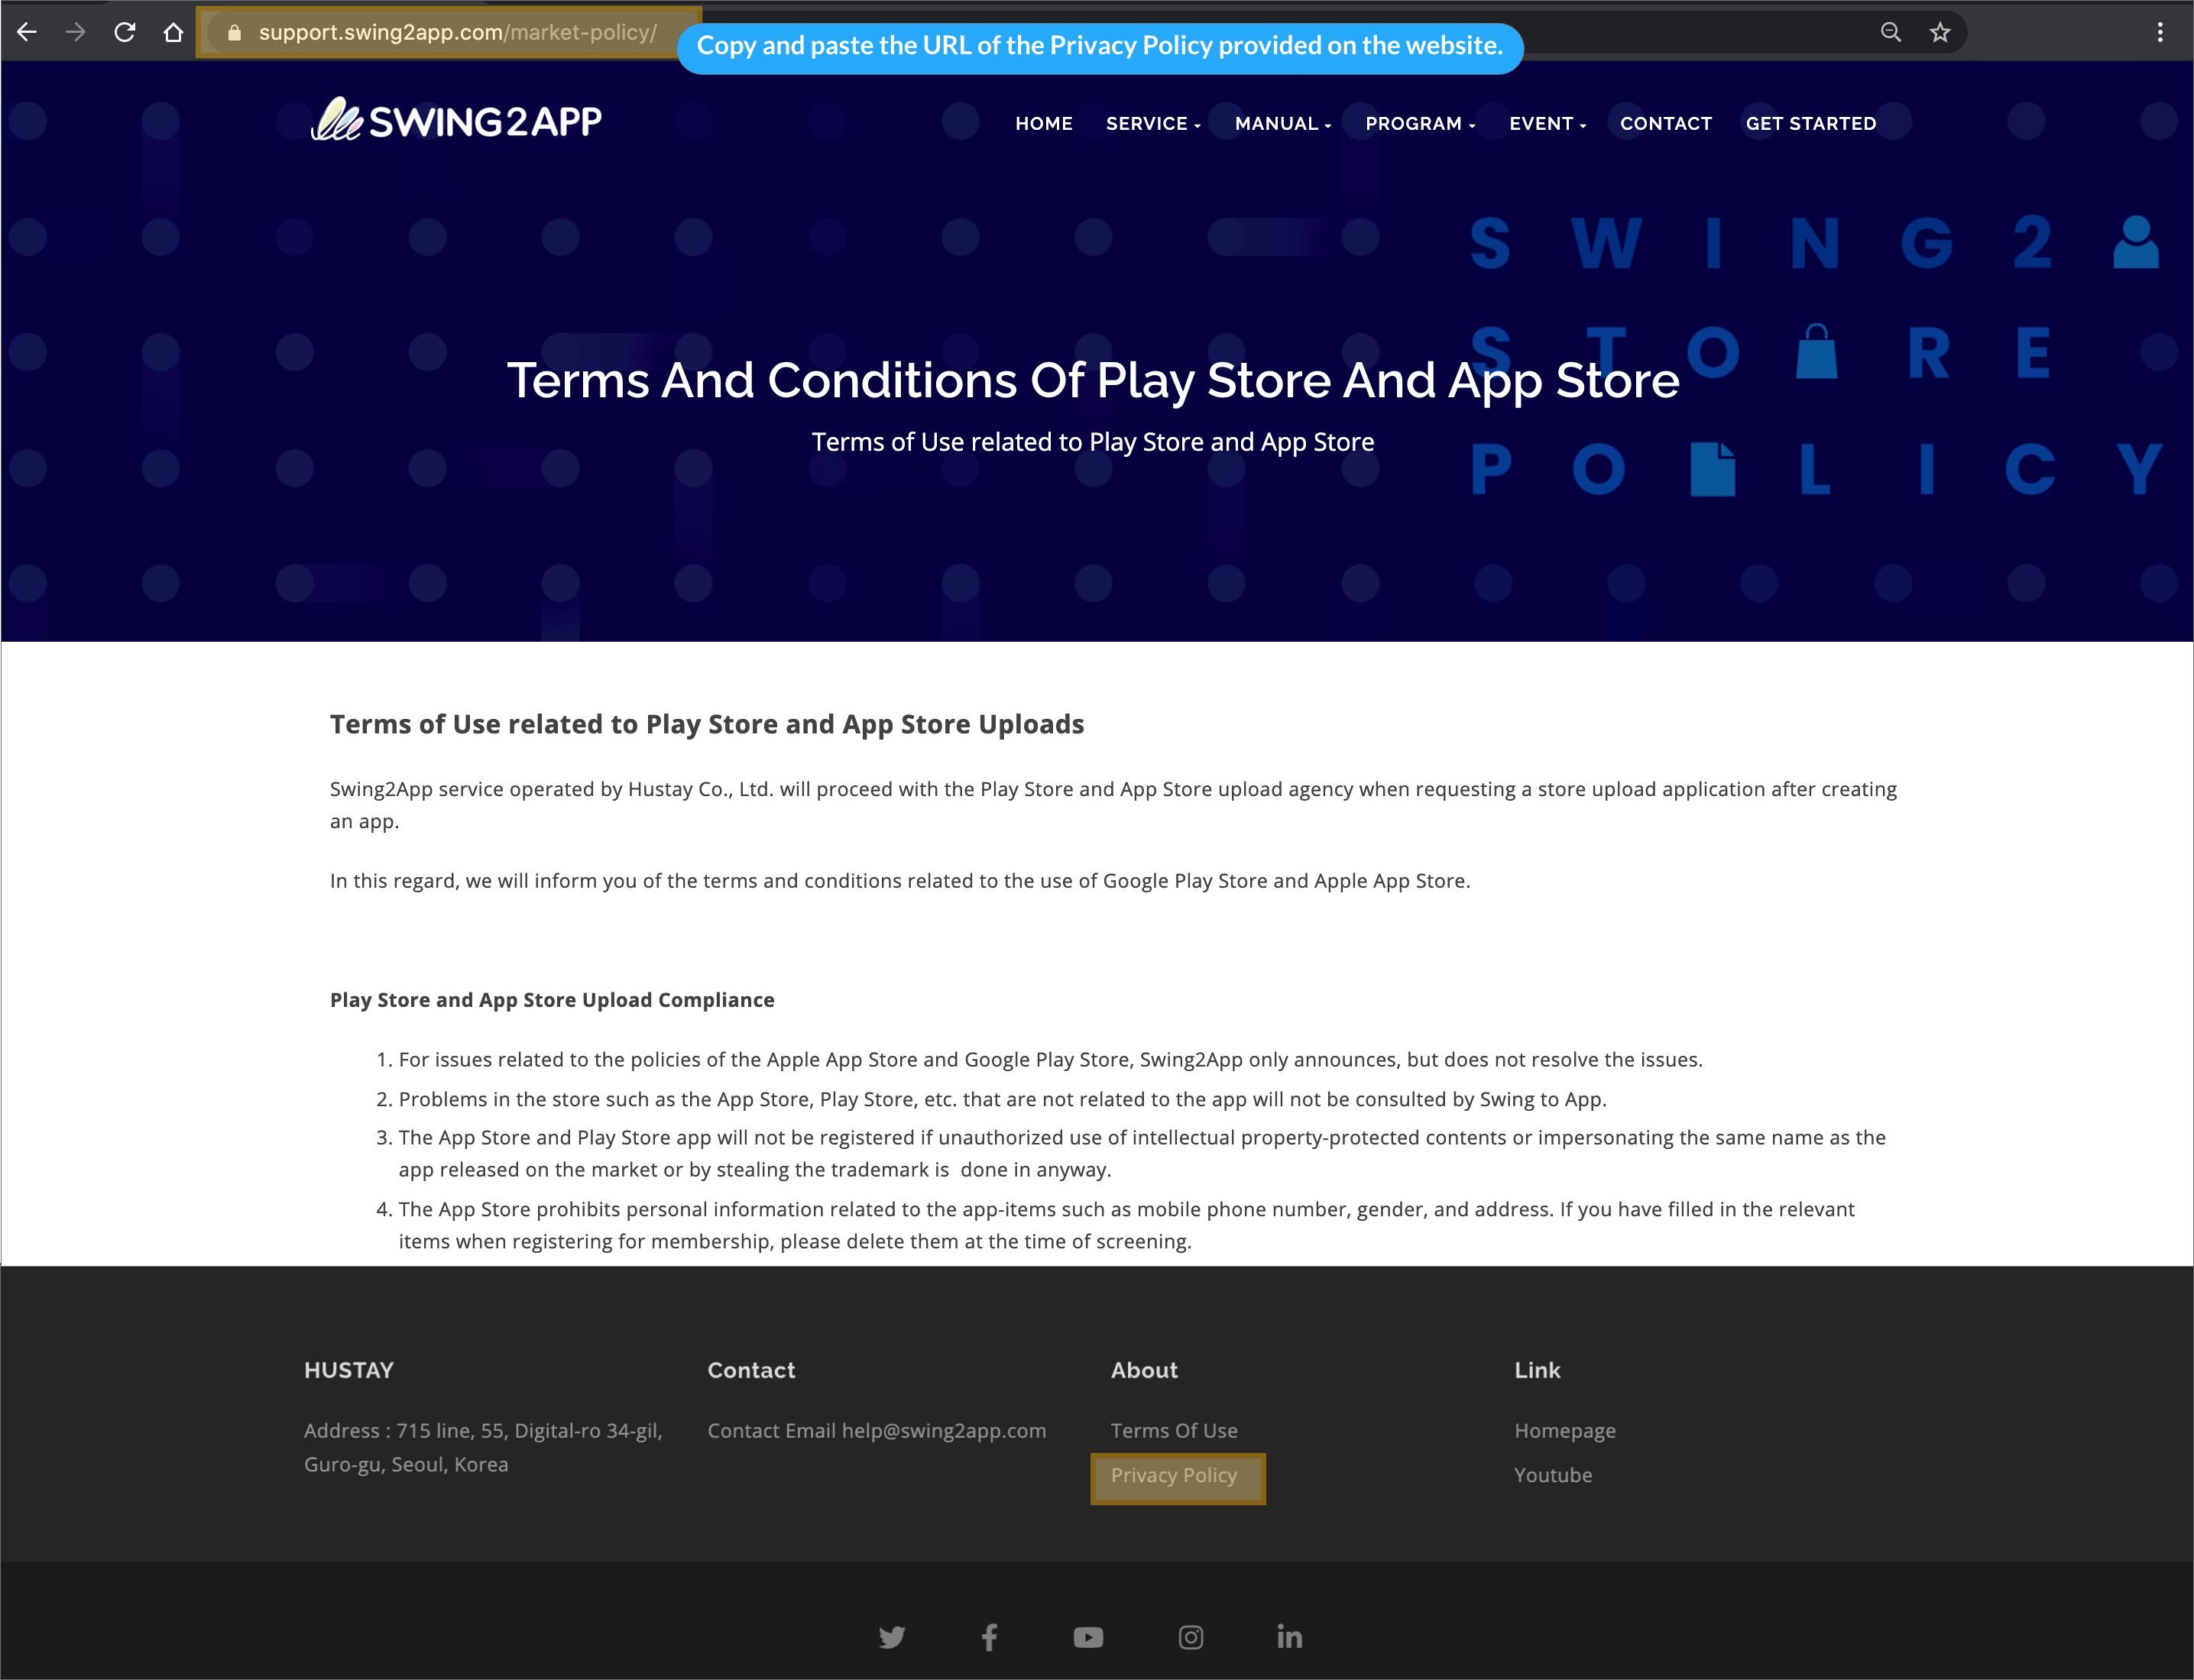
(This image is on the Swing2App site’s privacy policy page!)
For web view and push (web apps created by linking the website to the app as it is), you can insert the link to the privacy policy of the linked website.
Please enter the URL of the personal information processing policy page registered on the operating homepage site in the personal information handling policy.
If you look at the operating homepage, there is usually a privacy policy page.
Then, you can easily modify the privacy policy you have already created without having to edit the service use policy in Swing separately.
\*\* If you made a push or web view app, please make sure to put the page in the website linked to the app ^^
### **STEP3. Entering the Privacy Policy URL in the Play Store**
**If you’ve confirmed how to get the privacy policy link above!**
**You should also check how to put the link (URL) in the play store, right?**
Please access the [**Google Play developer console site** ](https://play.google.com/apps/publish)**and select the registered application.**
Connect to Google Developer Console and select ->\[Create App].
(If the application is already registered, please select the application)
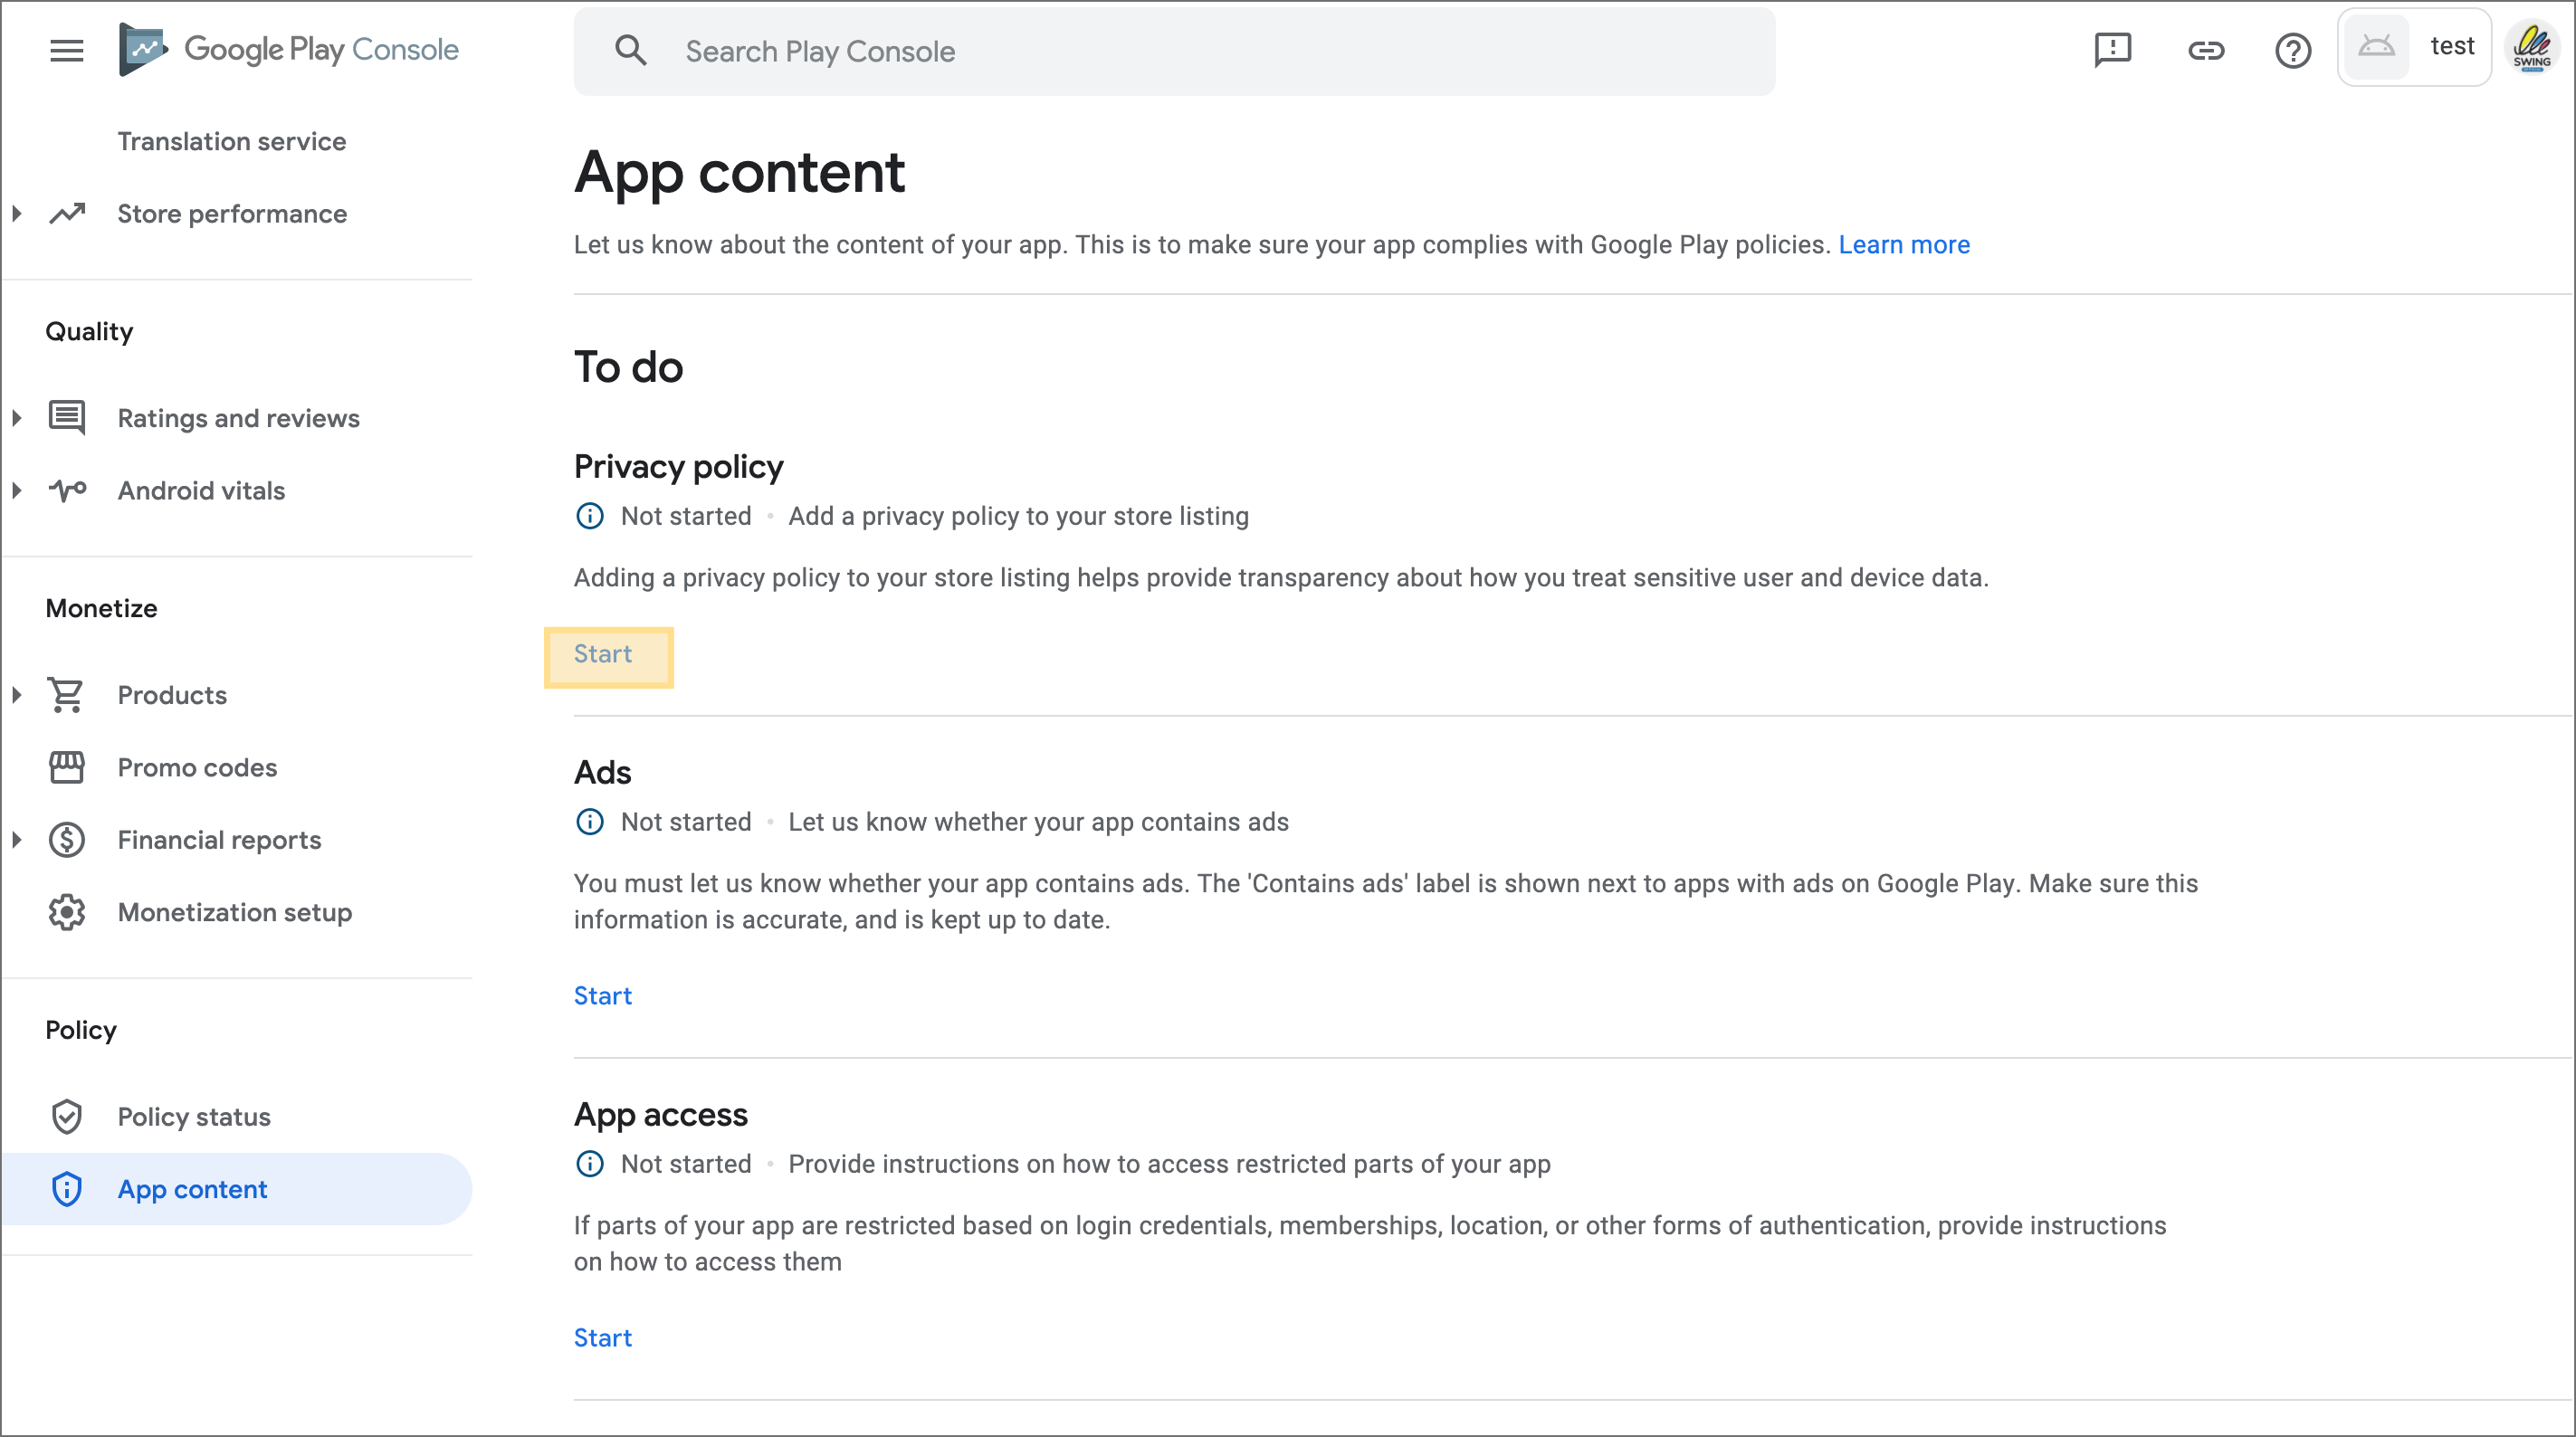
Dashboard \[Initial setting] Step 1 -> After completing the content rating input -> The ‘Privacy Policy’ item appears as in the image above.
You can check the **\[Privacy Policy]** item on the page, and select the \[Start] button.

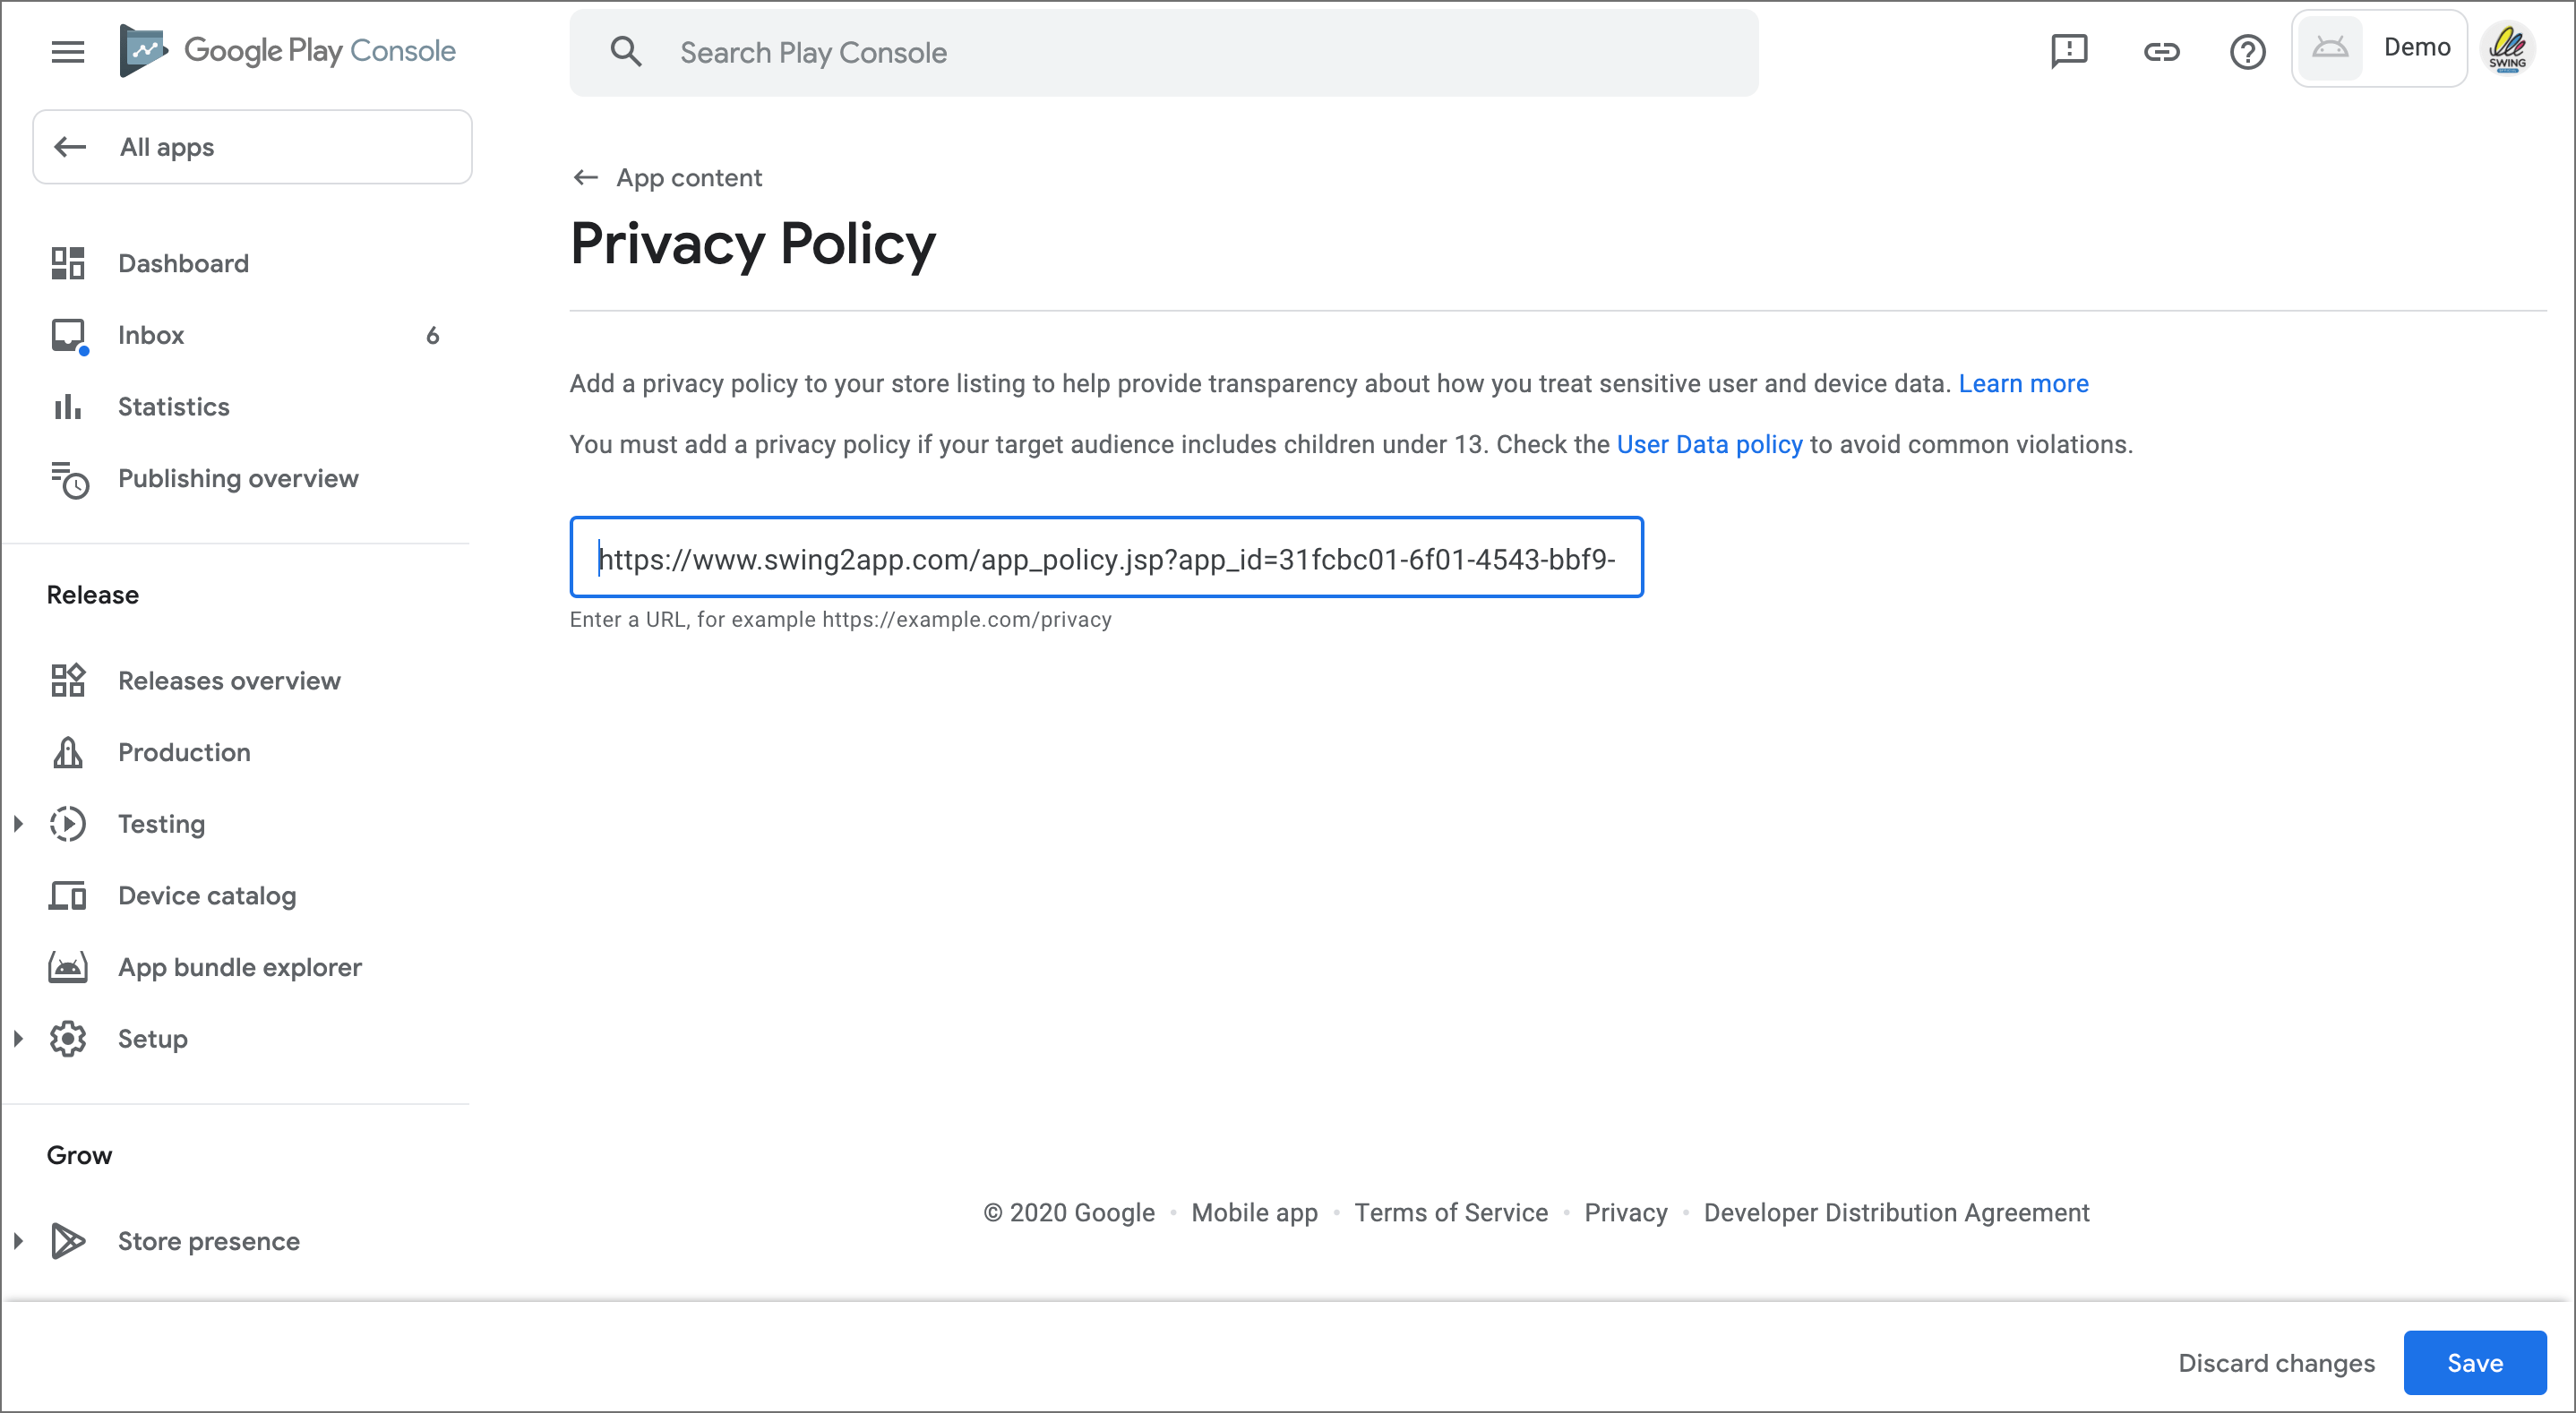
Enter the URL copied above in the Privacy Policy URL field ^^
Complete when you select the \[Save] button!

 **How does the privacy policy look in the released app?**
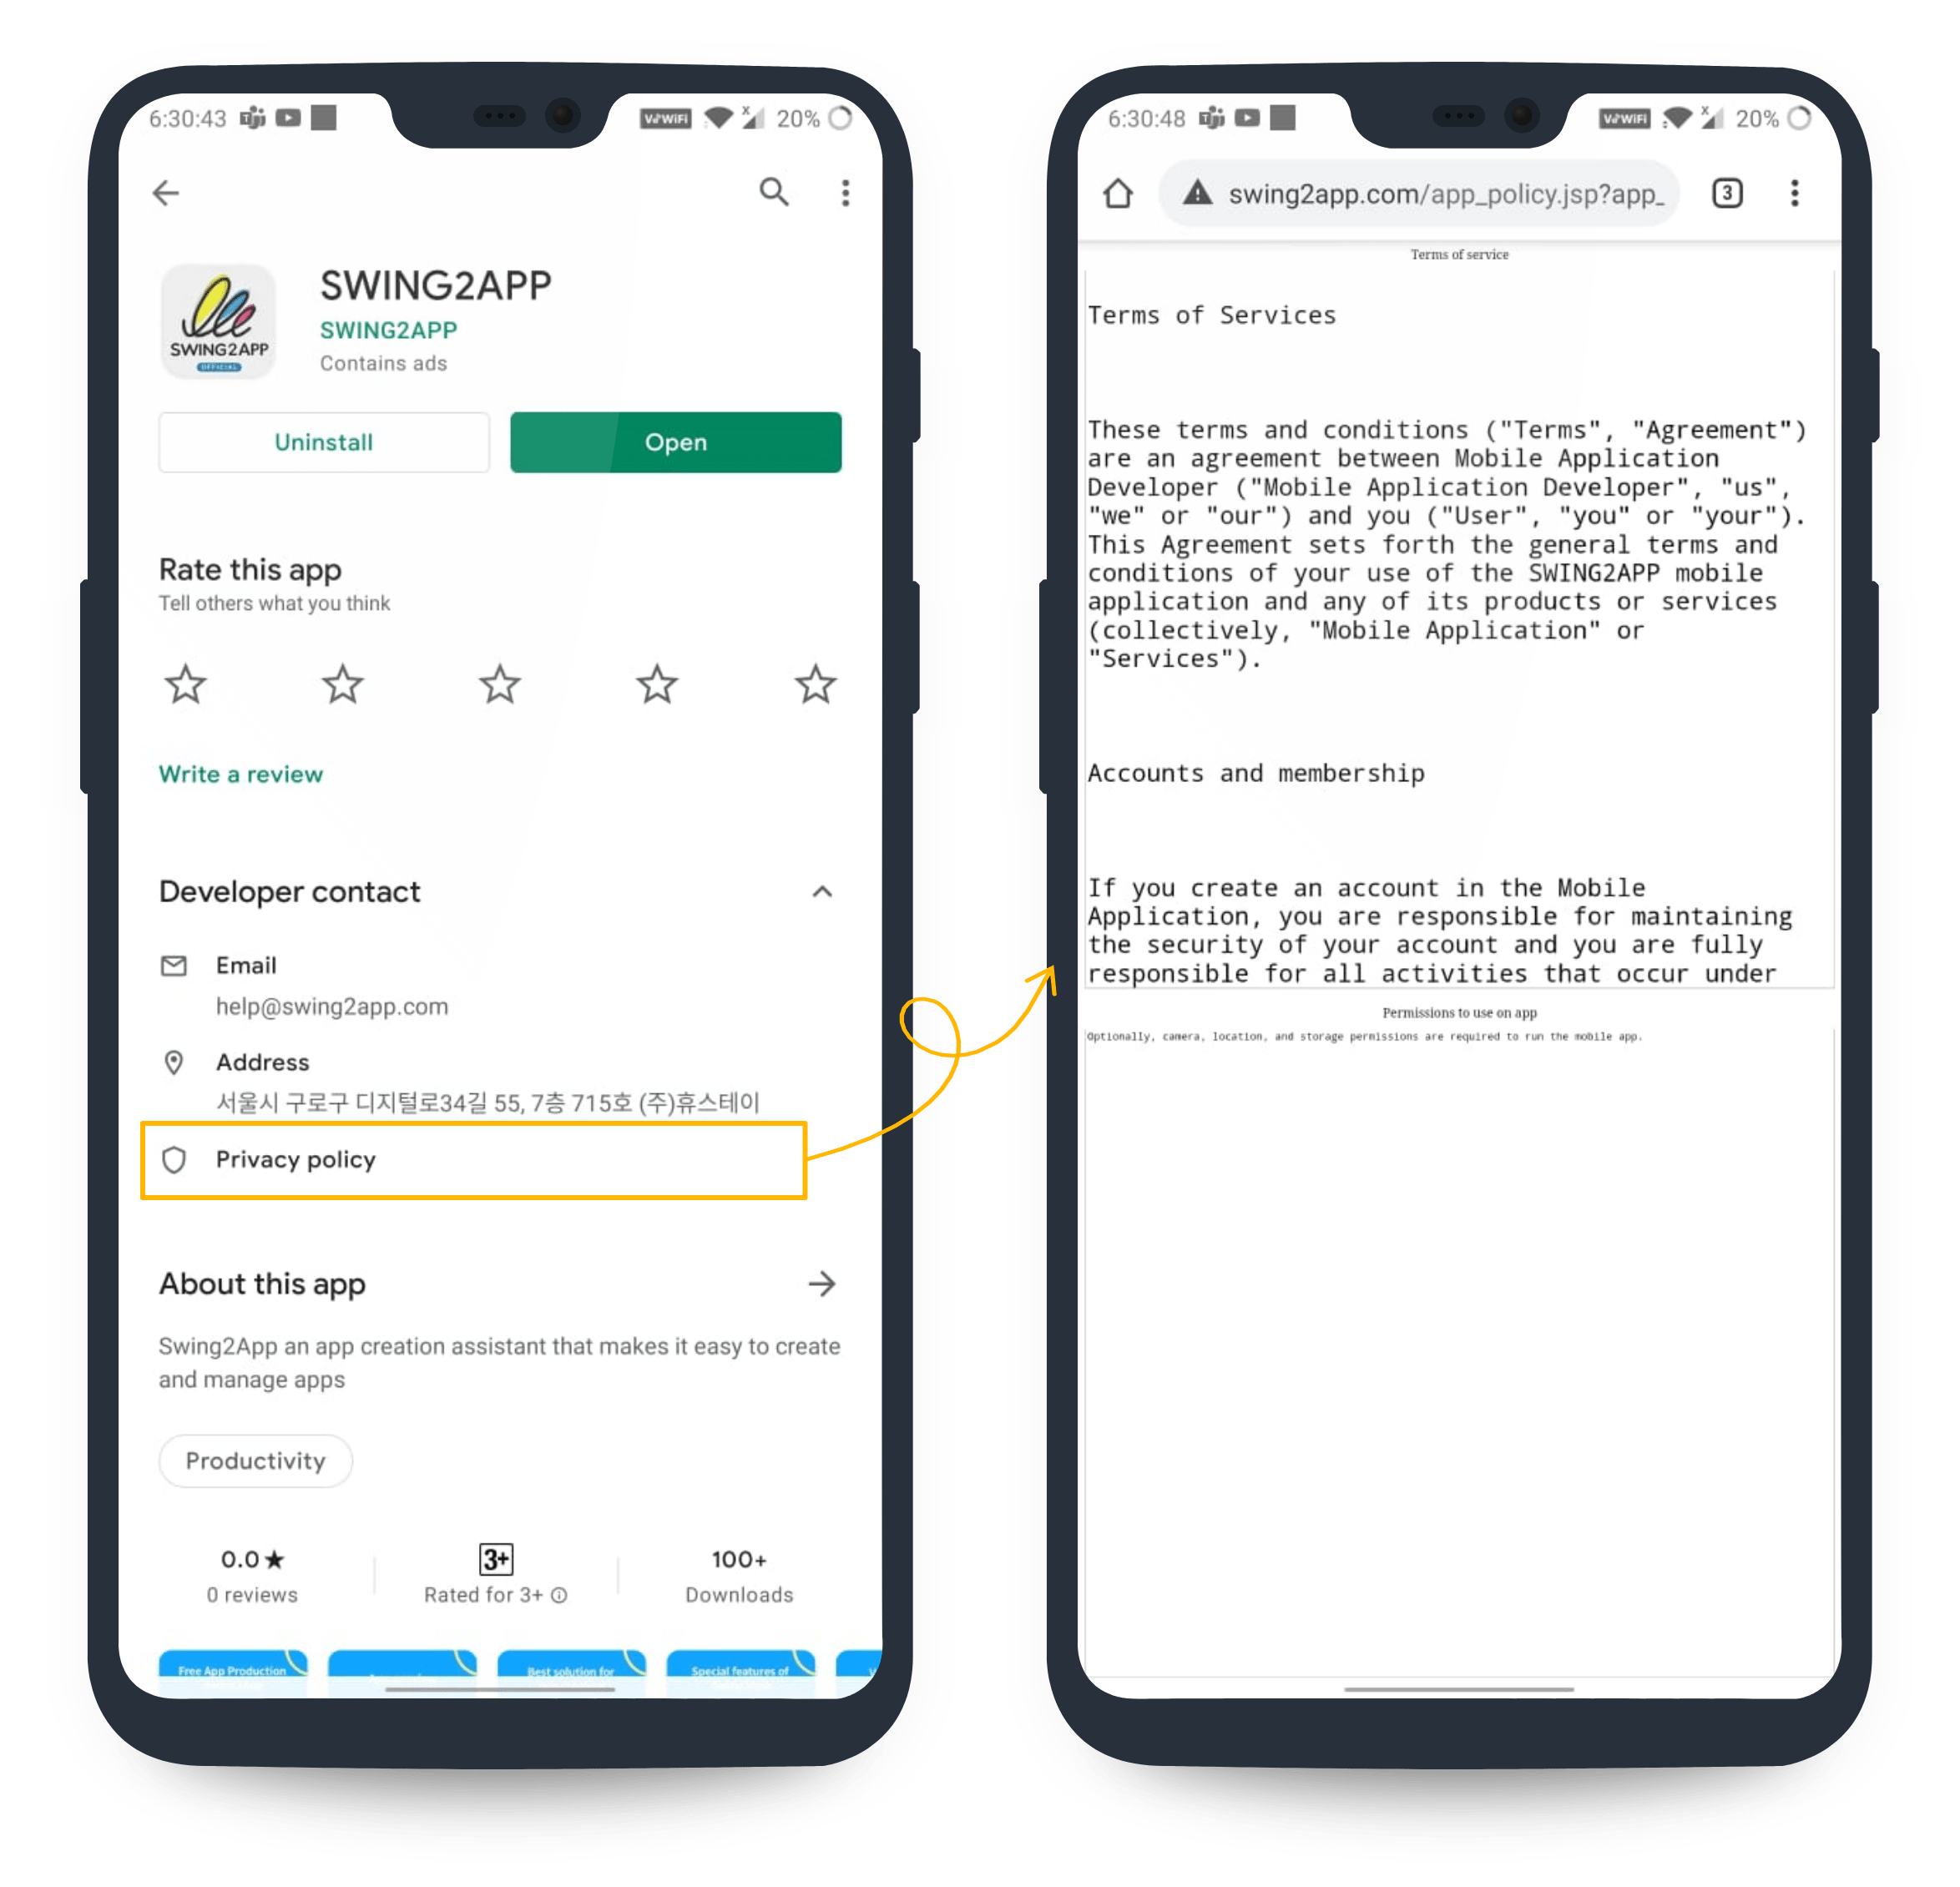
Apps released on the Play Store can be found in the **Developer Contact Menu-Privacy Policy menu.**
If selected, the page written in the Swing2App App Subscription Policy-Terms of Use will be displayed on the screen.
**How to register a link to the Play Store Privacy Policy**
1.Enter the privacy policy or copy the link
1. General prototyping app – Modify the \[Terms of Service] provided by Swing2App and copy the URL link
2. For WebView and Push apps, copy the link to the privacy policy provided by the website connected to the app.
2\. Google Play Console access (after login)
3\. Select \[Create App]. (If the application is already registered, please select the application)
4\. Dashboard \[Initial setting] First step -> When you finish entering the content rating ->’Privacy Policy’ item appears.
5\. You can check the **\[Privacy Policy]** item, and select the \[Start] button.
6\. Paste the URL copied above into the ‘Personal Information Processing Policy’ field and click the \[Save] button to complete
**\[Notes on policy change]**
1. If you are using version 1.0, unlike version 2.0 and version 2.1, there is no URL for the app usage policy.\
So, for those who use 1.0, I put a link to the privacy policy that I use in Swing.\
Please change it to a link to the privacy policy page operated on your homepage.\
If not, you must create a separate privacy policy page.
2. For apps (webview, push app) created by linking the website, you can put a link to the privacy policy operated by the website.
3. We do not provide a separate URL for handling personal information to those who have not created an app in Swing2.\
Only users who have created the app with Swing2App will provide the URL. \_ Unauthorized use may result in legal action based on copyright.
4. Privacy Policy URL is a required field and must be entered.\
If it is not entered, an error occurs when uploading the APK file and you cannot proceed to the next step.
**Where to enter the privacy policy URL when registering for the Play Store app?**

When you select an app on the Google Play console, the first step of initial setup comes out.
When you finish entering the content rating, you can check the **\[Privacy Policy]** section.
Enter the URL here.
**You just need to enter the link in the play store, so you won’t be very difficult in fact!**
**Instead, it would be most important to get the link that corresponds to the privacy policy, right**
**We will explain below.**
### **STEP.1 Copy the link after editing the personal information item in the app subscription policy**

**Move to** [**Swing2app Manager page → Services → Subscription Settings → Add subscription policy page.**](https://www.swing2app.com/view/app_setting)

You can check the \[Terms of Service] and \[Privacy Policy] on the app subscription policy page.
**You can apply these terms to the privacy policy URL described above.**
**\*\* Please correct the terms and conditions.**
**Since the default setting with our company name and service name, users must directly use their service name and company name, you need to make corrections.**
The contents of the Terms and Conditions can be edited, so please change the company name and brand name.
**\*Once the terms and conditions, the contents of the personal information processing rules and modifications are completed, please select the \[Save]**\*\* button at the bottom to save it.\*\*

You can preview the full terms by clicking the \[View Terms of Service URL] button.
Then, copy the URL and paste it into the Privacy Policy URL.


If you preview, you can check the terms of service.
You can copy the URL listed in the upper site address column and paste it into the Privacy Policy URL field.
### **STEP.2 For WebViews and Push apps, please provide the website privacy policy.**

(This image is on the Swing2App site’s privacy policy page!)
For web view and push (web apps created by linking the website to the app as it is), you can insert the link to the privacy policy of the linked website.
Please enter the URL of the personal information processing policy page registered on the operating homepage site in the personal information handling policy.
If you look at the operating homepage, there is usually a privacy policy page.
Then, you can easily modify the privacy policy you have already created without having to edit the service use policy in Swing separately.
\*\* If you made a push or web view app, please make sure to put the page in the website linked to the app ^^
### **STEP3. Entering the Privacy Policy URL in the Play Store**
**If you’ve confirmed how to get the privacy policy link above!**
**You should also check how to put the link (URL) in the play store, right?**
Please access the [**Google Play developer console site** ](https://play.google.com/apps/publish)**and select the registered application.**

Connect to Google Developer Console and select ->\[Create App].
(If the application is already registered, please select the application)
Dashboard \[Initial setting] Step 1 -> After completing the content rating input -> The ‘Privacy Policy’ item appears as in the image above.
You can check the **\[Privacy Policy]** item on the page, and select the \[Start] button.


Enter the URL copied above in the Privacy Policy URL field ^^
Complete when you select the \[Save] button!

 **How does the privacy policy look in the released app?**

Apps released on the Play Store can be found in the **Developer Contact Menu-Privacy Policy menu.**
If selected, the page written in the Swing2App App Subscription Policy-Terms of Use will be displayed on the screen.
**How to register a link to the Play Store Privacy Policy**
1.Enter the privacy policy or copy the link
1. General prototyping app – Modify the \[Terms of Service] provided by Swing2App and copy the URL link
2. For WebView and Push apps, copy the link to the privacy policy provided by the website connected to the app.
2\. Google Play Console access (after login)
3\. Select \[Create App]. (If the application is already registered, please select the application)
4\. Dashboard \[Initial setting] First step -> When you finish entering the content rating ->’Privacy Policy’ item appears.
5\. You can check the **\[Privacy Policy]** item, and select the \[Start] button.
6\. Paste the URL copied above into the ‘Personal Information Processing Policy’ field and click the \[Save] button to complete
**\[Notes on policy change]**
1. If you are using version 1.0, unlike version 2.0 and version 2.1, there is no URL for the app usage policy.\
So, for those who use 1.0, I put a link to the privacy policy that I use in Swing.\
Please change it to a link to the privacy policy page operated on your homepage.\
If not, you must create a separate privacy policy page.
2. For apps (webview, push app) created by linking the website, you can put a link to the privacy policy operated by the website.
3. We do not provide a separate URL for handling personal information to those who have not created an app in Swing2.\
Only users who have created the app with Swing2App will provide the URL. \_ Unauthorized use may result in legal action based on copyright.
4. Privacy Policy URL is a required field and must be entered.\
If it is not entered, an error occurs when uploading the APK file and you cannot proceed to the next step.