Swing2App Manual
Help CenterFAQContact UsBuild an app
  • Swing2App
  • Swing2App Update
  • FAQ
    • FAQ(Frequently Asked Questions)
      • Frequently Asked Questions (FAQ)
      • App Creation FAQ
      • App Operations & Features FAQ
      • App installation and download FAQ
      • Registration and Login FAQ
      • App Preview FAQ
      • Swing Shop FAQ
      • Billing FAQs
      • Paid App Passes & Tickets FAQ
      • Paid usage and uploading FAQ
      • Unlimited Usage and Package FAQ
      • Push sending FAQs
      • PlayStore FAQ
      • App Store FAQ
      • AdMob FAQ
      • Affiliate Program FAQ
      • Customization FAQ
  • Manual
    • App production manual (V3)
      • Start App Creation With MakerV3 Screen
      • Manual on How to Create an App In MakerV3 Screen
      • STEP1 Basic Information
      • STEP2 Prototype
      • STEP3 Page
        • How to Create a Home Screen For an App
        • Registering a menu icon image
        • How to use: Menu Exposure Settings
        • Set menu settings: Access permissions
        • Page Design - UI KIT
        • Page Design - eStore Page
        • Page Design - eStore Deals
        • Page Design - Product Category
        • Page Design- Page Templates
        • Page Design - Image Page
        • Page Design - HTML Editor
        • Page Design - Sign Up, login & Settings Page.
        • Page Design - Search Posts Page
        • Page Design - View Favorite Page
        • Page Design - View Coupons Page
        • Page Design - Share Your App Function
        • Page Design - App Introduction Page
        • Page Design - Admin Chat Page
        • Page Design - Chat List Page
        • Page Design - Surveys Page
        • Page Design - View My Posts Page
        • Page Design - Attendance Check Page
        • Page Design- Web Link
      • STEP4 Complete App Creation
        • How to create an additional app
        • How to update an app
        • App launch screen by update type
    • App production manual(V2)
      • App basics
        • Guide to create an app
        • App Update Type And Method
        • App Launch Screen Update Type
        • Push or WebView version creation method (super simple app creation)
        • WebView App Manual(production and operation)
        • Push App Manual(production and operation)
        • Remove Push App Toolbar
        • App Production
        • Guide to create App Icon Image
        • Guide to Create an Idle Screen Image
        • Image Editing Tool
      • Design Theme
        • Prototype UI Design
        • App Main Design Style
        • App Navigation Styles
        • Applying Slide Prototype
      • Page Menu
        • Page Menu – Main Menu Management
        • Creating an App Home Screen
        • How to use Web Link
        • Home screen: Applying App Introduction Page
        • How to use file attachment
        • How to use the image attachment
        • How to use Product category
        • How to use Weblink-linkeditor
        • How to use User Page
        • How to create an Image Page
        • How to create a web template page
        • How to create HTML editor page
        • Swing2App Page – Signup, Login, Settings
        • Swing2App Page – Search Post
        • Swing2App Page – View Favorites
        • Swing2App Page – View Coupon
        • Swing2App Page – Share App
        • Swing2App Page – App Introduction
        • Swing2App Page – Admin Chat
        • Swing2App Page – How to read my article
        • Swing2App Page - Survey
    • App Production Application TIP
      • Sending a push using the push API
      • Insert GIF image
      • Create a Flash style home screen
      • Change App Loading Icon
      • Set device mode (switch app screens)
      • How to use the app review button
    • App operation manual
      • Bulletin board management
        • Create a bulletin board
        • Bulletin board type, design style
        • Bulletin Board – How to Enter Posts
        • Bulletin Board – Post Schedule Settings
        • Set post detail options
        • Bulletin Board – How to Attach Files
        • Register video post(how to register a video)
        • Bulletin Board – How to Attach Music Files
        • How to enter post comments and comments
        • How to set up Bulletin Board Permission
        • Bulletin board authority setting
        • How to create a Form in Bulletin Board
        • How to write a bulletin board
        • How to use the list screen and creation screen
        • How to set up a bulletin board post alarm
        • Set Up a Board Administrator
        • Google Map Bulletin Board
        • Google Map Bulletin Board Advanced setting
        • HTML Editor Writing
        • Report and manage posts
        • Block posts
        • Create bulletin board by membership level
        • Bulletin board thumbnail image registration
        • Search Post Functions
        • Post Management Options
        • How to use the bulk registration bulletin board
        • Copy Bulletin Board
        • Copy Post
        • Move a post
        • How to delete bulk posts
        • Group Chat
        • Create a Secret Bulletin Board (1:1 Customer Service)
        • Create a link for a post
        • How to Use Calendar
        • Calendar Application - How To Use
        • How to create and register a stamp
        • Stamp application: Issue coupons upon completion of stamps
        • How to use the bulletin board header
        • Using 2 hash-tags Options
        • How to use hashtag search option
        • Download Posts
      • Service management
        • How to use Pop-up
        • Check-ins
        • Surveys
        • Resource Management – Capacity Management
        • Coupon Management: Create and Issue Coupon
        • How to use Admin Chat [1:1 Chat]
        • Chat Administrator Page – Chat List
        • Chat Administrator page – Chat settings
        • How to use chat list
        • Unified Notification Settings
        • App Policy Management – App Subscription Policy
        • App Terms of Use And Privacy Policy
        • App Policy Management-Membership Form
        • App policy management – How to set up a membership completion message
        • Membership Form-ID Setting
        • App Terms and Conditions, Privacy Policy
        • Create a Private App
        • App string management
        • Link Wizard
      • Push & Member Menu
        • Send push
        • Send Push from Push Version App
        • Push Posts
        • Display messages after getting push notifications
        • Delete or Mark as Read Push Notifications
        • Push history
        • Member Inquiry - Check Member Information
        • Member Inquiry - Setting up an Associate Administrator
        • Member Inquiry - Create User Account
        • Setting up an App Administrator
        • Permission Group Settings-Membership Rating
        • Admin Screen: Change App member's name
        • How to use Push device management
      • Analytics
      • Version control
        • Version management-App production and market registration history
        • How to apply for App Store Upload
        • How to apply for Google Play Store Upload
        • How to apply for a mobile web upload
      • Payment
        • Introduction of paid products and payment methods
        • Payment-How to use my payment status
        • How to Use 1000 SMS Tickets
        • WebView Lifetime Paid App
        • PushOnly Lifetime Paid App
        • How to use mobile web registration
        • Budget package
        • AdMob Power Package
        • Large Storage Packages
        • Online Stores – Coupon
      • Full Search Function
    • SwingShop
      • Apply for Swing Store
      • Swing Store Product Type
      • Introduction of pages provided by Swing Shop
      • How to Apply a Swing Store Menu to your App
      • Swing Shop - Shopping Mall Main Page How to Use
      • Shopping Mall Main Page Slide Image
      • Store Management - Basic Information Settings
      • Store Management - Shipping Management
      • Product Management - Set how to receive goods
      • Product Management - Product Category Registration
      • Store Management-Policy Settings
      • Product Management - Physical Product Registration
      • Product Management - Digital Products: PDF File Registration
      • Product Management - Digital Products: Video Files Registration
      • Product Management-Digital Products: Authorized Sales
      • Product Management-Digital Products: Coupon Registration
      • Product Management-Reservation system product registration
      • Product management - Reservation system, Time reservation product registration
      • Product management-Reservation System Operation TIP
      • Product Management - Product Post Management
      • Product Management- Product Inquiry, Reservation Product Inquiry
      • Product Management - Product Exposure Management
      • Order Management
      • Reservation Order Management
      • Store Statistics
      • Swing2App Page-shopinfo
      • Swing2App Page-Search
      • Swing2App Page - Category List
      • Swing2App Page-mypage
      • Swing2App Page - Cart
      • Swing2App Page-digital products
      • Product Modification - Modify a registered product
    • Affiliate program
      • How to apply for affiliate program
  • Web App - Webview, Push
    • Web App - Webview, Push
      • Swing2App WebView App
      • Swing2App Push App
      • webview app manual
      • Pushapp manual
      • How to create a push app or webview app easily
      • Push-app toolbar
      • How to use the first run address in webview and push app
      • WebviewApp basic settings and advanced setting options
      • Push App Toolbar - Introduction: How to Use and Functions
      • Registering a Push Notification Icon Image
      • Progress Bar Color Settings
      • Remove progress bar (not in use)
  • App Guide
    • How to use Swing2App Preview
    • Application operation
      • How to convert and use paid apps.
      • How to install APK file on your phone
      • How to install apps by sharing
      • Free app conversion method after Paid period ends/expires
      • Download the app after accessing the mobile Swing2App site
      • Download the app using the app installation link address
      • If you can not install the free version of the app (APK file), please check!
      • If you can not install the paid version app (APK file), please check!
      • Find App Password
      • Registering and changing your app profile picture
      • How to re-register with the same ID after leaving the app
      • Share app
      • App – Share your Bulletin Board Posts
      • How to use the App Administrator menu
      • App Administrator menu: Chat
      • App Administrator Menu: Registering Stamp
      • App Administrator Menu: Use Coupon
  • STORE
    • Play Store
      • How to create a Google Developer Account
      • Create a Google Developer - Business Account
      • Google Developer Account Identity Verification
      • Launching Play Store App
      • Setting up Play Store app auto-updates
      • Transfer your app to another developer account on the Play Store
      • How to change the name of Play Store Developer
      • Delete Play Store app
      • How to use Google Help Center
      • Issuing Google Maps API Key
      • Invite a Play Store Developer Account
      • How to get app updates released on the Play Store
      • Launch the Play Store Private App (Alpha release)
      • Check Play Store App Installs
      • Reply to Play Store app reviews
      • Play Store Developer Page
      • Play Store prior notice
      • Linking Play Store Privacy Links
      • Play Store App Search TIP
      • How to restore Play Store app
      • Update the Play Store App
    • App Store
      • App Store Apple Developer Account Registration
      • Check app store app downloads
      • How to use the App Store Customer Center
      • Delete apps from the App Store
      • AppStore App Rejection Cases
      • App Store TestFlight
      • How to invite Swing2App account on App Store Connect
    • AdMob (Google AdMob Ads)
      • Admob Banner Ad Frequency Settings
      • Admob Operation Precautions
      • How to apply AdMob plug-in
      • AdMob Plug-in check
      • What is AdMob plugin setting?
      • How to join AdMobs, create an Ad Unit ID
  • Developer Document
    • Server Side API Specifications
      • Sending a push notification By API
    • Webview (Webview, Push only) Development tool
      • Implementing Google and Facebook Login in WebView
      • Website Member Integration Guide
        • Wix Website User Integration Guide
        • WordPress Website Member Integration Guide
      • Javascript API Documentation
  • Policy
    • Store Policy
    • Limit on the Number of Devices for Free User
    • Swing Store Terms and Conditions
Powered by GitBook
On this page
  • STEP.1 Production Method 1 – Launch Photoshop
  • STEP.2 Insert an image into the blue area
  • STEP.3 Deleting a background color
  • STEP.4 Upgrading Background Image
  • STEP.5 Check Idle Screen Image on Phone and run the Application
Edit on GitHub
  1. Manual
  2. App production manual(V2)
  3. App basics

Guide to Create an Idle Screen Image

Last updated 3 years ago

â–¶ What is the Idle Screen Image?

The idle screen is an image that is displayed for a second or two before the app is launched. Since the idle screen image is a must have in the application, users should also pay attention to the production of the idle screen image while creating the application. ( If you look at the app on the market, it’s also necessary for publicity because it puts an image on the idle screen that can promote the company.)

But what is important here!! In swing2app, idle image is provided in square size (2282 * 2282). Mobile phones are usually long vertical rectangles. If you put a square image, does the image appear broken or distorted? You may ask. The reason for offering square size is that there are so many kinds of mobile phones with square size. So the official screen size provided by the application is (2282 * 2282) px. However, there are guidelines when creating an idle screen. After checking the production instructions, you need to create it according to the guide so that the image can be applied very cleanly without being cut off or distorted.

Check the manual to find out how to create the idle screen image.

â–¶ Idle Screen Guidelines

Please refer to the guidelines for the image to enter the idle screen. Usually the app idle screen will work in a square ratio.

Place the background image in the part that appears in blue, and the grey area in the middle is the part that will contain the important image and logo. In other words, the entire image should be designated as the background image, and the important image should be placed in the center of the screen. That way, depending on the phone model, it may look normal without being cut or crushed.\

+Example of Idle Screen

Existing apps also provide an important image in the center when you look at the idle screen and make the entire image a background image.

Check out the instruction below.

STEP.1 Production Method 1 – Launch Photoshop

First, open Photoshop and work on it so that you can make an idle screen image!!

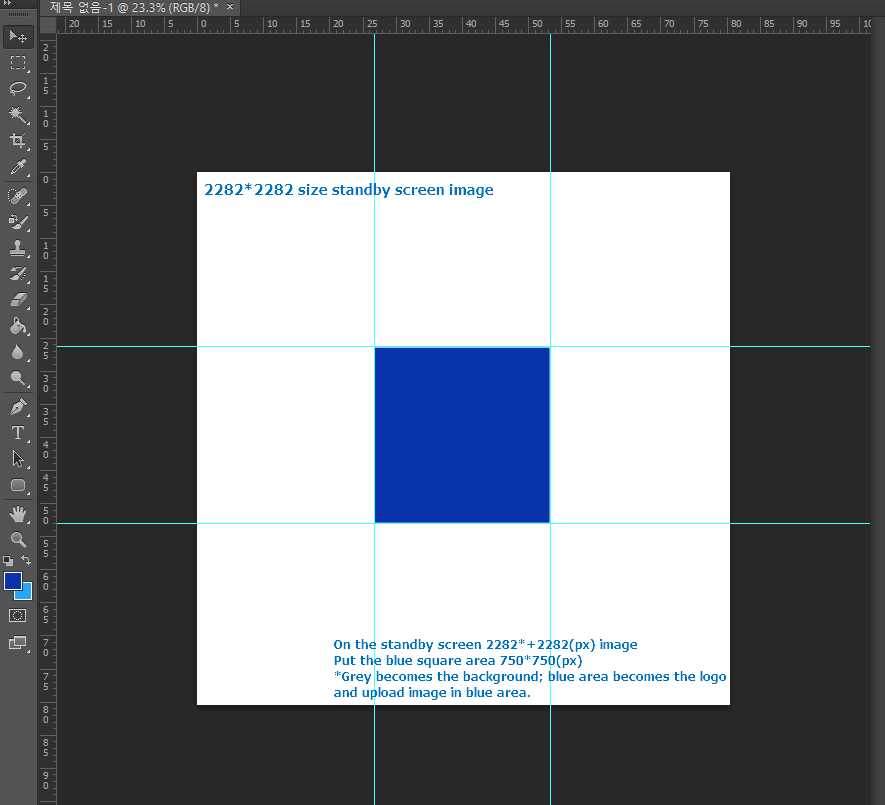
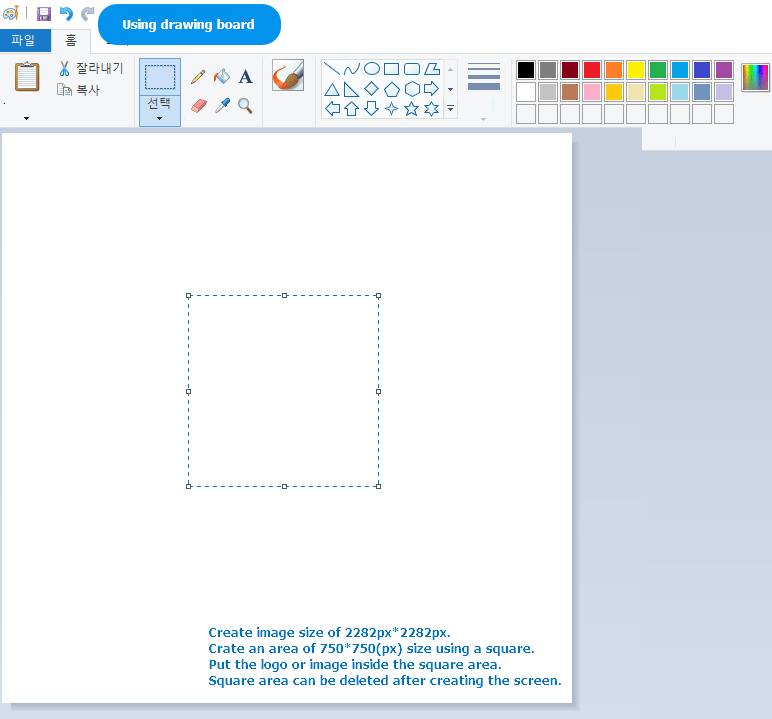
1. Please first create a square image of 2282 * 2282 size idle screen. 2. Use the grid line to give a total of 9 equals. (You don’t have to pay for grids, but you need to be more accurate in your image work.) 3. Center the square area of 750*750 px. = A color has been added to the area to make it easier to understand. ( Let’s create it by adding color and once the image is finished, you can subtract the color.) * The grey part is the part of the background that covers the entire area of the image. * And the image shown on the phone is the blue area. Create an image by putting the image or logo of the company you want to make into the blue area. * Only work inside the blue area.

The grey color is cut off on the phone, so make sure not to cross the blue area.

STEP.2 Insert an image into the blue area

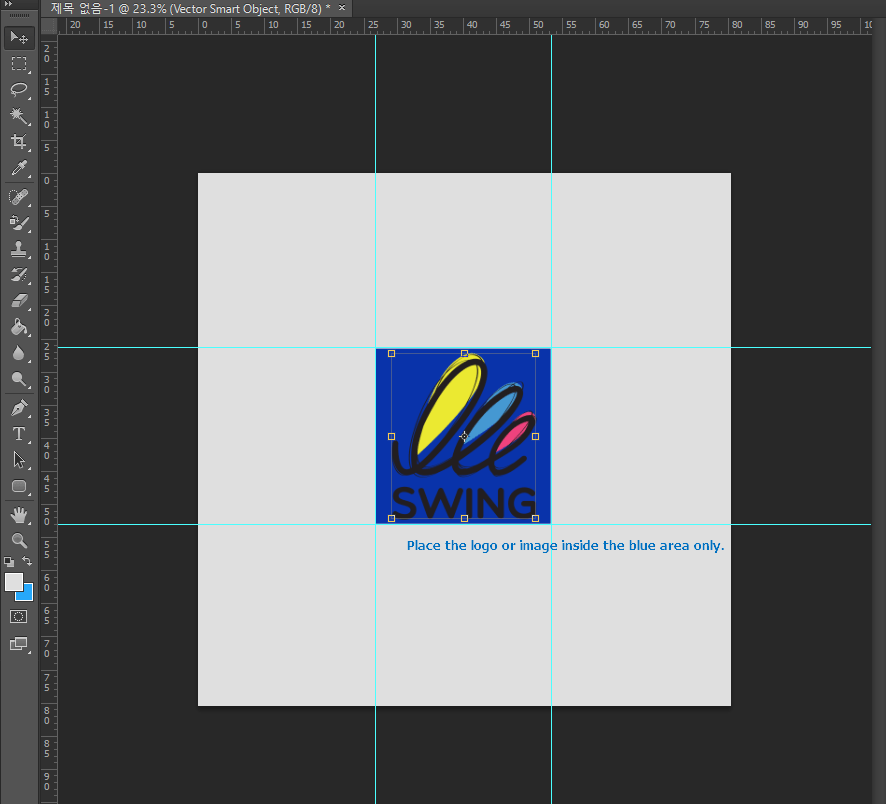
Place the logo or image in the blue area you created. You can create your own image, but the best thing is to put your company’s logo. If you want to create a separate promotional image, just place it inside the area. We place Swing2App image which is the company’s logo. As you can see in the image, you can place it neatly into this area.

STEP.3 Deleting a background color

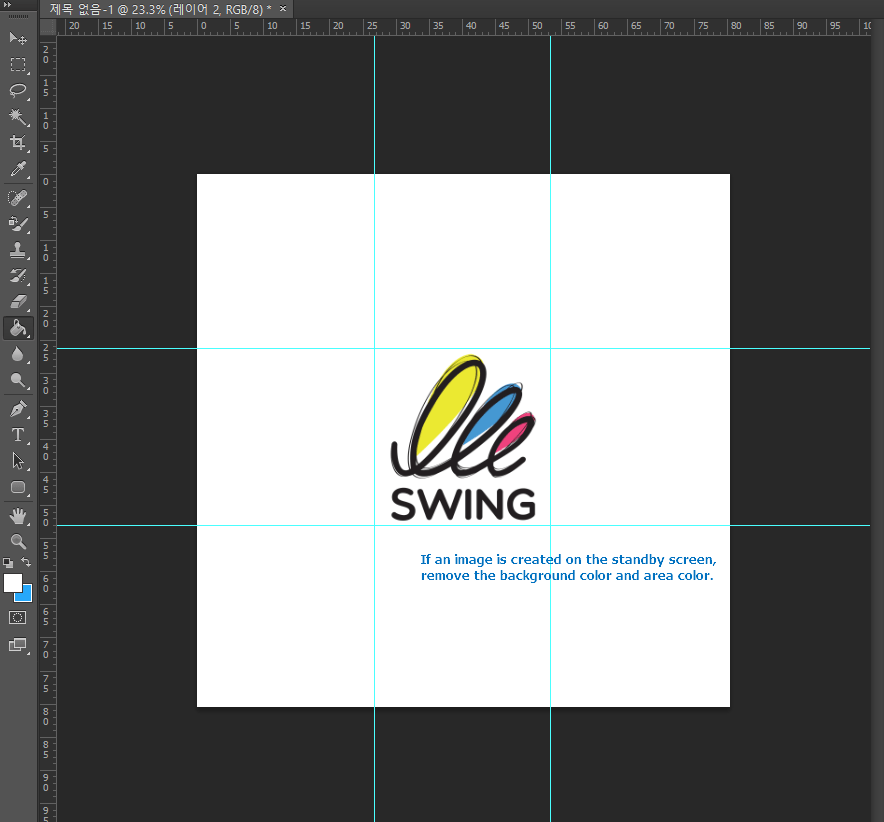
When you’re done working on the image, delete the background and area colors you’ve put in earlier. * If you remove the background color altogether, it will be transparent. It can be white or any other color you want!

STEP.4 Upgrading Background Image

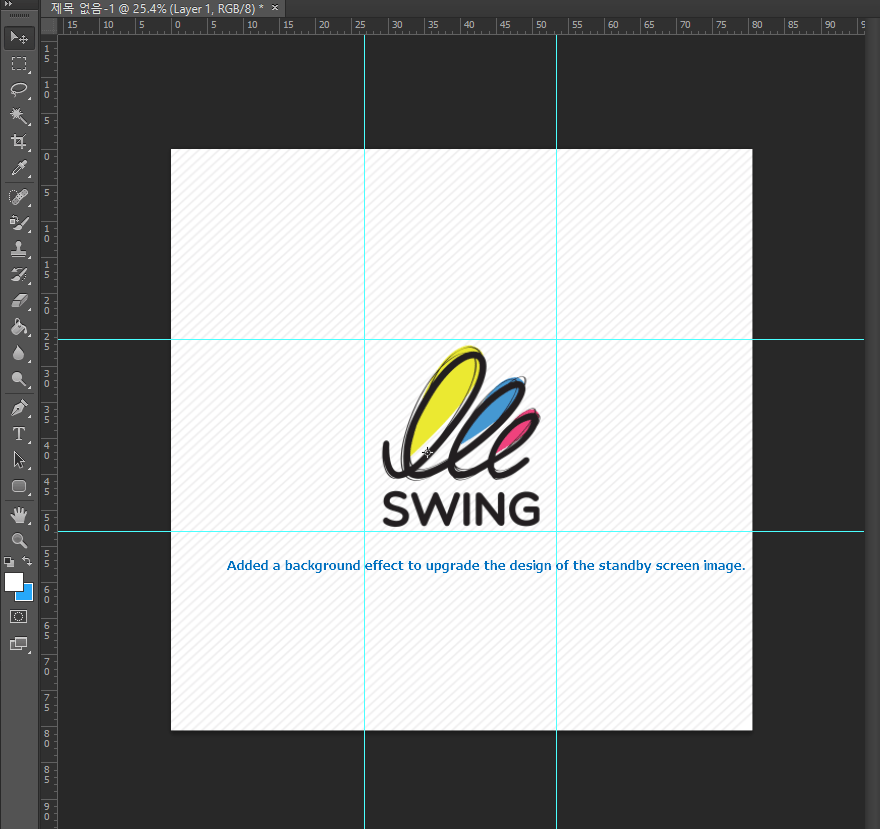
If you just want to cover the background image with a solid color, You can upgrade the background image and add the effect. The background image looks cut off on your phone, so you might want to give it a brush effect rather than a large image. If you look at the atmospheric screen guidelines and create an image, it will never be cut off or distorted on your phone. Let’s Go!!\

STEP.5 Check Idle Screen Image on Phone and run the Application

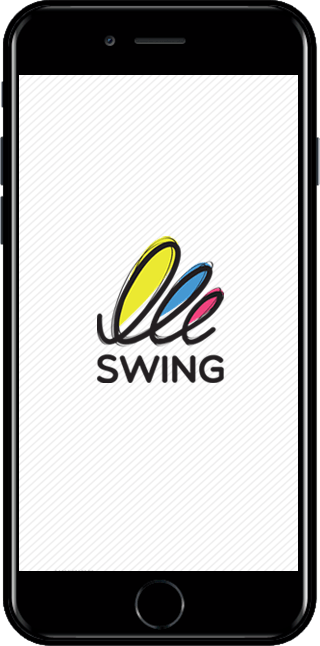
An idle screen image is one that appears after running the app.

I registered the idle screen image created above. Obviously we made it square but it fits very well into the rectangular cell phone screen. **Please create an idle screen image in this way.

â–¶Create Idle Screen Image with Paint!!

If you don’t have Photoshop, it’s hard to create an idle image! But you can also create it using paint!

1. Launch Paint, and then create an image of size 2282 * 2282 from the [Resize] menu at the top. 2. And select the [rectangular shape] tool tip and make it 750*750 size in the center. (It’s not 750 size, it’s 749, but the error is fine) 3. You can then create an image inside the area just like you saw in Photoshop. 4. After creating, delete the rectangular area.
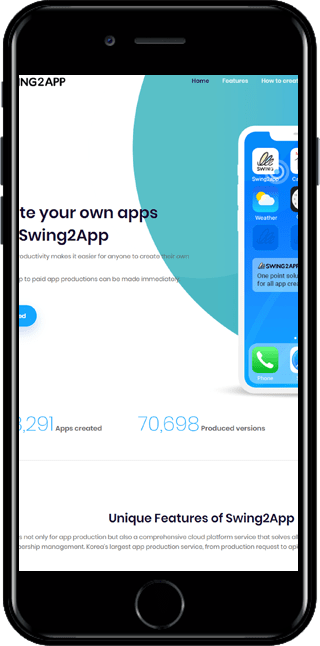
â–¶ Incorrect Screen Image 1

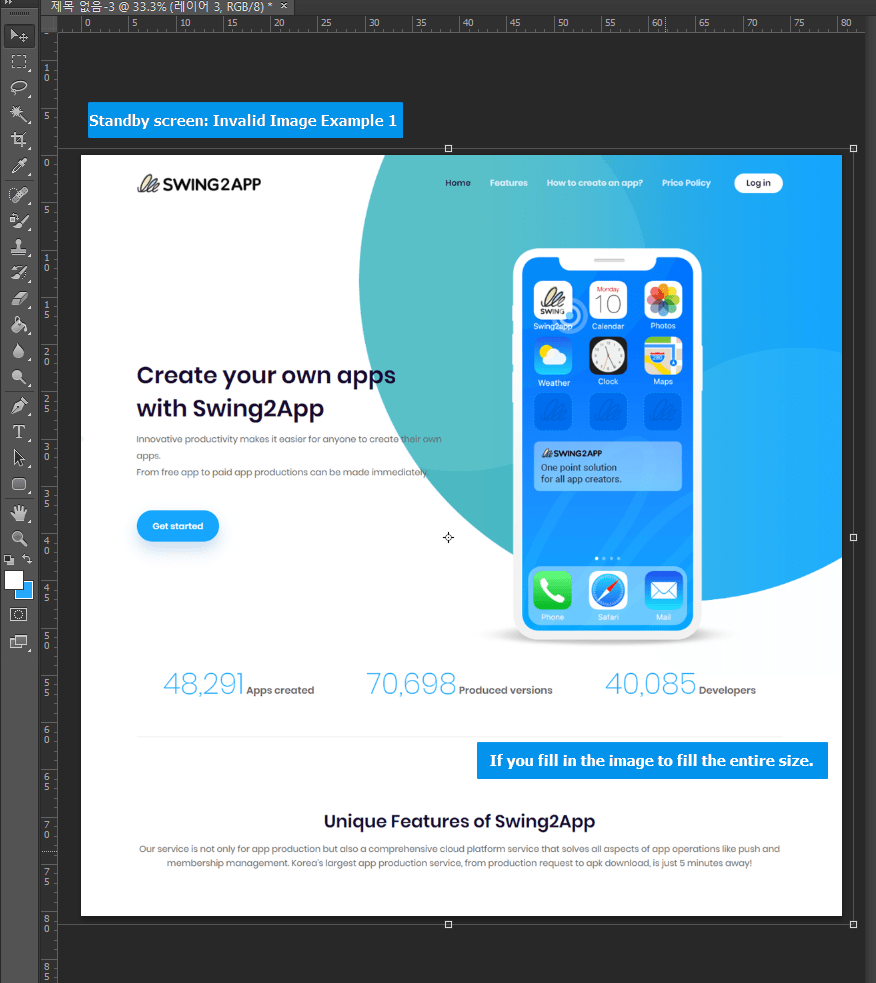
When you create an idle screen image, you do not create a center image area, as in the method above. If you fill an image with a full background size, it will be cut off or vertically distorted when running the mobile phone app! Never create an image that fills your screen!!

â–¶Incorrect way to check your idle screen image

â–¶Incorrect Screen Image 2

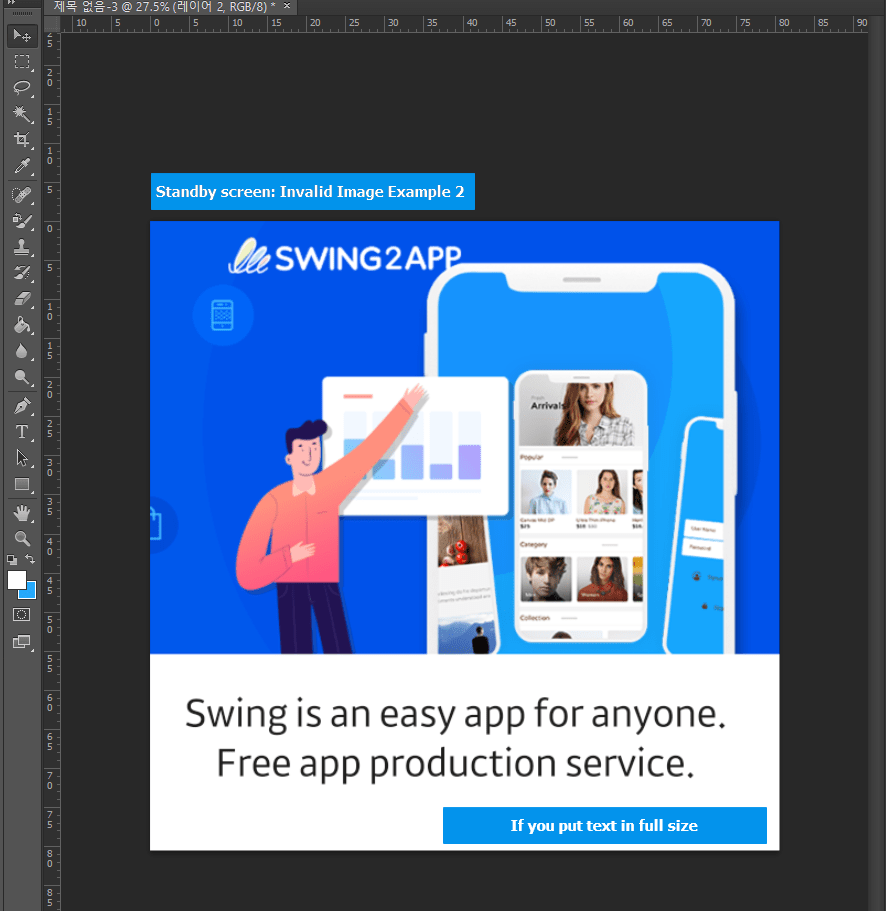
And the 2nd one is also not the right way. It is the case where you fill the entire screen with text (text). Even in this case, the text is cut off or the image seems to be long. We usually recommend that you do not put a lot of text on the idle screen image. We recommend putting a simple image.

â–¶ Incorrect way to check the idle screen image

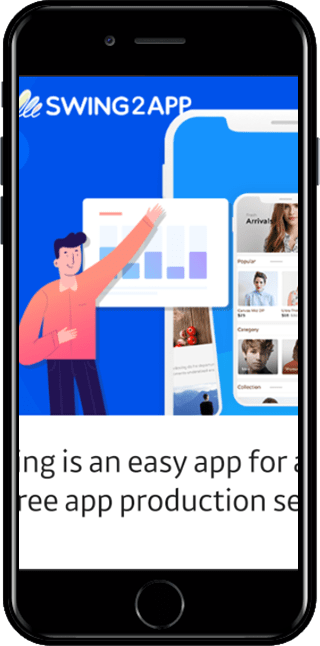
If you register this image as the idle screen image, it looks really ugly, right?

The image text is cut off and distorted and the resolution is terrible.

So, the idle screen image must follow this guidelines. This is the guide for the idle screen image applied to the app and how to create it.

** Things to remember!! Instead of filling the entire atmosphere with the image, leave the background image on the outside (the part that can be cut off), and apply the image only to the center square area!!