> For the complete documentation index, see [llms.txt](https://documentation.swing2app.com/llms.txt). Markdown versions of documentation pages are available by appending `.md` to page URLs; this page is available as [Markdown](https://documentation.swing2app.com/manual/swingshop/registration.md).
# Product Management - Physical Product Registration
**Swing Store-Product Registration**
If you’ve applied for a swing store, you’ll need to register your product directly at the mall.
Swing2App offers product types – physical, digital, and reservation systems.
-Physical items are generally sold in shopping malls.
-Digital includes documents, PDF files, videos, and administrator rights.
-Reservation system is a date-specific reservation management system for hotels, camping sites, guest houses, etc.
**The manual will show you how to register a physical product, apply it to your app, and more.**
### **STEP. 1 Register a product category after applying for swing store**
Please apply for a swing store first. The swing shop must be requested before the menu is available.
**☞** [**How to apply for Swing Shop**](/manual/aff-program/apply.md)
You must apply for a swing store to create a “Swing Store” menu at the top of the app operation page.
When you apply for the swing2app shopping mall, \[swing store] menu is created on the app operation page.
If \[Swing Store] has been created, you need to register the product category first.
\*Rather than registering a product, you must first create a category that contains the top menu which includes the product!
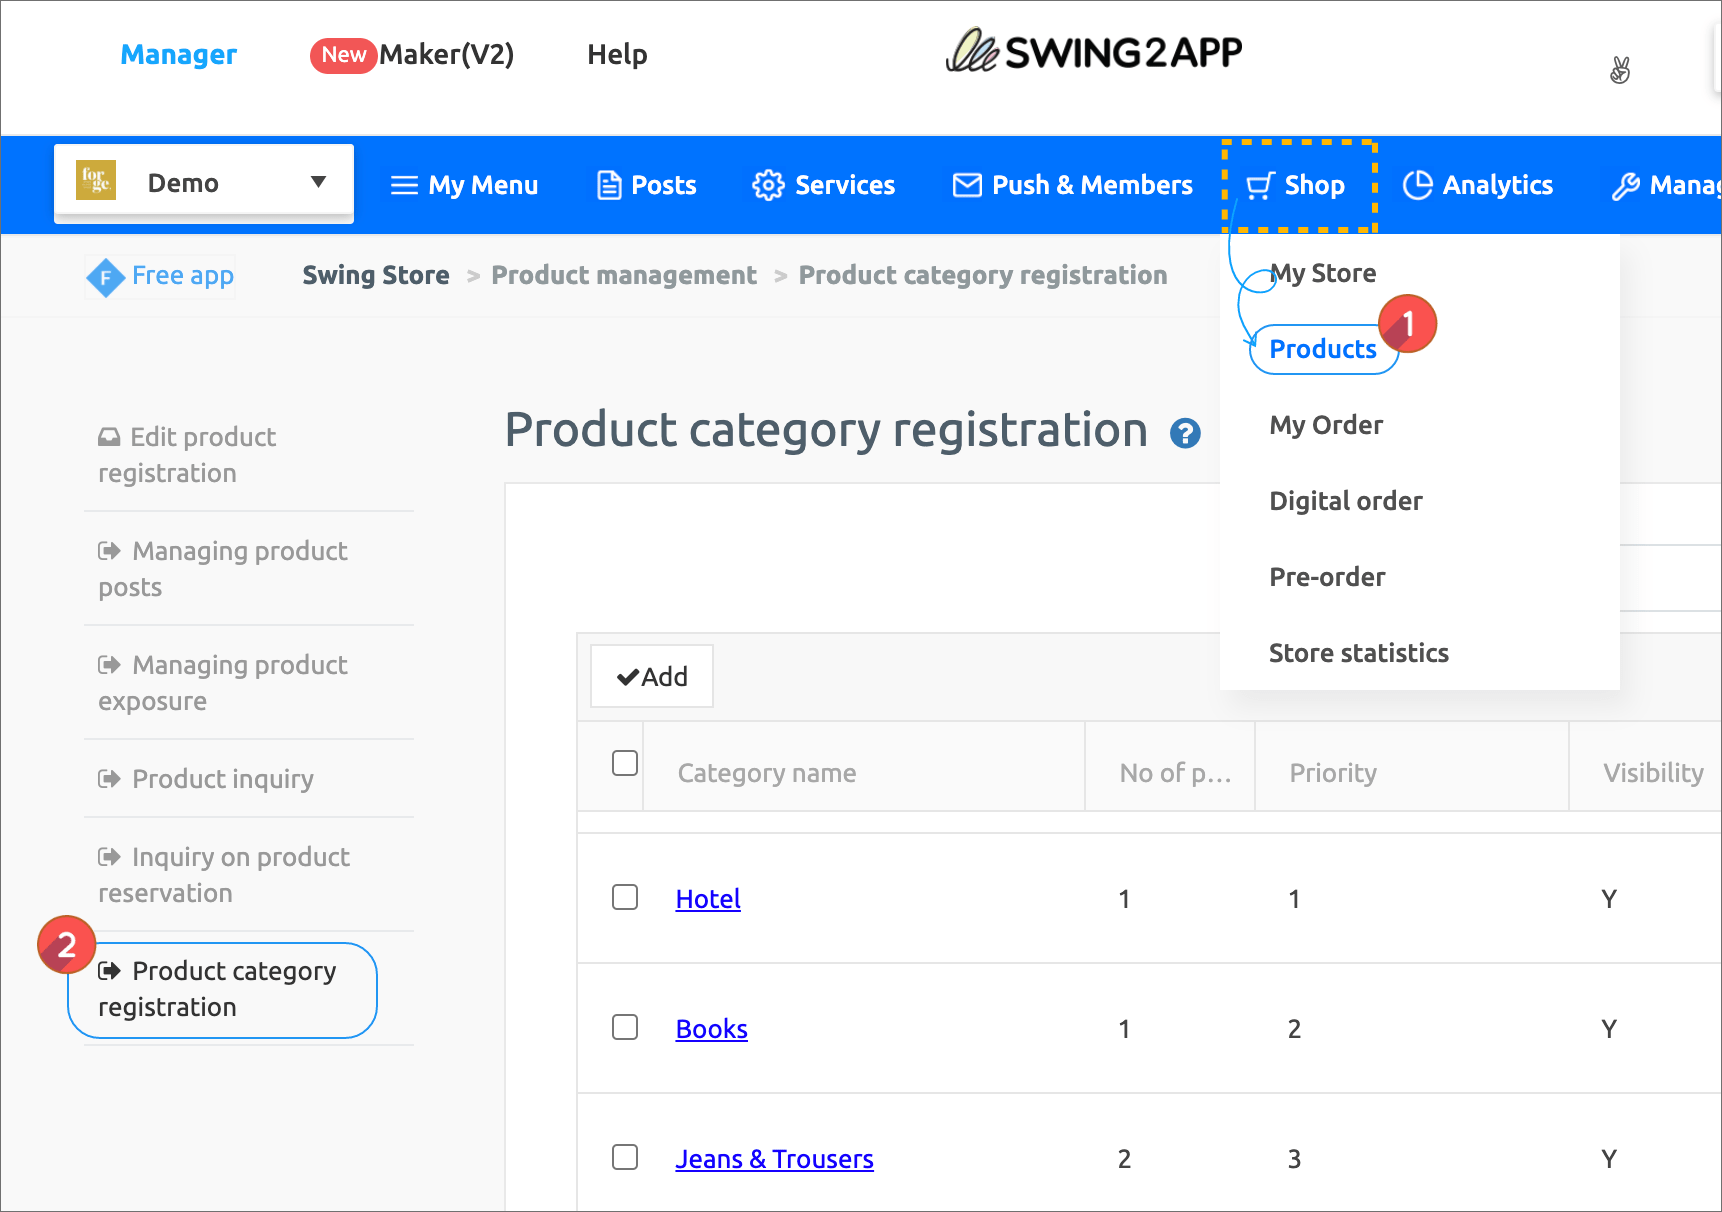
**Move to Swing Store → Product Management → Product Category Registration Management.**
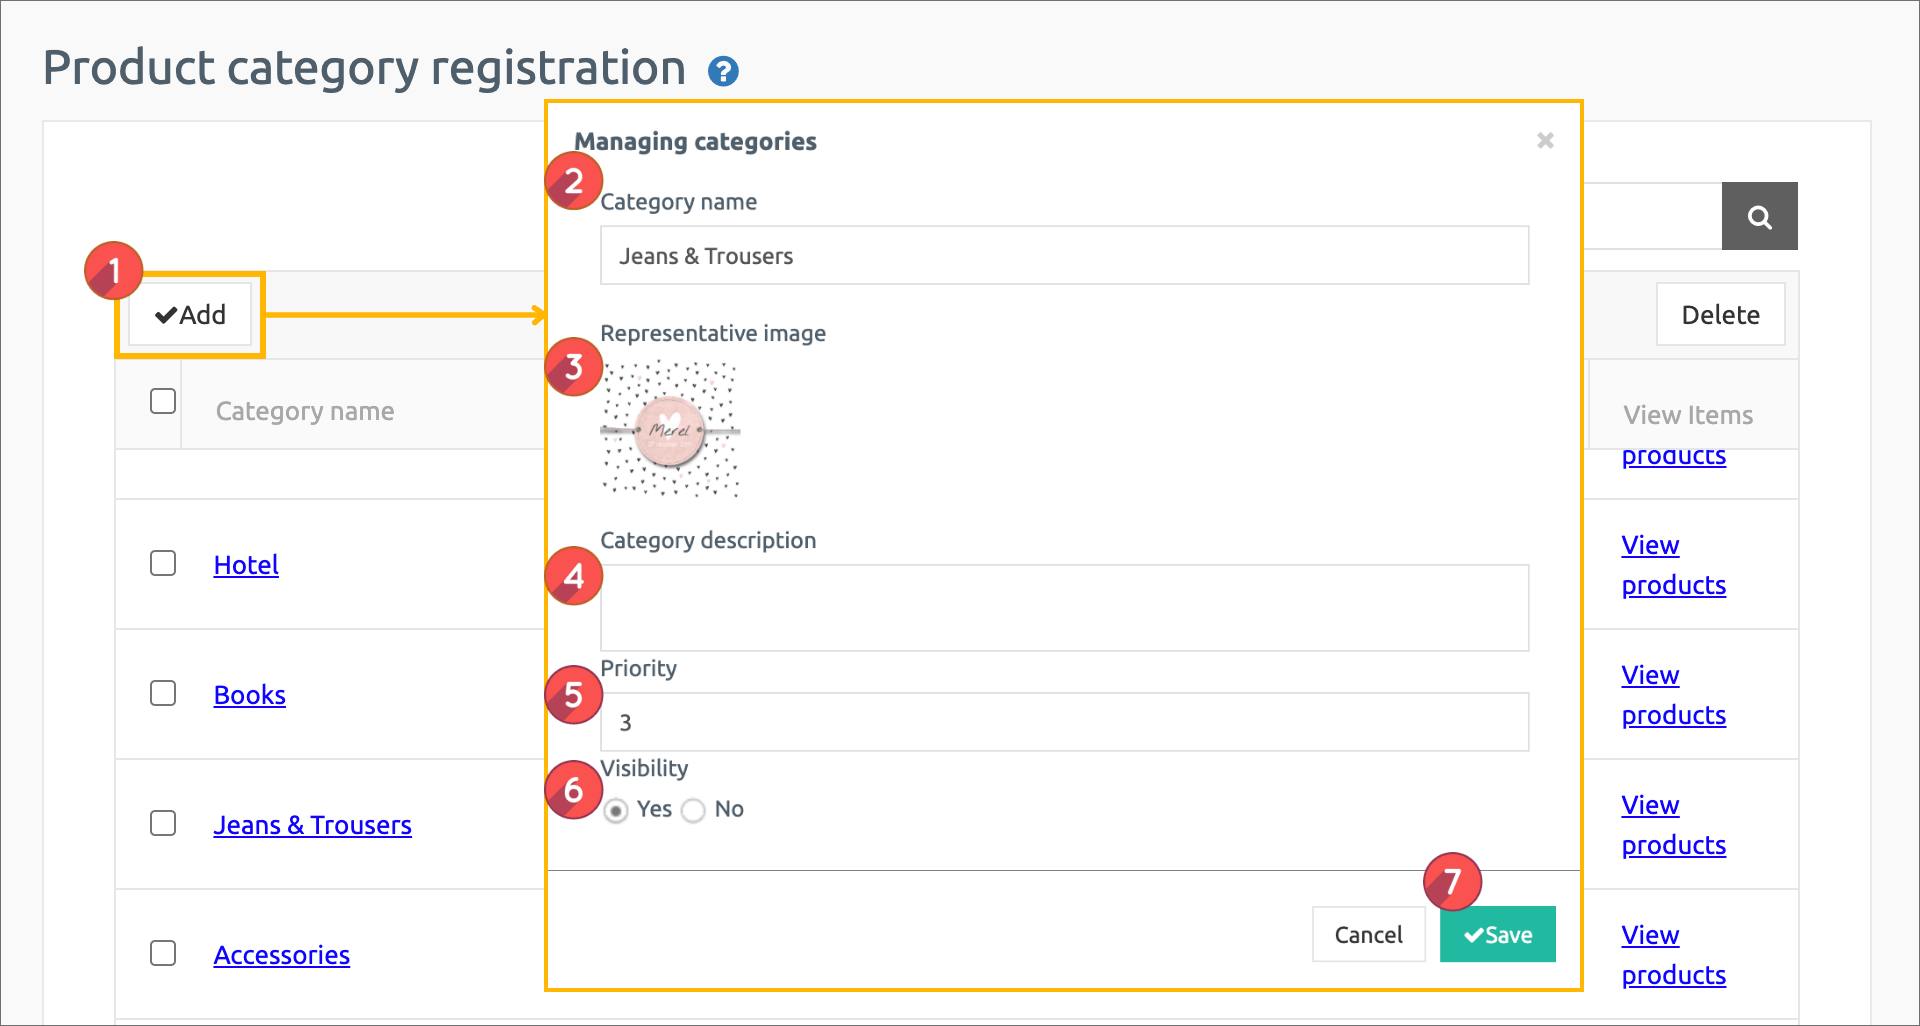
Select 1) \[Register] button on the product category registration management screen.
In category management window, 2) Category name 2) Representative image 3) Category description 5) Priority 6) Display Status 7) Select save button.
**\*Priority is placed at the top as the number is higher, and if the priority is the same, the first registered category will be placed at the top, depending on the item registration date.**
**\*Categories must include a name that includes the product. Example) top, bottoms, accessories… Like this.**
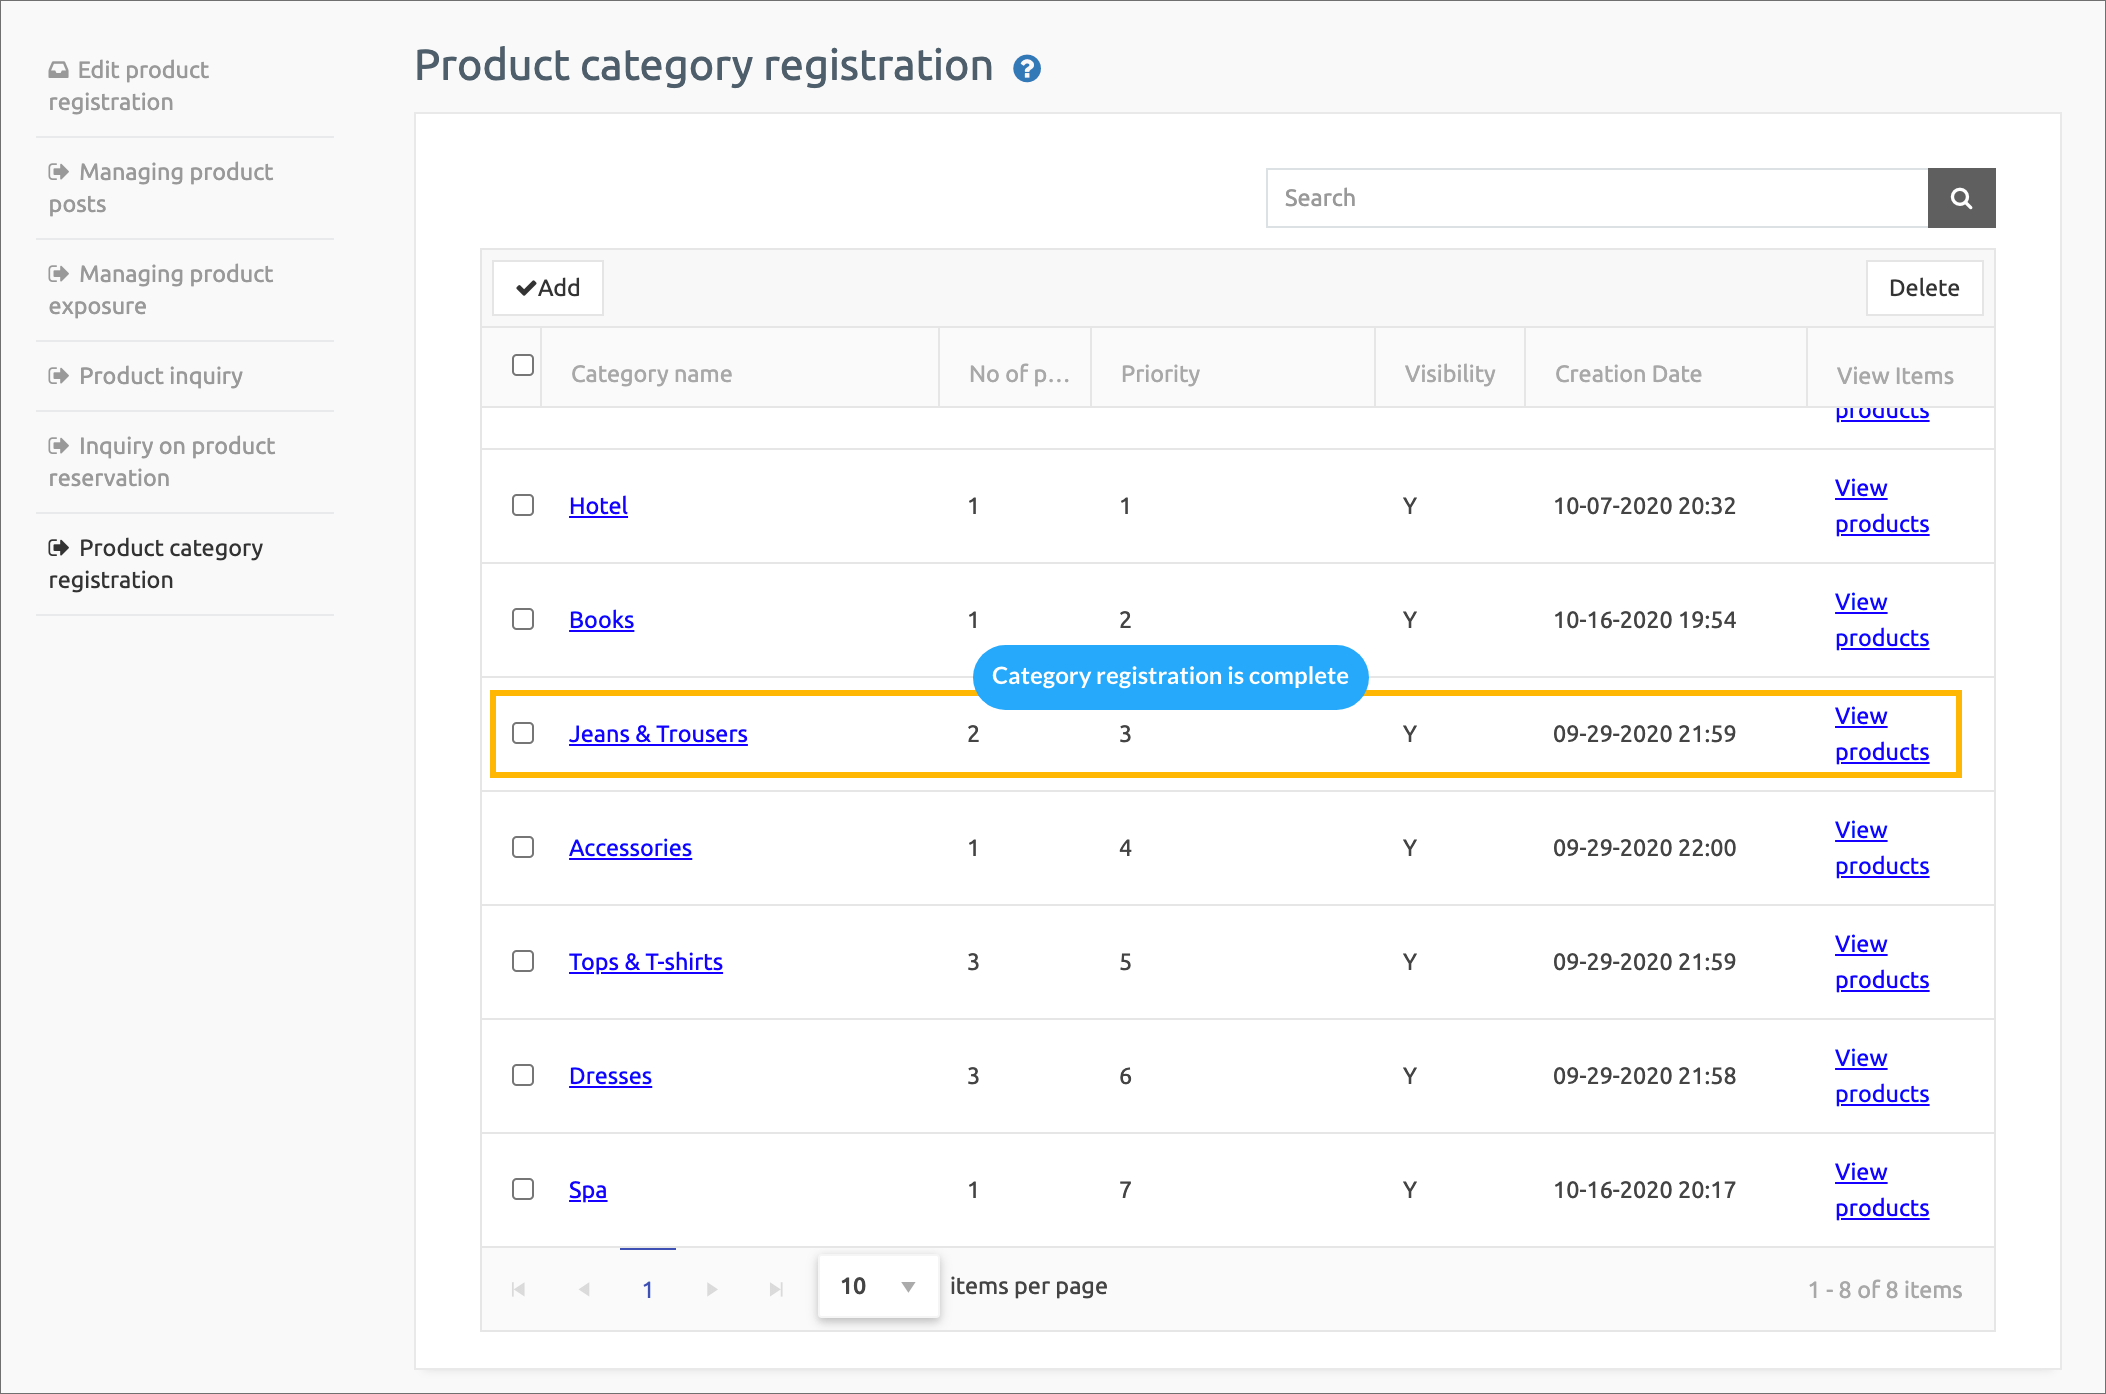
Category registration is complete.
Categories can still be added from that menu without limiting the number of categories.
You can edit the content by selecting the category, and delete the category with the \[Delete] button.
### **STEP. 2 Register Physical goods**
**Let’s register the product if category registration is over.**
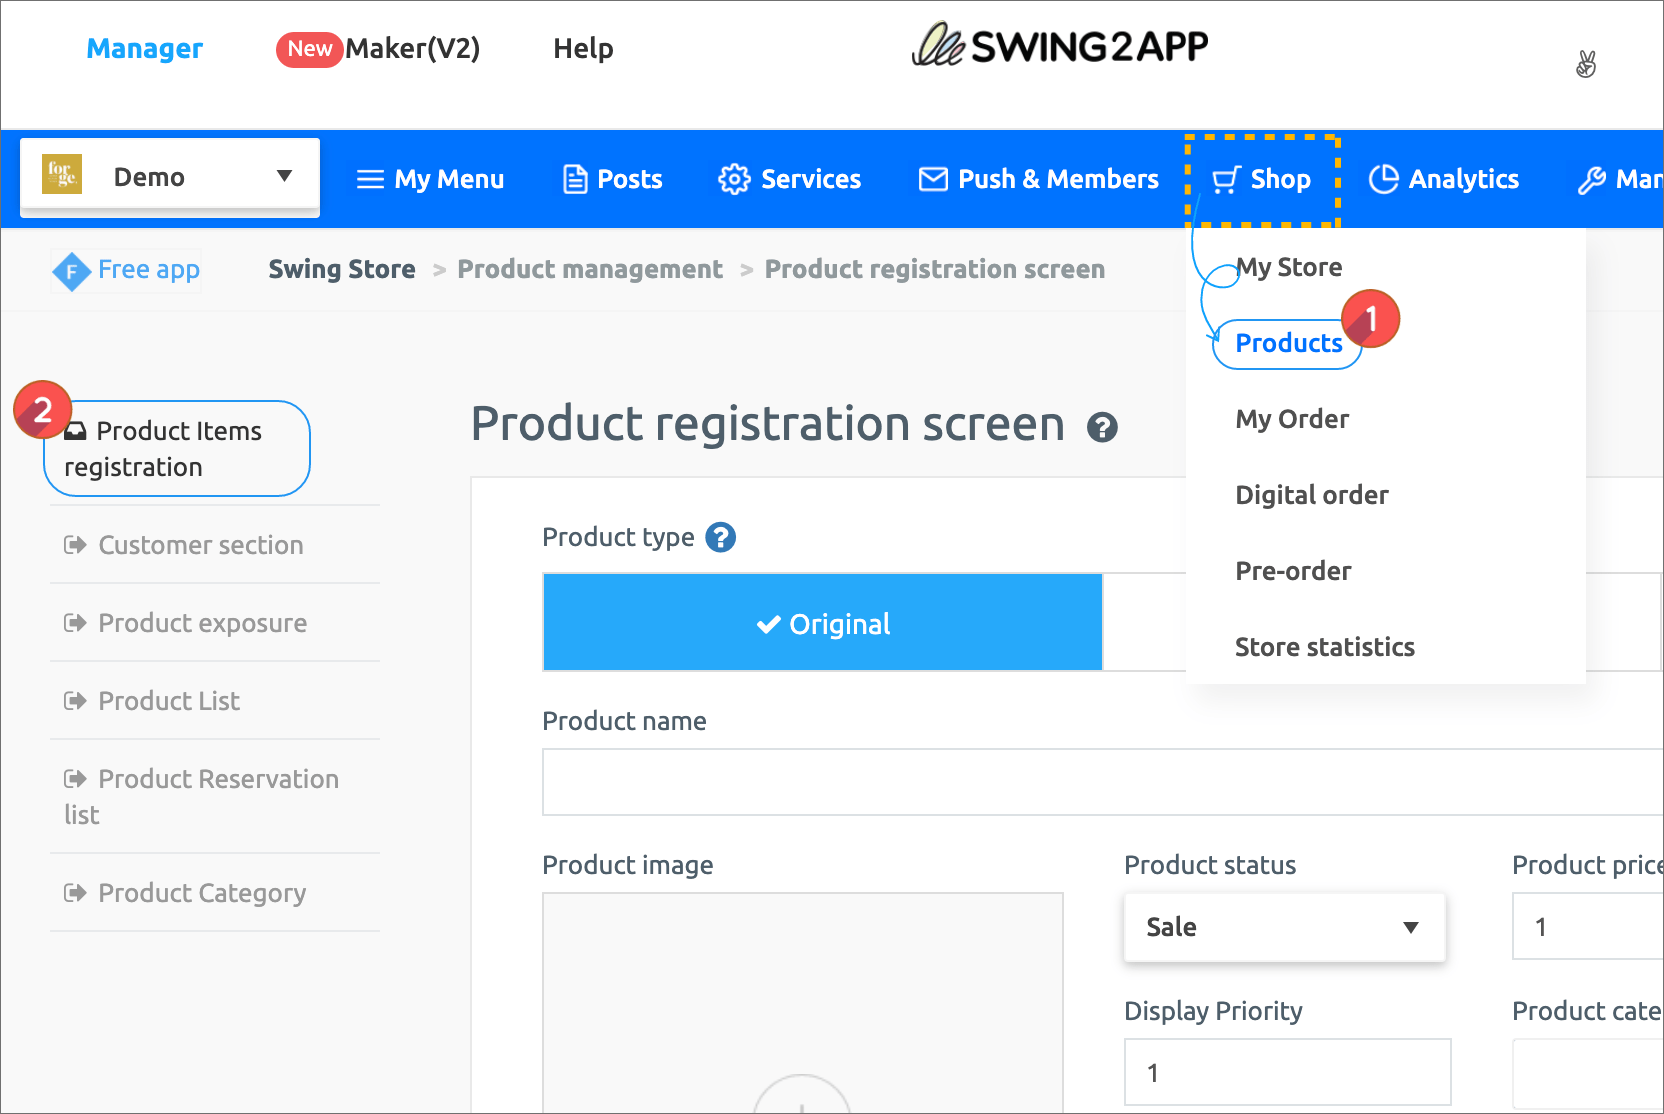
Please go to Swing Shop → Products → Product Item Registration.
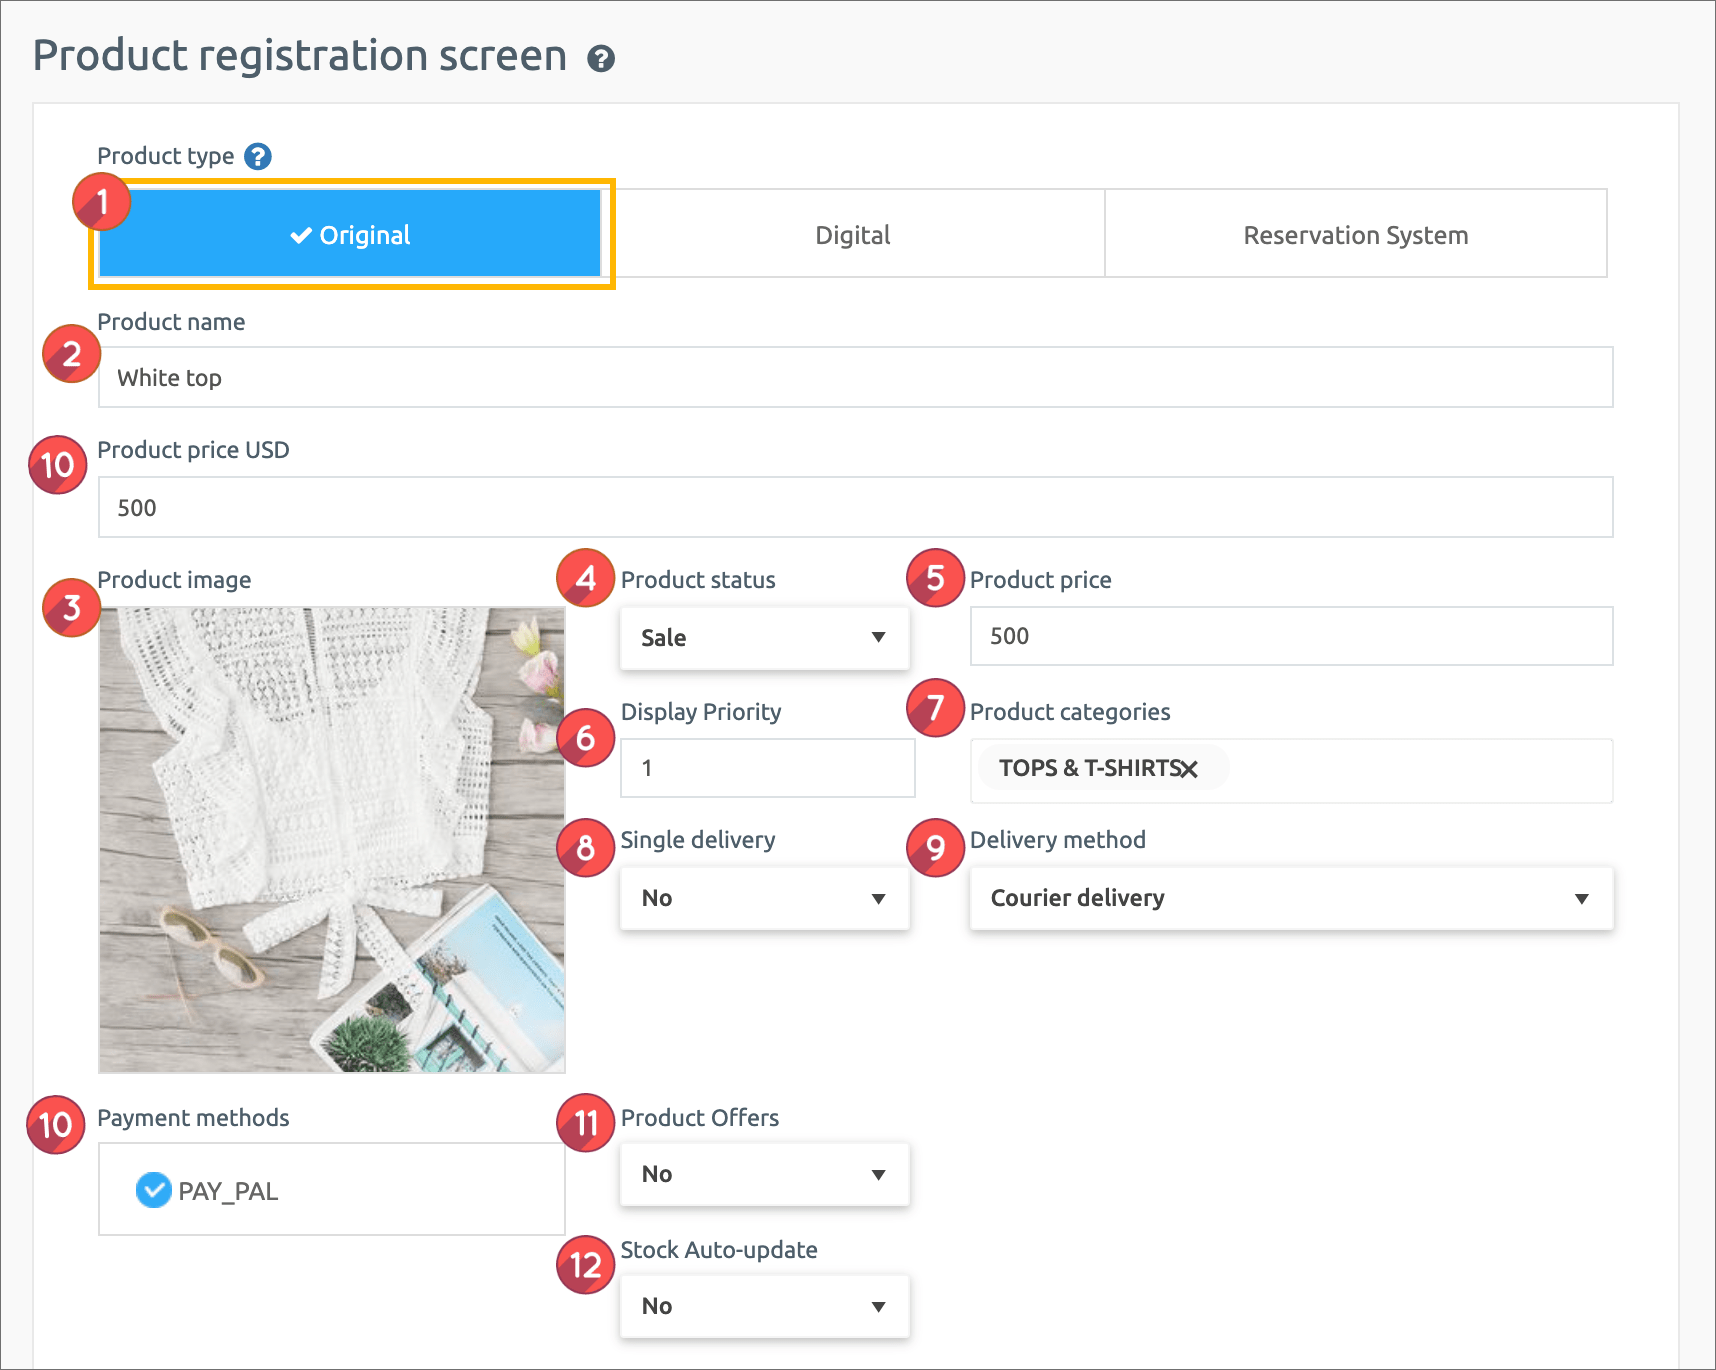
1\. Product type: Select ‘Original’.
2\. Product name: Enter the product name.
3\. Product representative image: Register the representative image shown on the product purchase page.
4\. Registration status: Available for sale, out of stock, suspension of sale, temporary registration status can be selected.
5\. Product price: Enter the price to sell.
6\. Display Priority order: Enter the order in which the products are displayed in the category.
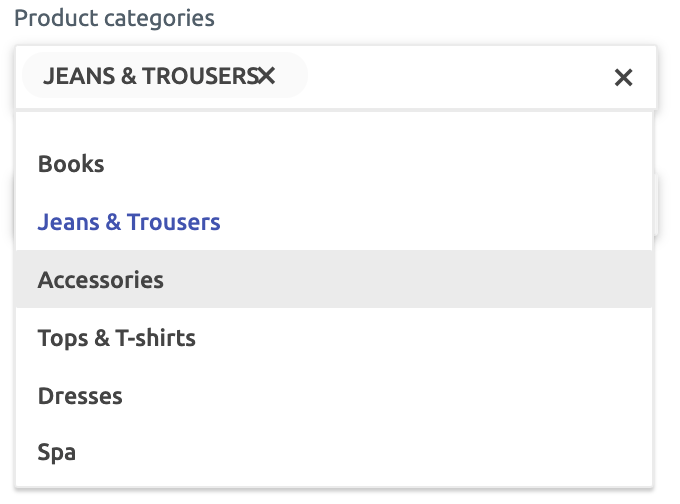
7\. Product Category: Please select a product category.
**\*As mentioned above, you must create a product category first so that you can select a category in the product registration! Don’t forget to create a category first.**
8\. Single delivery: Select ‘Yes’ or ‘No’.
\*Single delivery “Yes”: Additional shipping costs per quantity of goods
\*Single delivery: “No”: Buy multiple items and treat them as bundle delivery with the same shipping cost
9\. Select how to receive the goods: Please set whether the app user will receive the product as ‘courier’ or ‘direct pick’ or ‘optional’ when purchasing the product.
10\. Payment method by product: Check Bank Deposit, PAY APP(Pay App) and Card Payment. If Pay Pal is selected, please mention the price again(Product Price in USD) at the top of product image field.
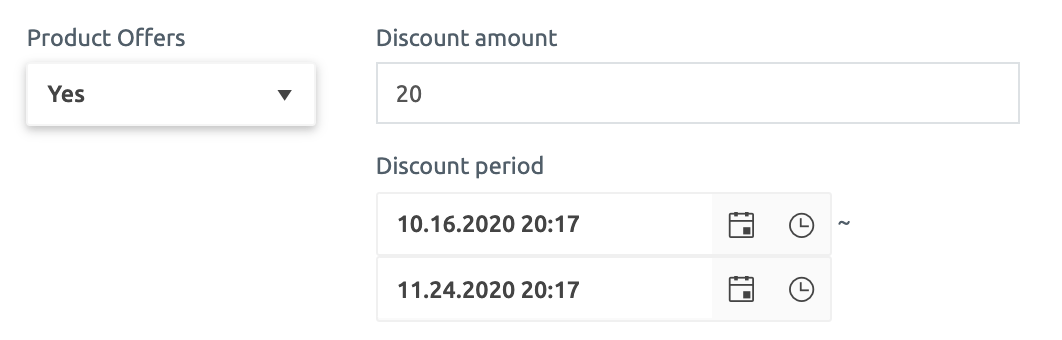
11: Offer a discount: Select whether to display the product at the original price or to apply the discount.
**\*If you check the discount as “Yes”, you will see an option window that sets the discount amount and the period.**
**\*The discount amount must be entered in the final discounted amount.**
12\. Use inventory management: Check whether you want to use product inventory management.
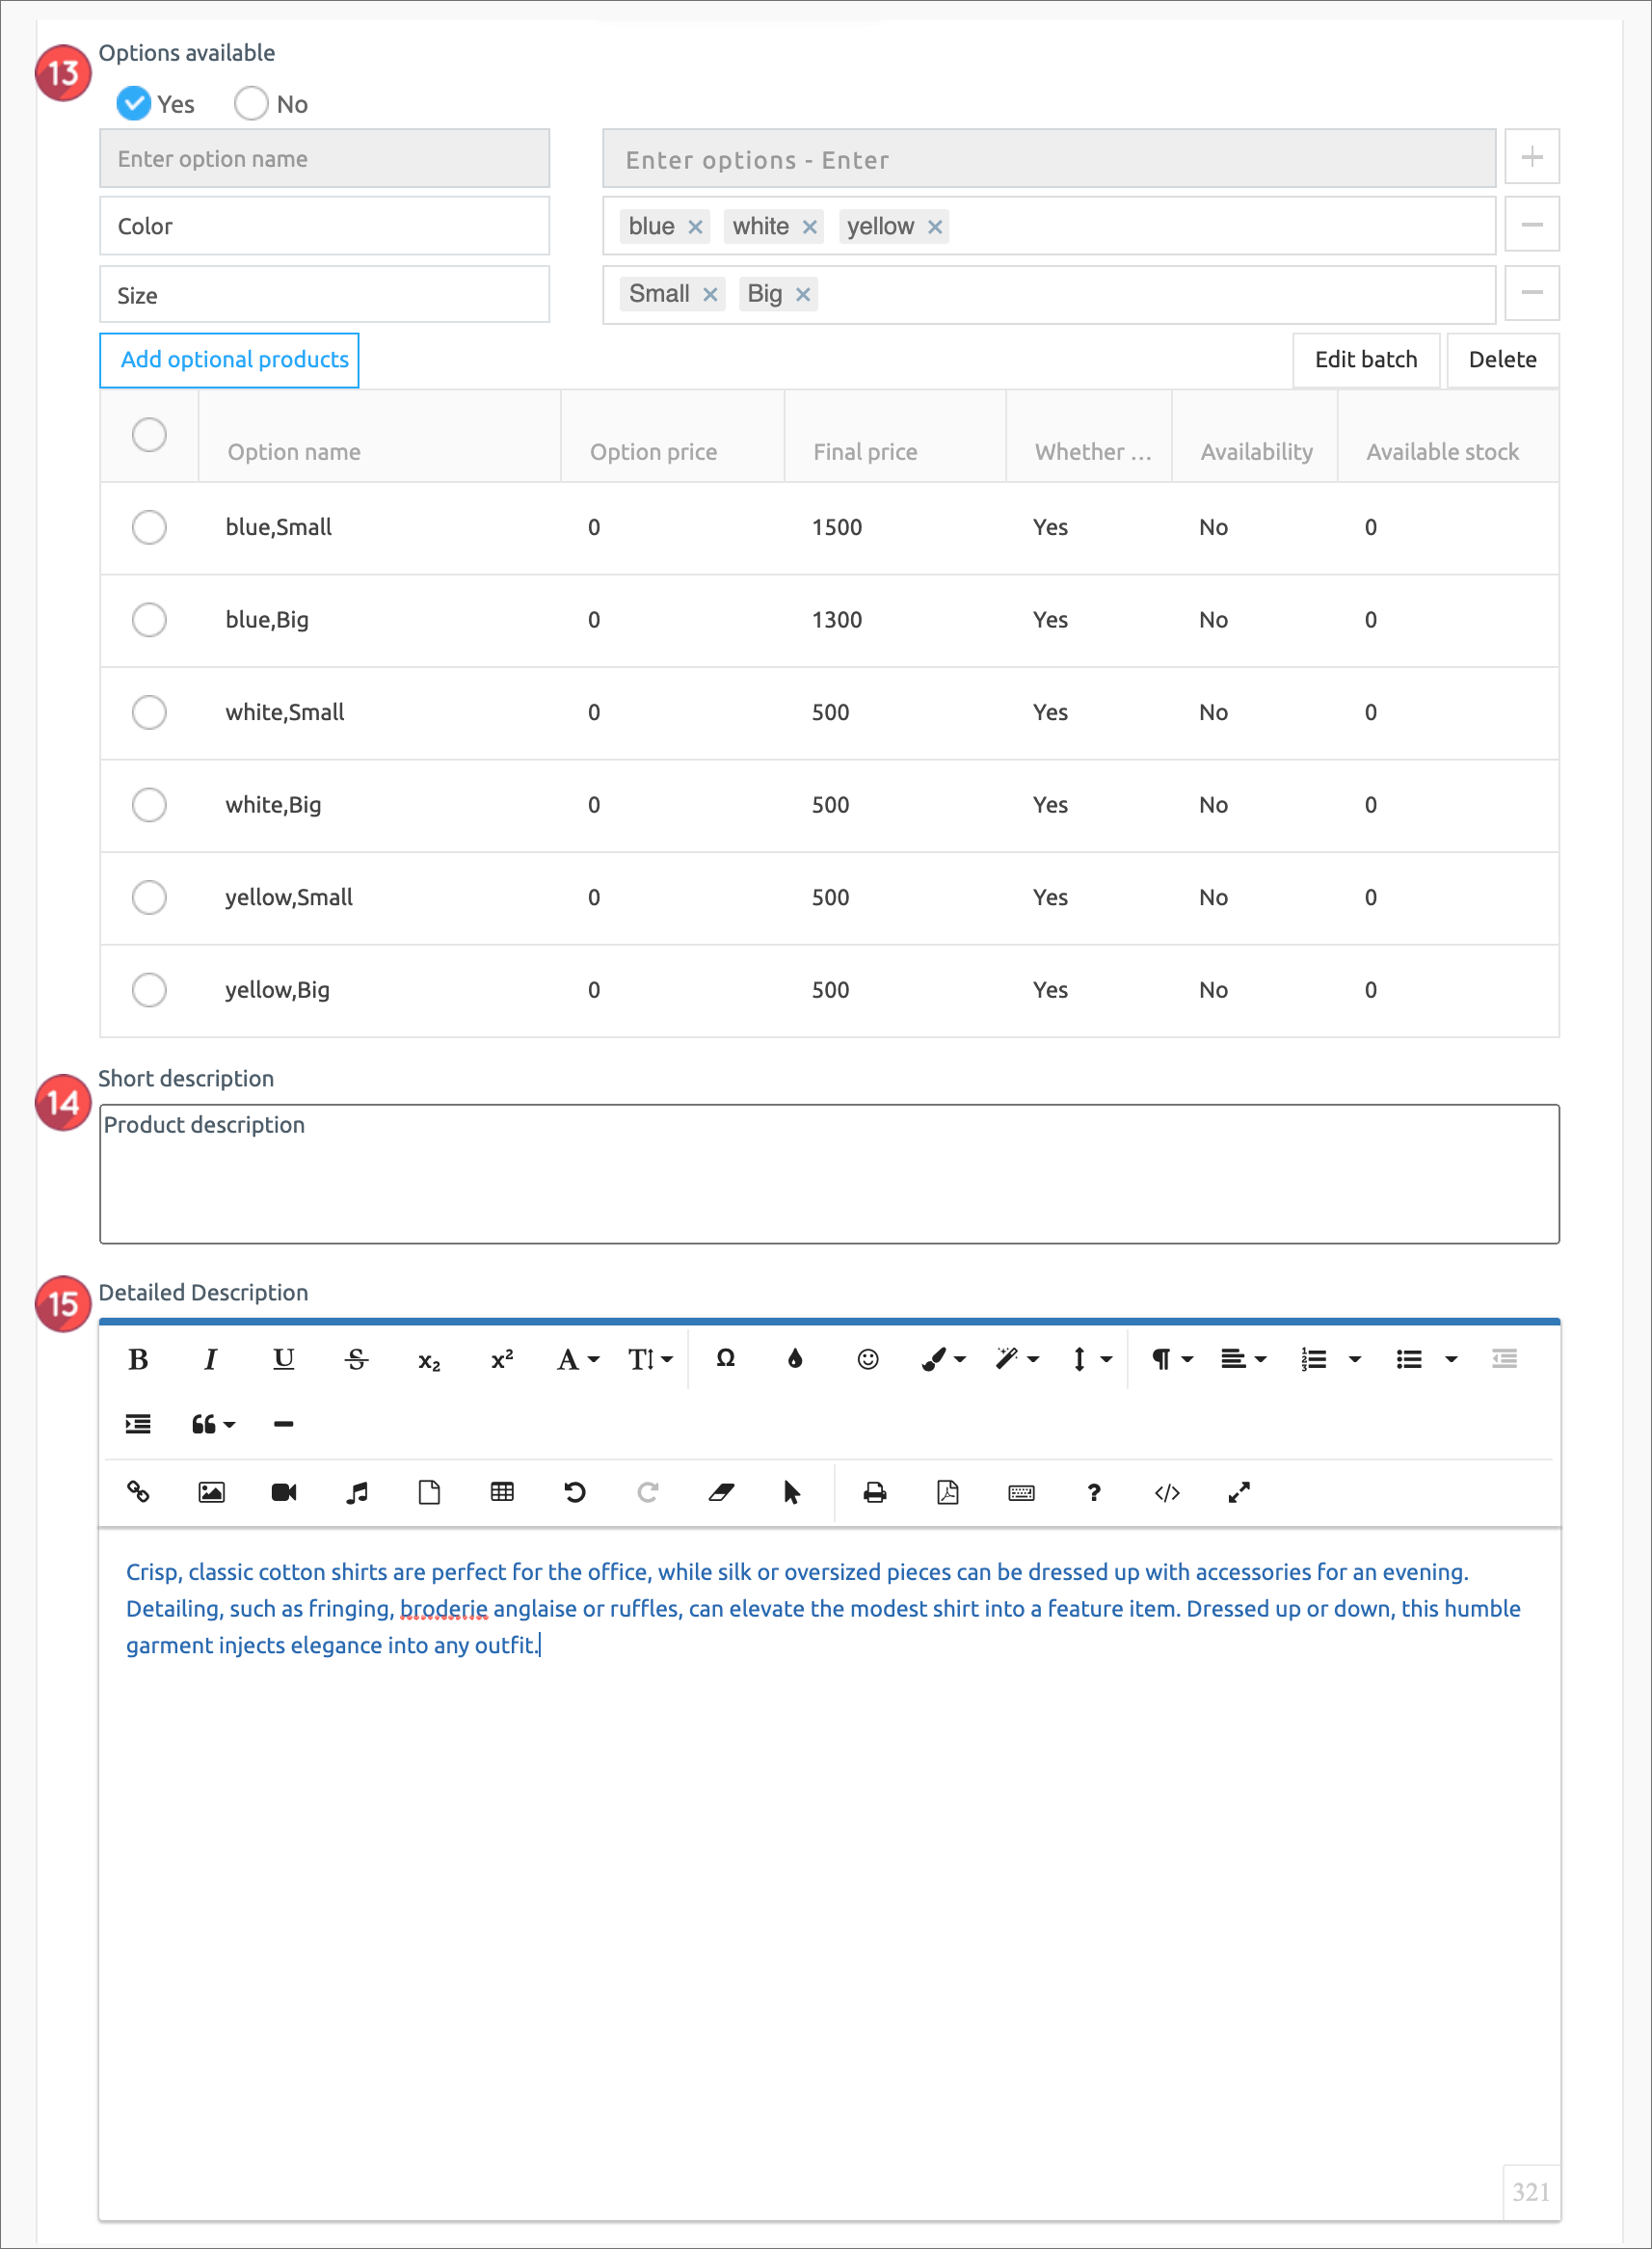
13\. Availability: You can use it when you add an optional item to the product.
Example) You can set the options and set the amount of options by adding size, adding color, etc.
14\. Product Brief Description: Introducing the product
Enter a simple one-line description.
15\. Product Description: Please write details such as product image, description, product information, refund and exchange using the editor program.
▶ **Check the image below on how to add the options!**
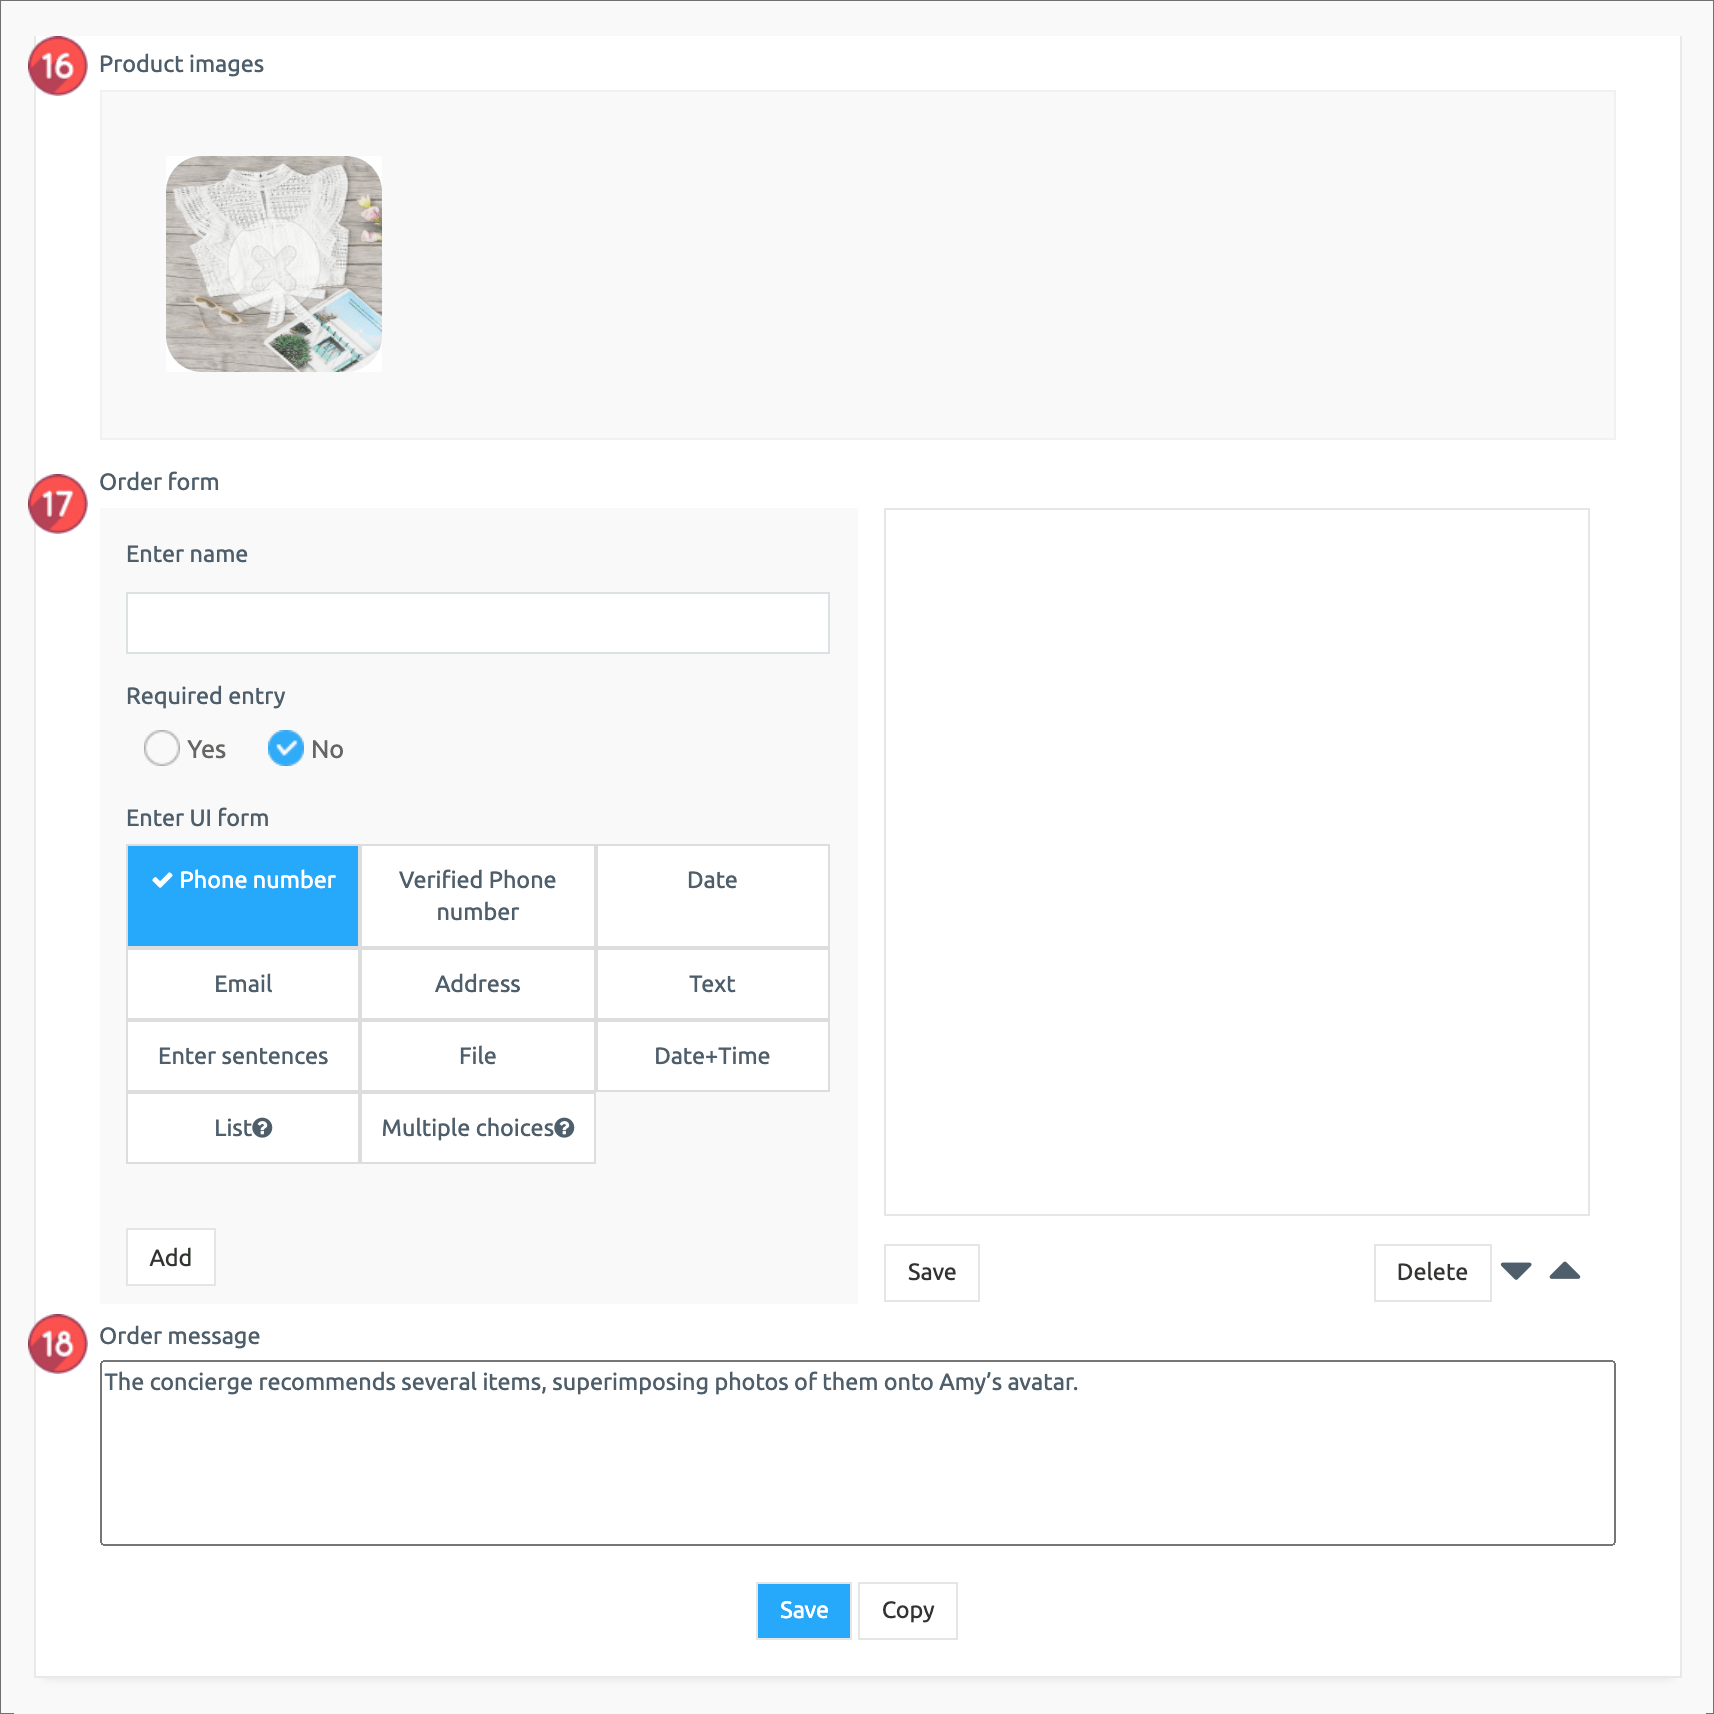
16\. Product detailed image: Register the product image. Multiple images can be registered and their order can be changed.
17\. Order form items: If you have any information you need to receive, please provide fill out the order form.
18\. Ordered Message: If you don’t have a specific message, you don’t have to write anything.
At last click the \[Save] button to complete the reservation system product registration.
**—Product registration is complete. You can check the registered product in the product inquiry.—**
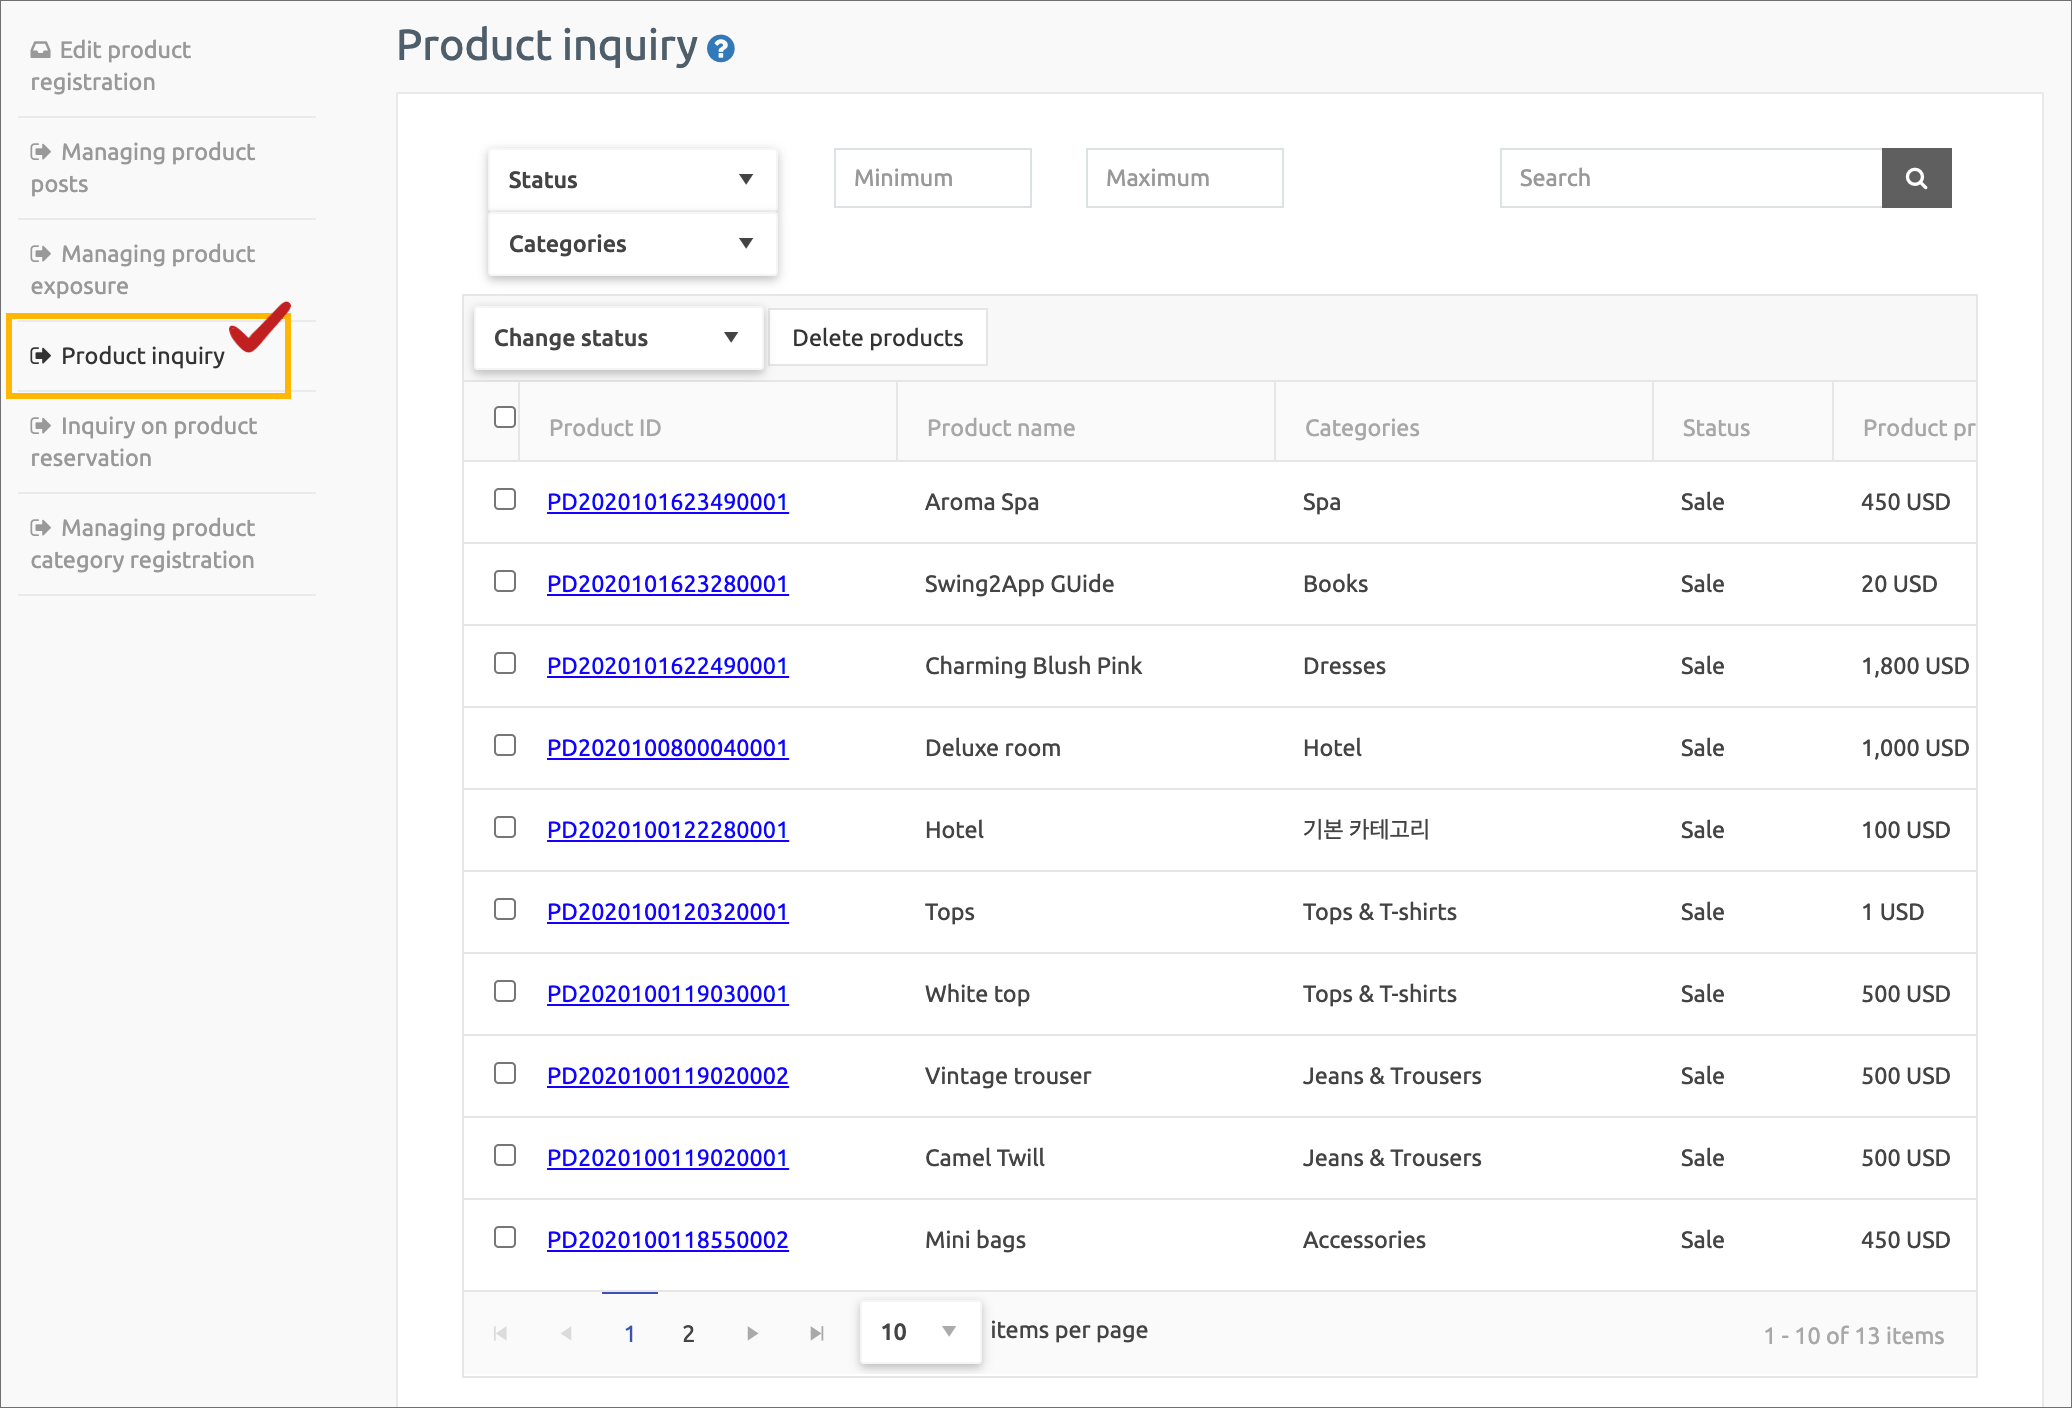
You can check the list of registered products in the product search menu.
If you need to modify the contents of the registered products, select the product you want to modify with your mouse.
Go to the product registration modification screen.
### **STEP. 3 Apply a physical products page to your app**
Once you’ve completed your physical product registration, we’ll show you how to apply the product page to your app!
**\*In case of real products, there are various pages that can be applied! We will show you how to use the menu in 3 ways!!**
**01. Home Screen – Apply shopping mall main page**
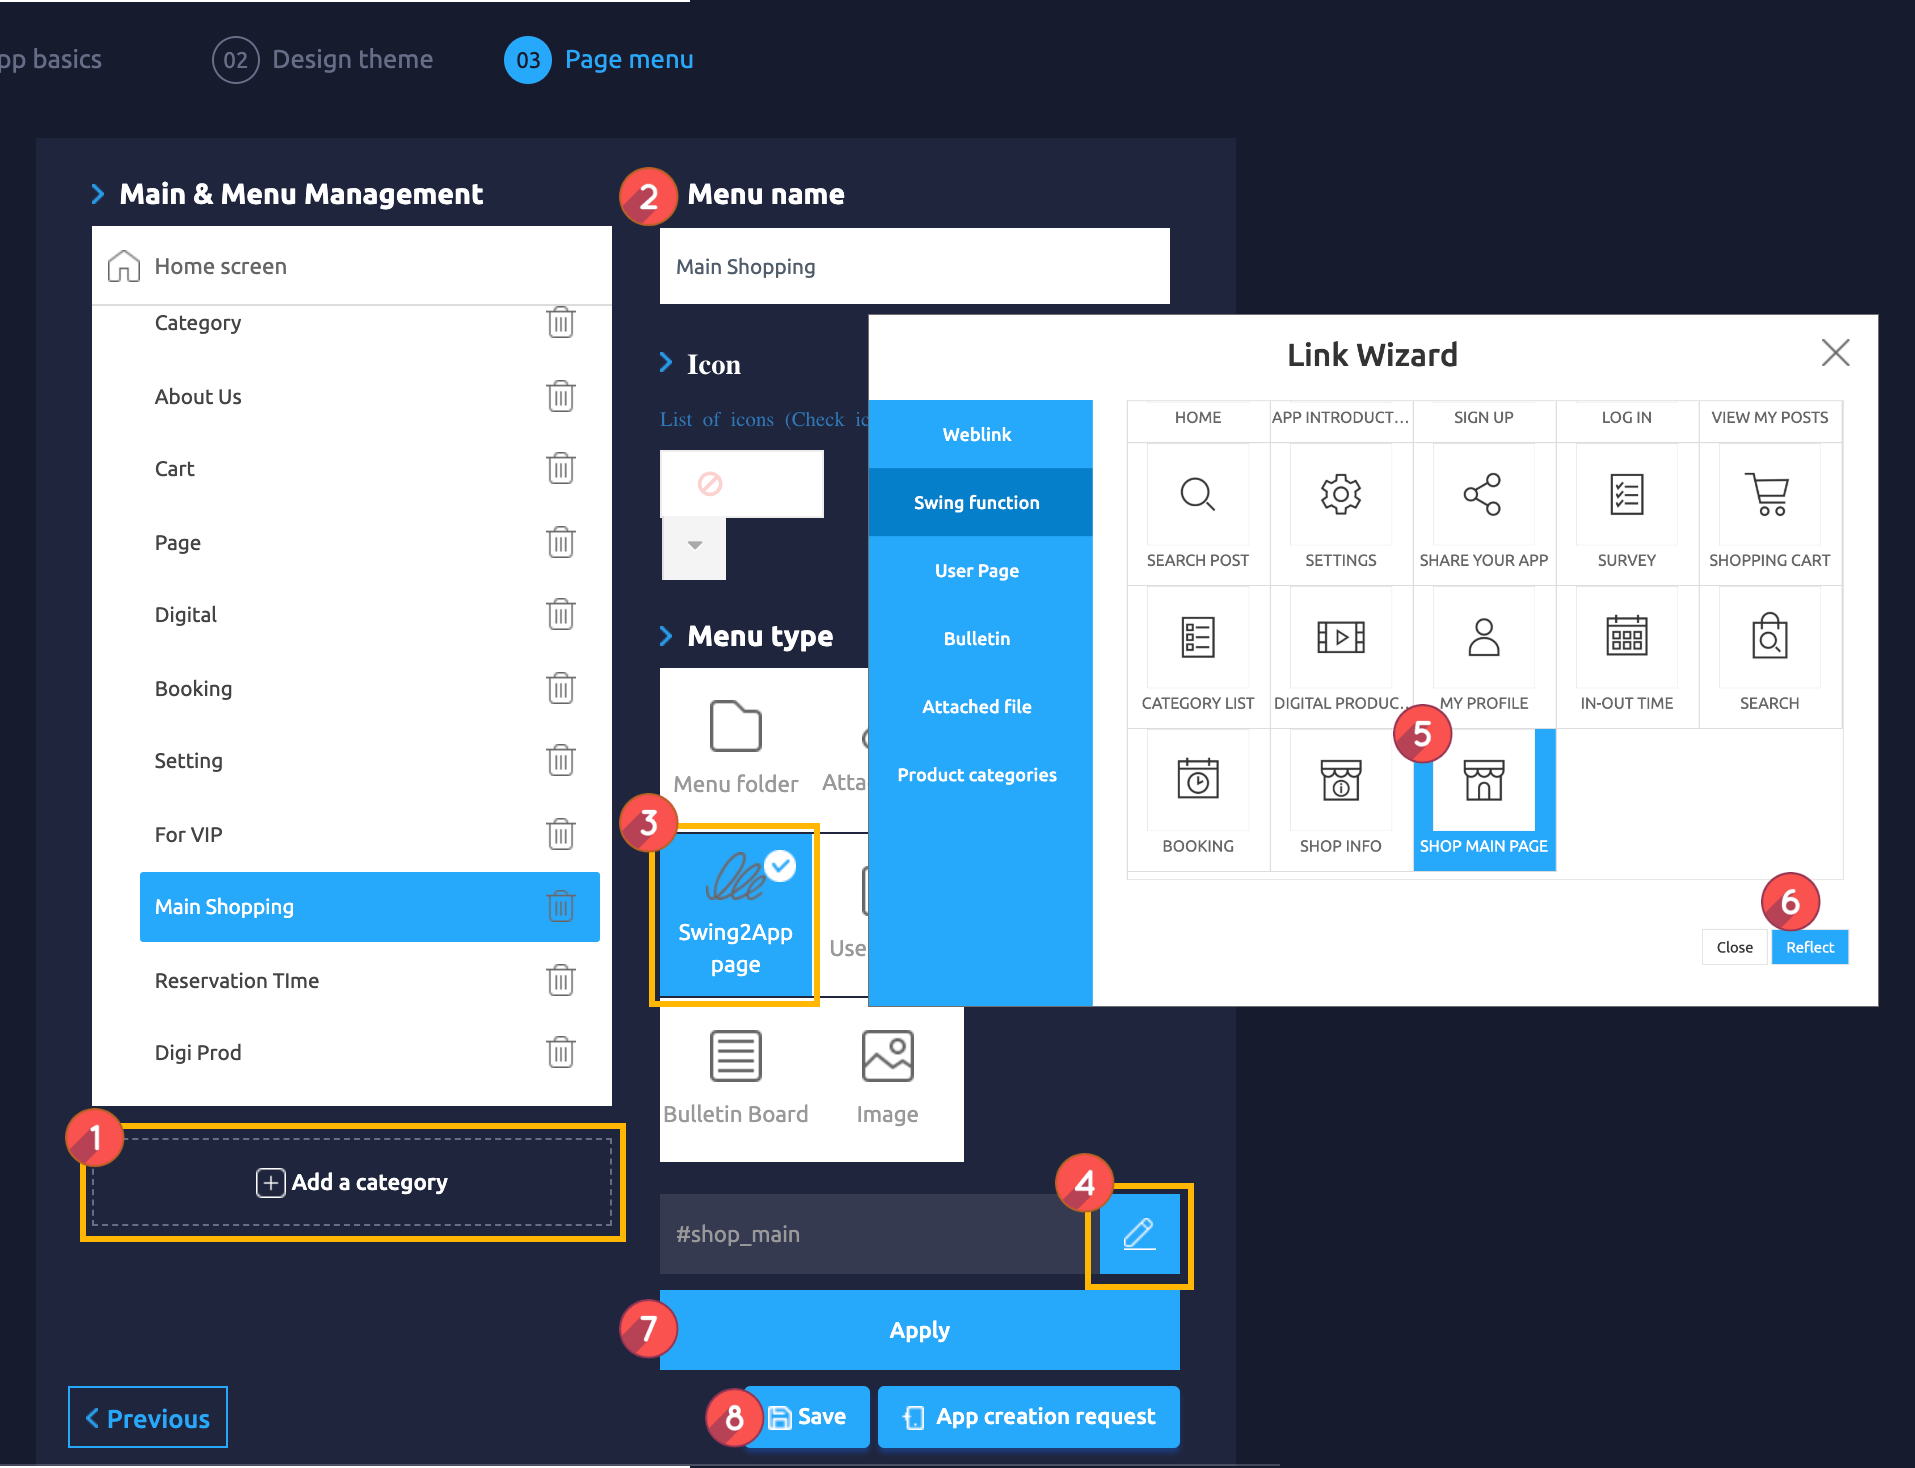
Maker(V2) Page → Move to Step 3 Page Menu
1. Select Home screen and click **Add a Category.** A new menu item will appear.
2. Select the new menu item and change the name in **Menu Name.**
3. Select **Swing2App Page.**
4. Click on the **Link Wizard** icon. The **Link Wizard** pop-up window will open.
5. Select a **Shop Main Page** from the list.
6. Click on **Reflect**
7. Click on **Apply.**
8. Click on **Save.**

**\[App Launch Screen]**
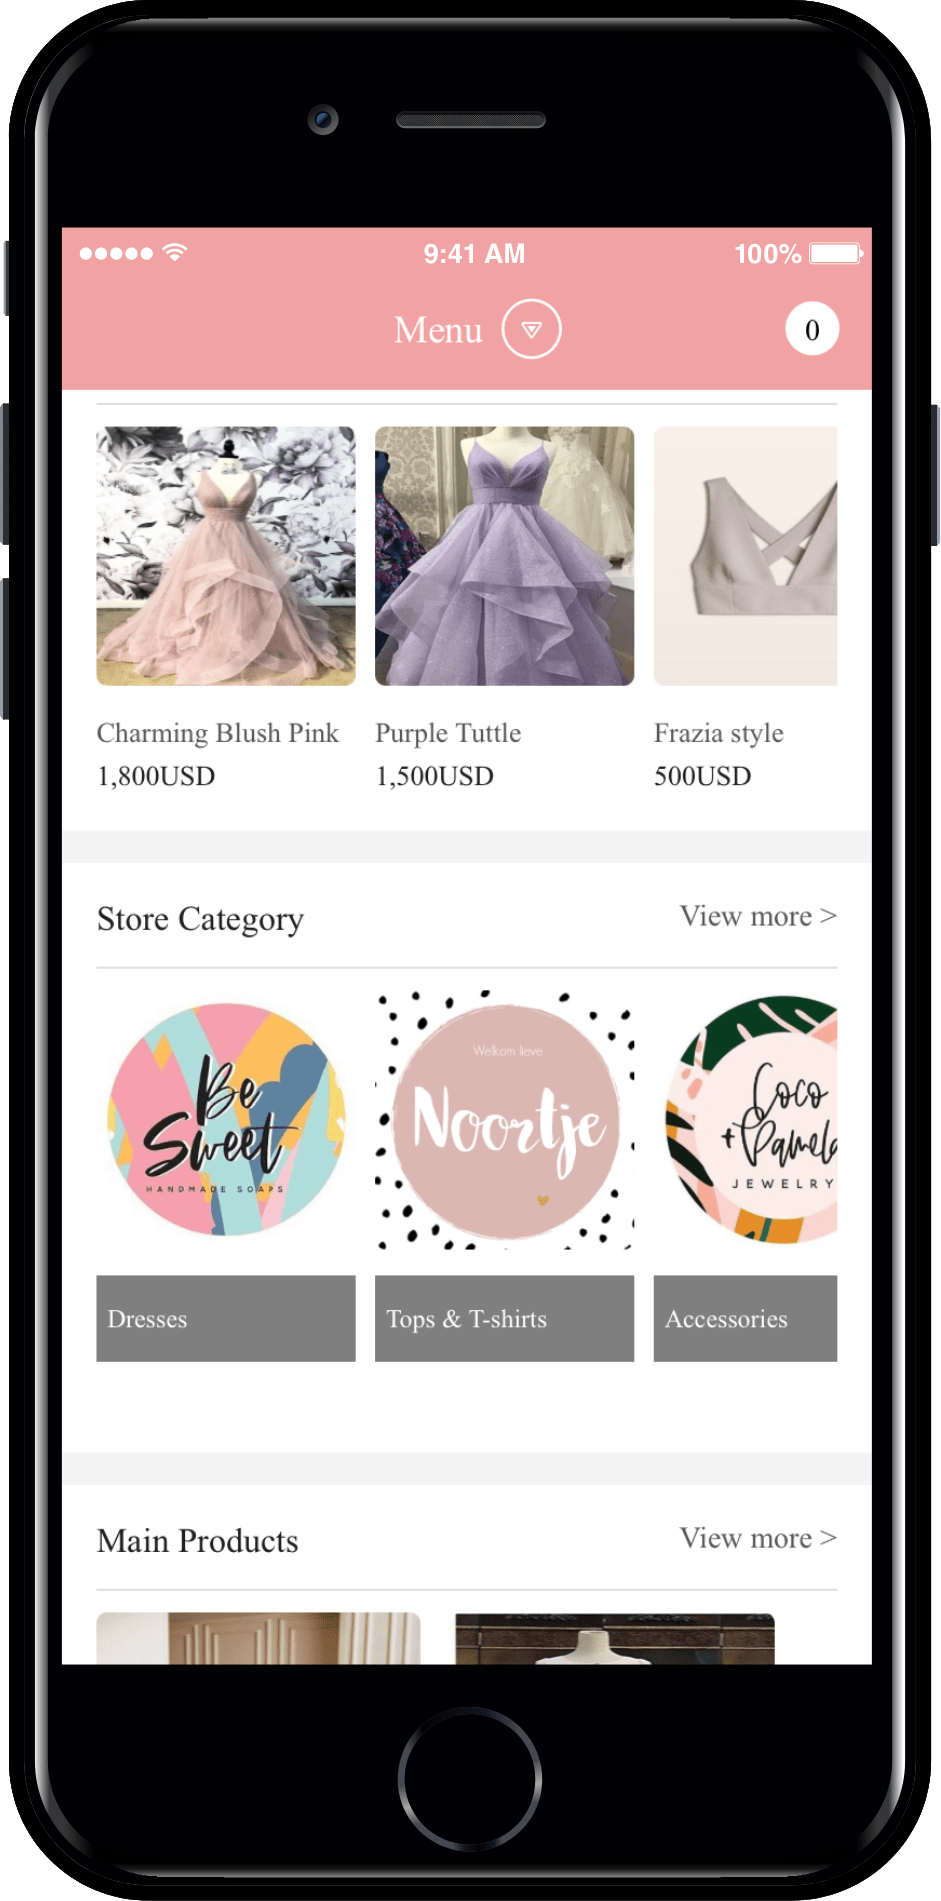
When you launch the app, the main page of the mall will appear on the home screen.
Main is the main page of the shopping mall that is provided by default in our Swing2App.
Menus such as popular items and categories are automatically set up.
Select each product to go to the purchase page.
**02. Apply Product Categories**
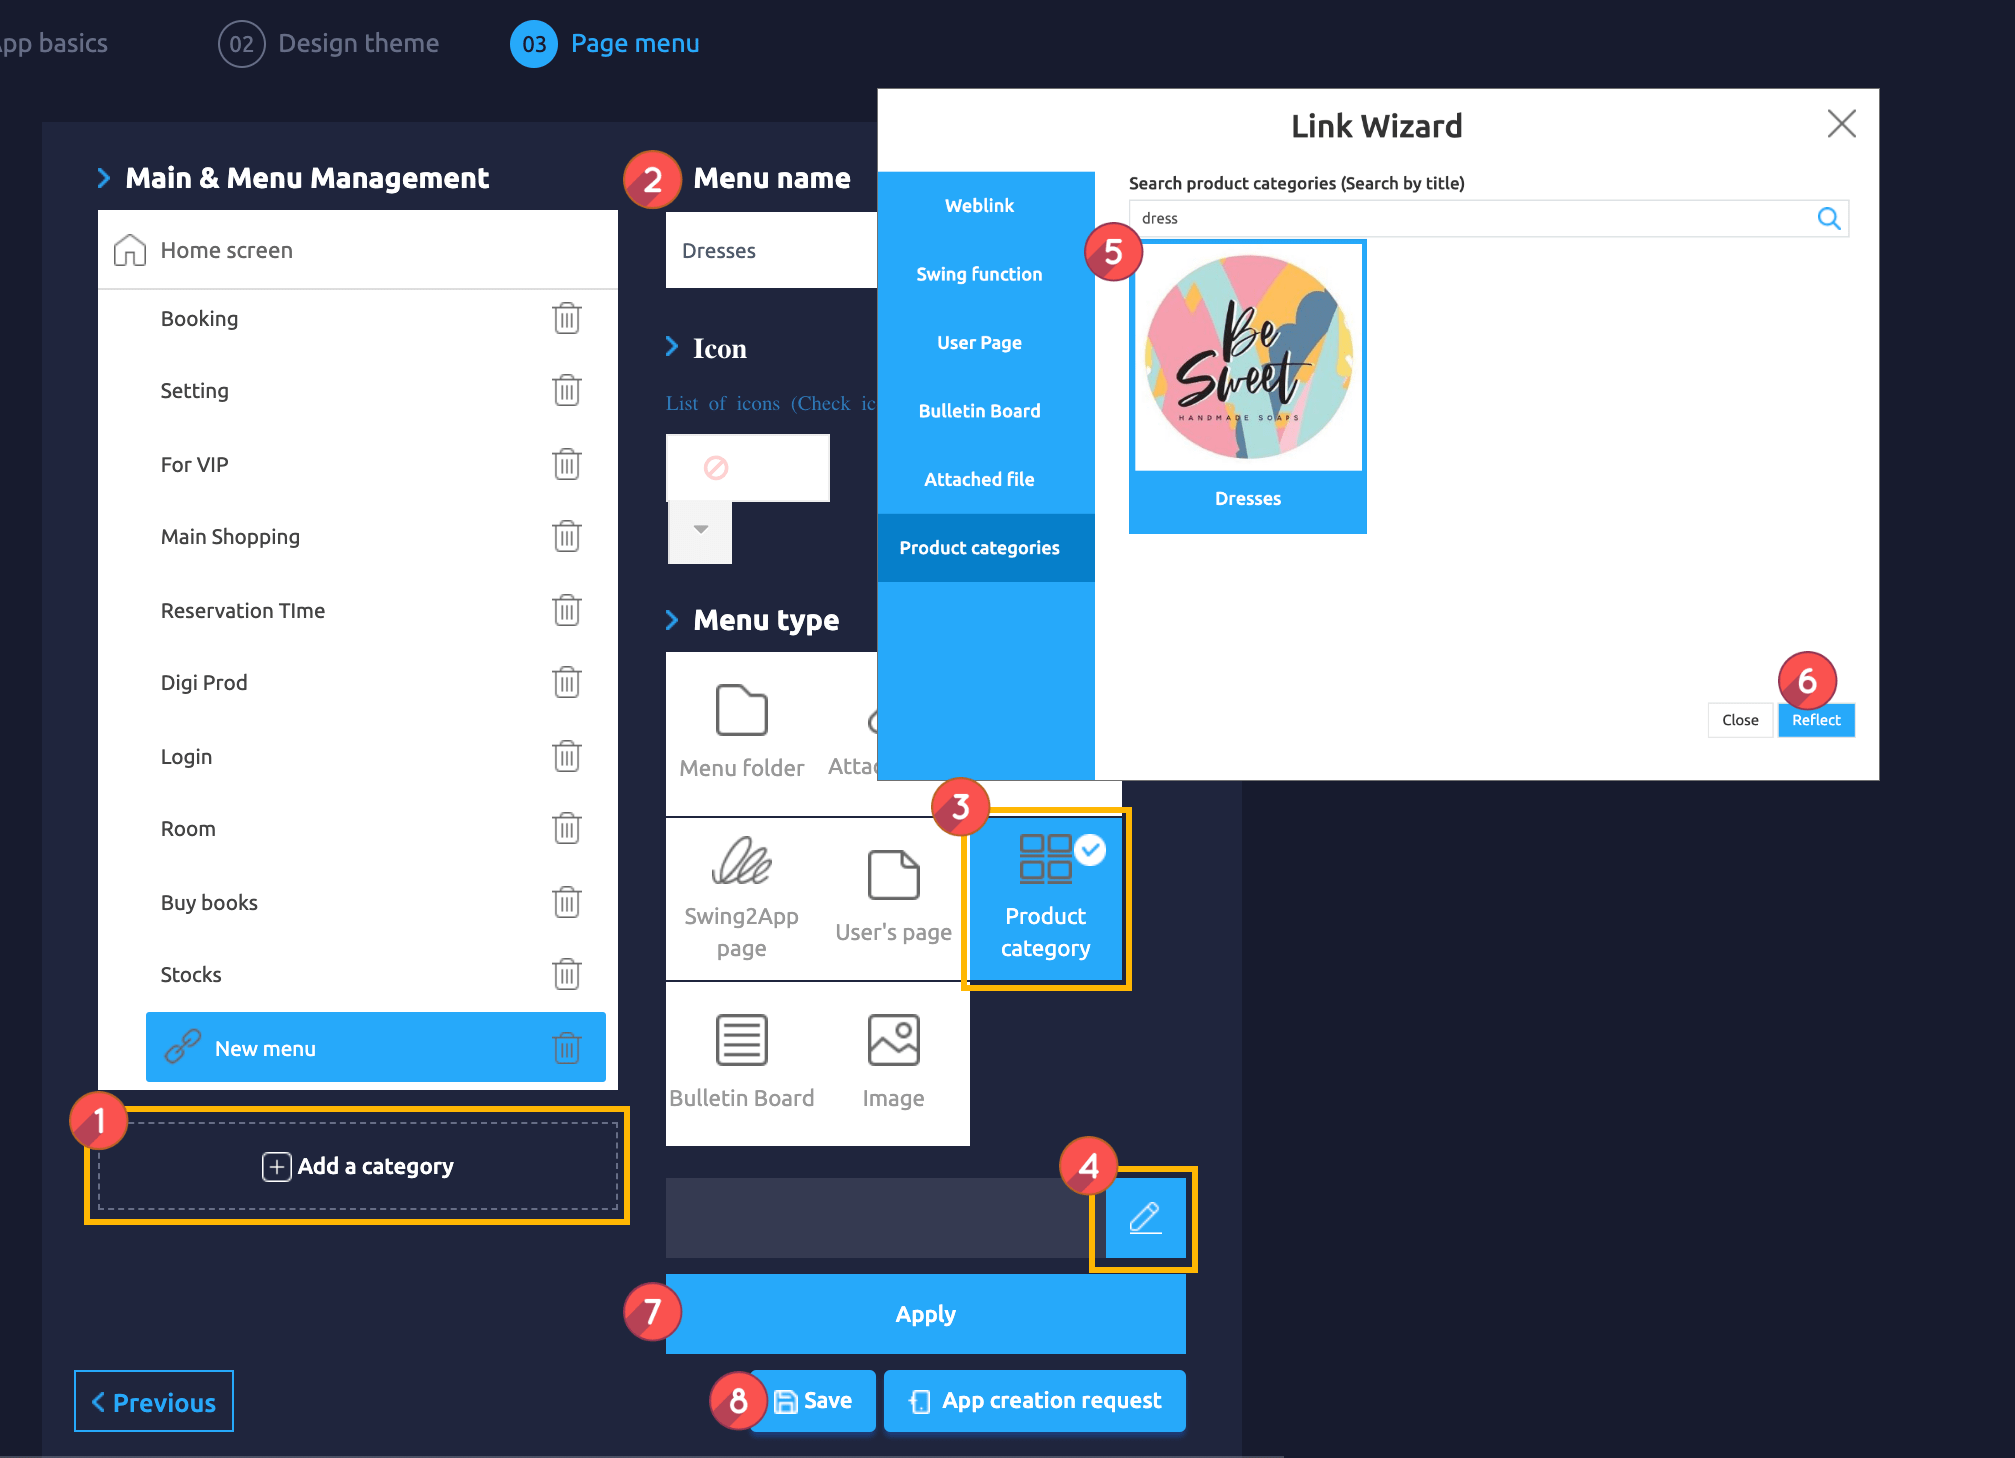
Go to **Maker(V2)** and click **Page Menu.**
1. Click **Add a category**.
2. You can change the menu name at the top of the home screen (unless you change the name, it will be displayed as the app name.)
3. Select the **Product Category** menu in the **menu type.**
4. Click the **Link Wizard.**
5. Search the product category you wish to assign.
6. Click on **Reflect.**
7. Press the **Apply** button.
8. Click on **Save.**

**\[App Launch Screen]**
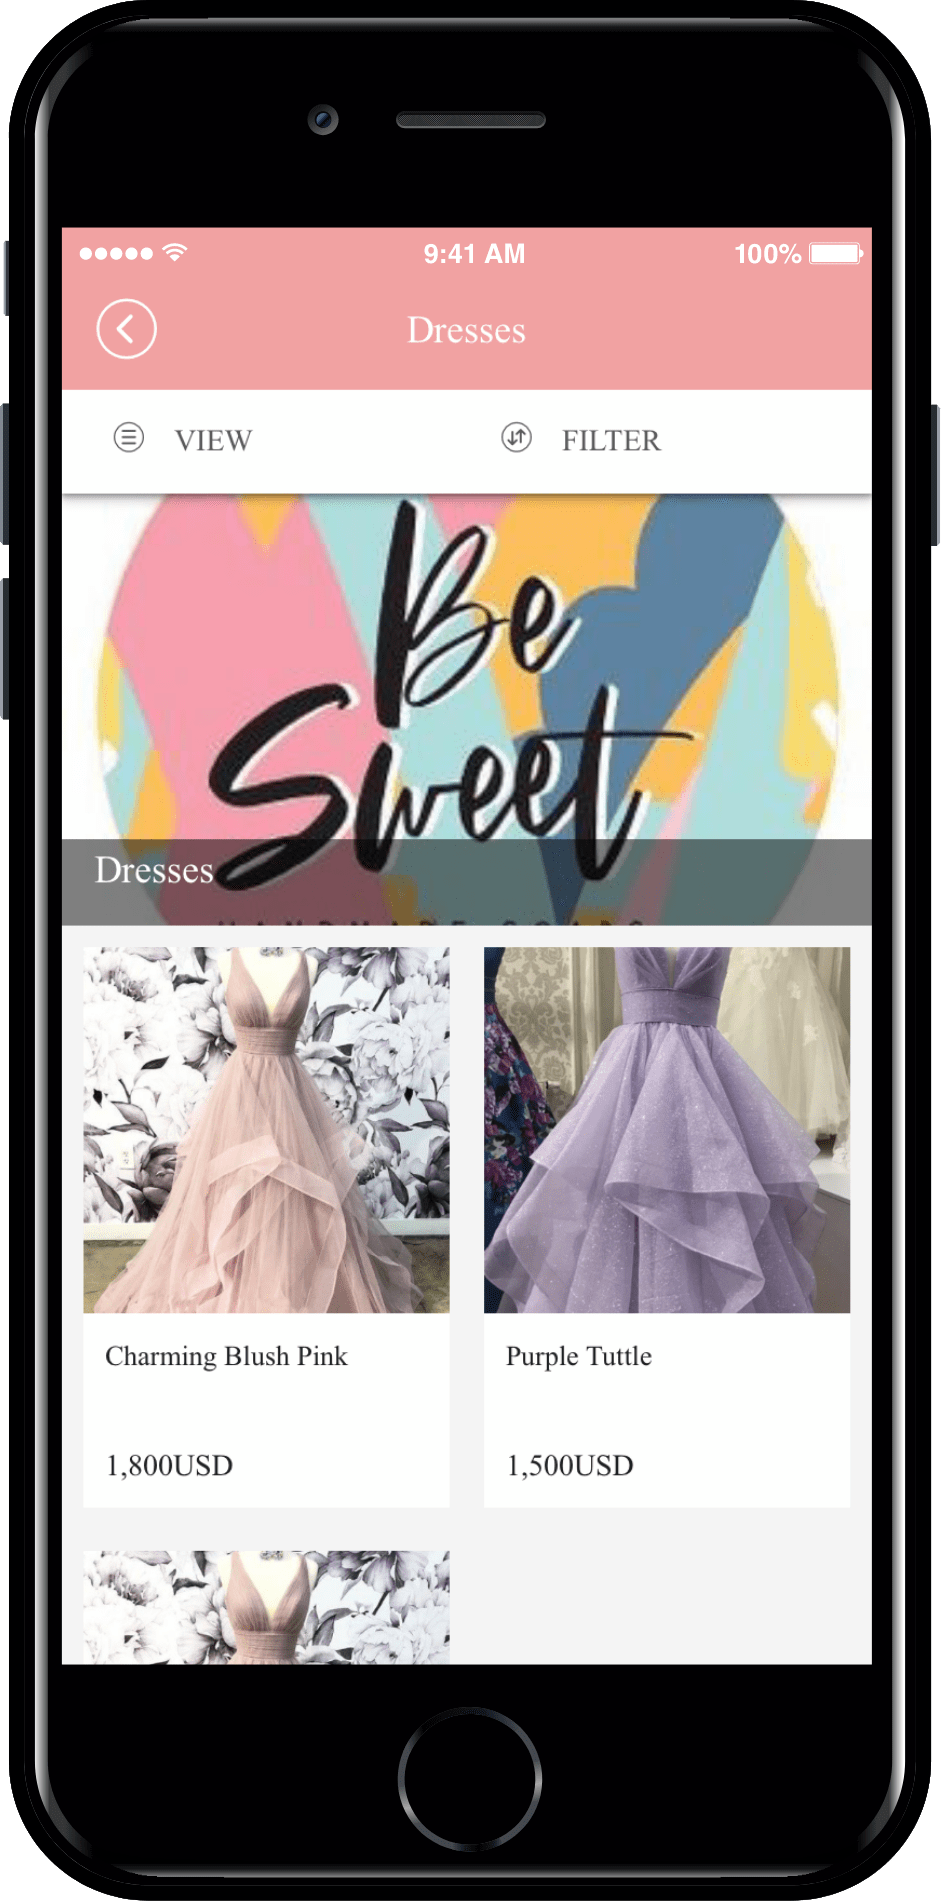
Product category is the style in which the category is configured in the menu.
For example, when you apply the DRESS category to your app, you’ll see a list of categories and see which products are listed in that category.
So it can be applied when you want to show your products by category.
Go to the purchase page after selecting a product.
**03. Add Category List**
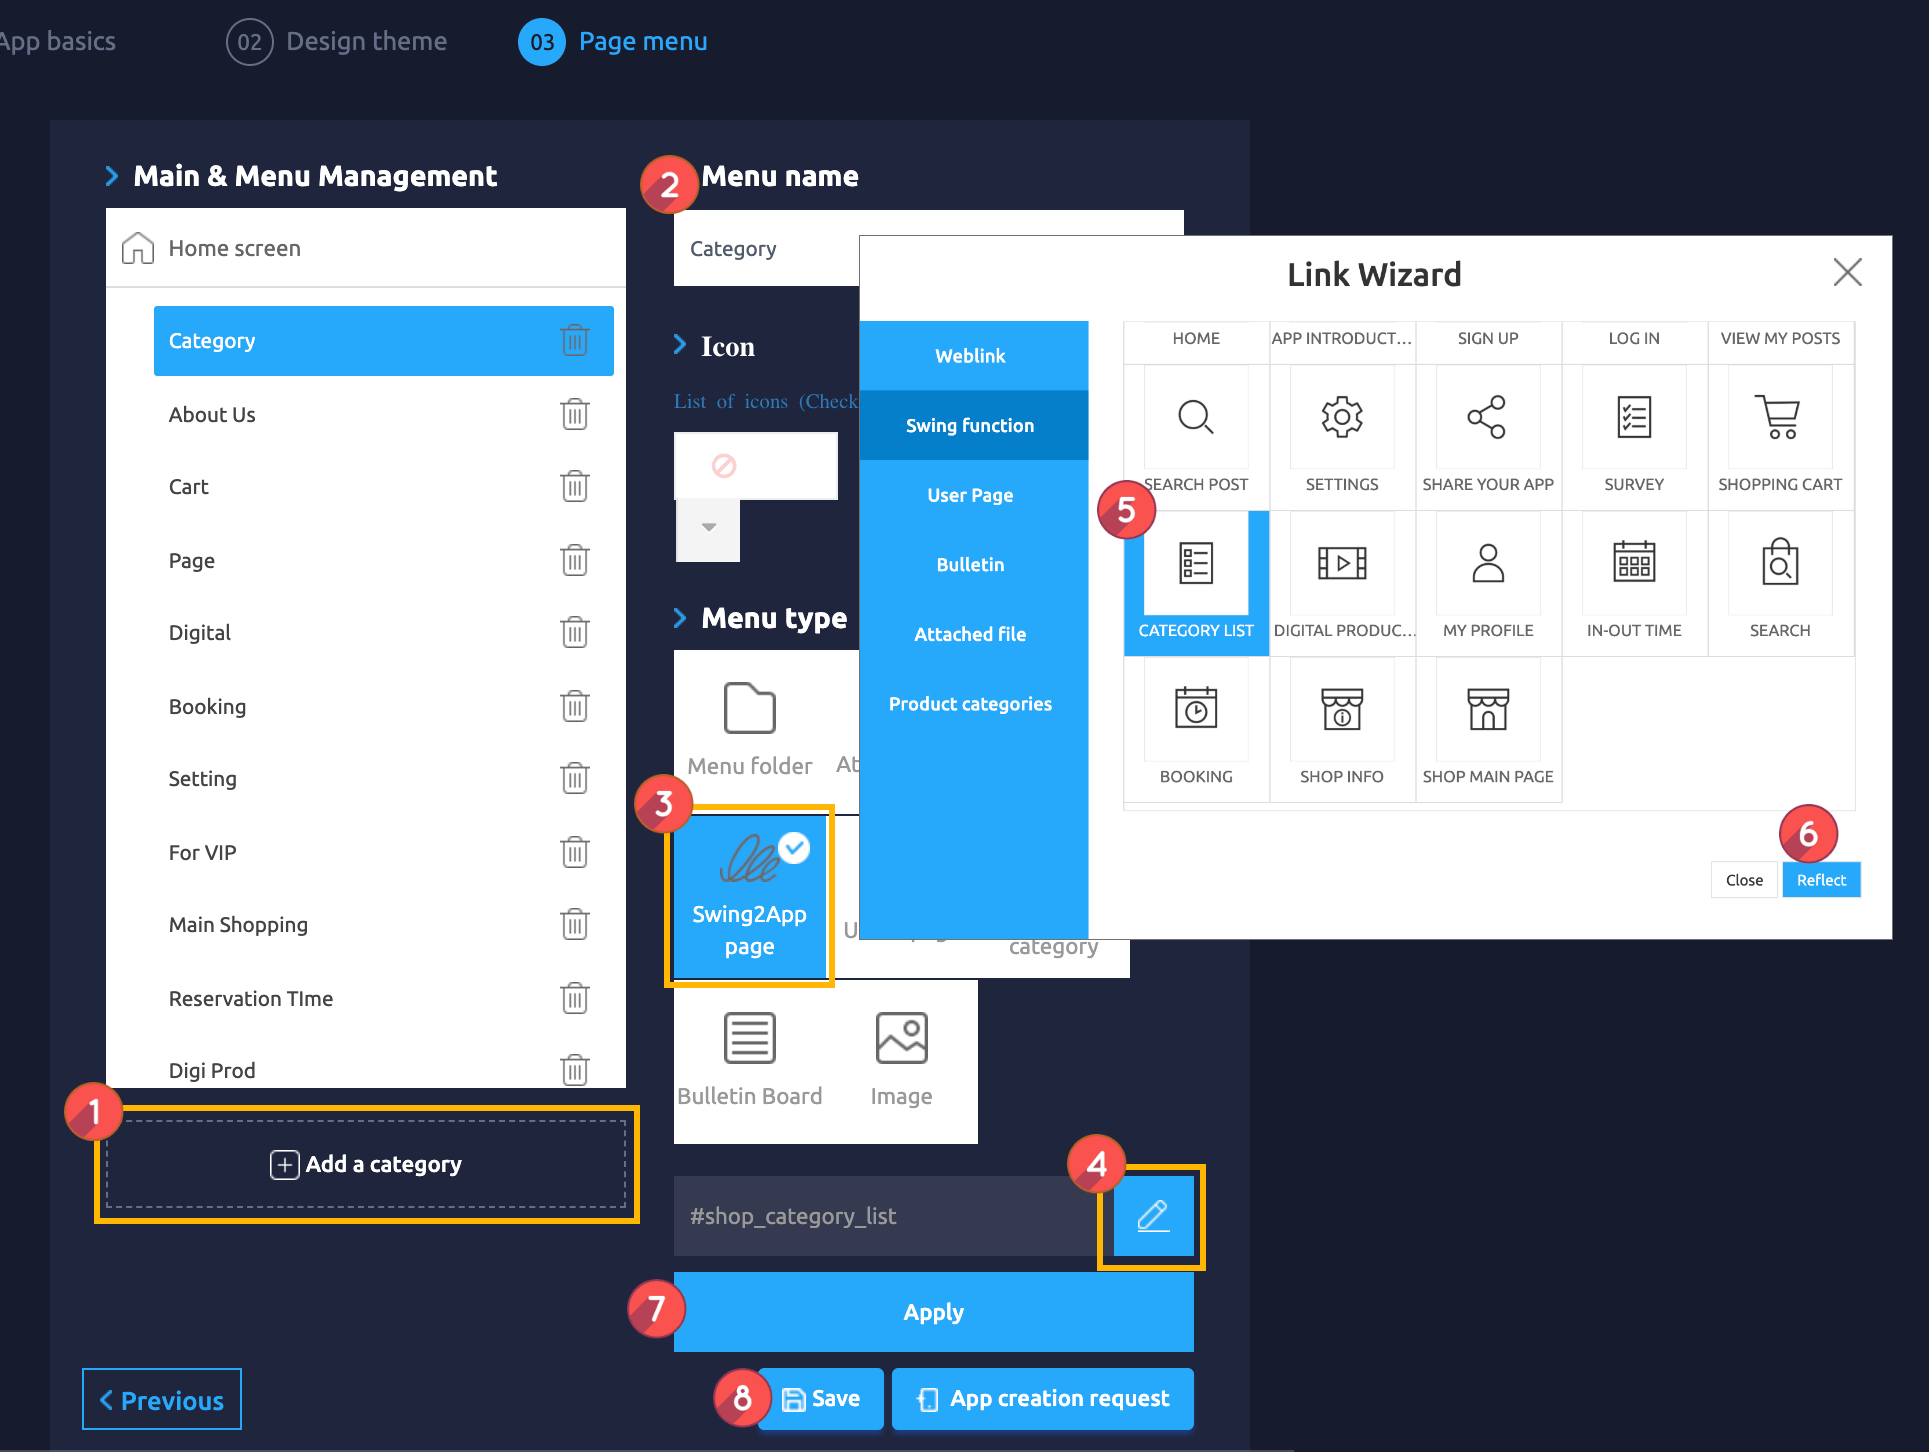
Maker(V2) Page → Move to Step 3 Page Menu
1. Select Home screen and click **Add a Category.** A new menu item will appear.
2. Select the new menu item and change the name in **Menu Name.**
3. Select **Swing2App Page.**
4. Click on the **Link Wizard** icon. The **Link Wizard** pop-up window will open.
5. Select a **Category List** from the list.
6. Click on **Reflect**
7. Click on **Apply.**
8. Click on **Save.**

**\[App Launch Screen]**
Category list is a style in which a list of all the categories registered in the app appears on 1 screen.
When you select a category, you’ll be redirected to the product category screen described above.
Selecting the same product will take you to the purchase page.